
KZ1000A1 Spare Parts Project
- kzstreetfighter71
-

- Offline
- User
-

Registered
- Atlantic West Coast
- Posts: 821
- Thanks: 208
Re: KZ1000A1 Spare Parts Project
10 Jul 2022 08:19
And sorted! it all looks newer than new, great work.
06 Gsf 1200 bandit, 08 Triumph tiger 1010
05 Yam xv1700 , 02 Hon shadow 1100
1975 Z1 (currently working on)
1977 Z1000 ( running and in storage)
1978 Z1000 (currently working on)
1978 Z1r "skinny tank" (currently working on)
1978 Z1r "fat tank (gathering parts)
1979 z1000st (currently working on)
05 Yam xv1700 , 02 Hon shadow 1100
1975 Z1 (currently working on)
1977 Z1000 ( running and in storage)
1978 Z1000 (currently working on)
1978 Z1r "skinny tank" (currently working on)
1978 Z1r "fat tank (gathering parts)
1979 z1000st (currently working on)
The following user(s) said Thank You: calum
Please Log in or Create an account to join the conversation.
- Wookie58
-

- Offline
- Moderator
-

Registered
- Posts: 6459
- Thanks: 4079
Re: KZ1000A1 Spare Parts Project
10 Jul 2022 10:24
Looks stunning, and I bet that roll pin is stronger than the original

1982 KZ1000 Ltd
www.kzrider.com/forum/11-projects/617631...-82-begins?start=192
kzrider.com/filebase-alias?view=download...d-fault-diagnosis&ca
www.kzrider.com/forum/11-projects/617631...-82-begins?start=192
kzrider.com/filebase-alias?view=download...d-fault-diagnosis&ca
The following user(s) said Thank You: calum
Please Log in or Create an account to join the conversation.
- Mikaw
-
- Offline
- Sustaining Member
-

Registered
- Posts: 4825
- Thanks: 1852
Re: KZ1000A1 Spare Parts Project
10 Jul 2022 13:59
This it turning in one super nice “spare parts” bike. Not your average spares.
1976 KZ 900 A4
kzrider.com/forum/11-projects/613548-1976-kz-900-a4
1976 KZ 900 B1 LTD
1978 KZ 1000 B2 LTD
1980 KZ 750 E1
Kowledge Speaks, But Wisdom Listens.
Jimi Hendrix.
1976 KZ 900 B1 LTD
1978 KZ 1000 B2 LTD
1980 KZ 750 E1
Kowledge Speaks, But Wisdom Listens.
Jimi Hendrix.
The following user(s) said Thank You: calum
Please Log in or Create an account to join the conversation.
- calum
-
 Topic Author
- Offline
- User
-
Registered
- Posts: 1144
- Thanks: 415
Re: KZ1000A1 Spare Parts Project
12 Jul 2022 08:19 - 12 Jul 2022 08:21
Thanks guys. May have gone a bit overboard with the spares ")
KZ1000 Restomod (
www.kzrider.com/forum/11-projects/614517-1977-kz1000-restomod
)
1977 KZ1000A1 ( www.kzrider.com/forum/11-projects/616901...-spare-parts-project )
1980 KZ750H ( kzrider.com/forum/11-projects/612054-kz750h-restoration )
2000 BMW F650GS
1977 KZ1000A1 ( www.kzrider.com/forum/11-projects/616901...-spare-parts-project )
1980 KZ750H ( kzrider.com/forum/11-projects/612054-kz750h-restoration )
2000 BMW F650GS
Last edit: 12 Jul 2022 08:21 by calum.
Please Log in or Create an account to join the conversation.
- calum
-
Topic Author
- Offline
- User
-
Registered
- Posts: 1144
- Thanks: 415
Re: KZ1000A1 Spare Parts Project
15 Jul 2022 09:36 - 15 Jul 2022 09:51
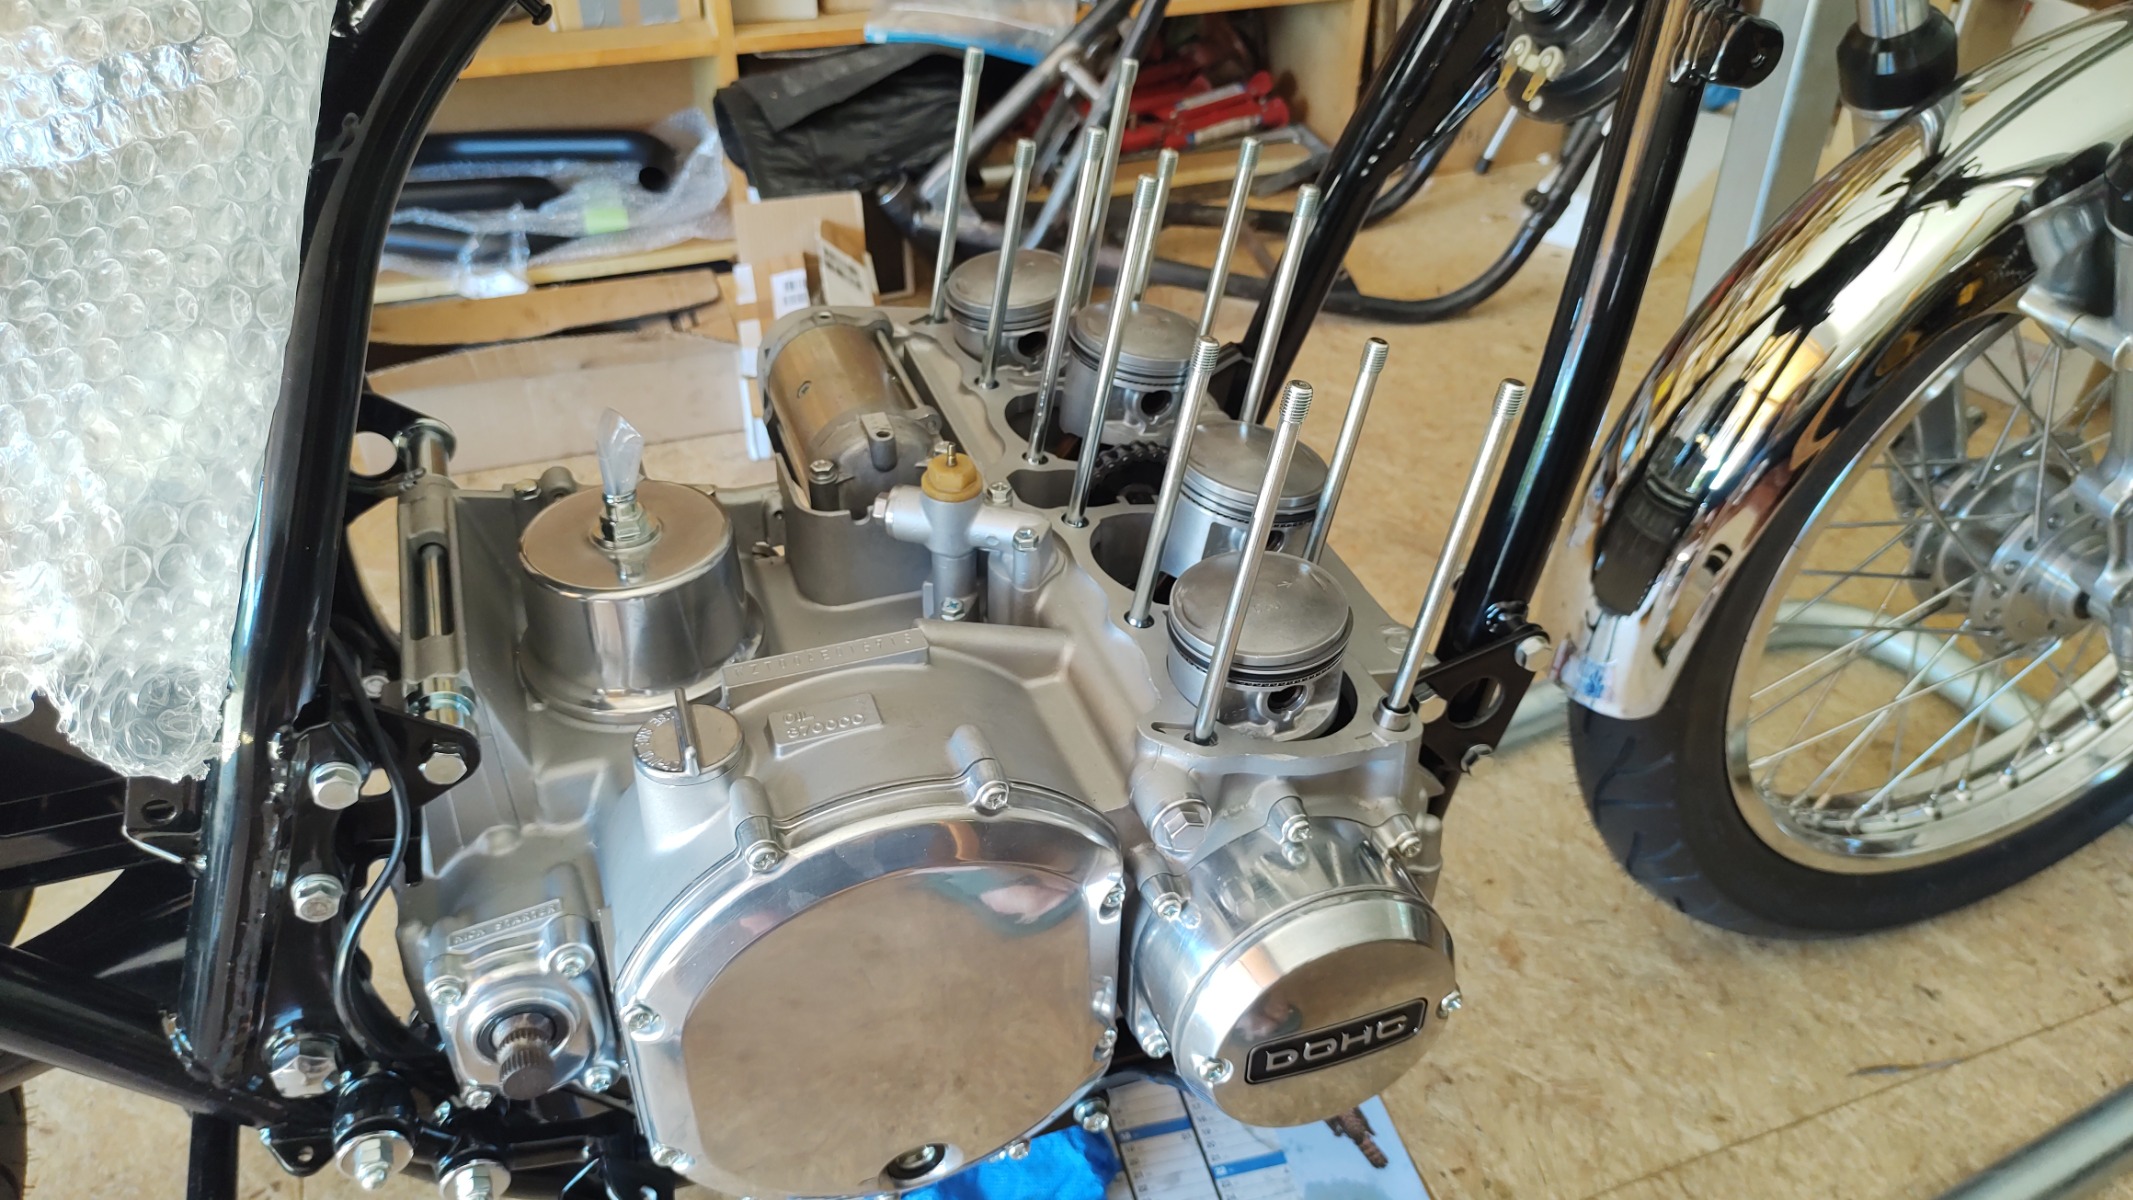
Picked up the cylinder block yesterday. €250 later and it's been resurfaced, blasted and honed for the oversize pistons (70.5mm).
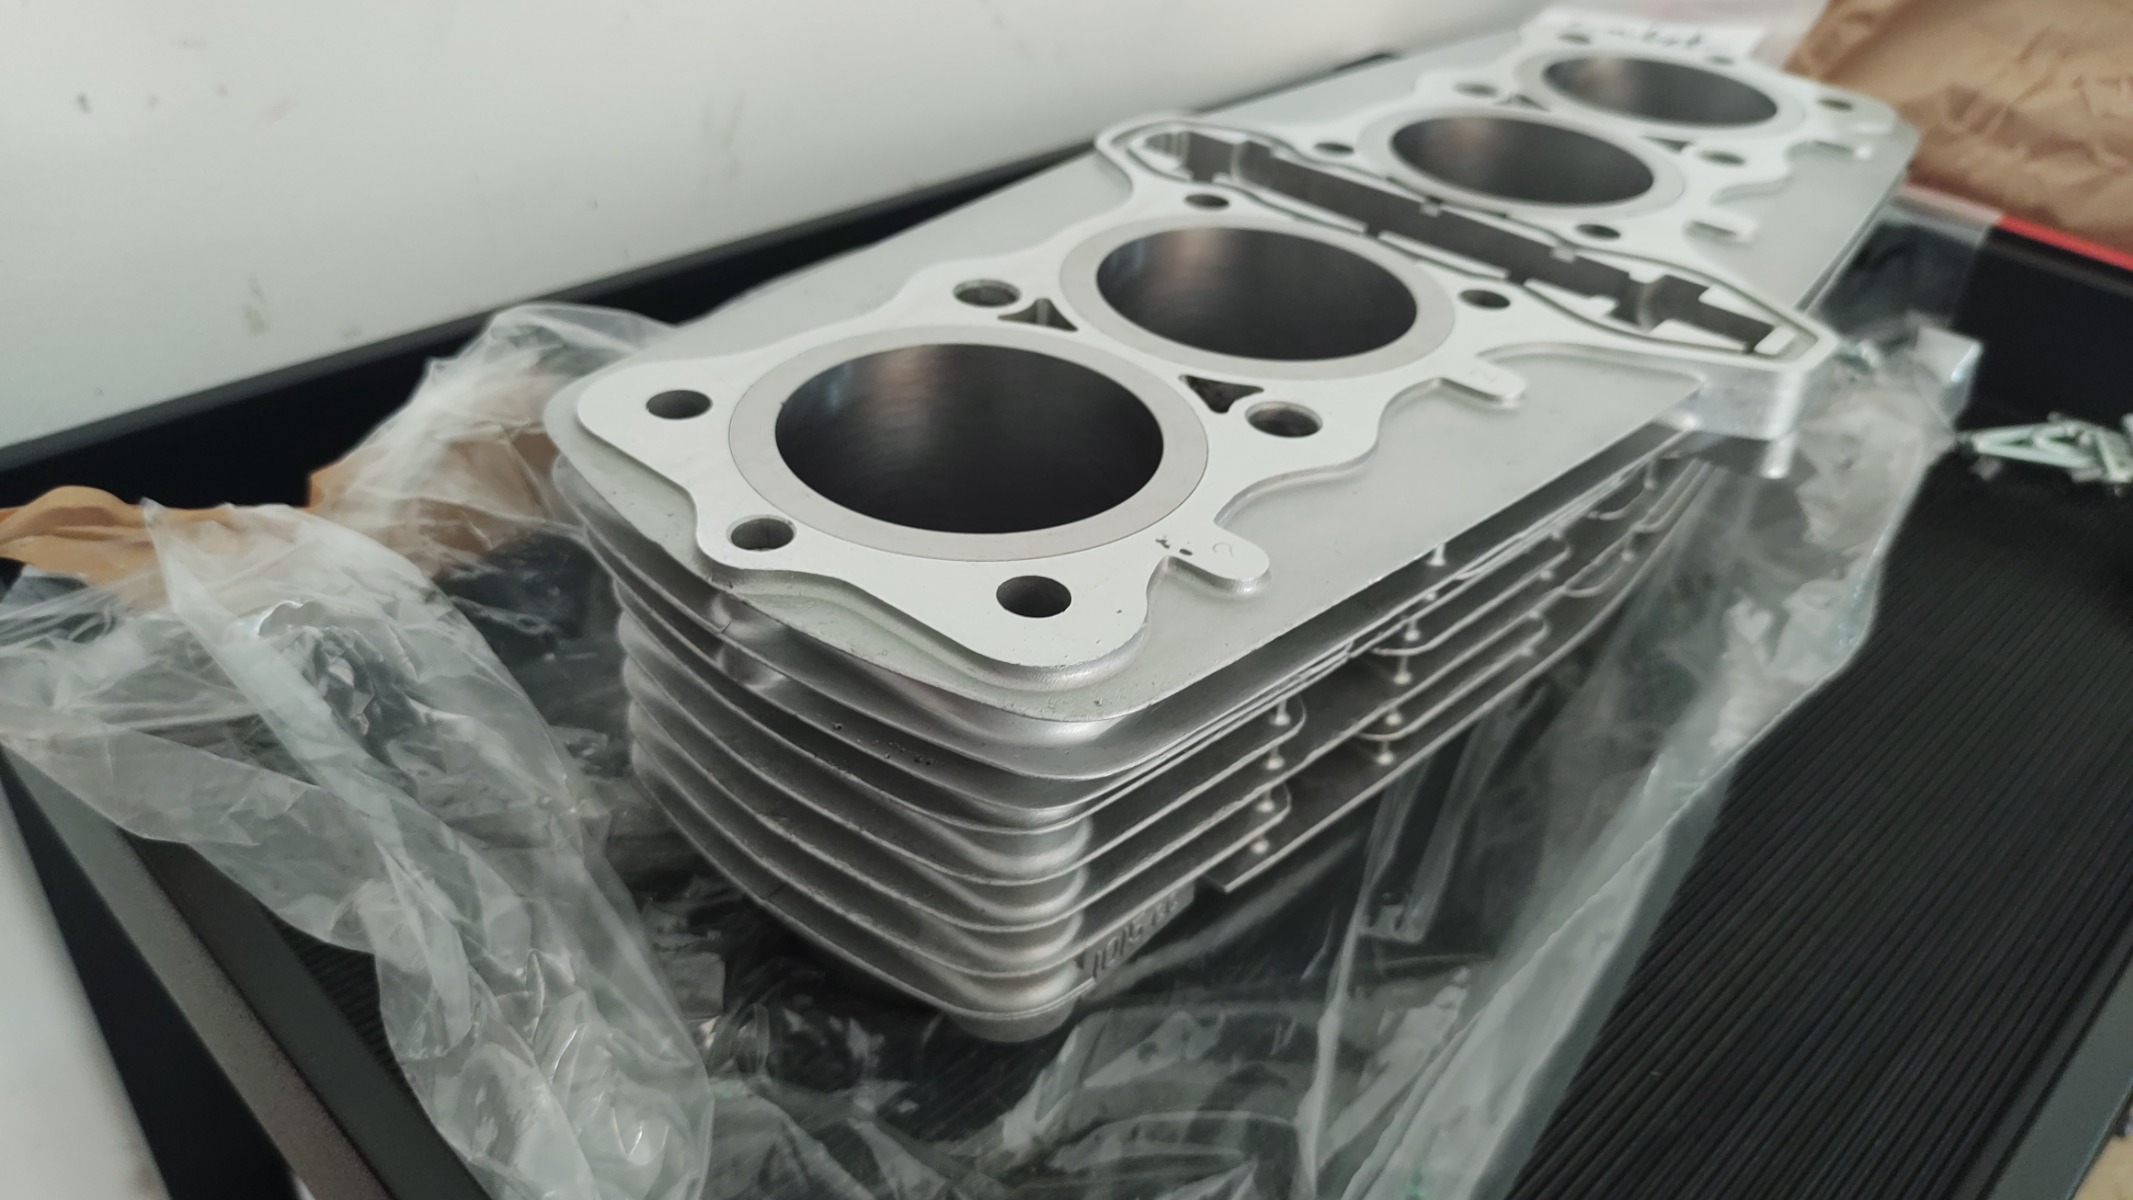
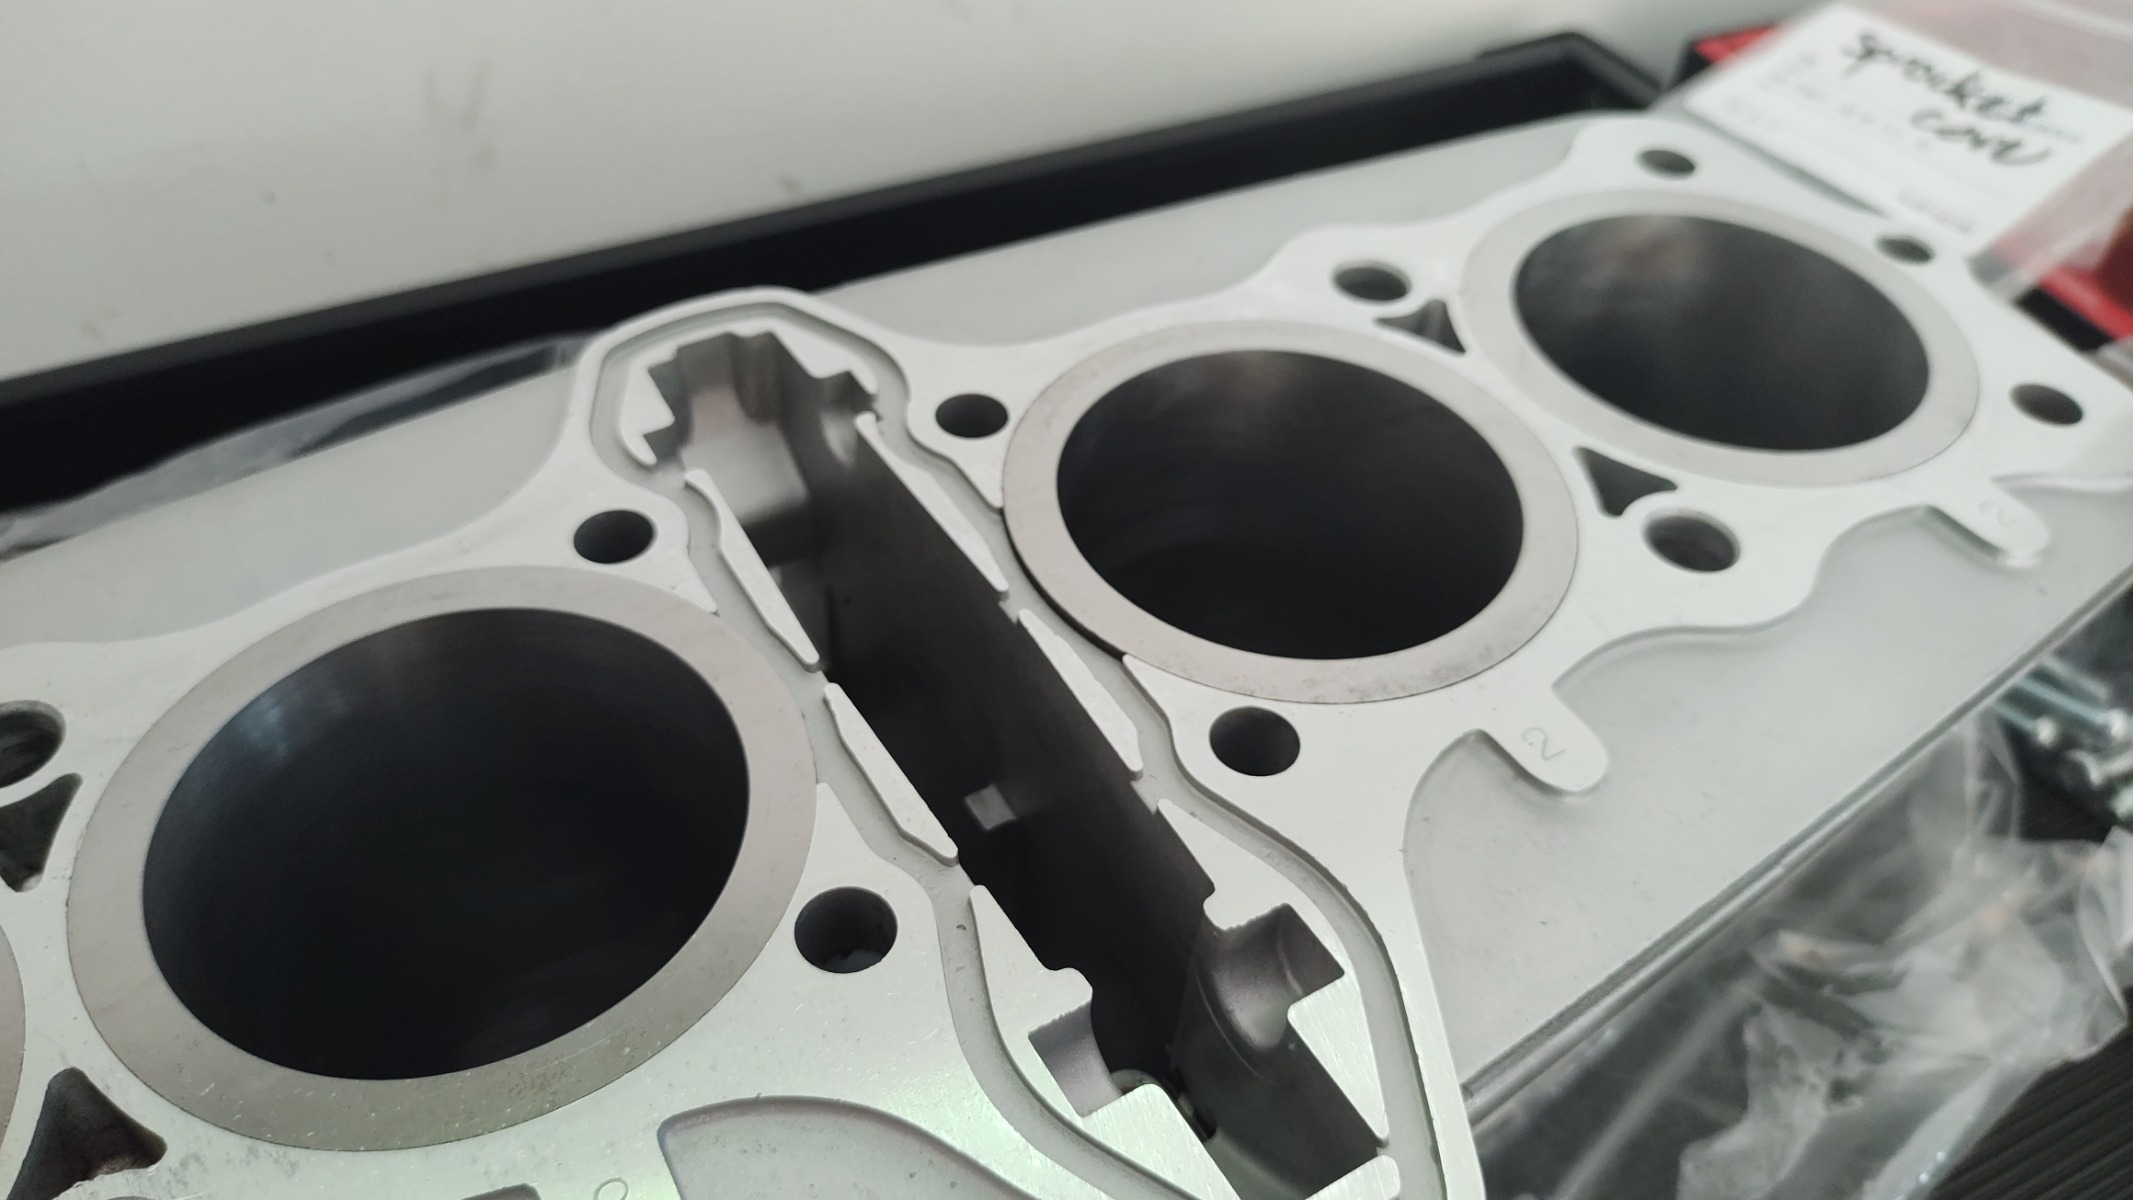
I got the second and third fins from the top welded and then filed them down. Turned out alright.
.
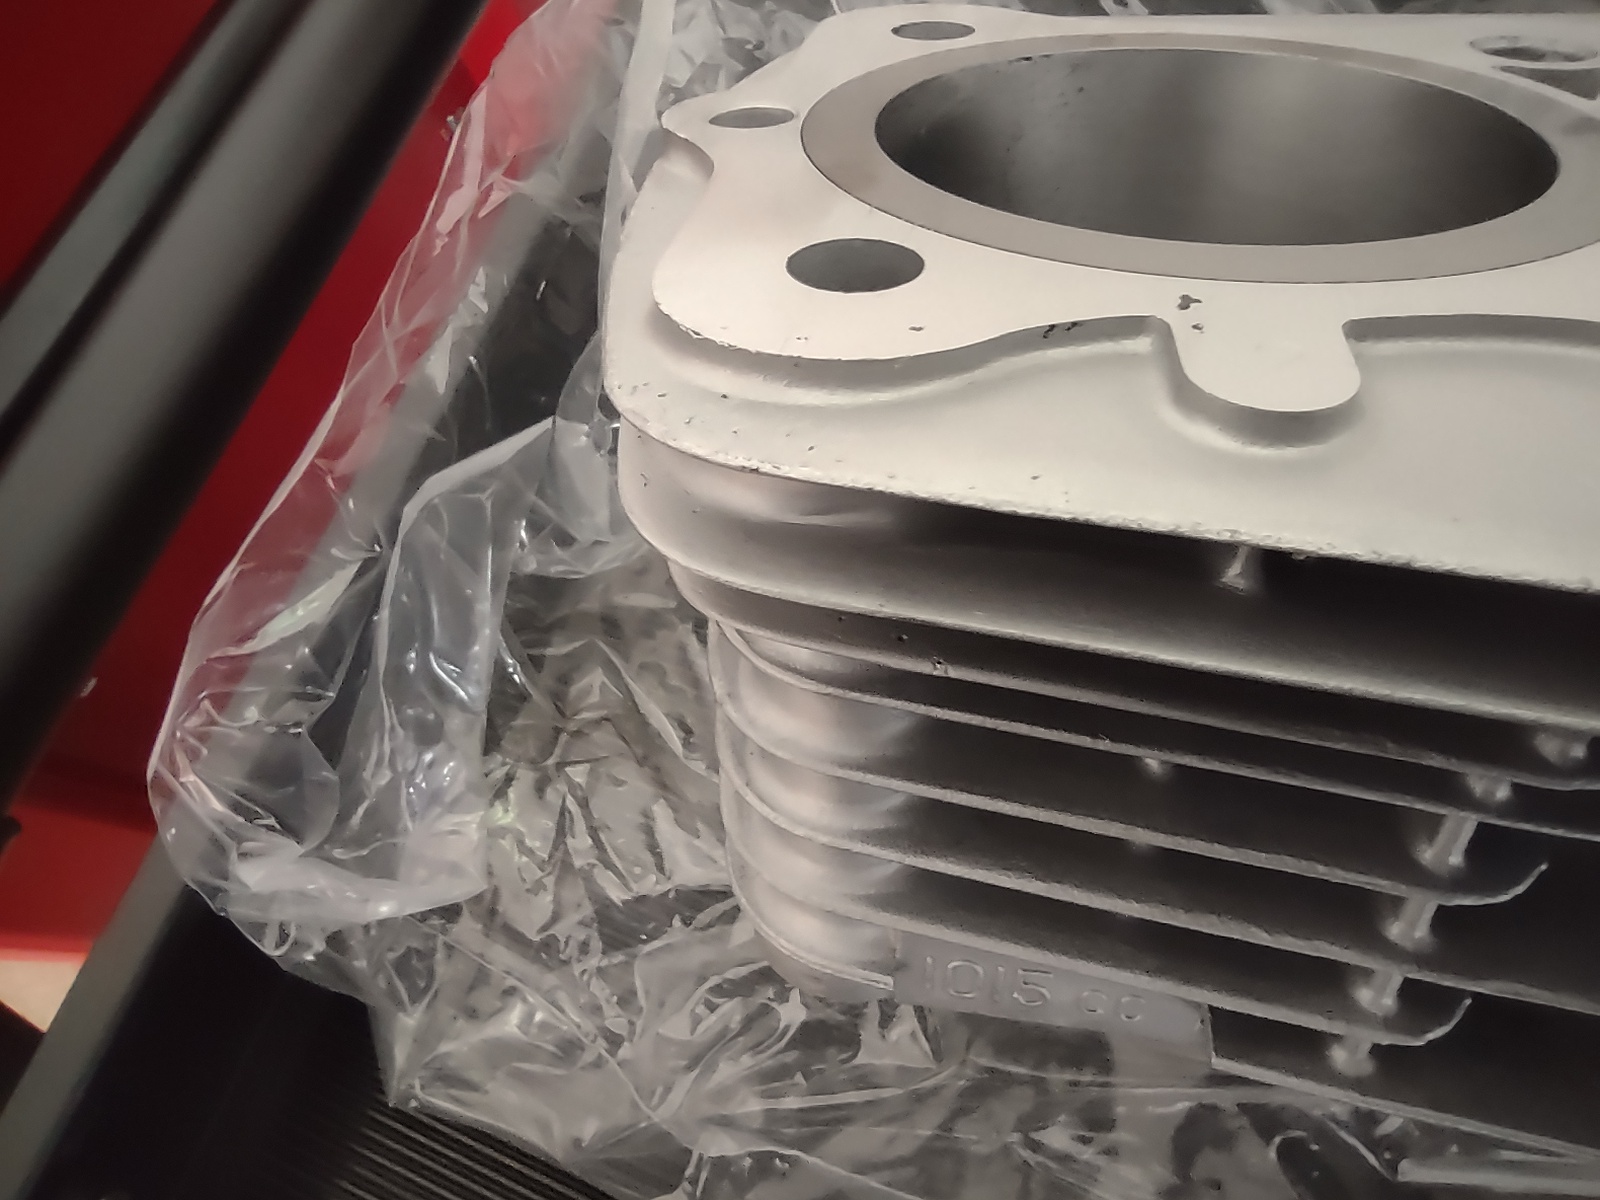
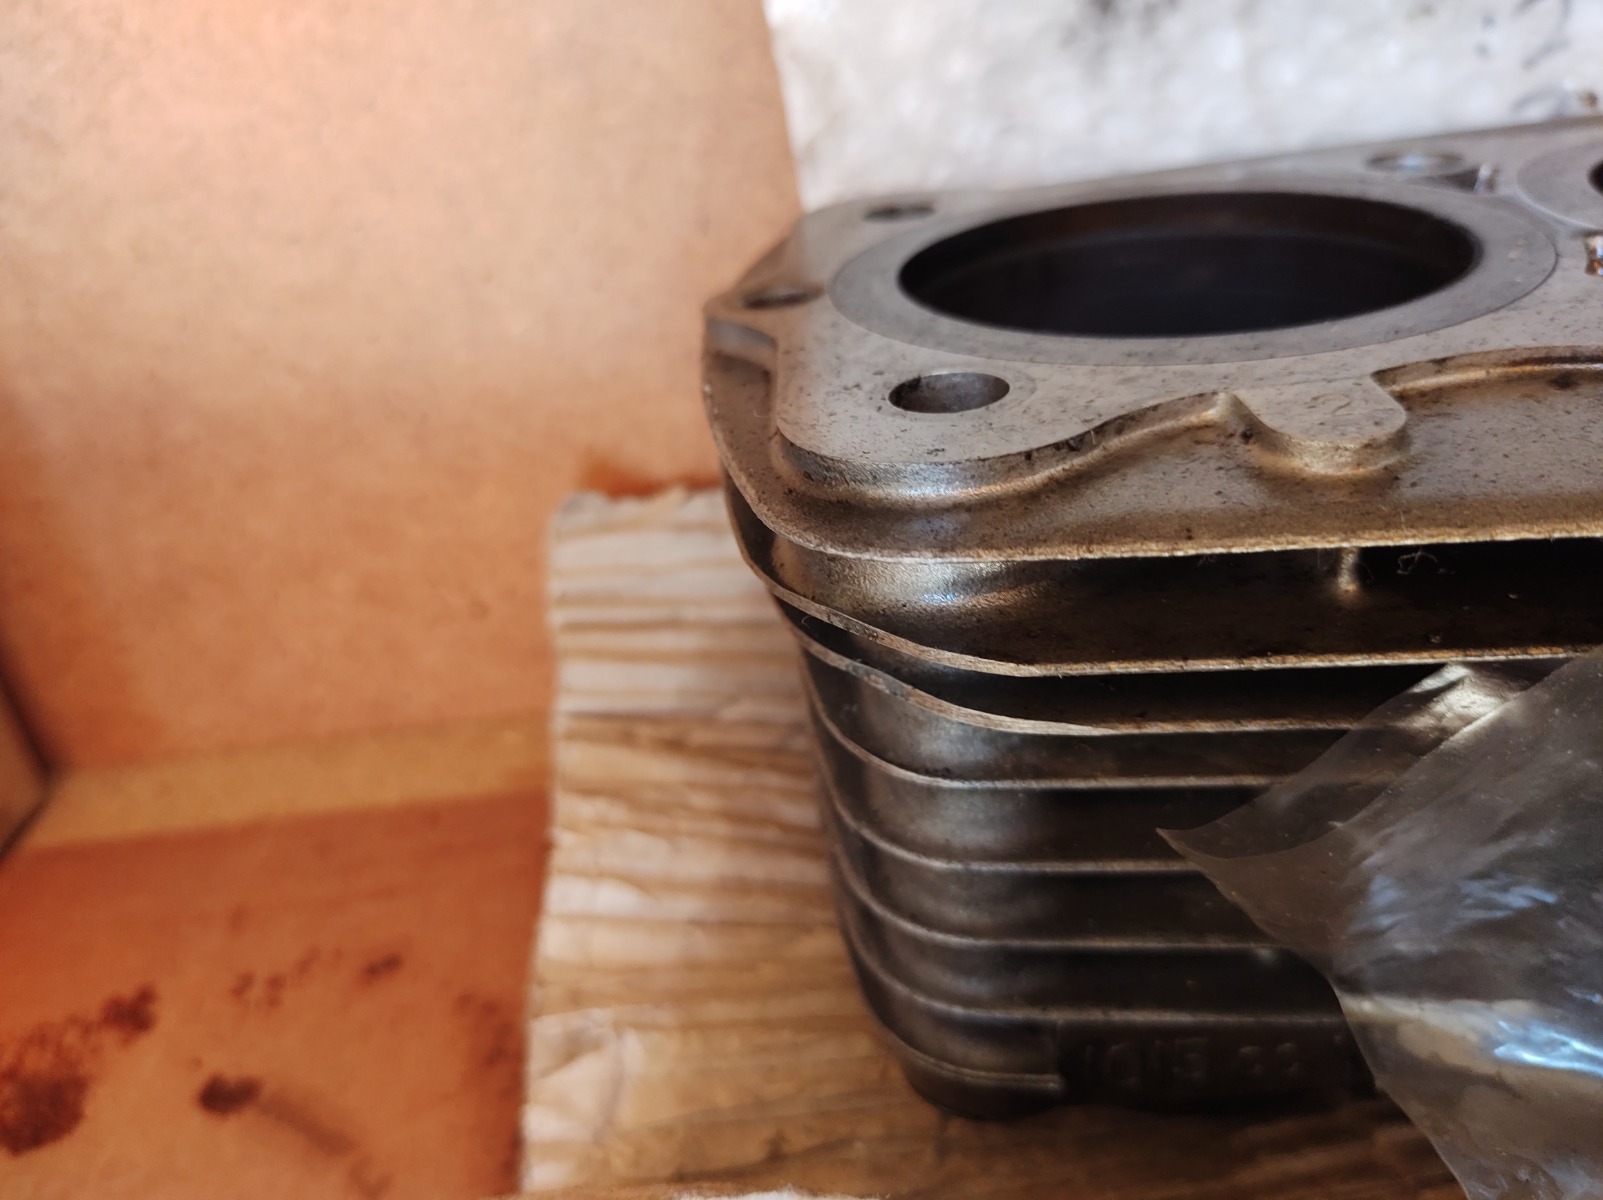
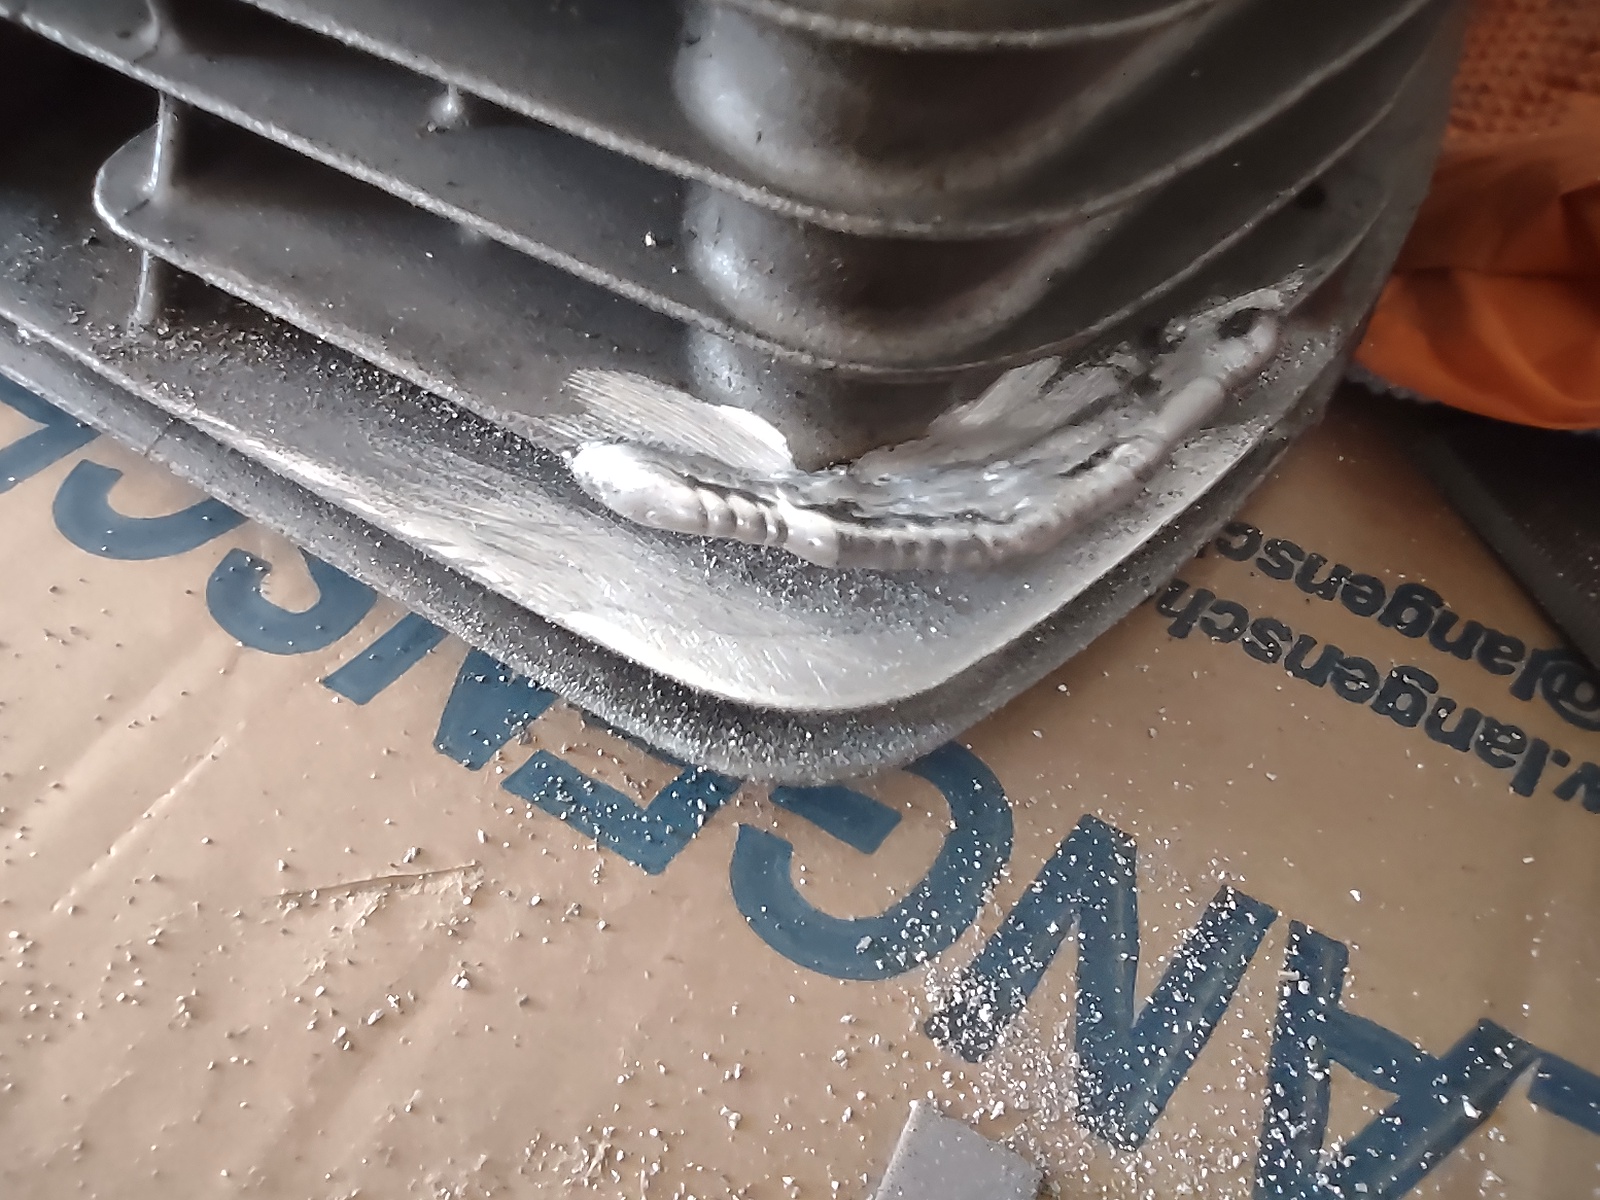
I got the second and third fins from the top welded and then filed them down. Turned out alright.
.
KZ1000 Restomod (
www.kzrider.com/forum/11-projects/614517-1977-kz1000-restomod
)
1977 KZ1000A1 ( www.kzrider.com/forum/11-projects/616901...-spare-parts-project )
1980 KZ750H ( kzrider.com/forum/11-projects/612054-kz750h-restoration )
2000 BMW F650GS
1977 KZ1000A1 ( www.kzrider.com/forum/11-projects/616901...-spare-parts-project )
1980 KZ750H ( kzrider.com/forum/11-projects/612054-kz750h-restoration )
2000 BMW F650GS
Last edit: 15 Jul 2022 09:51 by calum.
Please Log in or Create an account to join the conversation.
- Wookie58
-
- Offline
- Moderator
-
Registered
- Posts: 6459
- Thanks: 4079
Re: KZ1000A1 Spare Parts Project
15 Jul 2022 09:46
Nice "save" on the fins

1982 KZ1000 Ltd
www.kzrider.com/forum/11-projects/617631...-82-begins?start=192
kzrider.com/filebase-alias?view=download...d-fault-diagnosis&ca
www.kzrider.com/forum/11-projects/617631...-82-begins?start=192
kzrider.com/filebase-alias?view=download...d-fault-diagnosis&ca
The following user(s) said Thank You: calum
Please Log in or Create an account to join the conversation.
- 750 R1
-

- Offline
- User
-
Registered
- Posts: 1150
- Thanks: 389
Re: KZ1000A1 Spare Parts Project
16 Jul 2022 16:26Nice "save" on the fins
Hi Calum, I have a friend that fixes/welds a lot of fin repairs, he uses a brass block between the fins to make it easier to tig them, and a heat gun to heat the fins up before welding
The following user(s) said Thank You: calum
Please Log in or Create an account to join the conversation.
- calum
-
Topic Author
- Offline
- User
-
Registered
- Posts: 1144
- Thanks: 415
Re: KZ1000A1 Spare Parts Project
17 Jul 2022 21:46 - 17 Jul 2022 21:47
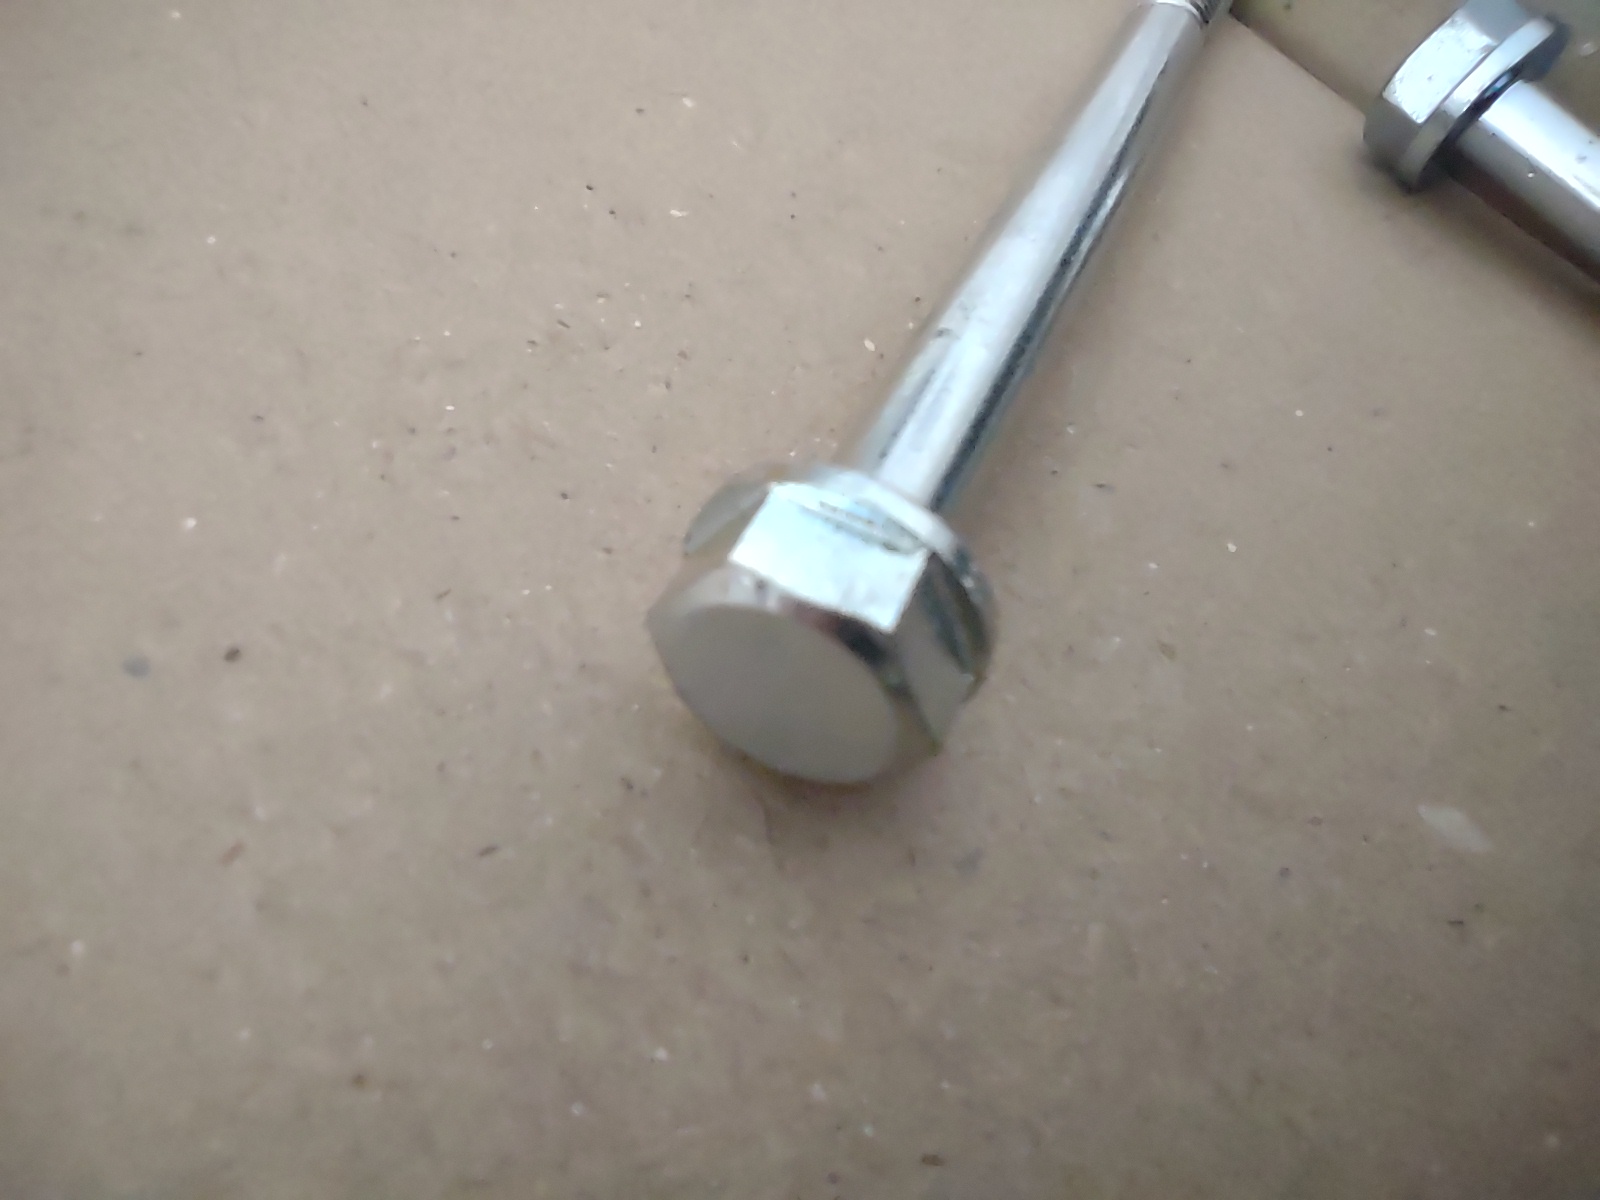
I'm missing a single bolt for the oil pan: M6 x 50 with a head as in the picture below. If anyone in europe has one lying around I have a load of other bolts that I don't need.
Would also be curious to know when they went from this head to the flanged head with the 7 stamped in it. A lot of part numbers from the old models point to the newer stamped head. Anyone got any history on this for me?
@750 R1: I'll pass on the brass block idea - thanks.
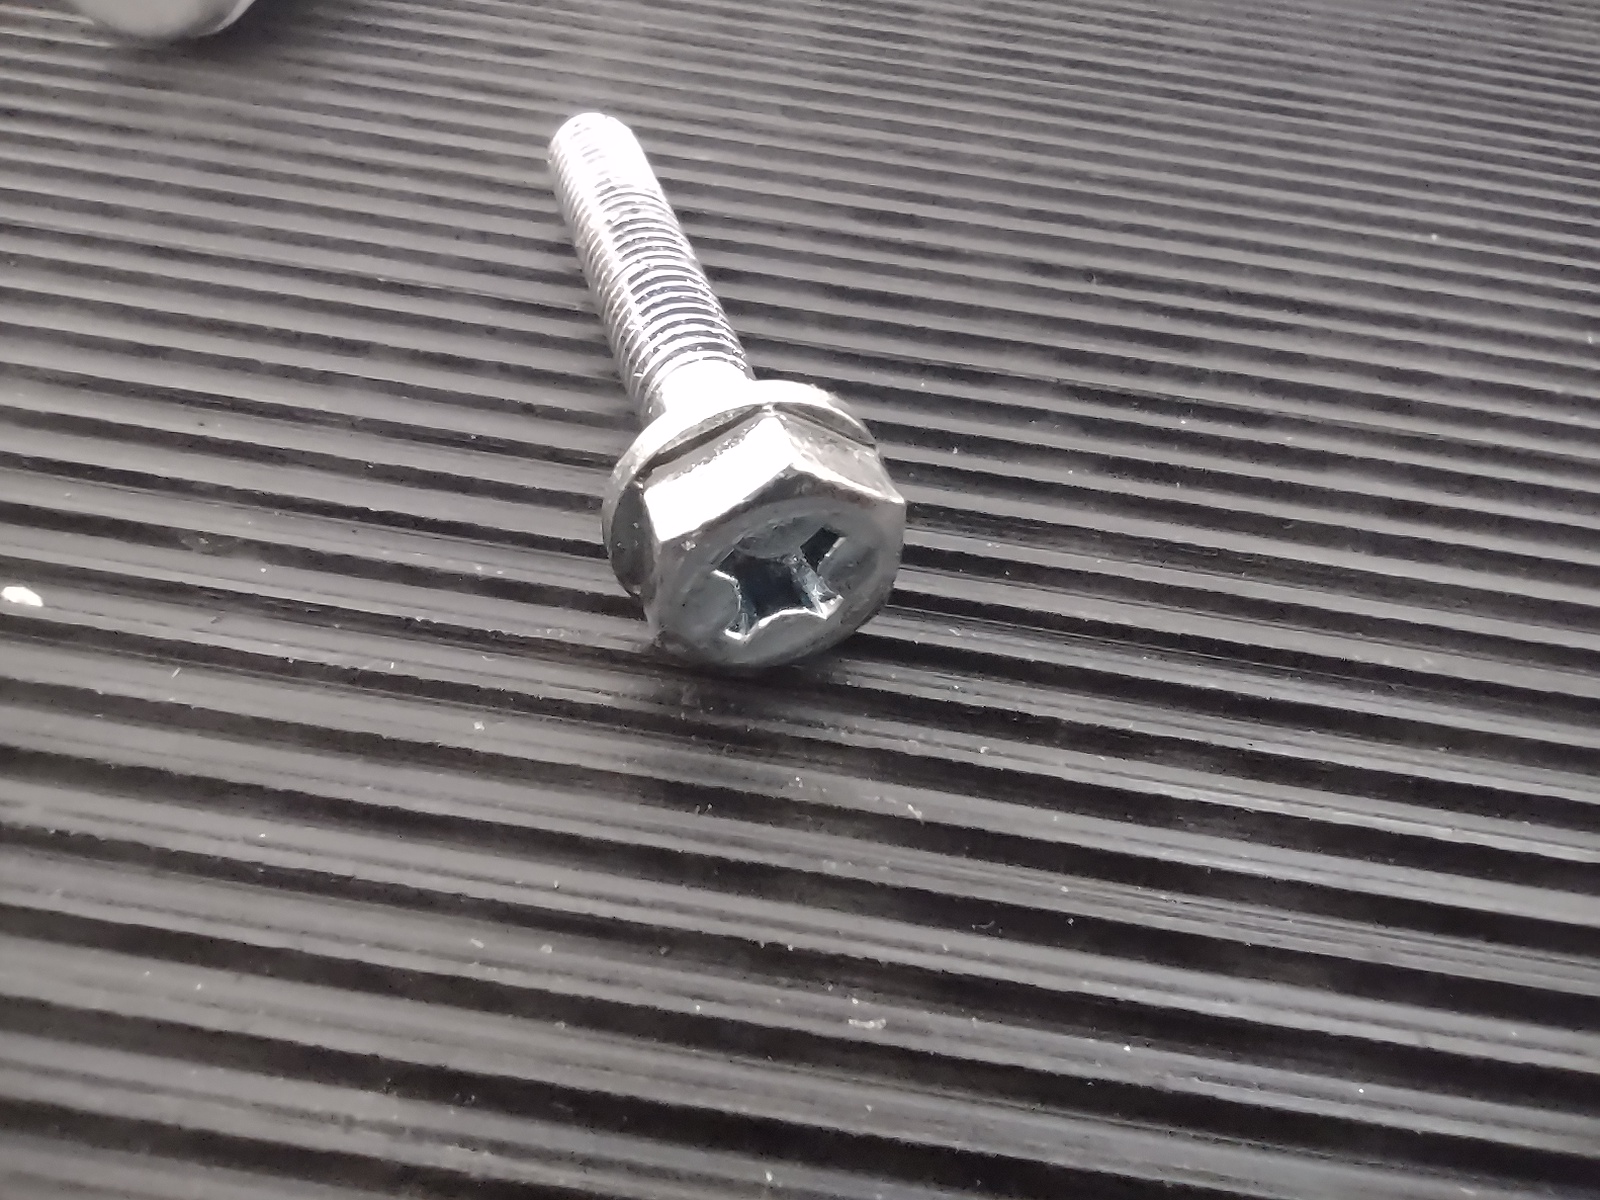
Also would like to get my hands on an M6x22 with the JIS head pictured below. It's for the oil pump so it's not the end of the world if I can't find one.
Would also be curious to know when they went from this head to the flanged head with the 7 stamped in it. A lot of part numbers from the old models point to the newer stamped head. Anyone got any history on this for me?
@750 R1: I'll pass on the brass block idea - thanks.
Also would like to get my hands on an M6x22 with the JIS head pictured below. It's for the oil pump so it's not the end of the world if I can't find one.
KZ1000 Restomod (
www.kzrider.com/forum/11-projects/614517-1977-kz1000-restomod
)
1977 KZ1000A1 ( www.kzrider.com/forum/11-projects/616901...-spare-parts-project )
1980 KZ750H ( kzrider.com/forum/11-projects/612054-kz750h-restoration )
2000 BMW F650GS
1977 KZ1000A1 ( www.kzrider.com/forum/11-projects/616901...-spare-parts-project )
1980 KZ750H ( kzrider.com/forum/11-projects/612054-kz750h-restoration )
2000 BMW F650GS
Last edit: 17 Jul 2022 21:47 by calum.
Please Log in or Create an account to join the conversation.
- kzstreetfighter71
-
- Offline
- User
-
Registered
- Atlantic West Coast
- Posts: 821
- Thanks: 208
Re: KZ1000A1 Spare Parts Project
18 Jul 2022 01:14
Im 99.9% sure i got you mate, ill just root them out and post them up later on i have about 5 oil pumps around an a bucket of bolts and what not.
06 Gsf 1200 bandit, 08 Triumph tiger 1010
05 Yam xv1700 , 02 Hon shadow 1100
1975 Z1 (currently working on)
1977 Z1000 ( running and in storage)
1978 Z1000 (currently working on)
1978 Z1r "skinny tank" (currently working on)
1978 Z1r "fat tank (gathering parts)
1979 z1000st (currently working on)
05 Yam xv1700 , 02 Hon shadow 1100
1975 Z1 (currently working on)
1977 Z1000 ( running and in storage)
1978 Z1000 (currently working on)
1978 Z1r "skinny tank" (currently working on)
1978 Z1r "fat tank (gathering parts)
1979 z1000st (currently working on)
The following user(s) said Thank You: calum
Please Log in or Create an account to join the conversation.
- calum
-
Topic Author
- Offline
- User
-
Registered
- Posts: 1144
- Thanks: 415
Re: KZ1000A1 Spare Parts Project
29 Jul 2022 13:11 - 29 Jul 2022 13:12
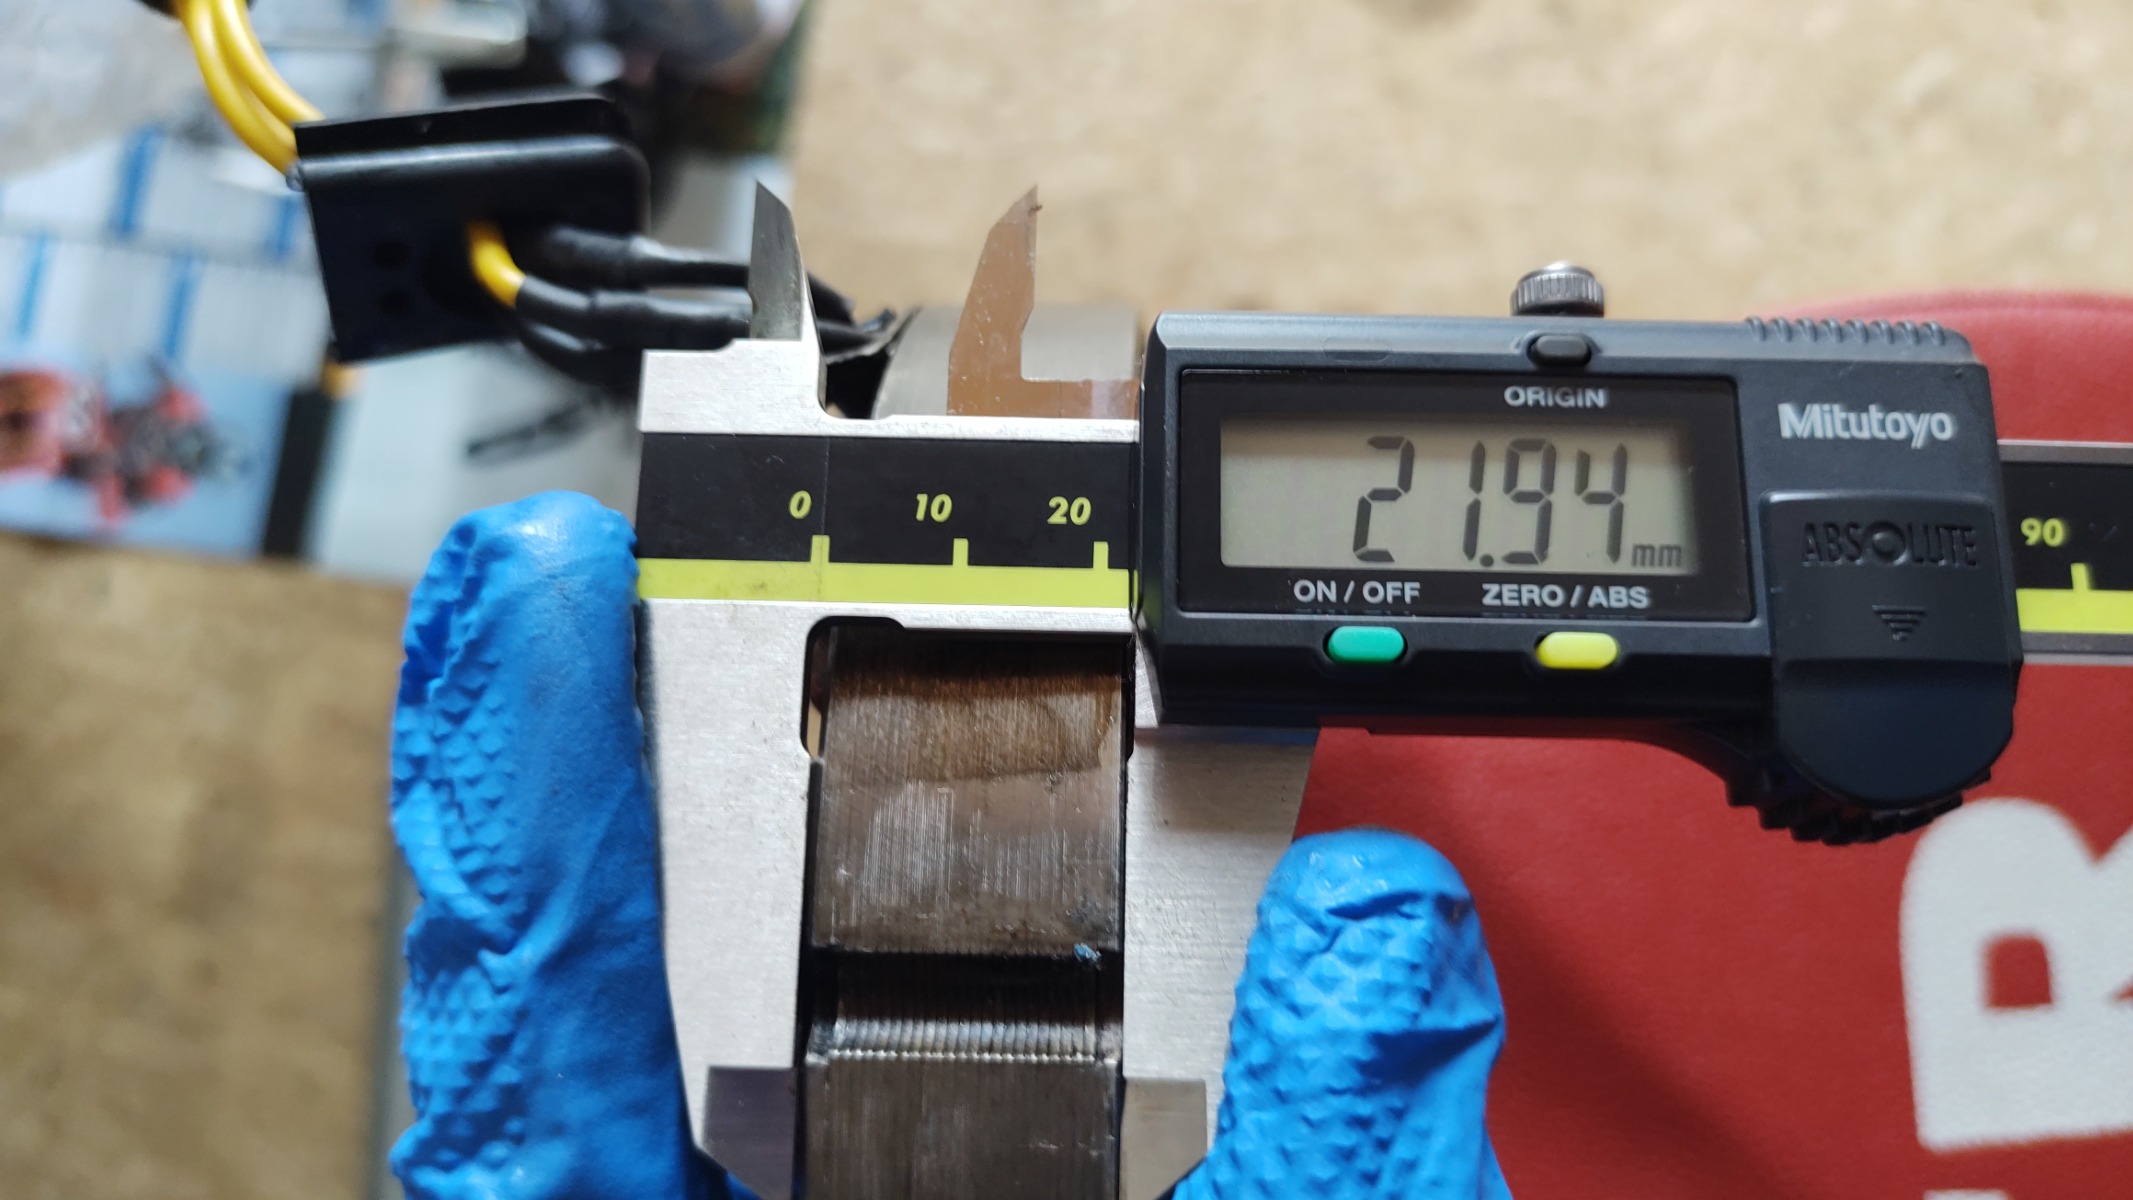
Can anyone tell me which of these is the wrong part (if any)? The height of the stator mount in my replica alternator cover is 23mm, the stator is only 22mm high. This means the stator can still move after tightening the three mounting screws. Stator came from a Z1R (probably) and the cover is a good quality replica (from japan?).
KZ1000 Restomod (
www.kzrider.com/forum/11-projects/614517-1977-kz1000-restomod
)
1977 KZ1000A1 ( www.kzrider.com/forum/11-projects/616901...-spare-parts-project )
1980 KZ750H ( kzrider.com/forum/11-projects/612054-kz750h-restoration )
2000 BMW F650GS
1977 KZ1000A1 ( www.kzrider.com/forum/11-projects/616901...-spare-parts-project )
1980 KZ750H ( kzrider.com/forum/11-projects/612054-kz750h-restoration )
2000 BMW F650GS
Last edit: 29 Jul 2022 13:12 by calum.
Please Log in or Create an account to join the conversation.
- calum
-
Topic Author
- Offline
- User
-
Registered
- Posts: 1144
- Thanks: 415
Re: KZ1000A1 Spare Parts Project
30 Jul 2022 04:12
The guy who I got the cover from got back to me. He reckons there was a production error on the cover and it was milled a bit too deep. It's in the post on it's way back to him.
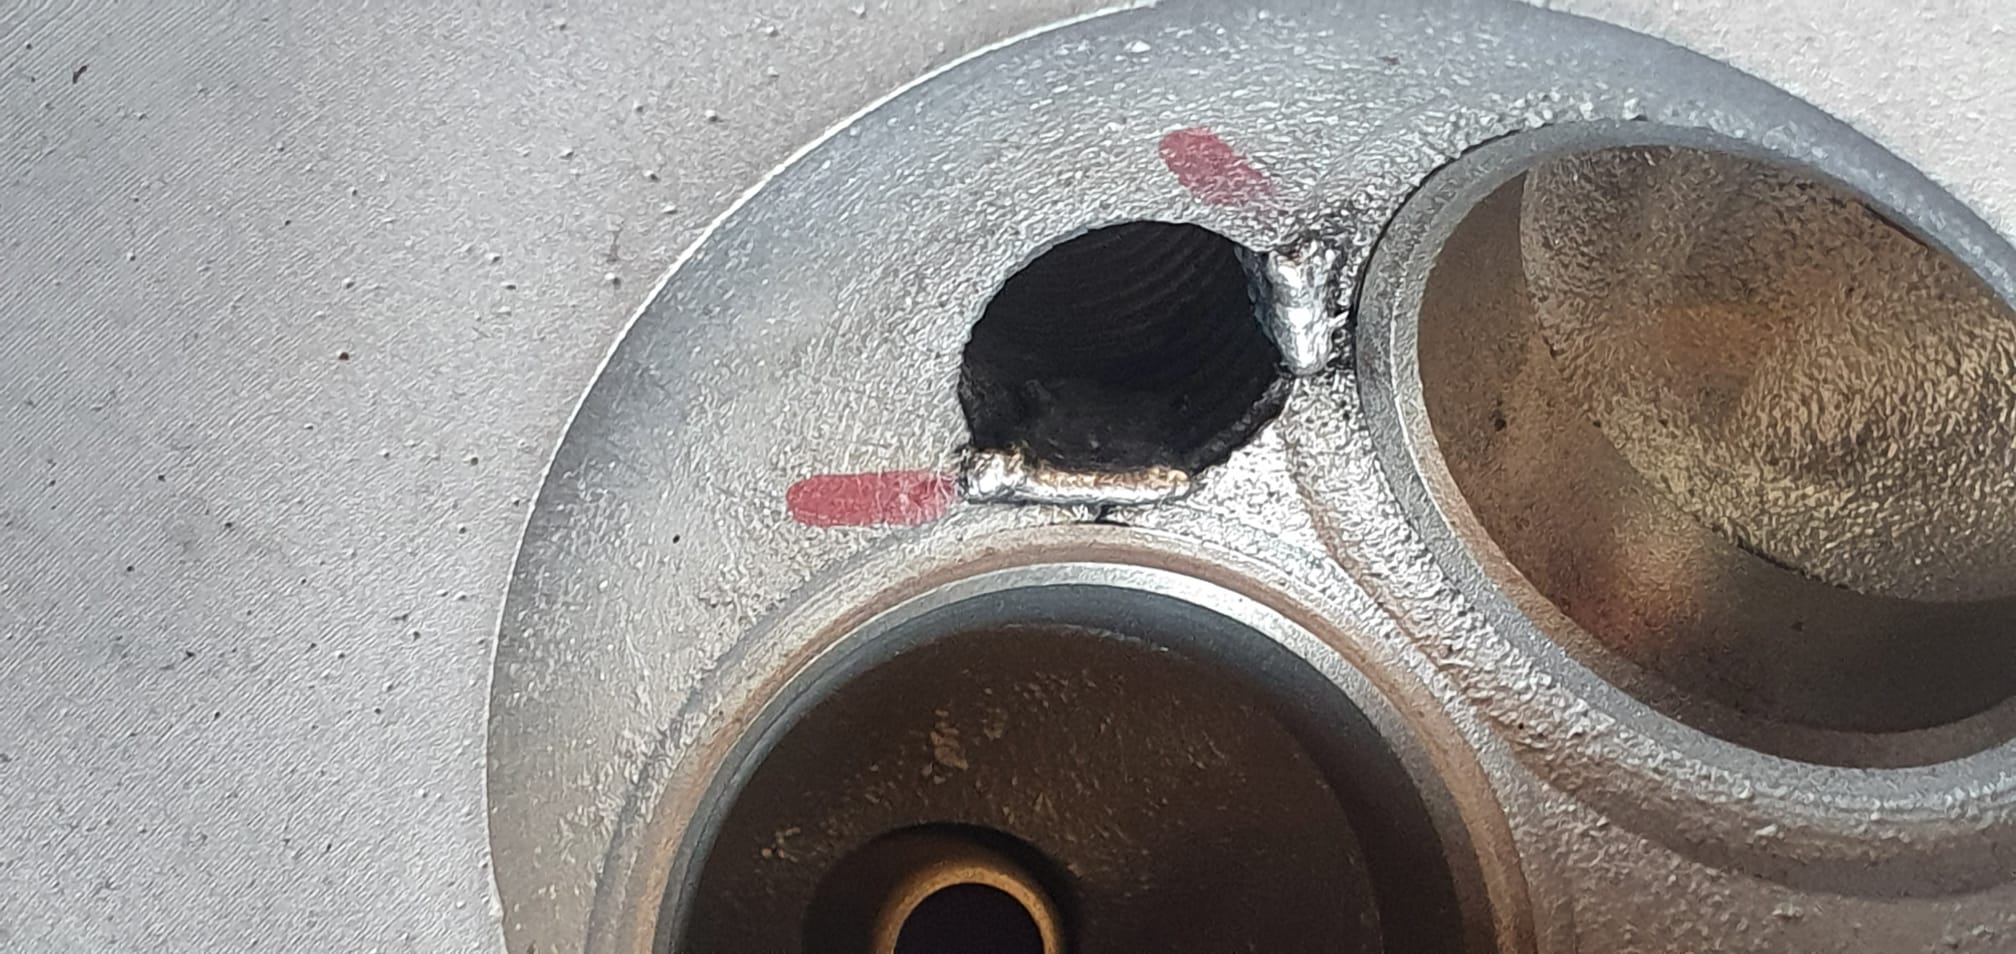
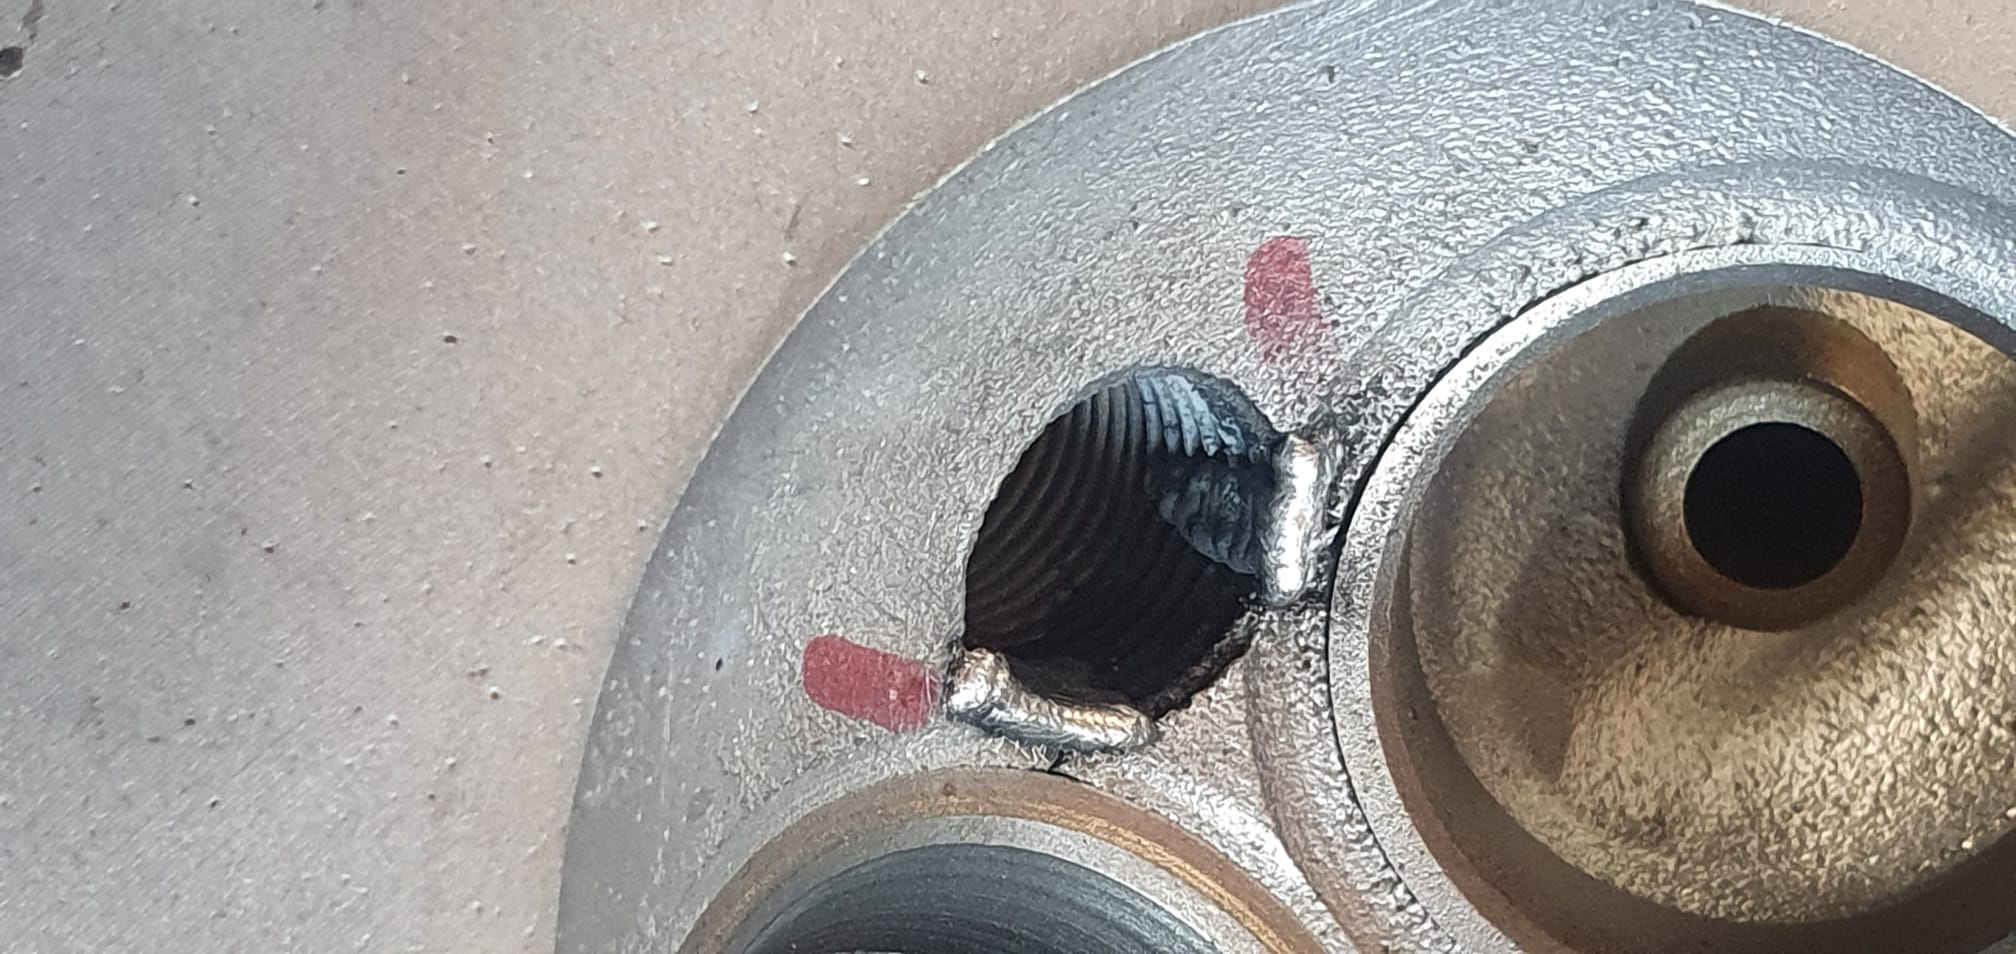
Got some picks from my engine guy. The cracks in the spark plug threads have been welded. He still needs to cut the threads and do the valve seats but he's on holiday now so I can probably pick it up around the end of August.
Got some picks from my engine guy. The cracks in the spark plug threads have been welded. He still needs to cut the threads and do the valve seats but he's on holiday now so I can probably pick it up around the end of August.
KZ1000 Restomod (
www.kzrider.com/forum/11-projects/614517-1977-kz1000-restomod
)
1977 KZ1000A1 ( www.kzrider.com/forum/11-projects/616901...-spare-parts-project )
1980 KZ750H ( kzrider.com/forum/11-projects/612054-kz750h-restoration )
2000 BMW F650GS
1977 KZ1000A1 ( www.kzrider.com/forum/11-projects/616901...-spare-parts-project )
1980 KZ750H ( kzrider.com/forum/11-projects/612054-kz750h-restoration )
2000 BMW F650GS
Please Log in or Create an account to join the conversation.
- calum
-
Topic Author
- Offline
- User
-
Registered
- Posts: 1144
- Thanks: 415
Re: KZ1000A1 Spare Parts Project
03 Aug 2022 07:38
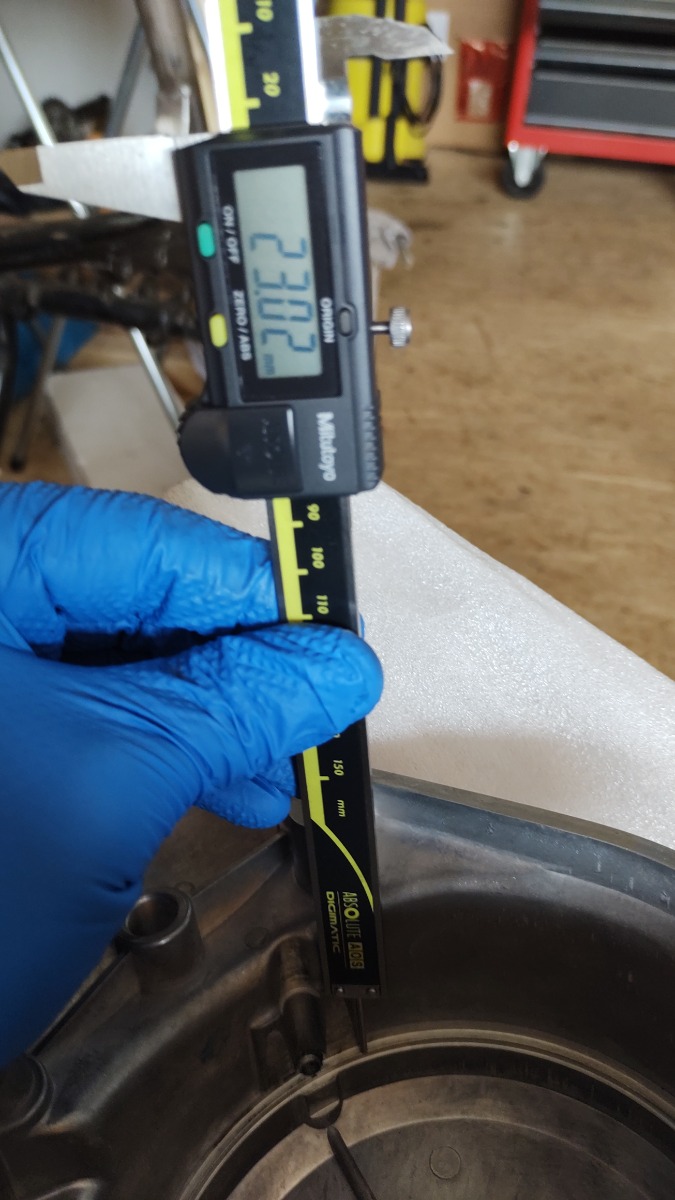
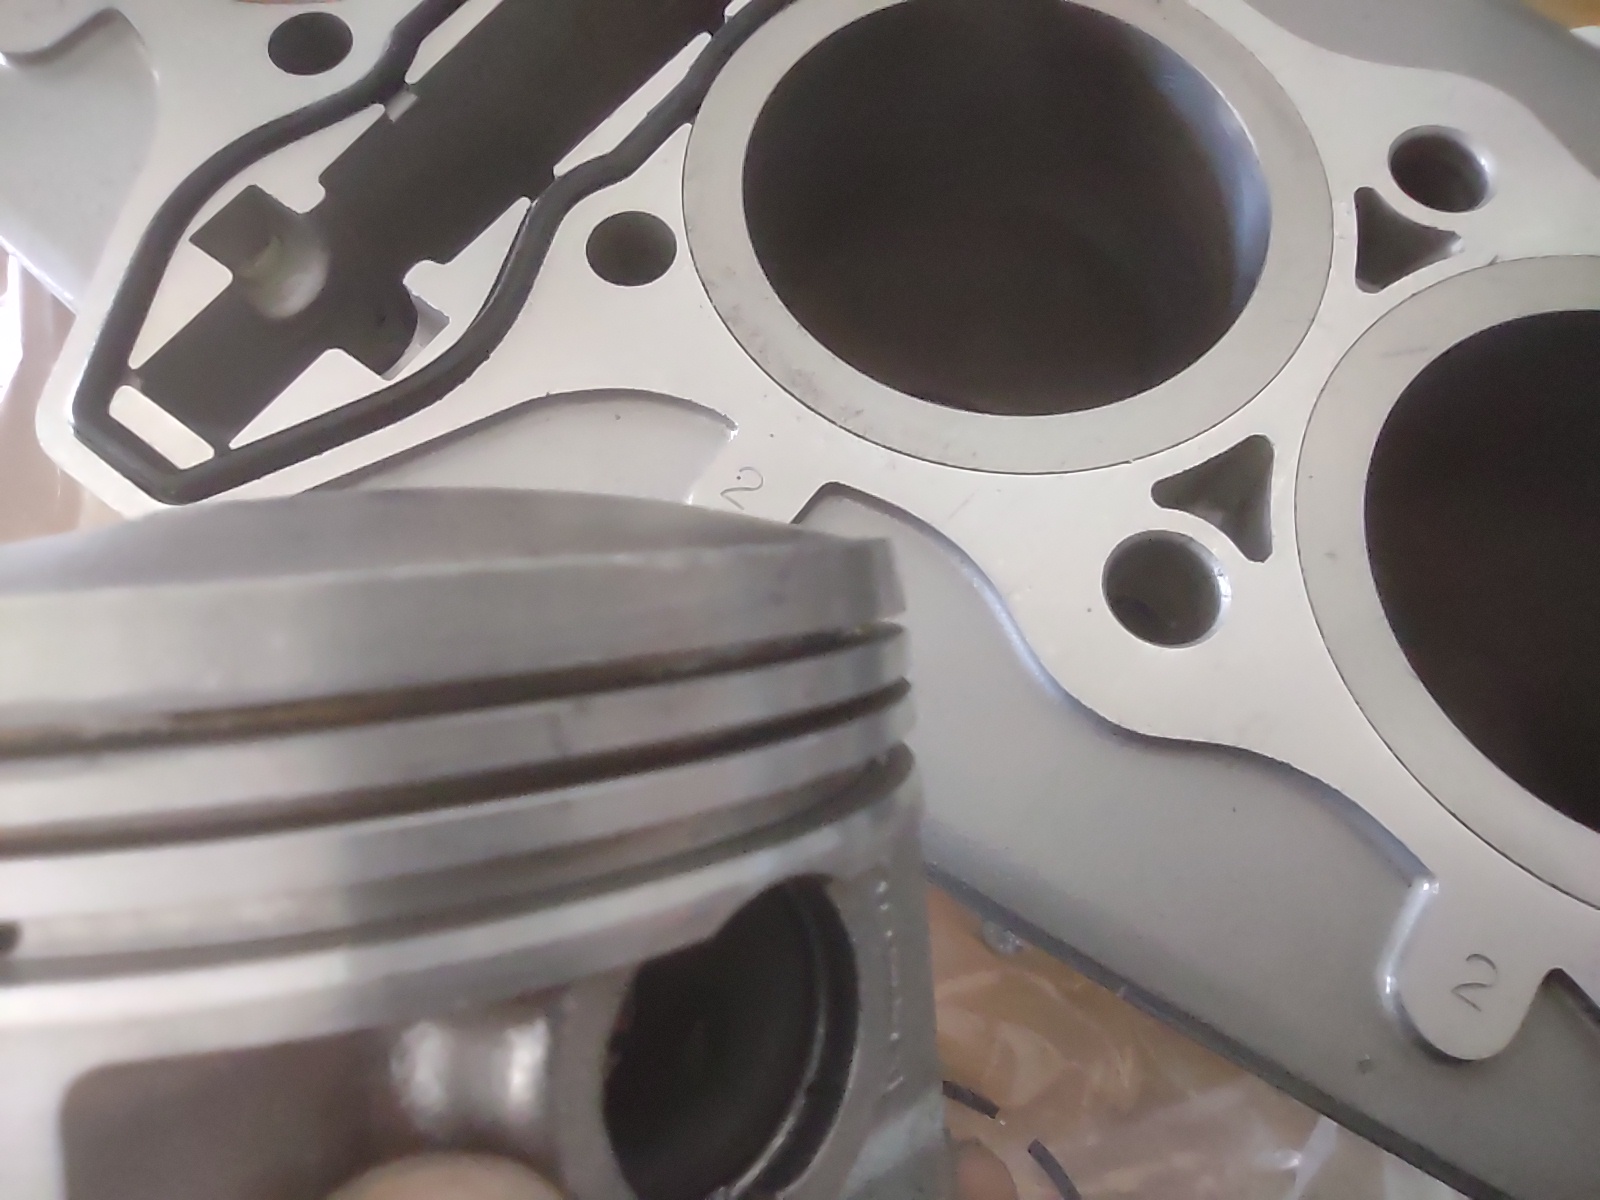
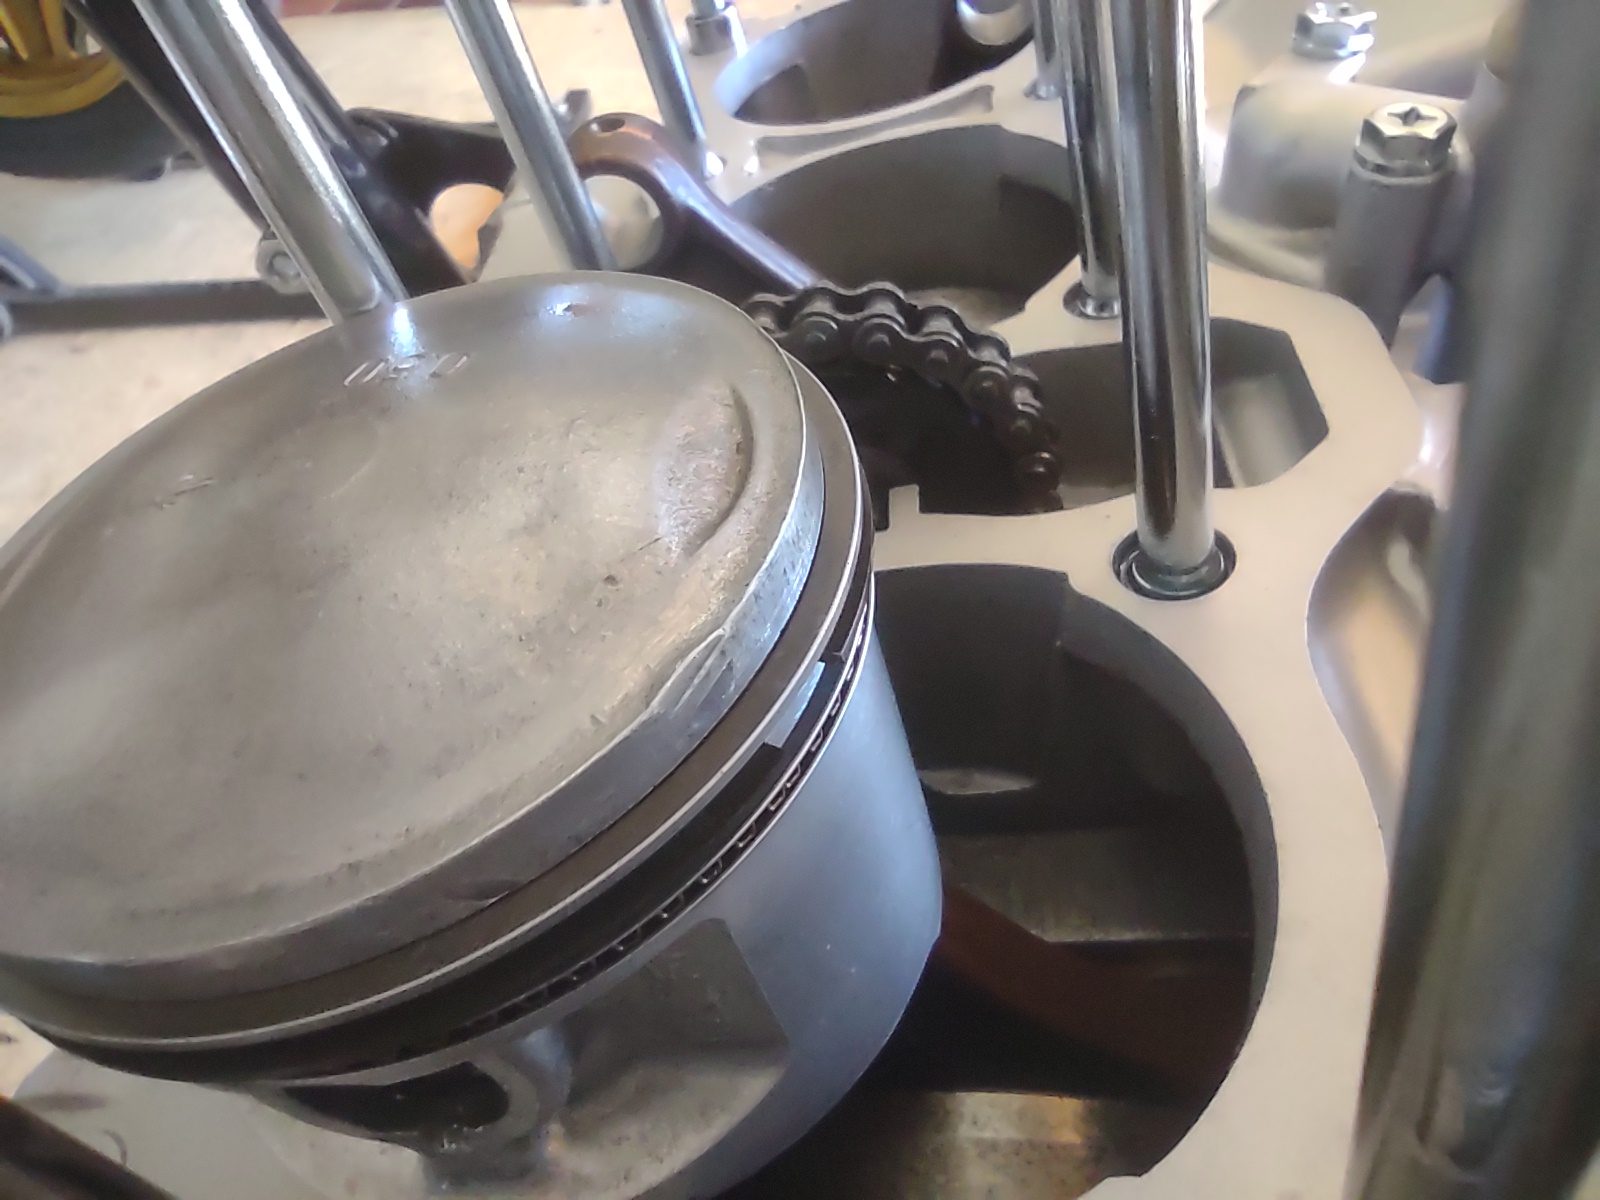
Gapped the piston rings today. A lot of filing required - the gaps on the first and second rings were all about 0.1mm too small. One of the rings wouldn't go in and I noticed some damage to one of the pistons that I had missed before. It looks lik it got a bit of a whack at some stage (see the last two photos below). The ring groove was deformed slightly and too tight for the ring. I found a file that was almost exactly the same size as the groove and carefully opened it back up. I'll double-check the groove clearance again but it seemed fine once I got the ring installed. I figure this should be fine on this build.
KZ1000 Restomod (
www.kzrider.com/forum/11-projects/614517-1977-kz1000-restomod
)
1977 KZ1000A1 ( www.kzrider.com/forum/11-projects/616901...-spare-parts-project )
1980 KZ750H ( kzrider.com/forum/11-projects/612054-kz750h-restoration )
2000 BMW F650GS
1977 KZ1000A1 ( www.kzrider.com/forum/11-projects/616901...-spare-parts-project )
1980 KZ750H ( kzrider.com/forum/11-projects/612054-kz750h-restoration )
2000 BMW F650GS
Please Log in or Create an account to join the conversation.
Moderators: Street Fighter LTD