
KZ1000A1 Spare Parts Project
- calum
-
 Topic Author
- Offline
- User
-

Registered
- Posts: 1144
- Thanks: 415
Re: KZ1000A1 Spare Parts Project
03 Aug 2022 07:58
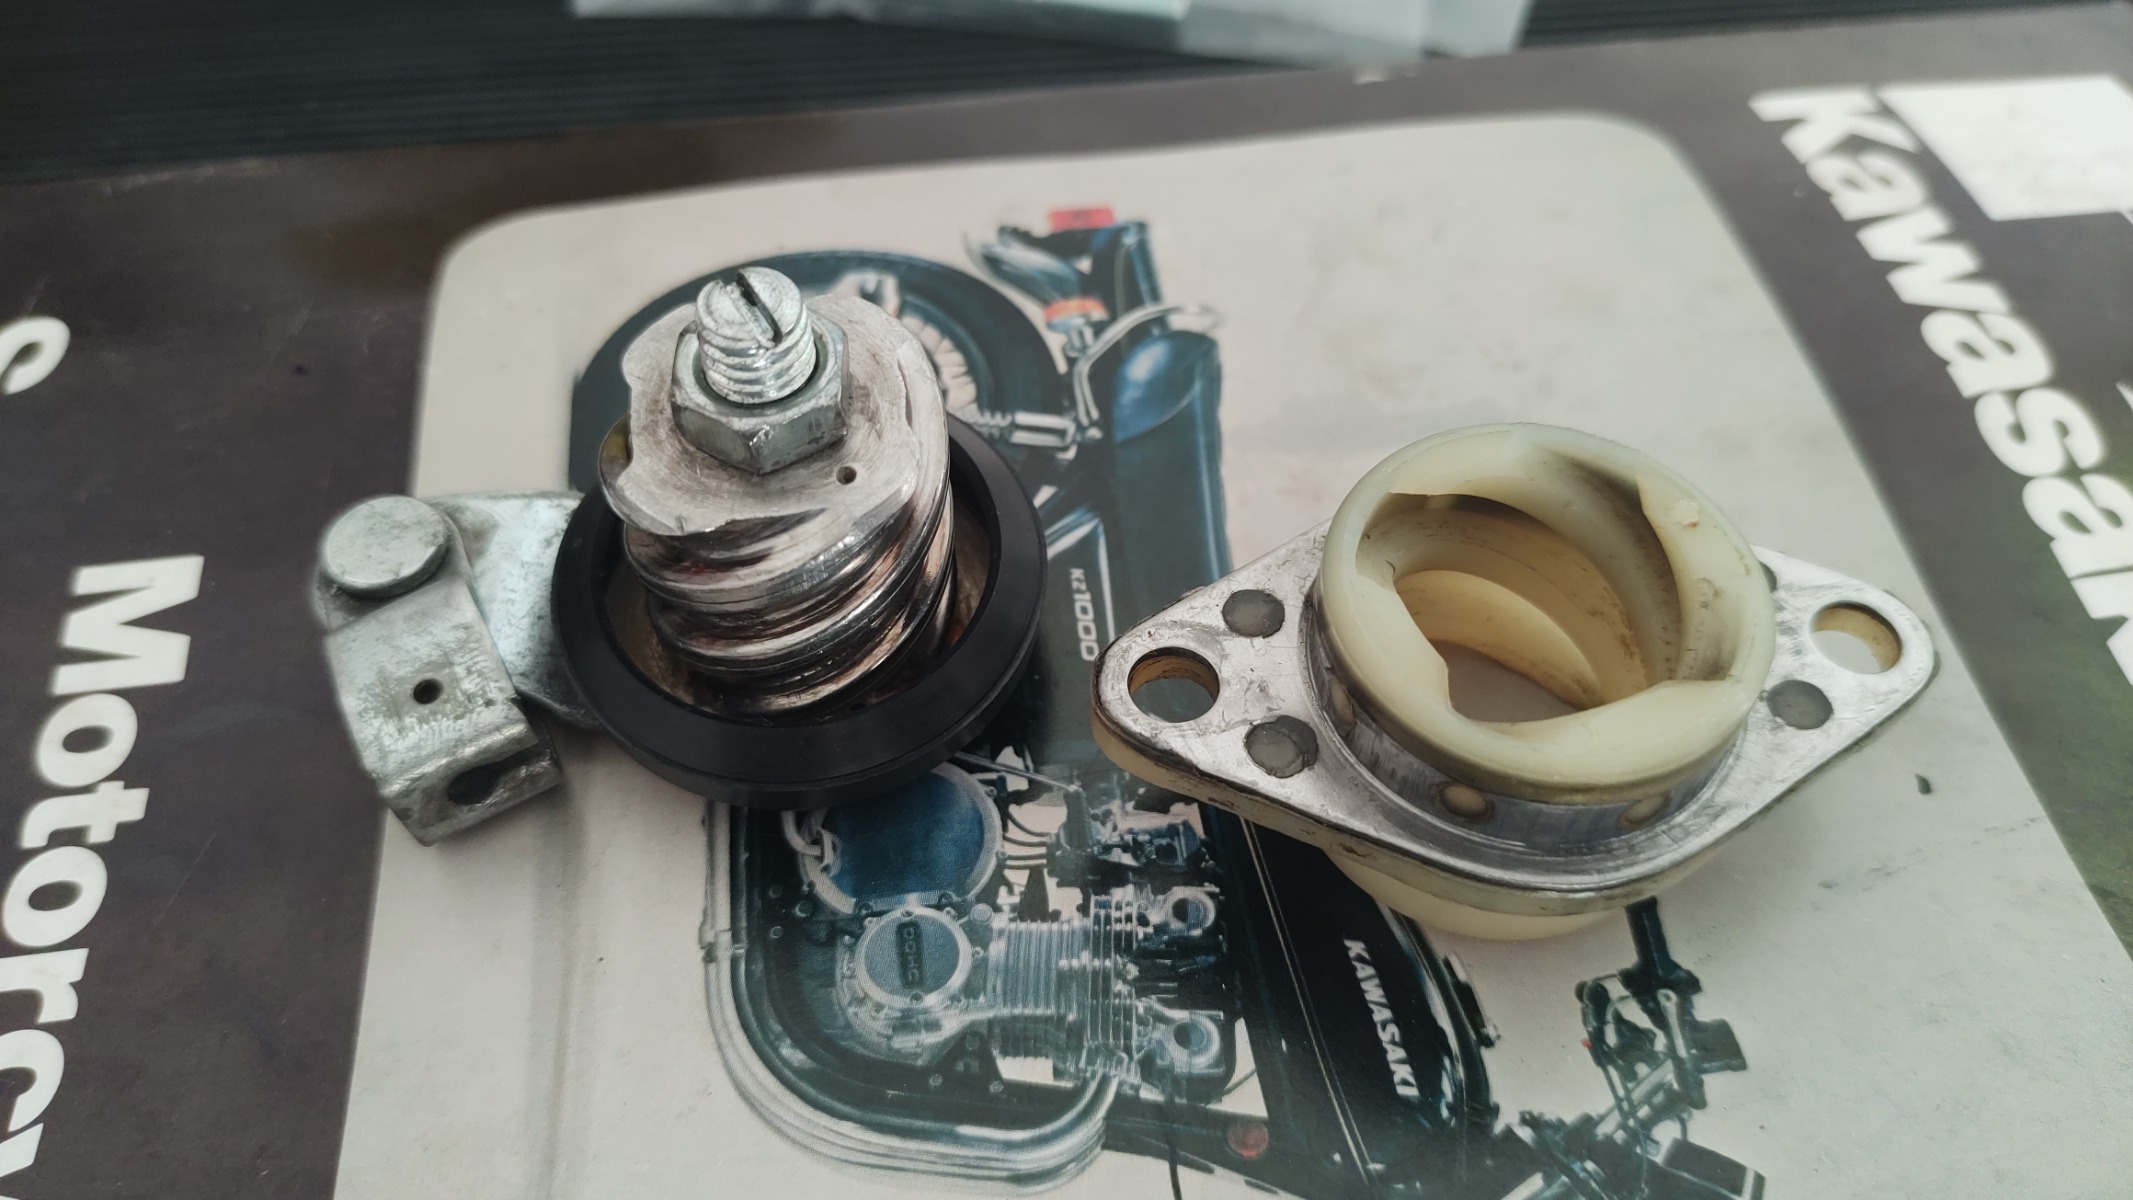
Can someone tell me if the liquid gasket that is supposed to go around the four cylinder studs (back, middle) just needs to fill the holes or whether it needs to set under pressure? Basically I'm asking if I can put the block on before I get the head back from the engine guy (need some space on the shelf). I assume it's used as the threads for the studs go through into the crankcase and the liquid gasket is just there to stop any oil seeping through. This doesn't even seem necessary but I can't think of any other reason.
KZ1000 Restomod (
www.kzrider.com/forum/11-projects/614517-1977-kz1000-restomod
)
1977 KZ1000A1 ( www.kzrider.com/forum/11-projects/616901...-spare-parts-project )
1980 KZ750H ( kzrider.com/forum/11-projects/612054-kz750h-restoration )
2000 BMW F650GS
1977 KZ1000A1 ( www.kzrider.com/forum/11-projects/616901...-spare-parts-project )
1980 KZ750H ( kzrider.com/forum/11-projects/612054-kz750h-restoration )
2000 BMW F650GS
Please Log in or Create an account to join the conversation.
- calum
-
Topic Author
- Offline
- User
-
Registered
- Posts: 1144
- Thanks: 415
Re: KZ1000A1 Spare Parts Project
05 Aug 2022 11:51
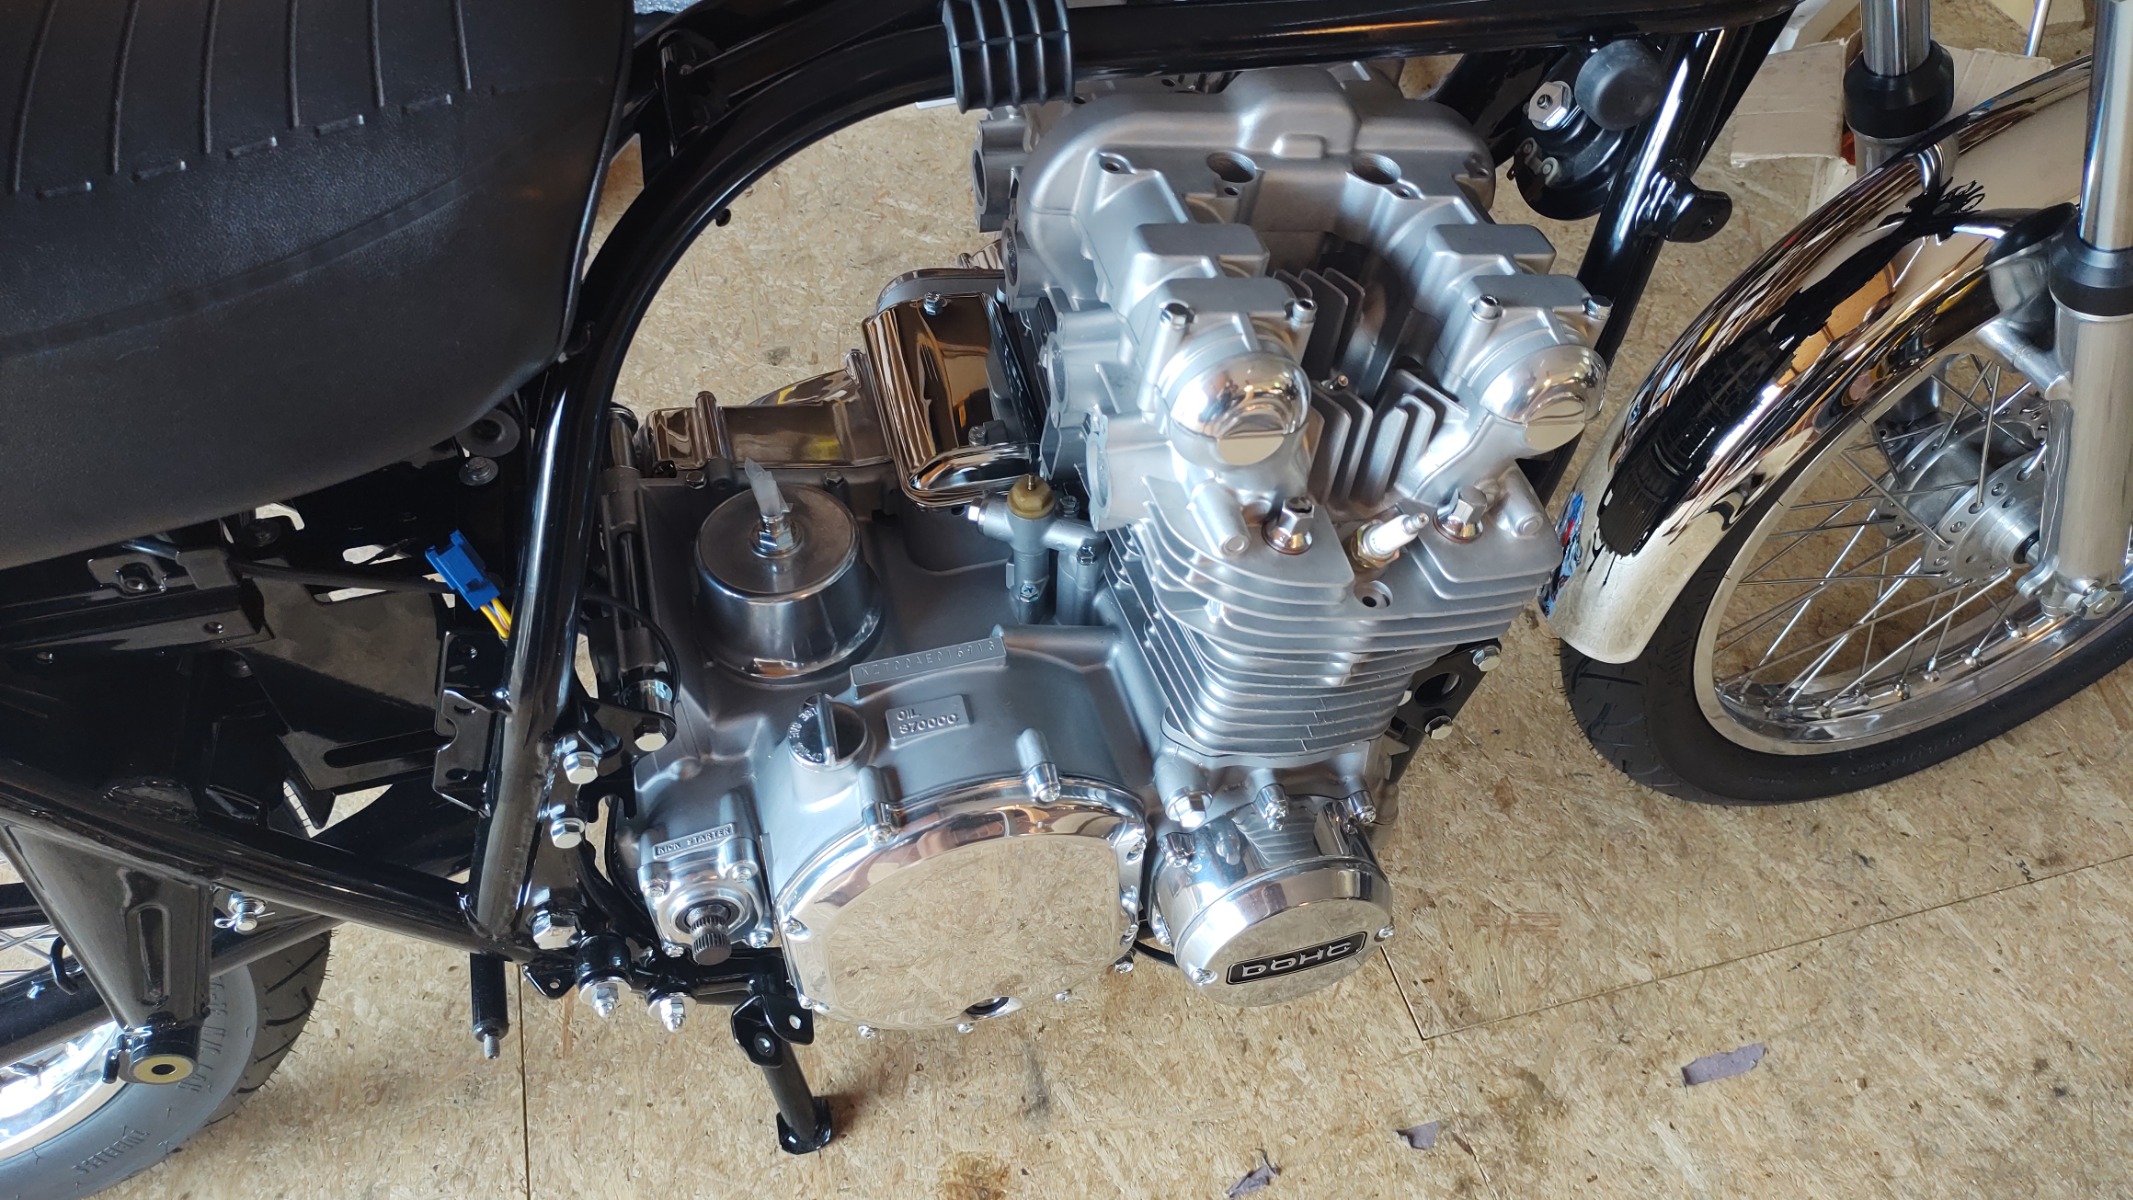
Still waiting on parts for my other build so just doing what I can here until they're ready. I got the block on today and finished the last of the polishing. Can pick up the head on Monday so I'll be able to put a lid on the engine before I go away at the end of next week.
I flipped the front forks around as well - I had mounted them backwards as I forgot that the A1 has the calipers mounted on the front of the forks. That meant that the forks weren't polished around the caliper mounts as I figured they wouldn't be visible. I cleaned them up but ended up polishing the forks a bit more than I wanted. Doesn't matter too much on this build so I'll leave them as they are. They're somewhere in the middle of mirror finish and stock.

I flipped the front forks around as well - I had mounted them backwards as I forgot that the A1 has the calipers mounted on the front of the forks. That meant that the forks weren't polished around the caliper mounts as I figured they wouldn't be visible. I cleaned them up but ended up polishing the forks a bit more than I wanted. Doesn't matter too much on this build so I'll leave them as they are. They're somewhere in the middle of mirror finish and stock.
KZ1000 Restomod (
www.kzrider.com/forum/11-projects/614517-1977-kz1000-restomod
)
1977 KZ1000A1 ( www.kzrider.com/forum/11-projects/616901...-spare-parts-project )
1980 KZ750H ( kzrider.com/forum/11-projects/612054-kz750h-restoration )
2000 BMW F650GS
1977 KZ1000A1 ( www.kzrider.com/forum/11-projects/616901...-spare-parts-project )
1980 KZ750H ( kzrider.com/forum/11-projects/612054-kz750h-restoration )
2000 BMW F650GS
Please Log in or Create an account to join the conversation.
- howardhb
-

- Offline
- Sustaining Member
-

Registered
- God, I trust
- Posts: 473
- Thanks: 510
Re: KZ1000A1 Spare Parts Project
05 Aug 2022 12:43
Lookin' mighty fine!
H.
H.
'81 GPz 550 D1
'81 GPz 1100 B1 ELR "Tribute" www.kzrider.com/forum/11-projects/617040...-elr-tribute?start=0
'82 Yamaha YB100 Fizzie
'79 Suzuki GT200 X5 TWO STROKE TWIN - SMOKER!
'81 GPz 1100 B1 ELR "Tribute" www.kzrider.com/forum/11-projects/617040...-elr-tribute?start=0
'82 Yamaha YB100 Fizzie
'79 Suzuki GT200 X5 TWO STROKE TWIN - SMOKER!
The following user(s) said Thank You: calum
Please Log in or Create an account to join the conversation.
- Dr. Gamma
-

- Offline
- Sustaining Member
-
Registered
- Posts: 1231
- Thanks: 706
Re: KZ1000A1 Spare Parts Project
05 Aug 2022 18:09 - 05 Aug 2022 18:11
Before you bolt your head on. I would check your head gasket placement. If you are using O.E.M. Kawasaki head gaskets the folded edge of the steel ring in the head gasket should face upward. Looking at your photo, it looks like the head gaskets have the wrong side facing upward. If they are aftermarket head gaskets maybe those gaskets are not made like the factory Kawasaki head gaskets and don't have that folded over lip like the factory head gaskets do........
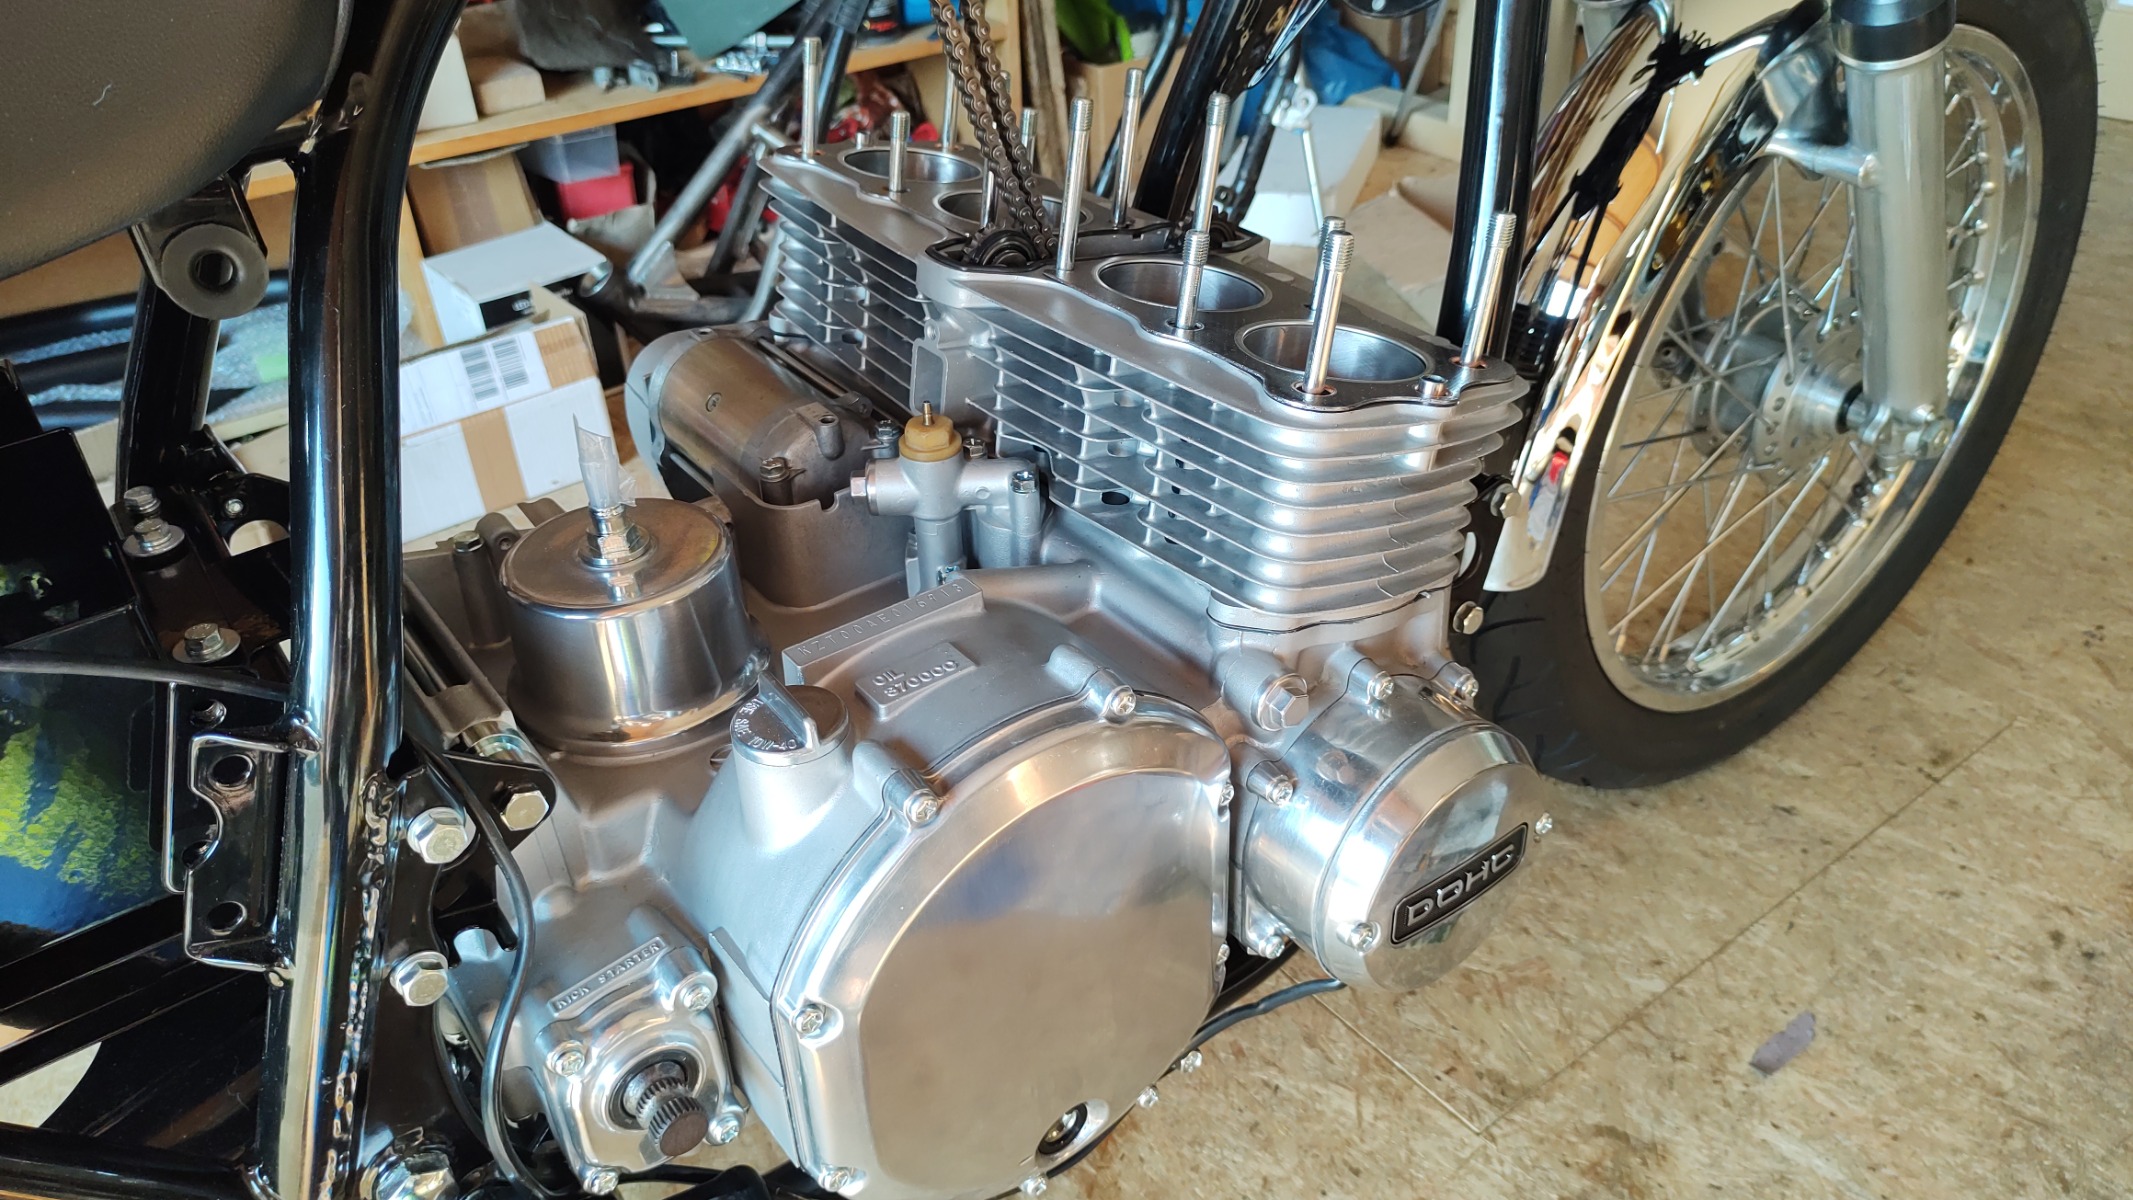
Photo from factory Kawasaki shop manual.
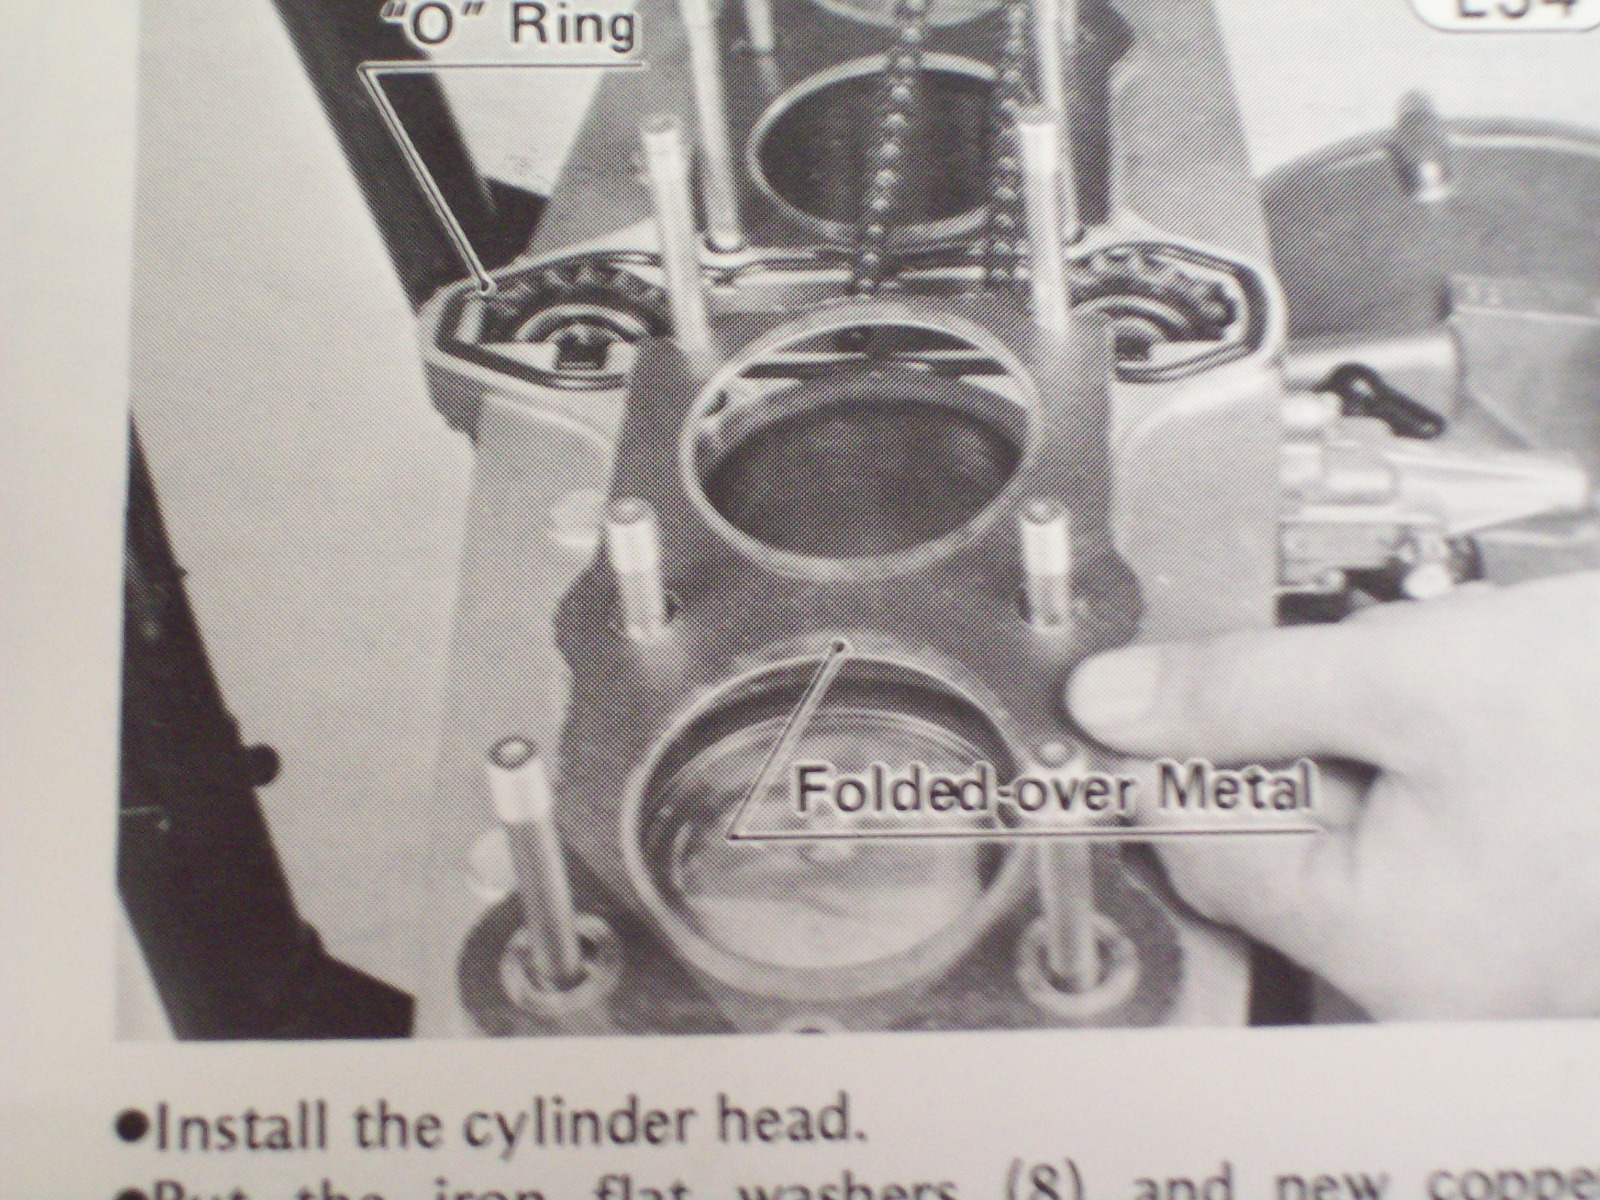
Photo of O.E.M. Kawasaki head gaskets The folded edge is the lower of the two gaskets pictured.
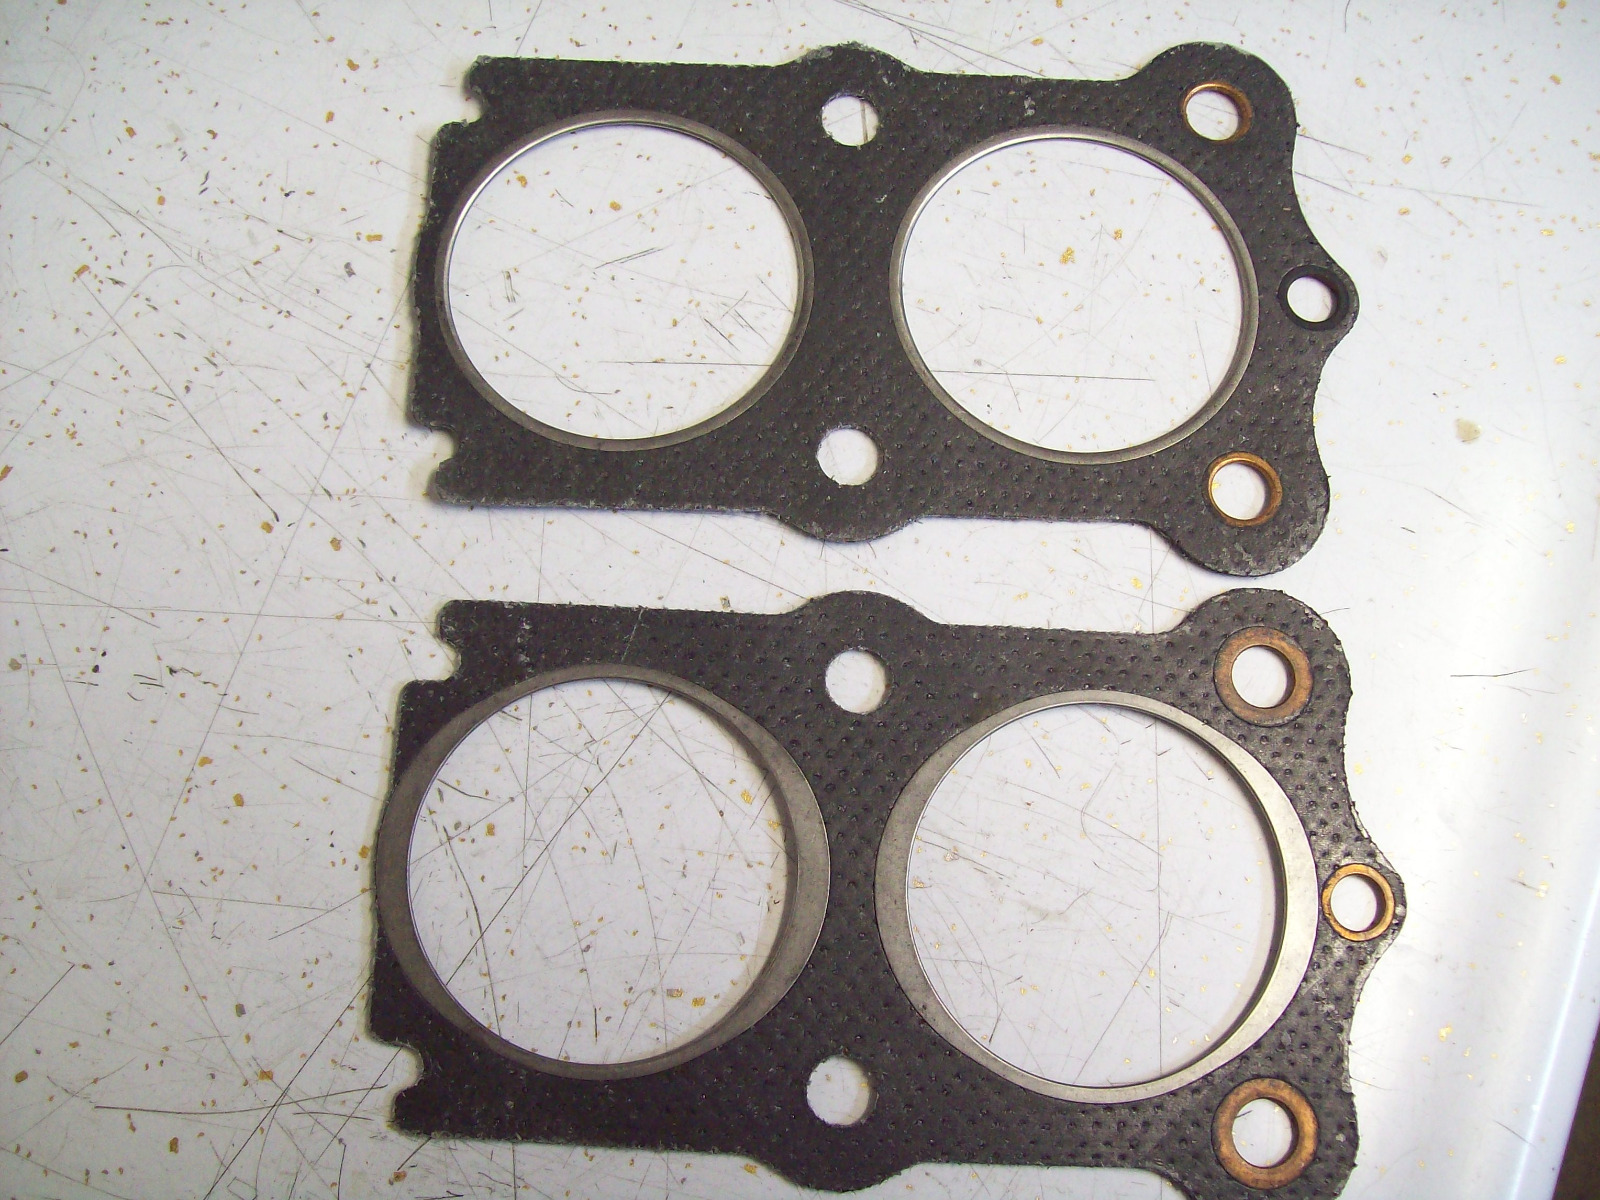
Photo from factory Kawasaki shop manual.
Photo of O.E.M. Kawasaki head gaskets The folded edge is the lower of the two gaskets pictured.
1972 H2 750 Cafe Racer built in 1974.
1976 KH400 Production Road Racer.
1979 Kz1000 MK. II Old AMA/WERA Superbike.
1986 RG500G 2 stroke terror.
1986 GSXR750RG The one with the clutch that rattles!
Up in the hills near Prescott, Az.
1976 KH400 Production Road Racer.
1979 Kz1000 MK. II Old AMA/WERA Superbike.
1986 RG500G 2 stroke terror.
1986 GSXR750RG The one with the clutch that rattles!
Up in the hills near Prescott, Az.
Last edit: 05 Aug 2022 18:11 by Dr. Gamma.
The following user(s) said Thank You: kzstreetfighter71, DOHC, calum
Please Log in or Create an account to join the conversation.
- calum
-
Topic Author
- Offline
- User
-
Registered
- Posts: 1144
- Thanks: 415
Re: KZ1000A1 Spare Parts Project
05 Aug 2022 18:27
Thanks for the heads up. They are Vesrah gaskets and there was nothing on them indicating which way is up. I have already sent an e-mail off to the guy I got the gasket kit from to find out which way they need to be mounted. I'm pretty sure the steel ring was the same on both sides but I'll have another look tomorrow.
KZ1000 Restomod (
www.kzrider.com/forum/11-projects/614517-1977-kz1000-restomod
)
1977 KZ1000A1 ( www.kzrider.com/forum/11-projects/616901...-spare-parts-project )
1980 KZ750H ( kzrider.com/forum/11-projects/612054-kz750h-restoration )
2000 BMW F650GS
1977 KZ1000A1 ( www.kzrider.com/forum/11-projects/616901...-spare-parts-project )
1980 KZ750H ( kzrider.com/forum/11-projects/612054-kz750h-restoration )
2000 BMW F650GS
Please Log in or Create an account to join the conversation.
- calum
-
Topic Author
- Offline
- User
-
Registered
- Posts: 1144
- Thanks: 415
Re: KZ1000A1 Spare Parts Project
06 Aug 2022 12:24
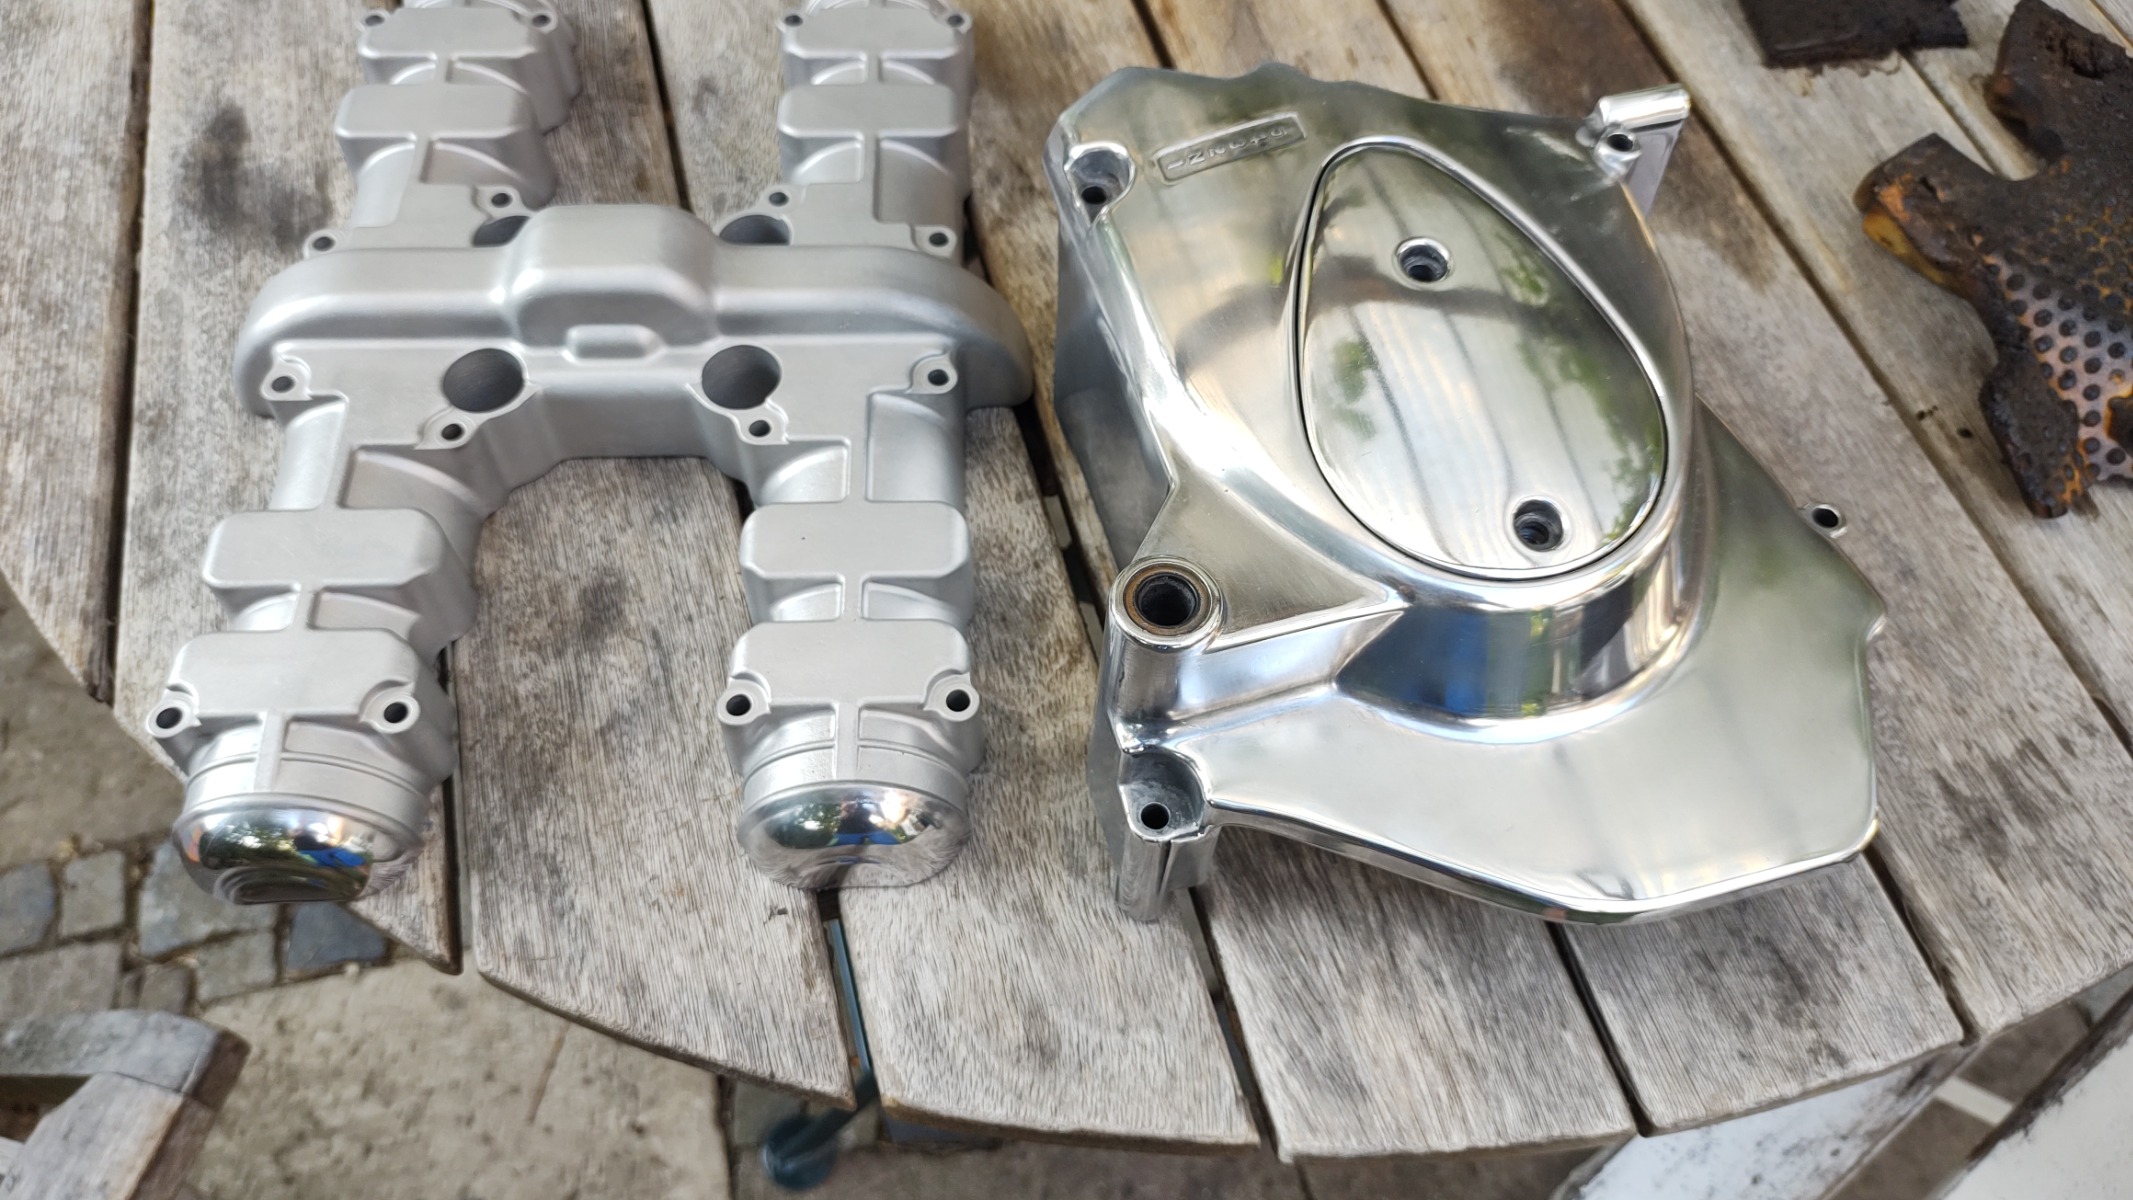
Left hand covers on today. Clutch release looks to be in good condition so no need to upgrade it for the moment. Checked the head gasket, the rings are the same on both sides.

KZ1000 Restomod (
www.kzrider.com/forum/11-projects/614517-1977-kz1000-restomod
)
1977 KZ1000A1 ( www.kzrider.com/forum/11-projects/616901...-spare-parts-project )
1980 KZ750H ( kzrider.com/forum/11-projects/612054-kz750h-restoration )
2000 BMW F650GS
1977 KZ1000A1 ( www.kzrider.com/forum/11-projects/616901...-spare-parts-project )
1980 KZ750H ( kzrider.com/forum/11-projects/612054-kz750h-restoration )
2000 BMW F650GS
The following user(s) said Thank You: kzstreetfighter71
Please Log in or Create an account to join the conversation.
- blackozvet
-
- Offline
- User
-
Registered
- Posts: 193
- Thanks: 79
Re: KZ1000A1 Spare Parts Project
06 Aug 2022 17:20I actually like that tappet cover look, thinking about doing that with mine.Still waiting on parts for my other build so just doing what I can here until they're ready. I got the block on today and finished the last of the polishing. Can pick up the head on Monday so I'll be able to put a lid on the engine before I go away at the end of next week.
I flipped the front forks around as well - I had mounted them backwards as I forgot that the A1 has the calipers mounted on the front of the forks. That meant that the forks weren't polished around the caliper mounts as I figured they wouldn't be visible. I cleaned them up but ended up polishing the forks a bit more than I wanted. Doesn't matter too much on this build so I'll leave them as they are. They're somewhere in the middle of mirror finish and stock.
1973 Z1 900 Kawasaki
Please Log in or Create an account to join the conversation.
- calum
-
Topic Author
- Offline
- User
-
Registered
- Posts: 1144
- Thanks: 415
Re: KZ1000A1 Spare Parts Project
09 Aug 2022 01:27 - 09 Aug 2022 01:28I'm pretty sure that was the stock look - at least all the restorations I've seen have polished the caps and left the rest untouched.I actually like that tappet cover look, thinking about doing that with mine.
KZ1000 Restomod (
www.kzrider.com/forum/11-projects/614517-1977-kz1000-restomod
)
1977 KZ1000A1 ( www.kzrider.com/forum/11-projects/616901...-spare-parts-project )
1980 KZ750H ( kzrider.com/forum/11-projects/612054-kz750h-restoration )
2000 BMW F650GS
1977 KZ1000A1 ( www.kzrider.com/forum/11-projects/616901...-spare-parts-project )
1980 KZ750H ( kzrider.com/forum/11-projects/612054-kz750h-restoration )
2000 BMW F650GS
Last edit: 09 Aug 2022 01:28 by calum.
Please Log in or Create an account to join the conversation.
- calum
-
Topic Author
- Offline
- User
-
Registered
- Posts: 1144
- Thanks: 415
Re: KZ1000A1 Spare Parts Project
10 Aug 2022 09:33 - 10 Aug 2022 09:35
Picked up the head yesterday. Put it on but it's not bolted down - it's just on so I can close up the engine while I am away for the next couple of weeks.
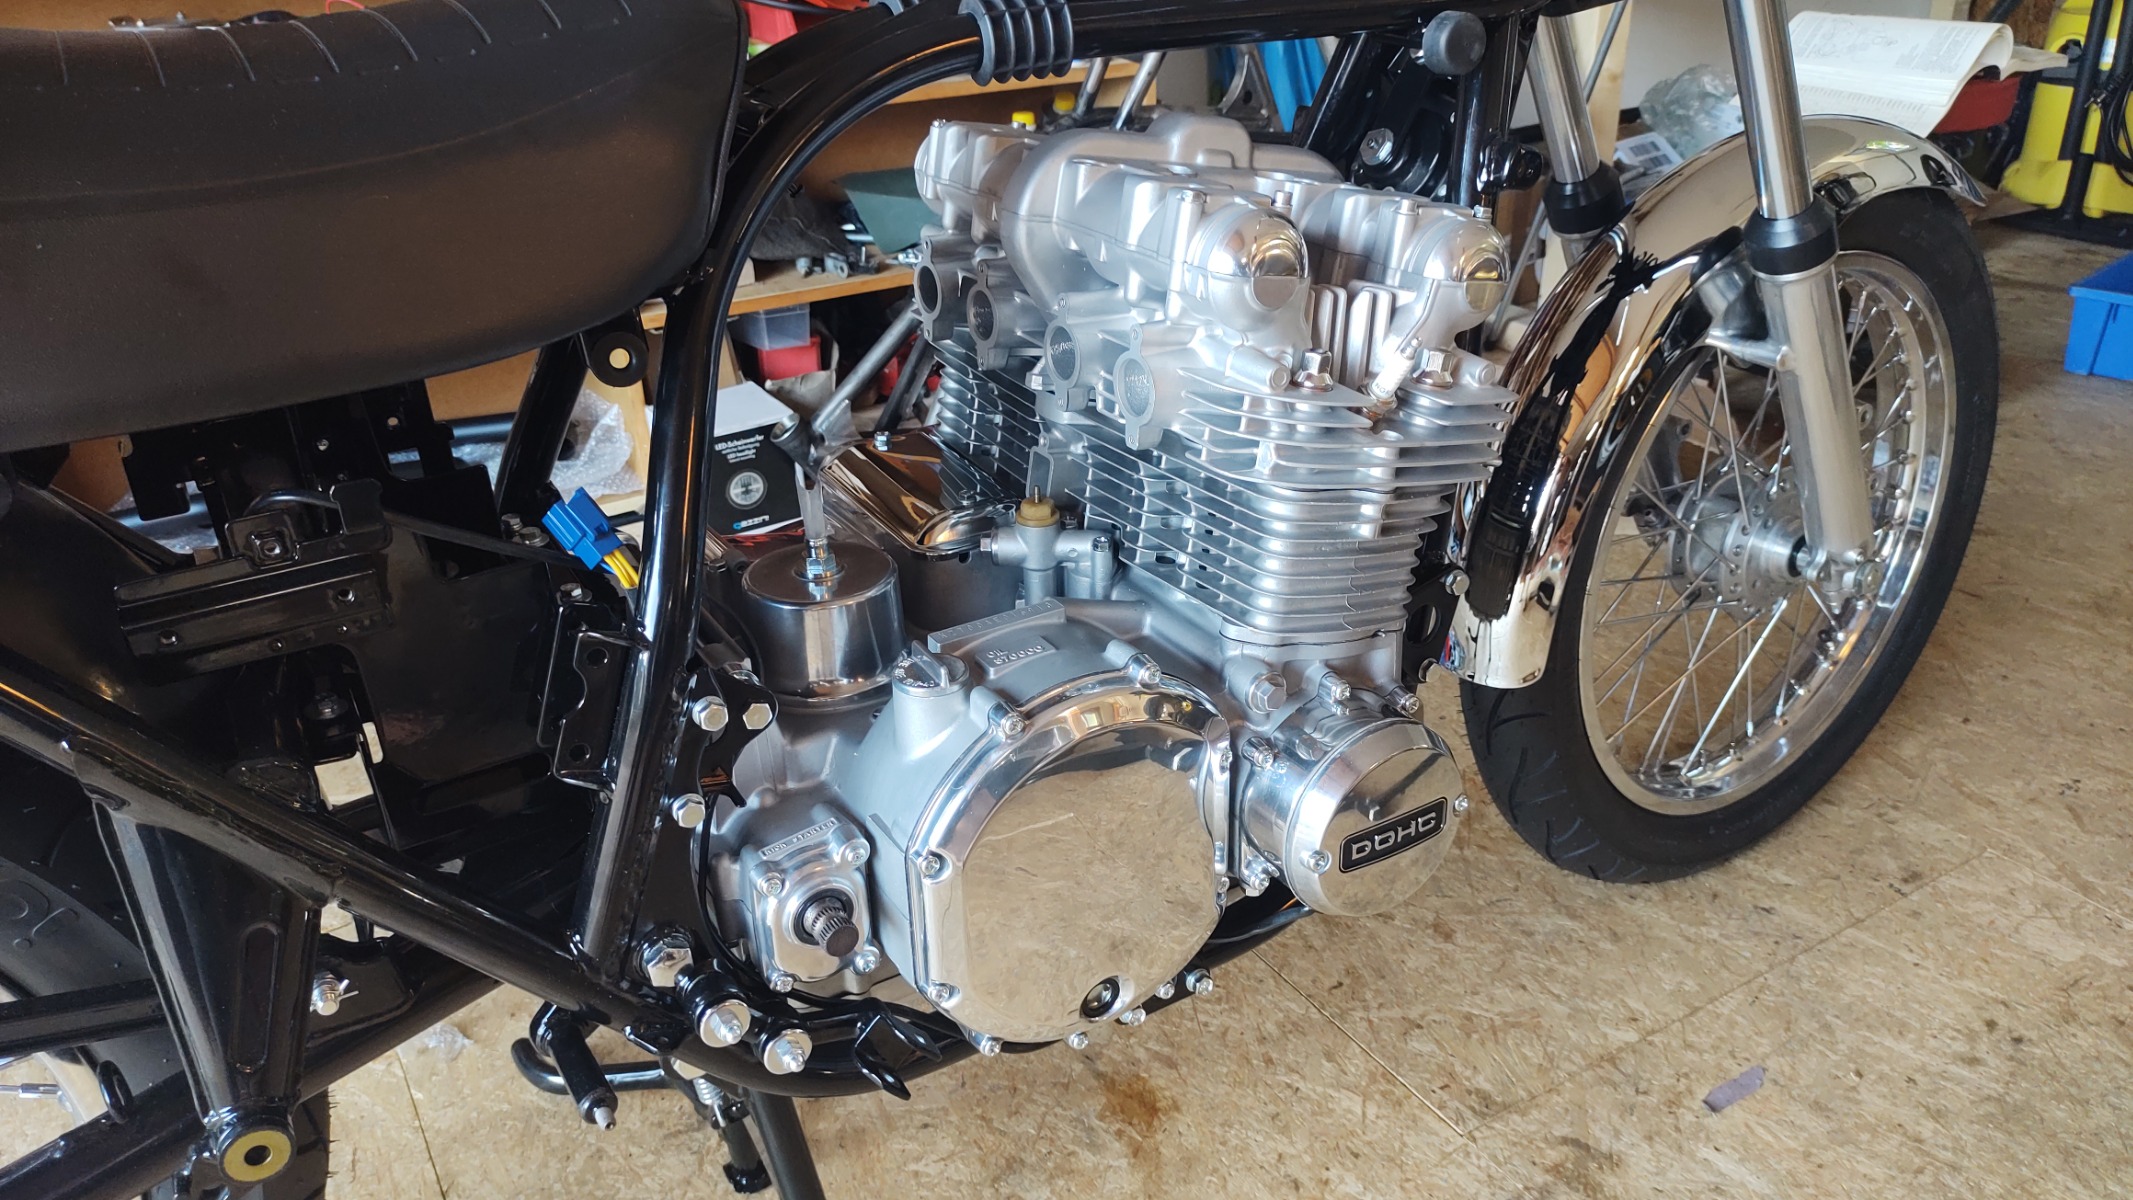

Threads have been repaired. Should hold for a while...
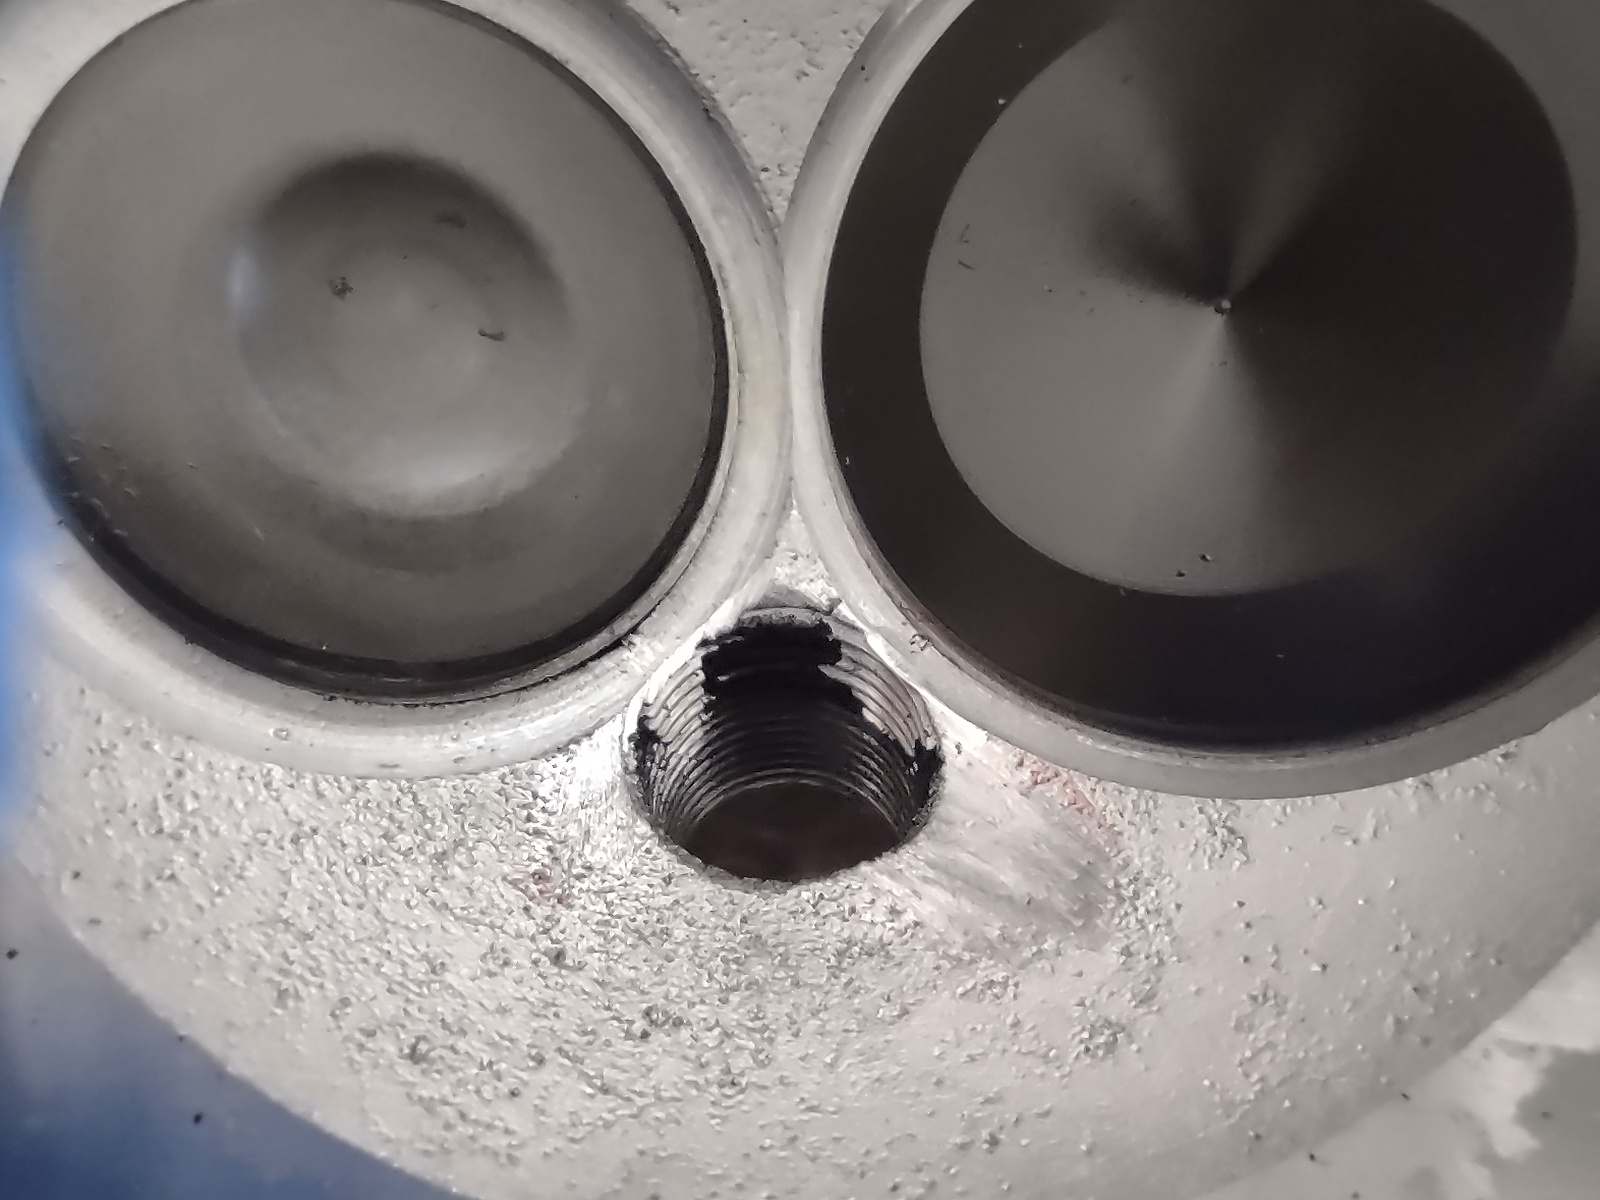
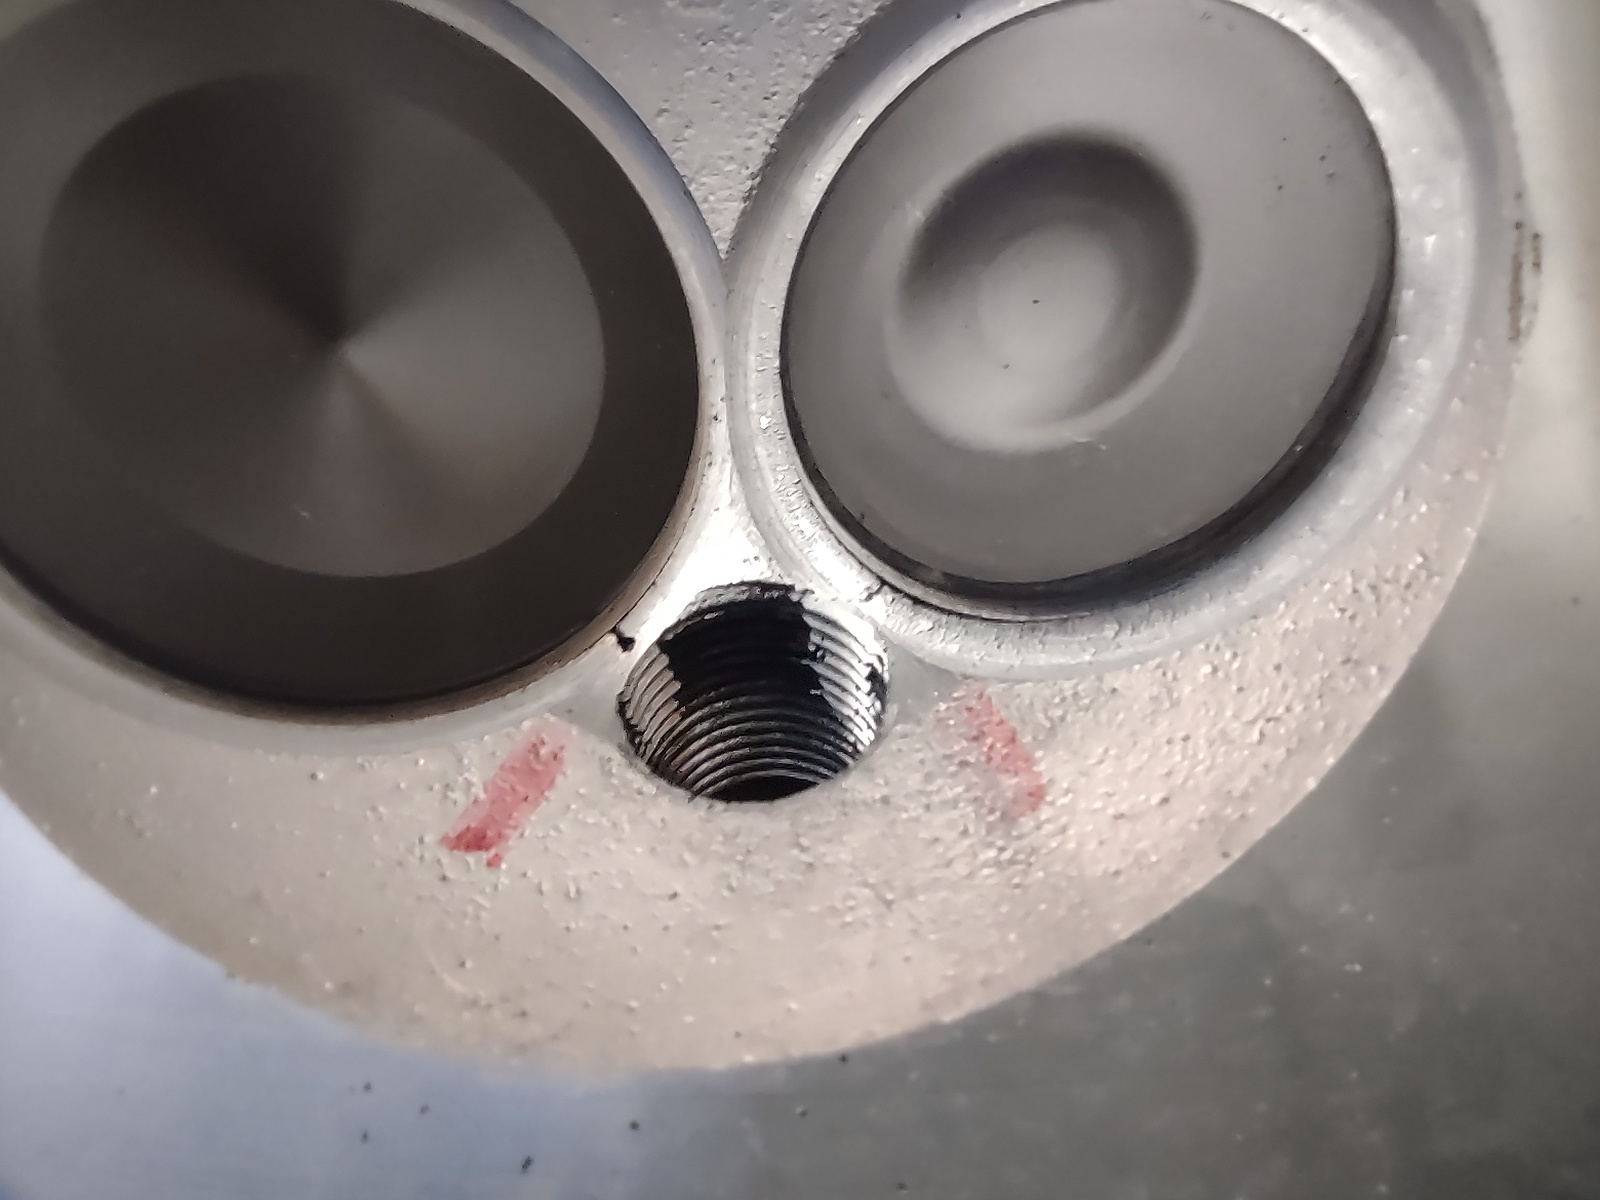
Threads have been repaired. Should hold for a while...
KZ1000 Restomod (
www.kzrider.com/forum/11-projects/614517-1977-kz1000-restomod
)
1977 KZ1000A1 ( www.kzrider.com/forum/11-projects/616901...-spare-parts-project )
1980 KZ750H ( kzrider.com/forum/11-projects/612054-kz750h-restoration )
2000 BMW F650GS
1977 KZ1000A1 ( www.kzrider.com/forum/11-projects/616901...-spare-parts-project )
1980 KZ750H ( kzrider.com/forum/11-projects/612054-kz750h-restoration )
2000 BMW F650GS
Last edit: 10 Aug 2022 09:35 by calum.
Please Log in or Create an account to join the conversation.
- calum
-
Topic Author
- Offline
- User
-
Registered
- Posts: 1144
- Thanks: 415
Re: KZ1000A1 Spare Parts Project
16 Aug 2022 14:40
I made an inquiry about getting the brake calipers and master cylinders powder coated. I asked if they could coat the middle of the discs as well. I wasn't sure if the heat would be a problem for the discs but they said they will be fine. Still thought I'd get a second (and third, ...) opinion here before I send them off. Will the discs be OK in the oven?
KZ1000 Restomod (
www.kzrider.com/forum/11-projects/614517-1977-kz1000-restomod
)
1977 KZ1000A1 ( www.kzrider.com/forum/11-projects/616901...-spare-parts-project )
1980 KZ750H ( kzrider.com/forum/11-projects/612054-kz750h-restoration )
2000 BMW F650GS
1977 KZ1000A1 ( www.kzrider.com/forum/11-projects/616901...-spare-parts-project )
1980 KZ750H ( kzrider.com/forum/11-projects/612054-kz750h-restoration )
2000 BMW F650GS
Please Log in or Create an account to join the conversation.
- Wookie58
-

- Away
- Moderator
-

Registered
- Posts: 6573
- Thanks: 4152
Re: KZ1000A1 Spare Parts Project
16 Aug 2022 15:08I would think they would be fine, I have painted them before without issue. The heat shouldn't harm the discs, under heavy braking they achieve extremely high temperatures very quickly. Don't coat the surface that sits against the wheel though as it will cause disc runout and could cause pad "knock back"I made an inquiry about getting the brake calipers and master cylinders powder coated. I asked if they could coat the middle of the discs as well. I wasn't sure if the heat would be a problem for the discs but they said they will be fine. Still thought I'd get a second (and third, ...) opinion here before I send them off. Will the discs be OK in the oven?
1982 KZ1000 Ltd
www.kzrider.com/forum/11-projects/617631...-82-begins?start=192
kzrider.com/forum/faq-wiki/616810-electr...-fault-finding-guide
www.kzrider.com/forum/11-projects/617631...-82-begins?start=192
kzrider.com/forum/faq-wiki/616810-electr...-fault-finding-guide
The following user(s) said Thank You: calum
Please Log in or Create an account to join the conversation.
- Scirocco
-
- Offline
- Premium Member
-

Registered
- Never change a running system
- Posts: 4397
- Thanks: 2262
Re: KZ1000A1 Spare Parts Project
16 Aug 2022 15:18 - 16 Aug 2022 15:23
The powder coating heat is only 200 C°/30 minutes, so you are on the save side for the steel rotor but the alu carrier...Who knows more about....?
My 1975 Z 1 B 900 Project
www.kzrider.com/forum/11-projects/605133...ears-deep-sleep-mode
www.kzrider.com/forum/11-projects/605133...ears-deep-sleep-mode
Last edit: 16 Aug 2022 15:23 by Scirocco.
The following user(s) said Thank You: calum
Please Log in or Create an account to join the conversation.
Moderators: Street Fighter LTD