
85 GPz750 Refresh Project
- Irish-Kawi
-
 Topic Author
- Offline
- User
-

Registered
- Posts: 498
- Thanks: 37
Re: 85 GPz750 Refresh Project
22 Mar 2016 18:24
Thanks Ness and Ed,
Guess so, I will say that the old filter was very very dirty. I tried blowing it out with compressed air and clean it as best as I could until I could get the replacement filter in so as y'all said seems it is more restrictive. I will also note that when I took the old filter out on my lunch break today and the foam on the filter was damp with some combination of some type of oil and some gas. It wasn't saturated but when I set the filter down on the porch it did leave a wet ring that stained it. I am not smart enough about this and new enough to this bike that I don't know if that is unexpected or if this is totally normal?
It was suggested that I try swapping the old filter back in and taking a short ride but I am working overtime tonight and tomorrow and won't have time to do this until either tomorrow at lunch again (maybe) or on Thursday. Will have to make a run to Pops to pick up some K&N filter oil since it is stored up there, no storage at all at my tiny tonwhome so have to store anything I need up there. If there are any other ideas please please share, this really confuses me as I am lost on how this would change it so dramatically :blink:
Brett
All the gear all the time!
1985 Kawasaki GPz 750 (ZX750-A3) 15,000 original miles www.kzrider.com/forum/11-projects/601230...z750-refresh-project
Father - Husband - Bourbonr - Rider
1985 Kawasaki GPz 750 (ZX750-A3) 15,000 original miles www.kzrider.com/forum/11-projects/601230...z750-refresh-project
Father - Husband - Bourbonr - Rider
Please Log in or Create an account to join the conversation.
- 650ed
-
- Offline
- User
-
Registered
- Posts: 15334
- Thanks: 2830
Re: 85 GPz750 Refresh Project
22 Mar 2016 19:42
K&N air filters are a bit odd. (BTW, I'm not anti K&N - I used their oil filters). The link below does a pretty good analysis of K&N and other air filters, although these are car air filters. The study found that K&N air filters let more dirt pass through than most others but also reach a point where they restrict air flow (not necessarily dirt flow) sooner. For sure, a new K&N air filter that has not been oiled will pass more air (and dirt) than a stock filter, so that may be why your engine is running poorly - probably a lean condition. Ed
www.nicoclub.com/archives/kn-vs-oem-filter.html
www.nicoclub.com/archives/kn-vs-oem-filter.html
1977 KZ650-C1 Original Owner - Stock (with additional invisible FIAMM horn)
Please Log in or Create an account to join the conversation.
- MadShad
-
- Offline
- User
-
Registered
- Posts: 232
- Thanks: 8
Re: 85 GPz750 Refresh Project
22 Mar 2016 20:05
Other more experienced members have already commented on this, the filter made your bike lean. I'm no mechanic and I'm also still learning about my bike and tuning in general, so take my advice for what it is.
A simple rule moving forward, if you take an engine that runs correctly and give it more air, you need to give it more fuel.
Your new filter flows more air, now you need more fuel. Don't expect to change one without the other.
If it were me I'd throw the stock filter back on and put some miles on the bike, from what you have said it ran pretty good.
Whatever you decide, I hope you enjoy the bike!
Shelbyville, Indiana. '80 KZ1000
No more of that talk or I'll put the leeches on you, understand?
No more of that talk or I'll put the leeches on you, understand?
Please Log in or Create an account to join the conversation.
- SWest
-

- Offline
- Sustaining Member
-

Registered
- 10 22 2014
- Posts: 23671
- Thanks: 2995
Re: 85 GPz750 Refresh Project
22 Mar 2016 21:34
Take a plug reading. That will tell you which way or the other.
Steve
Steve
Z1b1000 1975 Z1b
kzrider.com/forum/11-projects/598262-kz-...-will-it-live#672882
kzrider.com/forum/2-engine/597654-poser?start=240#704229
kzrider.com/forum/11-projects/598262-kz-...-will-it-live#672882
kzrider.com/forum/2-engine/597654-poser?start=240#704229
Please Log in or Create an account to join the conversation.
- Irish-Kawi
-
Topic Author
- Offline
- User
-
Registered
- Posts: 498
- Thanks: 37
Re: 85 GPz750 Refresh Project
23 Mar 2016 10:10
Thanks Gang and thank you Ed as well, that makes sense and I completely understand and agree that with more air then more fuel is needed and the bike is getting lean. From what I understand Kawasaki from the factory already made these about as lean as possible for emissions reasons so any changes even small ones may end up having bigger effects than expected. Thanks to Pops for explaining that to me and educating me on it.
The next step is to swap in the old filter again until the weather clears and I can get some time working with Pops to plug in the K&N and then put the sync tool on it and try adjusting the idle set screw and pilot circuit and see if we can retune properly without needing to re-jet. Time will tell and will figure it out, I am thinking about getting one of the foam "socks" (pre-filter) for the filter to help filter a bit more debris and make a touch more restrictive and protect the engine components more.
Brett
All the gear all the time!
1985 Kawasaki GPz 750 (ZX750-A3) 15,000 original miles www.kzrider.com/forum/11-projects/601230...z750-refresh-project
Father - Husband - Bourbonr - Rider
1985 Kawasaki GPz 750 (ZX750-A3) 15,000 original miles www.kzrider.com/forum/11-projects/601230...z750-refresh-project
Father - Husband - Bourbonr - Rider
Please Log in or Create an account to join the conversation.
- Irish-Kawi
-
Topic Author
- Offline
- User
-
Registered
- Posts: 498
- Thanks: 37
Re: 85 GPz750 Refresh Project - Phase Two Planning
23 Mar 2016 14:11
Well with the weather taking a complete SH!T and doing so much OT for work not having much time to do anything on the bike for the next several days or longer. Soooooo the brain has been super busy and grinding away at things when it has a free moment and was able to kinda compile my list of items/mods to do for Phase Two which I will start soon/already trying to start. Figured it might interest some here so here goes, feel free to skip to the end if you want as I know I am very long winded and talk way too damn much 
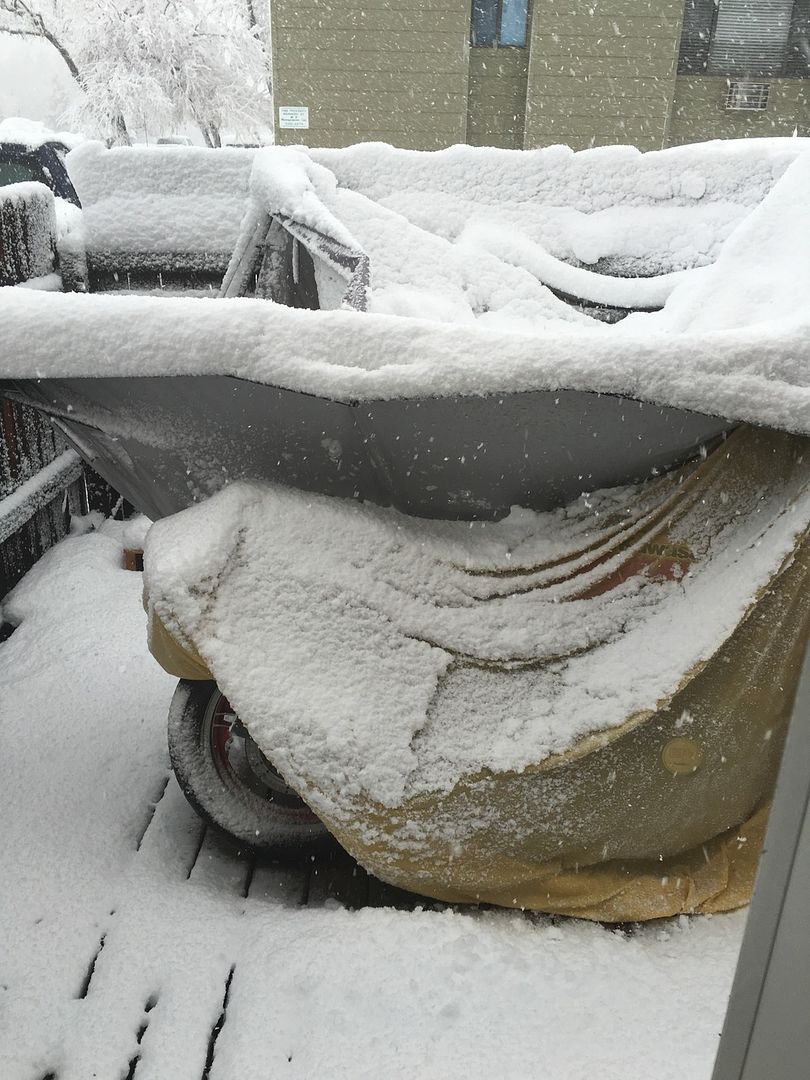
Here is the weather outside when I woke up, canopy I used to keep the bike out of the weather collapsed on top of the bike
Phase Two Modification List:
1. Create and fabricate my own custom aluminum fender eliminator kit (have a design in my mind)
A) Aluminum sheeting likely around 1/8th" thick
") Will install tail light with integrated turn signals to clean up the back end, really like this one would only like it more if it was LED and sequential but those are really really pricey:
Will install tail light with integrated turn signals to clean up the back end, really like this one would only like it more if it was LED and sequential but those are really really pricey:
2. Rebuild the Forks
A) Fork seals and bushings
Progressive Front Fork Springs 35/50 Spring Rate Part # 11-1103 - $87.30
C) Front Fork Brace Part # 23-0024 - $99.00
D) Anti-Dive Bypass Kit - $90.00
E) Sand and repaint the fork bodies
3. Upgrade Brake Lines
A) Locate and install stainless steel braided brake lines (need to locate a kit that is setup for no Anit-Dive setup)
Install new discs and new Verash pads (need to source and locate replacement discs that are drilled and if possible slotted)
C) Clean and paint front MC so it doesn't look like crud
4. Replace Rusted Stock Tank
A) Have replacement tank but need to clean inside of rust and restore it
Get dent pulled at paintless dent repair
C) Install C10 Petcock manual conversion kit - $65
5. Convert to 530 Chain and Sprockets
A) Order 530 Pitch 18T 6mm offset C/S sprocket steel and 530 pitch 45T rear sprocket aluminum from 7th Gear Designs
Purchase DID VX 530 X-Ring Chain 530VXGB-116 Gold X-Ring Amazon -$120.35
6. Install Aftermarket Rear Sets and Steering Damper
A) Tarozzi Rear Sets Folding Knurled Pegs Part # 19-0059 - $295.00
NHK Steering Damper Part # ODM3090E - $149.00
C) Steering Damper Mount Kit Part # O-16296N - $30.00
7. Check Timing and Valves and Cam Chain
A) Check valves
Check timing
C) Install Manual Cam Chain Tensioner kriegercamchaintensioners.com
8. Install K&N Air Filter and Properly tune carbs
A) Install Filter
Tune carbs, sync and if needed adjust pilot and re-jet if necessary
C) Pull apart stock mufflers and remove baffles and de-restrict as much as possible
9. Install ZR7S Mirrors
A) Purchase and locate 2001-2005 ZR7S mirrors and install these are nearly direct swap and require little to no modification - Partzilla $42/each Part #'s: 56001-1543 MIRROR-ASSY,LH and 56001-1544 MIRROR-ASSY,RH
10. Replace Windscreen
A) Maier Smoke GPz750 Replacement Windscreen Part # 00467 - $75.55
11. Replace Tires
A) Most likely will be going with Pirelli Sport Demons or Bridgestone BT45's but will search when the time comes
12. Replace Igniter and Ignition Coils
A) Locate and purchase and install 1995-1996 Kawasaki Ninja ZX6R Ignition Coils (need 2 of them) Part # 21121-1241 or 21121-1242 (left and ride hence two part numbers) - These are factory direct swaps with no mods, "hottest" stock ignition coils before going aftermarket
Locate and purchase and install 1986-1987 Kawasaki Ninja 1000R Igniter Part # 21119-1164 - This has a built in rev limiter at 10,600 rpms and is a 35 degree timing instead of the stock 40, gives better low end and mid range without sacrificing top end. Direct swap over with no mods, plug and play
13. Repaint Front Fender Plastic Rear Guard
A) Remove front fender, clean up and paint the black back plastic rear fender guard with bumper coat
I am sure that I will come up with more things and add it in, but so far thats the list of Mods for Phase Two to be called completed. Slowly starting to work on each line item as money and time allows, not a bad way to do it I think")
Brett
Here is the weather outside when I woke up, canopy I used to keep the bike out of the weather collapsed on top of the bike

Phase Two Modification List:
1. Create and fabricate my own custom aluminum fender eliminator kit (have a design in my mind)
A) Aluminum sheeting likely around 1/8th" thick
Will install tail light with integrated turn signals to clean up the back end, really like this one would only like it more if it was LED and sequential but those are really really pricey:2. Rebuild the Forks
A) Fork seals and bushings
Progressive Front Fork Springs 35/50 Spring Rate Part # 11-1103 - $87.30C) Front Fork Brace Part # 23-0024 - $99.00
D) Anti-Dive Bypass Kit - $90.00
E) Sand and repaint the fork bodies
3. Upgrade Brake Lines
A) Locate and install stainless steel braided brake lines (need to locate a kit that is setup for no Anit-Dive setup)
Install new discs and new Verash pads (need to source and locate replacement discs that are drilled and if possible slotted)C) Clean and paint front MC so it doesn't look like crud
4. Replace Rusted Stock Tank
A) Have replacement tank but need to clean inside of rust and restore it
Get dent pulled at paintless dent repairC) Install C10 Petcock manual conversion kit - $65
5. Convert to 530 Chain and Sprockets
A) Order 530 Pitch 18T 6mm offset C/S sprocket steel and 530 pitch 45T rear sprocket aluminum from 7th Gear Designs
Purchase DID VX 530 X-Ring Chain 530VXGB-116 Gold X-Ring Amazon -$120.356. Install Aftermarket Rear Sets and Steering Damper
A) Tarozzi Rear Sets Folding Knurled Pegs Part # 19-0059 - $295.00
NHK Steering Damper Part # ODM3090E - $149.00C) Steering Damper Mount Kit Part # O-16296N - $30.00
7. Check Timing and Valves and Cam Chain
A) Check valves
Check timingC) Install Manual Cam Chain Tensioner kriegercamchaintensioners.com
8. Install K&N Air Filter and Properly tune carbs
A) Install Filter
Tune carbs, sync and if needed adjust pilot and re-jet if necessaryC) Pull apart stock mufflers and remove baffles and de-restrict as much as possible
9. Install ZR7S Mirrors
A) Purchase and locate 2001-2005 ZR7S mirrors and install these are nearly direct swap and require little to no modification - Partzilla $42/each Part #'s: 56001-1543 MIRROR-ASSY,LH and 56001-1544 MIRROR-ASSY,RH
10. Replace Windscreen
A) Maier Smoke GPz750 Replacement Windscreen Part # 00467 - $75.55
11. Replace Tires
A) Most likely will be going with Pirelli Sport Demons or Bridgestone BT45's but will search when the time comes
12. Replace Igniter and Ignition Coils
A) Locate and purchase and install 1995-1996 Kawasaki Ninja ZX6R Ignition Coils (need 2 of them) Part # 21121-1241 or 21121-1242 (left and ride hence two part numbers) - These are factory direct swaps with no mods, "hottest" stock ignition coils before going aftermarket
Locate and purchase and install 1986-1987 Kawasaki Ninja 1000R Igniter Part # 21119-1164 - This has a built in rev limiter at 10,600 rpms and is a 35 degree timing instead of the stock 40, gives better low end and mid range without sacrificing top end. Direct swap over with no mods, plug and play13. Repaint Front Fender Plastic Rear Guard
A) Remove front fender, clean up and paint the black back plastic rear fender guard with bumper coat
I am sure that I will come up with more things and add it in, but so far thats the list of Mods for Phase Two to be called completed. Slowly starting to work on each line item as money and time allows, not a bad way to do it I think
Brett
All the gear all the time!
1985 Kawasaki GPz 750 (ZX750-A3) 15,000 original miles www.kzrider.com/forum/11-projects/601230...z750-refresh-project
Father - Husband - Bourbonr - Rider
1985 Kawasaki GPz 750 (ZX750-A3) 15,000 original miles www.kzrider.com/forum/11-projects/601230...z750-refresh-project
Father - Husband - Bourbonr - Rider
Please Log in or Create an account to join the conversation.
- larriken
-
- Offline
- User
-
Registered
- Posts: 556
- Thanks: 61
Please Log in or Create an account to join the conversation.
- SWest
-
- Offline
- Sustaining Member
-
Registered
- 10 22 2014
- Posts: 23671
- Thanks: 2995
Re: 85 GPz750 Refresh Project
25 Mar 2016 06:04
Poor thing.
Steve
Steve
Z1b1000 1975 Z1b
kzrider.com/forum/11-projects/598262-kz-...-will-it-live#672882
kzrider.com/forum/2-engine/597654-poser?start=240#704229
kzrider.com/forum/11-projects/598262-kz-...-will-it-live#672882
kzrider.com/forum/2-engine/597654-poser?start=240#704229
Please Log in or Create an account to join the conversation.
- Irish-Kawi
-
Topic Author
- Offline
- User
-
Registered
- Posts: 498
- Thanks: 37
Re: 85 GPz750 Refresh Project
25 Mar 2016 10:07
Yeah it kinda sucked the big one lol, snowed even heavier and more than that pic showed for the next few hours after it, we ended up getting about 14-16" of snow in certain places and it was really really wet and heavy snow, hence why everything collapsed. Ended up digging Saya out as well as the car and house but trashed my back in doing so and couldn't take a close look and inspection to see what if any damage happened to her. Will see what I can find but I doubt much if any damage occurred, if it did I believe it would be isolated to the mirror and MAYYYYYBE the windscreen since that is where it landed.
Brett
Brett
All the gear all the time!
1985 Kawasaki GPz 750 (ZX750-A3) 15,000 original miles www.kzrider.com/forum/11-projects/601230...z750-refresh-project
Father - Husband - Bourbonr - Rider
1985 Kawasaki GPz 750 (ZX750-A3) 15,000 original miles www.kzrider.com/forum/11-projects/601230...z750-refresh-project
Father - Husband - Bourbonr - Rider
Please Log in or Create an account to join the conversation.
- StreetfighterKz
-

- Offline
- User
-
Registered
- Posts: 1602
- Thanks: 199
Re: 85 GPz750 Refresh Project - Phase Two Planning
27 Mar 2016 04:26Irish-Kawi wrote: C) Install C10 Petcock manual conversion kit - $65
Brett,
Can you explain what this is? Is the C10 referring to. Zg1000 Concours fuel tap? My stock vacuum petcock is leaking and I wouldn't mind a manual one for a replacement.
Thanks.
Later, Doug
1978 z1000 Streetfighter
1976 z900 Stripfighter
1978 Z1R (roller)
1979 z650 Resto-Mod
1983 Gpz750 Resto-Mod
2018 Z900RS
1976 z900 Stripfighter
1978 Z1R (roller)
1979 z650 Resto-Mod
1983 Gpz750 Resto-Mod
2018 Z900RS
Please Log in or Create an account to join the conversation.
- Irish-Kawi
-
Topic Author
- Offline
- User
-
Registered
- Posts: 498
- Thanks: 37
Re: 85 GPz750 Refresh Project - Phase Two Planning
28 Mar 2016 09:12StreetfighterKz wrote:Irish-Kawi wrote: C) Install C10 Petcock manual conversion kit - $65
Brett,
Can you explain what this is? Is the C10 referring to. Zg1000 Concours fuel tap? My stock vacuum petcock is leaking and I wouldn't mind a manual one for a replacement.
Thanks.
Later, Doug
Hey Doug,
Yeah happy to help out with this and can certainly answer your questions on it. You are correct in the sense that I was making reference to the ZG1000 petcock to a degree. There is a kit for ZG1000's from Murphy's kits that convert the vacuum petcock to a manual one. On my GPz the petcock bolt hole spacing is 43mm center to center, it just so happens that the bolt hole spacing for the ZG1000 is the same, as is the 79' SR650 (Pops has one so he and I were working on his too and contemplating this). In the past the downside of converting a vacuum petcock to a manual one is that you lose the functionality of the Reserve. I was worried about that so I contacted the owner of Murph's and he confirmed that the reserve functionality is retained with this kit (at least according to him, I have yet to install so can't confirm one way or another yet). This kit is meant for the C10's but should be compatible with any that are 43mm bolt hole spacing in theory at least, the only thing that would need to be altered and adapted is that this kit includes a billet aluminum petcock "face" that replaces the stamped steel one that has On, Prime and Reserve on it. The two mounting points on the face are clocked differently on the C10's than on my GPz, so will have to drill new mounting points that are correctly clocked. But based on the reading and research I did the internal components are the same, so the conversion kit should work fine.
I did a homemade conversion on mine already of disassembling it and buffing and cleaning everything and then stretching the spring to twice its normal length and reinstalling and plugging the vacuum ports. It does work, but when it is cold out the seals shrink enough (cleaned them did not replace them so kinda expected this) to let fuel through and fills the cylinders and creates a hydrolock situation. This kit should fi the cold leak issue for me too at least that is my suspicion.
Here is a link to the kit, I like the price, like what it does, like that it retains the reserve supposedly, and really like how it cleans up the petcock look and is a visual upgrade as well:
www.murphskits.com/product_info.php?cPath=1_94&products_id=483
If you have any other remaining questions or concerns, don't hesitate to reach out I tried to be as thorough as I could with details. This is one of the few times where my being longwinded may be helpful and not tedious HAHAHAHA
Brett
All the gear all the time!
1985 Kawasaki GPz 750 (ZX750-A3) 15,000 original miles www.kzrider.com/forum/11-projects/601230...z750-refresh-project
Father - Husband - Bourbonr - Rider
1985 Kawasaki GPz 750 (ZX750-A3) 15,000 original miles www.kzrider.com/forum/11-projects/601230...z750-refresh-project
Father - Husband - Bourbonr - Rider
Please Log in or Create an account to join the conversation.
- Irish-Kawi
-
Topic Author
- Offline
- User
-
Registered
- Posts: 498
- Thanks: 37
Re: 85 GPz750 Refresh Project
28 Mar 2016 09:23
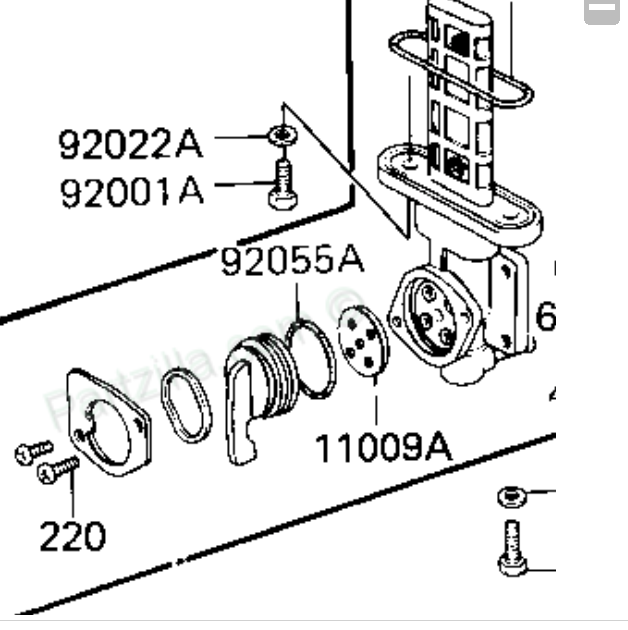
For the petcock "face" clocking here is what I am referring to. This is the Partzilla diagram of my 85 GPz750 petcock, note the clocking for the two mounting points for the petcock "Face" roughly clocked at 2 pm and 7pm positions.
Here is the "face" clocking for a 2001 ZG1000 petcock, roughly at 3pm and 9pm positions:
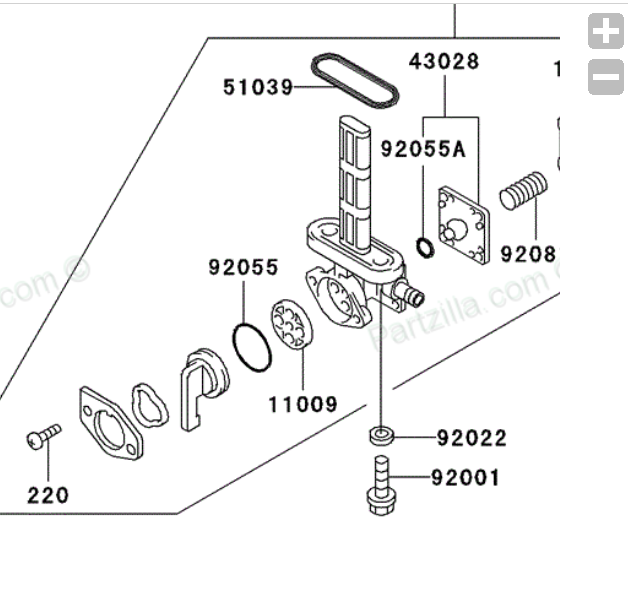
Hope this clarifies and helps others too, I would not have stumbled upon this or have had any idea where to start without Martin CSR's help and several others including TexasKZ (sp?), so I do not claim any of this as my own and I would be remiss not to give credit where credit is due.
Thanks,
Brett
All the gear all the time!
1985 Kawasaki GPz 750 (ZX750-A3) 15,000 original miles www.kzrider.com/forum/11-projects/601230...z750-refresh-project
Father - Husband - Bourbonr - Rider
1985 Kawasaki GPz 750 (ZX750-A3) 15,000 original miles www.kzrider.com/forum/11-projects/601230...z750-refresh-project
Father - Husband - Bourbonr - Rider
Please Log in or Create an account to join the conversation.
Moderators: Street Fighter LTD