
KZ650 Sleeper Build (KZ1000 engine transplant)
- Injected
-
 Topic Author
- Offline
- User
-

Registered
- Posts: 1726
- Thanks: 1222
Re: KZ650 Sleeper Build (KZ1000 engine transplant)
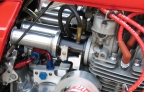
08 Feb 2024 09:48 - 08 Feb 2024 09:50Yes, I realize the tail pipe end is not ideal placement but this is the same arrangement I have seen used on Dyno tuning in motorcycle and car applications. My DFI build has the bung welded on the collector (4 into 1)I have an AFR meter and lambda probe which was going to be a fixture but there is no room in the nosecone for it so I will use it as a tuning aid and remove once happy with the tune (I will weld a lambda insert into the exhaust before coating which can be sealed with a plug when not in use so that if I decide to experiment with EFI in the future the fitting will already be there so I don't have to re-coat the exhaust collector)
FYI: the O2 sensor ideally wants to be in the collector as it only starts to work above 300 degrees
I can also put a much longer piece of tube that reaches deeper into the muffler. The last time one of my bikes was on the Dyno the tube was about 2 feet long.
I sort of copied this tail pipe attachment :
Exhaust comes in then dumps out the bottom, mine has a internal restrictor plate to slow down the flow just like a muffler. I built mine for a few dollars, that thing is $100.
I had it working years ago, the only issue was my gauge was crap.
1978 KZ650B2 w 1197cc Z1 engine
1977 KZ650B1 w 750cc Spectre engine
1979 KZ650C3 w 831cc Hot Rod engine
1978 KZ650C2 w 762cc DFI project
1977 KZ650C1 stock restoration project
1978 KZ650B2 modified project
1978 KZ650B2 Injected Drag 831cc
1981 Z50R Honda tow bike
1977 KZ650B1 w 750cc Spectre engine
1979 KZ650C3 w 831cc Hot Rod engine
1978 KZ650C2 w 762cc DFI project
1977 KZ650C1 stock restoration project
1978 KZ650B2 modified project
1978 KZ650B2 Injected Drag 831cc
1981 Z50R Honda tow bike
Last edit: 08 Feb 2024 09:50 by Injected. Reason: info
The following user(s) said Thank You: Wookie58
Please Log in or Create an account to join the conversation.
- Injected
-
Topic Author
- Offline
- User
-
Registered
- Posts: 1726
- Thanks: 1222
Re: KZ650 Sleeper Build (KZ1000 engine transplant)
10 Feb 2024 13:04
I was able to confirm the used AFR gauge is working properly by doing a bench test with and without the sensor attached.
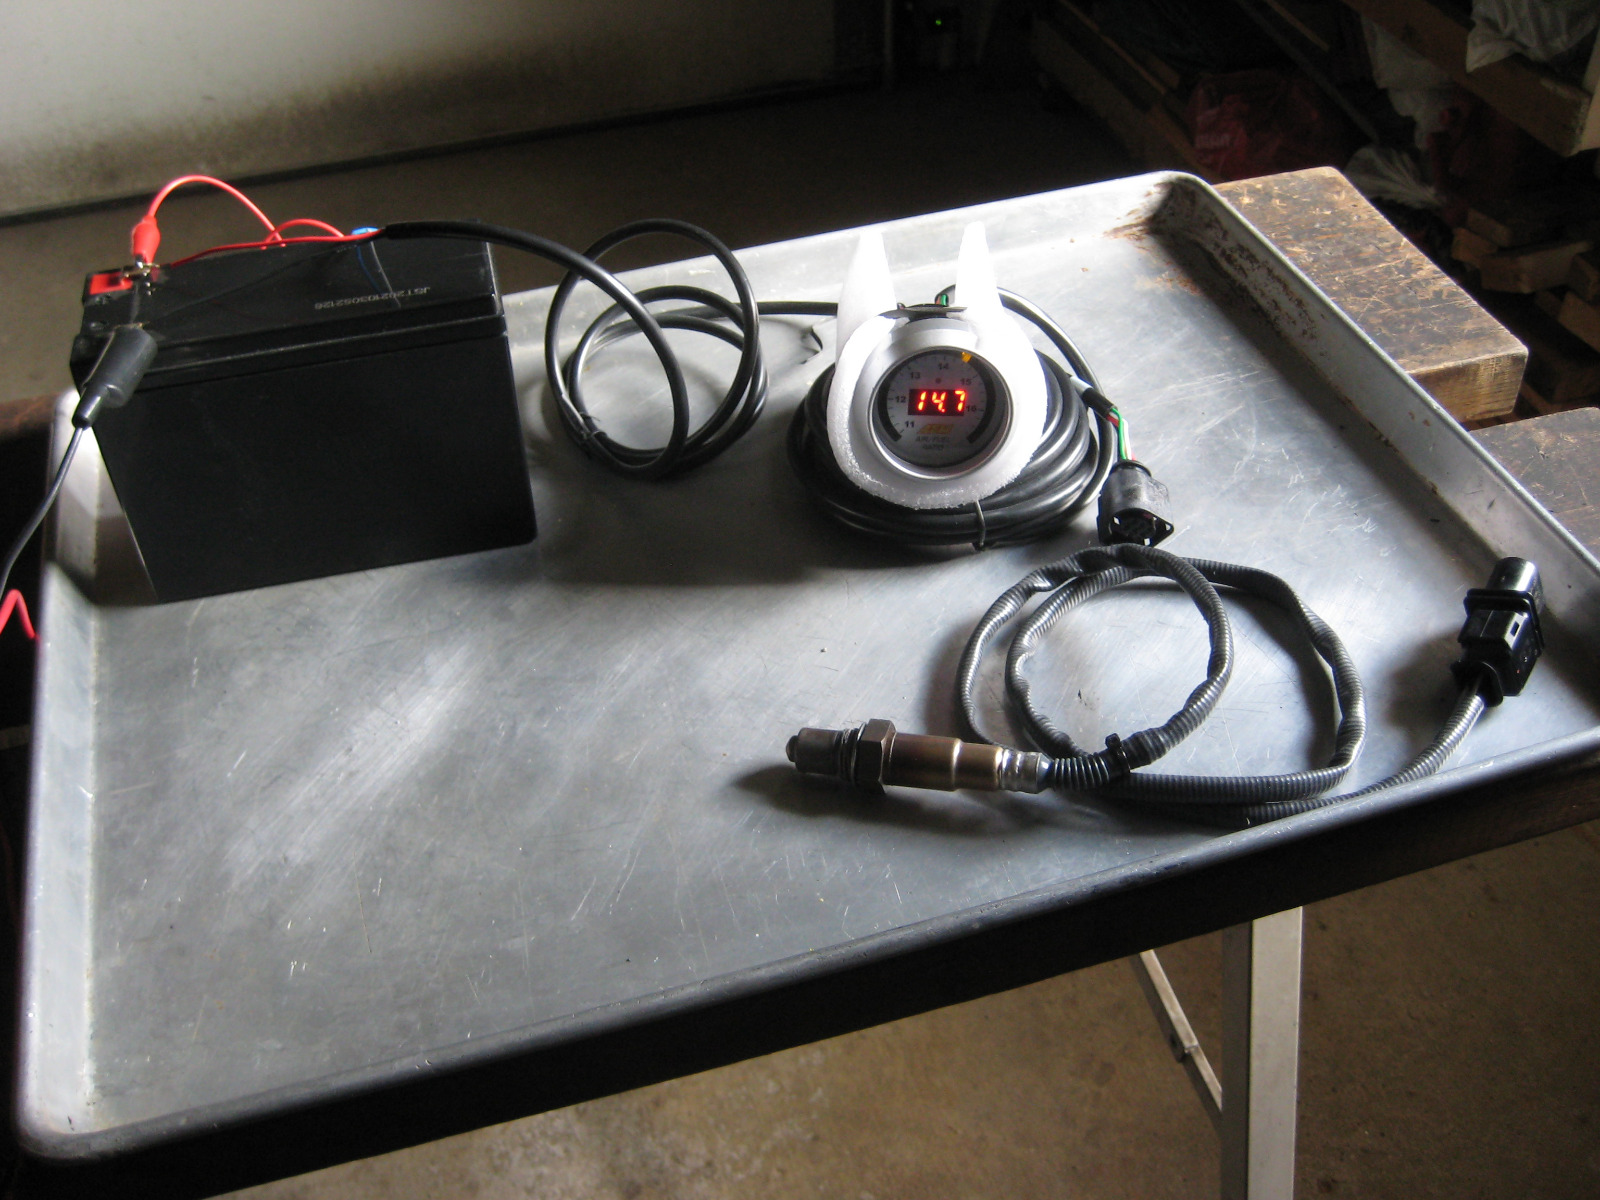
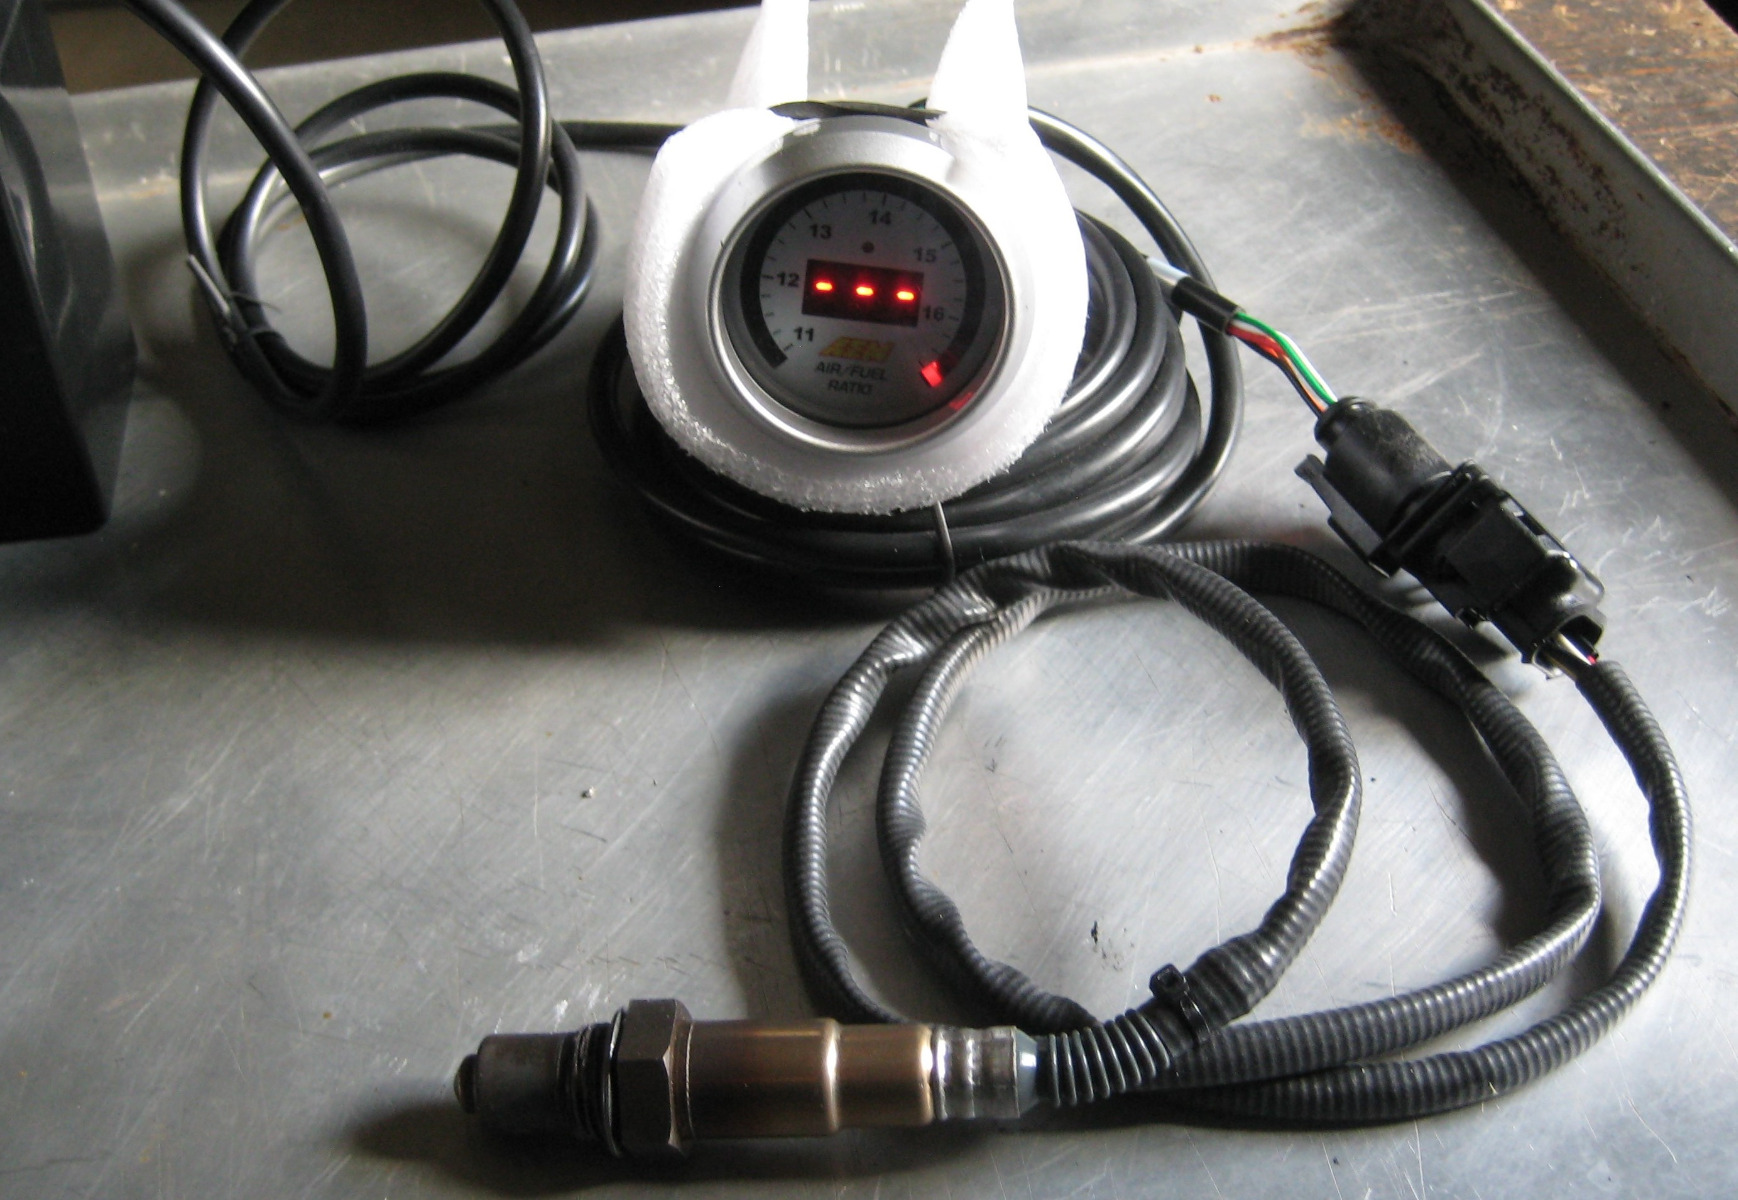
I am going to use a ABS plumbing union to make the gauge cover, the back will be ABS sheet stock. The cheapest cover I could find was over $30 shipped, I can make one for nothing.
I also found some black Delrin plastic in my scrap bin that will be perfect for the mounting base.
I am going to use a ABS plumbing union to make the gauge cover, the back will be ABS sheet stock. The cheapest cover I could find was over $30 shipped, I can make one for nothing.
I also found some black Delrin plastic in my scrap bin that will be perfect for the mounting base.
1978 KZ650B2 w 1197cc Z1 engine
1977 KZ650B1 w 750cc Spectre engine
1979 KZ650C3 w 831cc Hot Rod engine
1978 KZ650C2 w 762cc DFI project
1977 KZ650C1 stock restoration project
1978 KZ650B2 modified project
1978 KZ650B2 Injected Drag 831cc
1981 Z50R Honda tow bike
1977 KZ650B1 w 750cc Spectre engine
1979 KZ650C3 w 831cc Hot Rod engine
1978 KZ650C2 w 762cc DFI project
1977 KZ650C1 stock restoration project
1978 KZ650B2 modified project
1978 KZ650B2 Injected Drag 831cc
1981 Z50R Honda tow bike
The following user(s) said Thank You: Wookie58
Please Log in or Create an account to join the conversation.
- Injected
-
Topic Author
- Offline
- User
-
Registered
- Posts: 1726
- Thanks: 1222
Re: KZ650 Sleeper Build (KZ1000 engine transplant)
11 Feb 2024 10:34
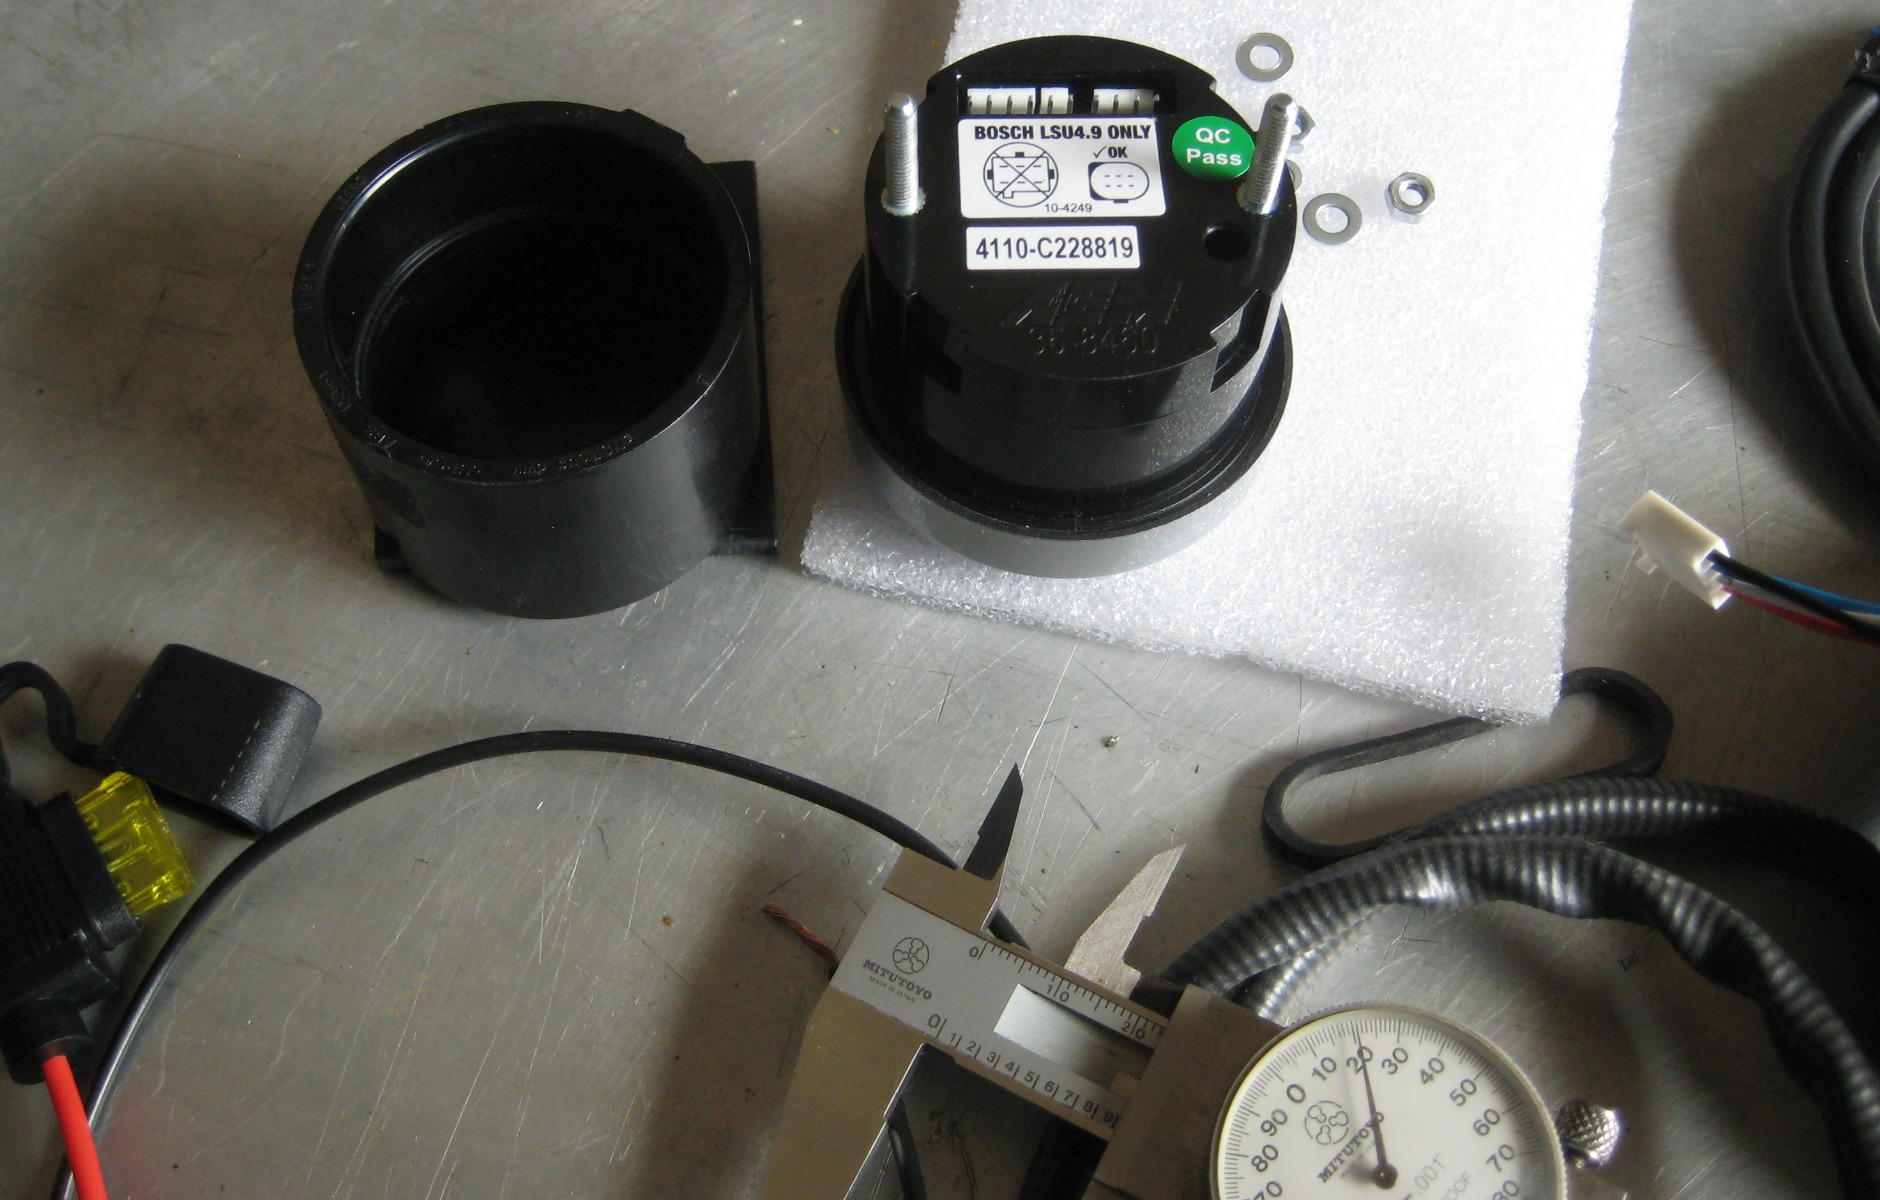
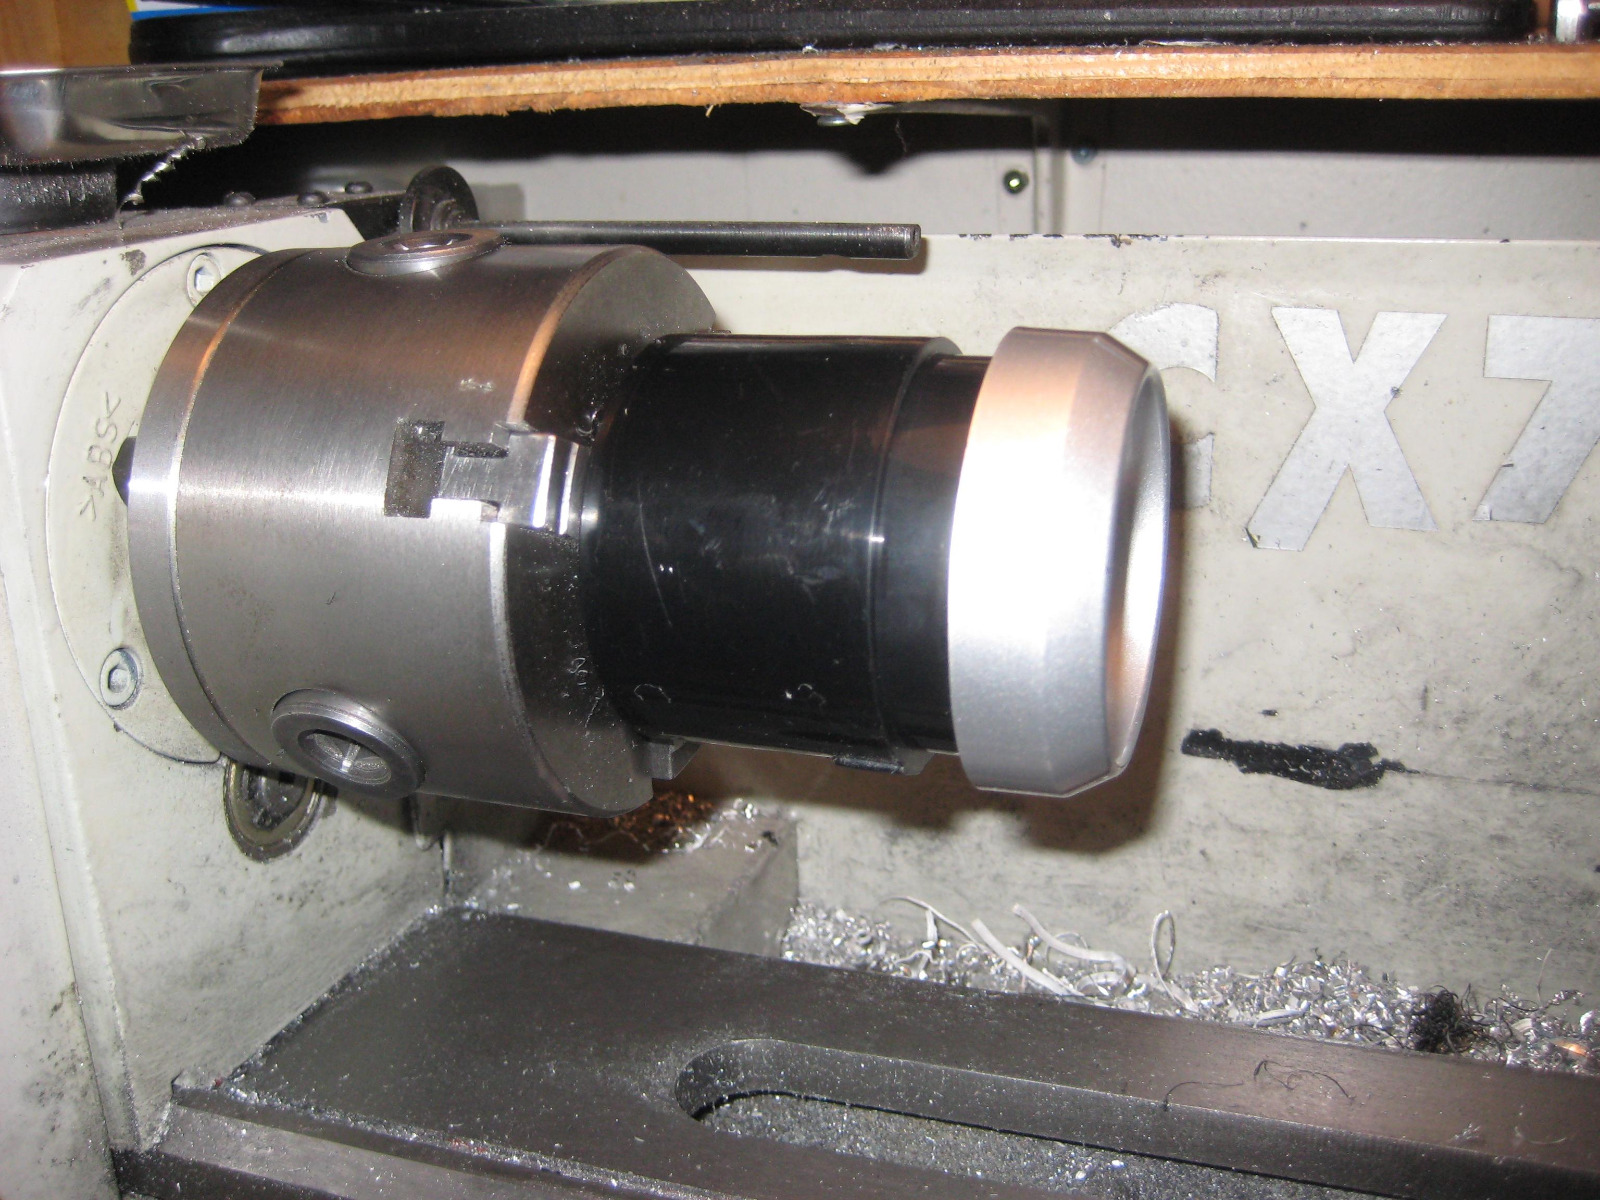
That plumbing union was exactly the right OD I needed to cover the gauge body, so all I need to do is trim the length and bore the ID.
I designed a back for it with a lip so I can join it with some RTV because getting the plugs onto the back is going to require something that can be easily taken apart.
It will be sandwiched in with some rubber mounts on the studs so it can float a bit. The studs and lock nuts will pull it all down onto the mount bracket.
I also need to make a cover for where the wires exit, found some .040" thick aluminum sheet that is already powder coated black (old drag bike dash) Easy enough to cut with tin snips after I drill some holes in it.
The hardest thing to make for it will be the angled mount bracket, that's going to require some milling machine work.Once its all assembled I can cover any gaps with black RTV to keep any moisture out.

If I bought a cheap Chinese gauge pod I would have had to make extensive mods anyways. By designing and building the parts I can control the finished product better.
I designed a back for it with a lip so I can join it with some RTV because getting the plugs onto the back is going to require something that can be easily taken apart.
It will be sandwiched in with some rubber mounts on the studs so it can float a bit. The studs and lock nuts will pull it all down onto the mount bracket.
I also need to make a cover for where the wires exit, found some .040" thick aluminum sheet that is already powder coated black (old drag bike dash) Easy enough to cut with tin snips after I drill some holes in it.
The hardest thing to make for it will be the angled mount bracket, that's going to require some milling machine work.Once its all assembled I can cover any gaps with black RTV to keep any moisture out.
If I bought a cheap Chinese gauge pod I would have had to make extensive mods anyways. By designing and building the parts I can control the finished product better.
1978 KZ650B2 w 1197cc Z1 engine
1977 KZ650B1 w 750cc Spectre engine
1979 KZ650C3 w 831cc Hot Rod engine
1978 KZ650C2 w 762cc DFI project
1977 KZ650C1 stock restoration project
1978 KZ650B2 modified project
1978 KZ650B2 Injected Drag 831cc
1981 Z50R Honda tow bike
1977 KZ650B1 w 750cc Spectre engine
1979 KZ650C3 w 831cc Hot Rod engine
1978 KZ650C2 w 762cc DFI project
1977 KZ650C1 stock restoration project
1978 KZ650B2 modified project
1978 KZ650B2 Injected Drag 831cc
1981 Z50R Honda tow bike
The following user(s) said Thank You: howardhb, Wookie58
Please Log in or Create an account to join the conversation.
- Injected
-
Topic Author
- Offline
- User
-
Registered
- Posts: 1726
- Thanks: 1222
Re: KZ650 Sleeper Build (KZ1000 engine transplant)
15 Feb 2024 16:46
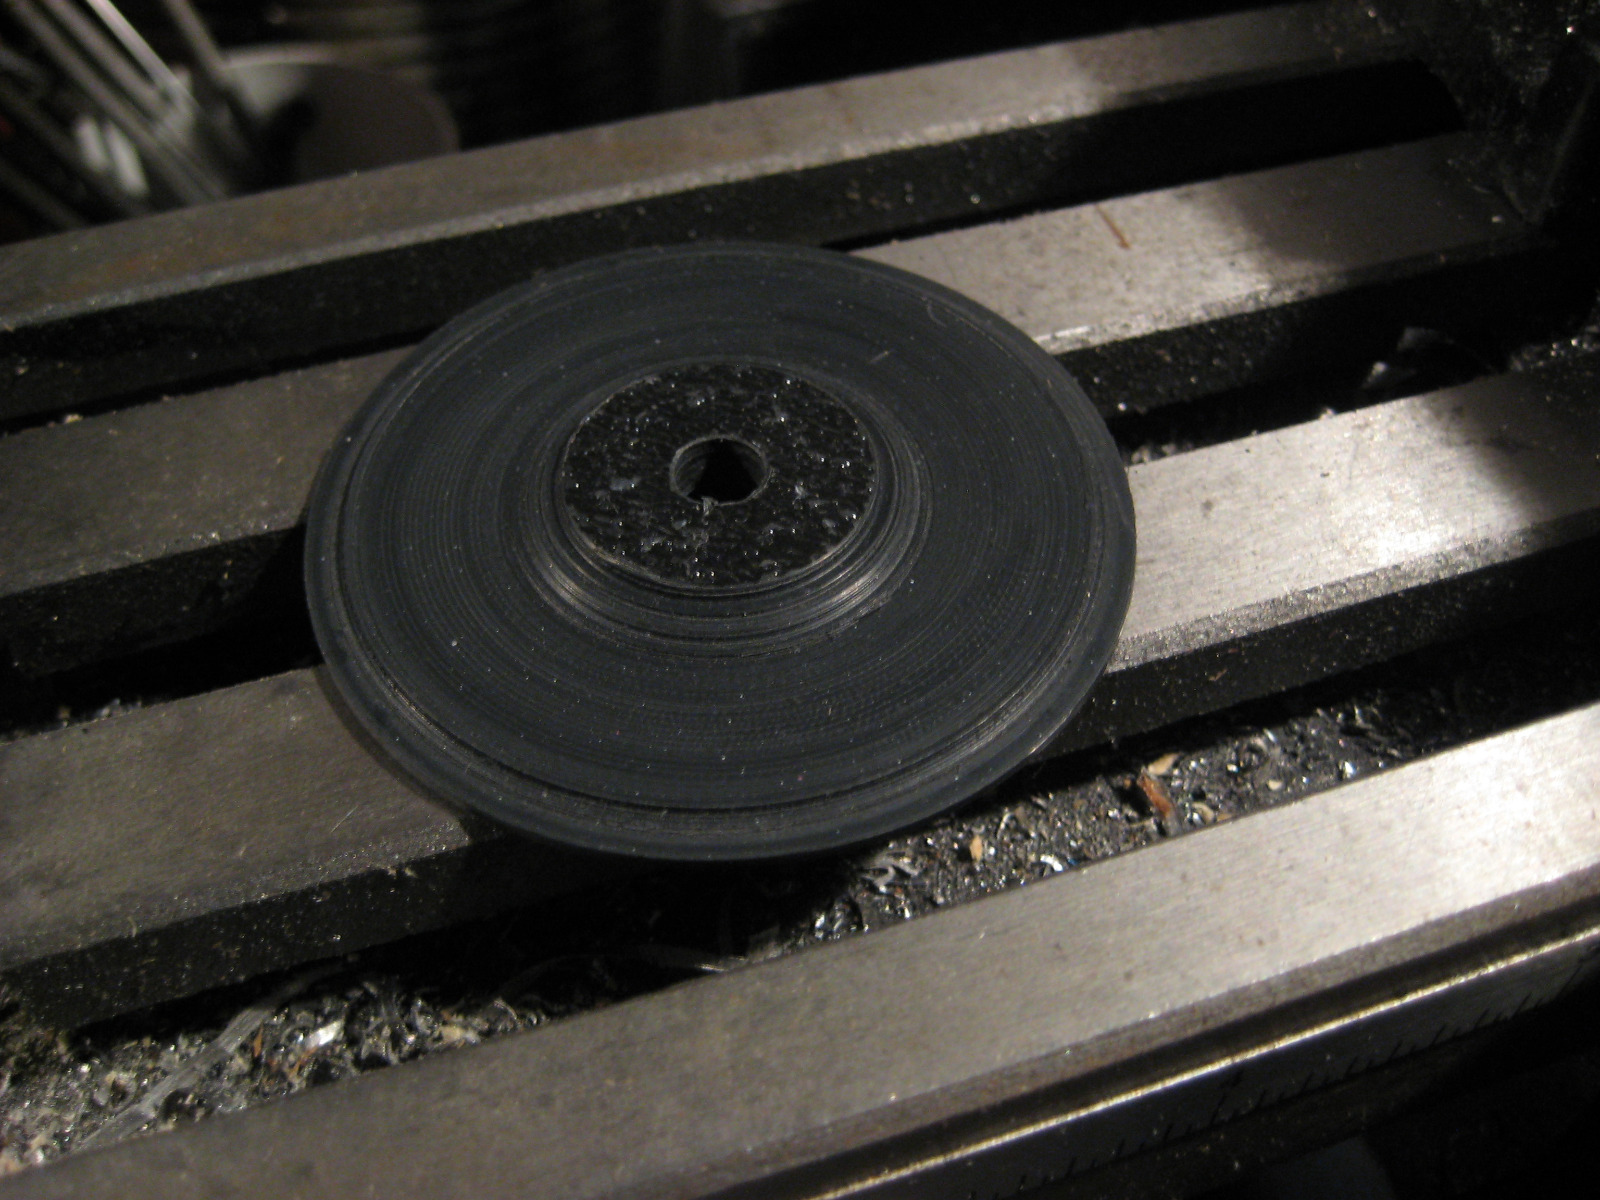
That ABS plumbing pipe cuts like butter, hard to chuck once it gets thin but the boring went quickly.
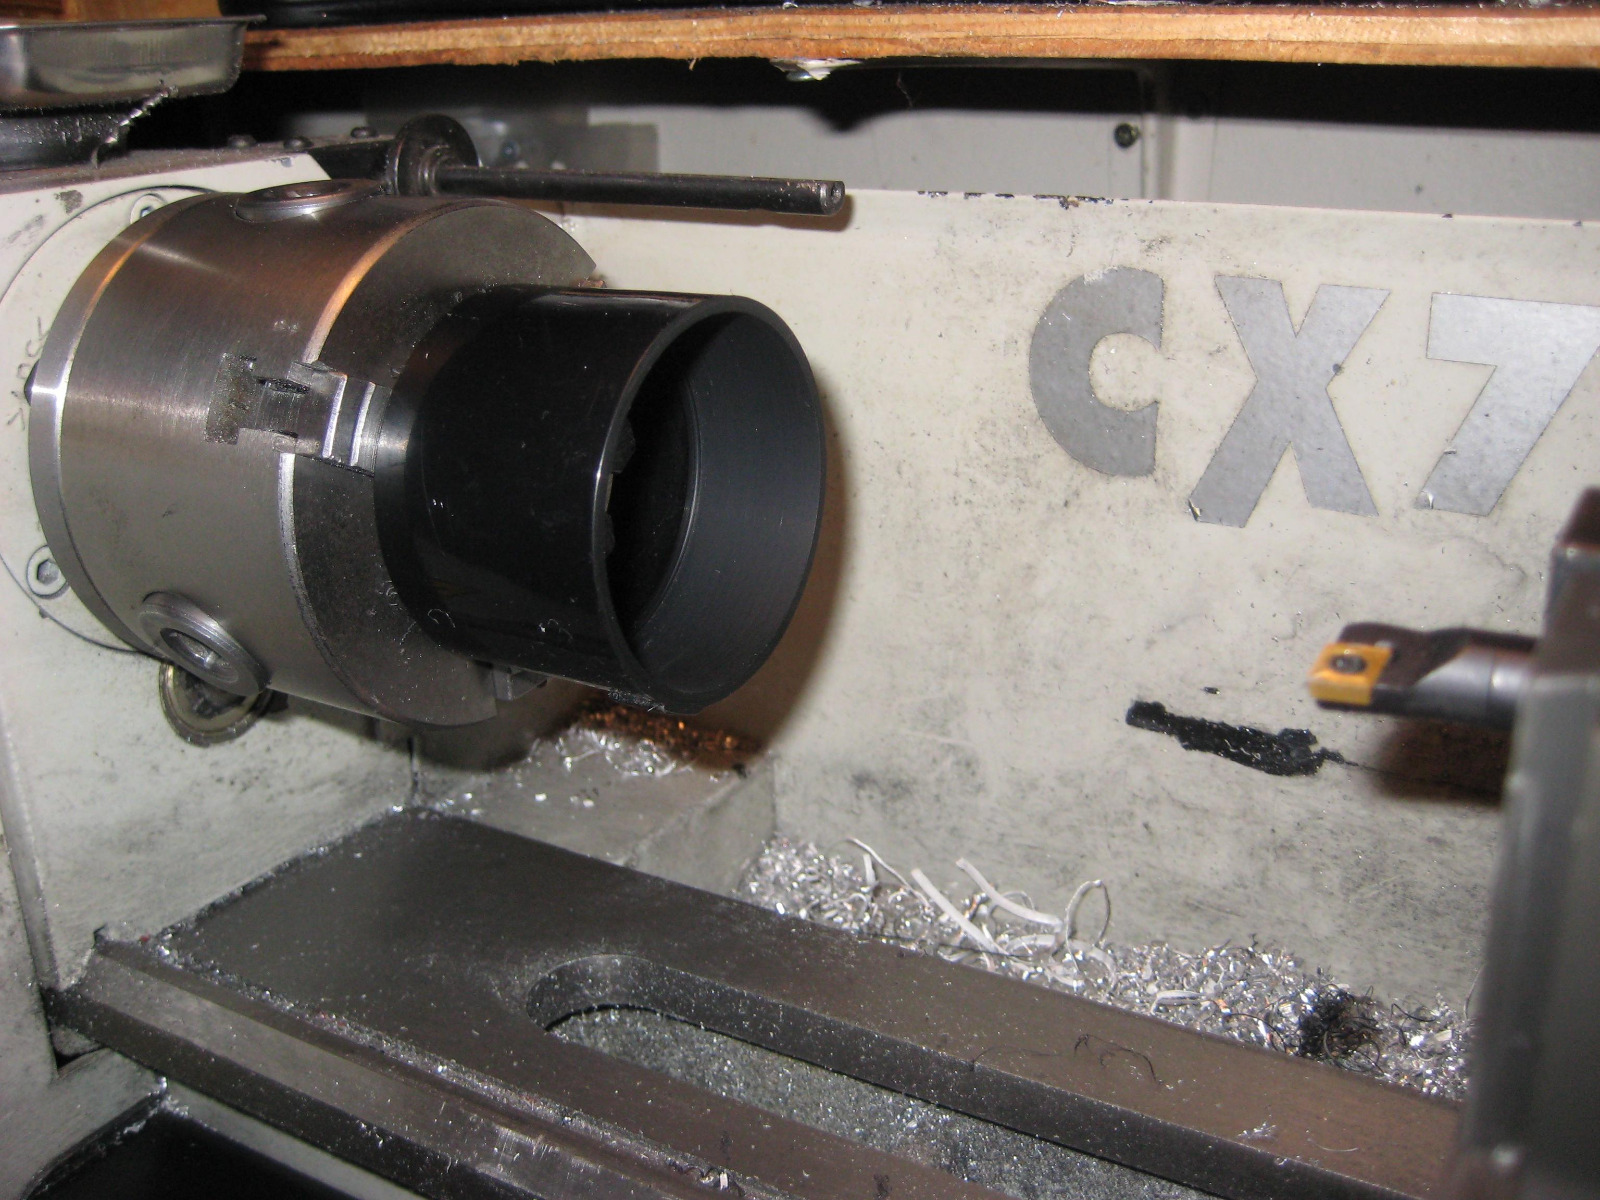
Have a loose fit on the gauge because I want it to be able to move if knocked.
I ground some rubber sheet into round pucks to act like shock absorbers once installed over the mount studs.
Hoping to get the back cover turned tomorrow then start milling the mounting base.
Have a loose fit on the gauge because I want it to be able to move if knocked.
I ground some rubber sheet into round pucks to act like shock absorbers once installed over the mount studs.
Hoping to get the back cover turned tomorrow then start milling the mounting base.
1978 KZ650B2 w 1197cc Z1 engine
1977 KZ650B1 w 750cc Spectre engine
1979 KZ650C3 w 831cc Hot Rod engine
1978 KZ650C2 w 762cc DFI project
1977 KZ650C1 stock restoration project
1978 KZ650B2 modified project
1978 KZ650B2 Injected Drag 831cc
1981 Z50R Honda tow bike
1977 KZ650B1 w 750cc Spectre engine
1979 KZ650C3 w 831cc Hot Rod engine
1978 KZ650C2 w 762cc DFI project
1977 KZ650C1 stock restoration project
1978 KZ650B2 modified project
1978 KZ650B2 Injected Drag 831cc
1981 Z50R Honda tow bike
The following user(s) said Thank You: howardhb, Wookie58
Please Log in or Create an account to join the conversation.
- RedPill
-

- Offline
- User
-
Registered
- Posts: 28
- Thanks: 10
Re: KZ650 Sleeper Build (KZ1000 engine transplant)
15 Feb 2024 22:05
Thank you for sharing your build.
I’ve seen AFR gauges in autocross cars.
I never thought about it on a bike, but I could definitely see it being useful for tuning. Desolate road seeing the mixture at different RPMs, engine loads, throttle openings, etc.
thank you for the idea.
I’ve seen AFR gauges in autocross cars.
I never thought about it on a bike, but I could definitely see it being useful for tuning. Desolate road seeing the mixture at different RPMs, engine loads, throttle openings, etc.
thank you for the idea.
The following user(s) said Thank You: Injected
Please Log in or Create an account to join the conversation.
- Injected
-
Topic Author
- Offline
- User
-
Registered
- Posts: 1726
- Thanks: 1222
Re: KZ650 Sleeper Build (KZ1000 engine transplant)
16 Feb 2024 07:33I have been using the country back roads North of my home to tune carbs since I got back to road riding in 2012. I mark the throttle grip with white paint marker, and was doing everything by feel over 1/4 throttle. I have a ColorTune kit for setting the idle (pilot circuit) so that is never a issue.Thank you for sharing your build.
I’ve seen AFR gauges in autocross cars.
I never thought about it on a bike, but I could definitely see it being useful for tuning. Desolate road seeing the mixture at different RPMs, engine loads, throttle openings, etc.
thank you for the idea.
Those back roads never have traffic at the right time of day and they are posted at 80KM (50MPH) but you can buzz up to 100KM or over in the right spots. There is no issue doing 5th gear pulls and plug chops.
This gauge will help to pinpoint mixtures in all ranges. I don't know if it will eliminate plug chops but I hope it will as I have never liked doing them.
1978 KZ650B2 w 1197cc Z1 engine
1977 KZ650B1 w 750cc Spectre engine
1979 KZ650C3 w 831cc Hot Rod engine
1978 KZ650C2 w 762cc DFI project
1977 KZ650C1 stock restoration project
1978 KZ650B2 modified project
1978 KZ650B2 Injected Drag 831cc
1981 Z50R Honda tow bike
1977 KZ650B1 w 750cc Spectre engine
1979 KZ650C3 w 831cc Hot Rod engine
1978 KZ650C2 w 762cc DFI project
1977 KZ650C1 stock restoration project
1978 KZ650B2 modified project
1978 KZ650B2 Injected Drag 831cc
1981 Z50R Honda tow bike
The following user(s) said Thank You: RedPill
Please Log in or Create an account to join the conversation.
- SWest
-

- Offline
- Sustaining Member
-

Registered
- 10 22 2014
- Posts: 23735
- Thanks: 3016
Re: KZ650 Sleeper Build (KZ1000 engine transplant)
16 Feb 2024 08:11
Watching this intently.

Z1b1000 1975 Z1b
kzrider.com/forum/11-projects/598262-kz-...-will-it-live#672882
kzrider.com/forum/2-engine/597654-poser?start=240#704229
kzrider.com/forum/11-projects/598262-kz-...-will-it-live#672882
kzrider.com/forum/2-engine/597654-poser?start=240#704229
Please Log in or Create an account to join the conversation.
- Injected
-
Topic Author
- Offline
- User
-
Registered
- Posts: 1726
- Thanks: 1222
Re: KZ650 Sleeper Build (KZ1000 engine transplant)
16 Feb 2024 11:30 - 16 Feb 2024 12:01
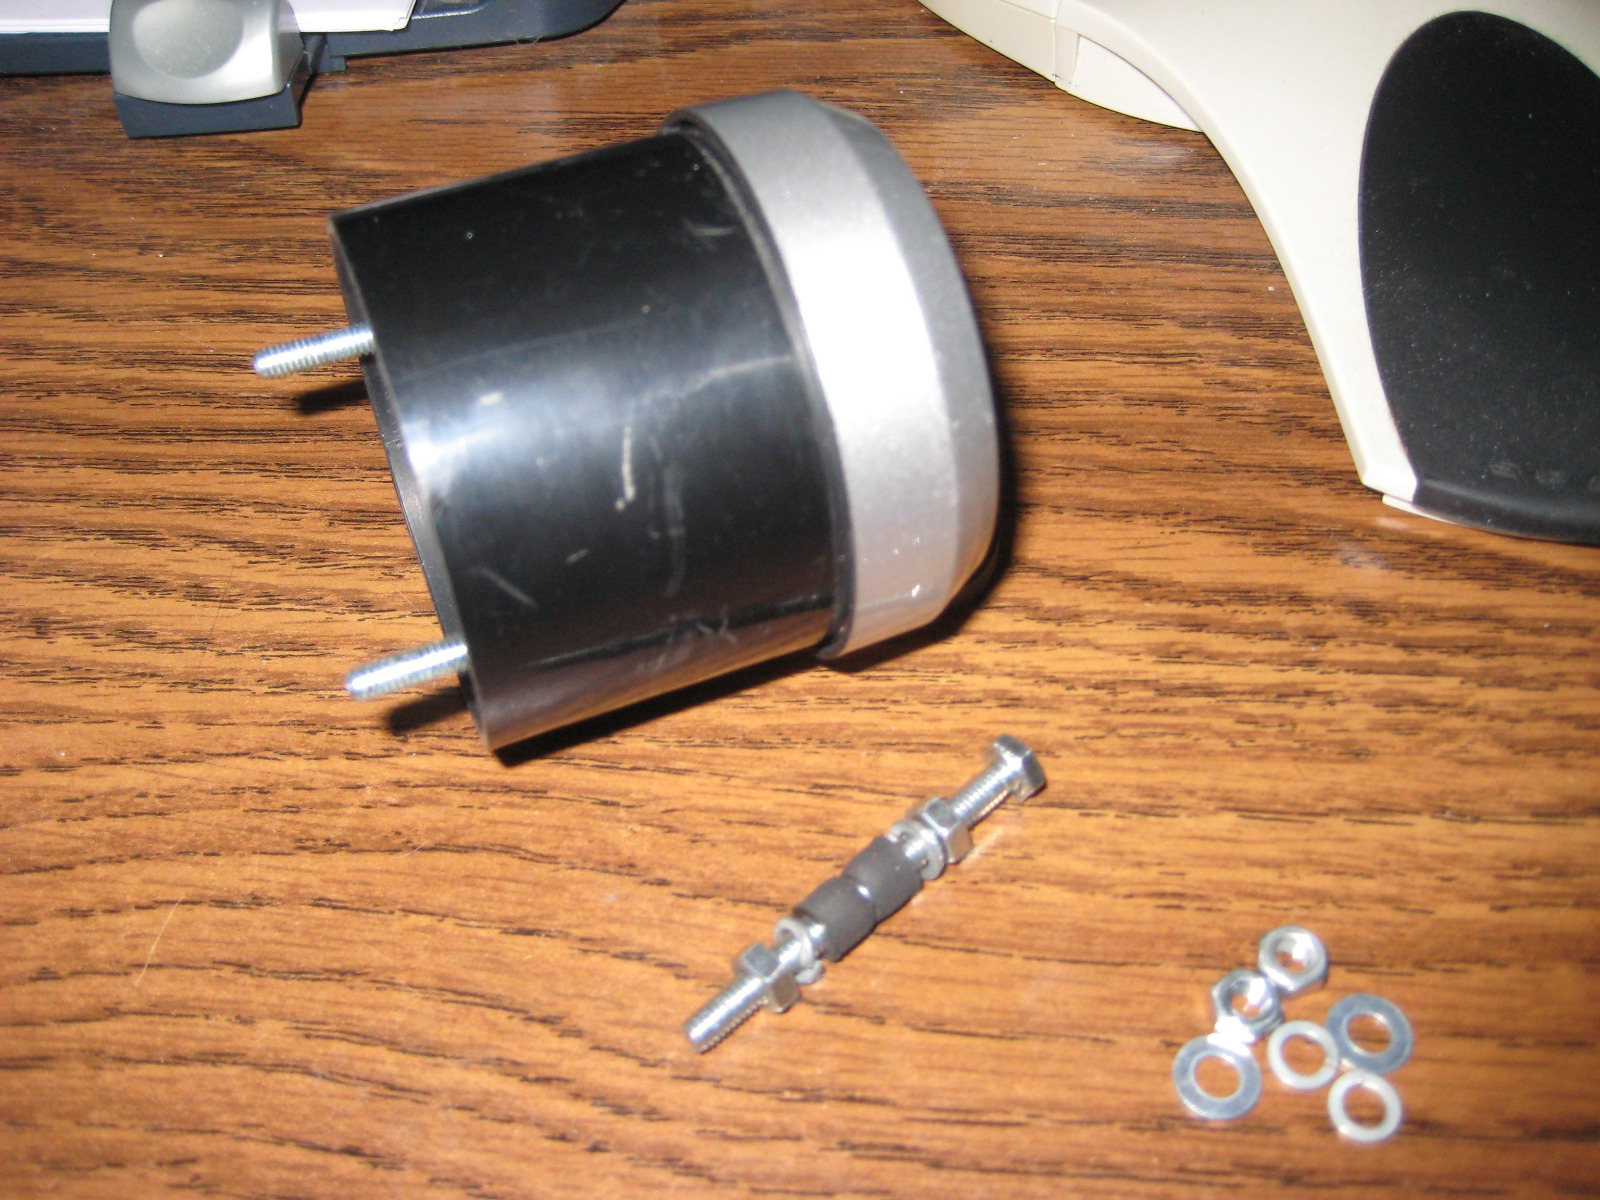
Got the gauge cover back turned this morning.
1/4" ABS "crinkle" sheet stock thinned down to .10" thick. This scrap piece was a little small so the OD is slightly smaller than the cover, but it does center on the ID.
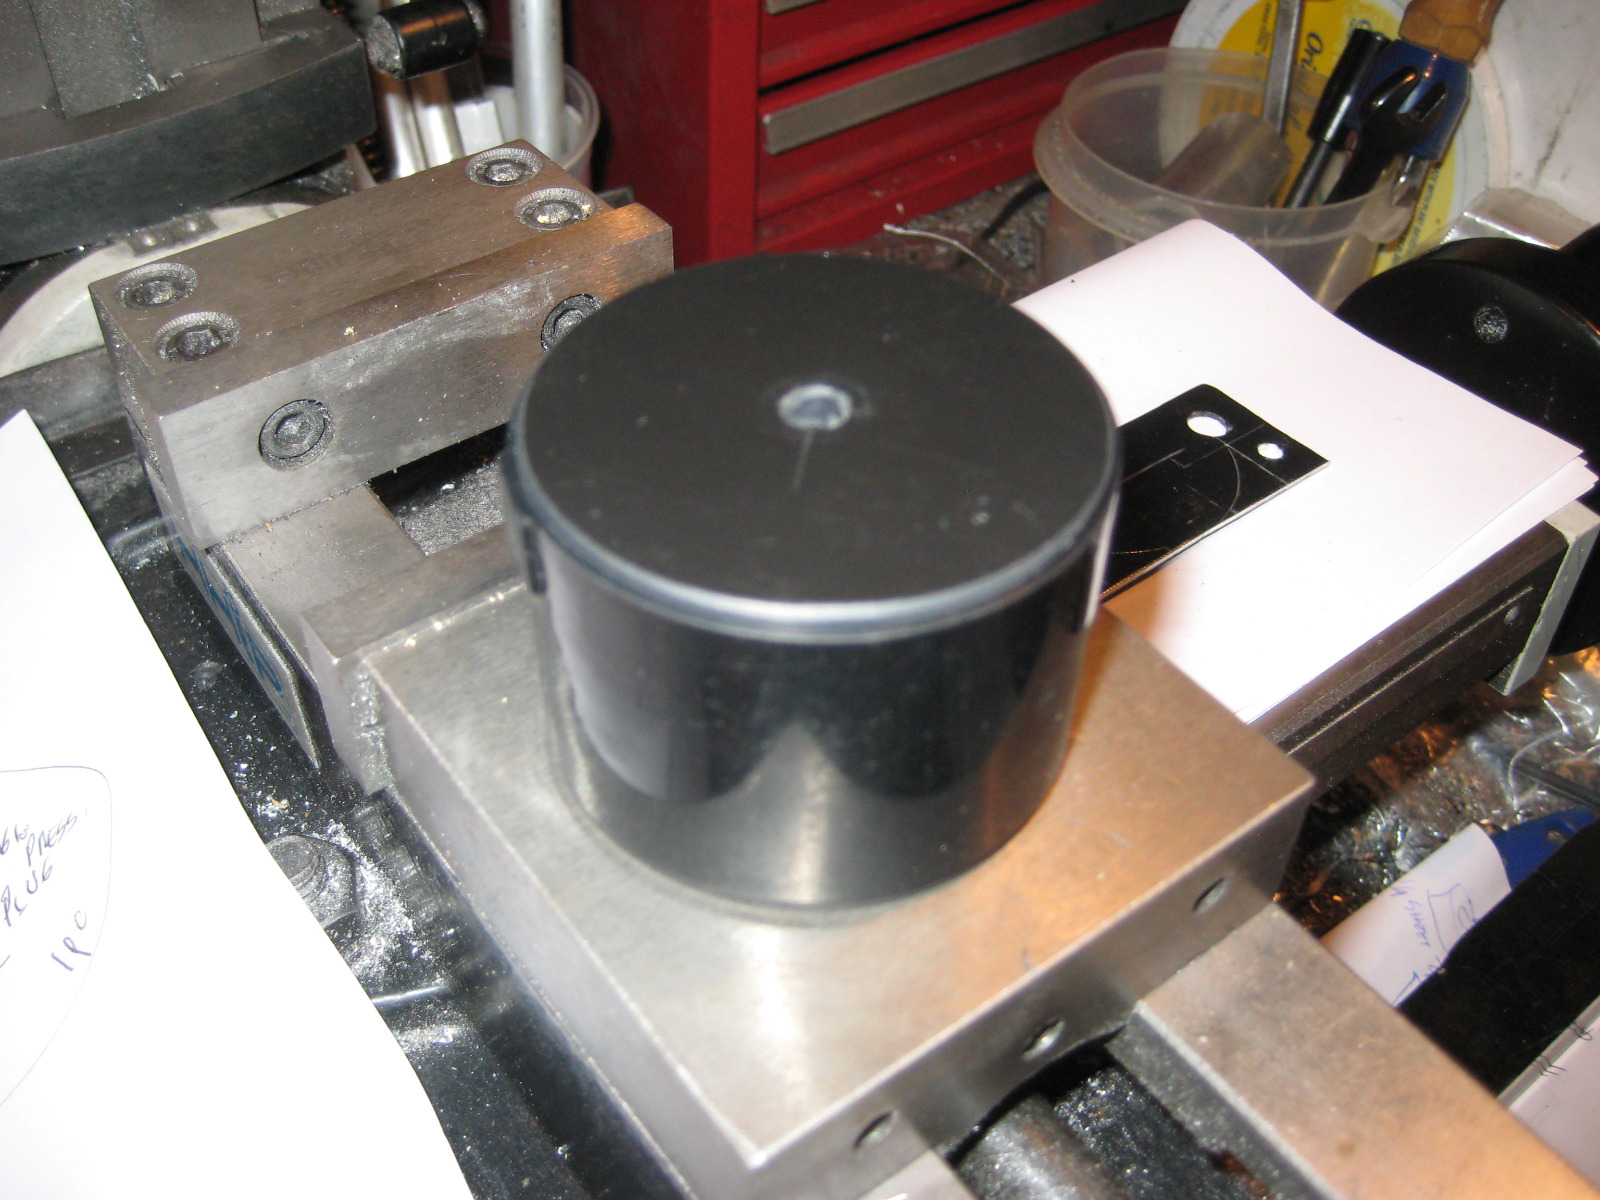
I plan to turn a aluminum plug to seal that center fixture hole. I also need to drill some holes in it to be able to hold it on a piece of wood so some slots can be milled so its not finished yet.
This is the roughed out aluminum wire cover to screw onto the back cover.
It will also be bolted down to some wood to mill a slot in it, the outer shape will be cut with tin ships.
1/4" ABS "crinkle" sheet stock thinned down to .10" thick. This scrap piece was a little small so the OD is slightly smaller than the cover, but it does center on the ID.
I plan to turn a aluminum plug to seal that center fixture hole. I also need to drill some holes in it to be able to hold it on a piece of wood so some slots can be milled so its not finished yet.
This is the roughed out aluminum wire cover to screw onto the back cover.
It will also be bolted down to some wood to mill a slot in it, the outer shape will be cut with tin ships.
1978 KZ650B2 w 1197cc Z1 engine
1977 KZ650B1 w 750cc Spectre engine
1979 KZ650C3 w 831cc Hot Rod engine
1978 KZ650C2 w 762cc DFI project
1977 KZ650C1 stock restoration project
1978 KZ650B2 modified project
1978 KZ650B2 Injected Drag 831cc
1981 Z50R Honda tow bike
1977 KZ650B1 w 750cc Spectre engine
1979 KZ650C3 w 831cc Hot Rod engine
1978 KZ650C2 w 762cc DFI project
1977 KZ650C1 stock restoration project
1978 KZ650B2 modified project
1978 KZ650B2 Injected Drag 831cc
1981 Z50R Honda tow bike
Last edit: 16 Feb 2024 12:01 by Injected. Reason: sp
The following user(s) said Thank You: RedPill
Please Log in or Create an account to join the conversation.
- Injected
-
Topic Author
- Offline
- User
-
Registered
- Posts: 1726
- Thanks: 1222
Re: KZ650 Sleeper Build (KZ1000 engine transplant)
18 Feb 2024 10:03
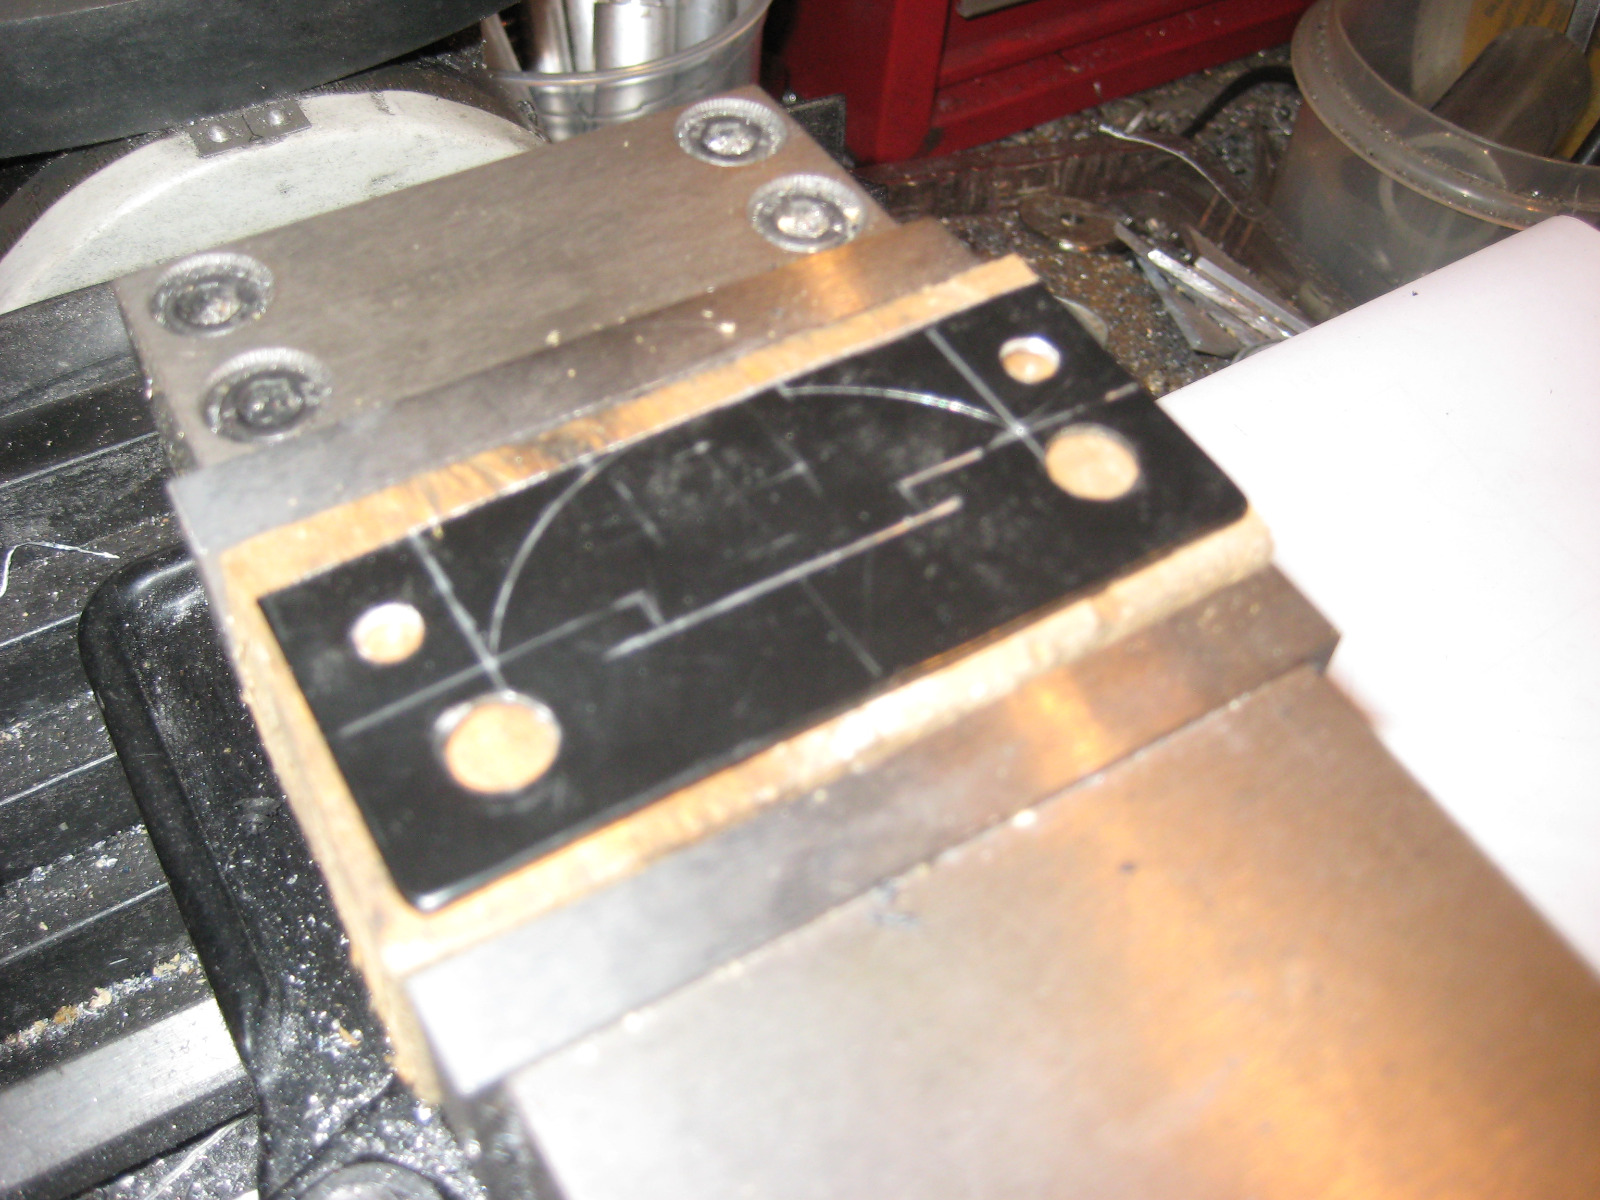
Finished the back plate and the wire slot cover.
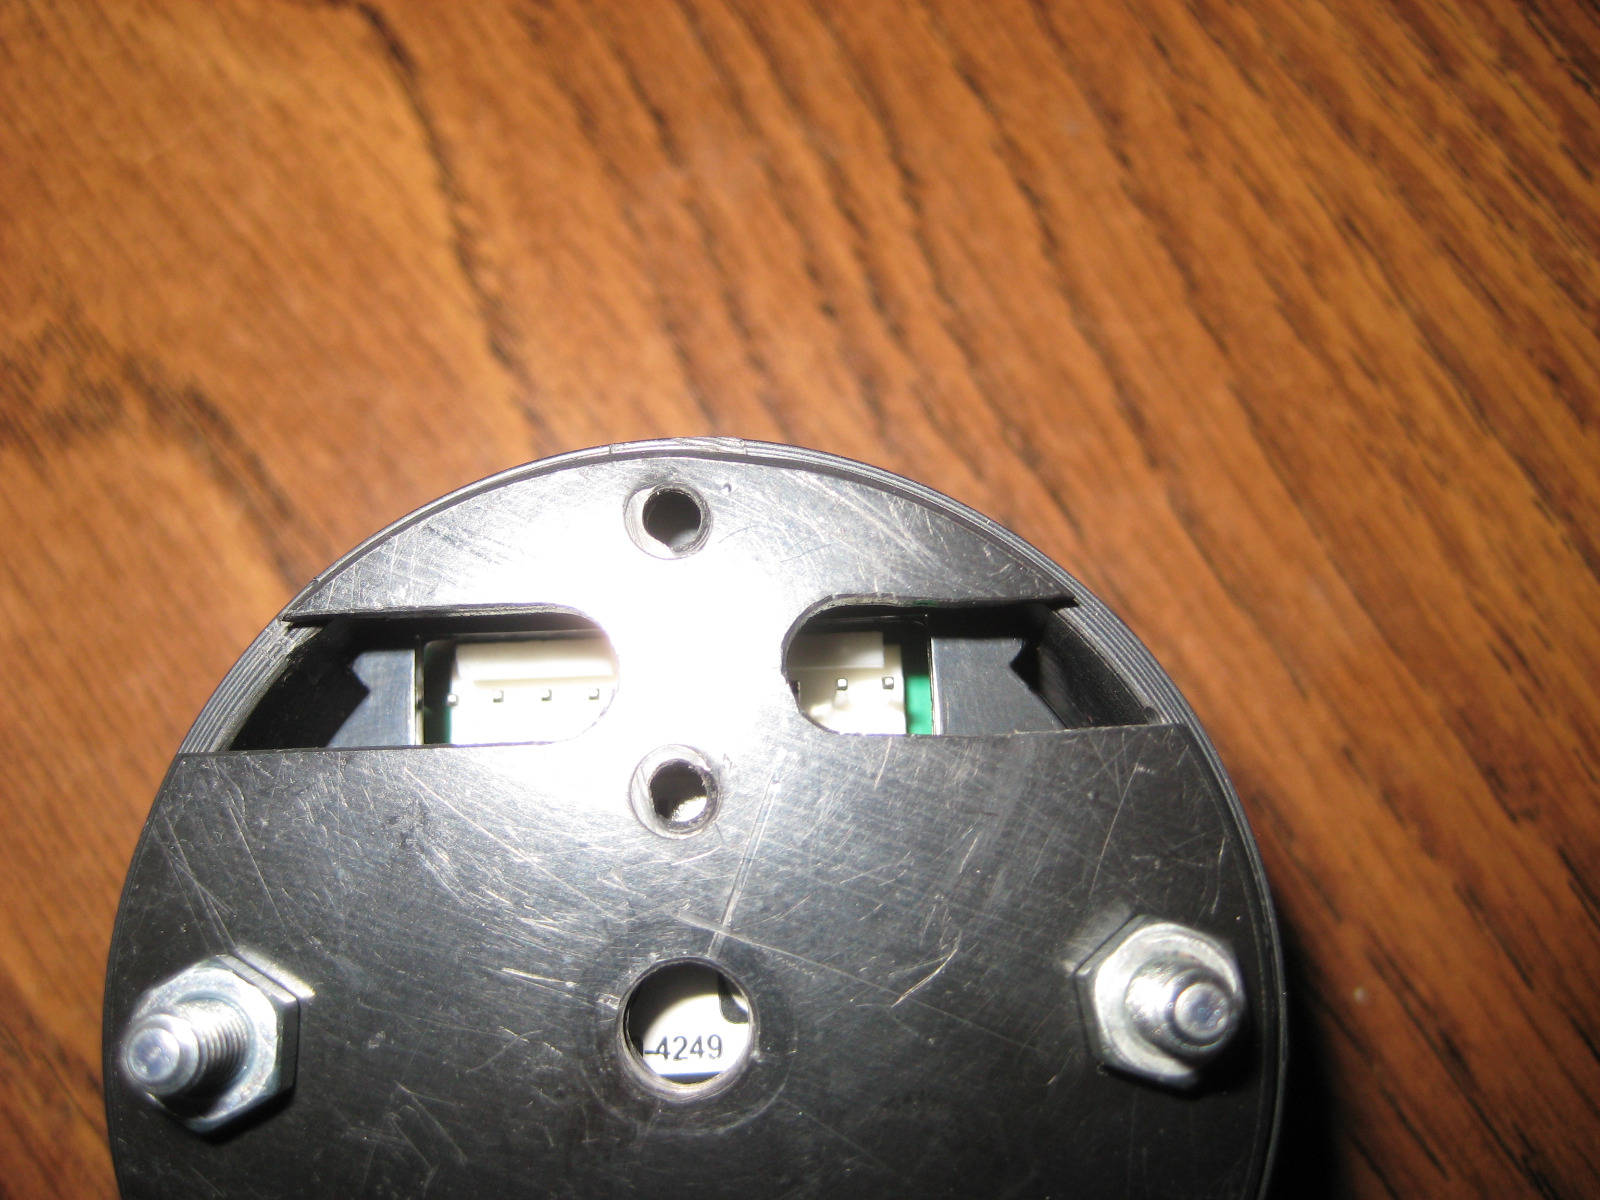
Just need to shorten some #6 screws and make a plug for the center hole.
Just need to shorten some #6 screws and make a plug for the center hole.
1978 KZ650B2 w 1197cc Z1 engine
1977 KZ650B1 w 750cc Spectre engine
1979 KZ650C3 w 831cc Hot Rod engine
1978 KZ650C2 w 762cc DFI project
1977 KZ650C1 stock restoration project
1978 KZ650B2 modified project
1978 KZ650B2 Injected Drag 831cc
1981 Z50R Honda tow bike
1977 KZ650B1 w 750cc Spectre engine
1979 KZ650C3 w 831cc Hot Rod engine
1978 KZ650C2 w 762cc DFI project
1977 KZ650C1 stock restoration project
1978 KZ650B2 modified project
1978 KZ650B2 Injected Drag 831cc
1981 Z50R Honda tow bike
The following user(s) said Thank You: howardhb, Wookie58
Please Log in or Create an account to join the conversation.
- Injected
-
Topic Author
- Offline
- User
-
Registered
- Posts: 1726
- Thanks: 1222
Re: KZ650 Sleeper Build (KZ1000 engine transplant)
24 Feb 2024 12:16
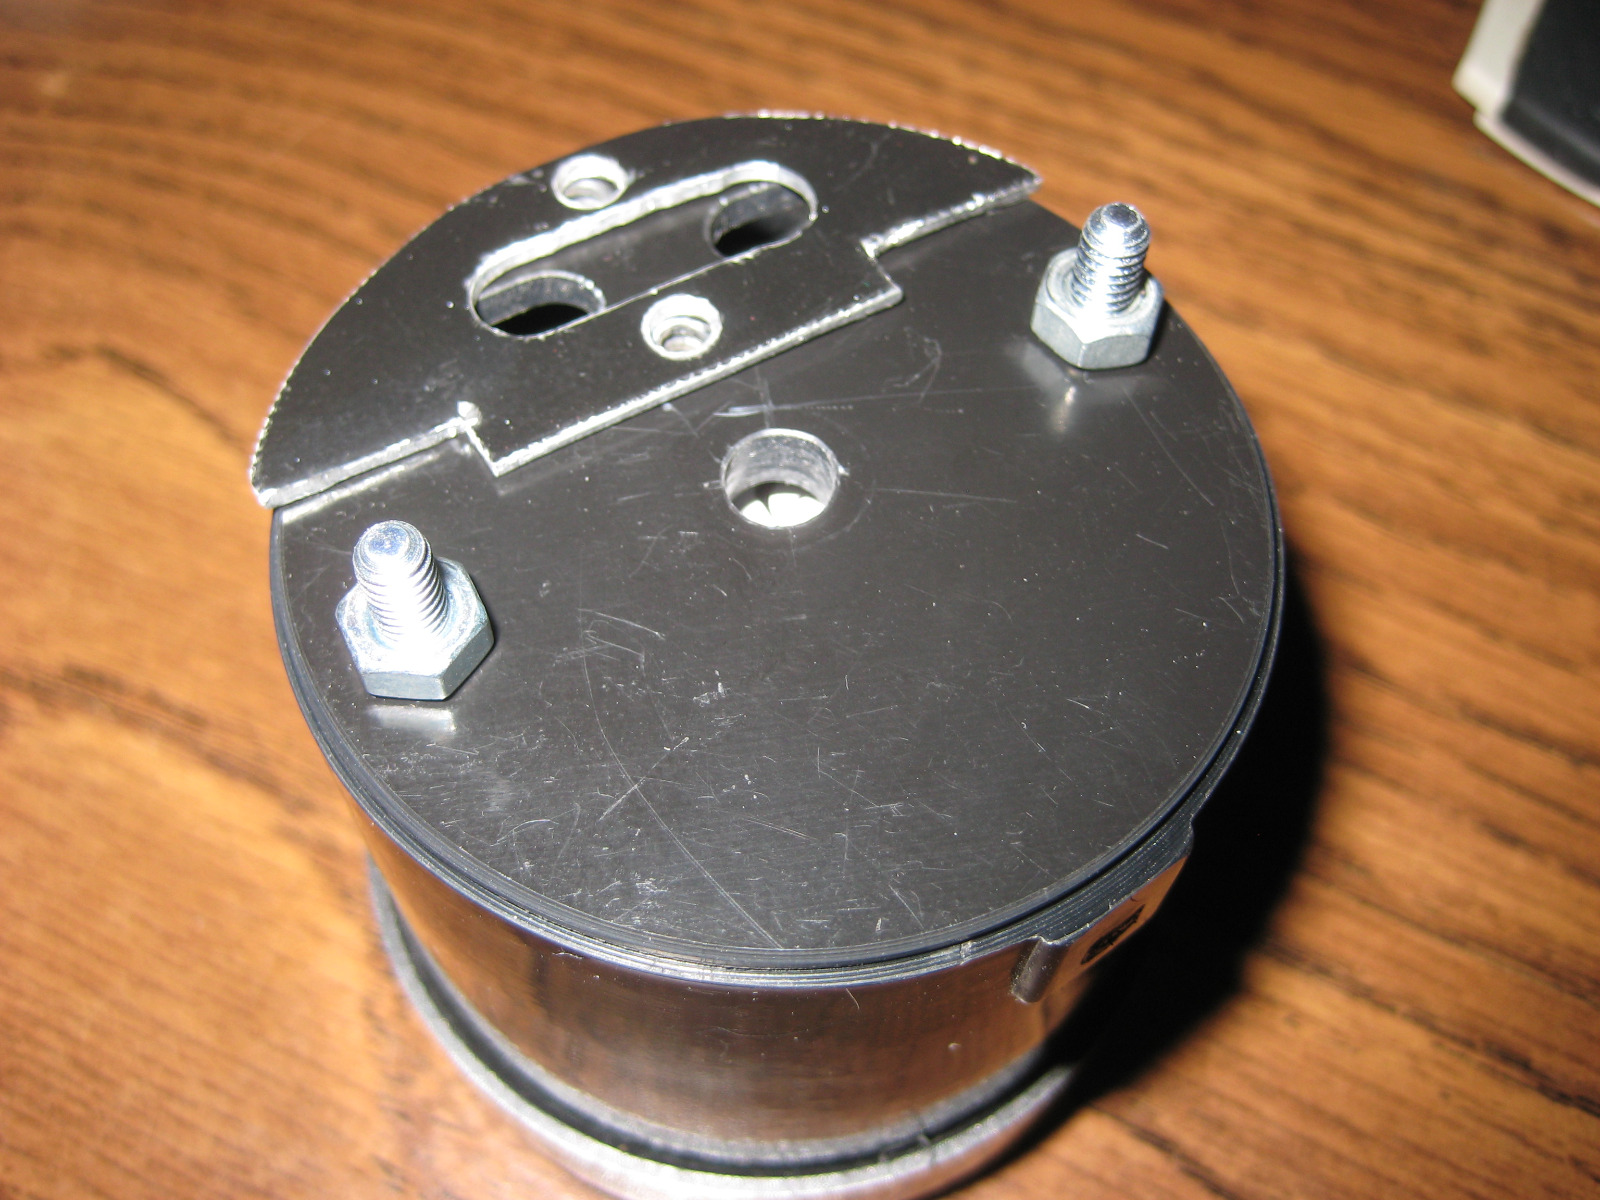
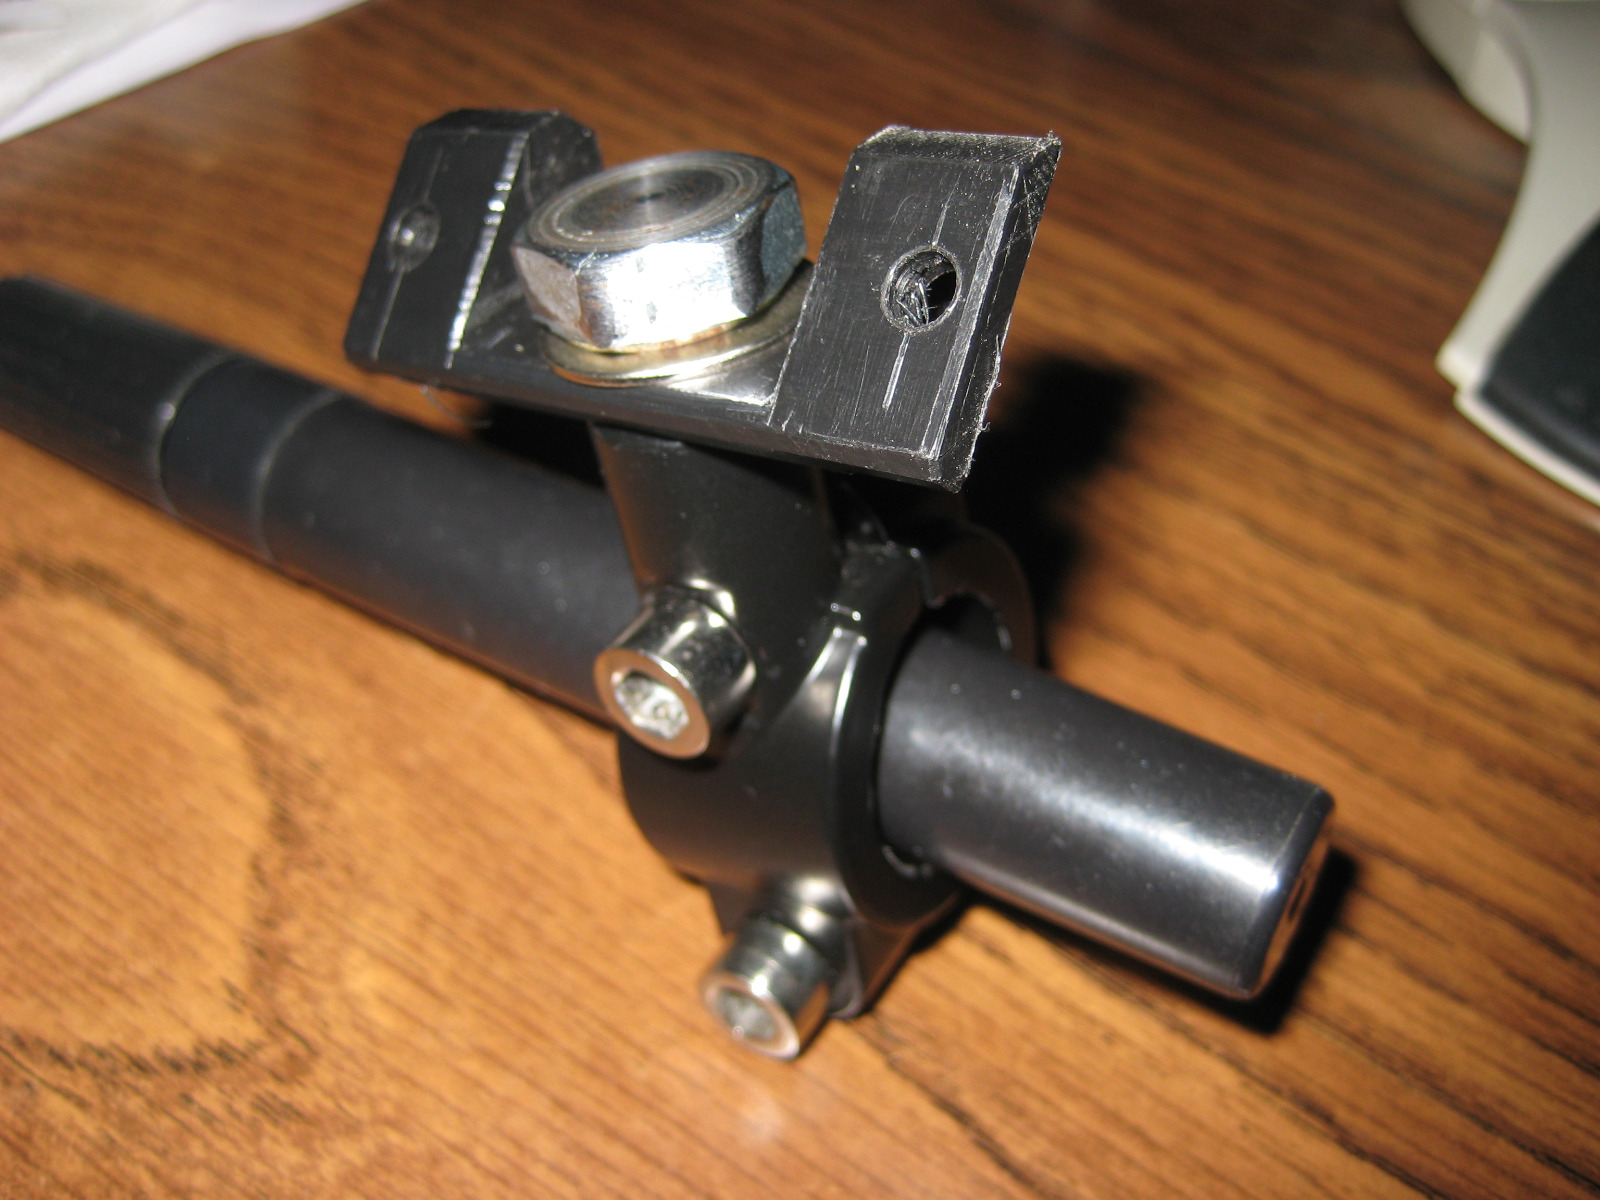
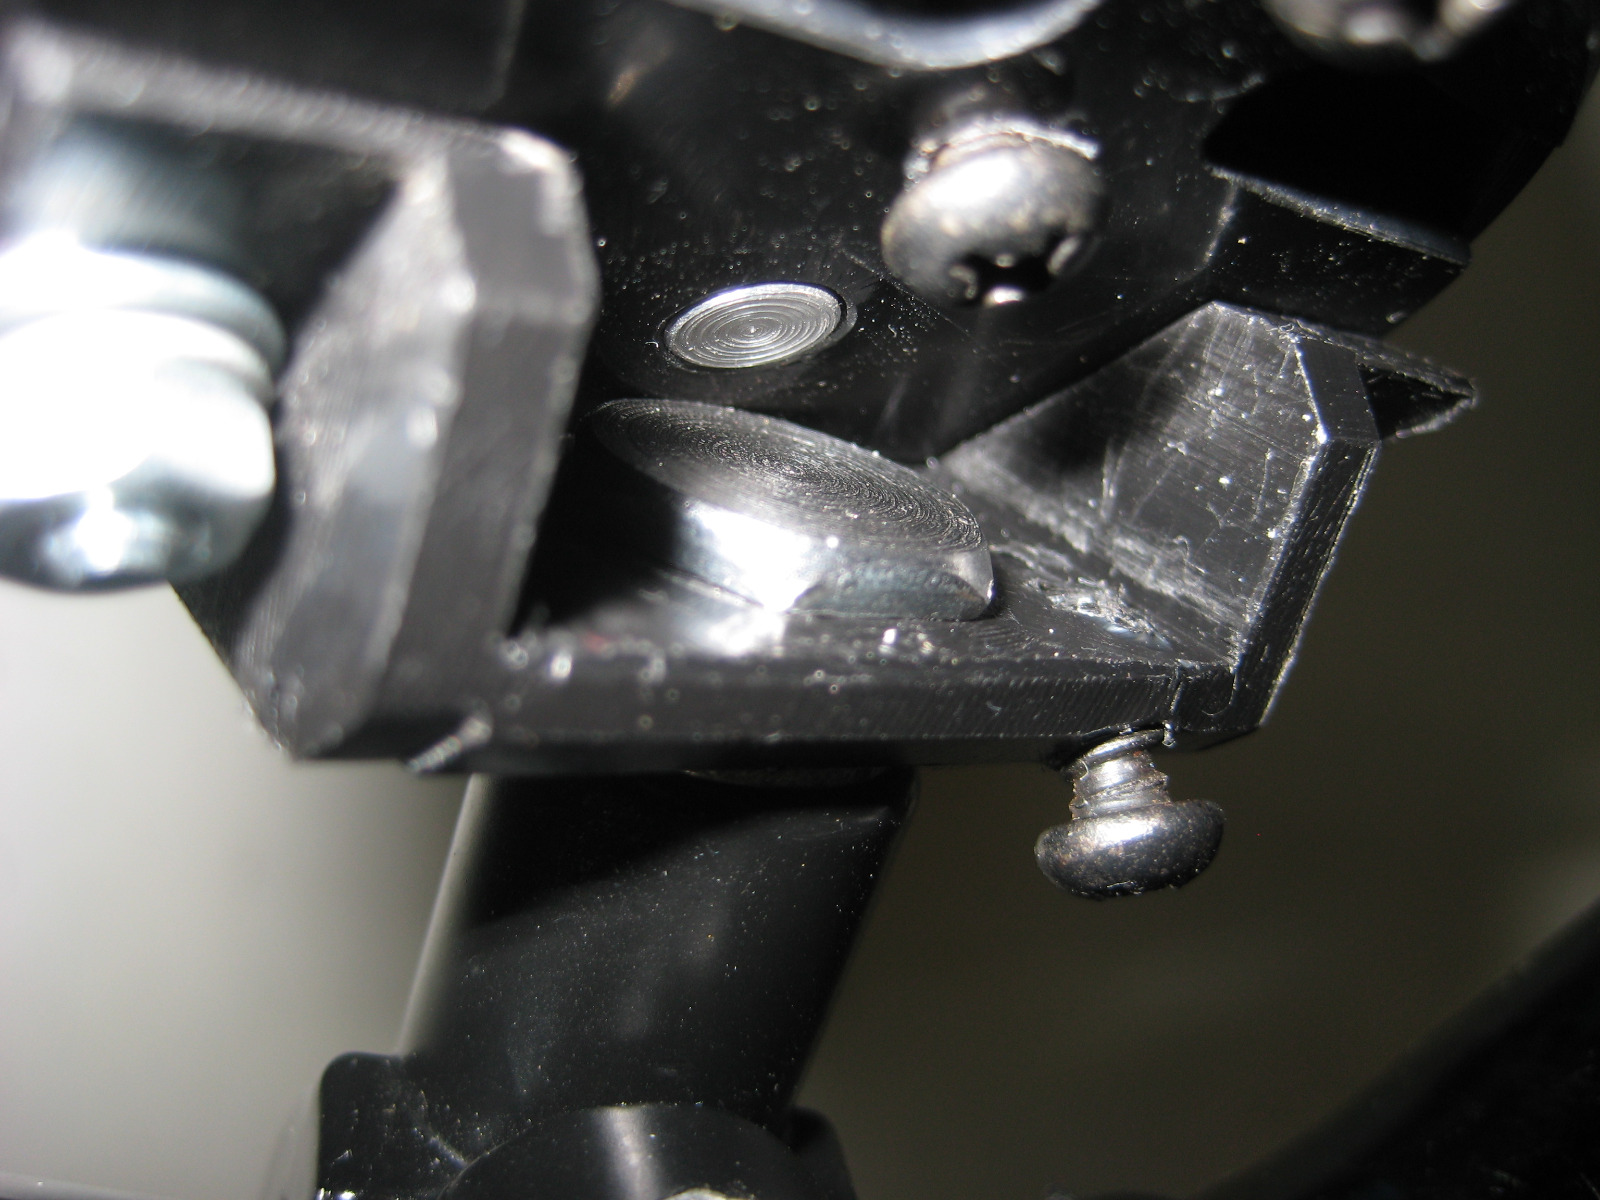
I completed the mount bracket today.
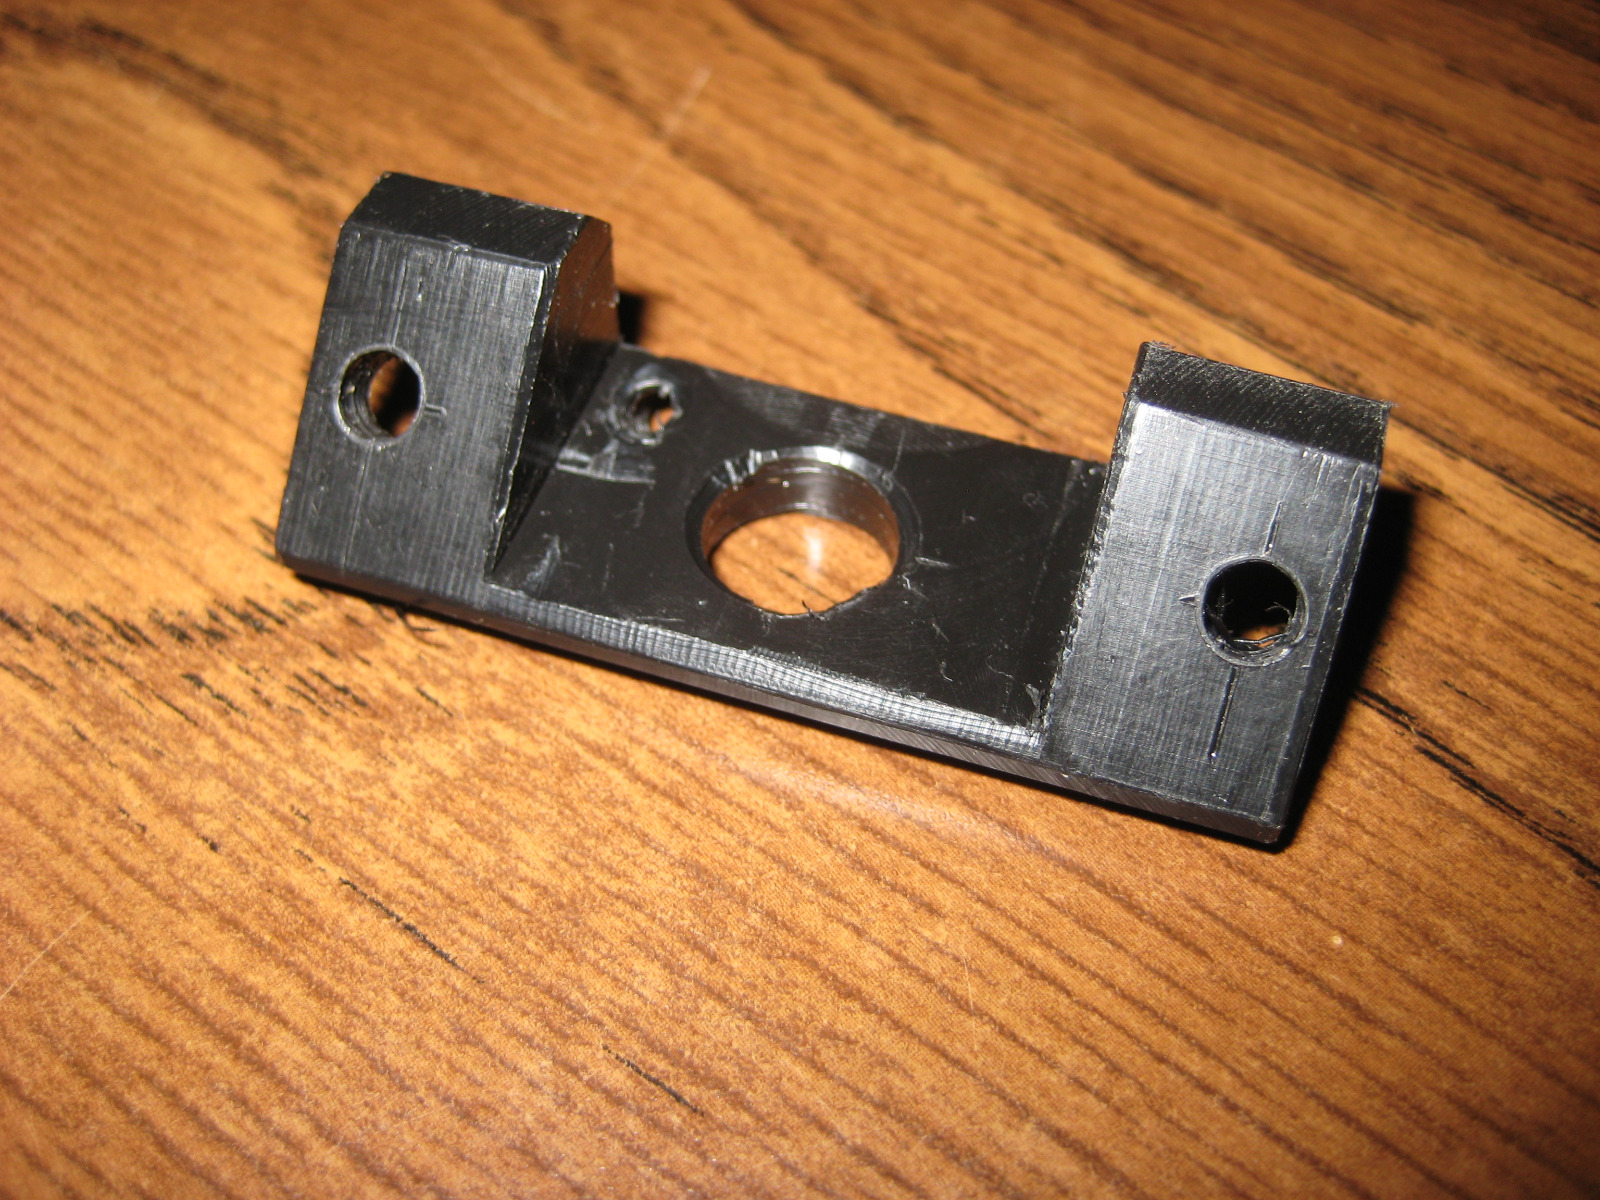
It was more challenging than I had envisioned just due to the lack of clamping faces to hold it in the mill vice.
It fit the back of the gauge nicely but I forgot to model in the hex bolt so the current hex bolt hits the back cover. I will see if I can modify a socket head cap bolt to fit, cut both the head diameter and height on the lathe. To make the hex bolt fit I would need to mill the hex from 17mm to 13mm then cut the height down. Its easier to do lathe work!
1978 KZ650B2 w 1197cc Z1 engine
1977 KZ650B1 w 750cc Spectre engine
1979 KZ650C3 w 831cc Hot Rod engine
1978 KZ650C2 w 762cc DFI project
1977 KZ650C1 stock restoration project
1978 KZ650B2 modified project
1978 KZ650B2 Injected Drag 831cc
1981 Z50R Honda tow bike
1977 KZ650B1 w 750cc Spectre engine
1979 KZ650C3 w 831cc Hot Rod engine
1978 KZ650C2 w 762cc DFI project
1977 KZ650C1 stock restoration project
1978 KZ650B2 modified project
1978 KZ650B2 Injected Drag 831cc
1981 Z50R Honda tow bike
Please Log in or Create an account to join the conversation.
- Injected
-
Topic Author
- Offline
- User
-
Registered
- Posts: 1726
- Thanks: 1222
Re: KZ650 Sleeper Build (KZ1000 engine transplant)
26 Feb 2024 05:11 - 26 Feb 2024 05:12
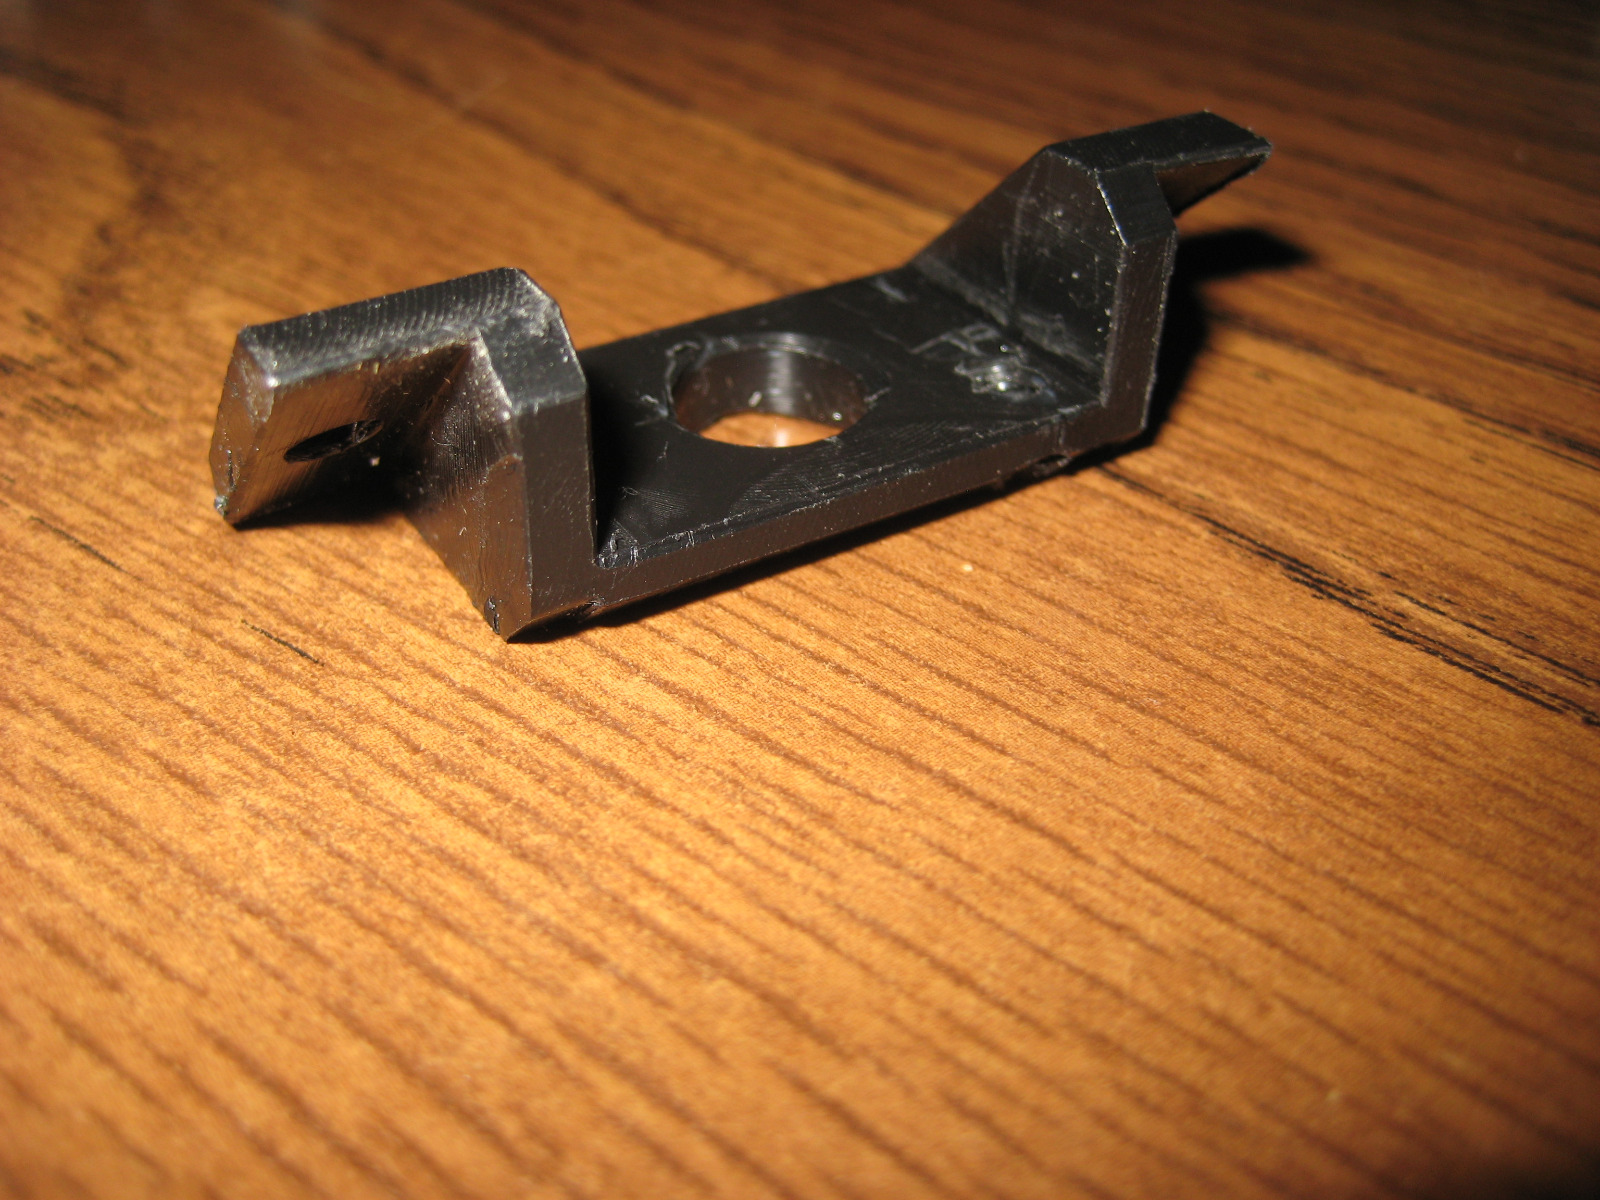
The aftermarket handle bar clamp I am using has the same thread in it as a Kawasaki mirror.
I found a Kawasaki hex bolt I can modify to fit that uses a 14 mm hex so I will use that bolt to replace the one I had on there. I just need to chuck it in the lathe and turn the head thickness down, then cut it to length.
I should be able to assemble this soon and get back to the main build.
I found a Kawasaki hex bolt I can modify to fit that uses a 14 mm hex so I will use that bolt to replace the one I had on there. I just need to chuck it in the lathe and turn the head thickness down, then cut it to length.
I should be able to assemble this soon and get back to the main build.
1978 KZ650B2 w 1197cc Z1 engine
1977 KZ650B1 w 750cc Spectre engine
1979 KZ650C3 w 831cc Hot Rod engine
1978 KZ650C2 w 762cc DFI project
1977 KZ650C1 stock restoration project
1978 KZ650B2 modified project
1978 KZ650B2 Injected Drag 831cc
1981 Z50R Honda tow bike
1977 KZ650B1 w 750cc Spectre engine
1979 KZ650C3 w 831cc Hot Rod engine
1978 KZ650C2 w 762cc DFI project
1977 KZ650C1 stock restoration project
1978 KZ650B2 modified project
1978 KZ650B2 Injected Drag 831cc
1981 Z50R Honda tow bike
Last edit: 26 Feb 2024 05:12 by Injected. Reason: sp
Please Log in or Create an account to join the conversation.
- Injected
-
Topic Author
- Offline
- User
-
Registered
- Posts: 1726
- Thanks: 1222
Re: KZ650 Sleeper Build (KZ1000 engine transplant)
26 Feb 2024 07:51
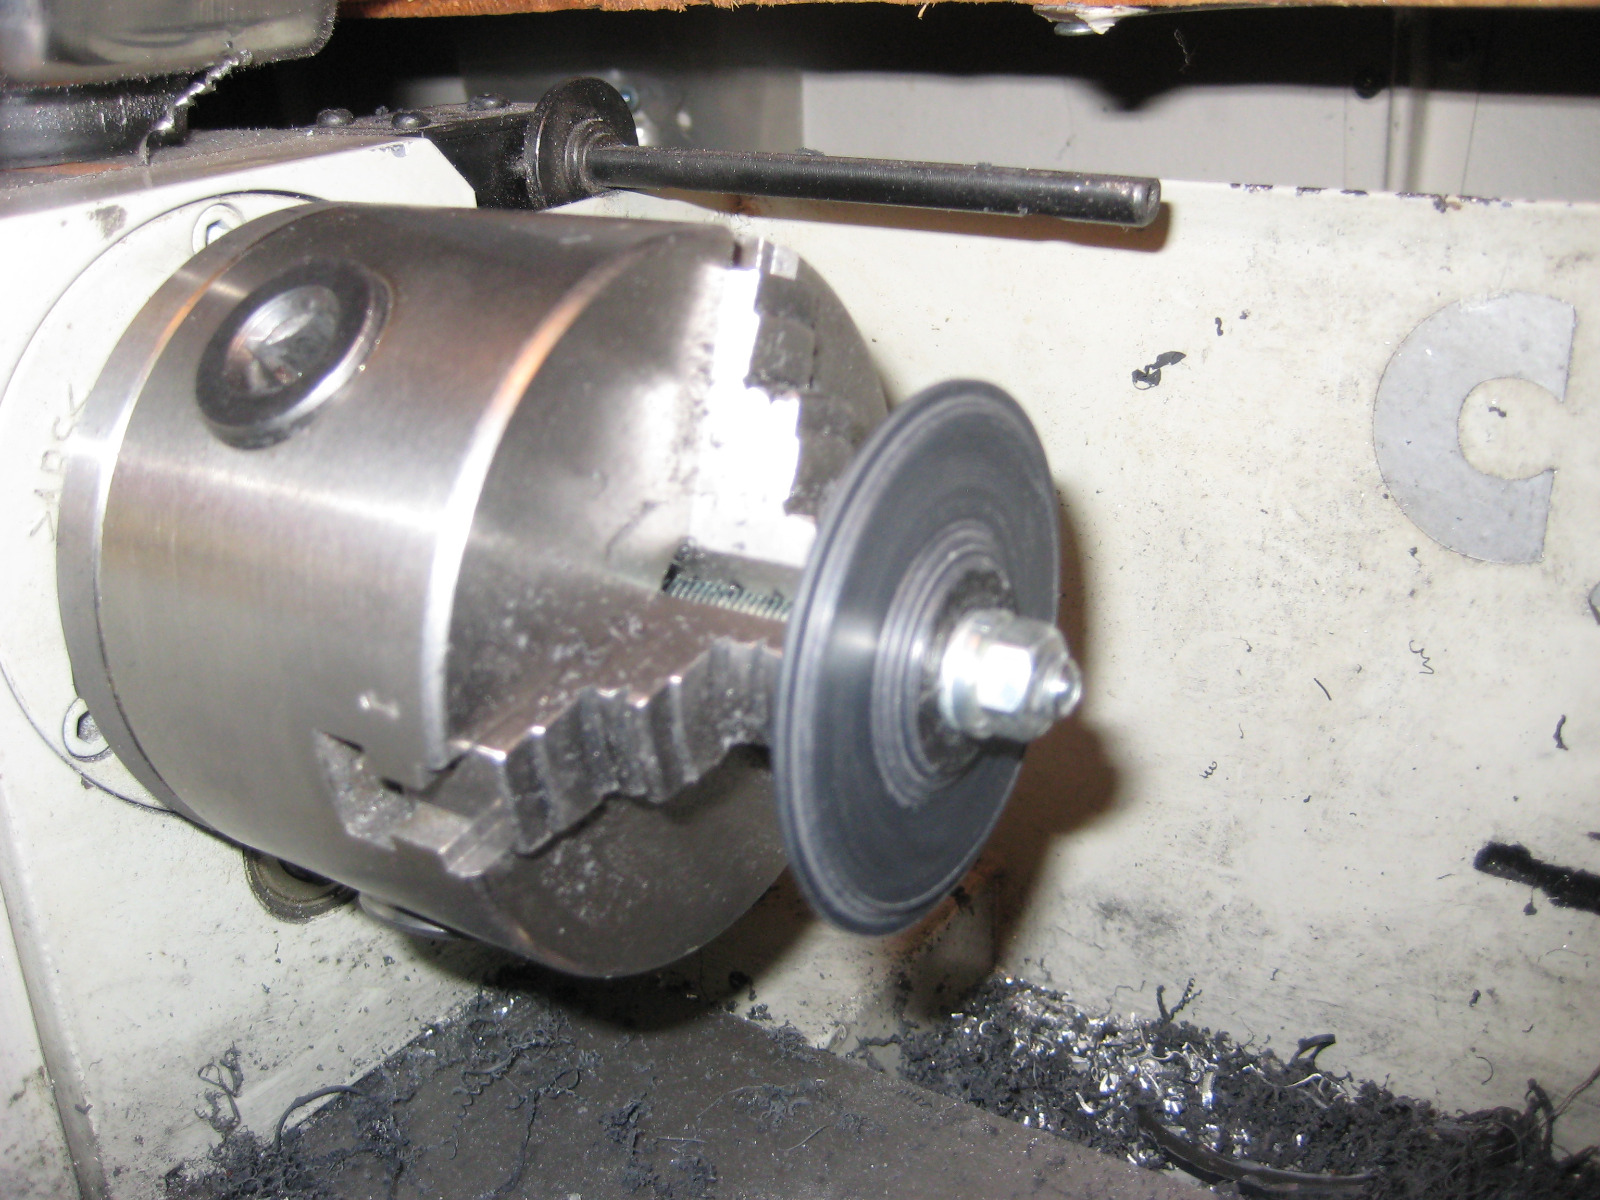
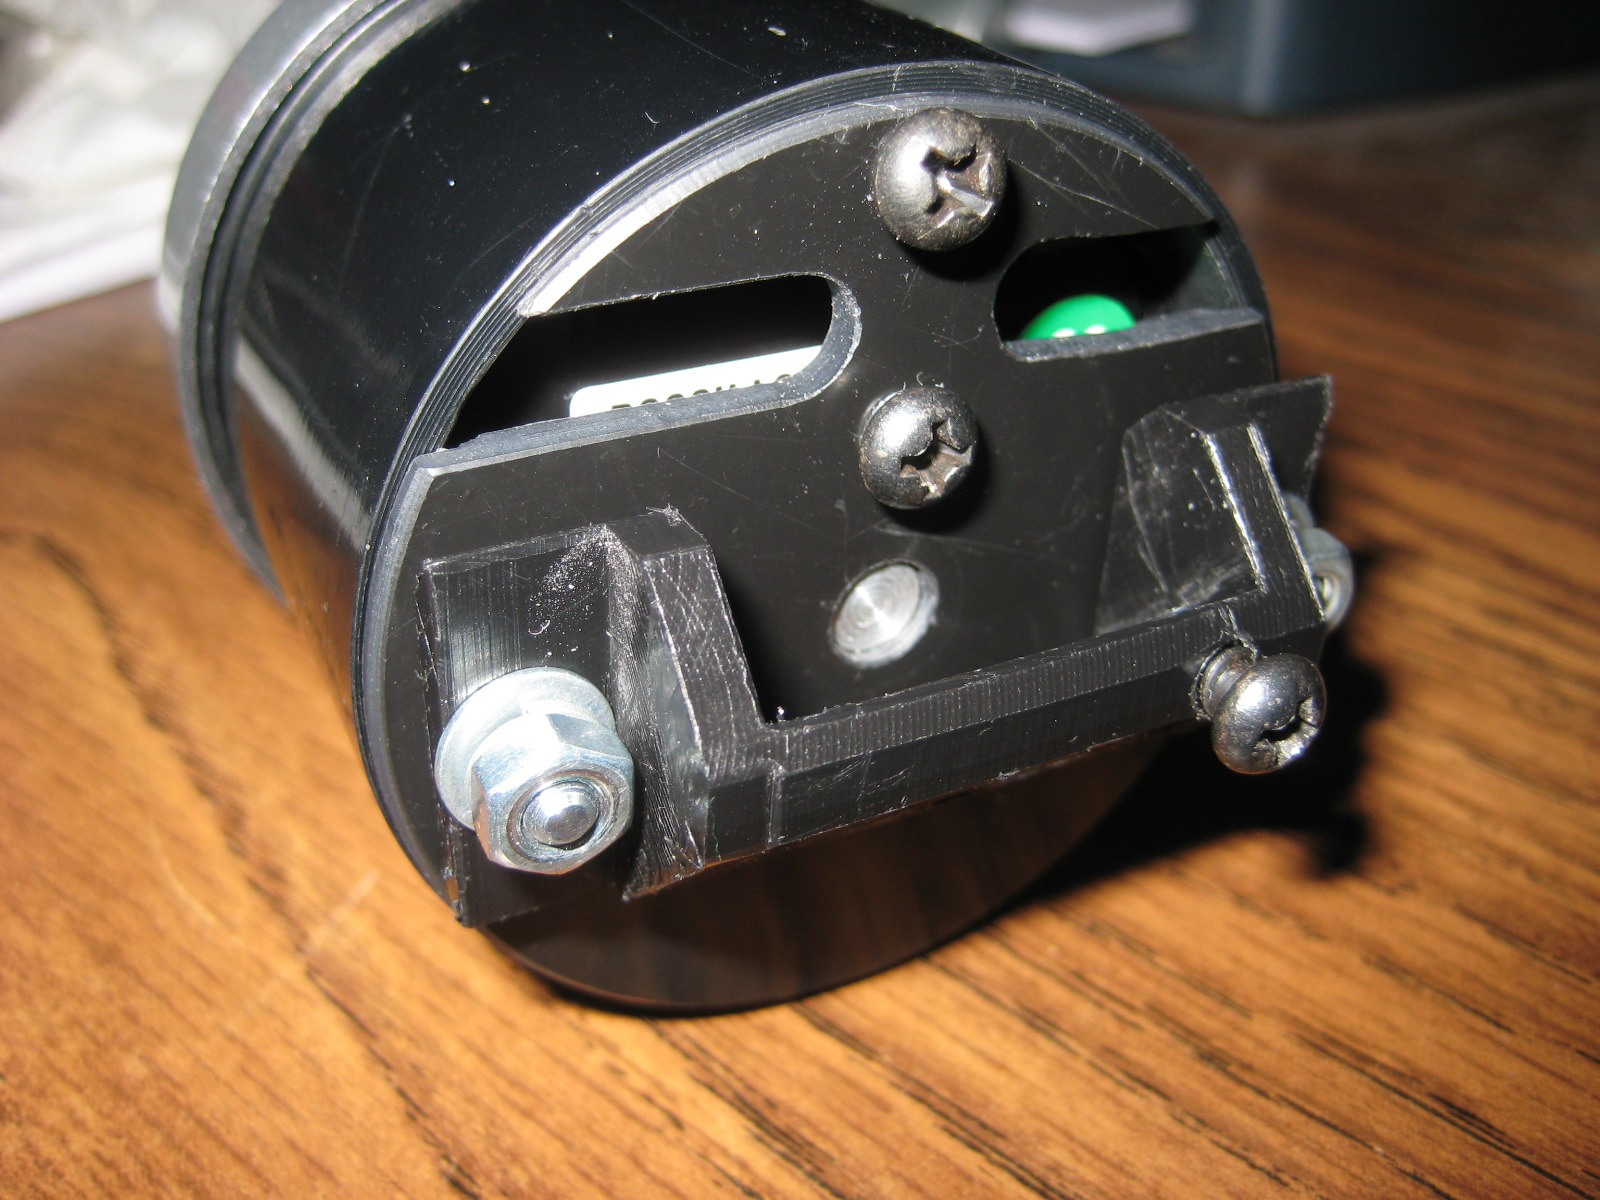
I have the gauge part of this about 98% complete. I got that bolt sorted and clamped it onto a handle bar to see how it looks.
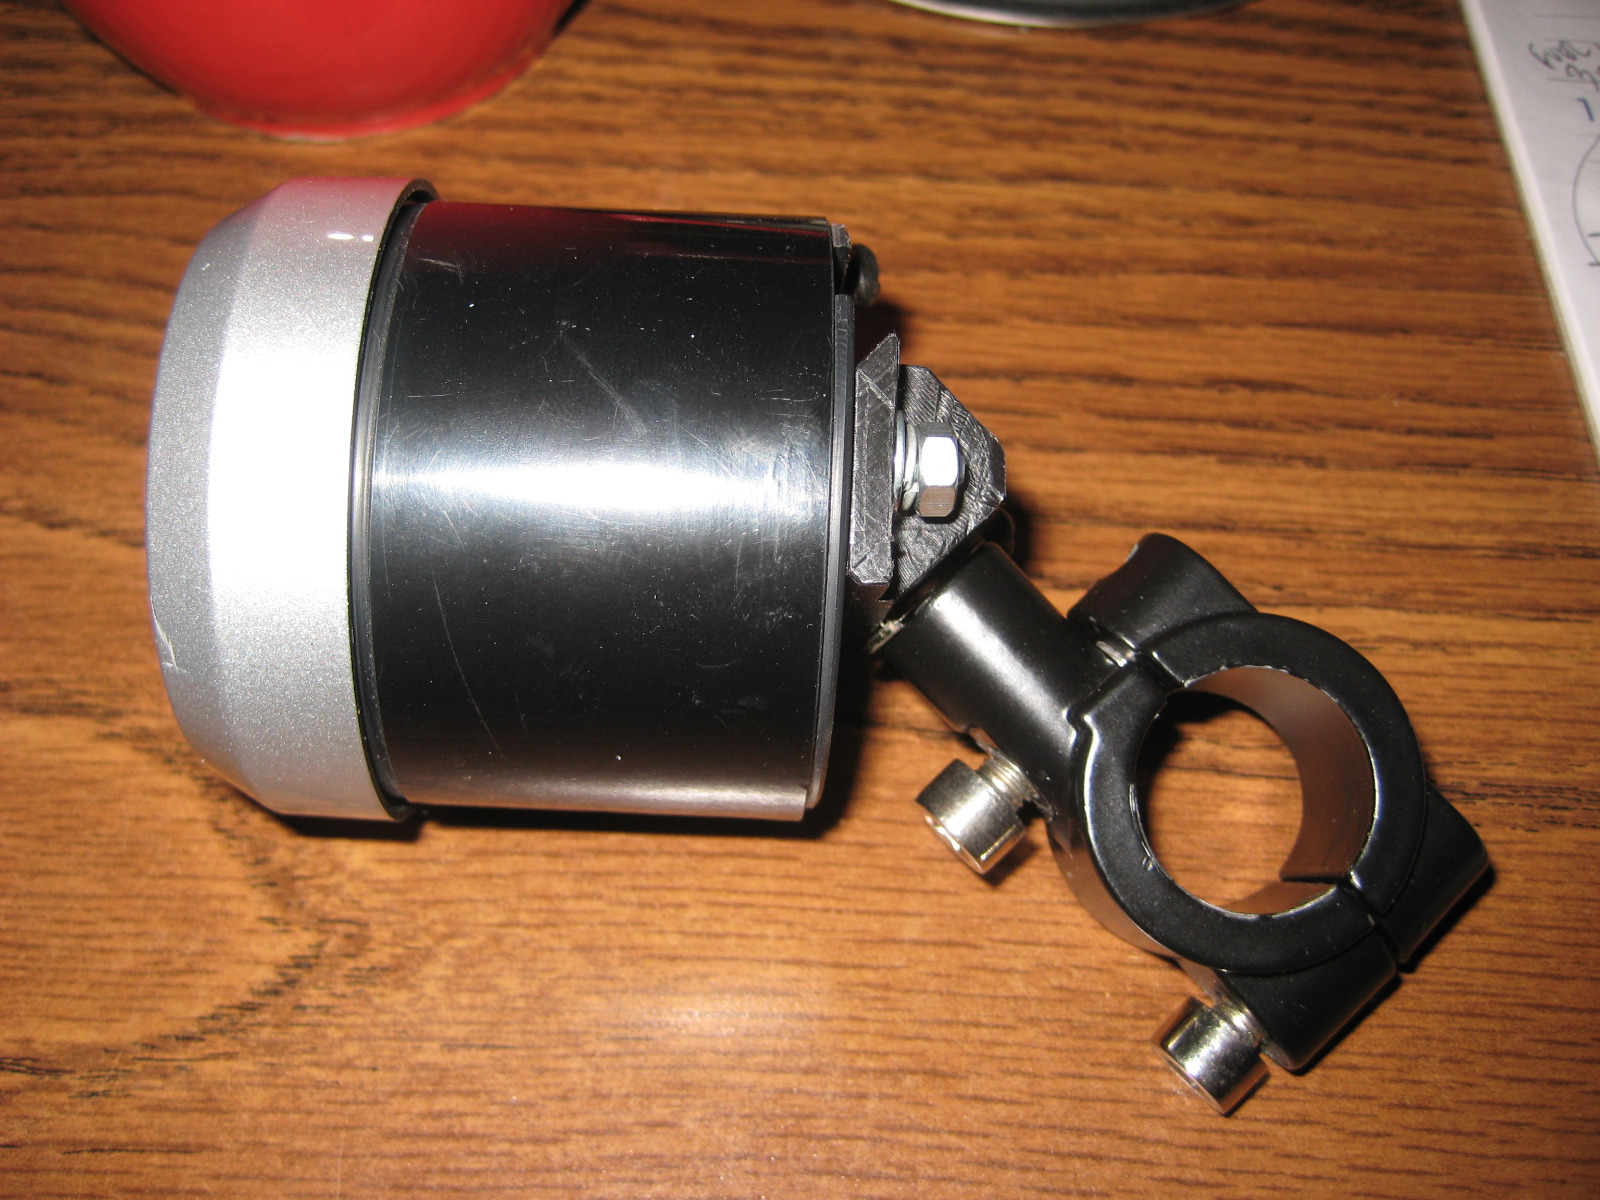
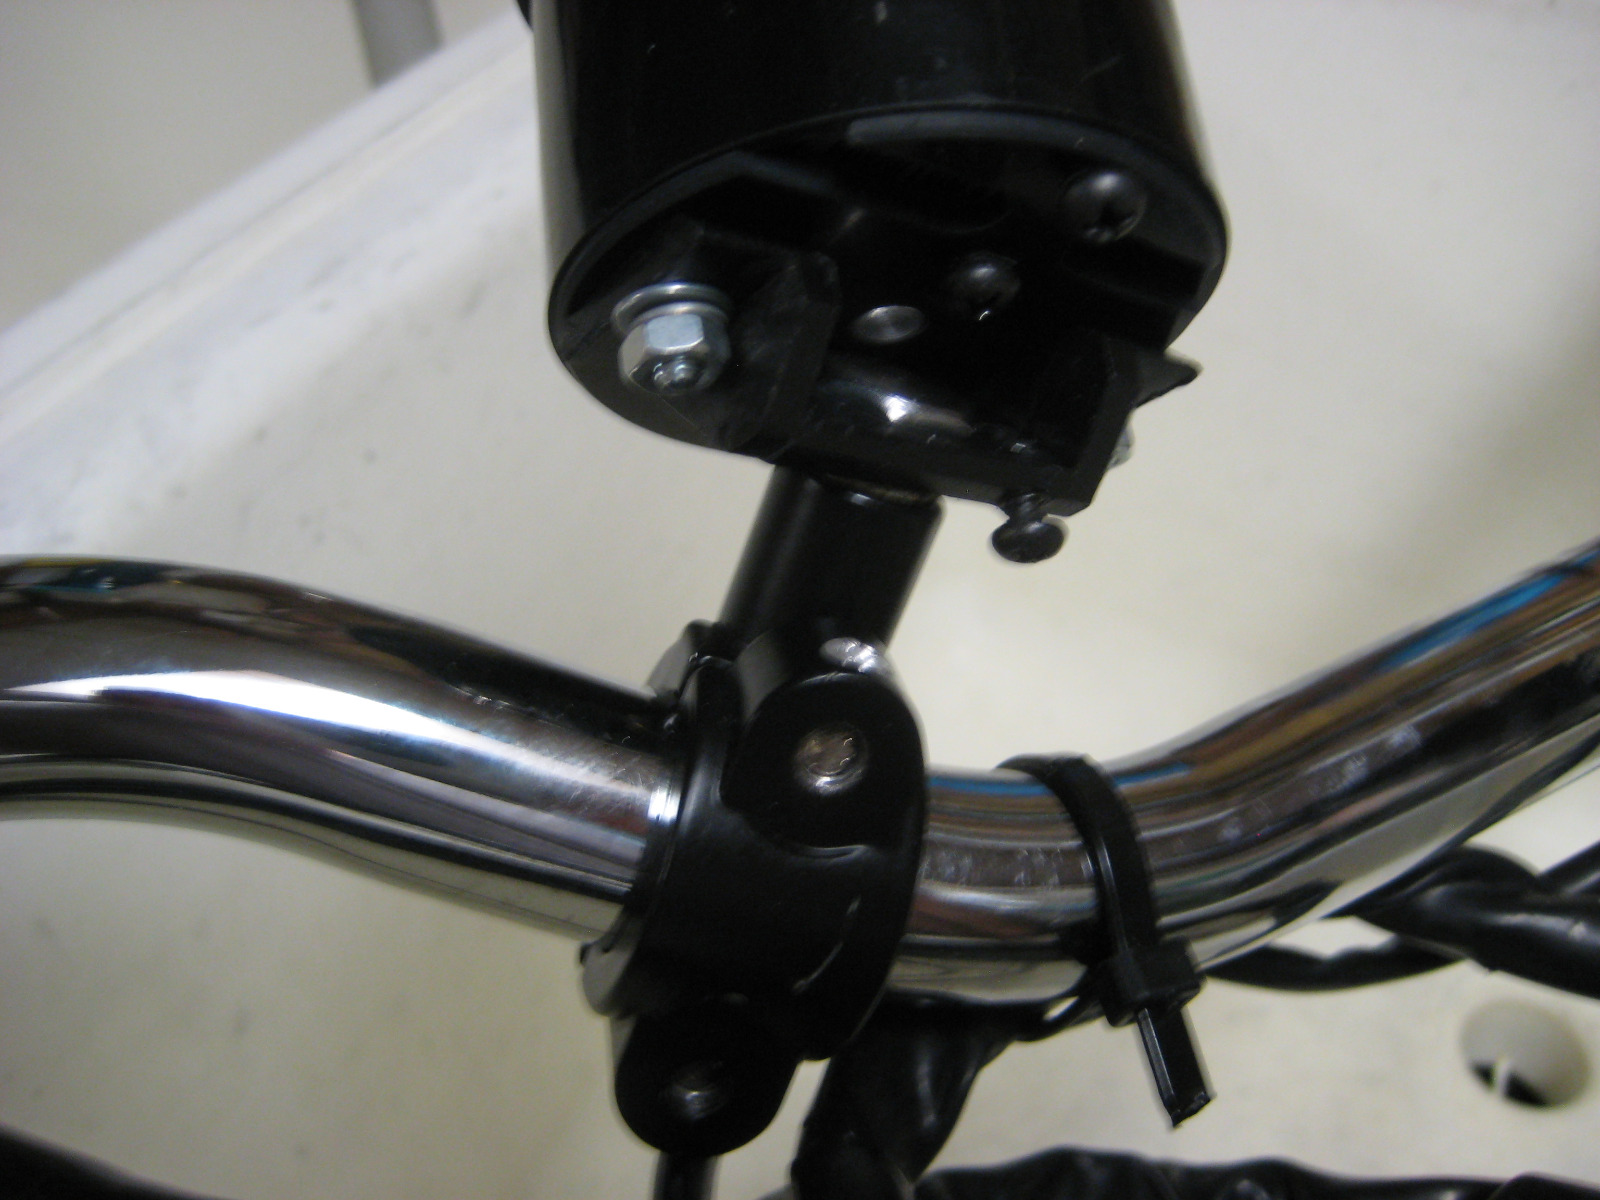
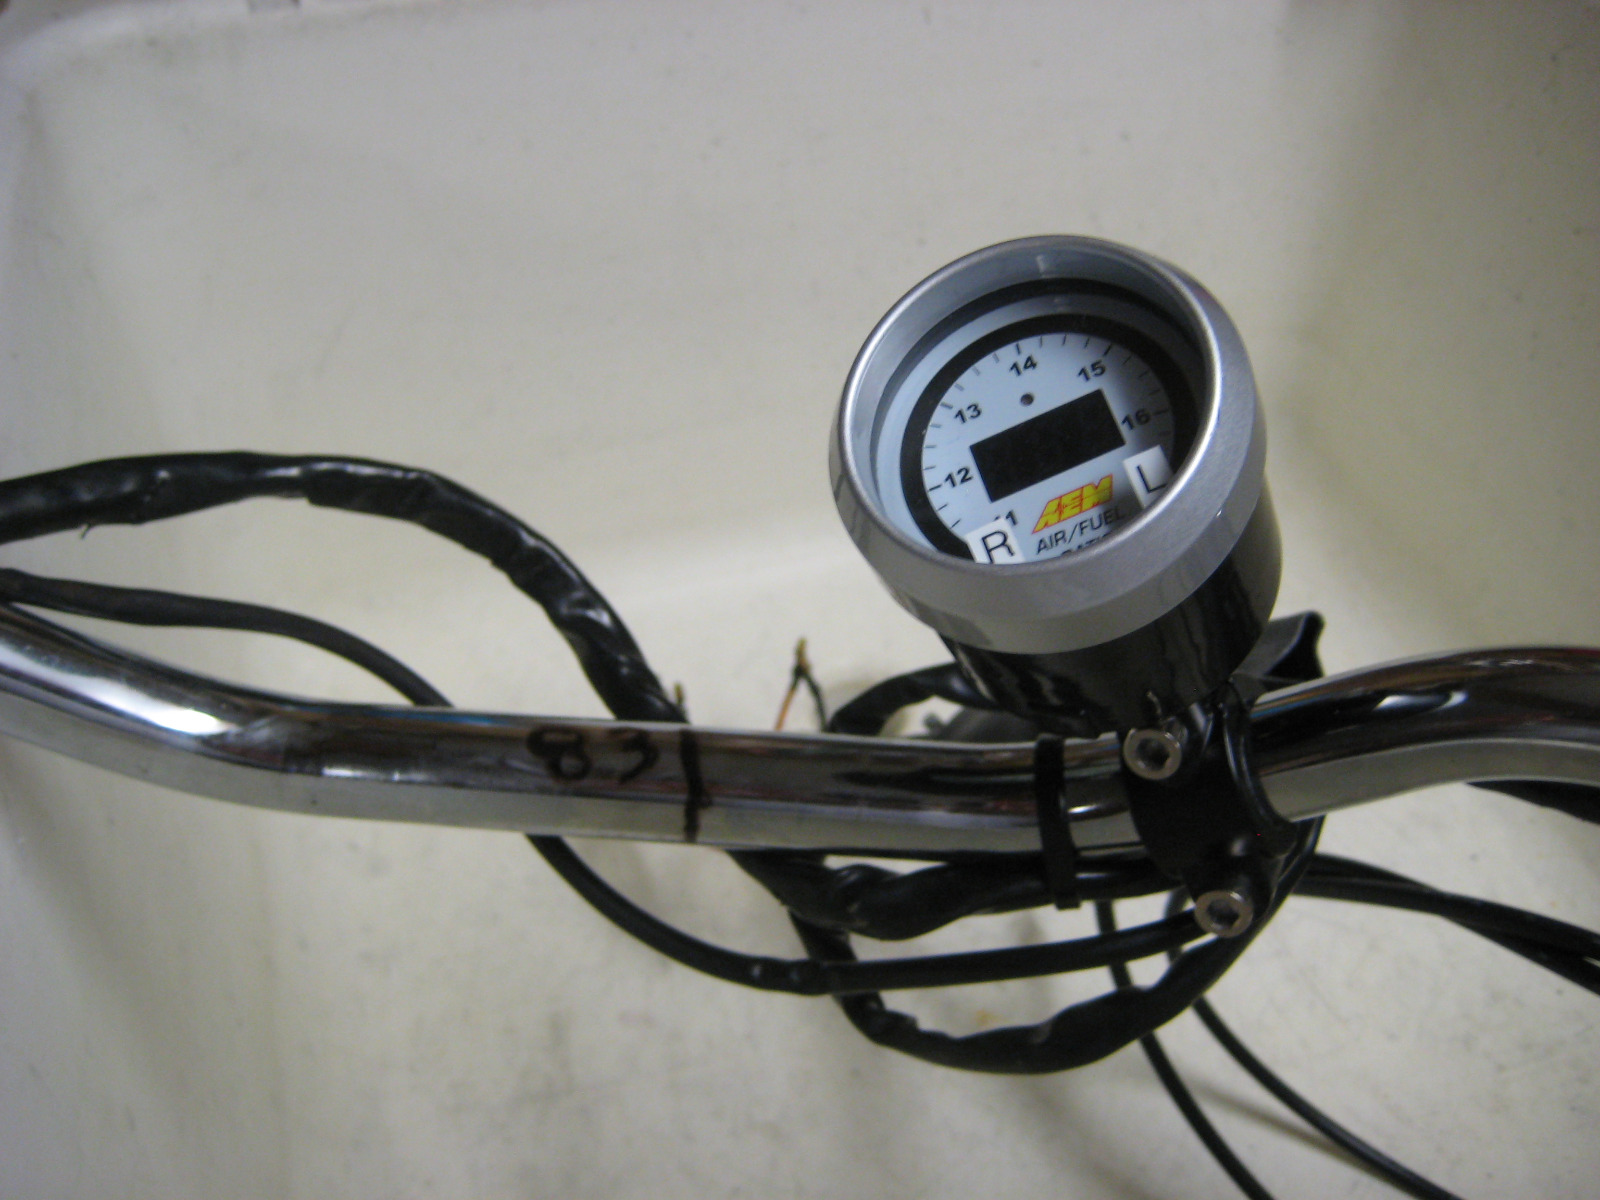
This is just a rough fit, will know better once the gauges and bar are finish assembled on the bike. I still need to make the mount rail and a centering plug for this particular muffler.
This is just a rough fit, will know better once the gauges and bar are finish assembled on the bike. I still need to make the mount rail and a centering plug for this particular muffler.
1978 KZ650B2 w 1197cc Z1 engine
1977 KZ650B1 w 750cc Spectre engine
1979 KZ650C3 w 831cc Hot Rod engine
1978 KZ650C2 w 762cc DFI project
1977 KZ650C1 stock restoration project
1978 KZ650B2 modified project
1978 KZ650B2 Injected Drag 831cc
1981 Z50R Honda tow bike
1977 KZ650B1 w 750cc Spectre engine
1979 KZ650C3 w 831cc Hot Rod engine
1978 KZ650C2 w 762cc DFI project
1977 KZ650C1 stock restoration project
1978 KZ650B2 modified project
1978 KZ650B2 Injected Drag 831cc
1981 Z50R Honda tow bike
The following user(s) said Thank You: howardhb
Please Log in or Create an account to join the conversation.
Moderators: Street Fighter LTD