
KZ650 Sleeper Build (KZ1000 engine transplant)
- Wookie58
-

- Away
- Moderator
-

Registered
- Posts: 6452
- Thanks: 4079
Re: KZ650 Sleeper Build (KZ1000 engine transplant)
30 Jan 2024 07:22
I feel your pain, my exhaust was a PITA (especially given it was originally made for this application
 )
)
1982 KZ1000 Ltd
www.kzrider.com/forum/11-projects/617631...-82-begins?start=192
kzrider.com/filebase-alias?view=download...d-fault-diagnosis&ca
www.kzrider.com/forum/11-projects/617631...-82-begins?start=192
kzrider.com/filebase-alias?view=download...d-fault-diagnosis&ca
The following user(s) said Thank You: Injected
Please Log in or Create an account to join the conversation.
- Injected
-
 Topic Author
- Offline
- User
-

Registered
- Posts: 1694
- Thanks: 1198
Re: KZ650 Sleeper Build (KZ1000 engine transplant)
30 Jan 2024 10:21 - 30 Jan 2024 10:22
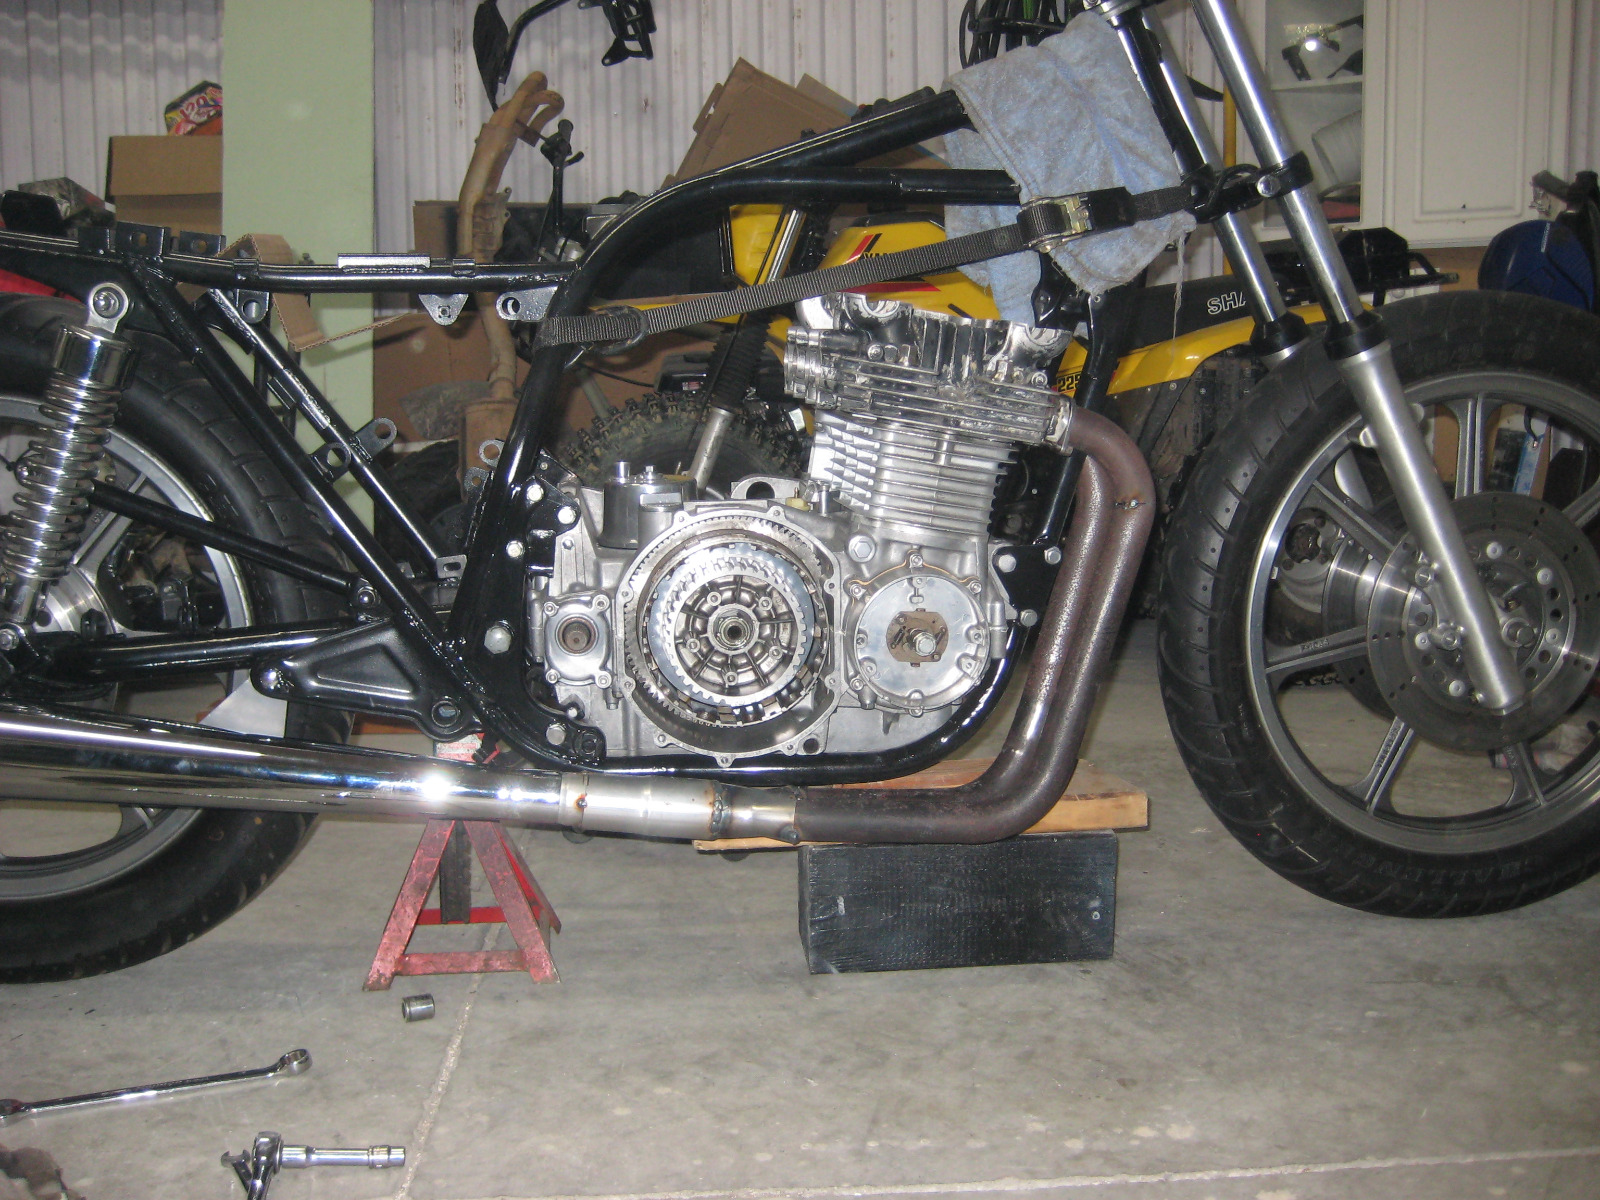
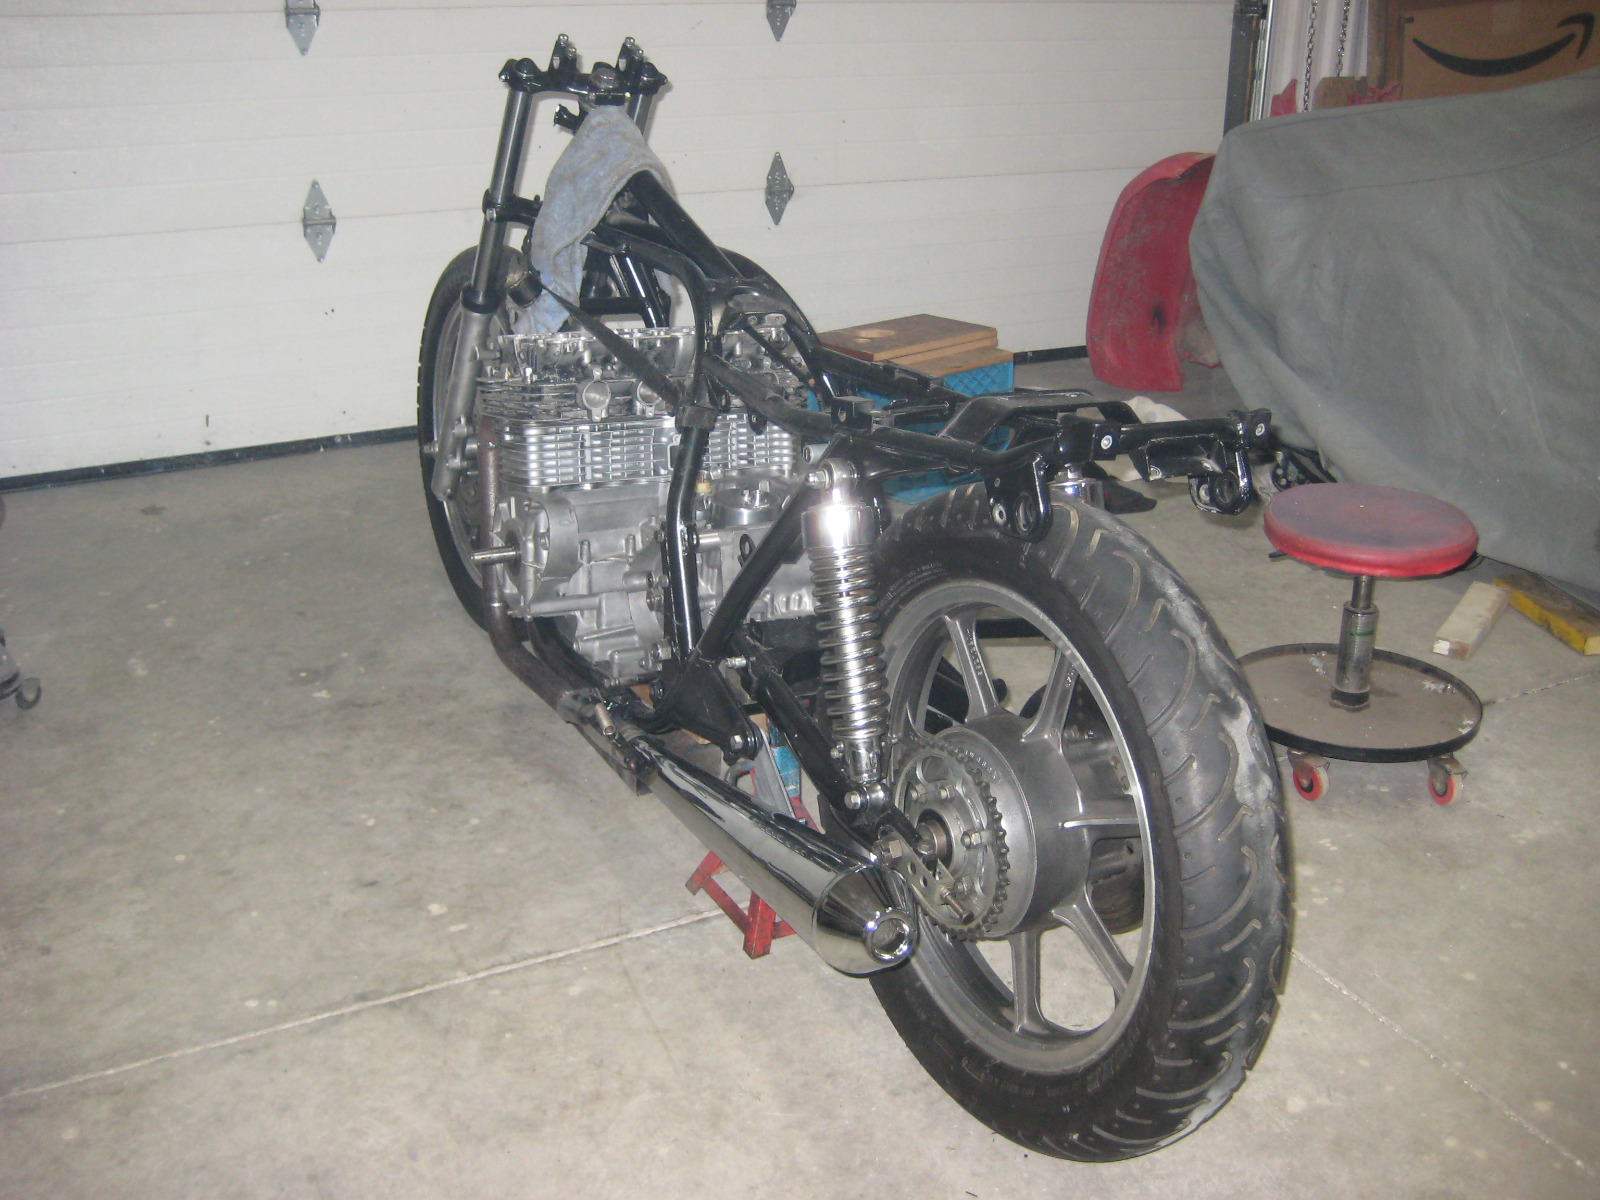
A off the shelf KZ1000 system would have hanged down way too low since I have the bike lowered front and rear by about 1.5" from stock. A lot of these hybrid builds have non stock suspension that raise the chassis rather than lower it so using a 1000 header works in those instances. I also wanted the exhaust to look as close to a stock system as possible and if you take a look at a stock 650 its tucked up pretty tight.
1978 KZ650B2 w 1197cc Z1 engine
1977 KZ650B1 w 750cc Spectre engine
1979 KZ650C3 w 831cc Hot Rod engine
1978 KZ650C2 w 762cc DFI project
1977 KZ650C1 stock restoration project
1978 KZ650B2 modified project
1978 KZ650B2 Injected Drag 831cc
1980 Z1 Custom Frame Drag 1327cc
1981 Z50R Honda tow bike
1977 KZ650B1 w 750cc Spectre engine
1979 KZ650C3 w 831cc Hot Rod engine
1978 KZ650C2 w 762cc DFI project
1977 KZ650C1 stock restoration project
1978 KZ650B2 modified project
1978 KZ650B2 Injected Drag 831cc
1980 Z1 Custom Frame Drag 1327cc
1981 Z50R Honda tow bike
Last edit: 30 Jan 2024 10:22 by Injected. Reason: sp
The following user(s) said Thank You: Wookie58
Please Log in or Create an account to join the conversation.
- Injected
-
Topic Author
- Offline
- User
-
Registered
- Posts: 1694
- Thanks: 1198
Re: KZ650 Sleeper Build (KZ1000 engine transplant)
31 Jan 2024 07:50
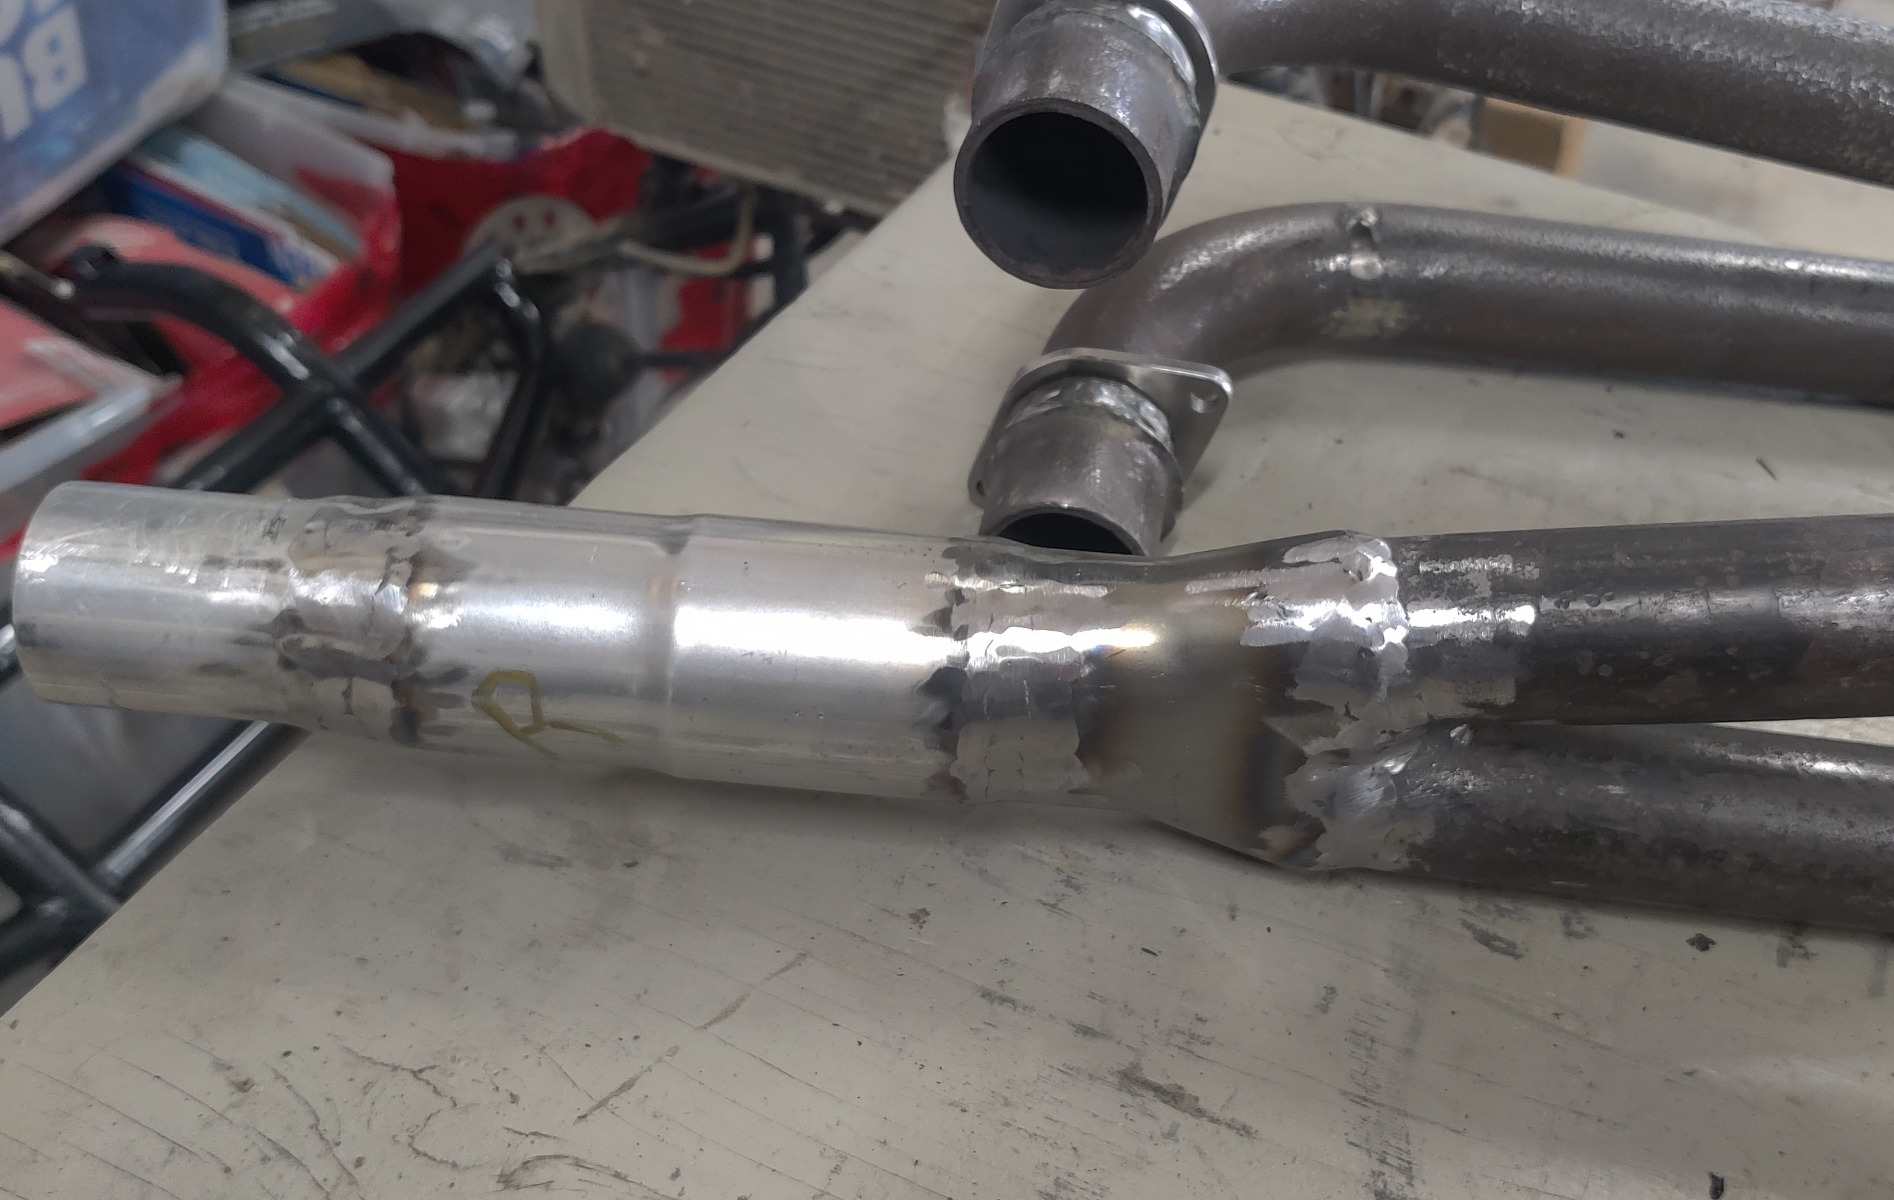
I got the exhaust fitted and final tack welded last night, left it with my friend to complete the welds and smooth them out.

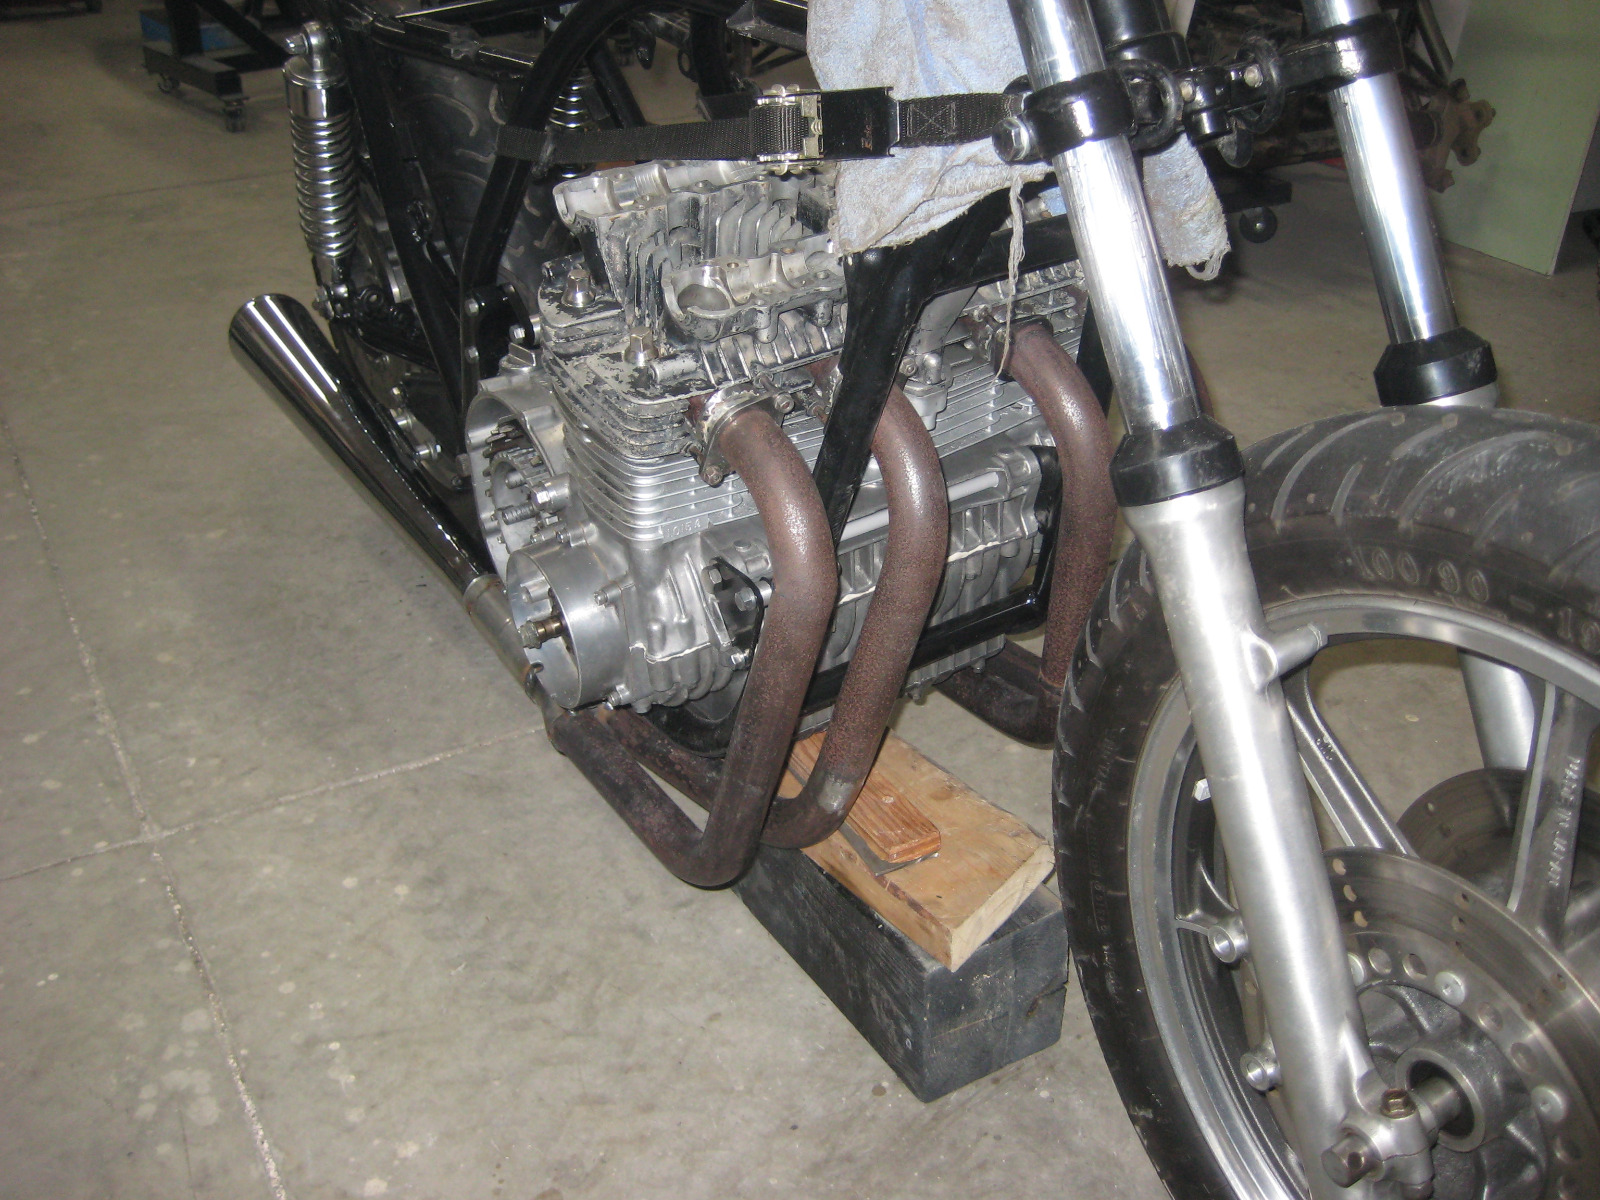


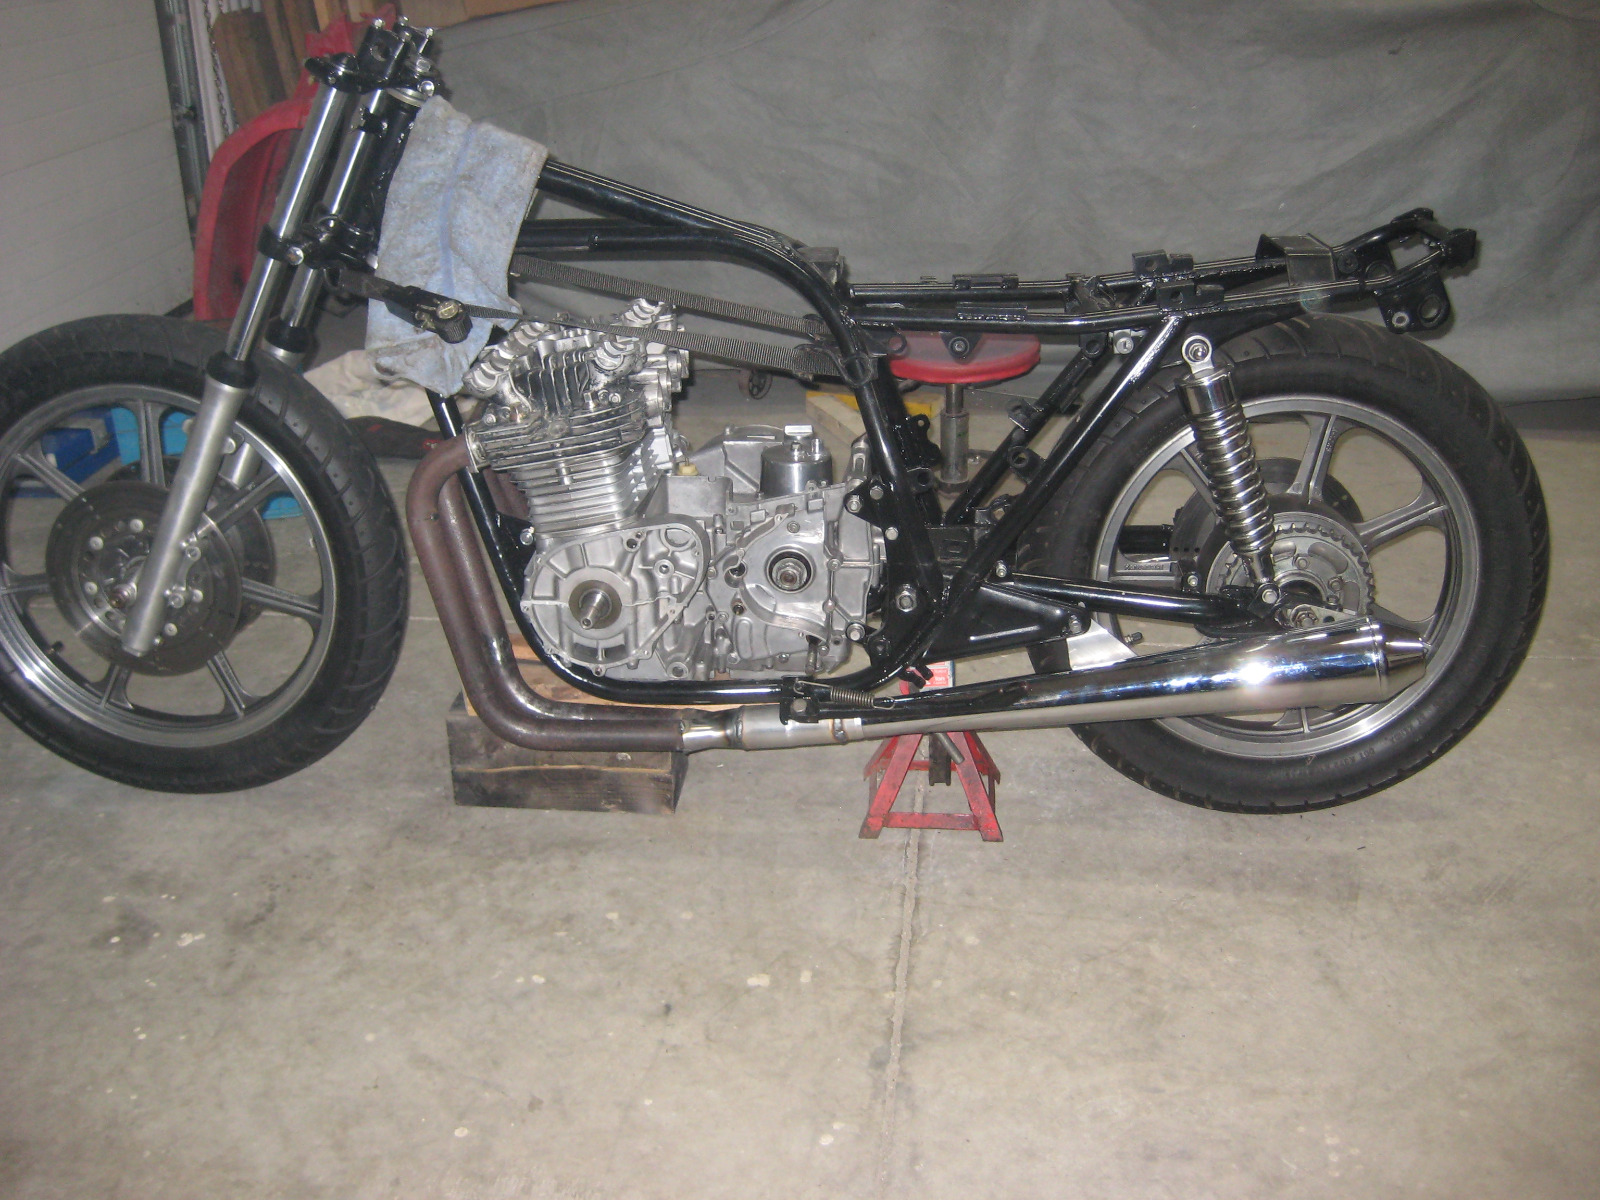
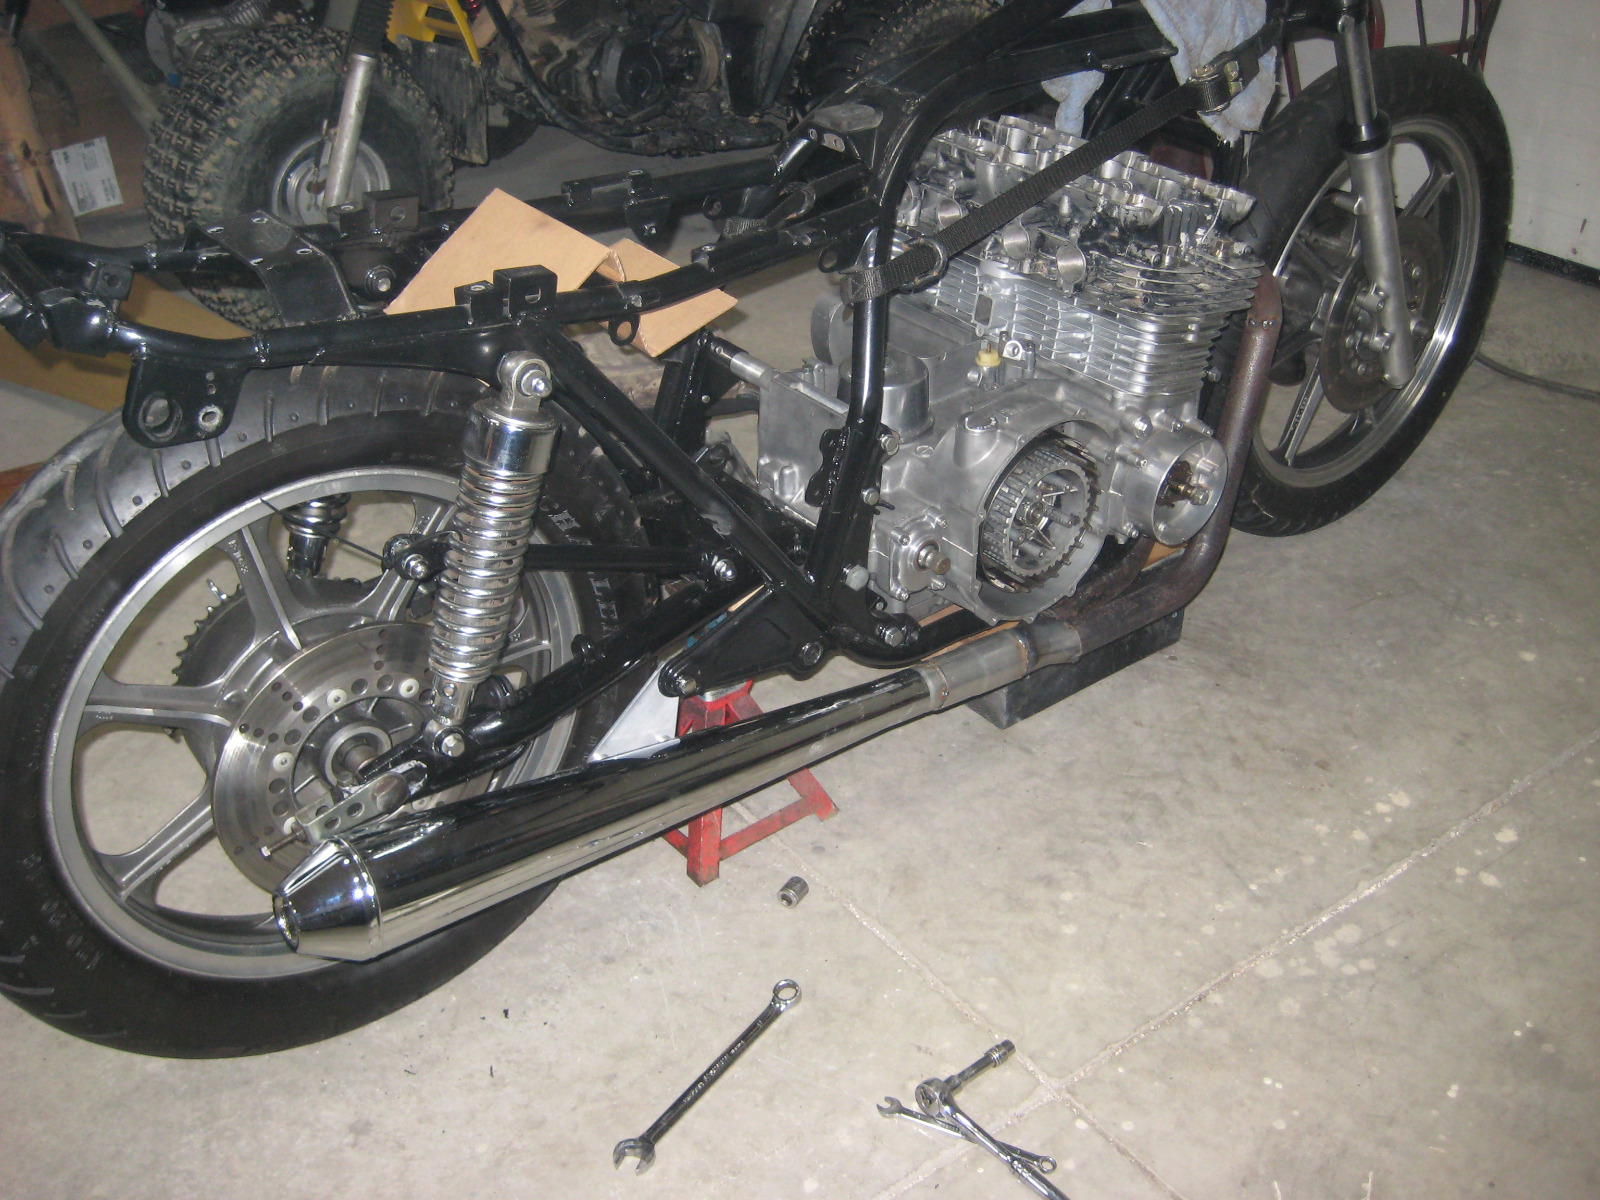
When he gets it done I will need to blast and paint the headers. I will also need to make some new muffler bracket spacers to set them at the same height and angle as they are slightly off. Luckily there is a bit of wiggle room into those muffler slip joints.
The pipes are set higher than a stock 650 system because there is no room to put a cross over pipe. What I did discover is that just like the MAC 4 into 2 system the left bank and right bank are set slightly different mostly to get under the kick stand attachment.
The other thing I discovered is that the rear brake foot pedal fouls on the clutch cover. I am going to have to heat and bend it out of the way.
1978 KZ650B2 w 1197cc Z1 engine
1977 KZ650B1 w 750cc Spectre engine
1979 KZ650C3 w 831cc Hot Rod engine
1978 KZ650C2 w 762cc DFI project
1977 KZ650C1 stock restoration project
1978 KZ650B2 modified project
1978 KZ650B2 Injected Drag 831cc
1980 Z1 Custom Frame Drag 1327cc
1981 Z50R Honda tow bike
1977 KZ650B1 w 750cc Spectre engine
1979 KZ650C3 w 831cc Hot Rod engine
1978 KZ650C2 w 762cc DFI project
1977 KZ650C1 stock restoration project
1978 KZ650B2 modified project
1978 KZ650B2 Injected Drag 831cc
1980 Z1 Custom Frame Drag 1327cc
1981 Z50R Honda tow bike
The following user(s) said Thank You: Wookie58
Please Log in or Create an account to join the conversation.
- Injected
-
Topic Author
- Offline
- User
-
Registered
- Posts: 1694
- Thanks: 1198
Re: KZ650 Sleeper Build (KZ1000 engine transplant)
31 Jan 2024 11:28 - 31 Jan 2024 11:31
I have been looking at some pictures of other examples of this type of engine swap and most builders use rear set pegs.
I did find some pictures of examples with stock looking brake pedals, some had used a spacer to kick out the pedal and some you can see the pedal was bent or split then re welded.
The foot pedal seems to be very stiff so bending it may be a crap shoot. I believe I will try a spacer to kick it out and see how much room I can gain.
Bending it would be a last resort as heating it will discolor it. I also own quite a few brake pedals so will go thru them and see if any offer more clearance than others since there seems to be a slight difference between B models and C models units.
I am really not sure how bad the interference is until put the clutch cover in place. Never thought about it being a issue!
Here is a example I found :
You can see there is a shim between the frame and the pedal.
1978 KZ650B2 w 1197cc Z1 engine
1977 KZ650B1 w 750cc Spectre engine
1979 KZ650C3 w 831cc Hot Rod engine
1978 KZ650C2 w 762cc DFI project
1977 KZ650C1 stock restoration project
1978 KZ650B2 modified project
1978 KZ650B2 Injected Drag 831cc
1980 Z1 Custom Frame Drag 1327cc
1981 Z50R Honda tow bike
1977 KZ650B1 w 750cc Spectre engine
1979 KZ650C3 w 831cc Hot Rod engine
1978 KZ650C2 w 762cc DFI project
1977 KZ650C1 stock restoration project
1978 KZ650B2 modified project
1978 KZ650B2 Injected Drag 831cc
1980 Z1 Custom Frame Drag 1327cc
1981 Z50R Honda tow bike
Last edit: 31 Jan 2024 11:31 by Injected. Reason: pic
Please Log in or Create an account to join the conversation.
- Injected
-
Topic Author
- Offline
- User
-
Registered
- Posts: 1694
- Thanks: 1198
Re: KZ650 Sleeper Build (KZ1000 engine transplant)
02 Feb 2024 12:58
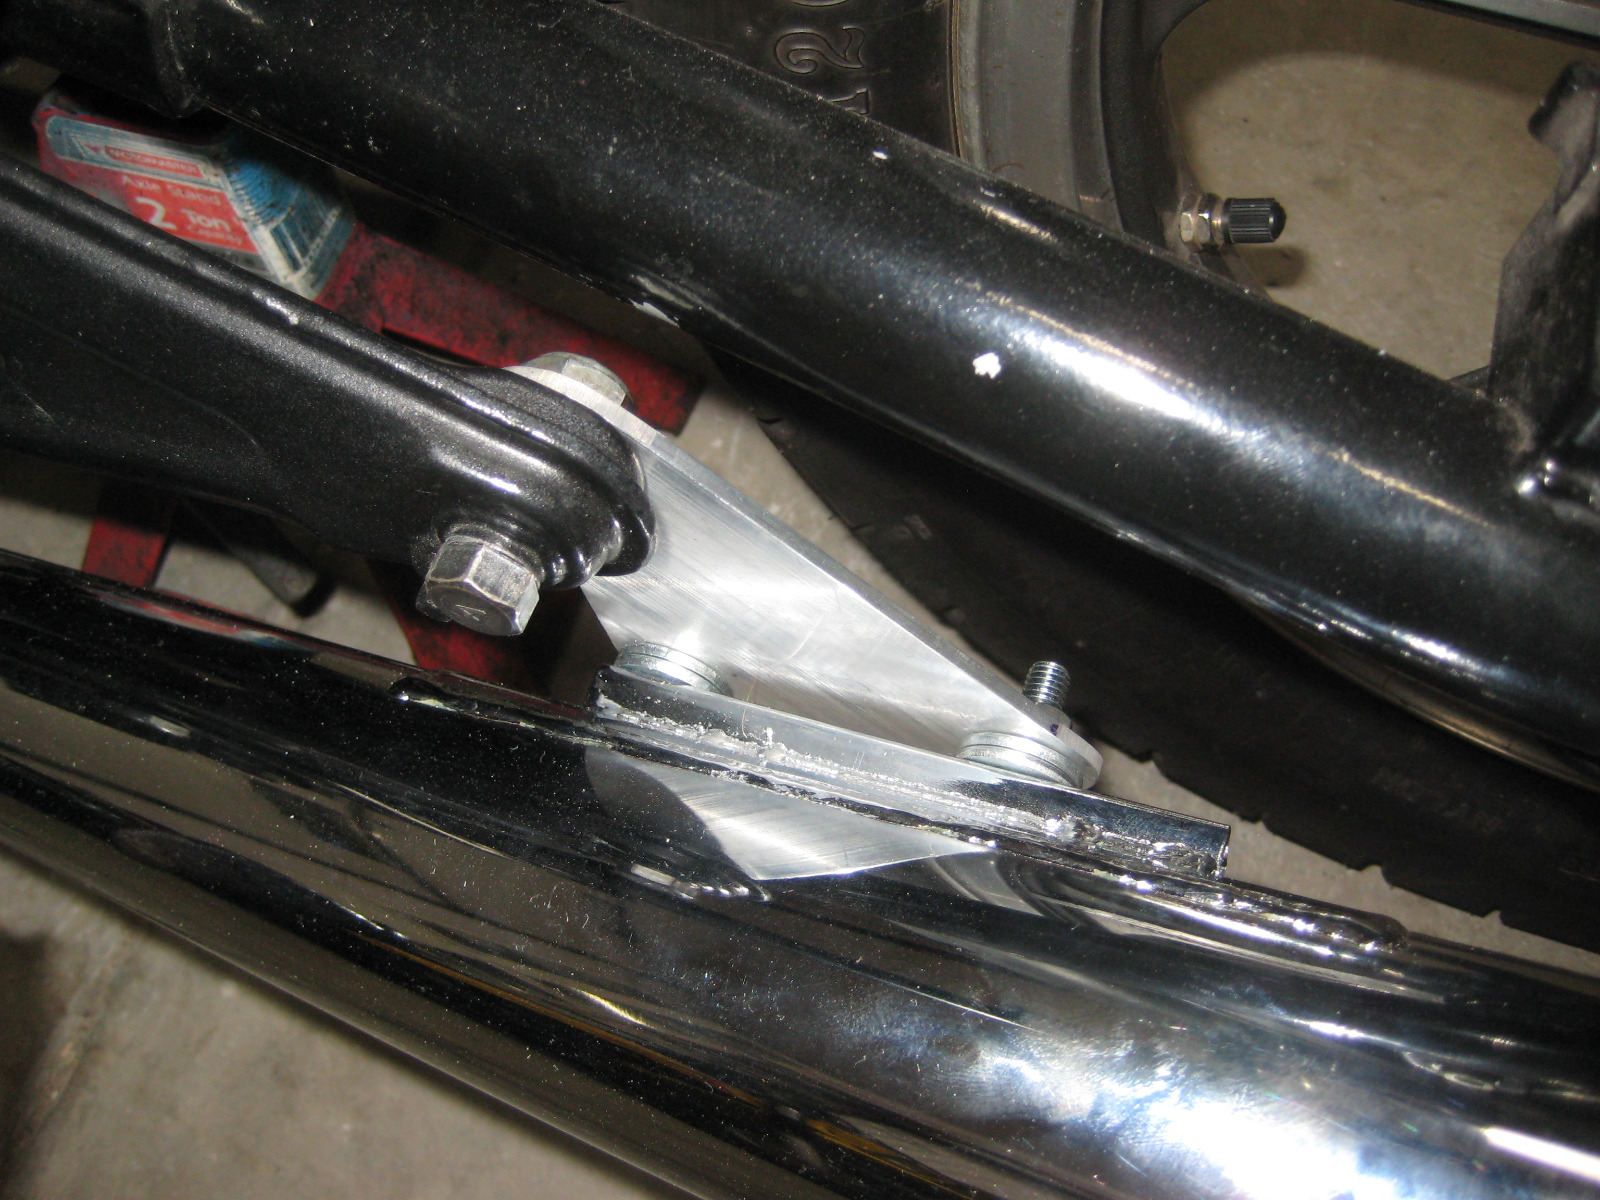
I was out in the garage today fabricating a 6061 shim to fit the back of the brake pedal. I left it thick till I get a front cap made, I need a cap to recess a M6 lock nut that holds the pedal on its pivot shaft.
The stock nut is a domed unit that sits on a washer, had to get rid of both of those items so the pedal could be slid on the pivot away from the frame.
I am pretty sure the pedal can be kicked out by about 5/16 to 3/8", I can also grind some material off the inside face of the foot platform if needed.
Will post pictures once completed.
1978 KZ650B2 w 1197cc Z1 engine
1977 KZ650B1 w 750cc Spectre engine
1979 KZ650C3 w 831cc Hot Rod engine
1978 KZ650C2 w 762cc DFI project
1977 KZ650C1 stock restoration project
1978 KZ650B2 modified project
1978 KZ650B2 Injected Drag 831cc
1980 Z1 Custom Frame Drag 1327cc
1981 Z50R Honda tow bike
1977 KZ650B1 w 750cc Spectre engine
1979 KZ650C3 w 831cc Hot Rod engine
1978 KZ650C2 w 762cc DFI project
1977 KZ650C1 stock restoration project
1978 KZ650B2 modified project
1978 KZ650B2 Injected Drag 831cc
1980 Z1 Custom Frame Drag 1327cc
1981 Z50R Honda tow bike
The following user(s) said Thank You: Wookie58
Please Log in or Create an account to join the conversation.
- Wookie58
-
- Away
- Moderator
-
Registered
- Posts: 6452
- Thanks: 4079
Re: KZ650 Sleeper Build (KZ1000 engine transplant)
02 Feb 2024 13:14
Could you open up the bore through the brake pedal and turn a nut from hex bar that would run through the pedal?
1982 KZ1000 Ltd
www.kzrider.com/forum/11-projects/617631...-82-begins?start=192
kzrider.com/filebase-alias?view=download...d-fault-diagnosis&ca
www.kzrider.com/forum/11-projects/617631...-82-begins?start=192
kzrider.com/filebase-alias?view=download...d-fault-diagnosis&ca
The following user(s) said Thank You: Injected, howardhb
Please Log in or Create an account to join the conversation.
- Injected
-
Topic Author
- Offline
- User
-
Registered
- Posts: 1694
- Thanks: 1198
Re: KZ650 Sleeper Build (KZ1000 engine transplant)
02 Feb 2024 16:12I always design around not having to modify stock parts if I can.Could you open up the bore through the brake pedal and turn a nut from hex bar that would run through the pedal?
The end "hat" is still in the chuck, just need to size the OD then part off to finish it.
To me there seems to be lots of engagement on the splined pivot shaft even when pulled out a bit. I measured what I required to get a nut on the end and designed the "hat" to retain the brake pedal housing. The nut is recessed flush with the outside of the hat and I bored clearance to get a socket half way onto the nut. Will see if this is adequate or not
")
1978 KZ650B2 w 1197cc Z1 engine
1977 KZ650B1 w 750cc Spectre engine
1979 KZ650C3 w 831cc Hot Rod engine
1978 KZ650C2 w 762cc DFI project
1977 KZ650C1 stock restoration project
1978 KZ650B2 modified project
1978 KZ650B2 Injected Drag 831cc
1980 Z1 Custom Frame Drag 1327cc
1981 Z50R Honda tow bike
1977 KZ650B1 w 750cc Spectre engine
1979 KZ650C3 w 831cc Hot Rod engine
1978 KZ650C2 w 762cc DFI project
1977 KZ650C1 stock restoration project
1978 KZ650B2 modified project
1978 KZ650B2 Injected Drag 831cc
1980 Z1 Custom Frame Drag 1327cc
1981 Z50R Honda tow bike
The following user(s) said Thank You: Wookie58
Please Log in or Create an account to join the conversation.
- Injected
-
Topic Author
- Offline
- User
-
Registered
- Posts: 1694
- Thanks: 1198
Re: KZ650 Sleeper Build (KZ1000 engine transplant)
03 Feb 2024 11:10 - 03 Feb 2024 11:11
I finished making the foot pedal end shim and end cap to shift the pedal outboard to miss the clutch cover.


I messed up on the stud size on the pivot shaft, it was M8 rather than M6, and I did not find out till I went to slip the end cap on!
Luckily I was able to fix it, just drilled it 5/16" then used a M8 long nut which I turned down to fit inside the hat then left enough hex to be able to tighten it.
Should be OK with Loctite on the threads.
In the end the shim at the back kicked the pedal 5/16" off the frame. Will see how much clearance that gives me once the frame is down off the work cart.
1978 KZ650B2 w 1197cc Z1 engine
1977 KZ650B1 w 750cc Spectre engine
1979 KZ650C3 w 831cc Hot Rod engine
1978 KZ650C2 w 762cc DFI project
1977 KZ650C1 stock restoration project
1978 KZ650B2 modified project
1978 KZ650B2 Injected Drag 831cc
1980 Z1 Custom Frame Drag 1327cc
1981 Z50R Honda tow bike
1977 KZ650B1 w 750cc Spectre engine
1979 KZ650C3 w 831cc Hot Rod engine
1978 KZ650C2 w 762cc DFI project
1977 KZ650C1 stock restoration project
1978 KZ650B2 modified project
1978 KZ650B2 Injected Drag 831cc
1980 Z1 Custom Frame Drag 1327cc
1981 Z50R Honda tow bike
Last edit: 03 Feb 2024 11:11 by Injected. Reason: sp
The following user(s) said Thank You: sf4t7, Wookie58
Please Log in or Create an account to join the conversation.
- Injected
-
Topic Author
- Offline
- User
-
Registered
- Posts: 1694
- Thanks: 1198
Re: KZ650 Sleeper Build (KZ1000 engine transplant)
07 Feb 2024 14:25 - 07 Feb 2024 14:44
Got the head pipes welded, he only has MIG so not as nice looking as some others can achieve. Should be OK once bead blasted then painted high heat silver.
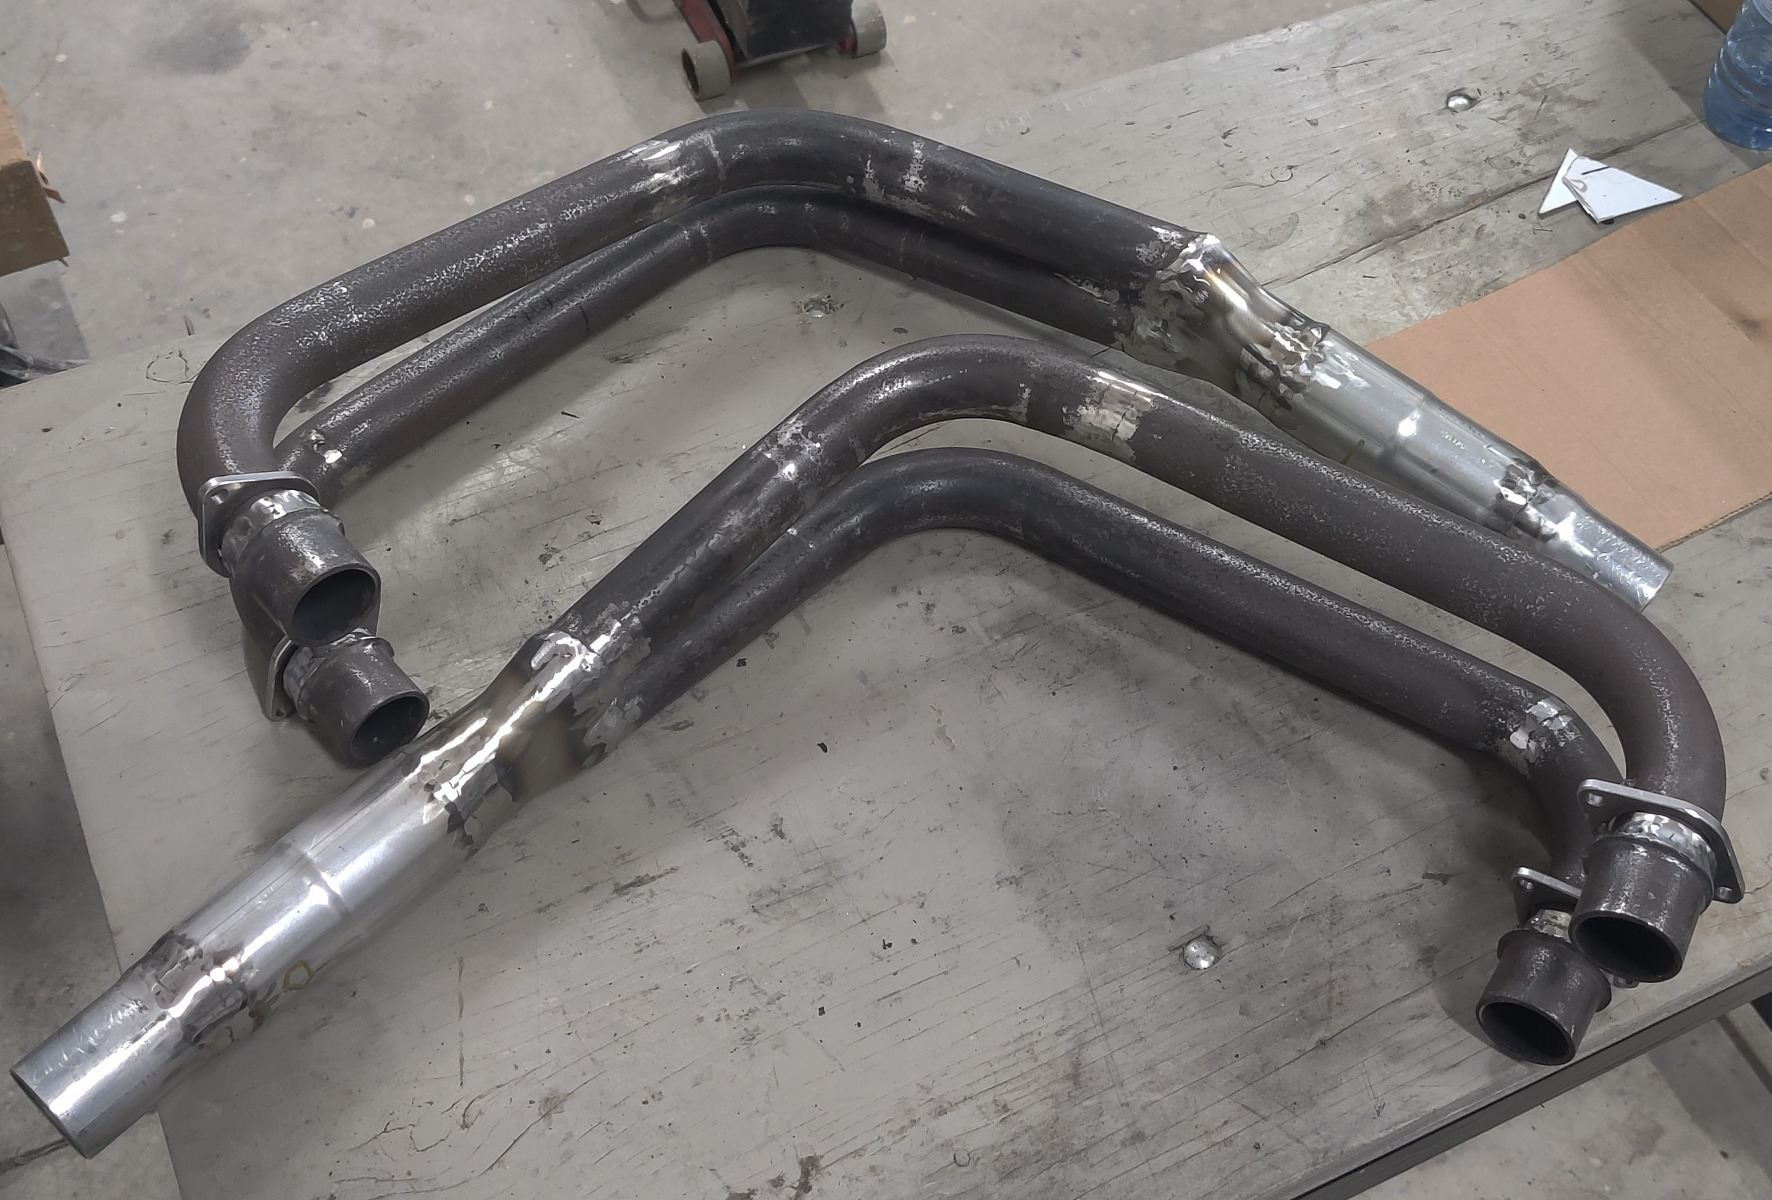
At some point I may opt to have them copied in stainless, but I am dollar challenged at the moment so it was never going to happen. The plan is to work with this for start up to get me on the road this coming April. I have always been more about the go than the show
At some point I may opt to have them copied in stainless, but I am dollar challenged at the moment so it was never going to happen. The plan is to work with this for start up to get me on the road this coming April. I have always been more about the go than the show
1978 KZ650B2 w 1197cc Z1 engine
1977 KZ650B1 w 750cc Spectre engine
1979 KZ650C3 w 831cc Hot Rod engine
1978 KZ650C2 w 762cc DFI project
1977 KZ650C1 stock restoration project
1978 KZ650B2 modified project
1978 KZ650B2 Injected Drag 831cc
1980 Z1 Custom Frame Drag 1327cc
1981 Z50R Honda tow bike
1977 KZ650B1 w 750cc Spectre engine
1979 KZ650C3 w 831cc Hot Rod engine
1978 KZ650C2 w 762cc DFI project
1977 KZ650C1 stock restoration project
1978 KZ650B2 modified project
1978 KZ650B2 Injected Drag 831cc
1980 Z1 Custom Frame Drag 1327cc
1981 Z50R Honda tow bike
Last edit: 07 Feb 2024 14:44 by Injected. Reason: sp
Please Log in or Create an account to join the conversation.
- Injected
-
Topic Author
- Offline
- User
-
Registered
- Posts: 1694
- Thanks: 1198
Re: KZ650 Sleeper Build (KZ1000 engine transplant)
07 Feb 2024 14:51 - 07 Feb 2024 18:03
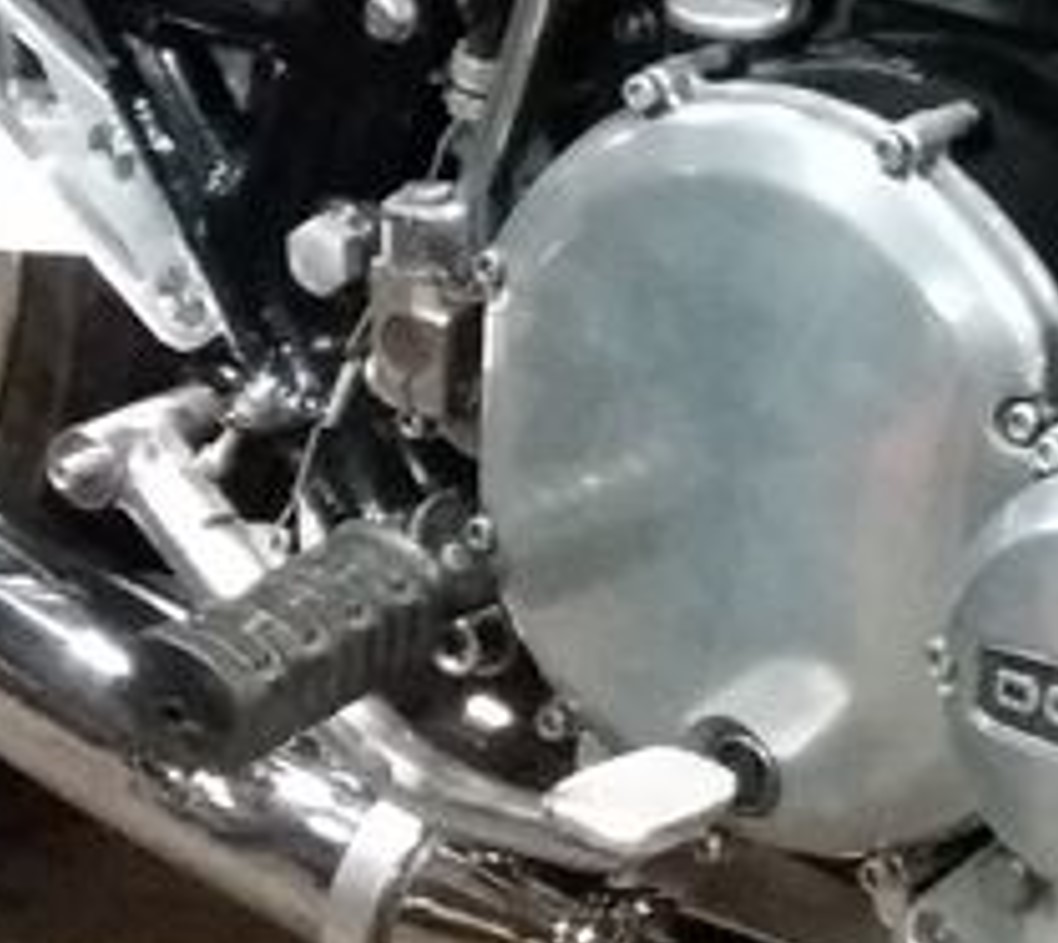
At the exhaust welding session I had the chance to check the valve cover clearance to the frame.
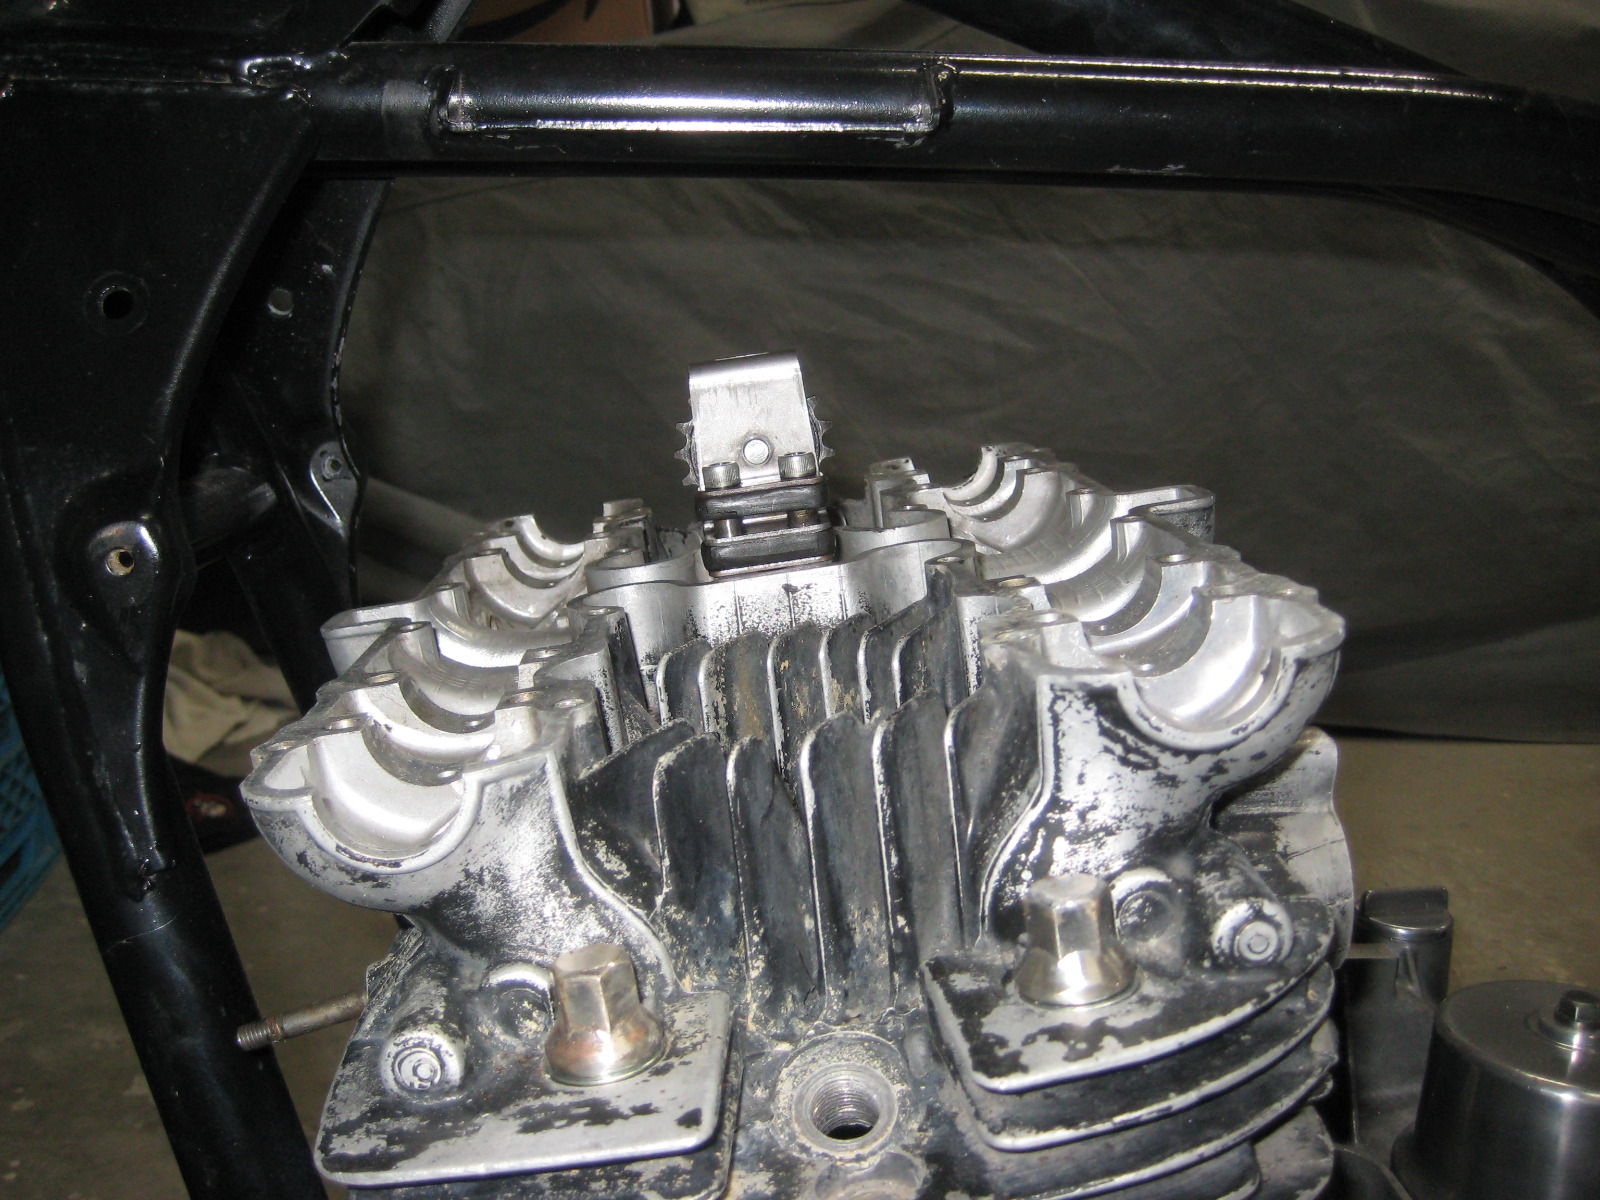
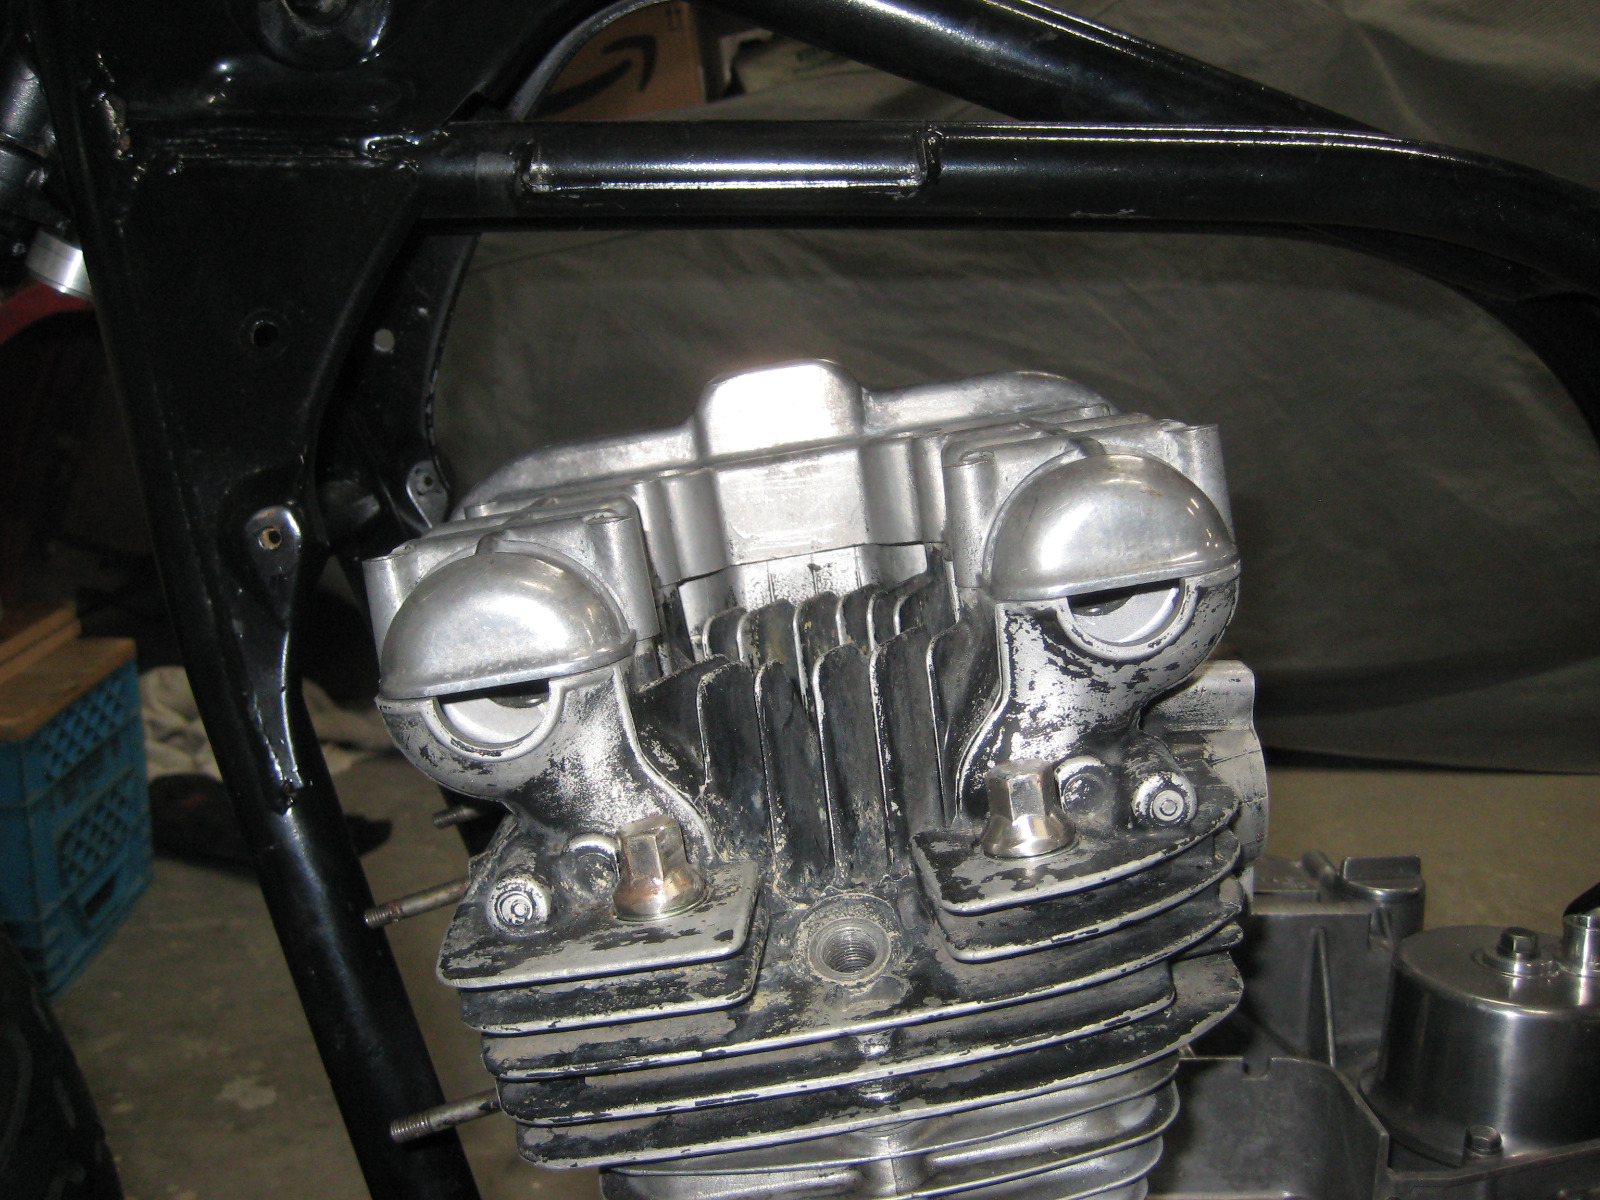
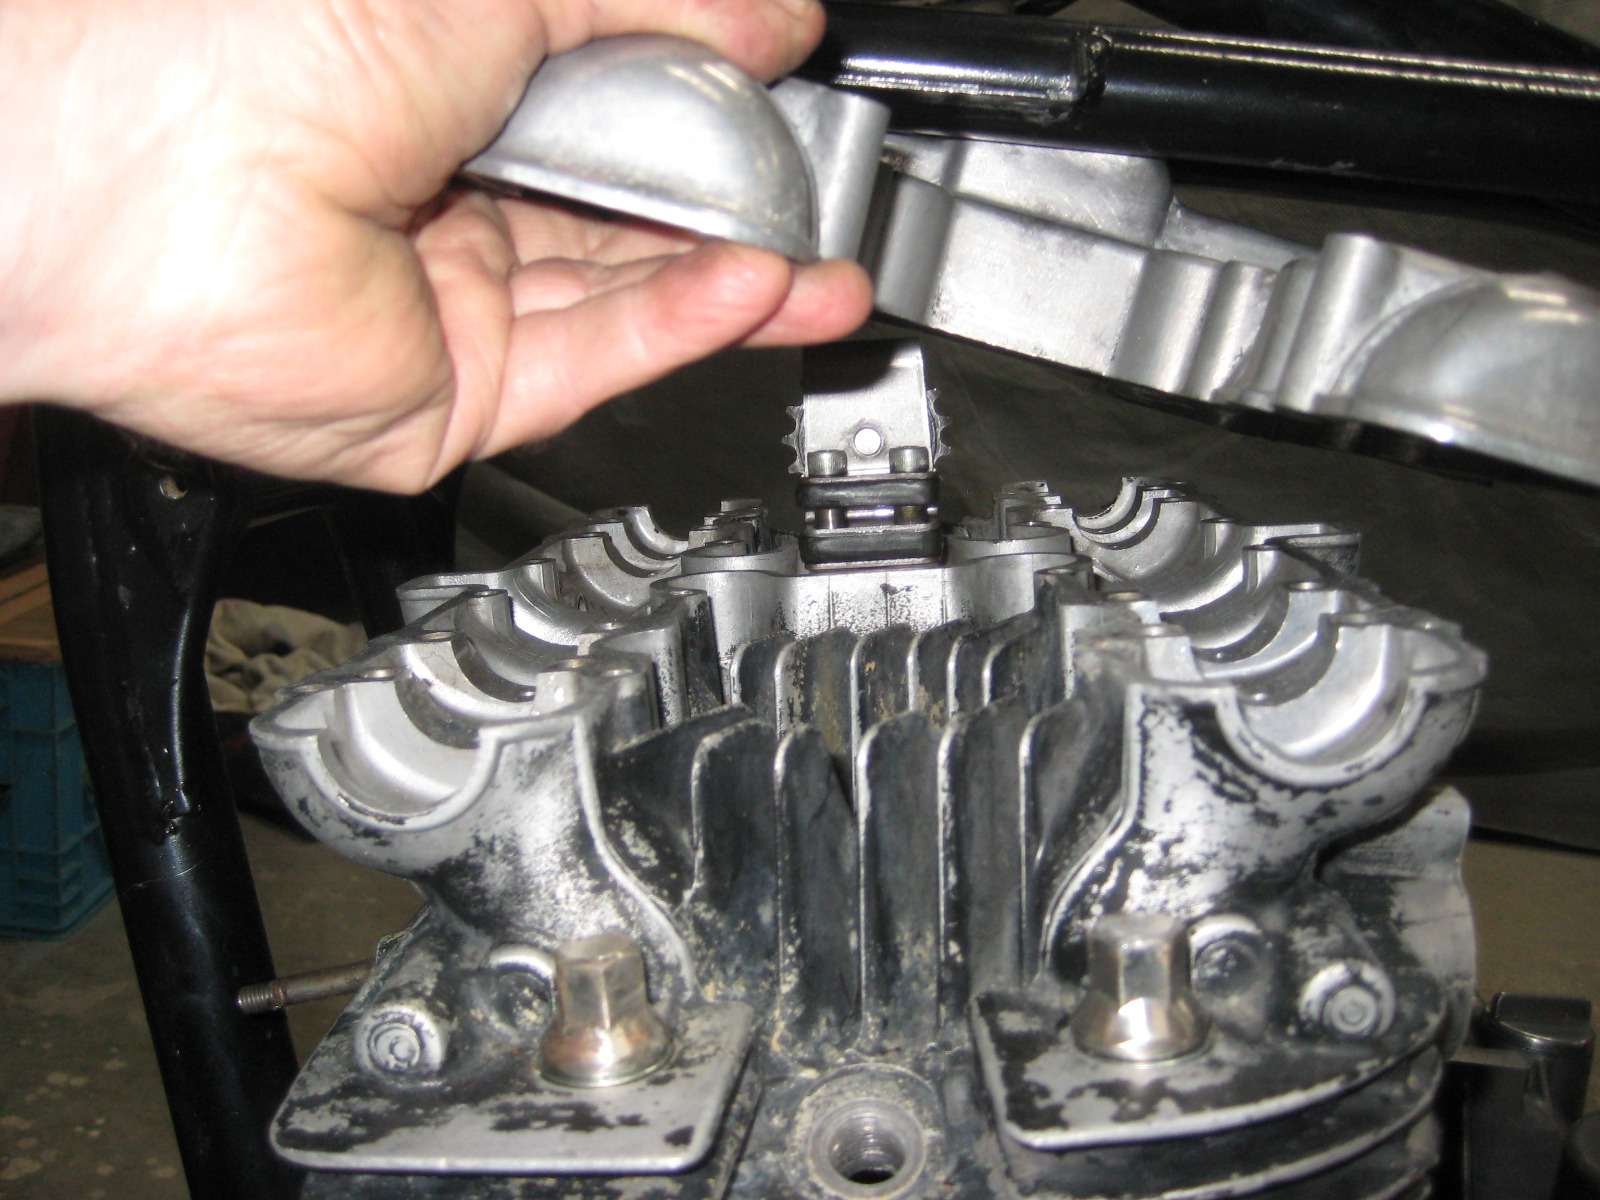
It seems to be enough to remove it without having to unbolt anything other than the coils (which is normal)
It may require removing the center idler, I just did not have enough time to fully investigate that evening. The cam sprockets sit lower than the center idler so that is the main obstacle.
Once I go to build the engine and install the carbs I will see what I need to do to remove it. Worse case is the carbs will need to be removed because I know it can slide off to the rear.
I had always heard horror stories about this type of engine swap of the engine having to be dropped off the mounts to check the valve lash - Myth Busted!
1978 KZ650B2 w 1197cc Z1 engine
1977 KZ650B1 w 750cc Spectre engine
1979 KZ650C3 w 831cc Hot Rod engine
1978 KZ650C2 w 762cc DFI project
1977 KZ650C1 stock restoration project
1978 KZ650B2 modified project
1978 KZ650B2 Injected Drag 831cc
1980 Z1 Custom Frame Drag 1327cc
1981 Z50R Honda tow bike
1977 KZ650B1 w 750cc Spectre engine
1979 KZ650C3 w 831cc Hot Rod engine
1978 KZ650C2 w 762cc DFI project
1977 KZ650C1 stock restoration project
1978 KZ650B2 modified project
1978 KZ650B2 Injected Drag 831cc
1980 Z1 Custom Frame Drag 1327cc
1981 Z50R Honda tow bike
Last edit: 07 Feb 2024 18:03 by Injected. Reason: info
The following user(s) said Thank You: Wookie58
Please Log in or Create an account to join the conversation.
- Injected
-
Topic Author
- Offline
- User
-
Registered
- Posts: 1694
- Thanks: 1198
Re: KZ650 Sleeper Build (KZ1000 engine transplant)
08 Feb 2024 08:36 - 08 Feb 2024 08:39
Got to thinking about tuning this beast last night.
Years ago I built a DIY tail pipe sniffer to hold a narrow band O2 sensor, it hooked that up to a digital voltage gauge and it seemed to work for a bit then crapped out. I shelved that unit but last night I dragged out the hardware.
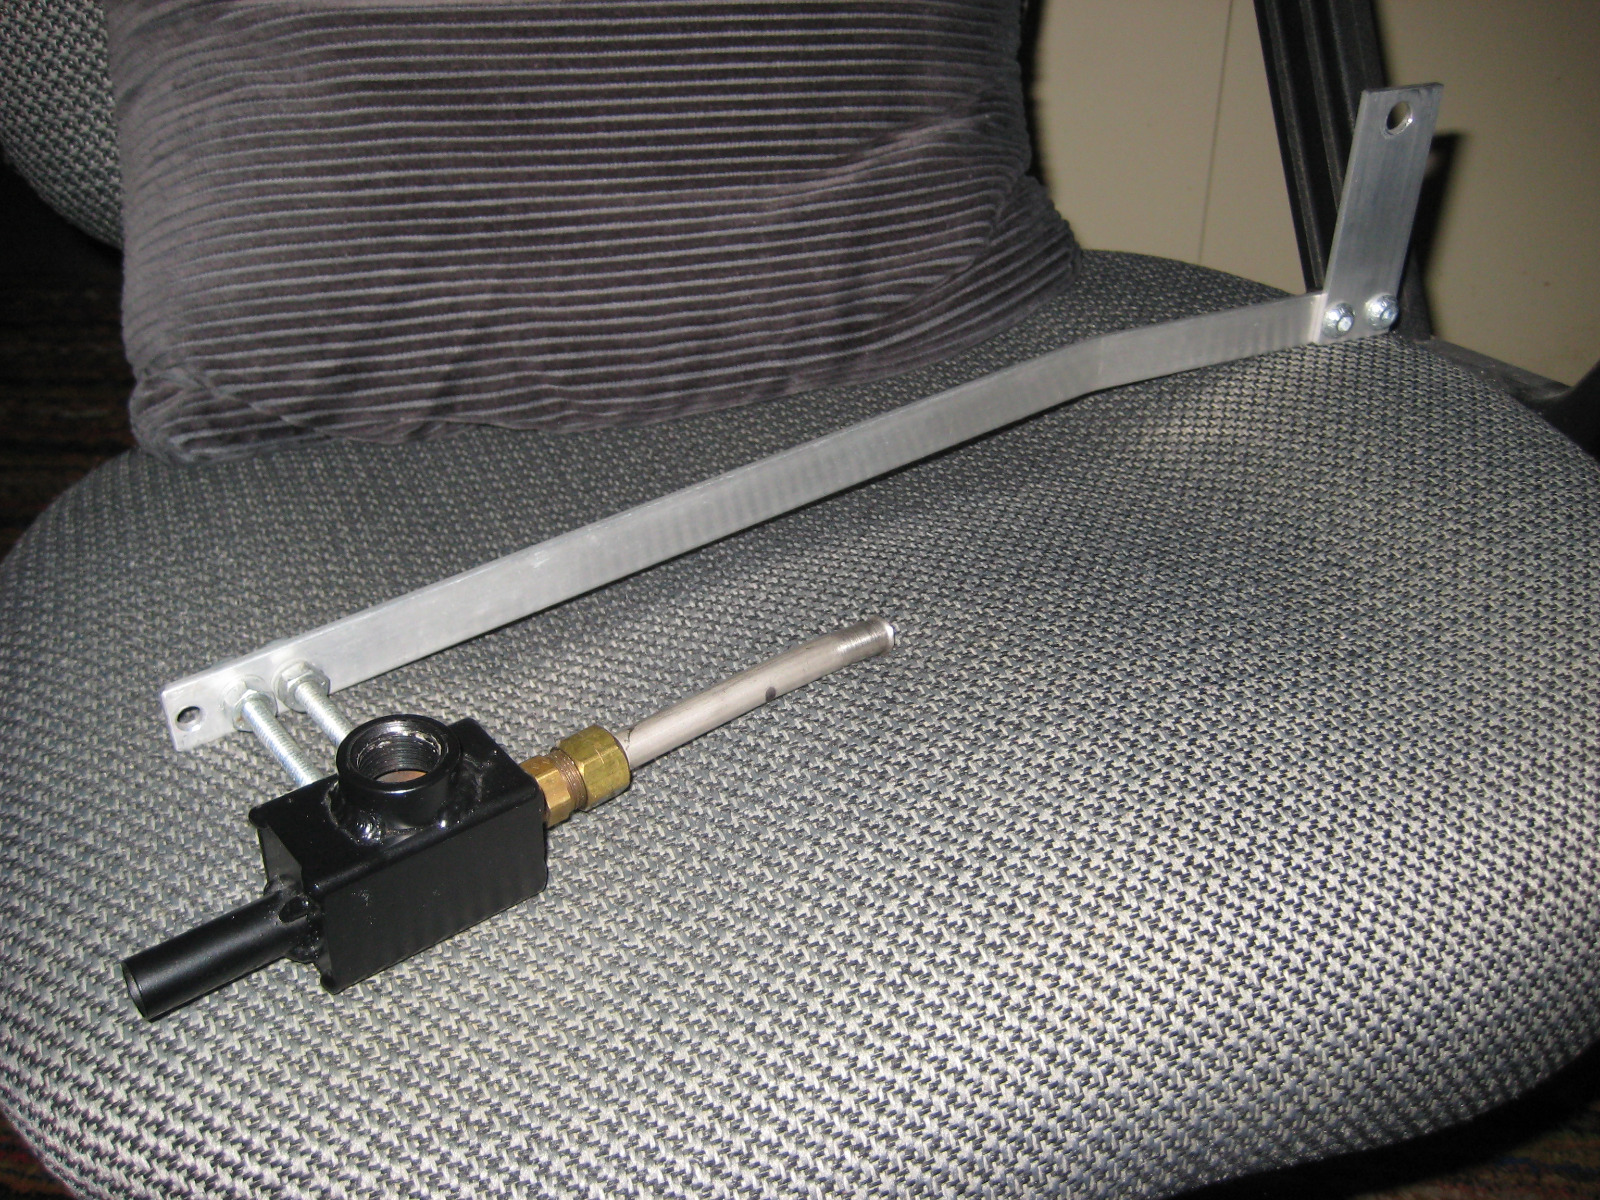
The mount rail on this one fit my MAC muffler on my 831 build. The rail hooks up on the rear foot peg mount. I am going to make a new rail to fit the muffler on this build and will probably have to make some additional parts to fit the pipe opening.
Then I got a smokin deal on a used AFR gauge/controller to finish out the system, this can be used on multiple bike builds by swapping out the mount rail.
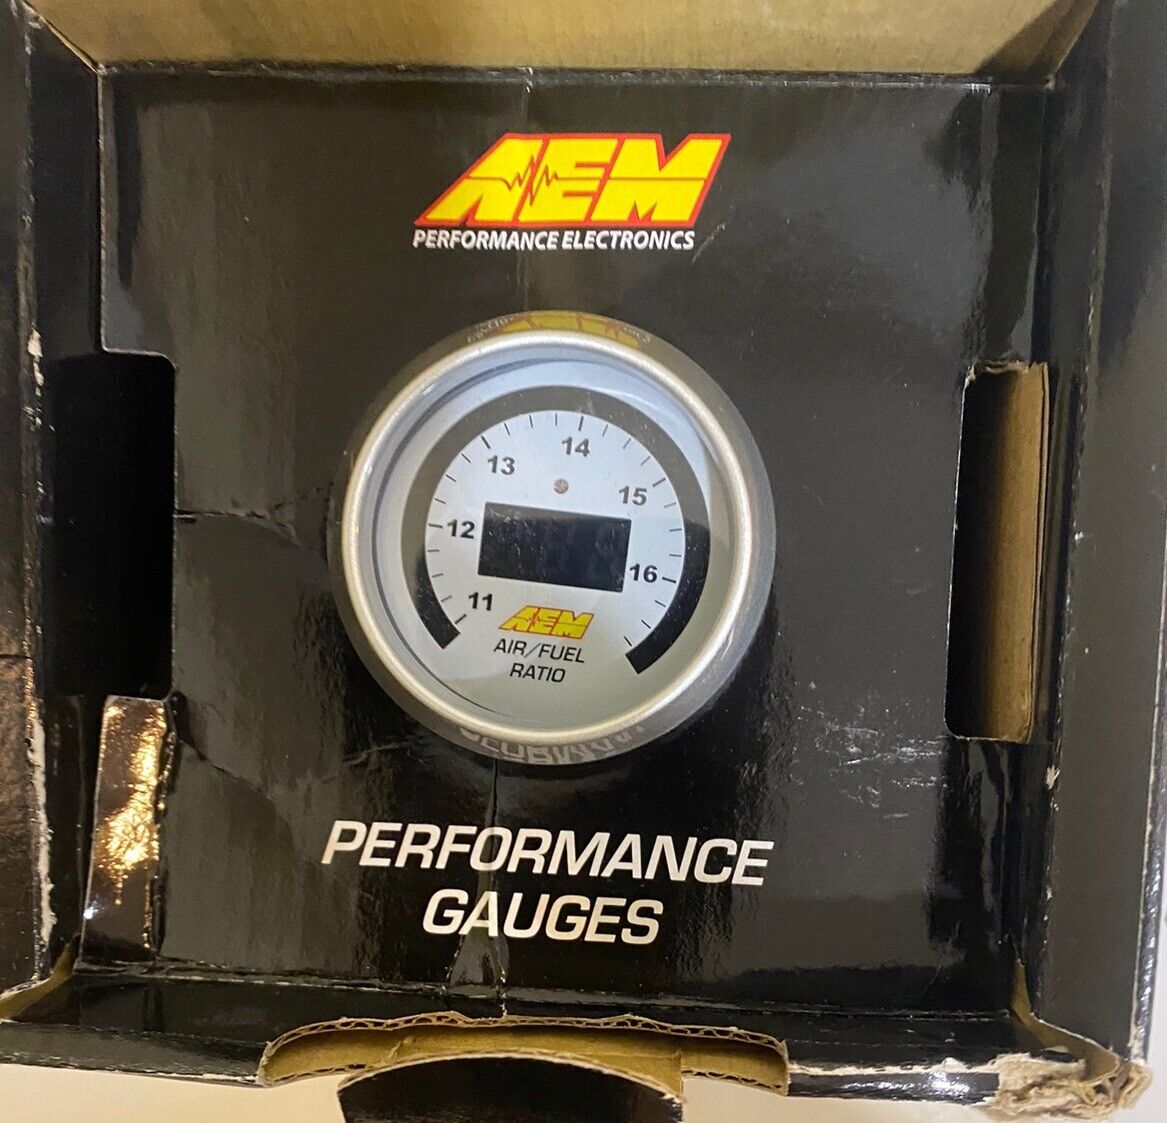
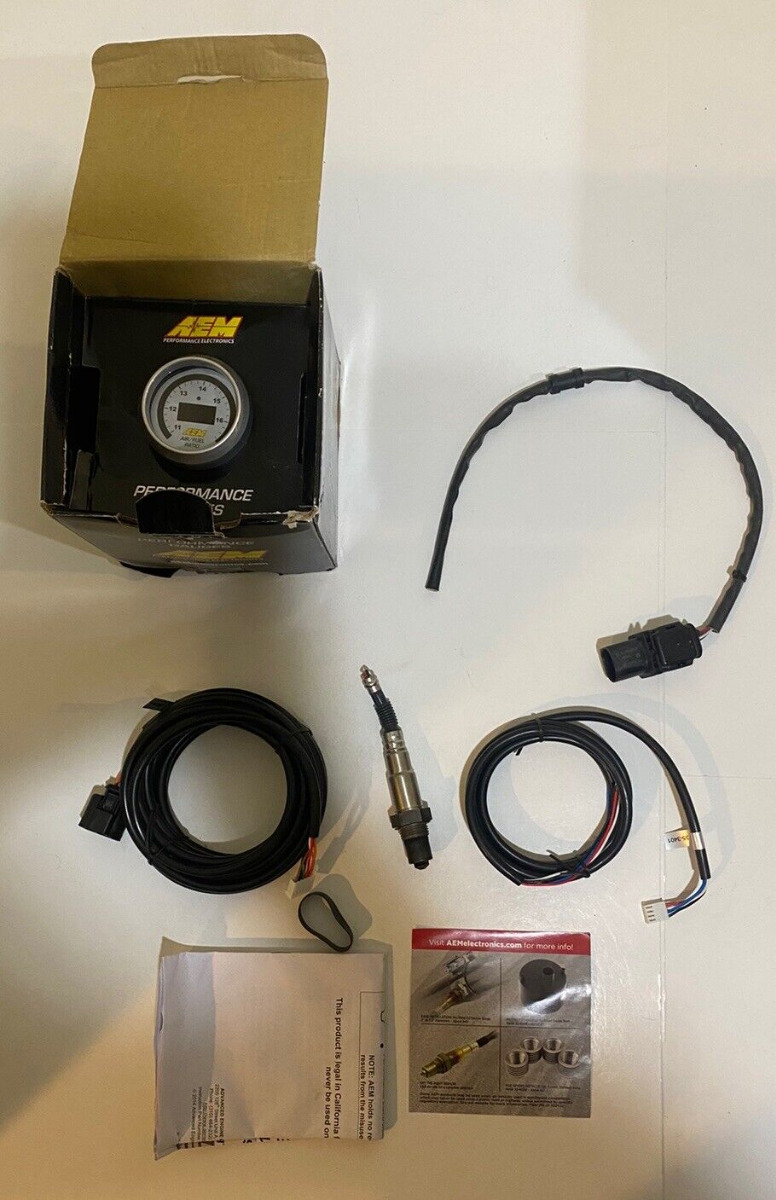
Its a AEM #30-4110 UEGO wideband gauge, you can see by the picture that some KNOB sheared off the wires on the O2 sensor! The weld bung is also missing but both of those issues don't both me a bit.
I already have a Bosch LSU49 O2 sensor sitting here slated for my Microsquirt DFI build.
The gauge usually comes with this stuff :
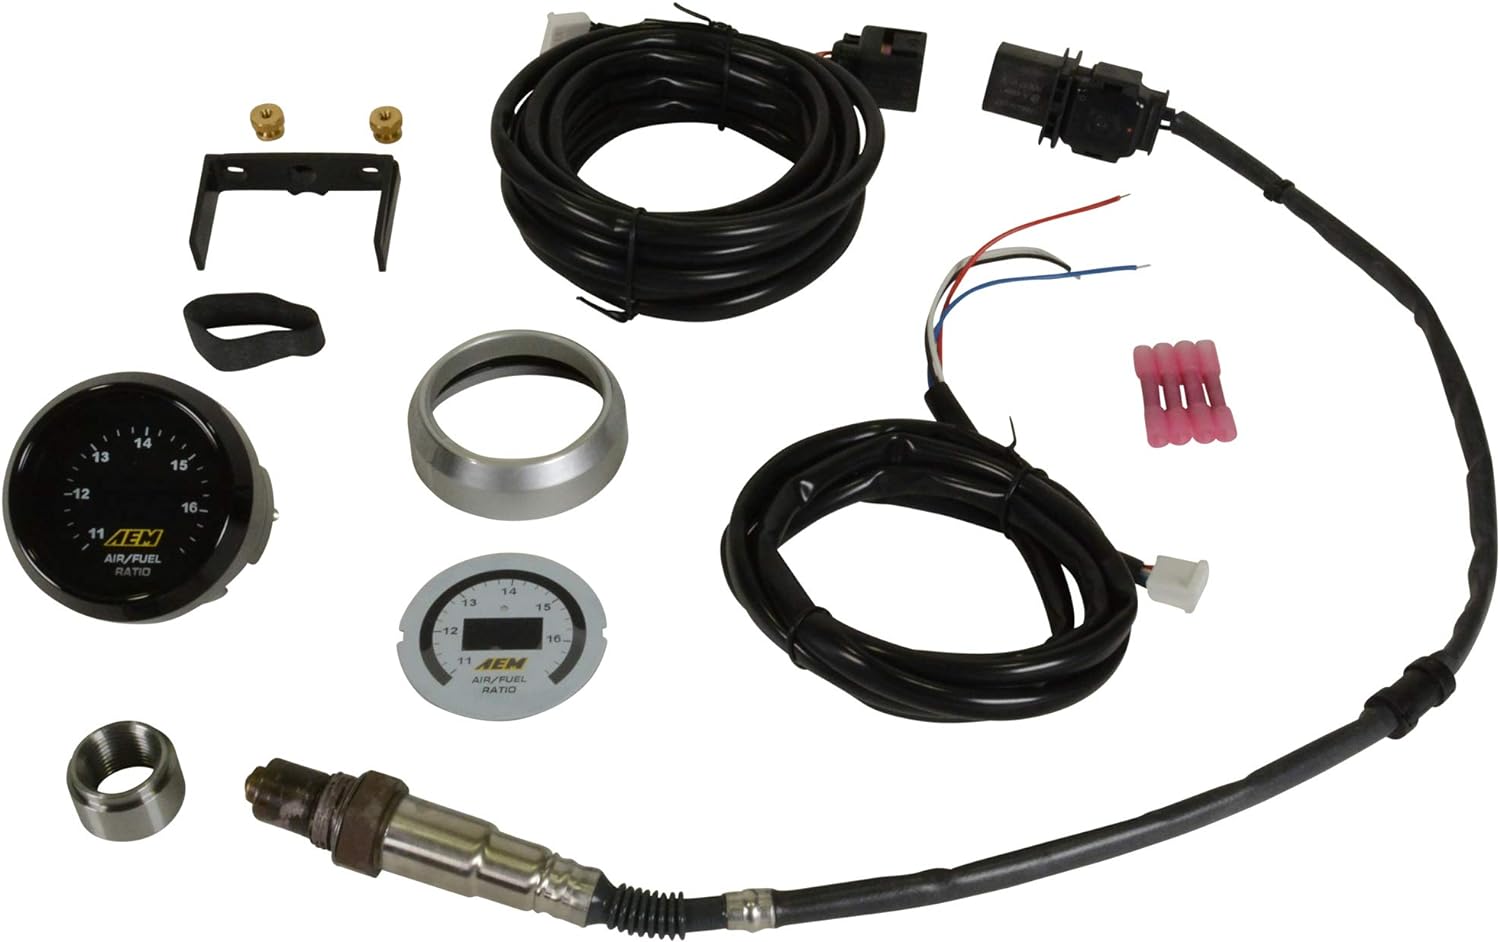
I prefer the black face plate, hopefully its in the box but if it is not then I will have to deal with it

I am also going to reuse this handle bar mount to get the gauge on the bars, it was a DIY voltage gauge setup.

I could not pass up on this gauge as it was super cheap and has a good reputation out there. This will just be used as a temporary tuning aid to dial in the jetting.
Years ago I built a DIY tail pipe sniffer to hold a narrow band O2 sensor, it hooked that up to a digital voltage gauge and it seemed to work for a bit then crapped out. I shelved that unit but last night I dragged out the hardware.
The mount rail on this one fit my MAC muffler on my 831 build. The rail hooks up on the rear foot peg mount. I am going to make a new rail to fit the muffler on this build and will probably have to make some additional parts to fit the pipe opening.
Then I got a smokin deal on a used AFR gauge/controller to finish out the system, this can be used on multiple bike builds by swapping out the mount rail.
Its a AEM #30-4110 UEGO wideband gauge, you can see by the picture that some KNOB sheared off the wires on the O2 sensor! The weld bung is also missing but both of those issues don't both me a bit.
I already have a Bosch LSU49 O2 sensor sitting here slated for my Microsquirt DFI build.
The gauge usually comes with this stuff :
I prefer the black face plate, hopefully its in the box but if it is not then I will have to deal with it
I am also going to reuse this handle bar mount to get the gauge on the bars, it was a DIY voltage gauge setup.
I could not pass up on this gauge as it was super cheap and has a good reputation out there. This will just be used as a temporary tuning aid to dial in the jetting.
1978 KZ650B2 w 1197cc Z1 engine
1977 KZ650B1 w 750cc Spectre engine
1979 KZ650C3 w 831cc Hot Rod engine
1978 KZ650C2 w 762cc DFI project
1977 KZ650C1 stock restoration project
1978 KZ650B2 modified project
1978 KZ650B2 Injected Drag 831cc
1980 Z1 Custom Frame Drag 1327cc
1981 Z50R Honda tow bike
1977 KZ650B1 w 750cc Spectre engine
1979 KZ650C3 w 831cc Hot Rod engine
1978 KZ650C2 w 762cc DFI project
1977 KZ650C1 stock restoration project
1978 KZ650B2 modified project
1978 KZ650B2 Injected Drag 831cc
1980 Z1 Custom Frame Drag 1327cc
1981 Z50R Honda tow bike
Last edit: 08 Feb 2024 08:39 by Injected. Reason: sp
The following user(s) said Thank You: Wookie58
Please Log in or Create an account to join the conversation.
- Wookie58
-
- Away
- Moderator
-
Registered
- Posts: 6452
- Thanks: 4079
Re: KZ650 Sleeper Build (KZ1000 engine transplant)
08 Feb 2024 08:58 - 08 Feb 2024 08:59
I have an AFR meter and lambda probe which was going to be a fixture but there is no room in the nosecone for it so I will use it as a tuning aid and remove once happy with the tune (I will weld a lambda insert into the exhaust before coating which can be sealed with a plug when not in use so that if I decide to experiment with EFI in the future the fitting will already be there so I don't have to re-coat the exhaust collector)
FYI: the O2 sensor ideally wants to be in the collector as it only starts to work above 300 degrees
FYI: the O2 sensor ideally wants to be in the collector as it only starts to work above 300 degrees
1982 KZ1000 Ltd
www.kzrider.com/forum/11-projects/617631...-82-begins?start=192
kzrider.com/filebase-alias?view=download...d-fault-diagnosis&ca
www.kzrider.com/forum/11-projects/617631...-82-begins?start=192
kzrider.com/filebase-alias?view=download...d-fault-diagnosis&ca
Last edit: 08 Feb 2024 08:59 by Wookie58.
The following user(s) said Thank You: Injected, howardhb
Please Log in or Create an account to join the conversation.
Moderators: Street Fighter LTD