
KZ650 Sleeper Build (KZ1000 engine transplant)
- Injected
-
 Topic Author
- Offline
- User
-

Registered
- Posts: 1726
- Thanks: 1222
Re: KZ650 Sleeper Build (KZ1000 engine transplant)
29 Jun 2023 19:19
I was hoping to spend more money on tires but it did not work out that way. The Shinko 230's seem to be made well and the rubber every bit as sticky as the old Pirelli Phantoms use to be way back in the day according to my finger nail ")
Its going to take a bit before I can install them. First I need to finish building this motor.
Its going to take a bit before I can install them. First I need to finish building this motor.
1978 KZ650B2 w 1197cc Z1 engine
1977 KZ650B1 w 750cc Spectre engine
1979 KZ650C3 w 831cc Hot Rod engine
1978 KZ650C2 w 762cc DFI project
1977 KZ650C1 stock restoration project
1978 KZ650B2 modified project
1978 KZ650B2 Injected Drag 831cc
1981 Z50R Honda tow bike
1977 KZ650B1 w 750cc Spectre engine
1979 KZ650C3 w 831cc Hot Rod engine
1978 KZ650C2 w 762cc DFI project
1977 KZ650C1 stock restoration project
1978 KZ650B2 modified project
1978 KZ650B2 Injected Drag 831cc
1981 Z50R Honda tow bike
The following user(s) said Thank You: sf4t7
Please Log in or Create an account to join the conversation.
- sf4t7
-

- Offline
- Sustaining Member
-

Registered
- Posts: 1017
- Thanks: 850
Re: KZ650 Sleeper Build (KZ1000 engine transplant)
29 Jun 2023 20:30
Go figure - An old set of Pirelli Phantoms are the tires I'm replacing on my Z1. Really liked them, but I haven't ridden it since 1997 so they've gotta be replaced.

Scotty
Scotty
Scotty
1974 Z1A
Yoshimura 987, 10.25:1
welded Z1 crank
Andrews 1X Cams
Delkevic 4 into 1
Superbike bars
530 conversion
1974 Z1A
Yoshimura 987, 10.25:1
welded Z1 crank
Andrews 1X Cams
Delkevic 4 into 1
Superbike bars
530 conversion
Please Log in or Create an account to join the conversation.
- SWest
-

- Offline
- Sustaining Member
-
Registered
- 10 22 2014
- Posts: 23735
- Thanks: 3016
Re: KZ650 Sleeper Build (KZ1000 engine transplant)
29 Jun 2023 20:31
The Shinko rear has a hard rubber strip down the center for more milage. When it gets down to the Bars it goes away quick. I'm averaging 5k a tire the way I ride.

Steve
www.chapmoto.com/shinko-230-tour-master-rear-tire.html
Steve
www.chapmoto.com/shinko-230-tour-master-rear-tire.html
Z1b1000 1975 Z1b
kzrider.com/forum/11-projects/598262-kz-...-will-it-live#672882
kzrider.com/forum/2-engine/597654-poser?start=240#704229
kzrider.com/forum/11-projects/598262-kz-...-will-it-live#672882
kzrider.com/forum/2-engine/597654-poser?start=240#704229
The following user(s) said Thank You: sf4t7
Please Log in or Create an account to join the conversation.
- Injected
-
Topic Author
- Offline
- User
-
Registered
- Posts: 1726
- Thanks: 1222
Re: KZ650 Sleeper Build (KZ1000 engine transplant)
16 Sep 2023 10:19 - 16 Sep 2023 10:22
Just got back on this project the other day after spending a lot of time on another bike.
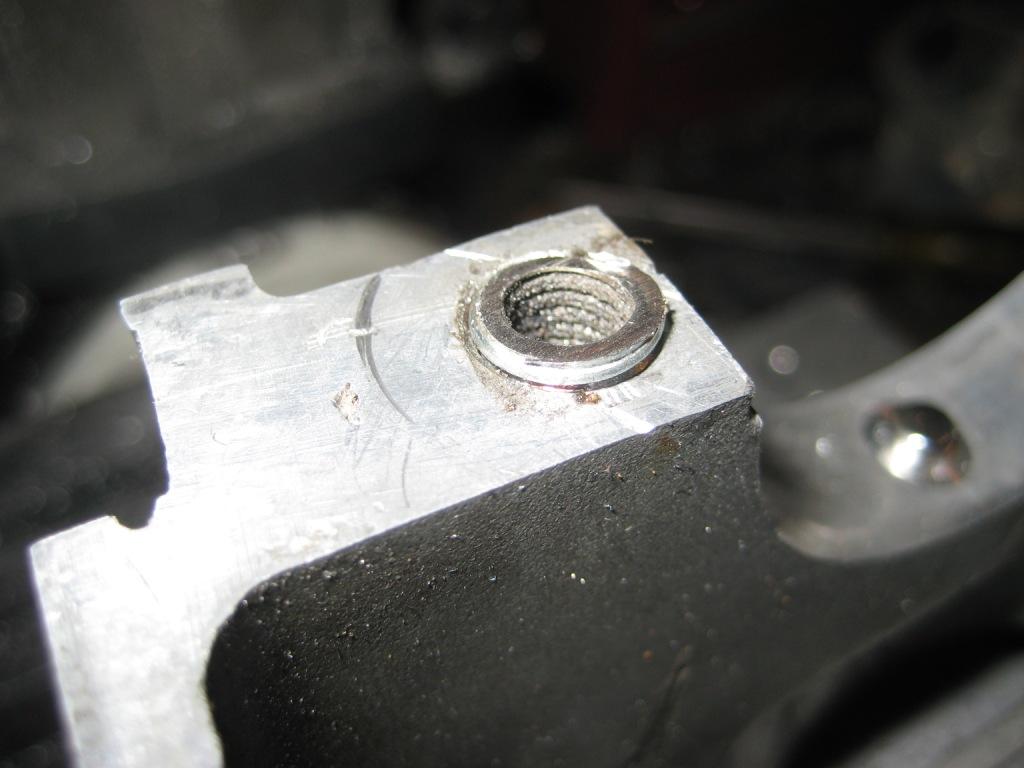
Getting back to fixing a F'd up crank bolt hole on the upper case.
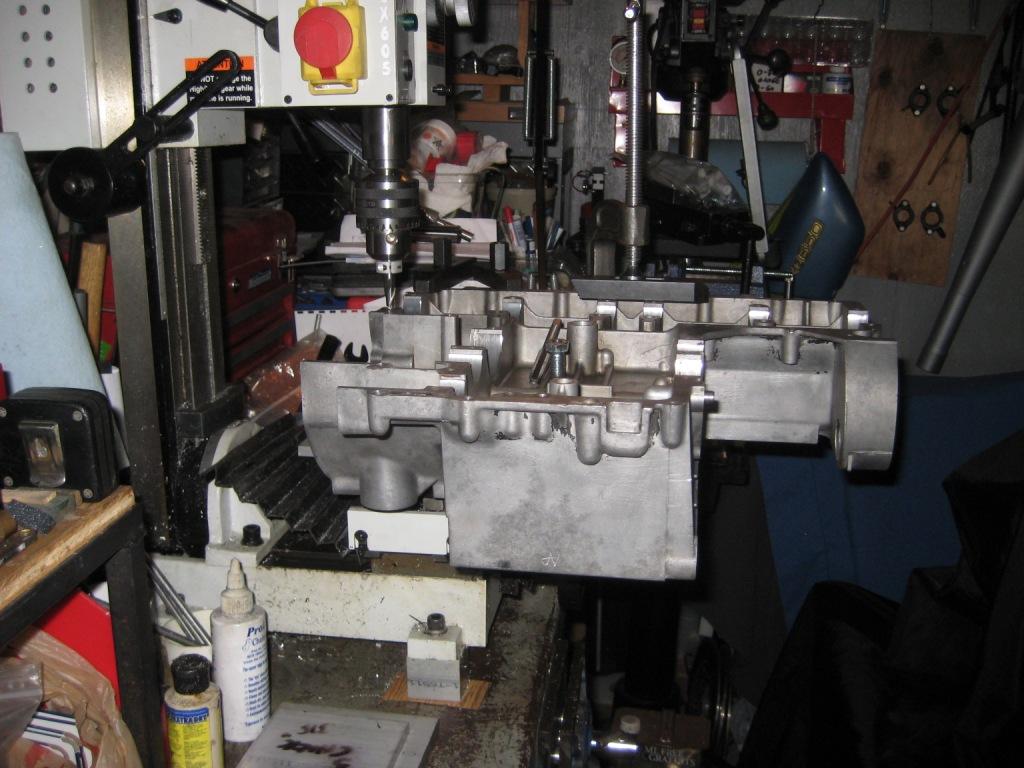
Getting it clamped to my tiny milling machine was going to be some work.It was a couple of hours of trial and error until I used the uprights from my exhaust stud drilling fixture which have the same angle cut as the top surface of the upper case.
Quite a bit of a struggle but I knew it was not going to be easy.
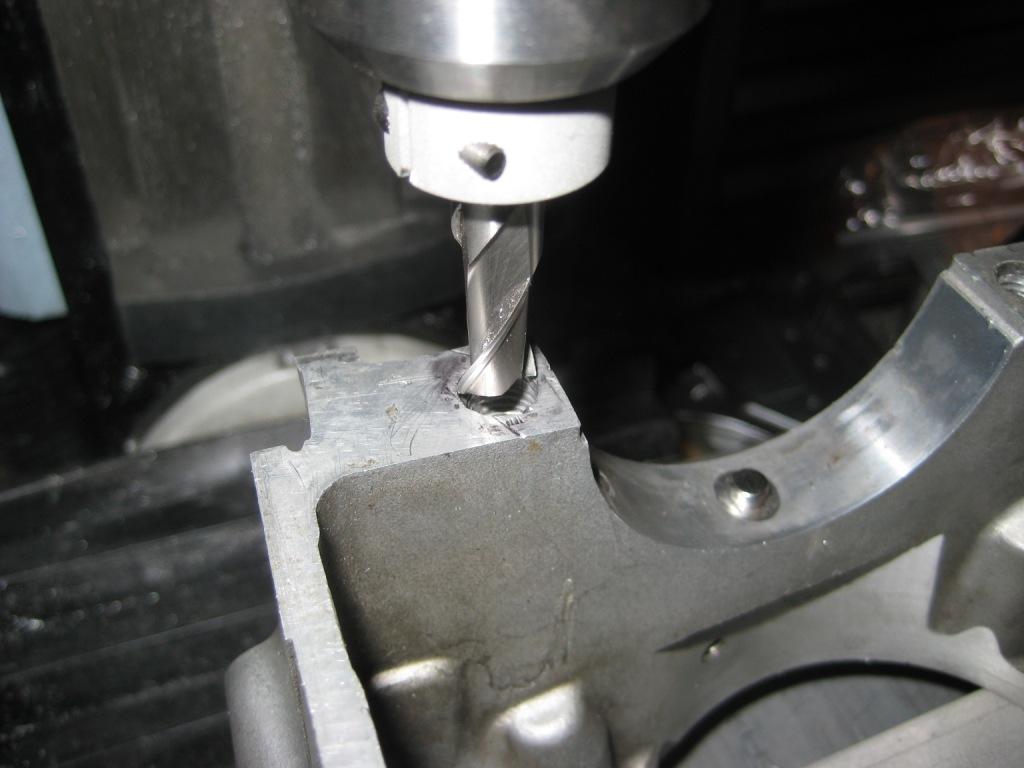
Have it clamped securely and used a drill bit to position the 3/8 end mill where it needs to be to do the tap drill hole. Looks like it will clean up most of that angled crap in there now.
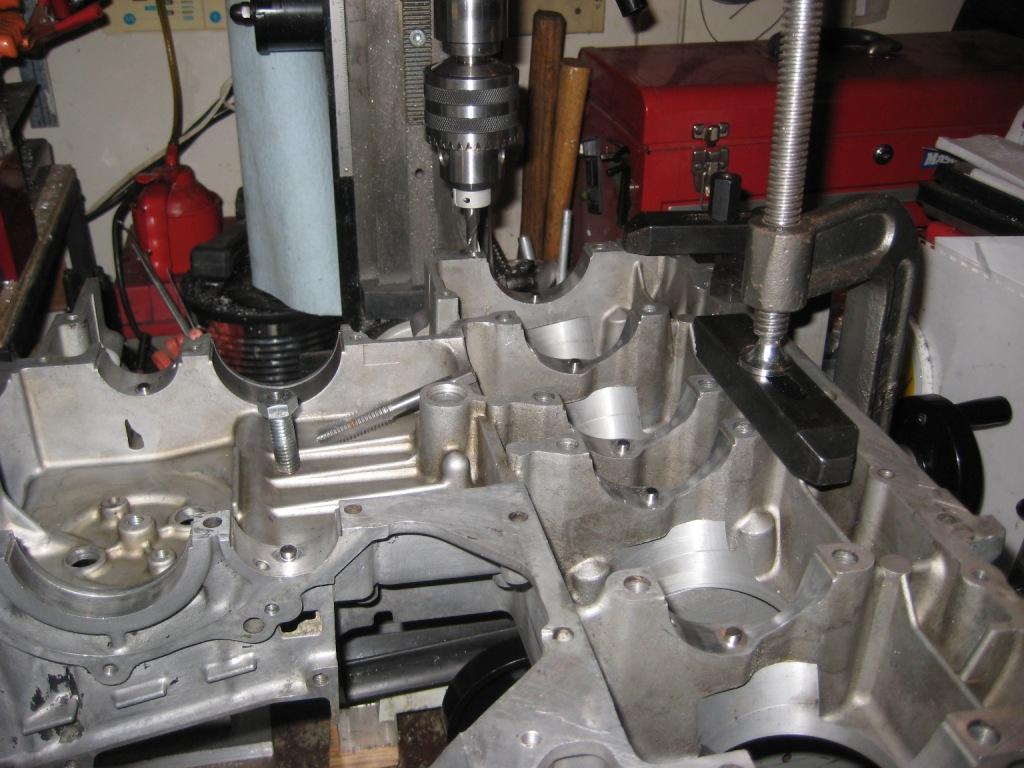
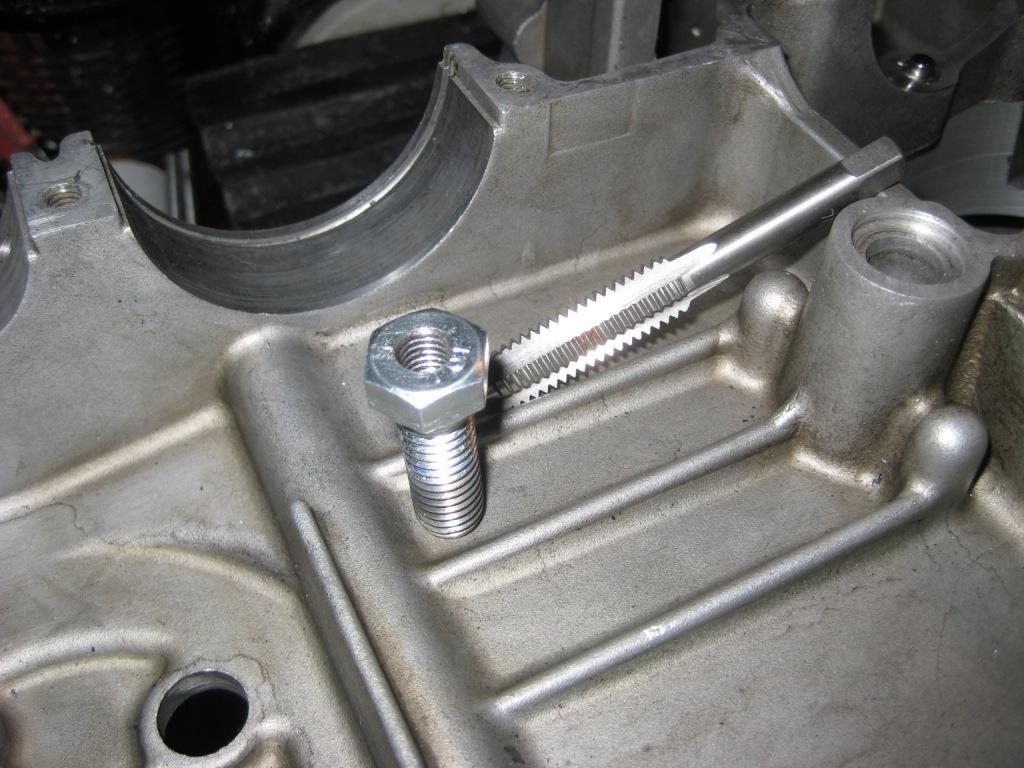
Here is the modified 7/16-14 X 1-1/4" bolt
Needed to use a end mill as the hole in there was oval. 3/8 is tap drill size for that thread (that is why I picked it) I just used the drill chuck as I had to swap out some tools on the same locked center.
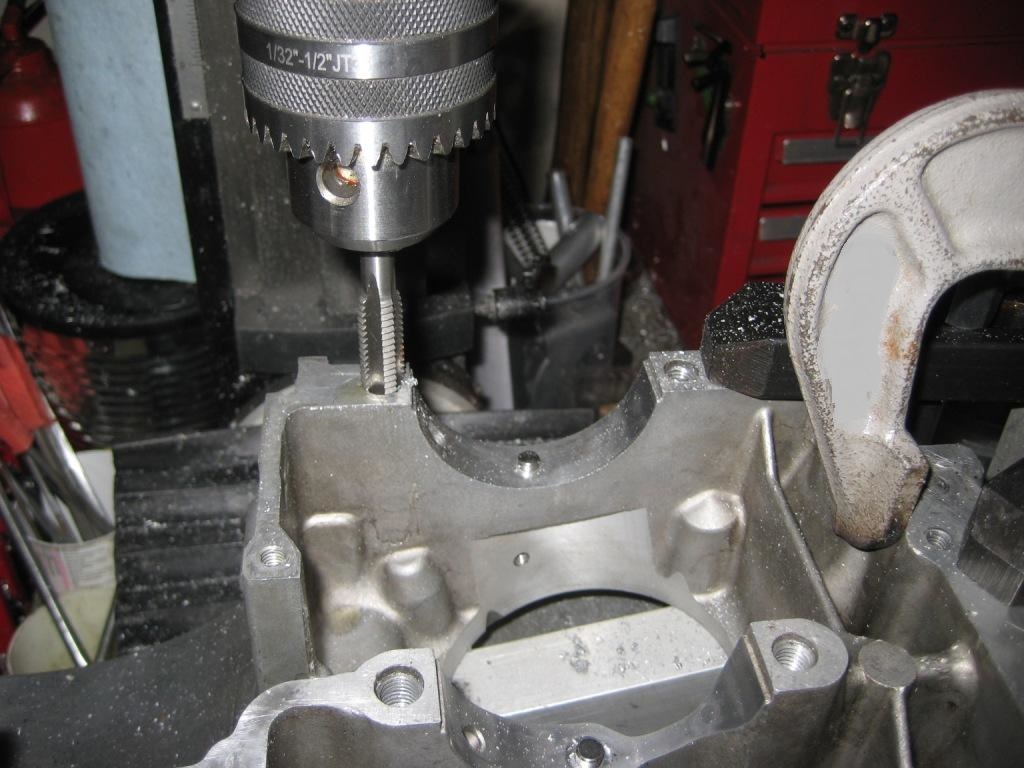
Here is the modified bolt with a M8 blind thread in it sunk into the fixed threaded hole. Put some 3 Bond about 1" down and some red Loctite at the top.
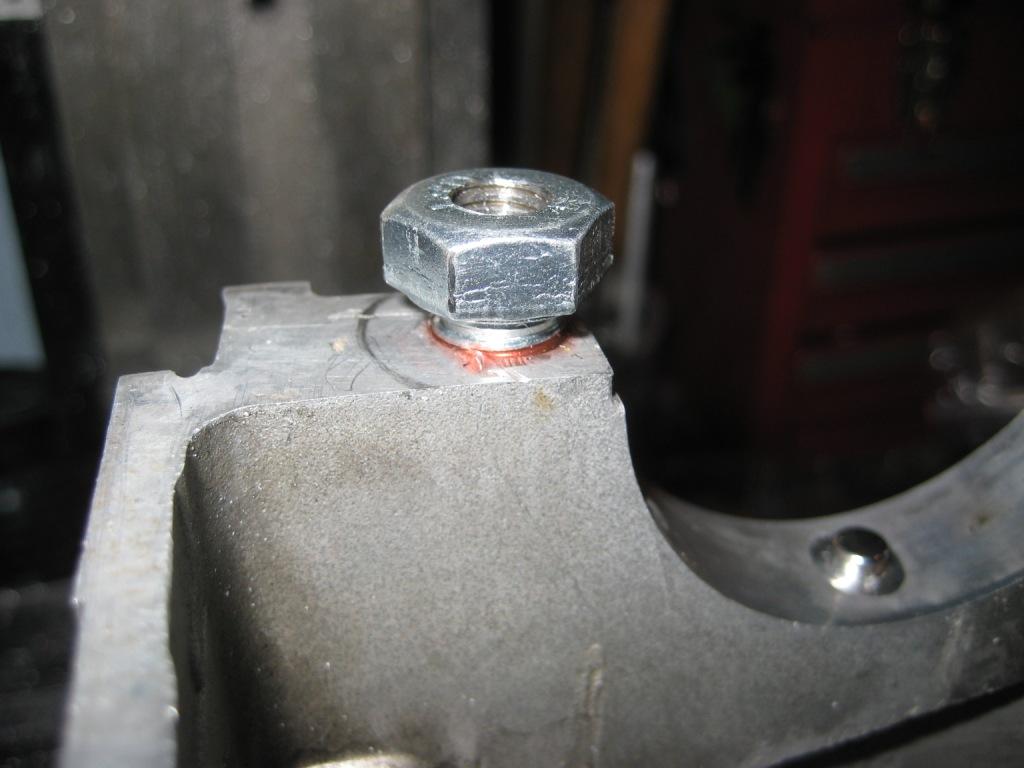
Cut off the hex head with a angle grinder and thin cut off disk.
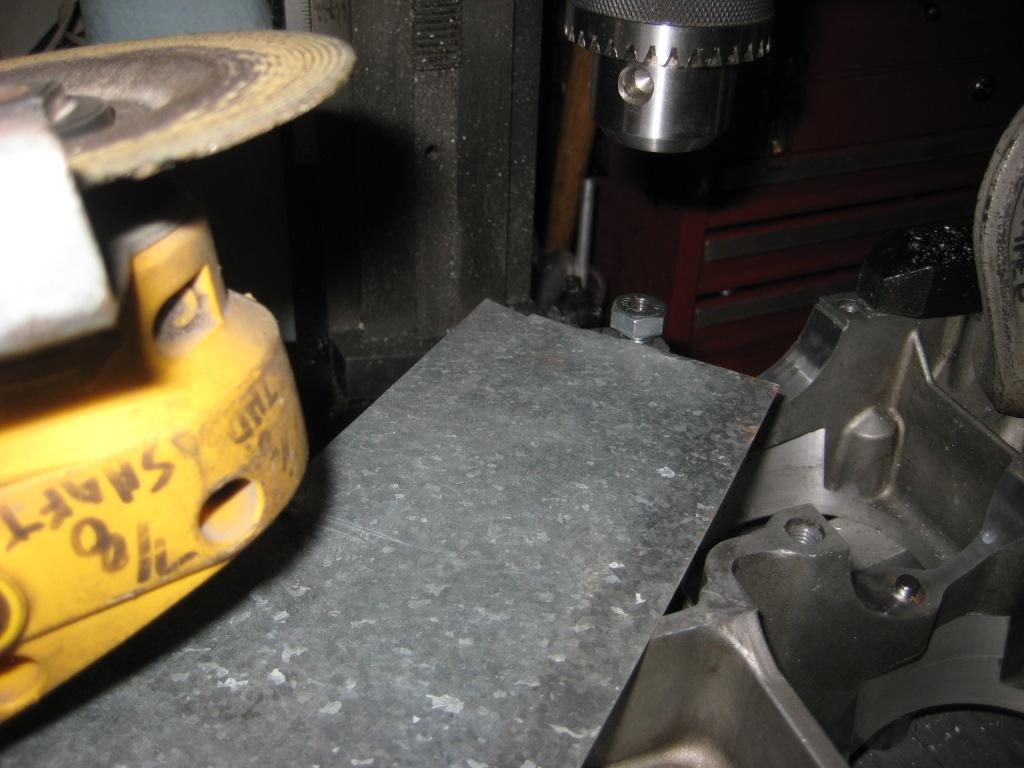
Finished insert spot faced with a 7/16" end mill to be flush with top of mating surface.
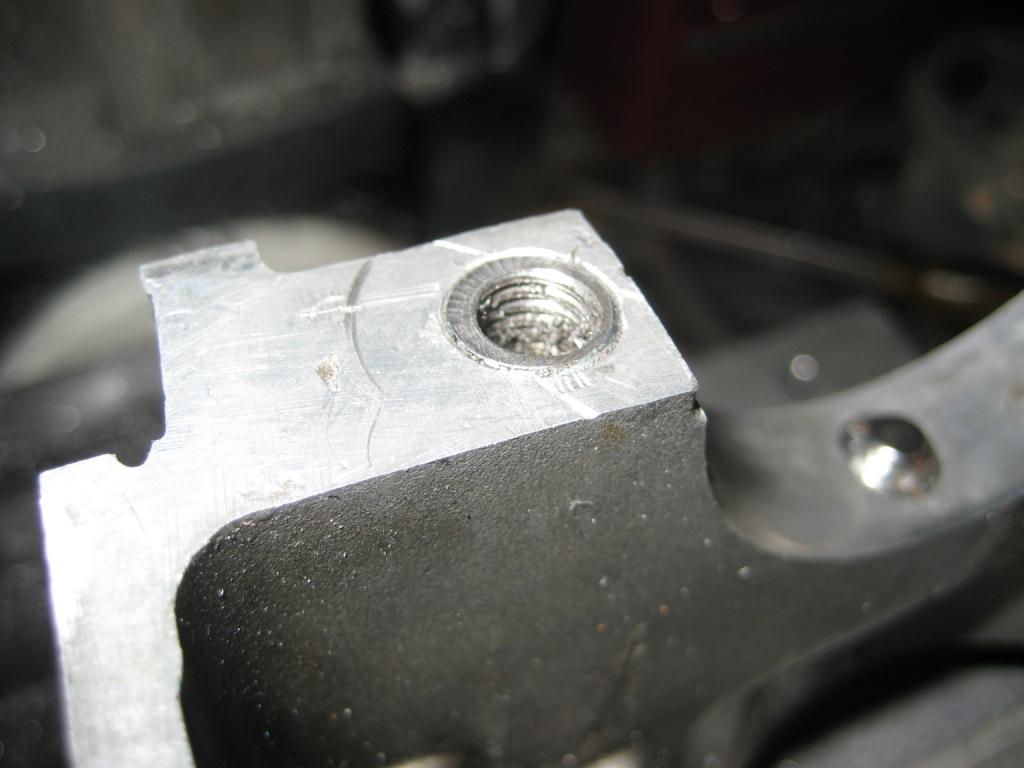
Now I have proper oil flow without leaks and a solid steel M8 thread for my crank bolt.
Getting back to fixing a F'd up crank bolt hole on the upper case.
Getting it clamped to my tiny milling machine was going to be some work.It was a couple of hours of trial and error until I used the uprights from my exhaust stud drilling fixture which have the same angle cut as the top surface of the upper case.
Quite a bit of a struggle but I knew it was not going to be easy.
Have it clamped securely and used a drill bit to position the 3/8 end mill where it needs to be to do the tap drill hole. Looks like it will clean up most of that angled crap in there now.
Here is the modified 7/16-14 X 1-1/4" bolt
Needed to use a end mill as the hole in there was oval. 3/8 is tap drill size for that thread (that is why I picked it) I just used the drill chuck as I had to swap out some tools on the same locked center.
Here is the modified bolt with a M8 blind thread in it sunk into the fixed threaded hole. Put some 3 Bond about 1" down and some red Loctite at the top.
Cut off the hex head with a angle grinder and thin cut off disk.
Finished insert spot faced with a 7/16" end mill to be flush with top of mating surface.
Now I have proper oil flow without leaks and a solid steel M8 thread for my crank bolt.
1978 KZ650B2 w 1197cc Z1 engine
1977 KZ650B1 w 750cc Spectre engine
1979 KZ650C3 w 831cc Hot Rod engine
1978 KZ650C2 w 762cc DFI project
1977 KZ650C1 stock restoration project
1978 KZ650B2 modified project
1978 KZ650B2 Injected Drag 831cc
1981 Z50R Honda tow bike
1977 KZ650B1 w 750cc Spectre engine
1979 KZ650C3 w 831cc Hot Rod engine
1978 KZ650C2 w 762cc DFI project
1977 KZ650C1 stock restoration project
1978 KZ650B2 modified project
1978 KZ650B2 Injected Drag 831cc
1981 Z50R Honda tow bike
Last edit: 16 Sep 2023 10:22 by Injected. Reason: sp
The following user(s) said Thank You: ThatGPzGuy, sf4t7, howardhb, Wookie58, Kelly E
Please Log in or Create an account to join the conversation.
- Wookie58
-

- Offline
- Moderator
-

Registered
- Posts: 6513
- Thanks: 4103
Re: KZ650 Sleeper Build (KZ1000 engine transplant)
16 Sep 2023 11:54
Another inspirational solution as ever

1982 KZ1000 Ltd
www.kzrider.com/forum/11-projects/617631...-82-begins?start=192
kzrider.com/forum/faq-wiki/616810-electr...-fault-finding-guide
www.kzrider.com/forum/11-projects/617631...-82-begins?start=192
kzrider.com/forum/faq-wiki/616810-electr...-fault-finding-guide
Please Log in or Create an account to join the conversation.
- sf4t7
-
- Offline
- Sustaining Member
-
Registered
- Posts: 1017
- Thanks: 850
Re: KZ650 Sleeper Build (KZ1000 engine transplant)
16 Sep 2023 14:29
Nice work ! Using a hex cap screw for the insert so you could install it is a clever idea. My hat's off to you Injected !

Scotty
1974 Z1A
Yoshimura 987, 10.25:1
welded Z1 crank
Andrews 1X Cams
Delkevic 4 into 1
Superbike bars
530 conversion
1974 Z1A
Yoshimura 987, 10.25:1
welded Z1 crank
Andrews 1X Cams
Delkevic 4 into 1
Superbike bars
530 conversion
Please Log in or Create an account to join the conversation.
- Injected
-
Topic Author
- Offline
- User
-
Registered
- Posts: 1726
- Thanks: 1222
Re: KZ650 Sleeper Build (KZ1000 engine transplant)
16 Sep 2023 15:33
Thanks for the support.
This idea also works for fixing stripped M6 cam cap bolts in 650/900 cylinder heads (different bolt size required) and is about as cheap as you can find.
This idea also works for fixing stripped M6 cam cap bolts in 650/900 cylinder heads (different bolt size required) and is about as cheap as you can find.
1978 KZ650B2 w 1197cc Z1 engine
1977 KZ650B1 w 750cc Spectre engine
1979 KZ650C3 w 831cc Hot Rod engine
1978 KZ650C2 w 762cc DFI project
1977 KZ650C1 stock restoration project
1978 KZ650B2 modified project
1978 KZ650B2 Injected Drag 831cc
1981 Z50R Honda tow bike
1977 KZ650B1 w 750cc Spectre engine
1979 KZ650C3 w 831cc Hot Rod engine
1978 KZ650C2 w 762cc DFI project
1977 KZ650C1 stock restoration project
1978 KZ650B2 modified project
1978 KZ650B2 Injected Drag 831cc
1981 Z50R Honda tow bike
The following user(s) said Thank You: sf4t7
Please Log in or Create an account to join the conversation.
- Injected
-
Topic Author
- Offline
- User
-
Registered
- Posts: 1726
- Thanks: 1222
Re: KZ650 Sleeper Build (KZ1000 engine transplant)
18 Sep 2023 15:17
I was going thru my engine bolts needed to assemble this motor, was looking to clean and de grease them.
The crank bolt that was in that messed up hole was not a Kawasaki bolt so I was looking to replace it. Looked up the part number for the M8 x 81mm flange head bolt, still available but for +$15 = YIKES!!
Remembered that I replaced the crank bolts in my 1327 drag bike engine with APE studs, so those extra bolts were here somewhere. Spent the better part of a hour looking for them to finally finding them plus some other goodies I forget I had. At least I don't have to pay $$ to Kawasaki for one
1978 KZ650B2 w 1197cc Z1 engine
1977 KZ650B1 w 750cc Spectre engine
1979 KZ650C3 w 831cc Hot Rod engine
1978 KZ650C2 w 762cc DFI project
1977 KZ650C1 stock restoration project
1978 KZ650B2 modified project
1978 KZ650B2 Injected Drag 831cc
1981 Z50R Honda tow bike
1977 KZ650B1 w 750cc Spectre engine
1979 KZ650C3 w 831cc Hot Rod engine
1978 KZ650C2 w 762cc DFI project
1977 KZ650C1 stock restoration project
1978 KZ650B2 modified project
1978 KZ650B2 Injected Drag 831cc
1981 Z50R Honda tow bike
Please Log in or Create an account to join the conversation.
- Injected
-
Topic Author
- Offline
- User
-
Registered
- Posts: 1726
- Thanks: 1222
Re: KZ650 Sleeper Build (KZ1000 engine transplant)
22 Sep 2023 09:39 - 22 Sep 2023 10:53
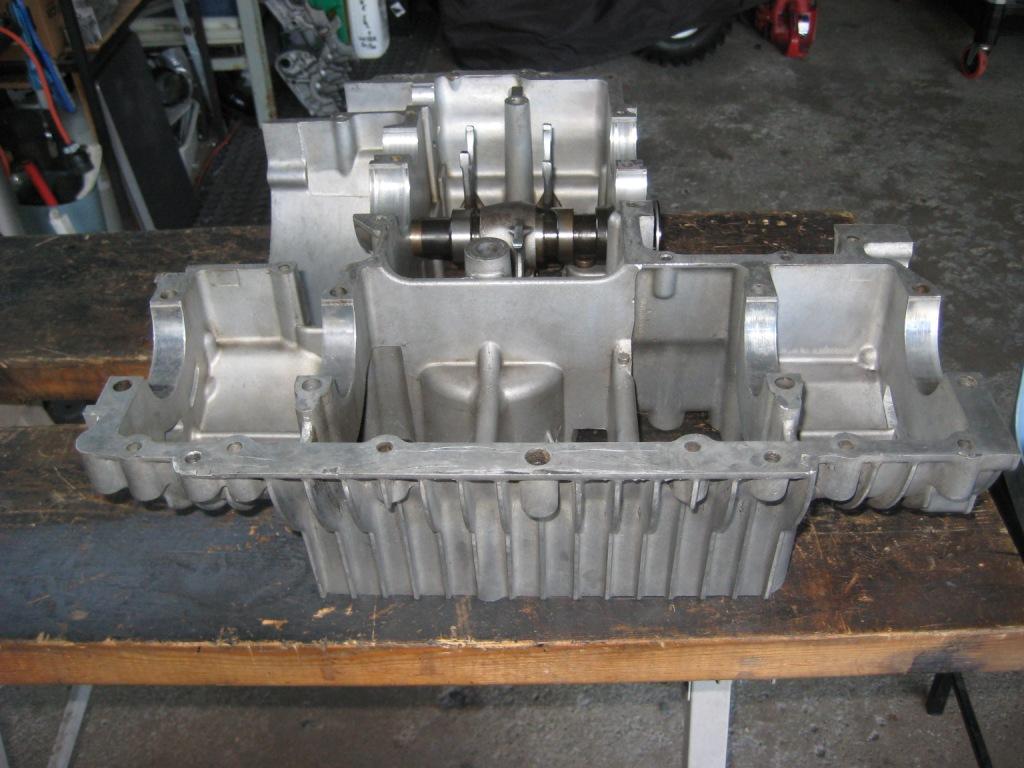
Filled both pry slots on upper case with JB Weld, will file flat once hard. This needs to be done as its very thin in the area around those to properly seal the base gasket.
The top bolt hole that attaches the points housing got filled the other day, a short bolt goes in that one, this keeps oil from seeping out.
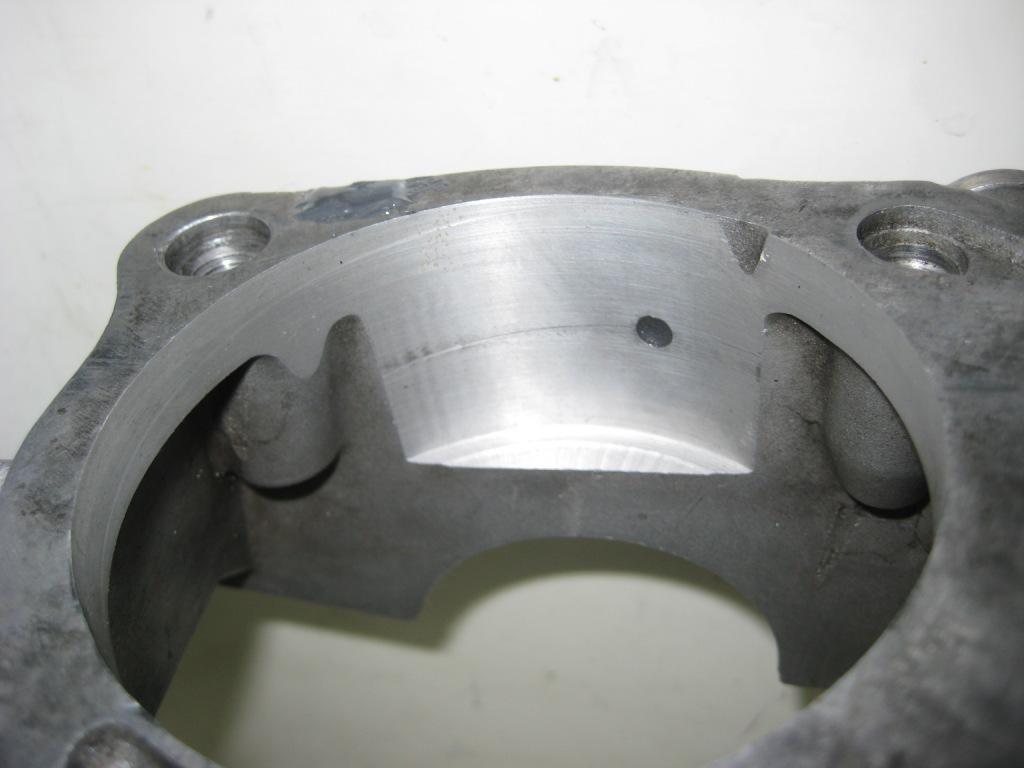
These steps are not necessary if you stay below 1135cc. It gets worse at 1327cc, a window opens up on the generator side.
The top bolt hole that attaches the points housing got filled the other day, a short bolt goes in that one, this keeps oil from seeping out.
These steps are not necessary if you stay below 1135cc. It gets worse at 1327cc, a window opens up on the generator side.
1978 KZ650B2 w 1197cc Z1 engine
1977 KZ650B1 w 750cc Spectre engine
1979 KZ650C3 w 831cc Hot Rod engine
1978 KZ650C2 w 762cc DFI project
1977 KZ650C1 stock restoration project
1978 KZ650B2 modified project
1978 KZ650B2 Injected Drag 831cc
1981 Z50R Honda tow bike
1977 KZ650B1 w 750cc Spectre engine
1979 KZ650C3 w 831cc Hot Rod engine
1978 KZ650C2 w 762cc DFI project
1977 KZ650C1 stock restoration project
1978 KZ650B2 modified project
1978 KZ650B2 Injected Drag 831cc
1981 Z50R Honda tow bike
Last edit: 22 Sep 2023 10:53 by Injected. Reason: sp
Please Log in or Create an account to join the conversation.
- Injected
-
Topic Author
- Offline
- User
-
Registered
- Posts: 1726
- Thanks: 1222
Re: KZ650 Sleeper Build (KZ1000 engine transplant)
26 Sep 2023 13:49 - 26 Sep 2023 13:49
Mock up for the oil cooler bracket, bolted where the stock horn mounts.
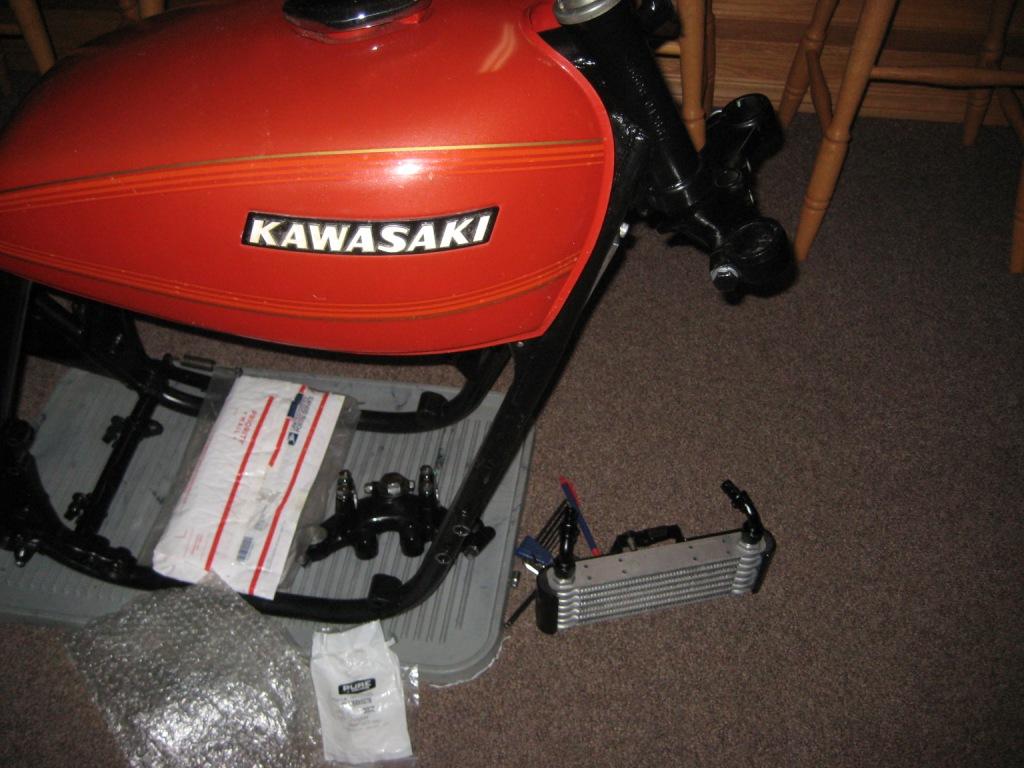
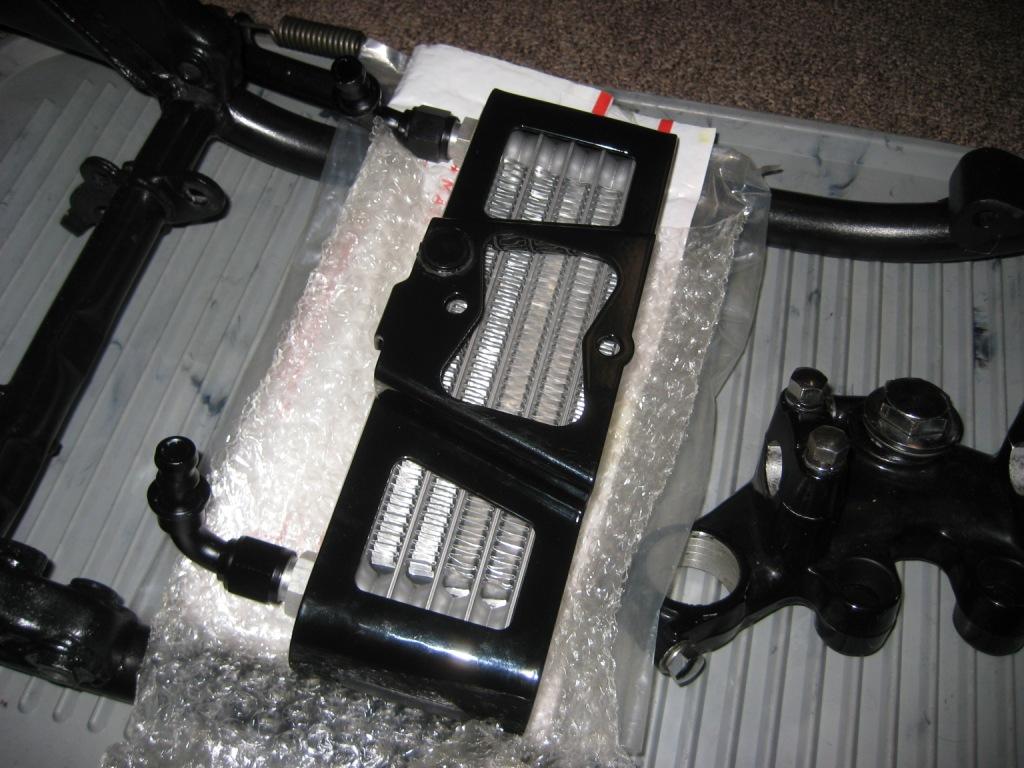
Bracket is a stock Polaris part, -8AN cooler was built to fit in it with rubbers (also Polaris) on each end, friction fit.
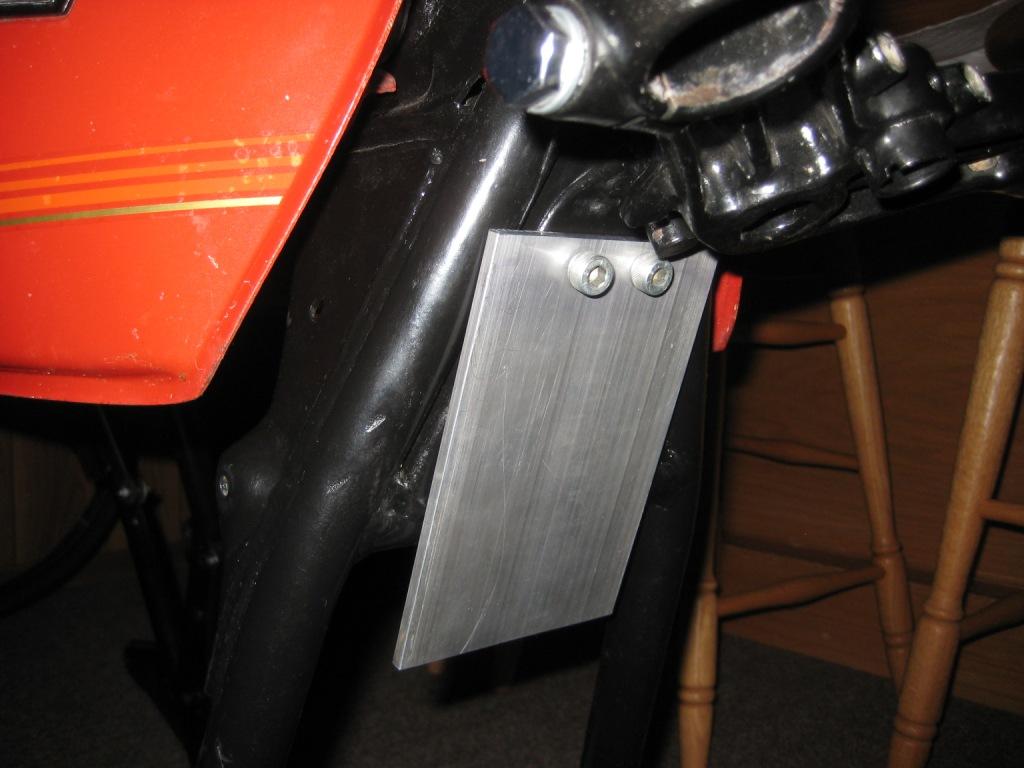
Plate will also be bolted thru the Polaris bracket then attached to a rail behind the frame cross tube.
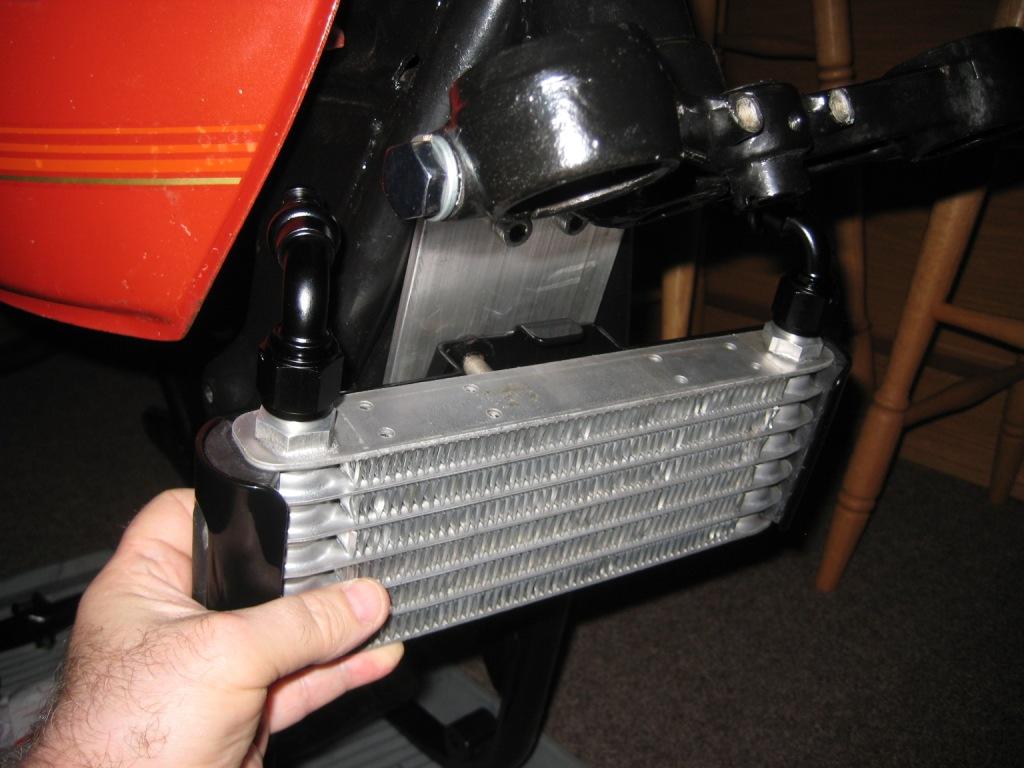
Need to make a triple clamp travel limit to attach to the welded peg.
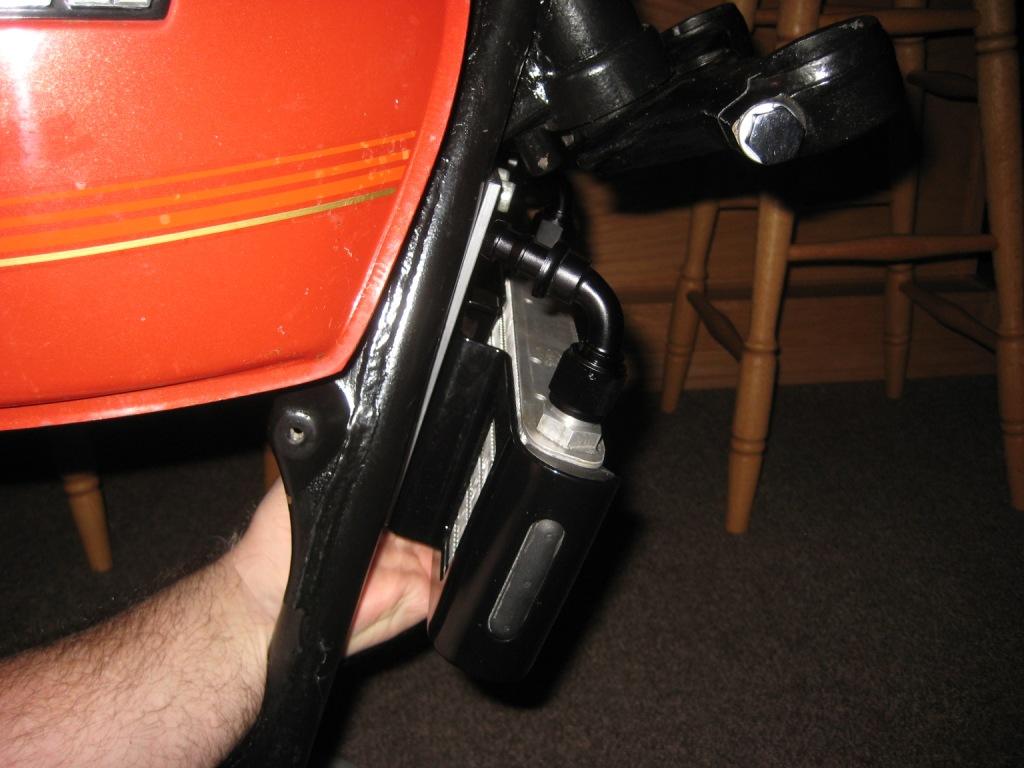
Sits around the same height as other examples I have pictures of.
Bracket is a stock Polaris part, -8AN cooler was built to fit in it with rubbers (also Polaris) on each end, friction fit.
Plate will also be bolted thru the Polaris bracket then attached to a rail behind the frame cross tube.
Need to make a triple clamp travel limit to attach to the welded peg.
Sits around the same height as other examples I have pictures of.
1978 KZ650B2 w 1197cc Z1 engine
1977 KZ650B1 w 750cc Spectre engine
1979 KZ650C3 w 831cc Hot Rod engine
1978 KZ650C2 w 762cc DFI project
1977 KZ650C1 stock restoration project
1978 KZ650B2 modified project
1978 KZ650B2 Injected Drag 831cc
1981 Z50R Honda tow bike
1977 KZ650B1 w 750cc Spectre engine
1979 KZ650C3 w 831cc Hot Rod engine
1978 KZ650C2 w 762cc DFI project
1977 KZ650C1 stock restoration project
1978 KZ650B2 modified project
1978 KZ650B2 Injected Drag 831cc
1981 Z50R Honda tow bike
Last edit: 26 Sep 2023 13:49 by Injected. Reason: sp
The following user(s) said Thank You: sf4t7
Please Log in or Create an account to join the conversation.
- Injected
-
Topic Author
- Offline
- User
-
Registered
- Posts: 1726
- Thanks: 1222
Re: KZ650 Sleeper Build (KZ1000 engine transplant)
06 Oct 2023 14:06 - 06 Oct 2023 14:10
Got all the engine bolts de-greased and found a bunch of non stock bolts in the mix.
Went thru my Kawasaki bolt spares and found some suitable pieces but some will need to be shortened and the threads chased longer. It amounts to four M6 oil pan bolts and five M6 lower case bolts that need modified. If I had to replace these with new OEM bolts its North of $50. Spent a little time with a die and a hack saw sorting them out and saving some cash.
Also found that once de-greased the cylinder nuts were rusty, about 4 pieces out of 12 I would use. Luckily I have a complete used good set I bought off Ebay for cheap a few years ago
 Just need to buff them out with some chrome polish.
For all the engine covers I have purchased Allen head SS replacements as they are much easier to work with than the JIS pan head bolts.
Going thru and checking parts for the bottom end rebuild these cases must have been split before, one of the trans bearing position half rings has been replaced by two cut piston rings - a sign that they lost the original part.
The pieces I found were not cut correctly and are not the correct OD. I found a old 650 piston ring will fit perfect as a replacement, I have lots of old rings in my spares
just have to dig some out!
Checked the oil pump clearance, surprised to find it nice and tight at .0015", kind of weird considering the mods this engine had.
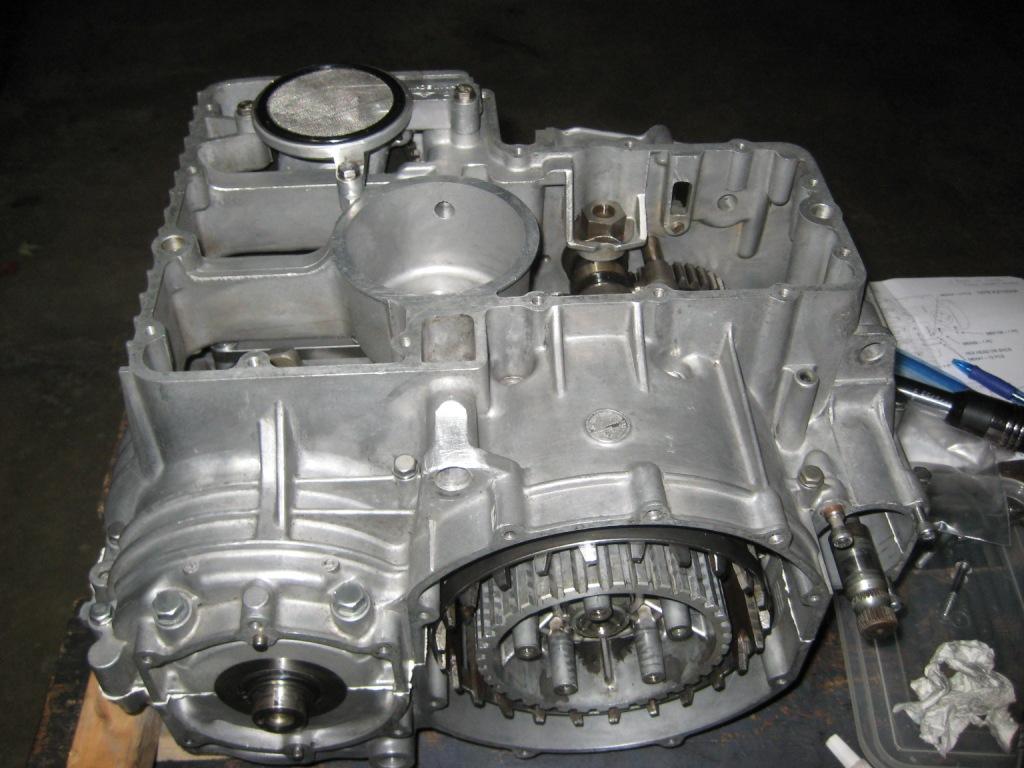
Got the lower case completed ready for assembly. Had to clean it then reassemble the shift drum and shifter forks.
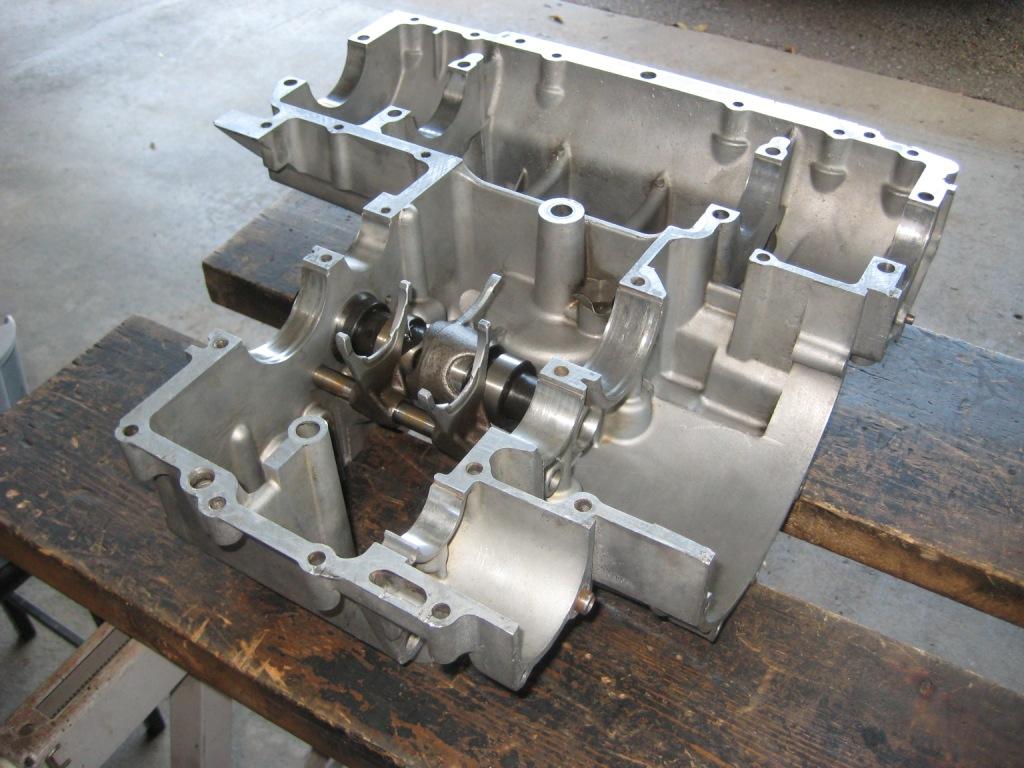
The black paint that was on there was already weakened by the paint remover so a little scrubbing with #1 steel wool got it off, tight spots I had to use tiny cut pieces held with forceps.
Tomorrow I will tackle the upper case, it has some corrosion and more paint left over than the lower case had so its going to be a bit more work to get clean.
Went thru my Kawasaki bolt spares and found some suitable pieces but some will need to be shortened and the threads chased longer. It amounts to four M6 oil pan bolts and five M6 lower case bolts that need modified. If I had to replace these with new OEM bolts its North of $50. Spent a little time with a die and a hack saw sorting them out and saving some cash.
Also found that once de-greased the cylinder nuts were rusty, about 4 pieces out of 12 I would use. Luckily I have a complete used good set I bought off Ebay for cheap a few years ago
For all the engine covers I have purchased Allen head SS replacements as they are much easier to work with than the JIS pan head bolts.
Going thru and checking parts for the bottom end rebuild these cases must have been split before, one of the trans bearing position half rings has been replaced by two cut piston rings - a sign that they lost the original part.
The pieces I found were not cut correctly and are not the correct OD. I found a old 650 piston ring will fit perfect as a replacement, I have lots of old rings in my spares
Checked the oil pump clearance, surprised to find it nice and tight at .0015", kind of weird considering the mods this engine had.
Got the lower case completed ready for assembly. Had to clean it then reassemble the shift drum and shifter forks.
The black paint that was on there was already weakened by the paint remover so a little scrubbing with #1 steel wool got it off, tight spots I had to use tiny cut pieces held with forceps.
Tomorrow I will tackle the upper case, it has some corrosion and more paint left over than the lower case had so its going to be a bit more work to get clean.
1978 KZ650B2 w 1197cc Z1 engine
1977 KZ650B1 w 750cc Spectre engine
1979 KZ650C3 w 831cc Hot Rod engine
1978 KZ650C2 w 762cc DFI project
1977 KZ650C1 stock restoration project
1978 KZ650B2 modified project
1978 KZ650B2 Injected Drag 831cc
1981 Z50R Honda tow bike
1977 KZ650B1 w 750cc Spectre engine
1979 KZ650C3 w 831cc Hot Rod engine
1978 KZ650C2 w 762cc DFI project
1977 KZ650C1 stock restoration project
1978 KZ650B2 modified project
1978 KZ650B2 Injected Drag 831cc
1981 Z50R Honda tow bike
Last edit: 06 Oct 2023 14:10 by Injected. Reason: sp
Please Log in or Create an account to join the conversation.
- Injected
-
Topic Author
- Offline
- User
-
Registered
- Posts: 1726
- Thanks: 1222
Re: KZ650 Sleeper Build (KZ1000 engine transplant)
07 Oct 2023 18:22 - 08 Oct 2023 08:05
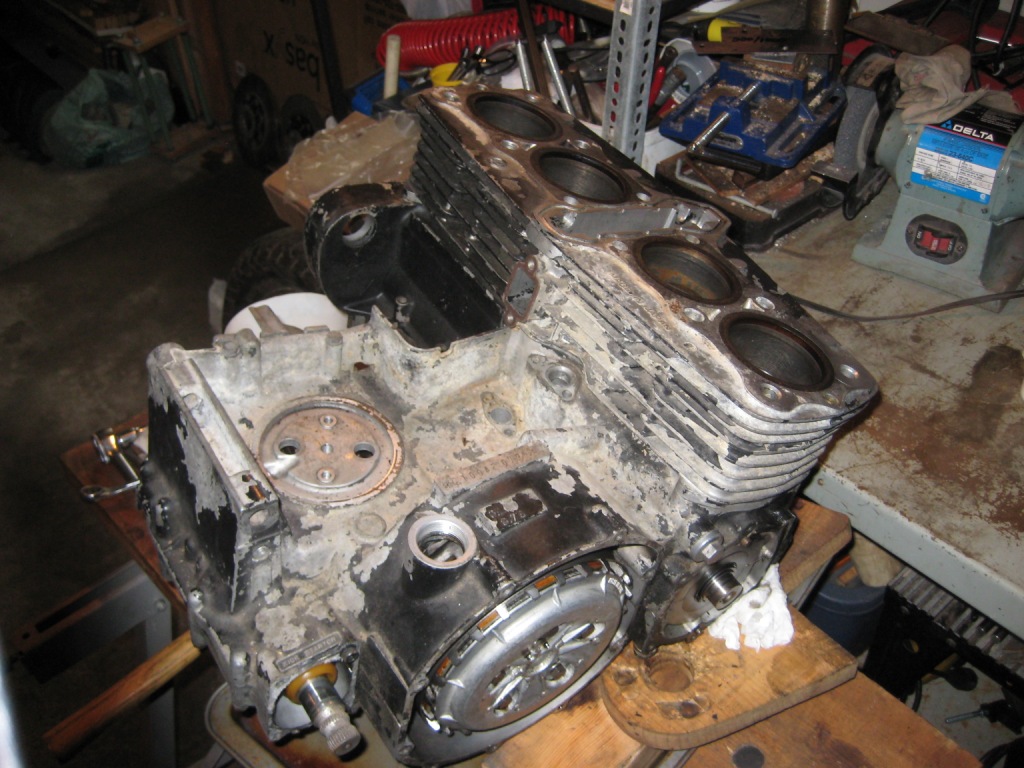
Got the upper case cleaned up then gathered all the parts for the assembly. Used a lot of elbow grease and steel wool to clean the cases as they were a mess to start off.
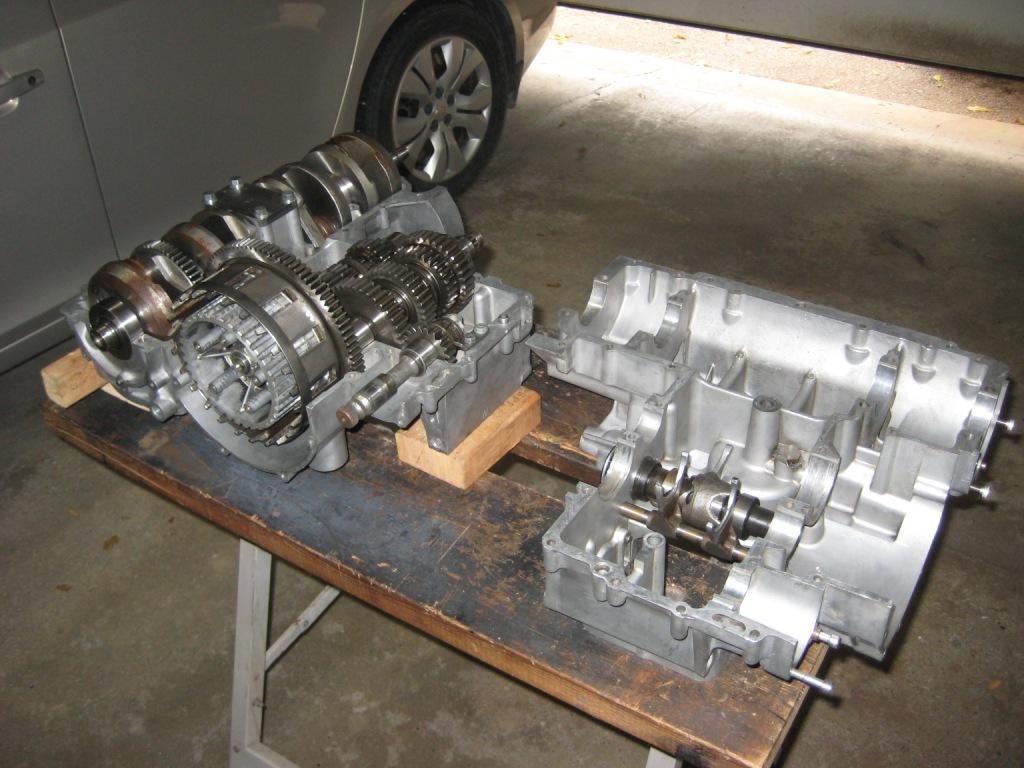

Just had enough 1194 to glue the cases together, need to order another tube
Missing a couple of 95mm bolts on the lower case, its been a while since I put a 1000 together so read the bolt chart wrong. Will try to find them in the next few days otherwise its together and torqued down to spec.
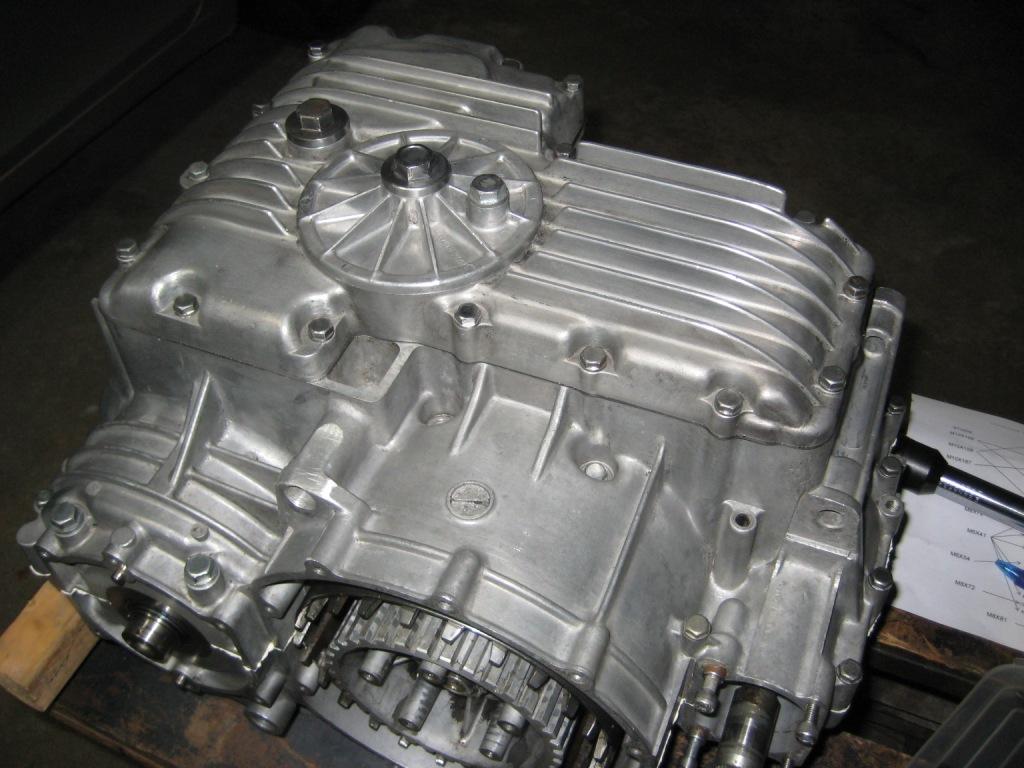
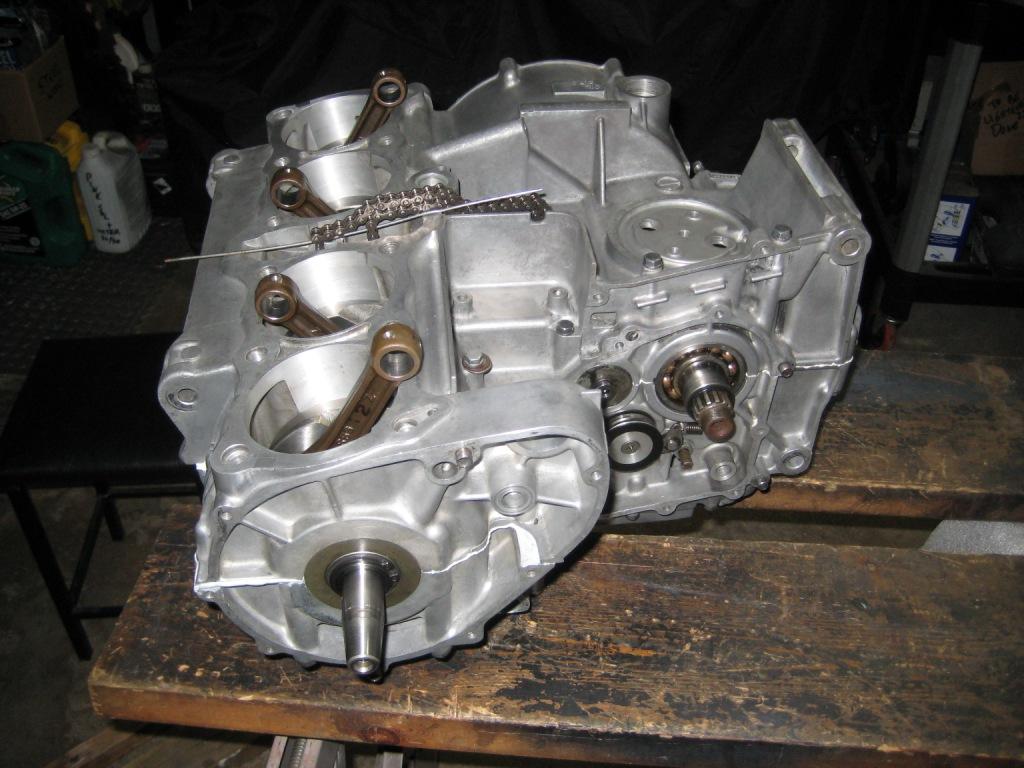
This is done enough for me to get it bolted into the frame, just need to drill and tap a hole for a steering stop then I should be OK to bolt it together.
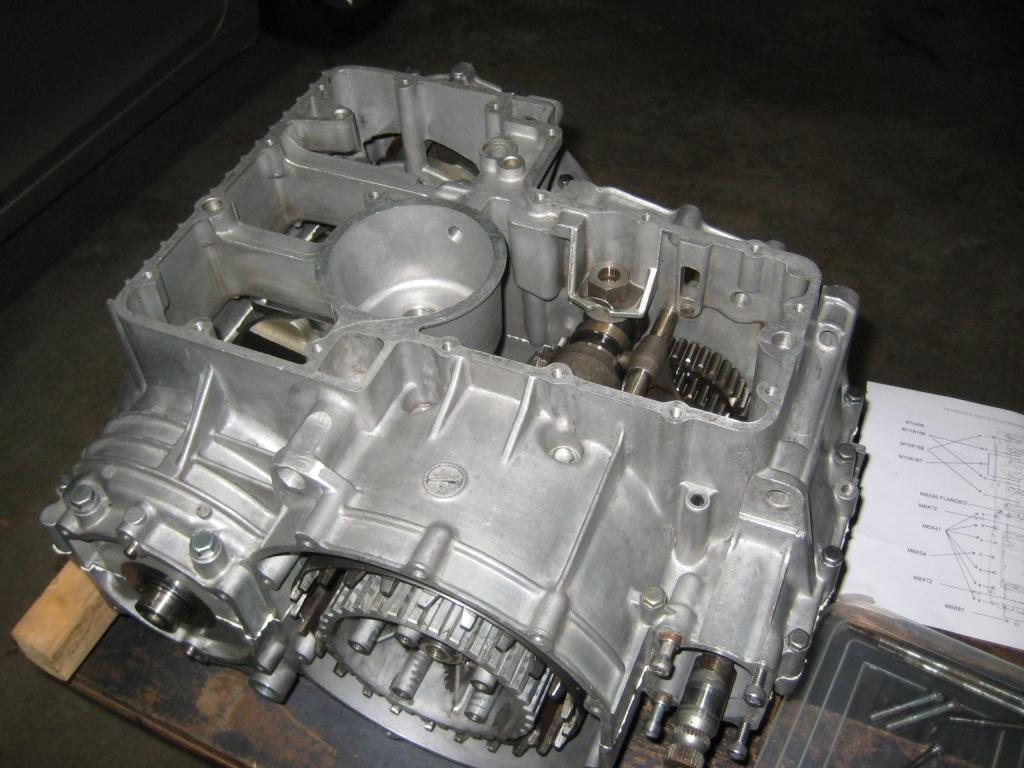
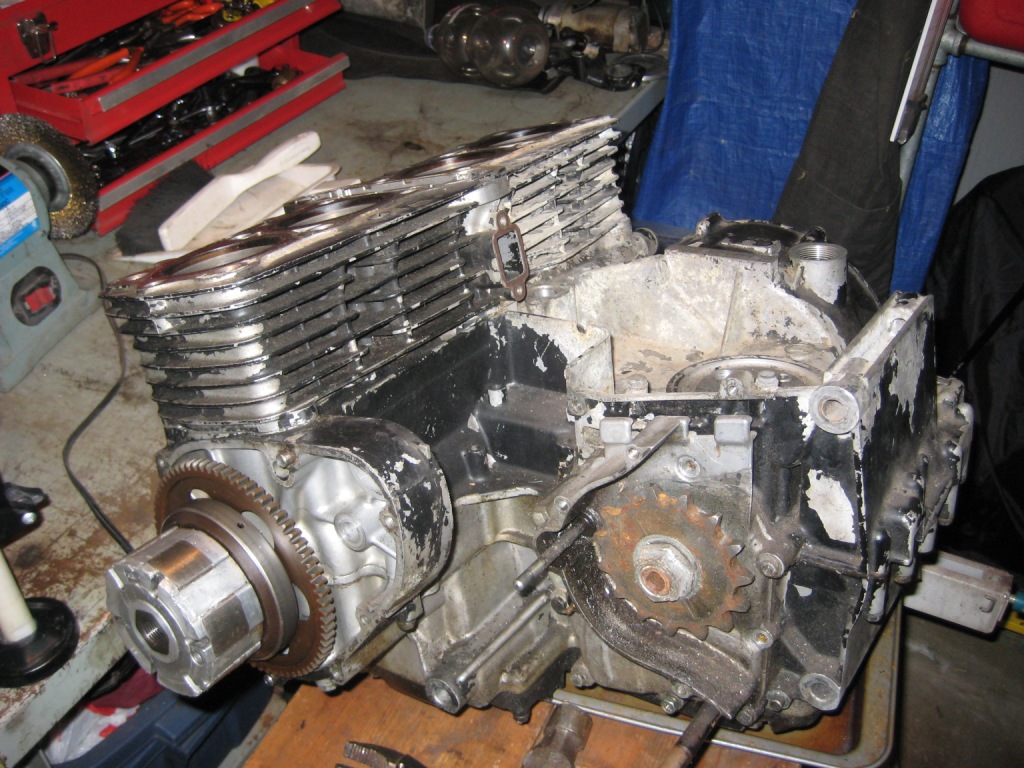
This is what it looked like when I first stripped it down :
Just had enough 1194 to glue the cases together, need to order another tube
Missing a couple of 95mm bolts on the lower case, its been a while since I put a 1000 together so read the bolt chart wrong. Will try to find them in the next few days otherwise its together and torqued down to spec.
This is done enough for me to get it bolted into the frame, just need to drill and tap a hole for a steering stop then I should be OK to bolt it together.
This is what it looked like when I first stripped it down :
1978 KZ650B2 w 1197cc Z1 engine
1977 KZ650B1 w 750cc Spectre engine
1979 KZ650C3 w 831cc Hot Rod engine
1978 KZ650C2 w 762cc DFI project
1977 KZ650C1 stock restoration project
1978 KZ650B2 modified project
1978 KZ650B2 Injected Drag 831cc
1981 Z50R Honda tow bike
1977 KZ650B1 w 750cc Spectre engine
1979 KZ650C3 w 831cc Hot Rod engine
1978 KZ650C2 w 762cc DFI project
1977 KZ650C1 stock restoration project
1978 KZ650B2 modified project
1978 KZ650B2 Injected Drag 831cc
1981 Z50R Honda tow bike
Last edit: 08 Oct 2023 08:05 by Injected. Reason: sp
The following user(s) said Thank You: ThatGPzGuy
Please Log in or Create an account to join the conversation.
Moderators: Street Fighter LTD