
And finally, Wookie's 82 begins !
- moizeau
-

- Away
- User
-

Registered
- Posts: 78
- Thanks: 59
Re: And finally, Wookie's 82 begins !
13 Apr 2026 10:39
Sorry missed the word 'use' out. Many of my photos have a tobaaco packet in view
The following user(s) said Thank You: Wookie58
Please Log in or Create an account to join the conversation.
- Wookie58
-
 Topic Author
- Offline
- Moderator
-

Registered
- Posts: 6786
- Thanks: 4277
Re: And finally, Wookie's 82 begins !
13 Apr 2026 11:34I get it now (wasn't familiar with the "go/no go" termSorry missed the word 'use' out. Many of my photos have a tobaaco packet in view

1982 KZ1000 Ltd
www.kzrider.com/forum/11-projects/617631...-82-begins?start=192
kzrider.com/forum/faq-wiki/616810-electr...-fault-finding-guide
www.kzrider.com/forum/11-projects/617631...-82-begins?start=192
kzrider.com/forum/faq-wiki/616810-electr...-fault-finding-guide
Please Log in or Create an account to join the conversation.
- Wookie58
-
Topic Author
- Offline
- Moderator
-
Registered
- Posts: 6786
- Thanks: 4277
Re: And finally, Wookie's 82 begins !
23 Apr 2026 12:27
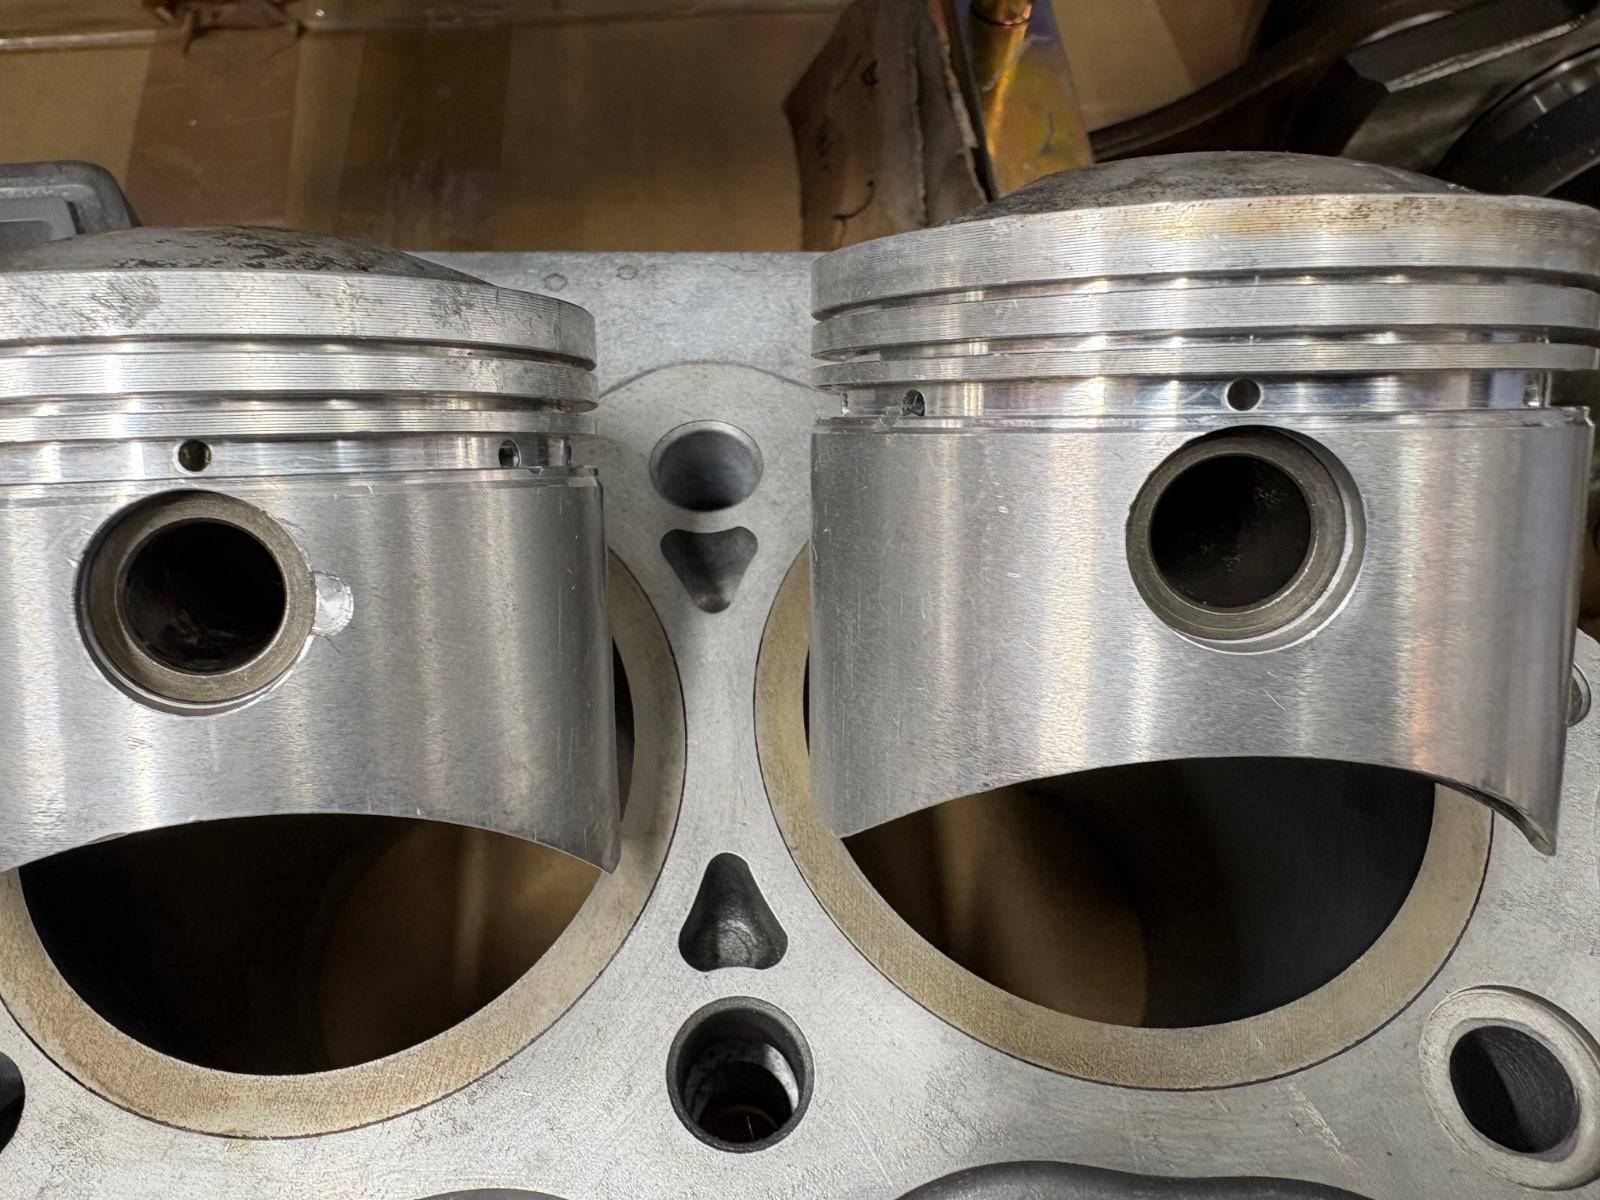
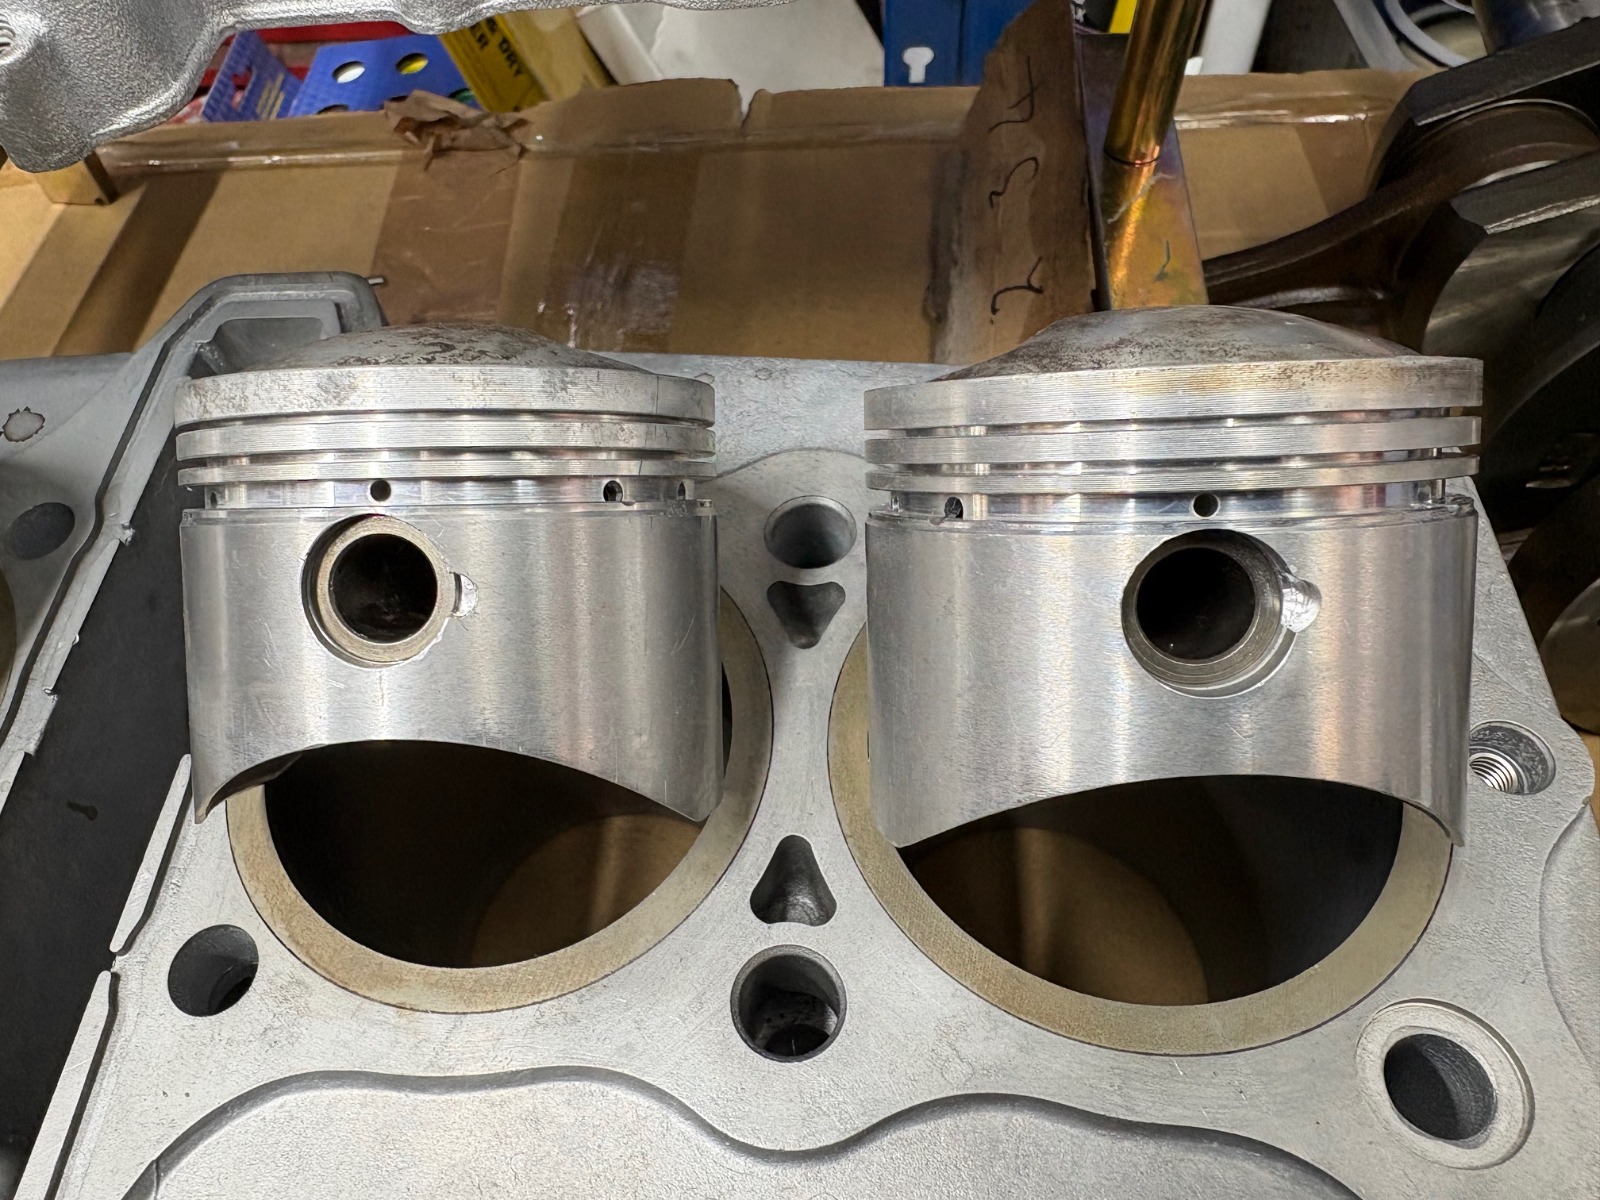
Well this old girl is still throwing me "curve balls" !! I am using a set of 72mm pistons that Warren sorted me out with (thanks again). At the weekend I was cleaning parts ready to start assembly and I noticed that one of the pistons didn't have any cut-outs to release the clips III All then numbers underneath are the same and in every other way all four are identical so "go figure" Fortunately I have a 4mm end mill so it wasn't too big a hassle to rectify tonight after work. Onwards and upwards 
1982 KZ1000 Ltd
www.kzrider.com/forum/11-projects/617631...-82-begins?start=192
kzrider.com/forum/faq-wiki/616810-electr...-fault-finding-guide
www.kzrider.com/forum/11-projects/617631...-82-begins?start=192
kzrider.com/forum/faq-wiki/616810-electr...-fault-finding-guide
The following user(s) said Thank You: MFP-Joe, Warren3200gt, Quofan
Please Log in or Create an account to join the conversation.
- TexasKZ
-

- Offline
- Platinum Member
-

Registered
- Posts: 8374
- Thanks: 2778
Re: And finally, Wookie's 82 begins !
24 Apr 2026 07:26
And just when you thought it was safe to go outside again.......
1982 KZ1000 LTD parts donor
1981 KZ1000 LTD slowly moving toward resurrection
2000 ZRX1100 not ridden enough
www.kzrider.com/forum/11-projects/620336...amateur-build-thread
1981 KZ1000 LTD slowly moving toward resurrection
2000 ZRX1100 not ridden enough
www.kzrider.com/forum/11-projects/620336...amateur-build-thread
The following user(s) said Thank You: Wookie58
Please Log in or Create an account to join the conversation.
- Wookie58
-
Topic Author
- Offline
- Moderator
-
Registered
- Posts: 6786
- Thanks: 4277
Re: And finally, Wookie's 82 begins !
07 May 2026 11:56
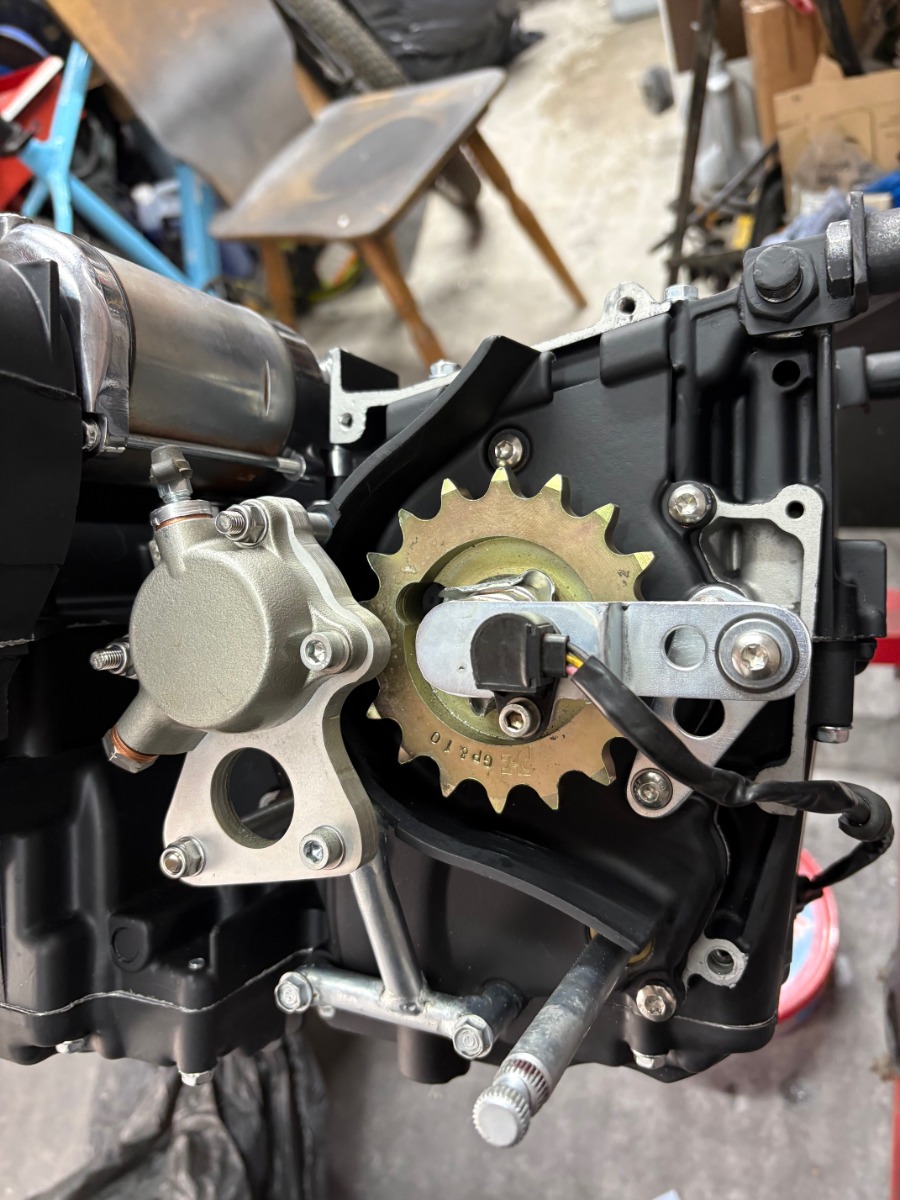
It's been a couple of weeks since my last post but I have been busy with my motor, first was to "Cerekote" the cylinders then I cracked on with the bottom end while the paint cured on the block. Once the cases where together I decided to build up the shift mechanism, speed sensor and the hydraulic clutch conversion. With the clutch slave cylinder I had to reverse the intake and the bleed nipple position (when the holes in the slave cylinder lined up with three of the trans cover screws it was upside down so would have been near impossible to bleed) I made an adaptor a while back to convert the original intake to a 7mm bleed nipple but the concern I had was that the adaptor would loosen when opening the bleed nipple. I decided to install it with red loctite and then pegged it with a 2mm roll pin so it should stay put hopefully !!
When it came to fitting the cylinder I decided to install the pistons in the block first (main reason was I believe it's easier than wrestling with the block single handed and reduces the risk of damaging rings and the base gasket (especially as with a +2.5mm overbore there isn't much of the taper left on the bottom of the liners) Now with a shell bearing crank this is easy as you can drop the pistons and rods into the block, bolt it down then flip it over and drop the crank in. With a roller crank it was a PITA !! I put the index rod in, lowered the block onto the middle four studs (I fitted the rest once all the pistons were connected) until it rested on the indexing rod then used a jig I made to lift the cylinder slightly. The middle two where tricky but the outer two were quite straightforward, so then it was just a case of dropping the studs in and pulling the block down. Easy eh !!!!!!
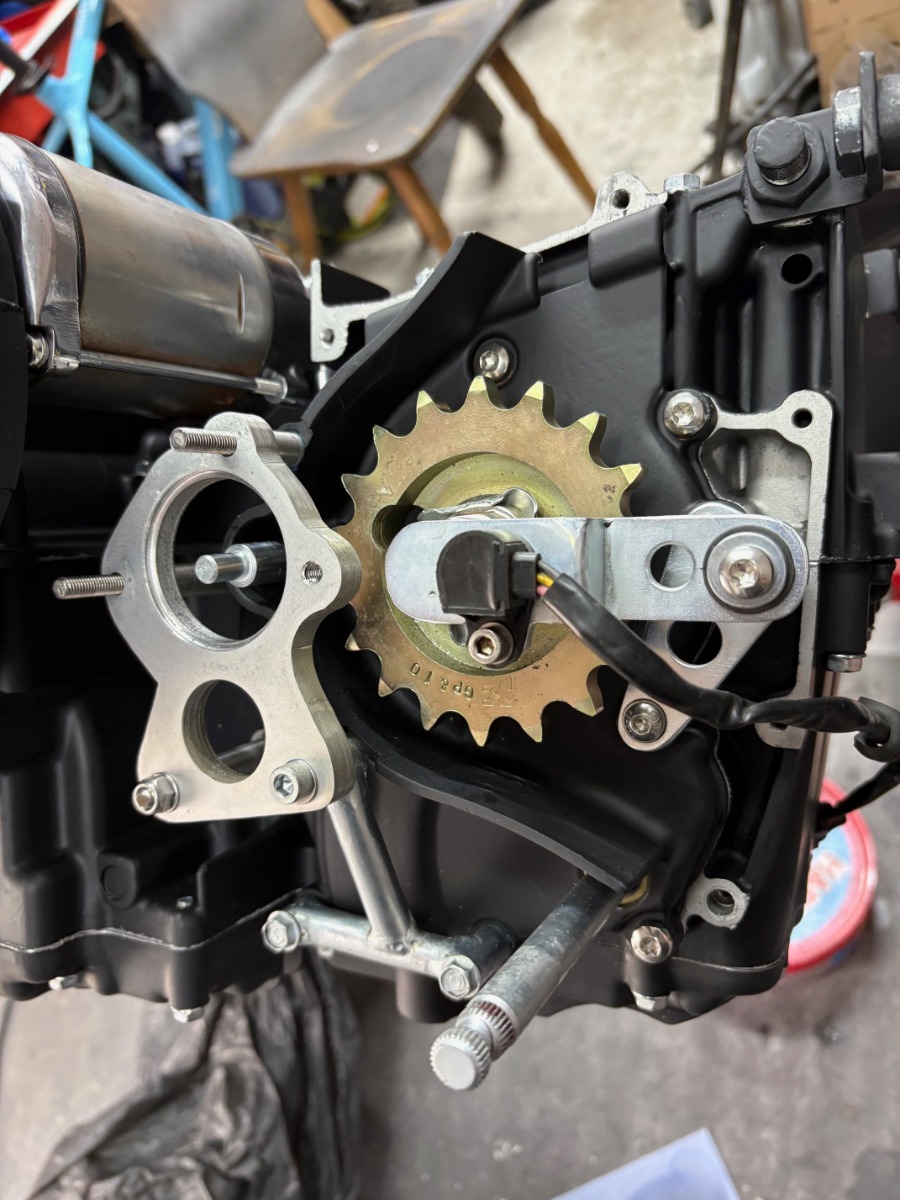
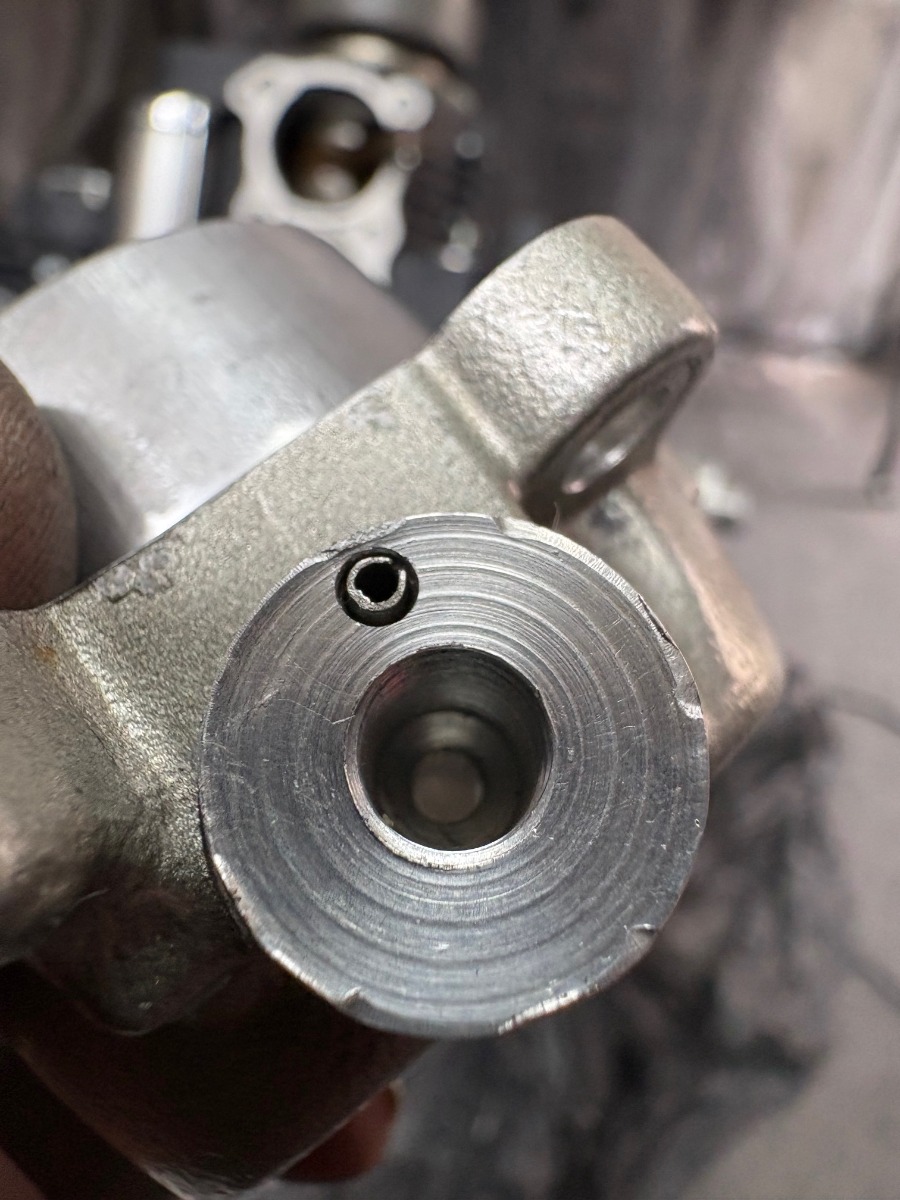
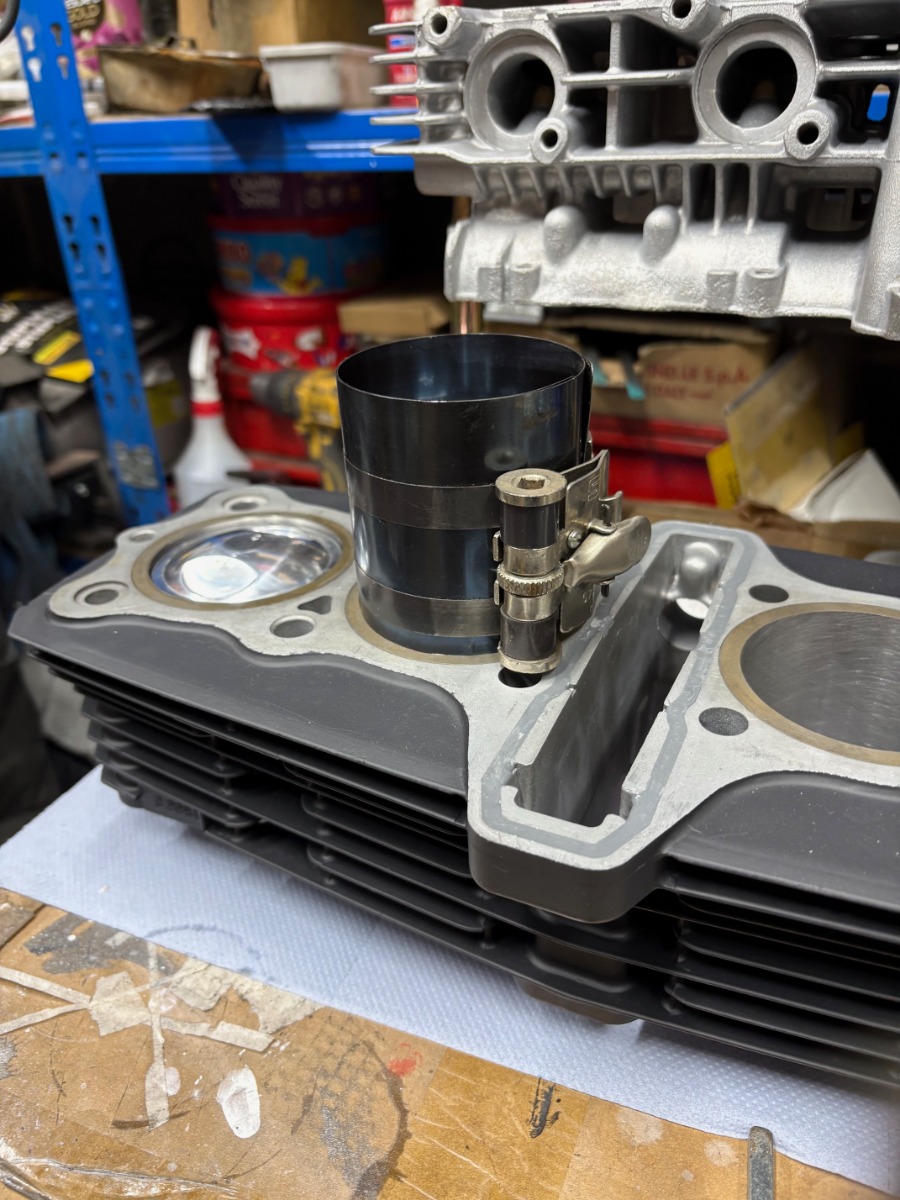
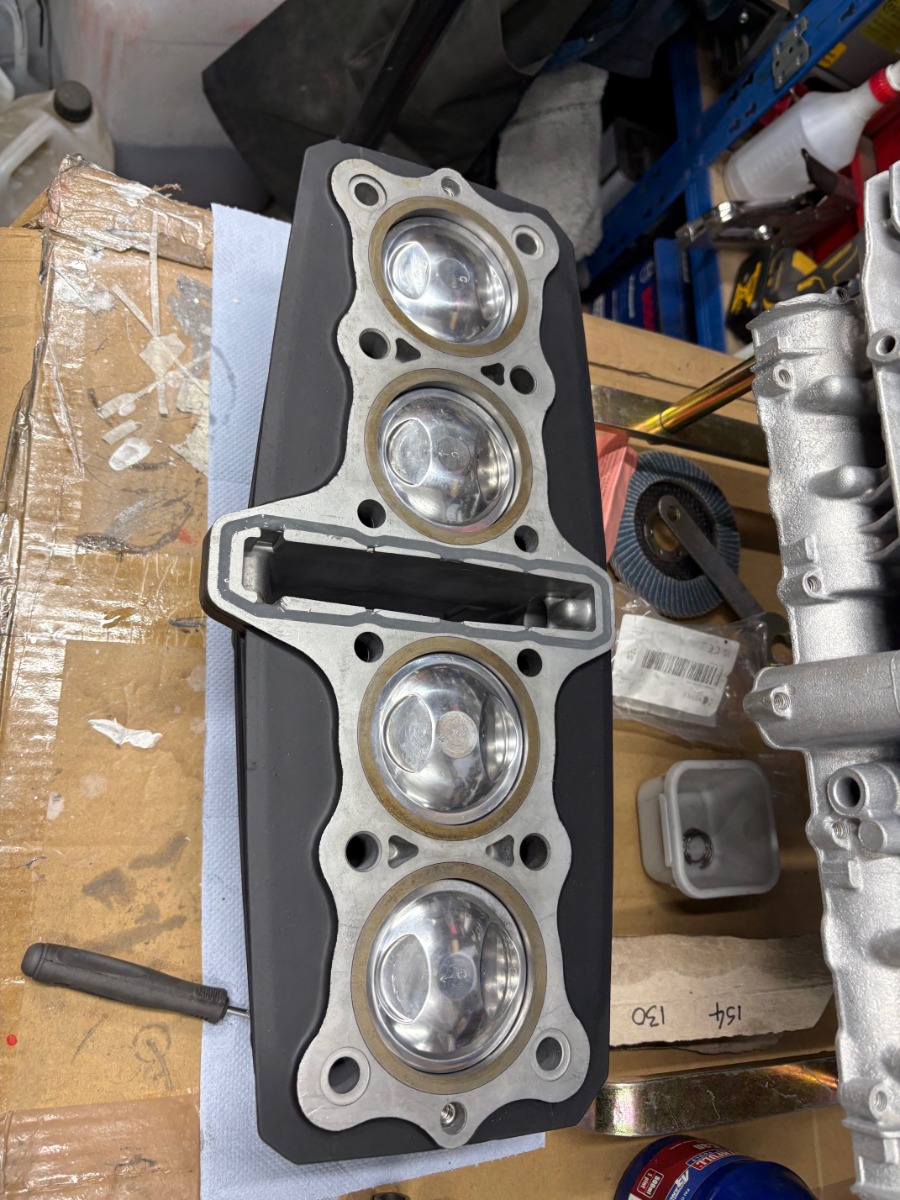
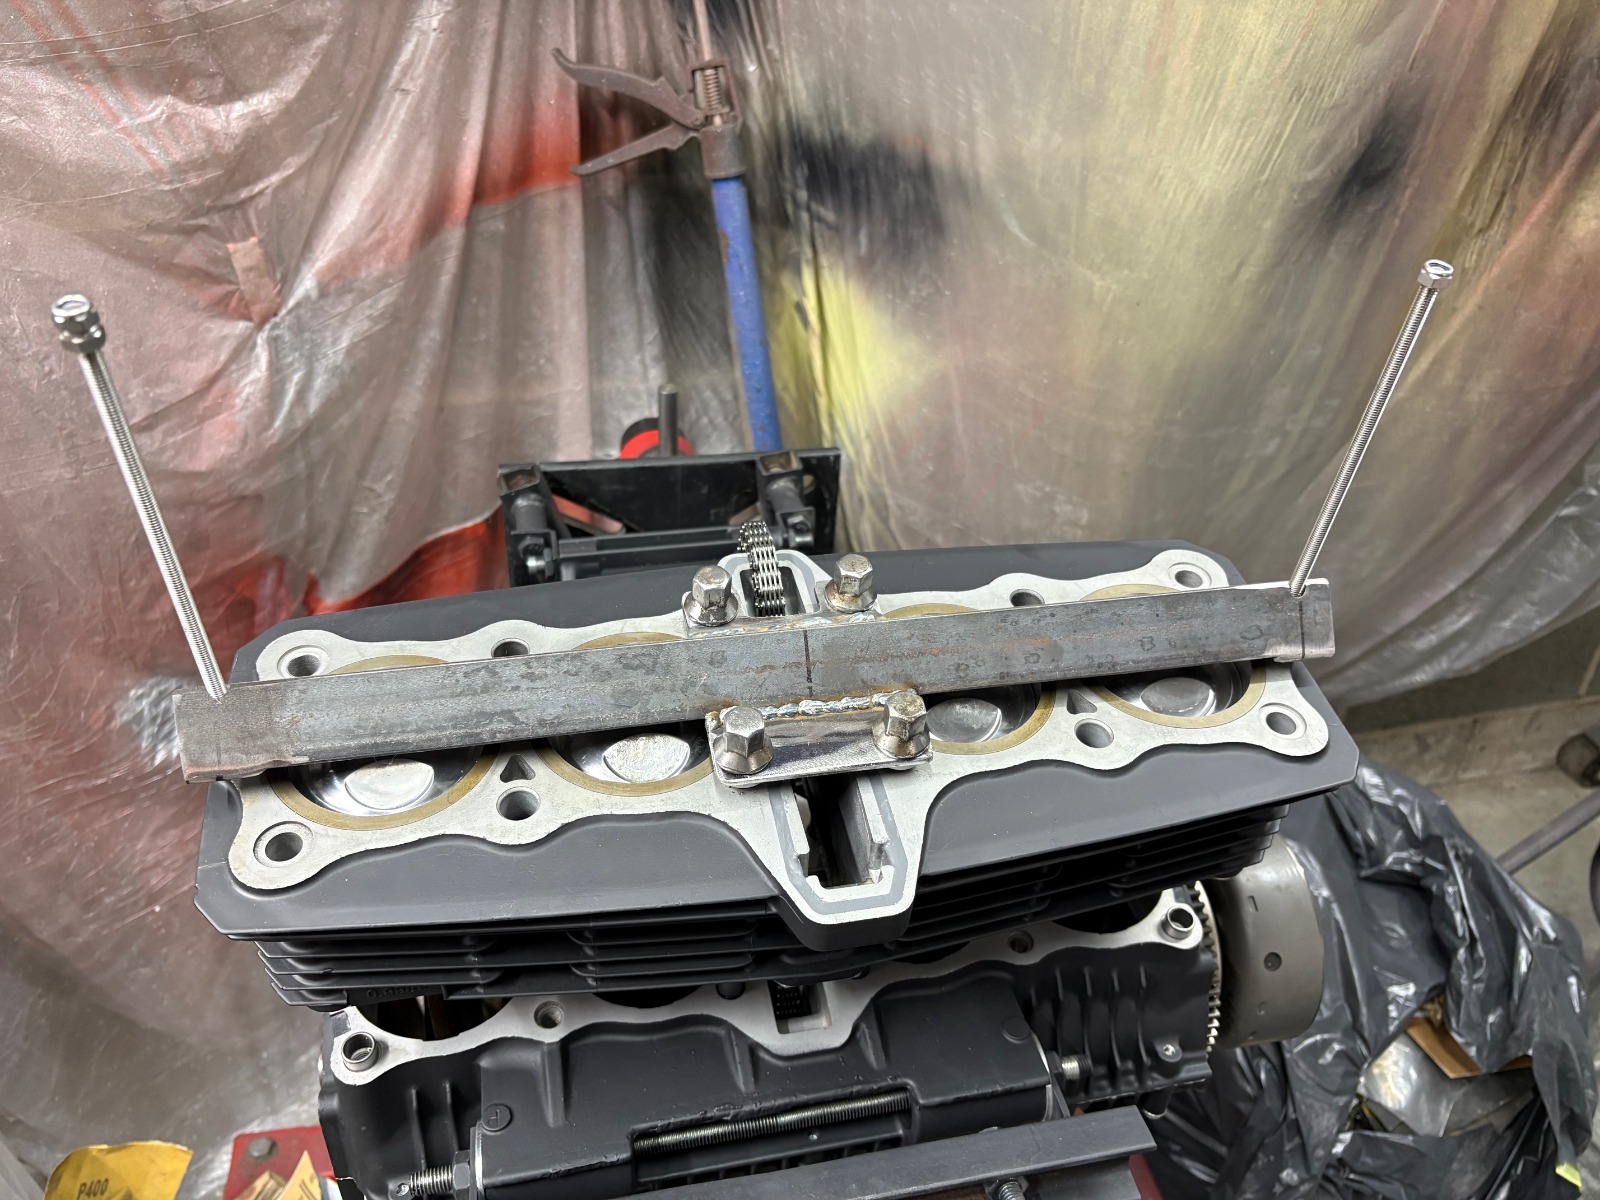
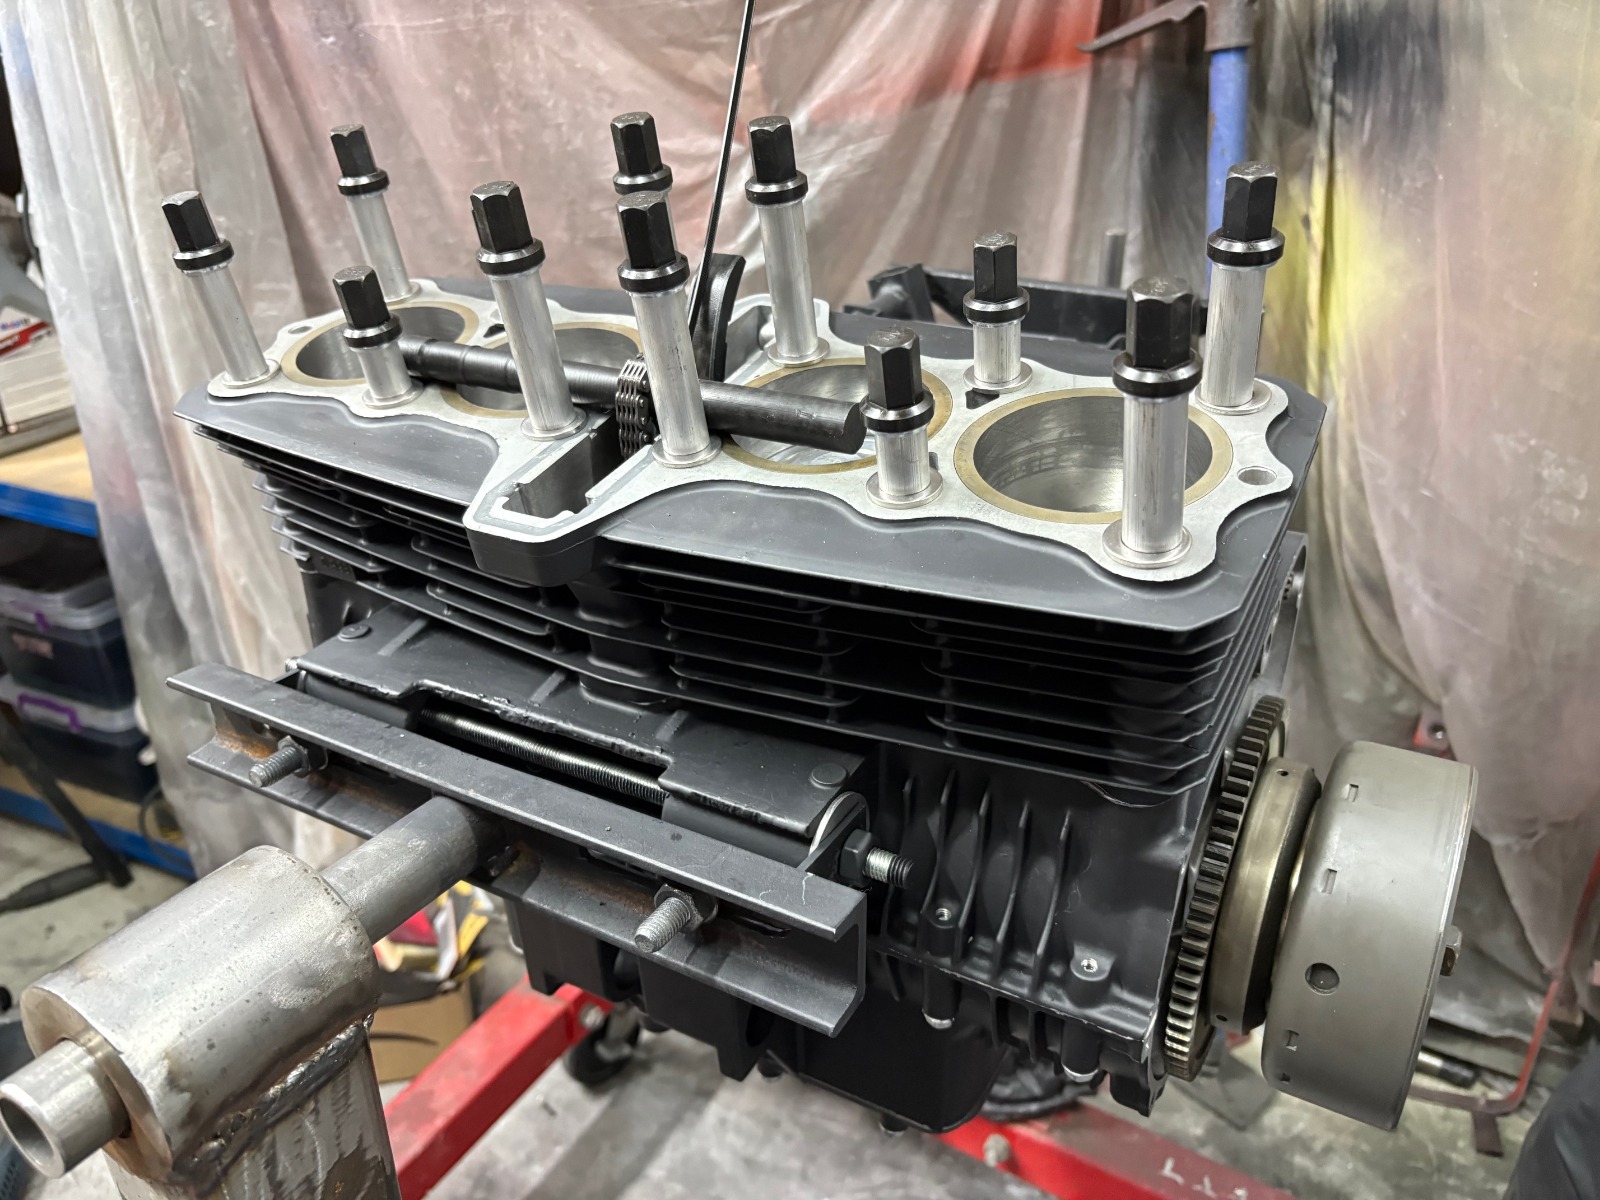
When it came to fitting the cylinder I decided to install the pistons in the block first (main reason was I believe it's easier than wrestling with the block single handed and reduces the risk of damaging rings and the base gasket (especially as with a +2.5mm overbore there isn't much of the taper left on the bottom of the liners) Now with a shell bearing crank this is easy as you can drop the pistons and rods into the block, bolt it down then flip it over and drop the crank in. With a roller crank it was a PITA !! I put the index rod in, lowered the block onto the middle four studs (I fitted the rest once all the pistons were connected) until it rested on the indexing rod then used a jig I made to lift the cylinder slightly. The middle two where tricky but the outer two were quite straightforward, so then it was just a case of dropping the studs in and pulling the block down. Easy eh !!!!!!
1982 KZ1000 Ltd
www.kzrider.com/forum/11-projects/617631...-82-begins?start=192
kzrider.com/forum/faq-wiki/616810-electr...-fault-finding-guide
www.kzrider.com/forum/11-projects/617631...-82-begins?start=192
kzrider.com/forum/faq-wiki/616810-electr...-fault-finding-guide
The following user(s) said Thank You: rstnick, MFP-Joe, sf4t7
Please Log in or Create an account to join the conversation.
- MFP-Joe
-

- Offline
- User
-
Registered
- forever 18 when on my bike ...!
- Posts: 620
- Thanks: 830
Re: And finally, Wookie's 82 begins !
08 May 2026 00:28
As ever: Very good job !!! Go ahead with all your enthusiasm, ideas and energy!!!
Z1000 A1 1976
Z1000 A2 1977
Greetings, Joe
Z1000 A2 1977
Greetings, Joe
The following user(s) said Thank You: Wookie58
Please Log in or Create an account to join the conversation.
- kimchella
-

- Offline
- Sustaining Member
-
Registered
- Posts: 313
- Thanks: 296
Re: And finally, Wookie's 82 begins !
08 May 2026 00:58
Great work as always Guy, looking forward to seeing the next part of assembly.
Rich.6
Rich.6
KZ650B1 frame number 225
New Zealand
New Zealand
The following user(s) said Thank You: Wookie58
Please Log in or Create an account to join the conversation.
- Wookie58
-
Topic Author
- Offline
- Moderator
-
Registered
- Posts: 6786
- Thanks: 4277
Re: And finally, Wookie's 82 begins !
10 May 2026 12:45 - 10 May 2026 12:49
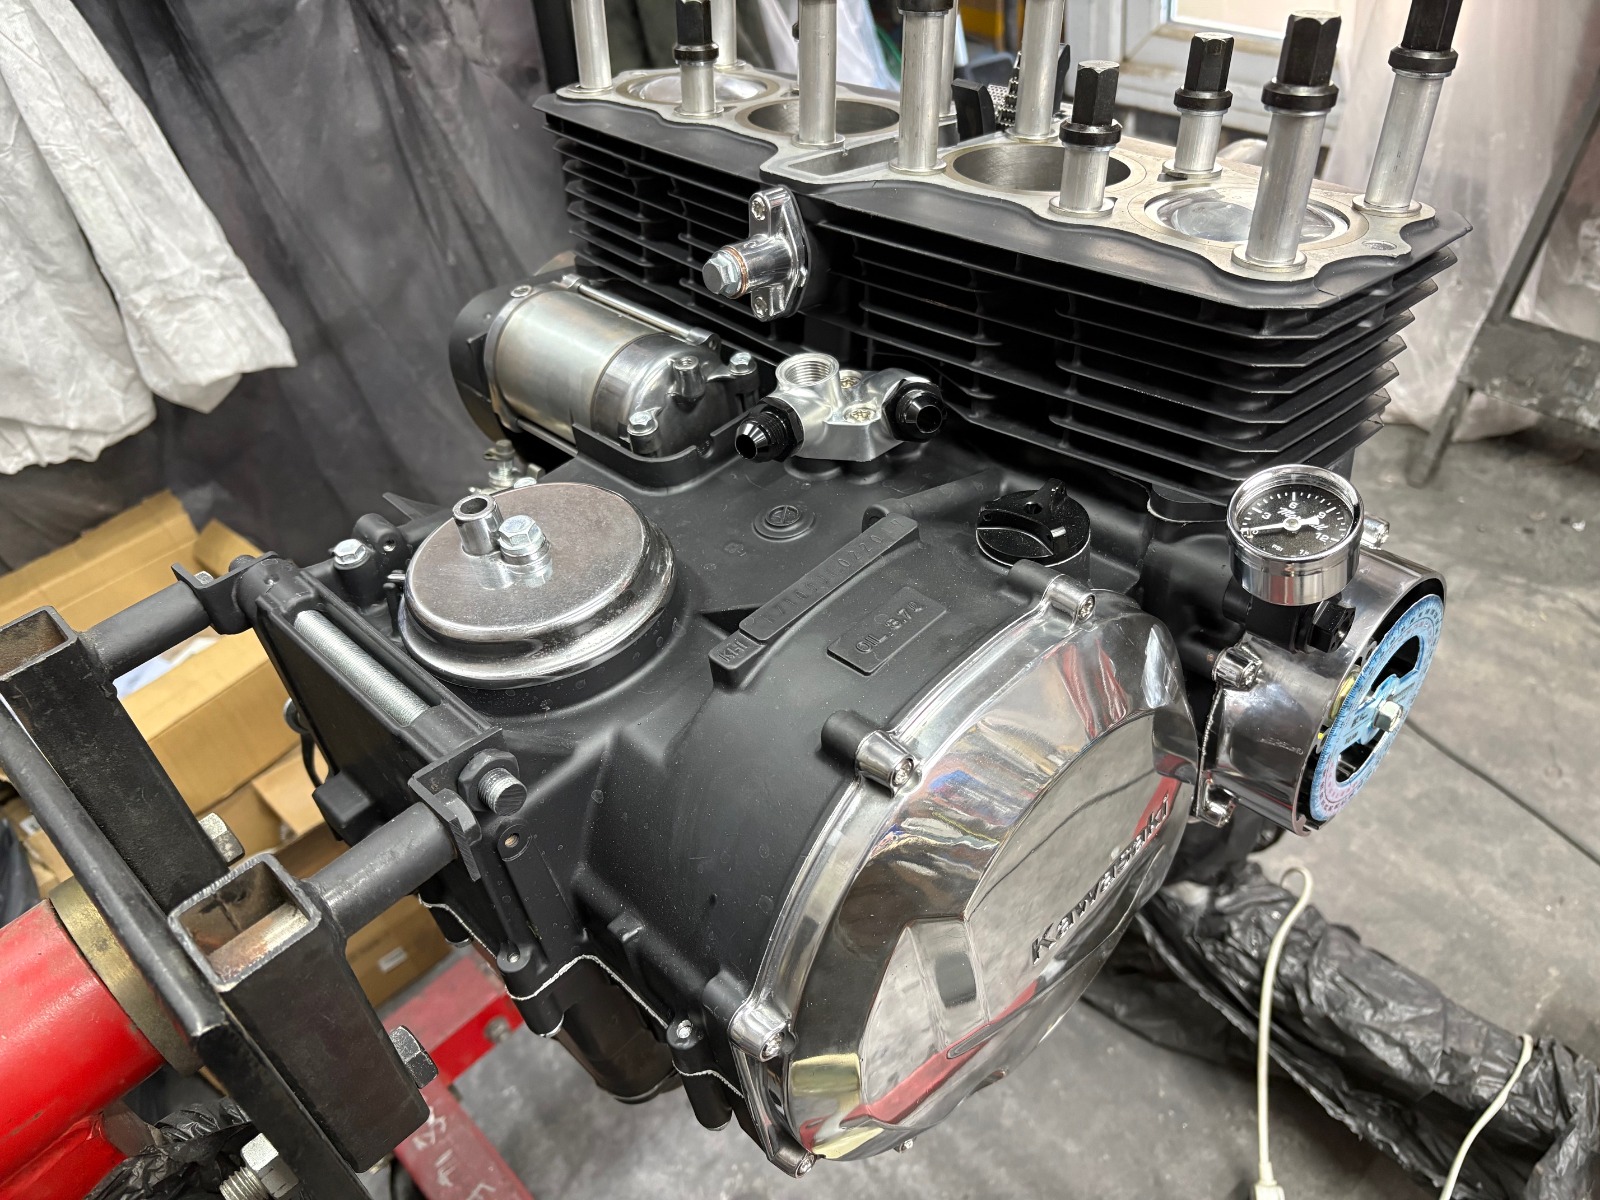
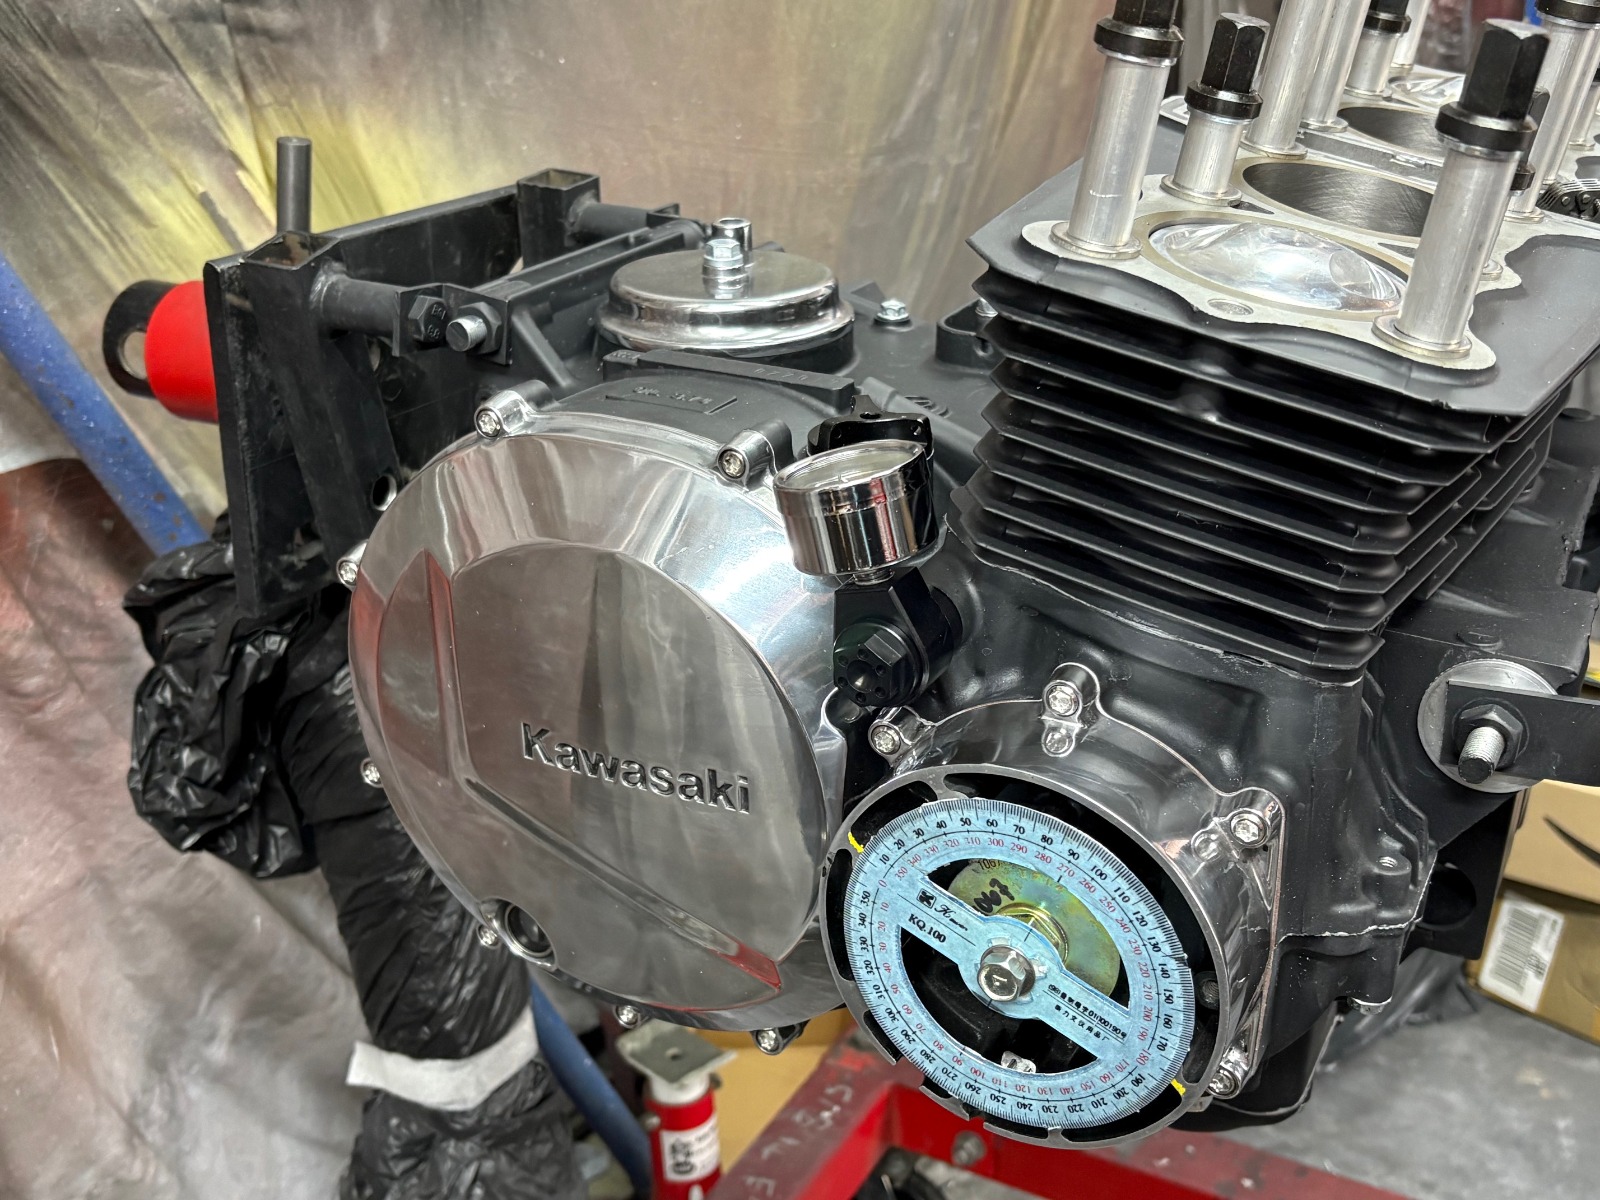
Mrs Wookie had plans yesterday not not got a huge amount done this weekend. I like to finish one bit before moving on so I have concentrated on wrapping up the bottom end. First was to check the accuracy of the factory TDC and therefore timing marks, as expected (due to manufacturing tolerances) the factory marks are "retarded" 3 degrees so first off I had added new marks in the correct spot. This then meant removing some material from the left side of the rotor to ensure the retarded ignition is corrected. I have added my cooler take off and ZZR/ZXR ratchet tensioner. I also had to add a couple of role pins in the ignition housing as one of the lugs to secure the cables was broken off (2nd hand part) So that's pretty much it for now, I will move onto the head next weekend (seats are cut and valves tipped but I want to do some light porting and pull the oil gallery plugs) I have also had a moment of extravagance and splashed out on a "Joker Machine" billet oil pressure gauge mount

PS: I'm glad I took the time to counterbore the side covers for the bolts, I think it looks great now it's assembled
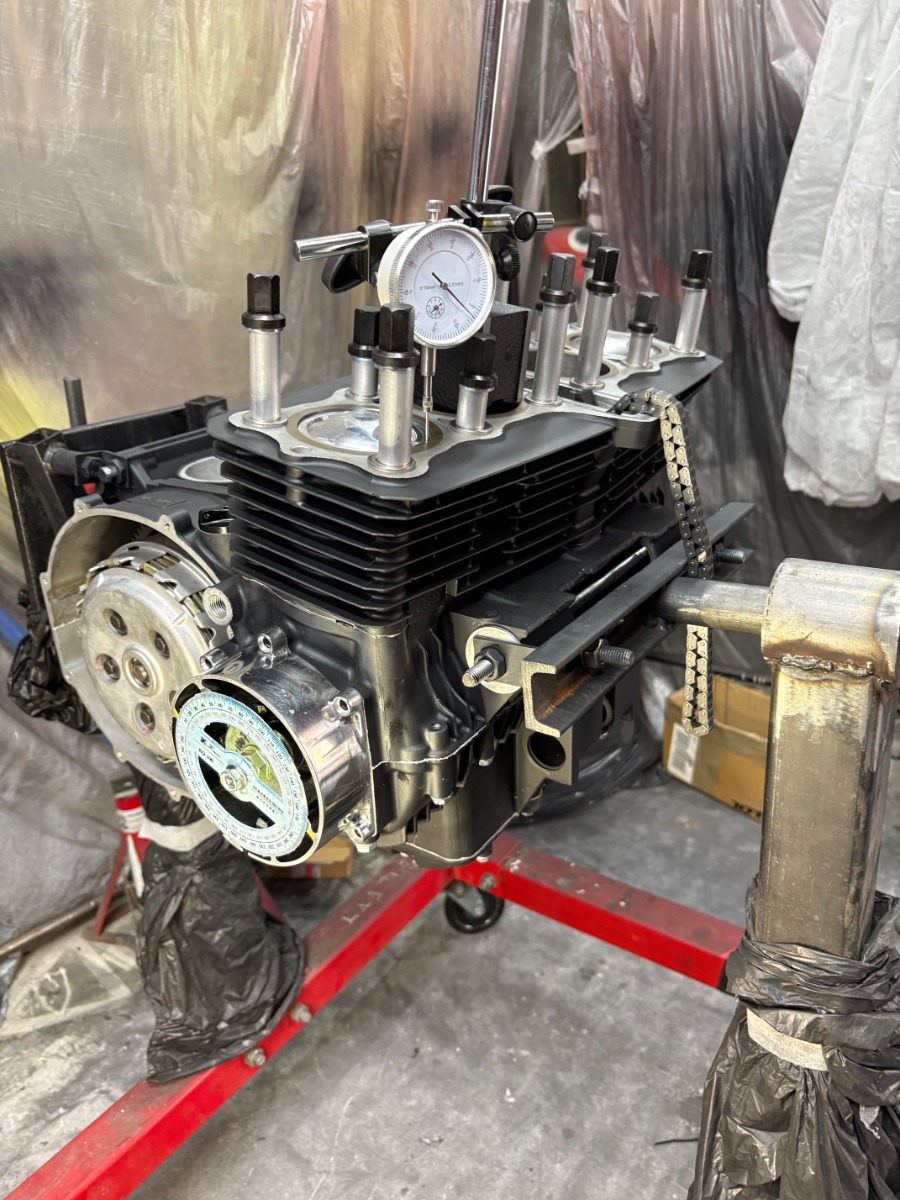
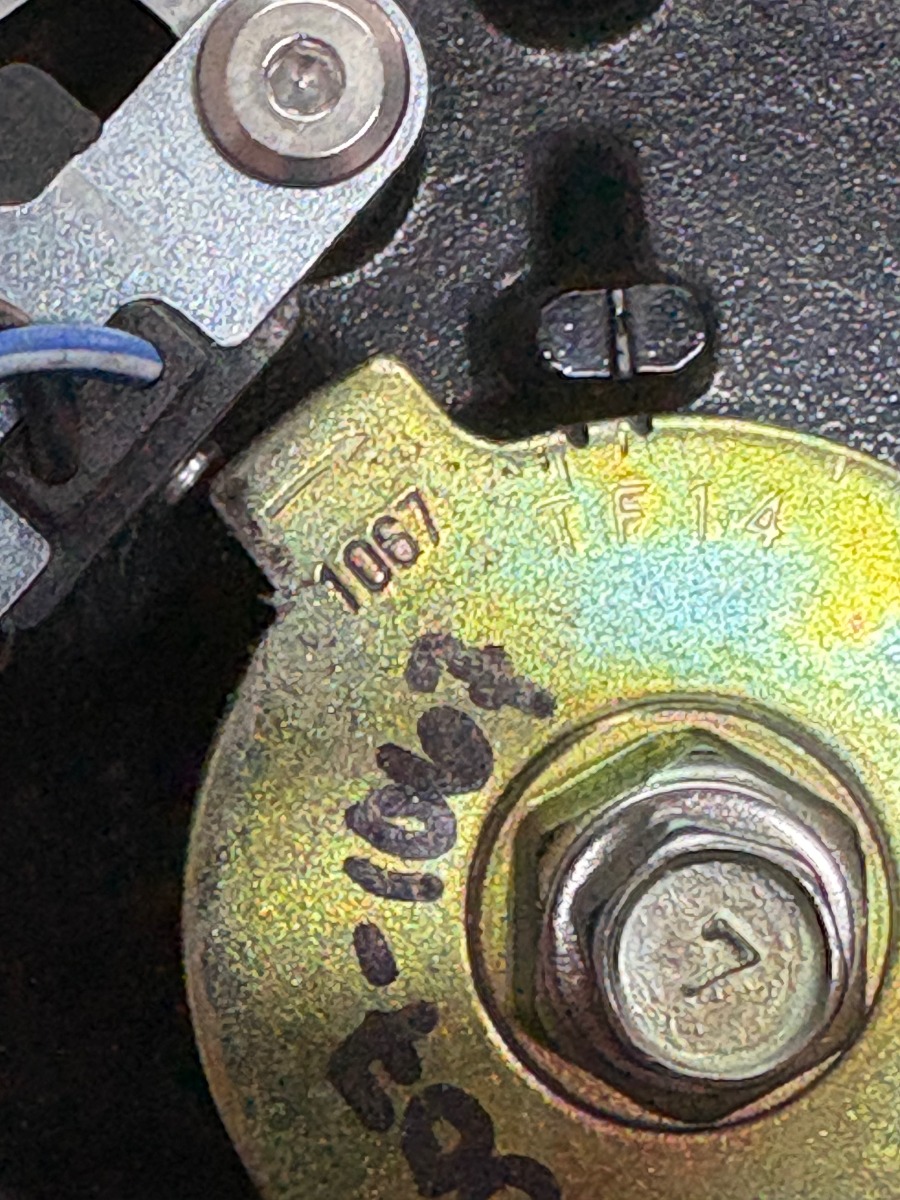
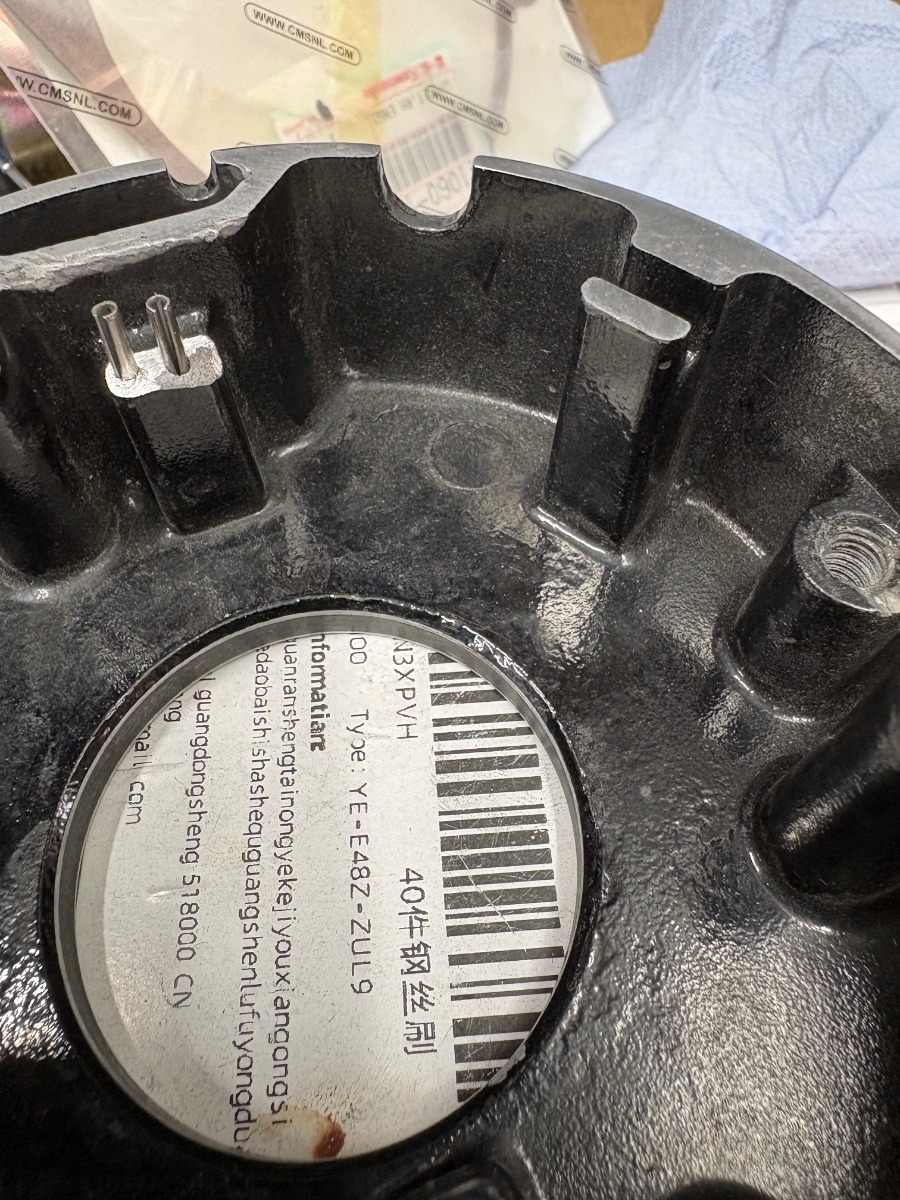
PS: I'm glad I took the time to counterbore the side covers for the bolts, I think it looks great now it's assembled
1982 KZ1000 Ltd
www.kzrider.com/forum/11-projects/617631...-82-begins?start=192
kzrider.com/forum/faq-wiki/616810-electr...-fault-finding-guide
www.kzrider.com/forum/11-projects/617631...-82-begins?start=192
kzrider.com/forum/faq-wiki/616810-electr...-fault-finding-guide
Last edit: 10 May 2026 12:49 by Wookie58.
The following user(s) said Thank You: ThatGPzGuy, MFP-Joe, sf4t7, Bent Trigger, Quofan
Please Log in or Create an account to join the conversation.
- Bent Trigger
-
- Offline
- User
-
Registered
- Posts: 68
- Thanks: 15
Re: And finally, Wookie's 82 begins !
21 May 2026 18:05
Sweet Build.
Where can I source that degree wheel?
I like it!!

Where can I source that degree wheel?
I like it!!
The following user(s) said Thank You: Wookie58
Please Log in or Create an account to join the conversation.
- Wookie58
-
Topic Author
- Offline
- Moderator
-
Registered
- Posts: 6786
- Thanks: 4277
Re: And finally, Wookie's 82 begins !
22 May 2026 00:58Simple answer is any "dime store" that has students geometry sets for a few bucksSweet Build.
Where can I source that degree wheel?
I like it!!
. I put masking tape on the back so my tired old eyes could read the numbers and drilled a suitable hole in the middle (carefully so it didn't shatter)I have an old "Piper Cams" one from years ago but it's huge so would have needed a pointer rigging up and I wanted to be able to see and mark the rotor once I had the correct TDC point (Piper one is solid) This set up is easy to Zero just by loosening the centre bolt then nipping it up again. I have used the edge of the mounting lug for the pick up coil as the data point (yellow painted line in the pics) When I turn the motor I do it from the generator rotor so nothing moves out of place on the degree wheel - I'm a big fan of simple and easy
1982 KZ1000 Ltd
www.kzrider.com/forum/11-projects/617631...-82-begins?start=192
kzrider.com/forum/faq-wiki/616810-electr...-fault-finding-guide
www.kzrider.com/forum/11-projects/617631...-82-begins?start=192
kzrider.com/forum/faq-wiki/616810-electr...-fault-finding-guide
The following user(s) said Thank You: MFP-Joe, sf4t7
Please Log in or Create an account to join the conversation.
- TexasKZ
-
- Offline
- Platinum Member
-
Registered
- Posts: 8374
- Thanks: 2778
Re: And finally, Wookie's 82 begins !
22 May 2026 08:51
Brilliant idea. Here are some 360 degree protractors listed on the jungle website--
www.amazon.ca/s?k=protractor+360&crid=19...151&ref=nb_sb_noss_1
www.amazon.ca/s?k=protractor+360&crid=19...151&ref=nb_sb_noss_1
1982 KZ1000 LTD parts donor
1981 KZ1000 LTD slowly moving toward resurrection
2000 ZRX1100 not ridden enough
www.kzrider.com/forum/11-projects/620336...amateur-build-thread
1981 KZ1000 LTD slowly moving toward resurrection
2000 ZRX1100 not ridden enough
www.kzrider.com/forum/11-projects/620336...amateur-build-thread
The following user(s) said Thank You: willemZ900, Wookie58
Please Log in or Create an account to join the conversation.
- Wookie58
-
Topic Author
- Offline
- Moderator
-
Registered
- Posts: 6786
- Thanks: 4277
Re: And finally, Wookie's 82 begins !
26 May 2026 06:49 - 26 May 2026 06:55
Well this weekend "pragmatic Wookie" has been on vacation and "Tazmanian Wookie" has definitely been "in da house" !!!!!!!!! There has been an immense amount of "dummy spitting" "cussing" and "stamping of feet"
mainly because I should "know better" !!
As it was a holiday weekend the plan was
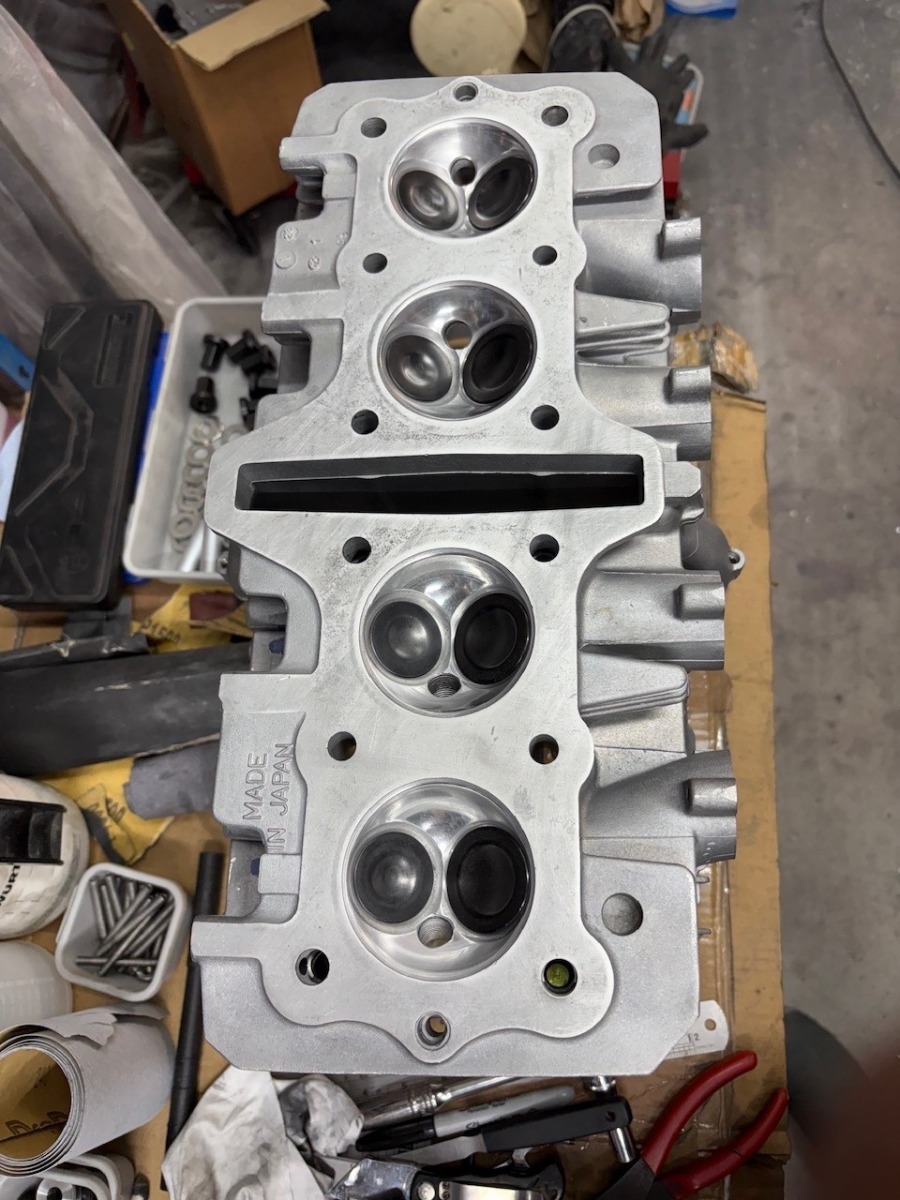
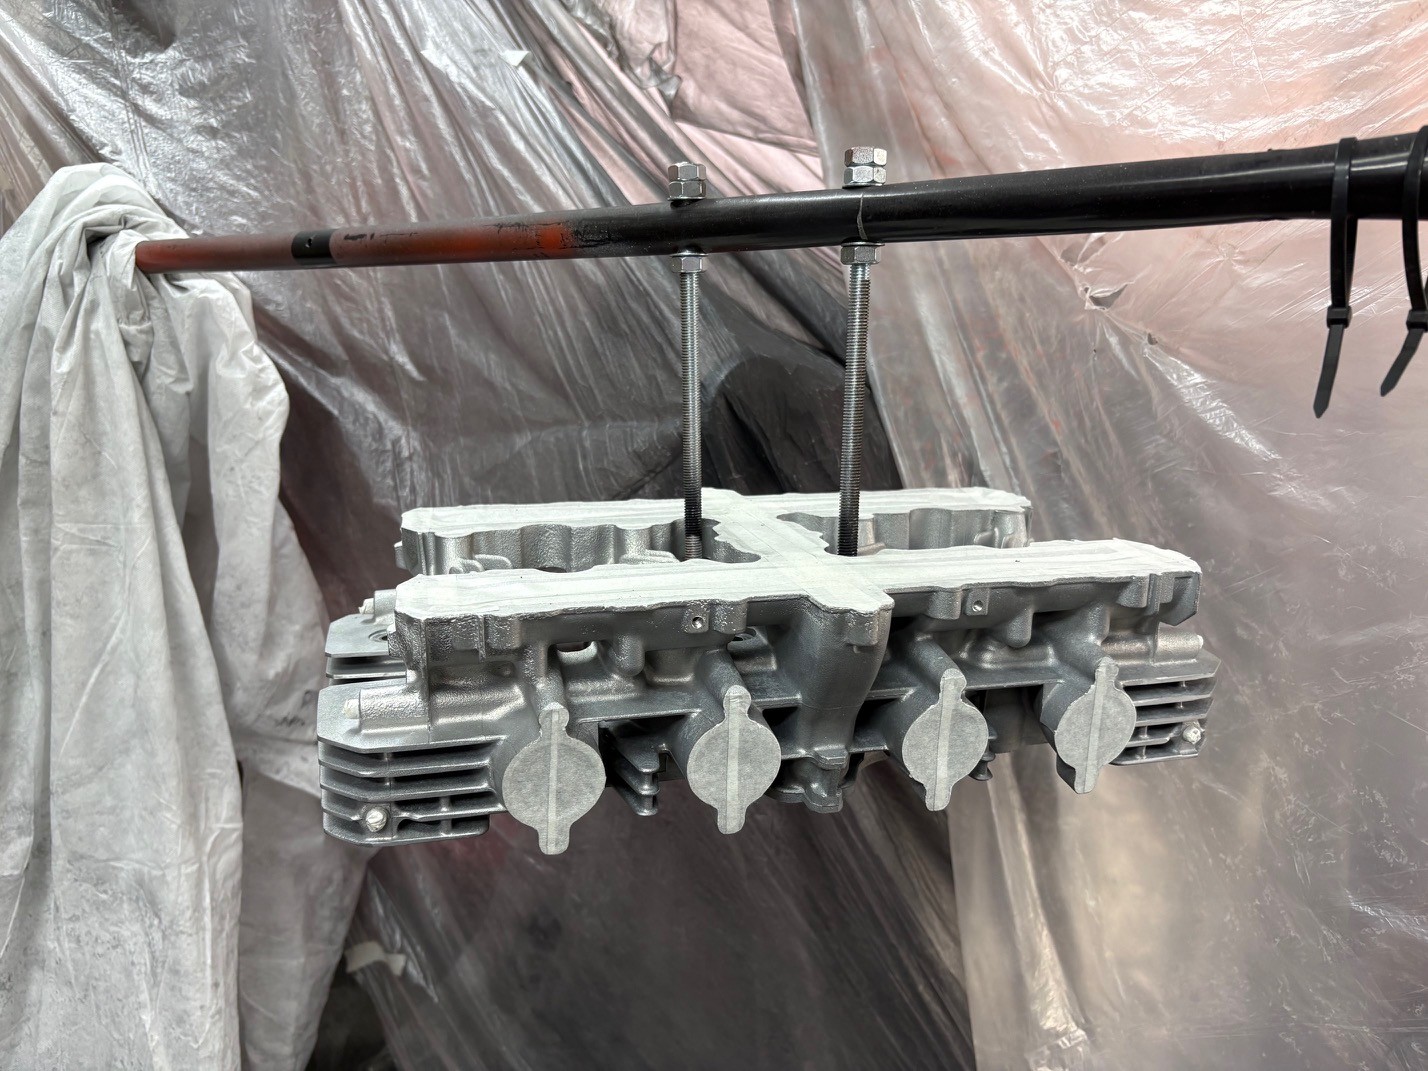
Saturday - lap the valves build the head, check lash and order shims, mark "lobe centres" on cams (last weekend I ported it, polished the chambers and pulled the gallery plugs)
Sunday - mask and paint the head
Monday - check paint and install on block
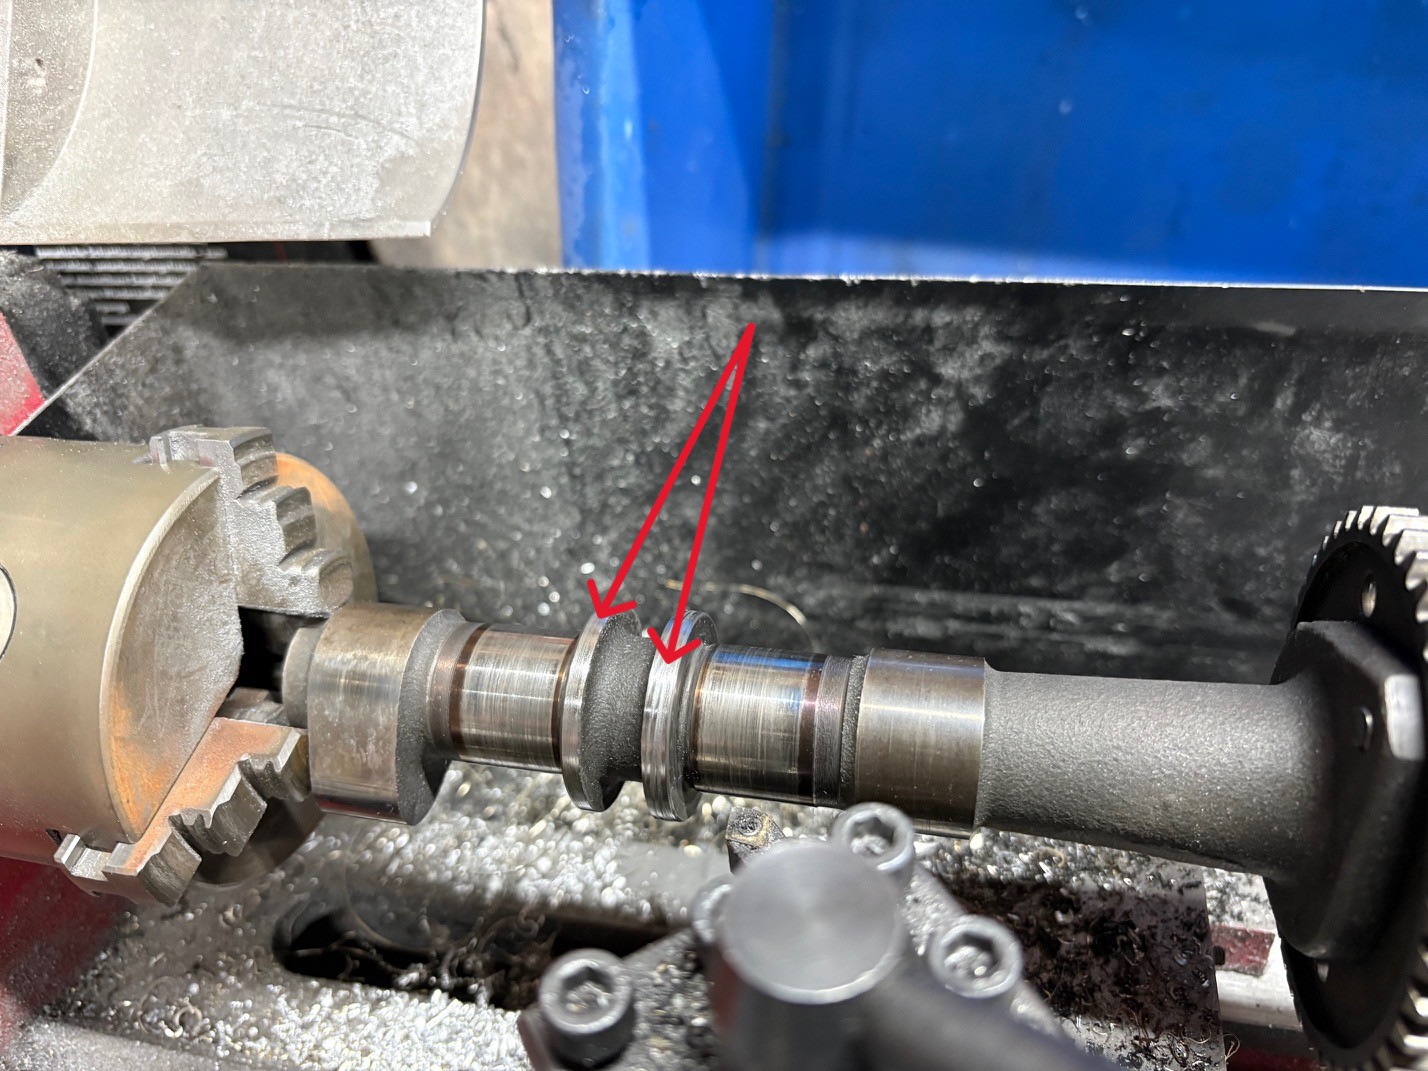
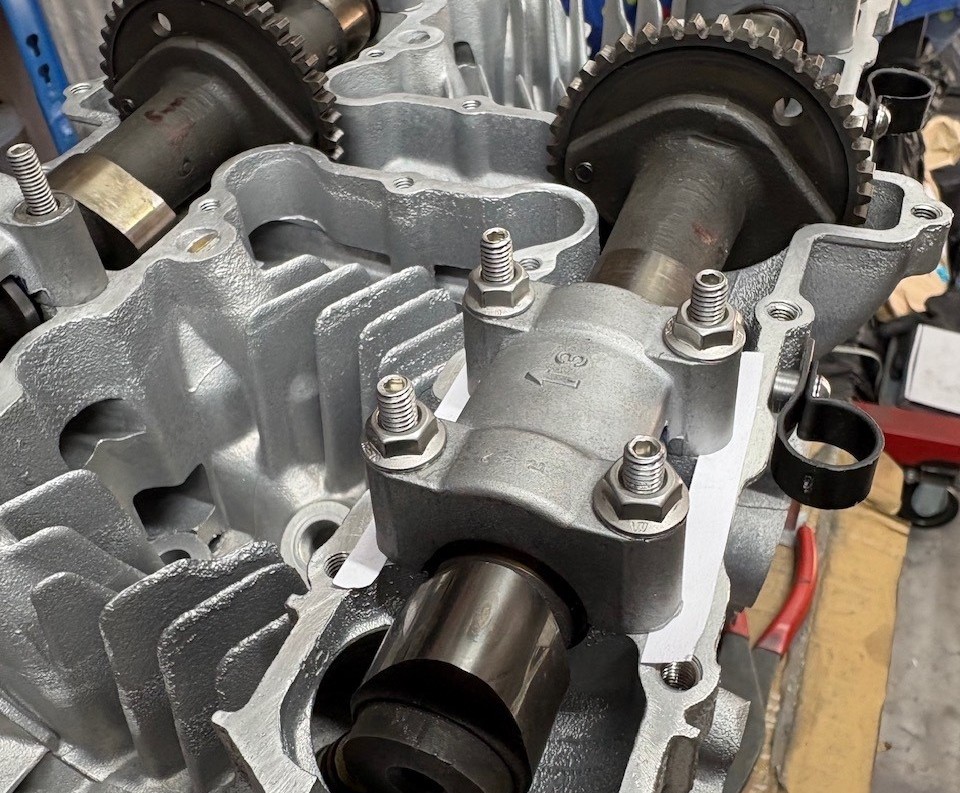
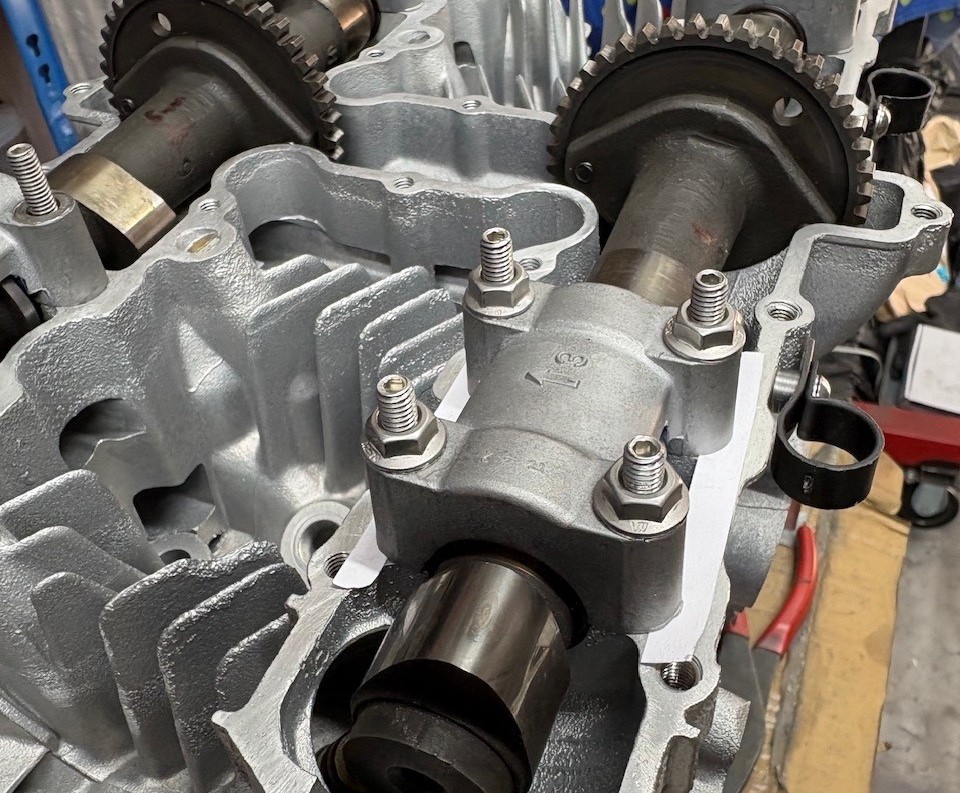
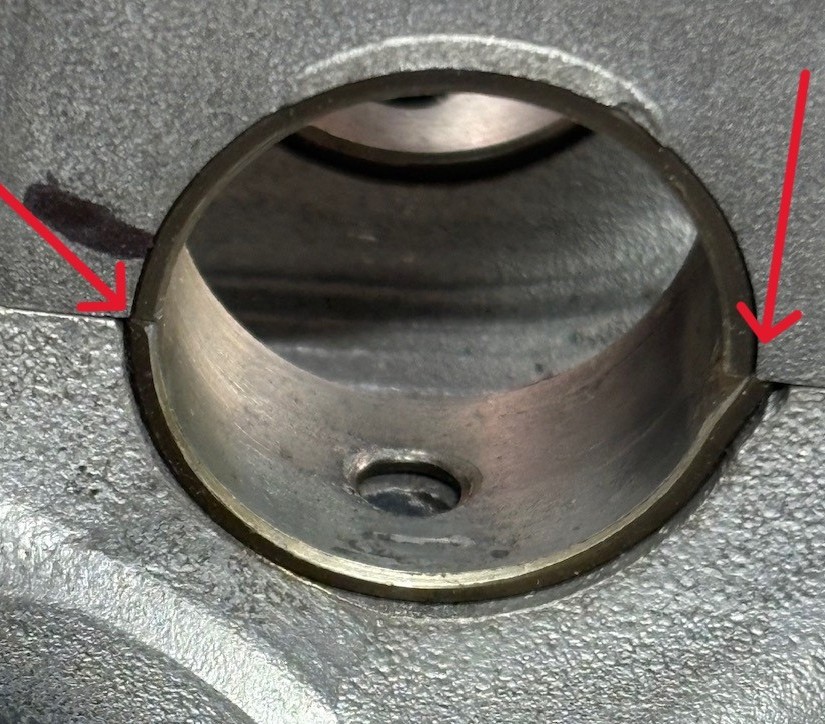
So on Sat morning I thought before I start I'll plastigauge the cam bearing to check wear (OEM bearings and OEM cams albeit from a GPZ1100) as a formality but should be fine !!!!!!!!!! This was the point where it all went horribly wrong, plastigauged in spec but when I cleaned off the plastigauge and bolted them down again both cams locked solid WTF !!!!!!!!!!!!!!!! So I tried all the normal things (bolted the head to the block, swopped inlet and exhaust cams, tried the cams the other way round to rule out a journal issue all to no avail - as soon as I pull down caps 1 & 3 the last 1/4 turn they lock up. If I shim them with a piece of paper which is 0.07mm when compressed they are fine. I thought it may be the end float restrictors fouling in the caps as there was a little build up on the edges so I lightly skimmed them in my lathe. Still the same. Following an email exchange with Rob (zed1015) we (he) came to the conclusion that caps 1 & 3 are from a different motor as he has never had an issue with OEM cams and bearings !!! I hadn.t even considered this option as the bike still had a valid MOT when I bought it so must have been running right ? (I'm not so sure) So this is where the "I should know better than to assume" comes in - when I checked the MOT history this bike has done less than 200mls in the last 10 years and only 1200mls in the last 20 years so anything could have happened to it in that time (given the issue is 1 & 3 I suspect someone has pulled the caps down with the cams out of alignment and damaged the end float restrictor shoulders)Date tested29 June 2020 PASS Mileage 40,308 milesDate tested29 April 2017 PASS Mileage 40,295 milesDate tested27 June 2015 PASS Mileage 40,111 milesDate tested4 November 2005 PASS Mileage 39,072 miles
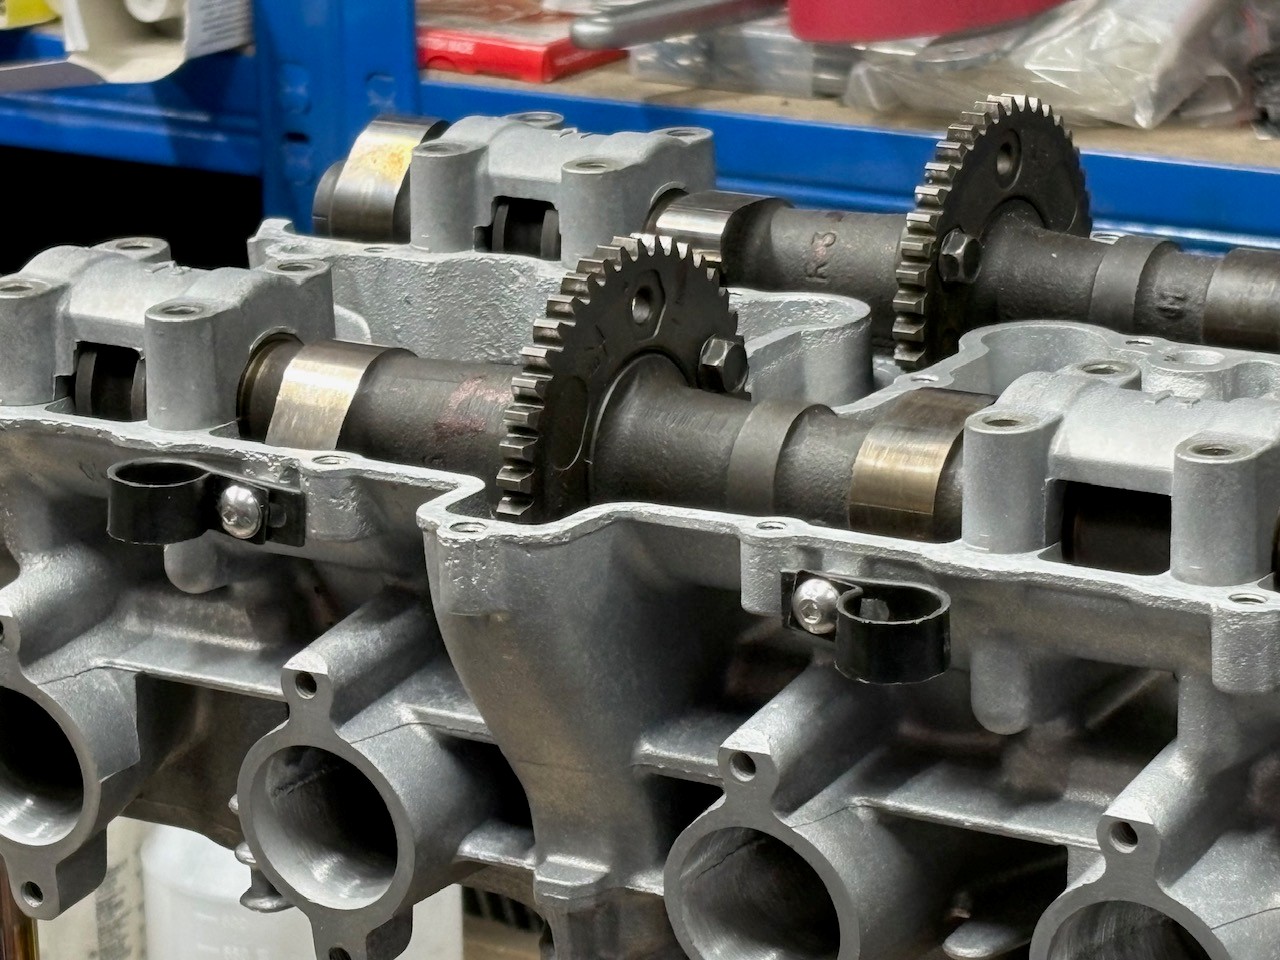
The "correct" thing to do at this stage would be to junk the head and find another, however I am heavily invested in this head with both time and money for machining (would need all new valves as well since they have been tipped to the re-cut seats) Bolting the caps down with the bearings installed but not the cams identified that there was a misalignment between cap and head so when tightened the bearings where "pinching" the sides of the cam journals - so began a long process of "grind the cap a little" re-fit "grind a little more" re-fit etc etc etc. I am now 99.9% comfortable that this remedial action will work. So in the end the plan well and truly went out of the window (my daughter phoned on Sunday with a car issue so had to look at that yesterday morning). Hopefully I will paint the head tonight and get "back on course"
On the "up side" there are a couple of lugs on the cam carrier that are located perfectly to attach clips for my oil lines rather than a big ugly bracket to keep them out of the throttle linkage
mainly because I should "know better" !!
As it was a holiday weekend the plan was
Saturday - lap the valves build the head, check lash and order shims, mark "lobe centres" on cams (last weekend I ported it, polished the chambers and pulled the gallery plugs)
Sunday - mask and paint the head
Monday - check paint and install on block
So on Sat morning I thought before I start I'll plastigauge the cam bearing to check wear (OEM bearings and OEM cams albeit from a GPZ1100) as a formality but should be fine !!!!!!!!!! This was the point where it all went horribly wrong, plastigauged in spec but when I cleaned off the plastigauge and bolted them down again both cams locked solid WTF !!!!!!!!!!!!!!!! So I tried all the normal things (bolted the head to the block, swopped inlet and exhaust cams, tried the cams the other way round to rule out a journal issue all to no avail - as soon as I pull down caps 1 & 3 the last 1/4 turn they lock up. If I shim them with a piece of paper which is 0.07mm when compressed they are fine. I thought it may be the end float restrictors fouling in the caps as there was a little build up on the edges so I lightly skimmed them in my lathe. Still the same. Following an email exchange with Rob (zed1015) we (he) came to the conclusion that caps 1 & 3 are from a different motor as he has never had an issue with OEM cams and bearings !!! I hadn.t even considered this option as the bike still had a valid MOT when I bought it so must have been running right ? (I'm not so sure) So this is where the "I should know better than to assume" comes in - when I checked the MOT history this bike has done less than 200mls in the last 10 years and only 1200mls in the last 20 years so anything could have happened to it in that time (given the issue is 1 & 3 I suspect someone has pulled the caps down with the cams out of alignment and damaged the end float restrictor shoulders)Date tested29 June 2020 PASS Mileage 40,308 milesDate tested29 April 2017 PASS Mileage 40,295 milesDate tested27 June 2015 PASS Mileage 40,111 milesDate tested4 November 2005 PASS Mileage 39,072 miles
The "correct" thing to do at this stage would be to junk the head and find another, however I am heavily invested in this head with both time and money for machining (would need all new valves as well since they have been tipped to the re-cut seats) Bolting the caps down with the bearings installed but not the cams identified that there was a misalignment between cap and head so when tightened the bearings where "pinching" the sides of the cam journals - so began a long process of "grind the cap a little" re-fit "grind a little more" re-fit etc etc etc. I am now 99.9% comfortable that this remedial action will work. So in the end the plan well and truly went out of the window (my daughter phoned on Sunday with a car issue so had to look at that yesterday morning). Hopefully I will paint the head tonight and get "back on course"
On the "up side" there are a couple of lugs on the cam carrier that are located perfectly to attach clips for my oil lines rather than a big ugly bracket to keep them out of the throttle linkage
1982 KZ1000 Ltd
www.kzrider.com/forum/11-projects/617631...-82-begins?start=192
kzrider.com/forum/faq-wiki/616810-electr...-fault-finding-guide
www.kzrider.com/forum/11-projects/617631...-82-begins?start=192
kzrider.com/forum/faq-wiki/616810-electr...-fault-finding-guide
Last edit: 26 May 2026 06:55 by Wookie58.
The following user(s) said Thank You: ThatGPzGuy, MFP-Joe, sf4t7, Quofan
Please Log in or Create an account to join the conversation.
Moderators: Street Fighter LTD