
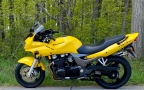
Trying to Rescue a Late 1970s (1977??) Kawasaki KZ1000
- wdhewson
-
 Topic Author
- Offline
- User
-

Registered
- Posts: 162
- Thanks: 58
Re: Trying to Rescue a Late 1970s (1977??) Kawasaki KZ1000
09 Oct 2023 05:22
Thanks howardhb, did the ferrule pull off the cable, or did the steel wires fatigue and break?
Your picture reminds me to put a drop of oil on that drum shaped ferrule at the lever. Ideally the drum rotates a wee bit in the lever in use. If there's no rotation, there's a side load on the steel cable.
Where's my oil can.........?
Your picture reminds me to put a drop of oil on that drum shaped ferrule at the lever. Ideally the drum rotates a wee bit in the lever in use. If there's no rotation, there's a side load on the steel cable.
Where's my oil can.........?
Nothing quite like the rip of a Big KZ
The following user(s) said Thank You: howardhb
Please Log in or Create an account to join the conversation.
- howardhb
-

- Offline
- Sustaining Member
-

Registered
- God, I trust
- Posts: 473
- Thanks: 510
Re: Trying to Rescue a Late 1970s (1977??) Kawasaki KZ1000
09 Oct 2023 05:58
It was actually an aftermarket (Motion Pro?) cable that I had "professionally" repaired on the other end...
However, as you correctly assesed the failure, the cable pulled out of the "drum shaped ferrule".
Oiling that little ferrule regularly is mandatory!
Also, I note the O.E. cables come with a teflon cover over that ferrule to reduce the friction.
Remember to oil a NEW cable before installation.
H.
However, as you correctly assesed the failure, the cable pulled out of the "drum shaped ferrule".
Oiling that little ferrule regularly is mandatory!
Also, I note the O.E. cables come with a teflon cover over that ferrule to reduce the friction.
Remember to oil a NEW cable before installation.
H.
'81 GPz 550 D1
'81 GPz 1100 B1 ELR "Tribute" www.kzrider.com/forum/11-projects/617040...-elr-tribute?start=0
'82 Yamaha YB100 Fizzie
'79 Suzuki GT200 X5 TWO STROKE TWIN - SMOKER!
'81 GPz 1100 B1 ELR "Tribute" www.kzrider.com/forum/11-projects/617040...-elr-tribute?start=0
'82 Yamaha YB100 Fizzie
'79 Suzuki GT200 X5 TWO STROKE TWIN - SMOKER!
The following user(s) said Thank You: wdhewson, Wookie58
Please Log in or Create an account to join the conversation.
- Wookie58
-

- Offline
- Moderator
-

Registered
- Posts: 6199
- Thanks: 3919
Re: Trying to Rescue a Late 1970s (1977??) Kawasaki KZ1000
09 Oct 2023 06:13This is one of the reasons I intend to go "hydraulic" with the clutch and "electronic" with the speedo and ignition (I know the K is mech/elec from stock) - LESS MAINTENANCEIt was actually an aftermarket (Motion Pro?) cable that I had "professionally" repaired on the other end...
However, as you correctly assesed the failure, the cable pulled out of the "drum shaped ferrule".
Oiling that little ferrule regularly is mandatory!
Also, I note the O.E. cables come with a teflon cover over that ferrule to reduce the friction.
Remember to oil a NEW cable before installation.
H.


1982 KZ1000 Ltd
www.kzrider.com/forum/11-projects/617631...-82-begins?start=192
kzrider.com/filebase-alias?view=download...d-fault-diagnosis&ca
www.kzrider.com/forum/11-projects/617631...-82-begins?start=192
kzrider.com/filebase-alias?view=download...d-fault-diagnosis&ca
The following user(s) said Thank You: wdhewson, howardhb
Please Log in or Create an account to join the conversation.
- Kelly E
-

- Offline
- User
-
Registered
- Never Give Up. Never Surrender
- Posts: 521
- Thanks: 440
Re: Trying to Rescue a Late 1970s (1977??) Kawasaki KZ1000
09 Oct 2023 08:41
I use Sylglide grease on the cable barrels, it doesn't wash out like oil does.
The Rust Bros. Garage Collection
1974 Honda CB 550 K0
1975 Honda CB 400F Super Sport
1977 Kawasaki KZ 1000 LTD
1978 Kawasaki KL 250
1980 Suzuki GS 1100E
1983 Honda CB 1100F
1984 Honda Sabre 700
1984 Honda Interceptor 1000
1990 Moto Guzzi 1000
1994 Kawasaki ZG 1000 Concours
And more
1974 Honda CB 550 K0
1975 Honda CB 400F Super Sport
1977 Kawasaki KZ 1000 LTD
1978 Kawasaki KL 250
1980 Suzuki GS 1100E
1983 Honda CB 1100F
1984 Honda Sabre 700
1984 Honda Interceptor 1000
1990 Moto Guzzi 1000
1994 Kawasaki ZG 1000 Concours
And more
The following user(s) said Thank You: wdhewson, Mikaw, BCScott, howardhb
Please Log in or Create an account to join the conversation.
- wdhewson
-
Topic Author
- Offline
- User
-
Registered
- Posts: 162
- Thanks: 58
Re: Trying to Rescue a Late 1970s (1977??) Kawasaki KZ1000
13 Oct 2023 15:29
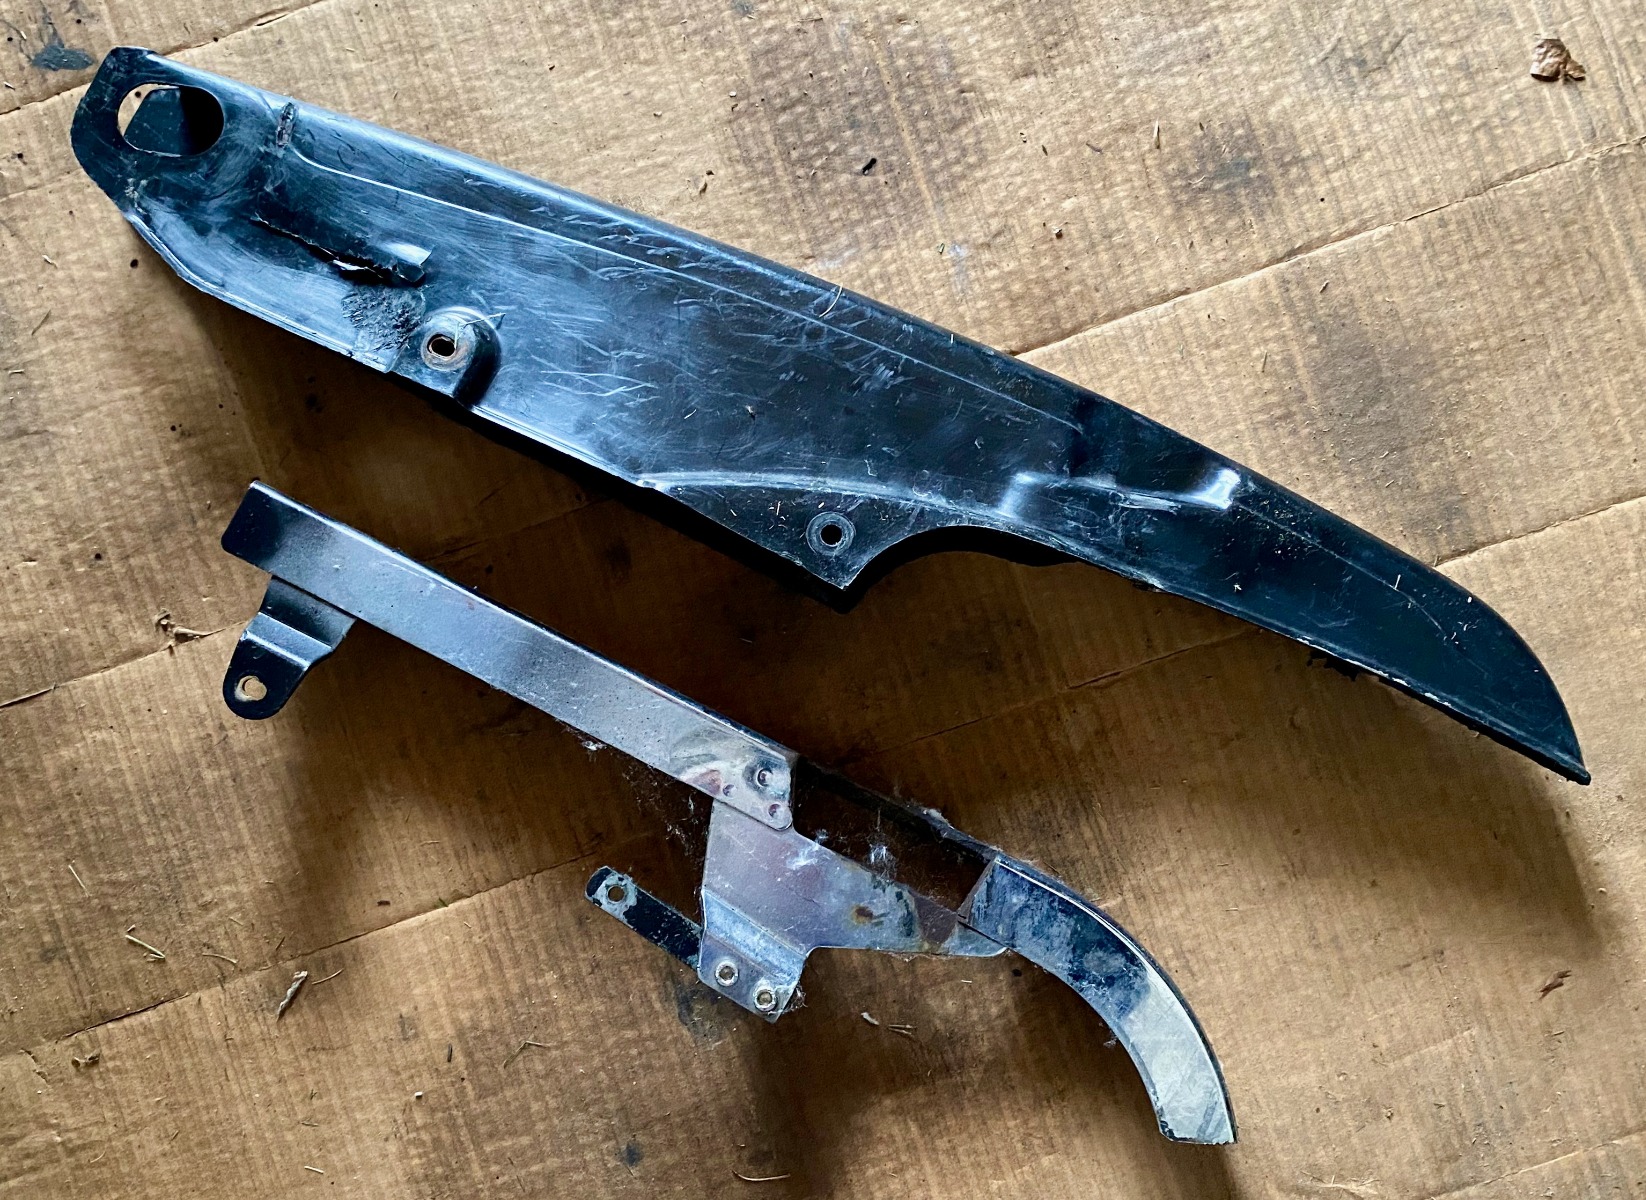
I got two chain guards with this KZ1000.
One is a long black plastic job, and the other an abbreviated chromed steel item.
Searched the parts diagrams and my best guess is that the plastic item is from the "standard", and the chrome from the "LTD".
I like the subdued black plastic guard as it seems long (front to back) with deep vertical aprons............both guarding the bike from thrown chain oil. However, it seems badly warped, and the fit is lousy even with the two bolts in place and the guard's inner edge correctly located into the tabs welded on the swing arm.
Has anyone tried to "re-shape" this guard with a heat gun?
The metal chrome LTD fit nicely, but it's a decoration rather than a functional guard. Is there a way to make this guard more functional?
Thanks guys..............
Nothing quite like the rip of a Big KZ
Please Log in or Create an account to join the conversation.
- TexasKZ
-

- Offline
- Platinum Member
-
Registered
- Posts: 8193
- Thanks: 2675
Re: Trying to Rescue a Late 1970s (1977??) Kawasaki KZ1000
13 Oct 2023 17:21
If you use ACF-50 on the chain, you won’t have to worry about stuff flinging around.
1982 KZ1000 LTD parts donor
1981 KZ1000 LTD awaiting resurrection
2000 ZRX1100 not ridden enough
www.kzrider.com/11-projects/620336-anoth...uild-thread?start=24
1981 KZ1000 LTD awaiting resurrection
2000 ZRX1100 not ridden enough
www.kzrider.com/11-projects/620336-anoth...uild-thread?start=24
The following user(s) said Thank You: wdhewson, sf4t7
Please Log in or Create an account to join the conversation.
- Kelly E
-
- Offline
- User
-
Registered
- Never Give Up. Never Surrender
- Posts: 521
- Thanks: 440
Re: Trying to Rescue a Late 1970s (1977??) Kawasaki KZ1000
13 Oct 2023 17:24
Riveting on a couple of fabricated aluminium bits could make a big difference in the effectiveness of the chrome guard. Polishing the added bits and it could look nice enough.
The Rust Bros. Garage Collection
1974 Honda CB 550 K0
1975 Honda CB 400F Super Sport
1977 Kawasaki KZ 1000 LTD
1978 Kawasaki KL 250
1980 Suzuki GS 1100E
1983 Honda CB 1100F
1984 Honda Sabre 700
1984 Honda Interceptor 1000
1990 Moto Guzzi 1000
1994 Kawasaki ZG 1000 Concours
And more
1974 Honda CB 550 K0
1975 Honda CB 400F Super Sport
1977 Kawasaki KZ 1000 LTD
1978 Kawasaki KL 250
1980 Suzuki GS 1100E
1983 Honda CB 1100F
1984 Honda Sabre 700
1984 Honda Interceptor 1000
1990 Moto Guzzi 1000
1994 Kawasaki ZG 1000 Concours
And more
The following user(s) said Thank You: wdhewson
Please Log in or Create an account to join the conversation.
- Wookie58
-
- Offline
- Moderator
-
Registered
- Posts: 6199
- Thanks: 3919
Re: Trying to Rescue a Late 1970s (1977??) Kawasaki KZ1000
14 Oct 2023 01:30 - 14 Oct 2023 01:31
I have done quite a bit of plastic shaping on my build with a hot air gun, one thing I found was that there is a "fine line" between getting it hot enough to bend and it developing "a mind of it's own". It take a little while to reach the required temp (a few minutes possibly) but then the change to "too hot" happens quickly !! Keep the heat gun moving to spread the heat throughout the part then "clamp" to a flat board and allow to cool (put something under the clamp to spread the load or you will get an imprint of the clamp in the plastic) it's better to cycle "heat" & " clamp" than to overheat in the first instance to find the "sweet spot"
1982 KZ1000 Ltd
www.kzrider.com/forum/11-projects/617631...-82-begins?start=192
kzrider.com/filebase-alias?view=download...d-fault-diagnosis&ca
www.kzrider.com/forum/11-projects/617631...-82-begins?start=192
kzrider.com/filebase-alias?view=download...d-fault-diagnosis&ca
Last edit: 14 Oct 2023 01:31 by Wookie58.
Please Log in or Create an account to join the conversation.
- wdhewson
-
Topic Author
- Offline
- User
-
Registered
- Posts: 162
- Thanks: 58
Re: Trying to Rescue a Late 1970s (1977??) Kawasaki KZ1000
14 Oct 2023 06:14I have done quite a bit of plastic shaping on my build with a hot air gun, one thing I found was that there is a "fine line" between getting it hot enough to bend and it developing "a mind of it's own". It take a little while to reach the required temp (a few minutes possibly) but then the change to "too hot" happens quickly !! Keep the heat gun moving to spread the heat throughout the part then "clamp" to a flat board and allow to cool (put something under the clamp to spread the load or you will get an imprint of the clamp in the plastic) it's better to cycle "heat" & " clamp" than to overheat in the first instance to find the "sweet spot"
Thanks Wookie58, the board and clamp is a great idea, and the "fine line" caution makes sense, like heating aluminum to bend it........whoops melted......and now puddled on the floor.
I'll go with the LTD chain guard for awhile and consider an extension toward the gearbox sprocket. That extension might be plastic, so if it falls off, the chain chews it up and spits it out rather than a chain lock up.
I found a few file pictures of the 1977 Standard KZ1000, chain guard side. Some of my ill-fitment might be the weird shocks I have installed where the coil spring goes lower. It looks like the stock shock's springs don't go below a cut out in the chain guard.
There's every chance I'll want more supple rear shocks in the future, so the current ones might get binned.
Thanks guys.
Nothing quite like the rip of a Big KZ
The following user(s) said Thank You: howardhb, Wookie58
Please Log in or Create an account to join the conversation.
- wdhewson
-
Topic Author
- Offline
- User
-
Registered
- Posts: 162
- Thanks: 58
Re: Trying to Rescue a Late 1970s (1977??) Kawasaki KZ1000
15 Oct 2023 12:02
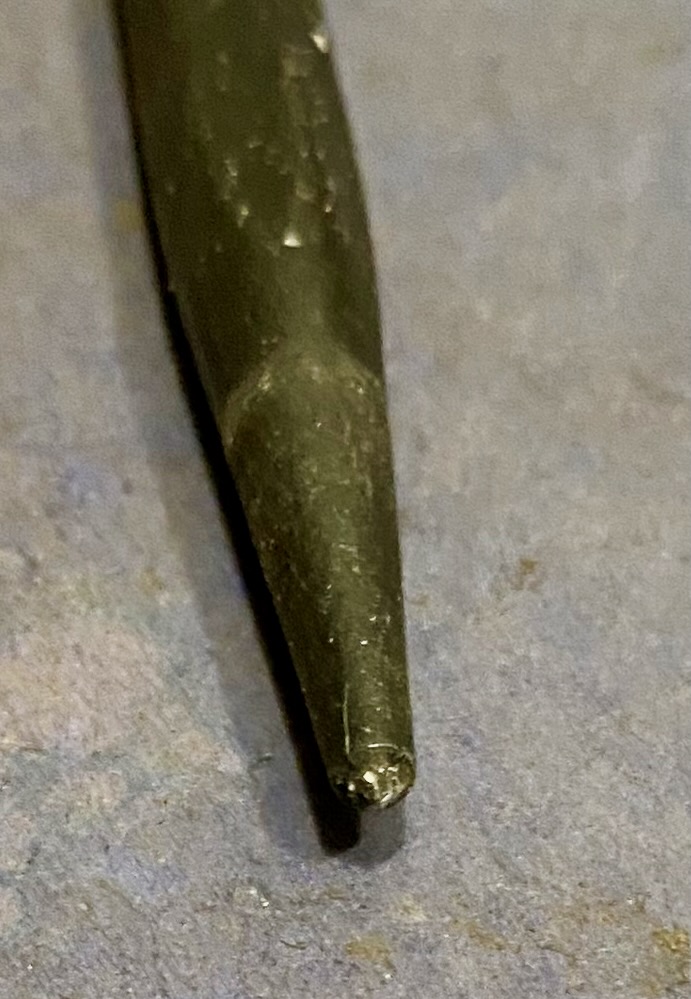
Had a coffee with Frank, the airframe riveter when he was a machinist apprentice in England.
Frank asked me how the rest of the chain was riveted, and I showed him the pin I had pressed out to shorten the chain.
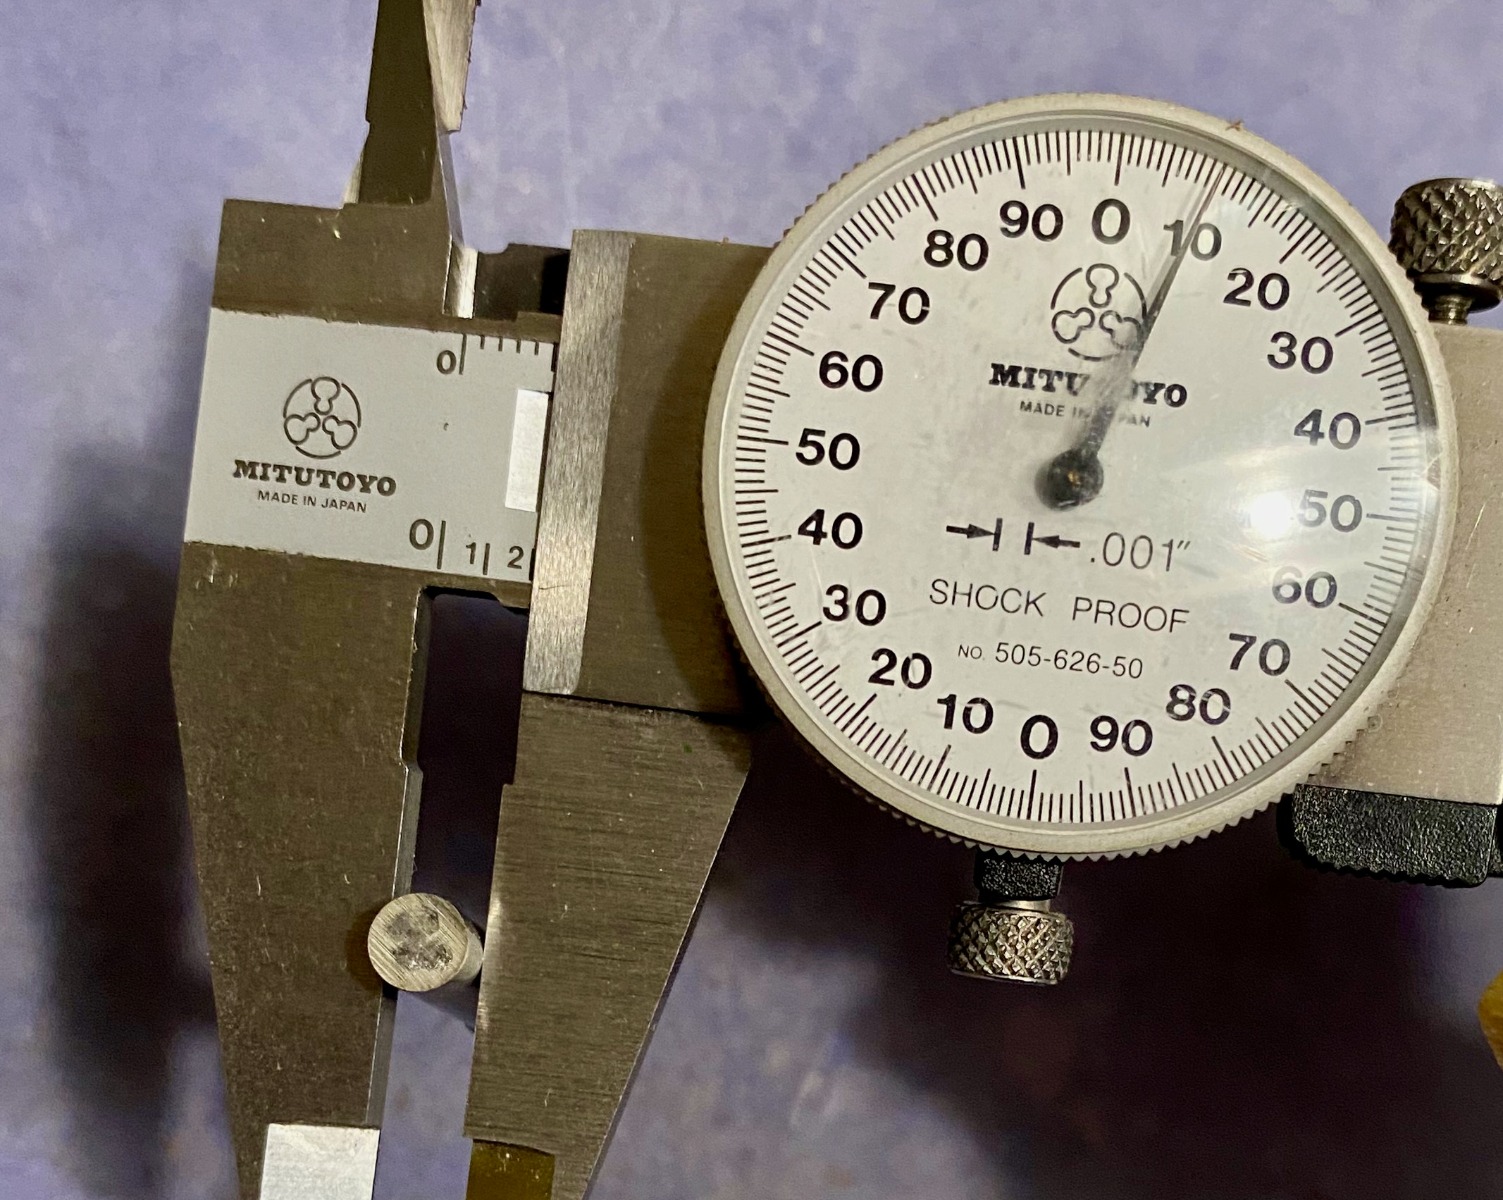
With that guidance he suggested a punch with a 120 degree included angle (like a drill bit). That 120 degrees will flare the end of the pin AND push more metal into the pin hole in the side plate for a tighter interference fit. Frank suggested the same flare diameter as on the original pin, which is a diameter increase of about 17 thou.
Frank loaned me the punch in the picture, and said to "upset" the pin head gradually with several hammer taps rather than one big blow, as gradual upsetting is work hardening, and one big blow is more likely to cause splitting in the flare.
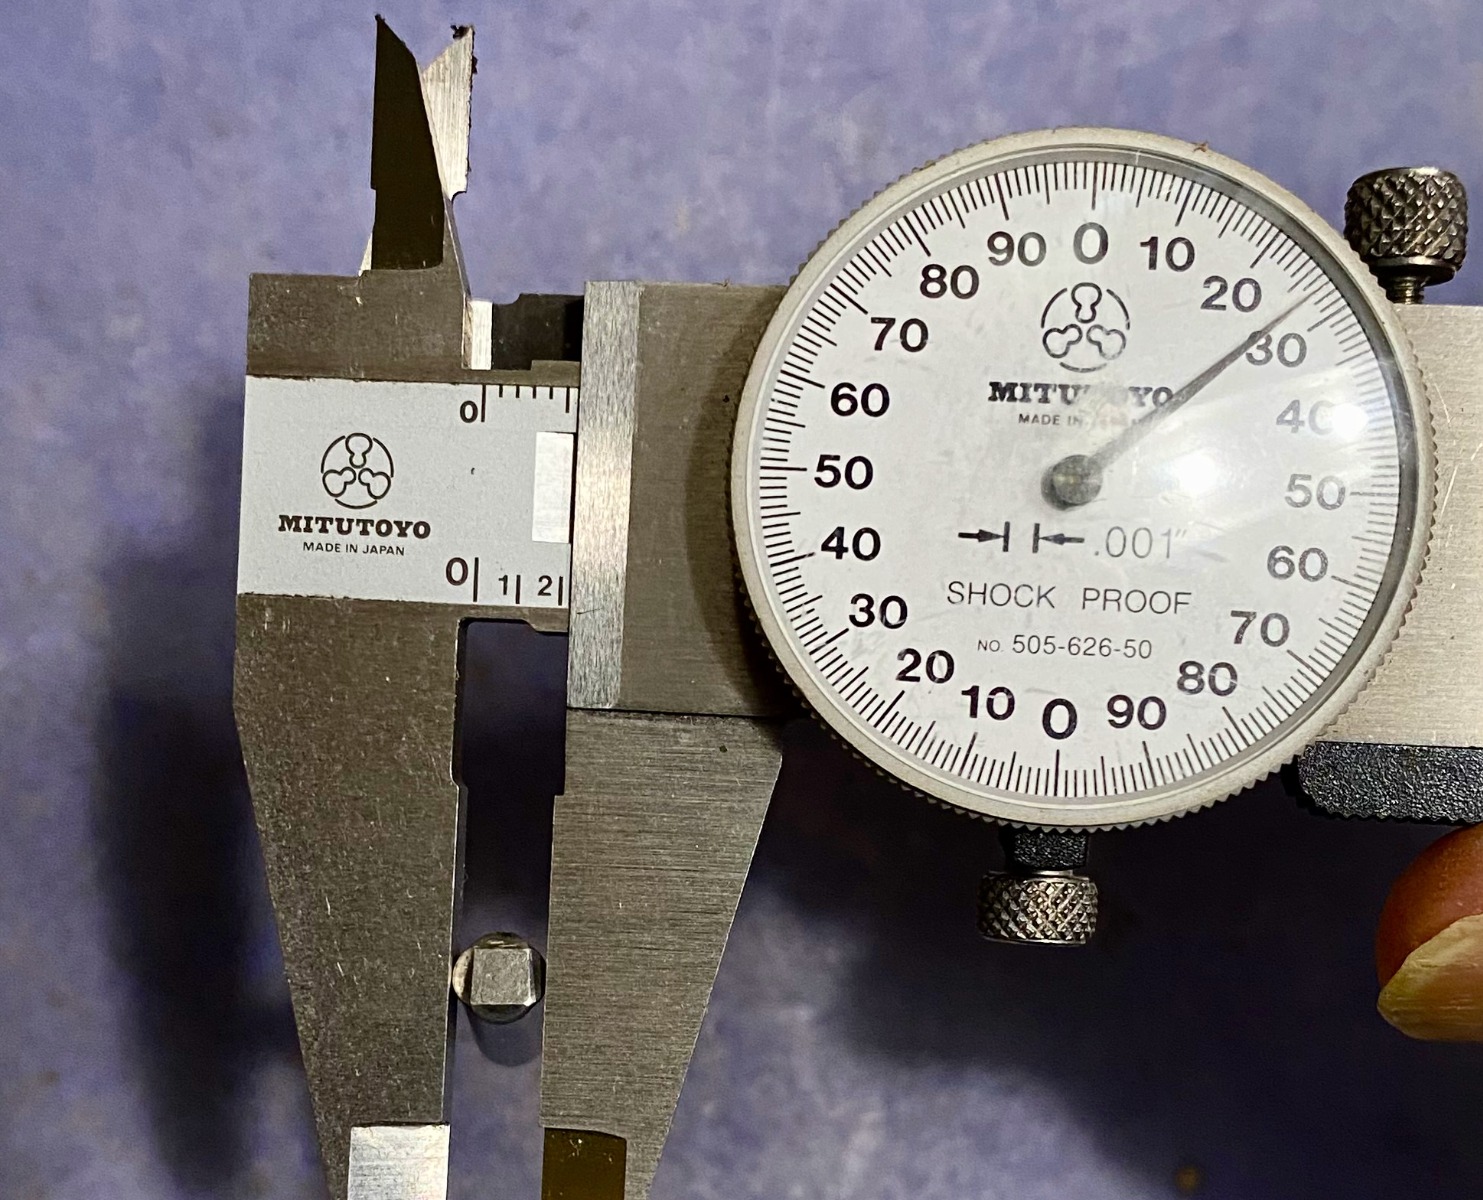
The calipers show my pins at 0.0210 inches and the "Quad-Staked" pin head at about 0.227. So I'll aim for a diameter increase of 15 to 20 thou.
Those earlier DID riveting instructions tell us to flare a 5.5 mm pin to 5.8 mm. Or converted to inches, 0.216 flared to 0.228 for a diameter increase of 12 thou. So same ballpark as the Quad-Staked process.
Some chance I may have overworked the planning of this task.............
Frank asked me how the rest of the chain was riveted, and I showed him the pin I had pressed out to shorten the chain.
With that guidance he suggested a punch with a 120 degree included angle (like a drill bit). That 120 degrees will flare the end of the pin AND push more metal into the pin hole in the side plate for a tighter interference fit. Frank suggested the same flare diameter as on the original pin, which is a diameter increase of about 17 thou.
Frank loaned me the punch in the picture, and said to "upset" the pin head gradually with several hammer taps rather than one big blow, as gradual upsetting is work hardening, and one big blow is more likely to cause splitting in the flare.
The calipers show my pins at 0.0210 inches and the "Quad-Staked" pin head at about 0.227. So I'll aim for a diameter increase of 15 to 20 thou.
Those earlier DID riveting instructions tell us to flare a 5.5 mm pin to 5.8 mm. Or converted to inches, 0.216 flared to 0.228 for a diameter increase of 12 thou. So same ballpark as the Quad-Staked process.
Some chance I may have overworked the planning of this task.............
Nothing quite like the rip of a Big KZ
Please Log in or Create an account to join the conversation.
- wdhewson
-
Topic Author
- Offline
- User
-
Registered
- Posts: 162
- Thanks: 58
Re: Trying to Rescue a Late 1970s (1977??) Kawasaki KZ1000
16 Oct 2023 15:36
Cool but not cold in the garage today, and nothing but drizzle outdoors.
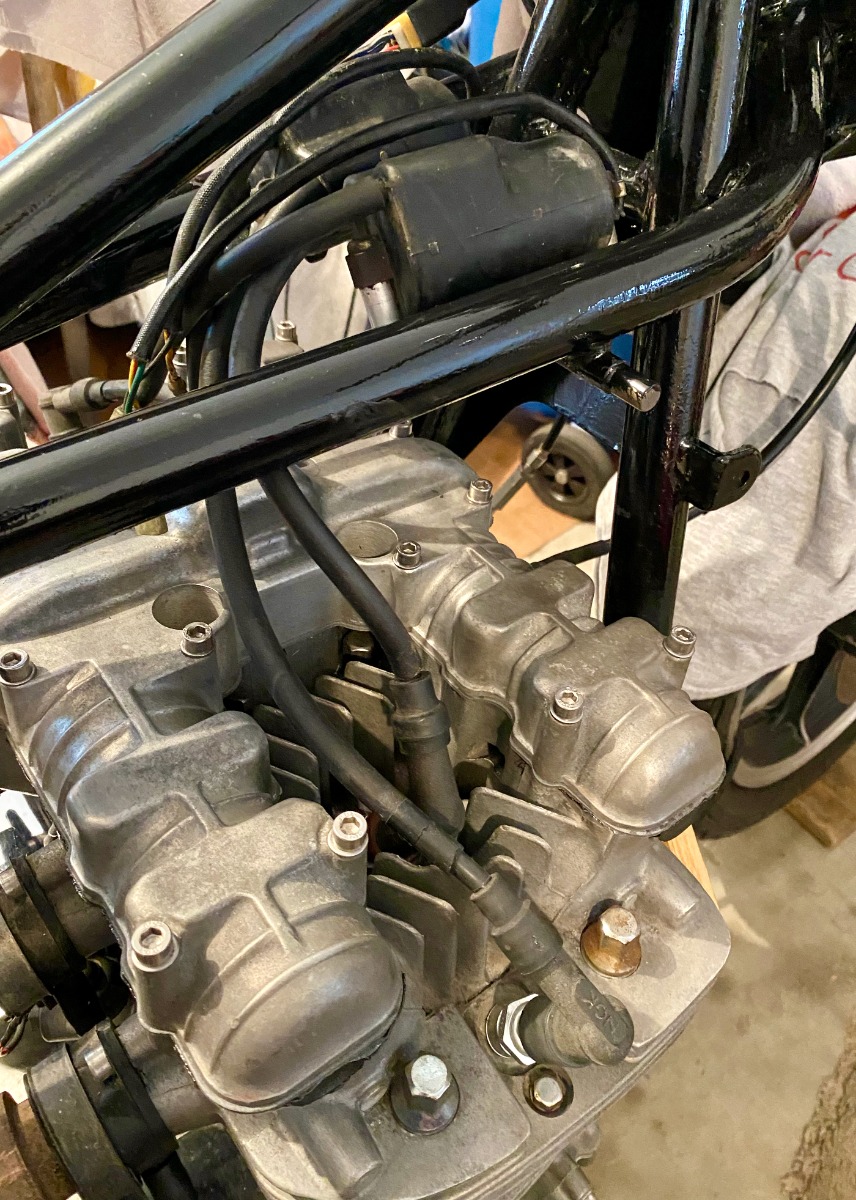
I had the cam cover finger tight, so figured to do a final installation. Put some goop on the head joint and gasket bottom, but not on the gasket top or cover joint. Might leak, who knows?
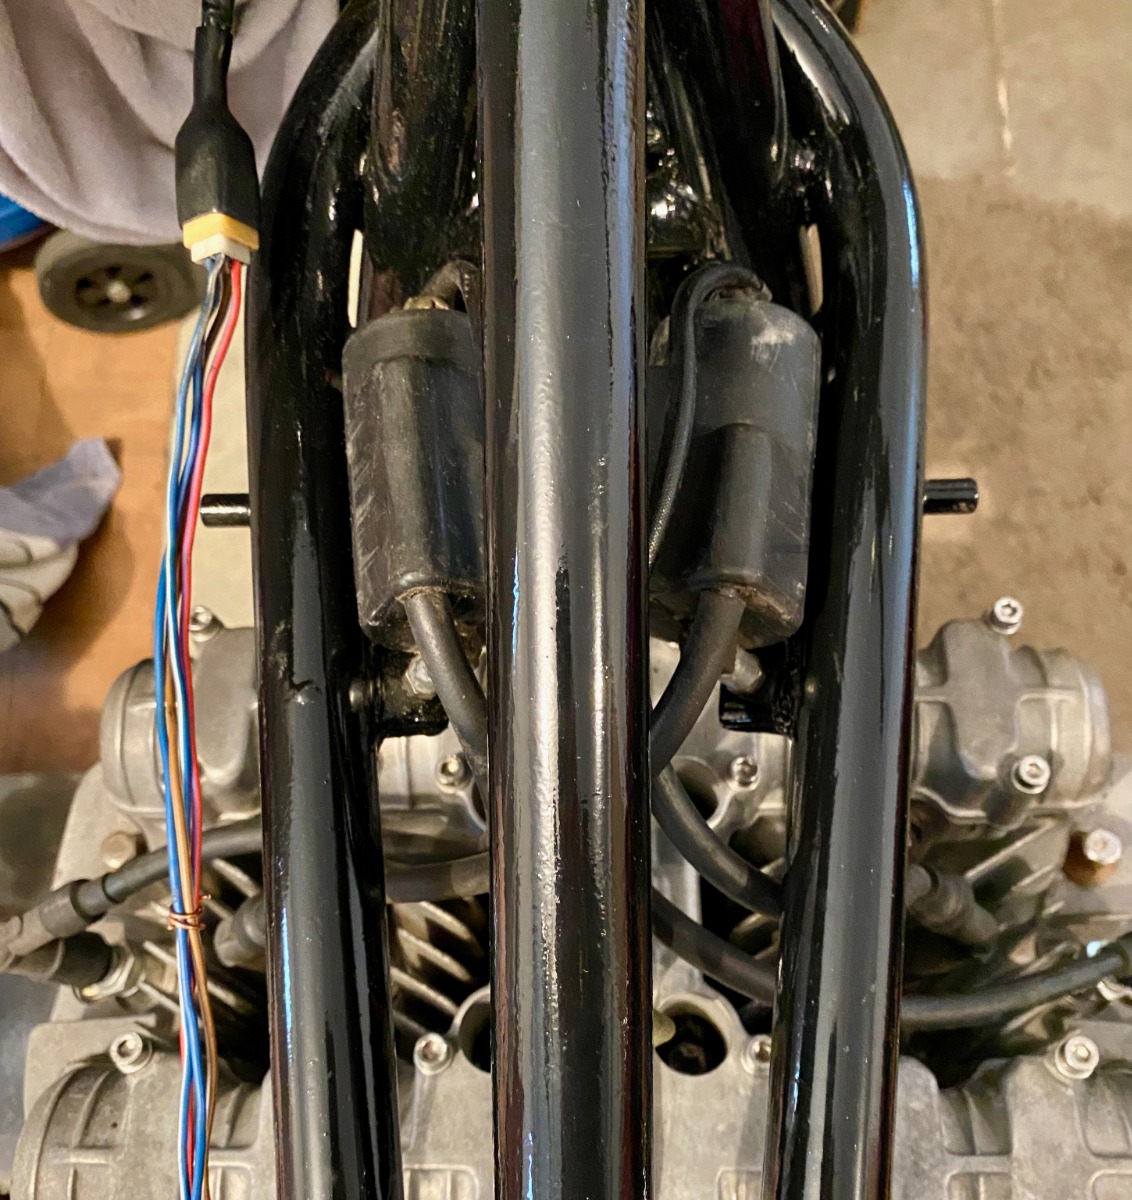
This meant the coils could go in place, so did that.
It occurred to me that carbs, exhaust, an IV bottle of fuel, and wire up a simple ignition with test leads , and it might fire up. But maybe later.
Next note about working of the kill switch.
I had the cam cover finger tight, so figured to do a final installation. Put some goop on the head joint and gasket bottom, but not on the gasket top or cover joint. Might leak, who knows?
This meant the coils could go in place, so did that.
It occurred to me that carbs, exhaust, an IV bottle of fuel, and wire up a simple ignition with test leads , and it might fire up. But maybe later.
Next note about working of the kill switch.
Nothing quite like the rip of a Big KZ
Please Log in or Create an account to join the conversation.
- wdhewson
-
Topic Author
- Offline
- User
-
Registered
- Posts: 162
- Thanks: 58
Re: Trying to Rescue a Late 1970s (1977??) Kawasaki KZ1000
17 Oct 2023 09:14 - 17 Oct 2023 09:15
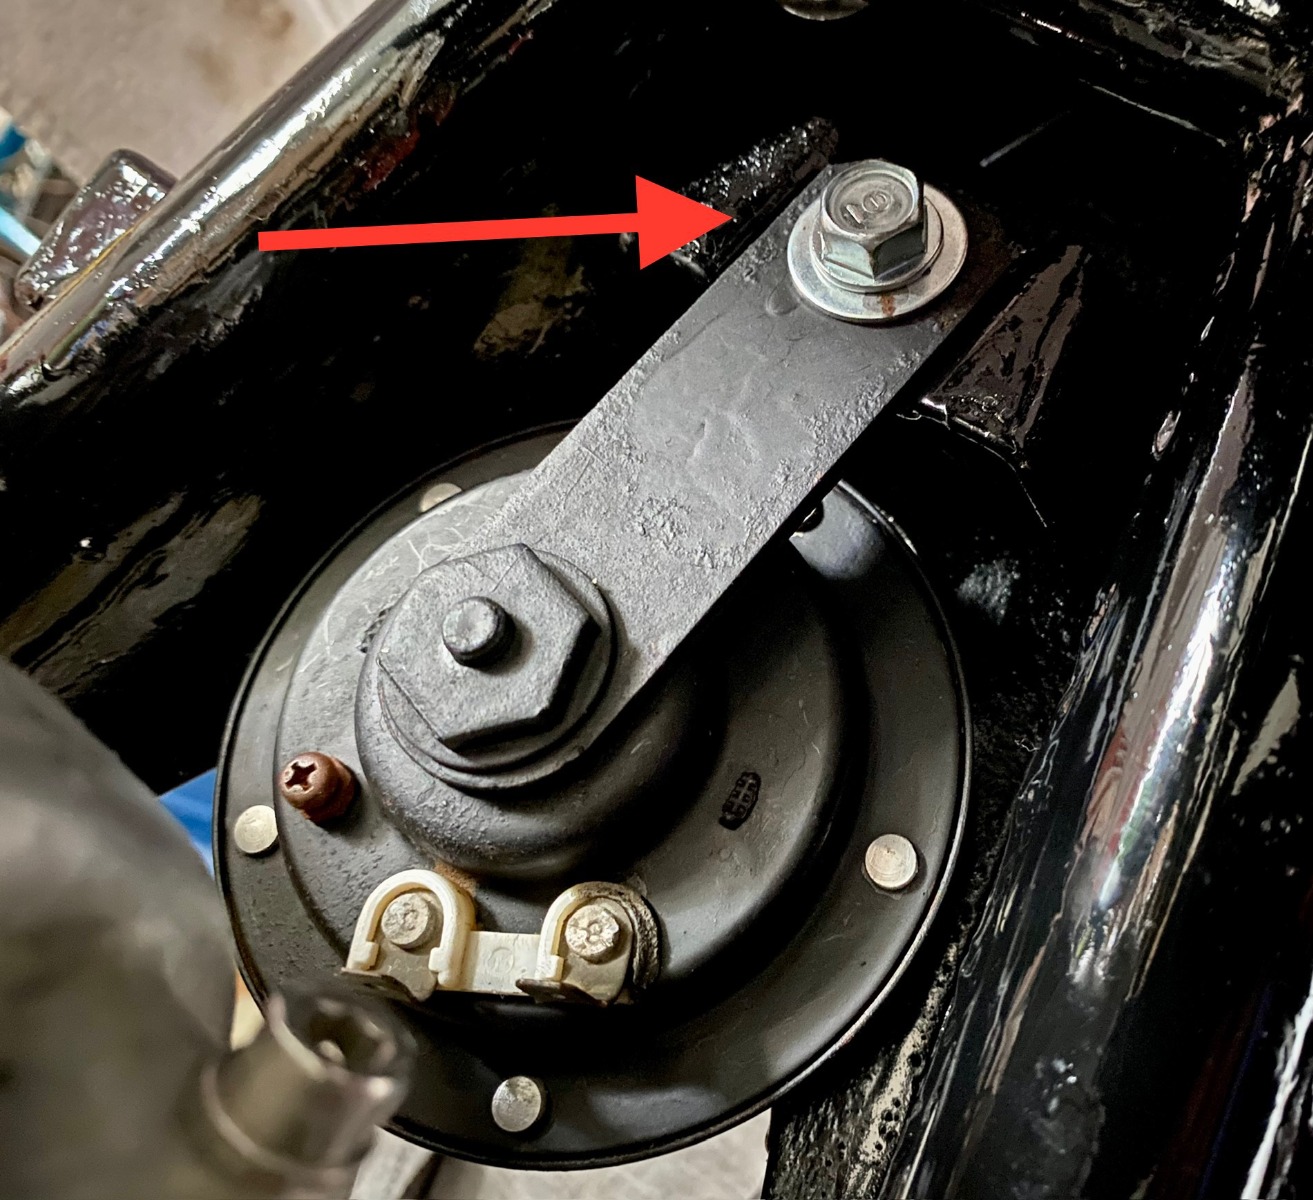
Small job to get the horn installed, but it took more than an hour.
The bolt is described as an M8 16 ( 8 mm diameter and 16 mm long under head), but I could not find the thread pitch. And neither a pitch of 1.25 or 1.0 would catch the captive nut which was clogged with thick paint. But the 1.25 is more common so I went with that, and it went in without stripping so seems correct.
The bolt is described as an M8 16 ( 8 mm diameter and 16 mm long under head), but I could not find the thread pitch. And neither a pitch of 1.25 or 1.0 would catch the captive nut which was clogged with thick paint. But the 1.25 is more common so I went with that, and it went in without stripping so seems correct.
Nothing quite like the rip of a Big KZ
Last edit: 17 Oct 2023 09:15 by wdhewson.
Please Log in or Create an account to join the conversation.
Moderators: Street Fighter LTD