
1973 Z1 rebuild
- blackozvet
-
 Topic Author
- Offline
- User
-

Registered
- Posts: 193
- Thanks: 79
Re: 1973 Z1 rebuild
24 Oct 2022 16:31
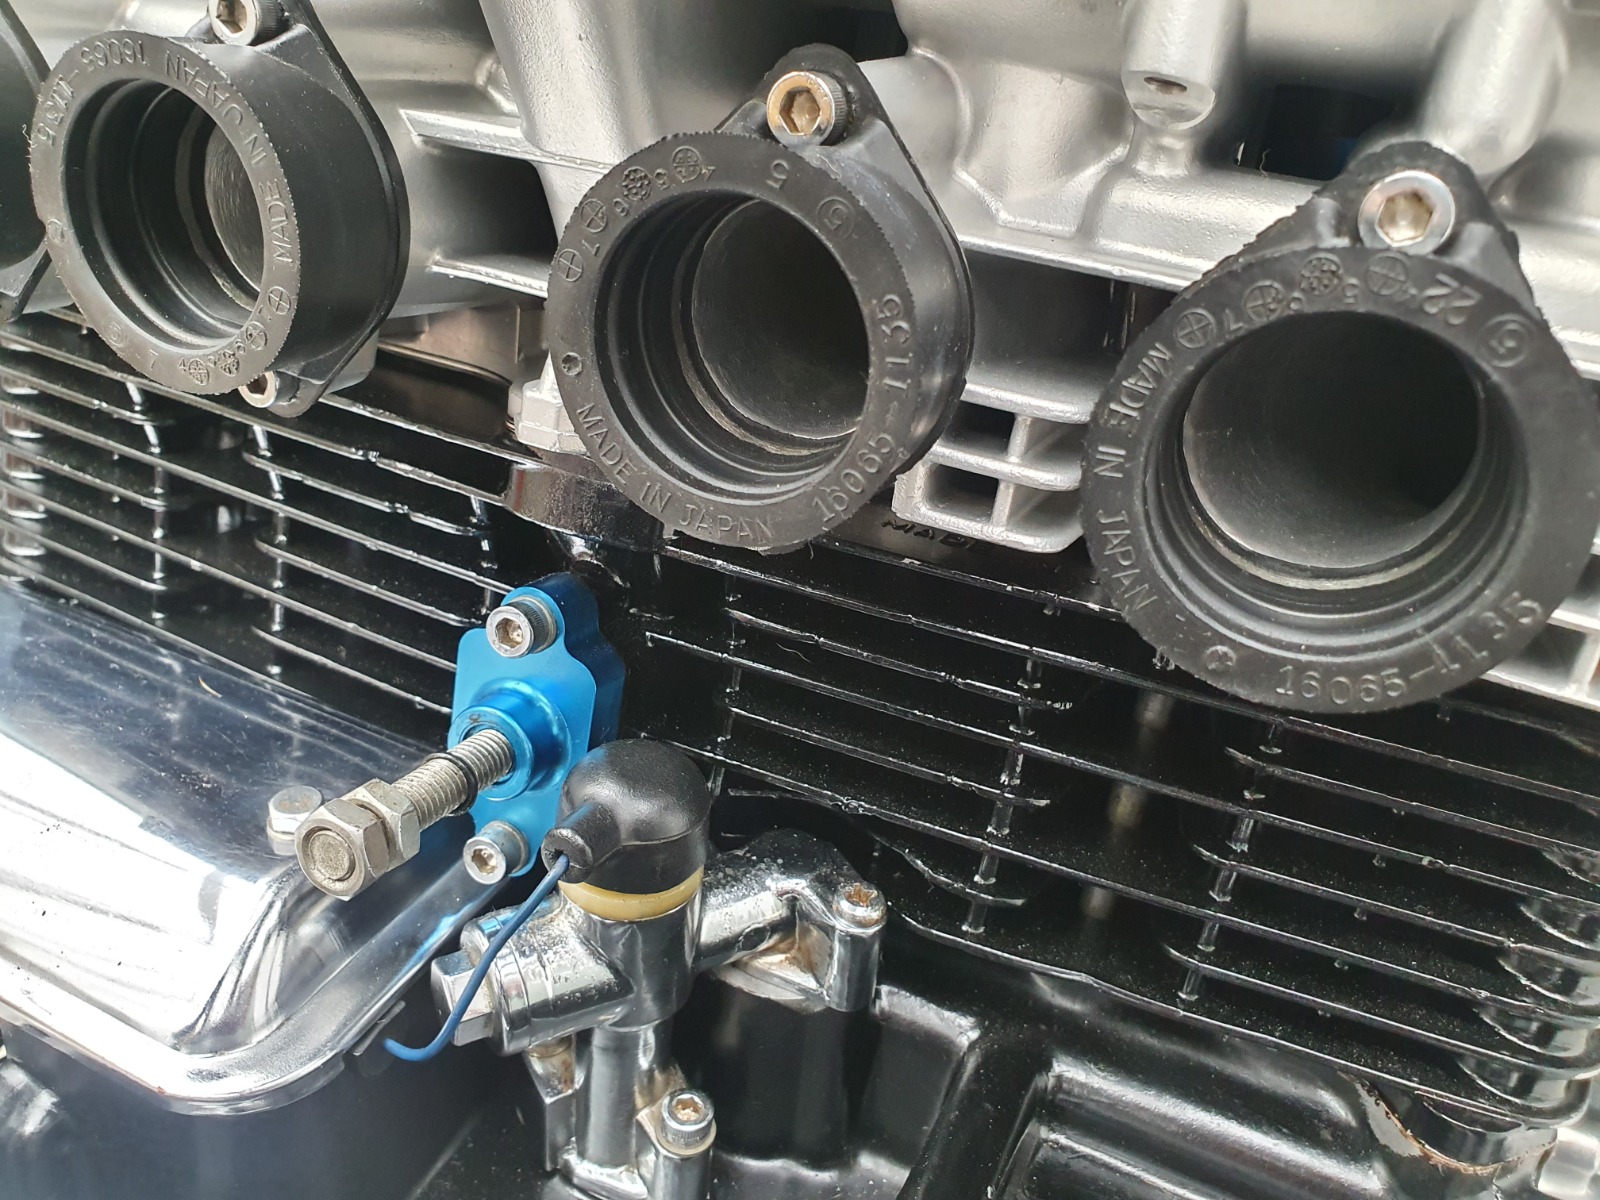
The rubbers were milled to match the ported intakes.
With 38mm flatslides and 430 cams it has never been vacuum synced.
With 38mm flatslides and 430 cams it has never been vacuum synced.
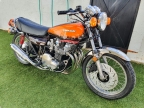
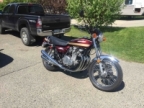
1973 Z1 900 Kawasaki
Please Log in or Create an account to join the conversation.
- hardrockminer
-
- Offline
- Sustaining Member
-

Registered
- Posts: 3118
- Thanks: 1230
Re: 1973 Z1 rebuild
24 Oct 2022 19:00
I think I understand. The inside diameter of the intake boots was milled to make them larger. Do you know why the synch ports were removed?
I have several restored bikes along with a 2006 Goldwing with a sidecar.
Please Log in or Create an account to join the conversation.
- blackozvet
-
Topic Author
- Offline
- User
-
Registered
- Posts: 193
- Thanks: 79
Re: 1973 Z1 rebuild
24 Oct 2022 19:52These intake rubbers are #16065-1135 which are from early 80's Z1000J- they dont have vacuum ports.I think I understand. The inside diameter of the intake boots was milled to make them larger. Do you know why the synch ports were removed?
Engine builders in the 80's were using these rubbers for ported head/large carb applications. Lack of vac port was a bonus, coz they are just a potential leak in a race engine.
My rubbers were then bored on the inside half to match the diameter of the ported intake.
1973 Z1 900 Kawasaki
Please Log in or Create an account to join the conversation.
- Wookie58
-

- Offline
- Moderator
-

Registered
- Posts: 6042
- Thanks: 3792
Re: 1973 Z1 rebuild
25 Oct 2022 00:55Vac syncing is worthwhile to get the smoothest running, you could do this with the tool I posted or if your hearing is ok you could go "old skool" and listen to the intakes with a length of 1/2 inch hose and adjust until the rush of air in the intakes sounds the sameThe rubbers were milled to match the ported intakes.
With 38mm flatslides and 430 cams it has never been vacuum synced.

1982 KZ1000 Ltd
www.kzrider.com/forum/11-projects/617631...-82-begins?start=192
kzrider.com/filebase-alias?view=download...d-fault-diagnosis&ca
www.kzrider.com/forum/11-projects/617631...-82-begins?start=192
kzrider.com/filebase-alias?view=download...d-fault-diagnosis&ca
The following user(s) said Thank You: howardhb
Please Log in or Create an account to join the conversation.
- blackozvet
-
Topic Author
- Offline
- User
-
Registered
- Posts: 193
- Thanks: 79
Re: 1973 Z1 rebuild
25 Oct 2022 02:52
First thing on the agenda is to get the garage cleaned up - too many boxes everywhere.
Now take the carbs out of their box and throw the box away!
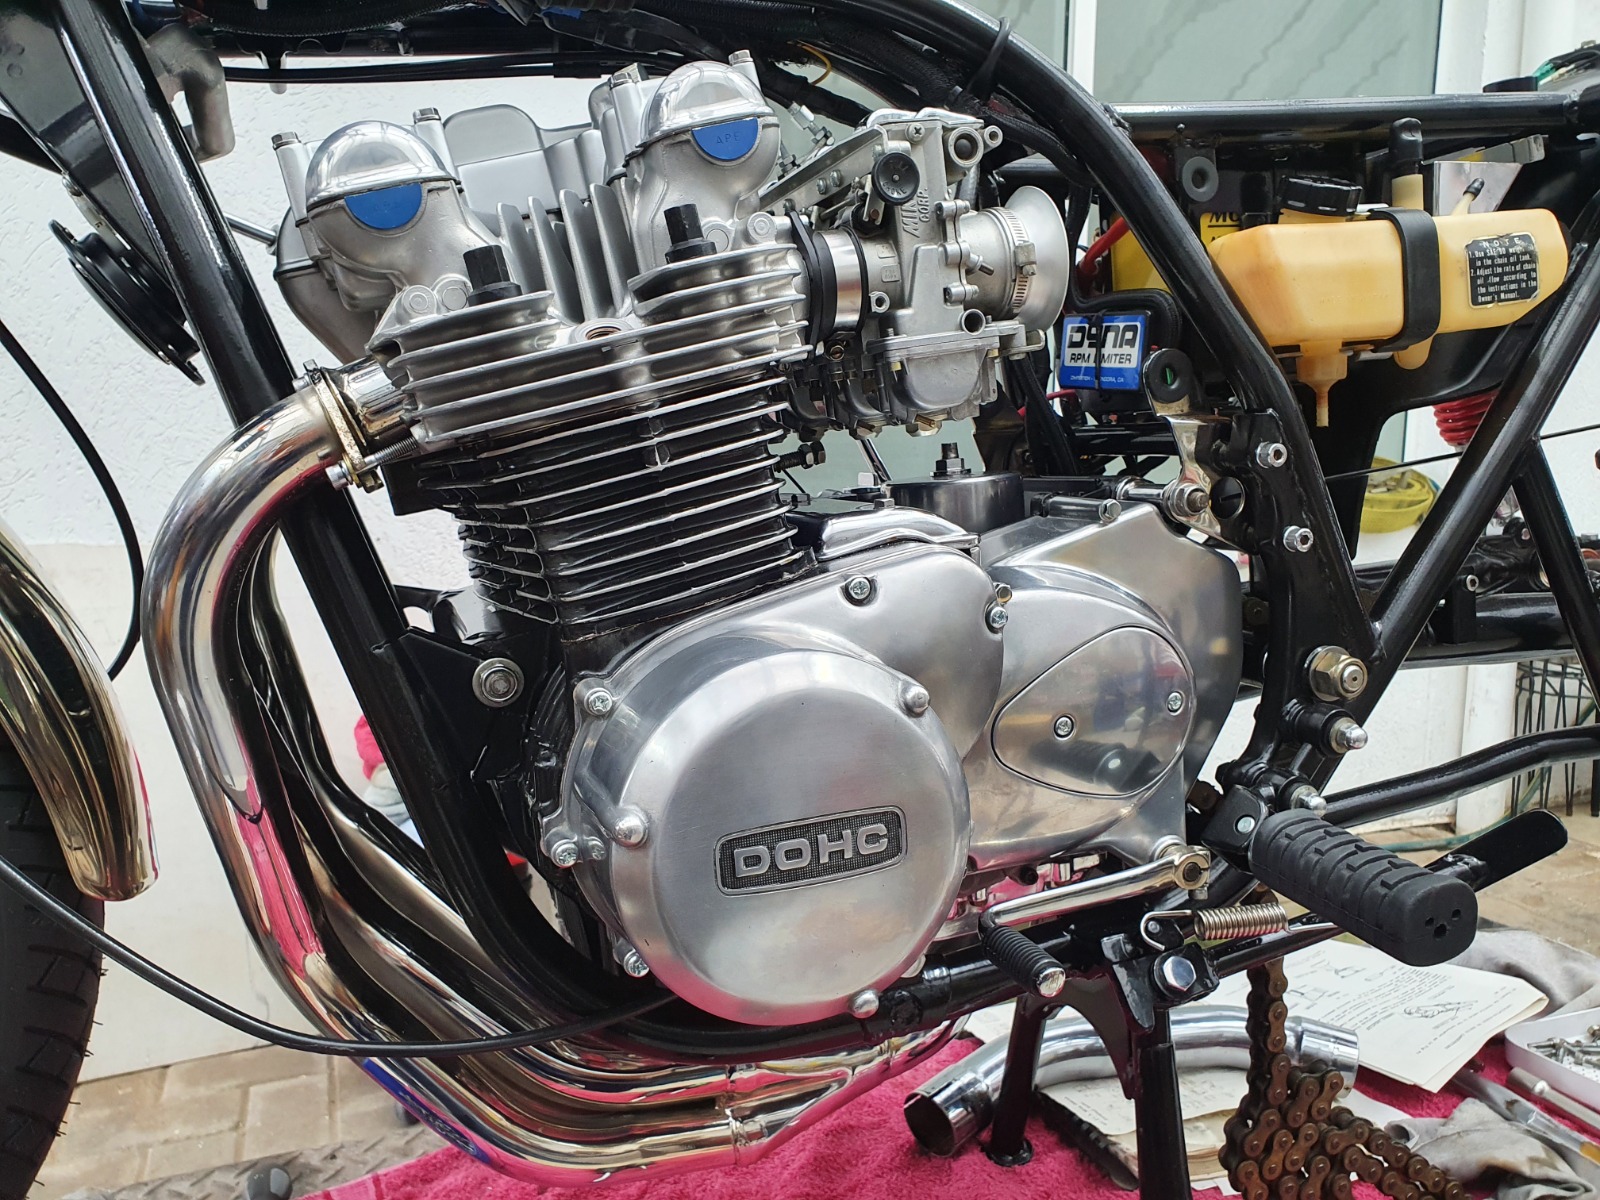
The carbs on this engine are Mikuni 38 mm flatslides.
I take the carbs apart, give everything a good clean, blow out all the orifices and put it back together.
Once the carbs are on, its time to fit up the new throttle cables. I have used the 'short ' version of the cables, which are 990mm - it doesnt sound short at almost a metre but its just about perfect for my application.
Its a little bit tricky getting the new combo together as I have deleted the remote single quick action throttle and gone back to the stock type push/pull throttle grip mounted in the switch block, but eventually get it sorted.

The engine is now looking almost done - the only thing remaining is the camshafts.
Now take the carbs out of their box and throw the box away!
The carbs on this engine are Mikuni 38 mm flatslides.
I take the carbs apart, give everything a good clean, blow out all the orifices and put it back together.
Once the carbs are on, its time to fit up the new throttle cables. I have used the 'short ' version of the cables, which are 990mm - it doesnt sound short at almost a metre but its just about perfect for my application.
Its a little bit tricky getting the new combo together as I have deleted the remote single quick action throttle and gone back to the stock type push/pull throttle grip mounted in the switch block, but eventually get it sorted.
The engine is now looking almost done - the only thing remaining is the camshafts.
1973 Z1 900 Kawasaki
The following user(s) said Thank You: Street Fighter LTD, Dragbike_Mike, howardhb
Please Log in or Create an account to join the conversation.
- slmjim+Z1BEBE
-

- Away
- User
-
Registered
- Enjoy Life! IT HAS AN EXPIRATION DATE!
- Posts: 1411
- Thanks: 901
Re: 1973 Z1 rebuild
25 Oct 2022 04:38
Among the first class details and workmanship, gotta say you really nailed the shiny-dull / glossy-satin finish on the polished aluminum motor covers. In the pics they appear stock finish, something much more difficult to accomplish than simple mirror-like polishing.
Good Ridin'
slmjim & Z1BEBE
Good Ridin'
slmjim & Z1BEBE
A biker looks at your engine and chrome.
A Rider looks at your odometer and tags.
1973 ('72 builds) Z1 x2
1974 Z1-A x2
1975 Z1-B x2
1993 CB 750 Nighthawk x2
2009 ST1300A
www.kawasaki-z-classik.com
A Forum tightly focused on all things Z1 and Z2.
A Rider looks at your odometer and tags.
1973 ('72 builds) Z1 x2
1974 Z1-A x2
1975 Z1-B x2
1993 CB 750 Nighthawk x2
2009 ST1300A
www.kawasaki-z-classik.com
A Forum tightly focused on all things Z1 and Z2.
The following user(s) said Thank You: howardhb, blackozvet
Please Log in or Create an account to join the conversation.
- howardhb
-

- Offline
- Sustaining Member
-
Registered
- God, I trust
- Posts: 472
- Thanks: 508
Re: 1973 Z1 rebuild
25 Oct 2022 05:06 - 25 Oct 2022 05:41
"Vac syncing is worthwhile to get the smoothest running, you could do this with the tool I posted or if your hearing is ok you could go "old skool" and listen to the intakes with a length of 1/2 inch hose and adjust until the rush of air in the intakes sounds the same
 "
"
+1 !
I agonised over getting the vacuum sync. "right". However, using "analog" guages or Carbitune bugged me, in the digital age....
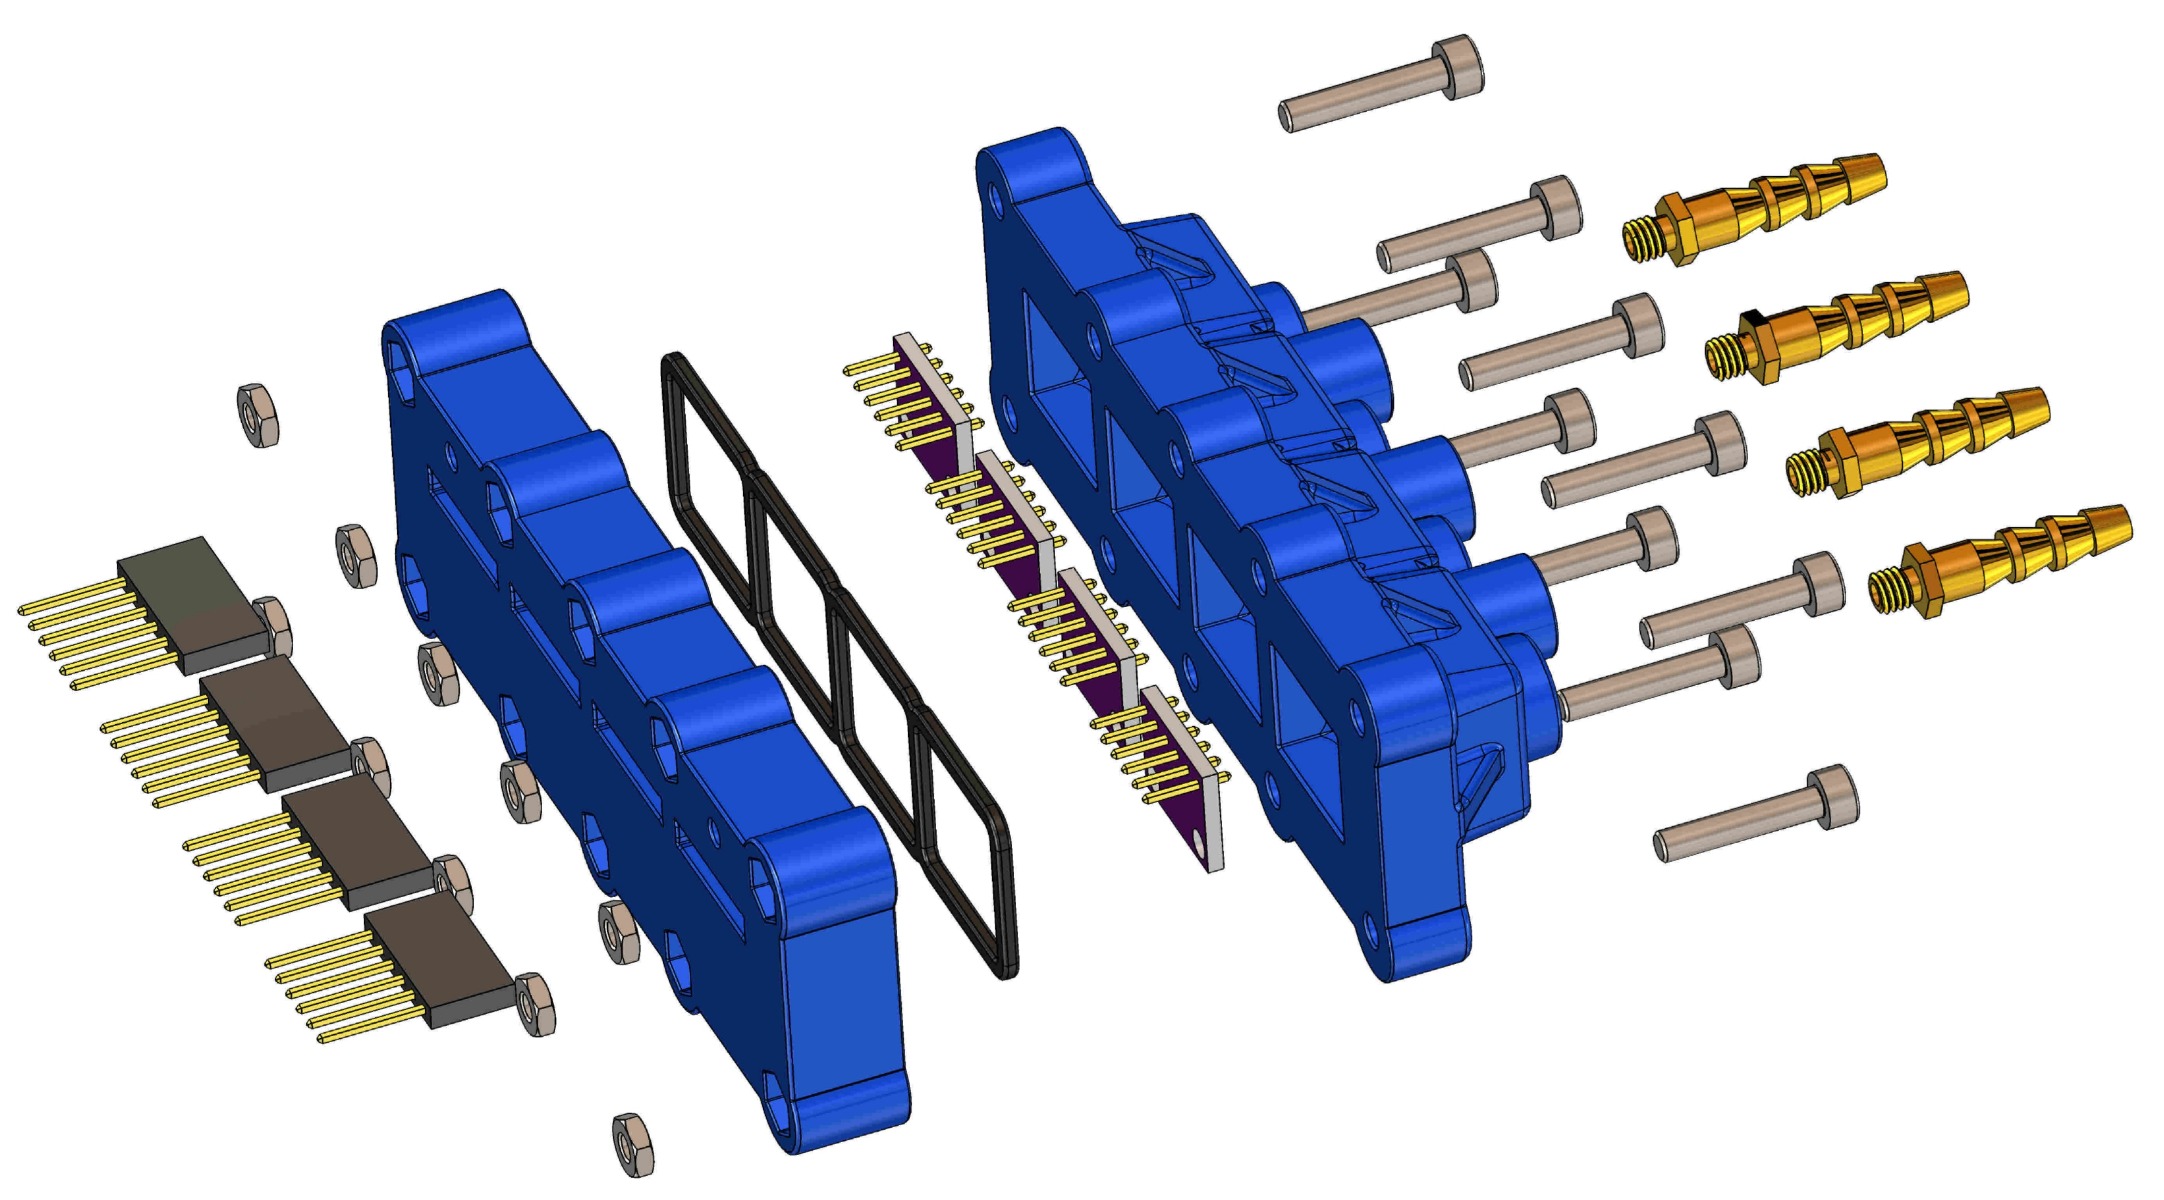
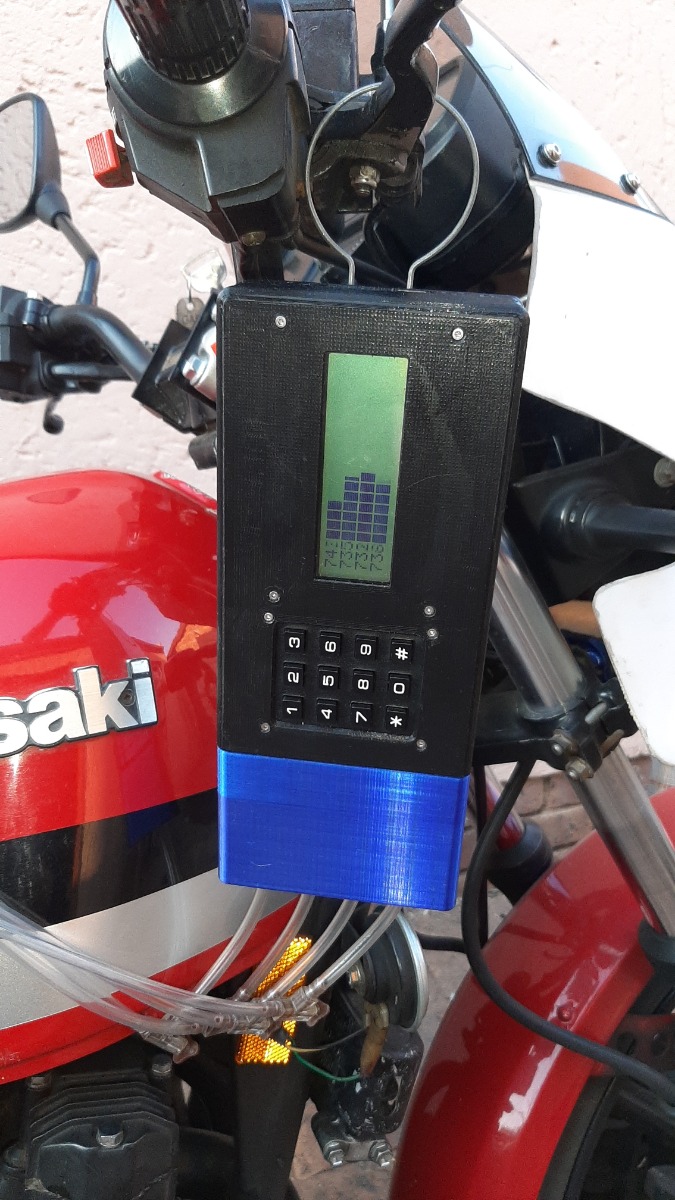
So I designed a digital sync. tool:
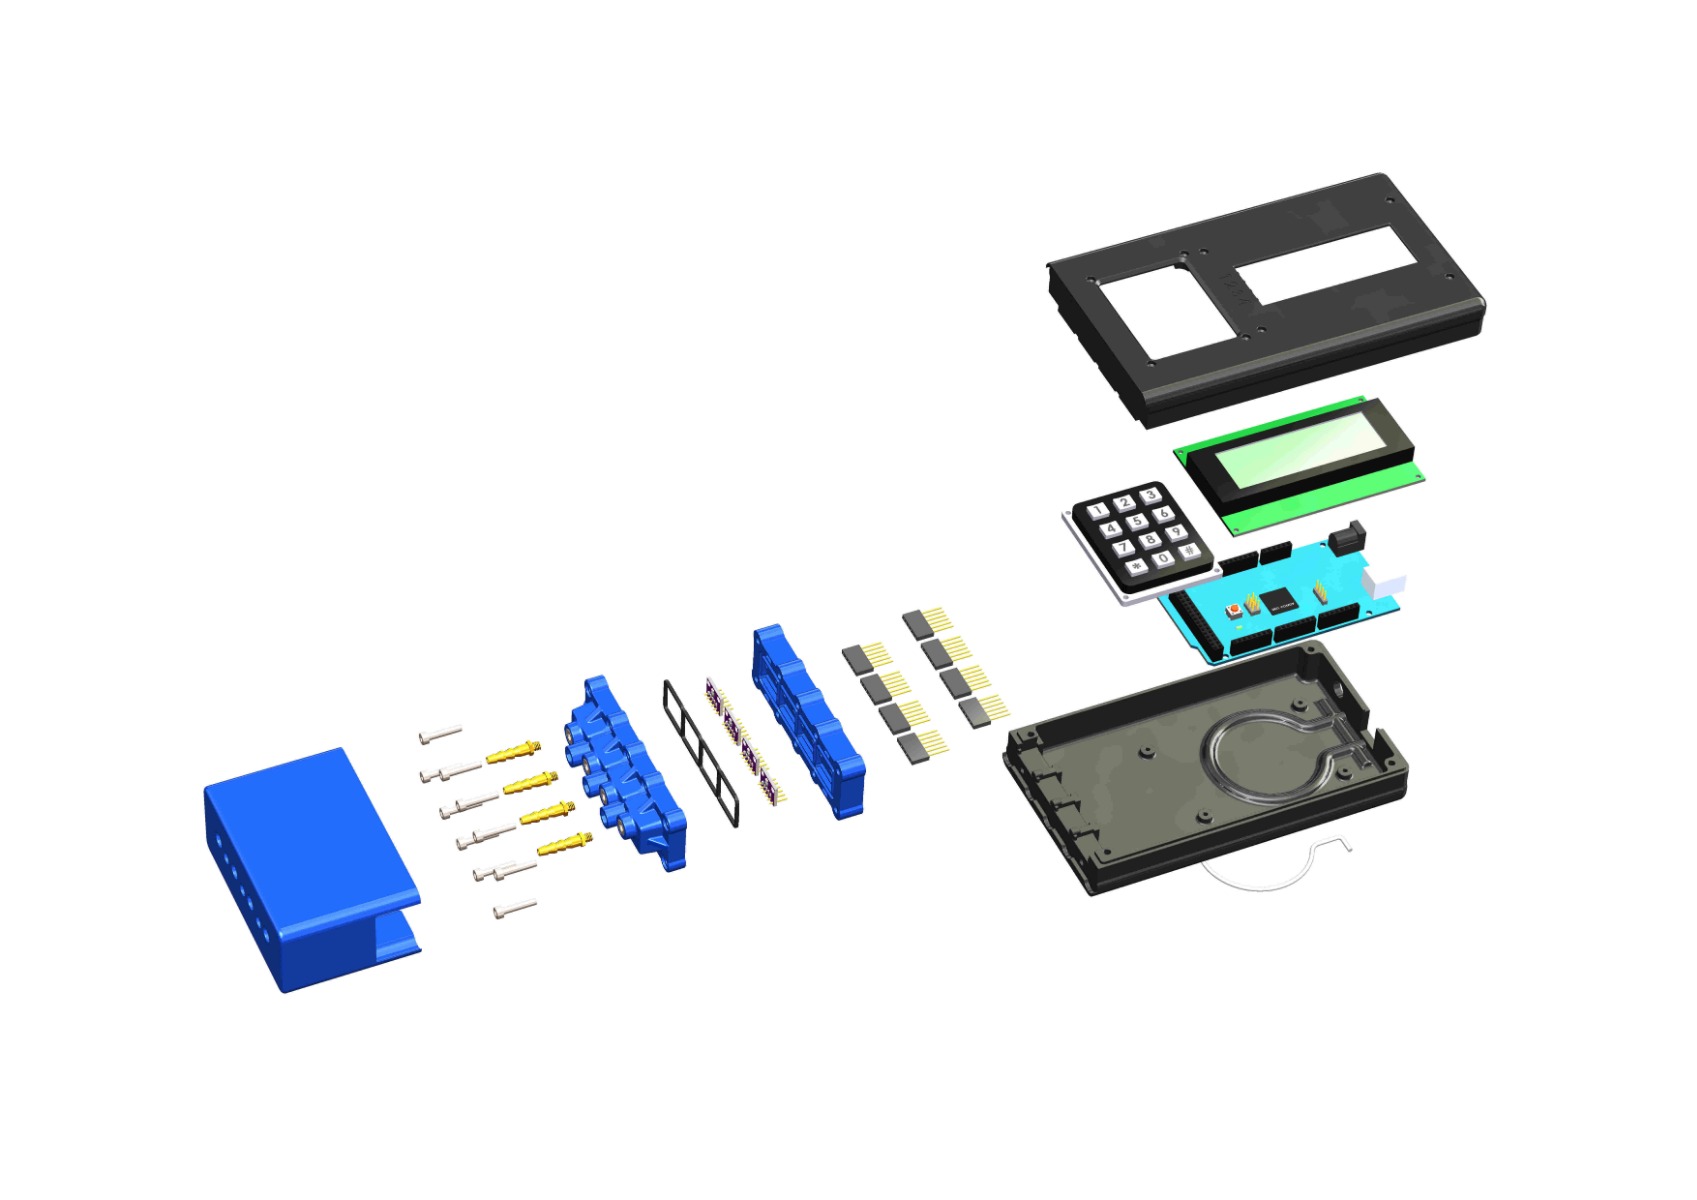
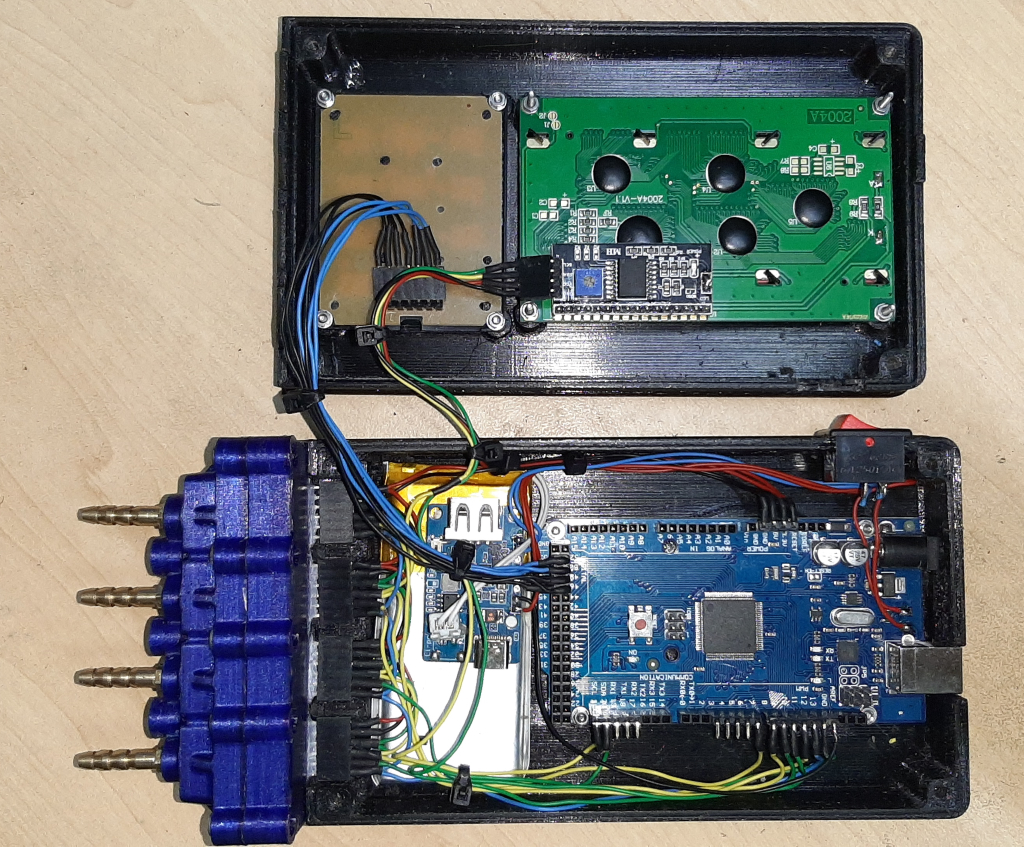
It uses four individual Bosch atmospheric sensors, like 2 dollars each.
Internal Lithium Ion battery, charged by cell-phone charger!
The trick was embedding them in an "air-tight (vacuum tight) housing, with 4 electrical connections to each one.
But, it's totally do-able.
The graphic display of each cylinder's vacuum is an expanded scale of 100millibar, and can be switched to inches or millimetres Mercury.
Being digital, calibrating all 4 sensors is simple... my software measures ambient atmospheric pressure before starting a sync. and, using channel 1 as the "reference", offsets the other 3 to read the same value.
I managed to set the sync to withing 2 mmMercury. (ok, so it took some patience...) now, once warm, it will idle happily at 500 rpm!
It's quite remarkable what a difference a good sync. makes.
If anyone wants to make one, I will gladly supply all the 3D print files, circuit diagram and the software, por nada!
H.
+1 !
I agonised over getting the vacuum sync. "right". However, using "analog" guages or Carbitune bugged me, in the digital age....
So I designed a digital sync. tool:
It uses four individual Bosch atmospheric sensors, like 2 dollars each.
Internal Lithium Ion battery, charged by cell-phone charger!
The trick was embedding them in an "air-tight (vacuum tight) housing, with 4 electrical connections to each one.
But, it's totally do-able.
The graphic display of each cylinder's vacuum is an expanded scale of 100millibar, and can be switched to inches or millimetres Mercury.
Being digital, calibrating all 4 sensors is simple... my software measures ambient atmospheric pressure before starting a sync. and, using channel 1 as the "reference", offsets the other 3 to read the same value.
I managed to set the sync to withing 2 mmMercury. (ok, so it took some patience...) now, once warm, it will idle happily at 500 rpm!
It's quite remarkable what a difference a good sync. makes.
If anyone wants to make one, I will gladly supply all the 3D print files, circuit diagram and the software, por nada!
H.
'81 GPz 550 D1
'81 GPz 1100 B1 ELR "Tribute" www.kzrider.com/forum/11-projects/617040...-elr-tribute?start=0
'82 Yamaha YB100 Fizzie
'79 Suzuki GT200 X5 TWO STROKE TWIN - SMOKER!
'81 GPz 1100 B1 ELR "Tribute" www.kzrider.com/forum/11-projects/617040...-elr-tribute?start=0
'82 Yamaha YB100 Fizzie
'79 Suzuki GT200 X5 TWO STROKE TWIN - SMOKER!
Last edit: 25 Oct 2022 05:41 by howardhb.
The following user(s) said Thank You: slmjim+Z1BEBE, Street Fighter LTD, Scirocco, calum
Please Log in or Create an account to join the conversation.
- Wookie58
-
- Offline
- Moderator
-
Registered
- Posts: 6042
- Thanks: 3792
Re: 1973 Z1 rebuild
25 Oct 2022 06:52
Howard that is an awesome piece of kit, you should sell the idea to one of the many equipment company's out there

1982 KZ1000 Ltd
www.kzrider.com/forum/11-projects/617631...-82-begins?start=192
kzrider.com/filebase-alias?view=download...d-fault-diagnosis&ca
www.kzrider.com/forum/11-projects/617631...-82-begins?start=192
kzrider.com/filebase-alias?view=download...d-fault-diagnosis&ca
The following user(s) said Thank You: howardhb
Please Log in or Create an account to join the conversation.
- Dr. Gamma
-

- Offline
- Sustaining Member
-
Registered
- Posts: 1232
- Thanks: 706
Re: 1973 Z1 rebuild
25 Oct 2022 10:06
.430 lift cams? Whats the valve overlap......50~55 degrees?? With that big of a cam, and enlarged intake ports, I really doubt you would have a halfway steady vacuum reading to use either mercury sticks or vacuum gauges. The mercury sticks would be bouncing up and down about 4 or 5 lines with that setup!!!!
Just wire gauge the slides with like a .025 wire to sync the carbs. That will get you close as you can get.
I hope you don't expect this motor to have a nice smooth idle like a stock motor does.
Just wire gauge the slides with like a .025 wire to sync the carbs. That will get you close as you can get.
I hope you don't expect this motor to have a nice smooth idle like a stock motor does.
1972 H2 750 Cafe Racer built in 1974.
1976 KH400 Production Road Racer.
1979 Kz1000 MK. II Old AMA/WERA Superbike.
1986 RG500G 2 stroke terror.
1986 GSXR750RG The one with the clutch that rattles!
Up in the hills near Prescott, Az.
1976 KH400 Production Road Racer.
1979 Kz1000 MK. II Old AMA/WERA Superbike.
1986 RG500G 2 stroke terror.
1986 GSXR750RG The one with the clutch that rattles!
Up in the hills near Prescott, Az.
Please Log in or Create an account to join the conversation.
- Wookie58
-
- Offline
- Moderator
-
Registered
- Posts: 6042
- Thanks: 3792
Re: 1973 Z1 rebuild
25 Oct 2022 10:15Good point Doc, I know that big cams play havoc with early muscle cars where everything is vacum operated. I Remember seeing a programme where a guy was restoring an early 70's Vette and the headlights wouldn't lift with the cam that was in it.430 lift cams? Whats the valve overlap......50~55 degrees?? With that big of a cam, and enlarged intake ports, I really doubt you would have a halfway steady vacuum reading to use either mercury sticks or vacuum gauges. The mercury sticks would be bouncing up and down about 4 or 5 lines with that setup!!!!
Just wire gauge the slides with like a .025 wire to sync the carbs. That will get you close as you can get.
I hope you don't expect this motor to have a nice smooth idle like a stock motor does.
1982 KZ1000 Ltd
www.kzrider.com/forum/11-projects/617631...-82-begins?start=192
kzrider.com/filebase-alias?view=download...d-fault-diagnosis&ca
www.kzrider.com/forum/11-projects/617631...-82-begins?start=192
kzrider.com/filebase-alias?view=download...d-fault-diagnosis&ca
Please Log in or Create an account to join the conversation.
- Wheelhop
-
- Offline
- Sustaining Member
-
Registered
- Posts: 526
- Thanks: 313
Re: 1973 Z1 rebuild
25 Oct 2022 11:38When I got my 76 KZ900, the "sync" ports appeared to be drilled into the intake portion of the head (see pic). It originally had Mikuni 33 mm SB's and the carb holders did not have sync ports.These intake rubbers are #16065-1135 which are from early 80's Z1000J- they dont have vacuum ports.I think I understand. The inside diameter of the intake boots was milled to make them larger. Do you know why the synch ports were removed?
Engine builders in the 80's were using these rubbers for ported head/large carb applications. Lack of vac port was a bonus, coz they are just a potential leak in a race engine.
My rubbers were then bored on the inside half to match the diameter of the ported intake.
1978 KZ 1000B (73 tribute)
1977 KZ1000 project
1976 KZ 900
1976 KV 75
1976 Honda Elsinore MT250
1974 Z1 900 project
1971 Honda CT70
2000 ZRX 1100
1977 KZ1000 project
1976 KZ 900
1976 KV 75
1976 Honda Elsinore MT250
1974 Z1 900 project
1971 Honda CT70
2000 ZRX 1100
Please Log in or Create an account to join the conversation.
- Wookie58
-
- Offline
- Moderator
-
Registered
- Posts: 6042
- Thanks: 3792
Re: 1973 Z1 rebuild
25 Oct 2022 13:18That is similar to the factory set up on a CB900When I got my 76 KZ900, the "sync" ports appeared to be drilled into the intake portion of the head (see pic). It originally had Mikuni 33 mm SB's and the carb holders did not have sync ports.These intake rubbers are #16065-1135 which are from early 80's Z1000J- they dont have vacuum ports.I think I understand. The inside diameter of the intake boots was milled to make them larger. Do you know why the synch ports were removed?
Engine builders in the 80's were using these rubbers for ported head/large carb applications. Lack of vac port was a bonus, coz they are just a potential leak in a race engine.
My rubbers were then bored on the inside half to match the diameter of the ported intake.
1982 KZ1000 Ltd
www.kzrider.com/forum/11-projects/617631...-82-begins?start=192
kzrider.com/filebase-alias?view=download...d-fault-diagnosis&ca
www.kzrider.com/forum/11-projects/617631...-82-begins?start=192
kzrider.com/filebase-alias?view=download...d-fault-diagnosis&ca
Please Log in or Create an account to join the conversation.
Moderators: Street Fighter LTD