
Replaced perished manifold boots now v high idle speed
- Scirocco
-
- Offline
- Premium Member
-

Registered
- Never change a running system
- Posts: 4397
- Thanks: 2260
Re: Replaced perished manifold boots now v high idle speed
09 Mar 2023 12:49 - 09 Mar 2023 12:52
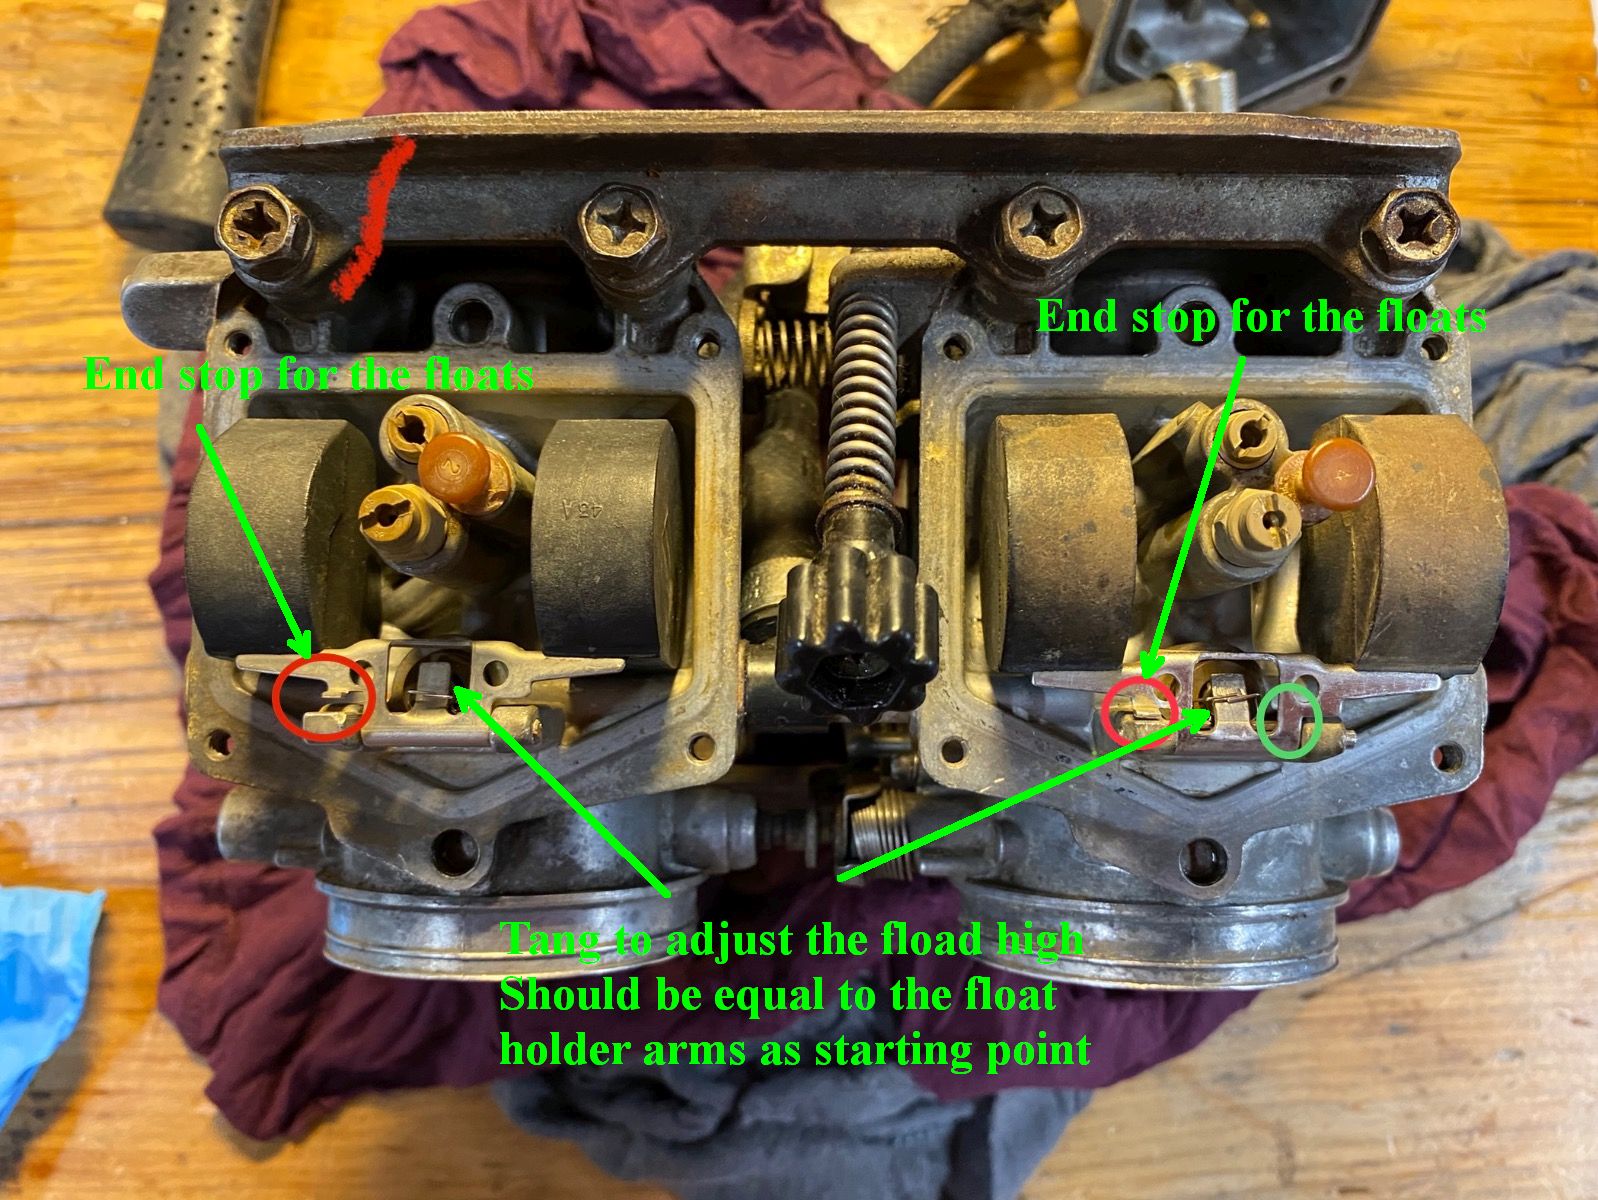
Pics say more than 1000 words.....
My 1975 Z 1 B 900 Project
www.kzrider.com/forum/11-projects/605133...ears-deep-sleep-mode
www.kzrider.com/forum/11-projects/605133...ears-deep-sleep-mode
Last edit: 09 Mar 2023 12:52 by Scirocco.
The following user(s) said Thank You: Jimbo68
Please Log in or Create an account to join the conversation.
- Jimbo68
-
 Topic Author
- Offline
- User
-

Registered
- Posts: 103
- Thanks: 7
Re: Replaced perished manifold boots now v high idle speed
09 Mar 2023 12:55
Thank you Warrengt32. I wish I’d known that. Great tip. I’m learning a lot here.
in the meantime I’ve decided the float assembly is just too mangled to re-use. To be fair, it had already been bent out of shape a fair bit (looking at an earlier photo) before I removed it and started adjusting it per earlier advice.
I’ve tracked down a replacement which looks undamaged, possibly unused, on eBay. So it’s on its way.
this feels a bit like renovating an old house: start with one small problem then as the layers are peeled away, more trouble emerges.
I will get there.
Given my spraying of the rubber gaskets with carb cleaner, would you recommend replacing them ?
1981 Kawasaki KZ440-A2
Please Log in or Create an account to join the conversation.
- Jimbo68
-
Topic Author
- Offline
- User
-
Registered
- Posts: 103
- Thanks: 7
Re: Replaced perished manifold boots now v high idle speed
09 Mar 2023 13:02
Thank you Scirocco.
I can see what you mean. My iPhone can’t take such good close ups and it’s hard to get good lighting and good line of sight under the float assembly to see things here so clearly.
55 year-old eyes don’t help either

I can see what you mean. My iPhone can’t take such good close ups and it’s hard to get good lighting and good line of sight under the float assembly to see things here so clearly.
55 year-old eyes don’t help either
1981 Kawasaki KZ440-A2
Please Log in or Create an account to join the conversation.
- TexasKZ
-

- Offline
- Platinum Member
-

Registered
- Posts: 8138
- Thanks: 2646
Re: Replaced perished manifold boots now v high idle speed
09 Mar 2023 13:22
Regarding your question about the rubber bits, they should always be replaced. The only exception are the slide diaphragms.
Reusing old rubber bits is false economy, especially when you do not know their age or what quality they were when new.
The best carburetor cleaning fluids will damage rubber, some do not. If you got some on the slide diaphragms, then immediately and carefully wash them with warm soapy water. They might be ok.
1982 KZ1000 LTD parts donor
1981 KZ1000 LTD awaiting resurrection
2000 ZRX1100 not ridden enough
www.kzrider.com/11-projects/620336-anoth...uild-thread?start=24
1981 KZ1000 LTD awaiting resurrection
2000 ZRX1100 not ridden enough
www.kzrider.com/11-projects/620336-anoth...uild-thread?start=24
Please Log in or Create an account to join the conversation.
- Nessism
-

- Offline
- Sustaining Member
-
Registered
- Posts: 8050
- Thanks: 3432
Re: Replaced perished manifold boots now v high idle speed
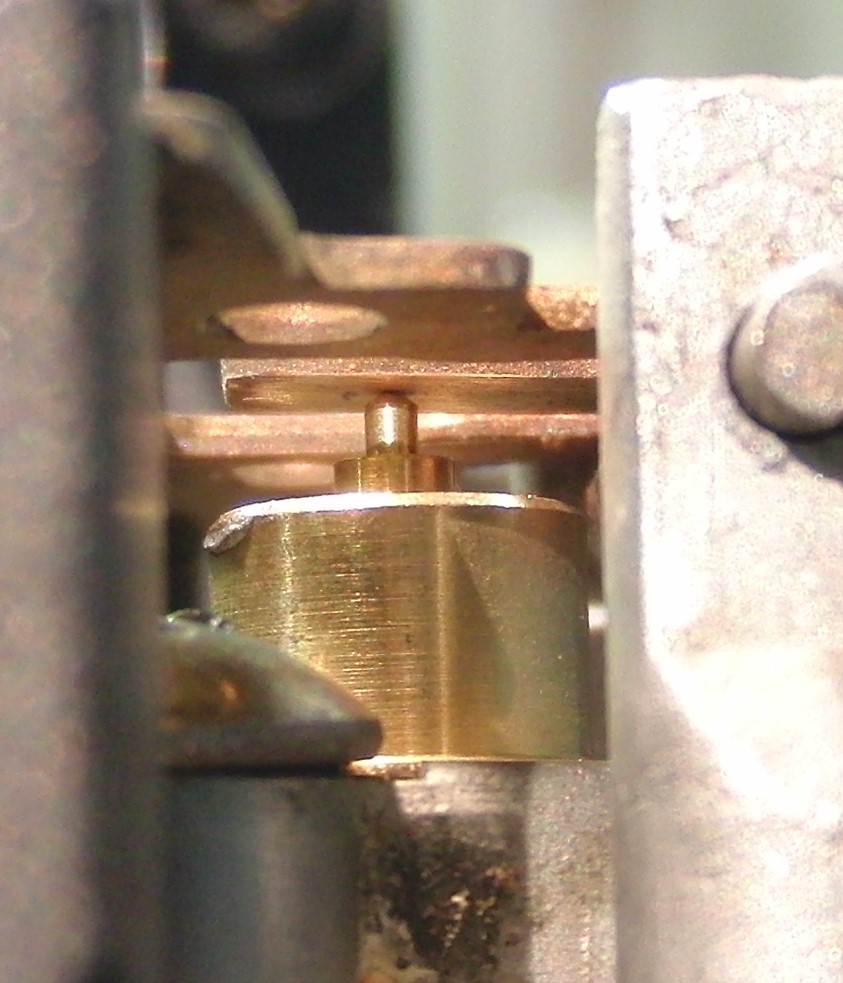
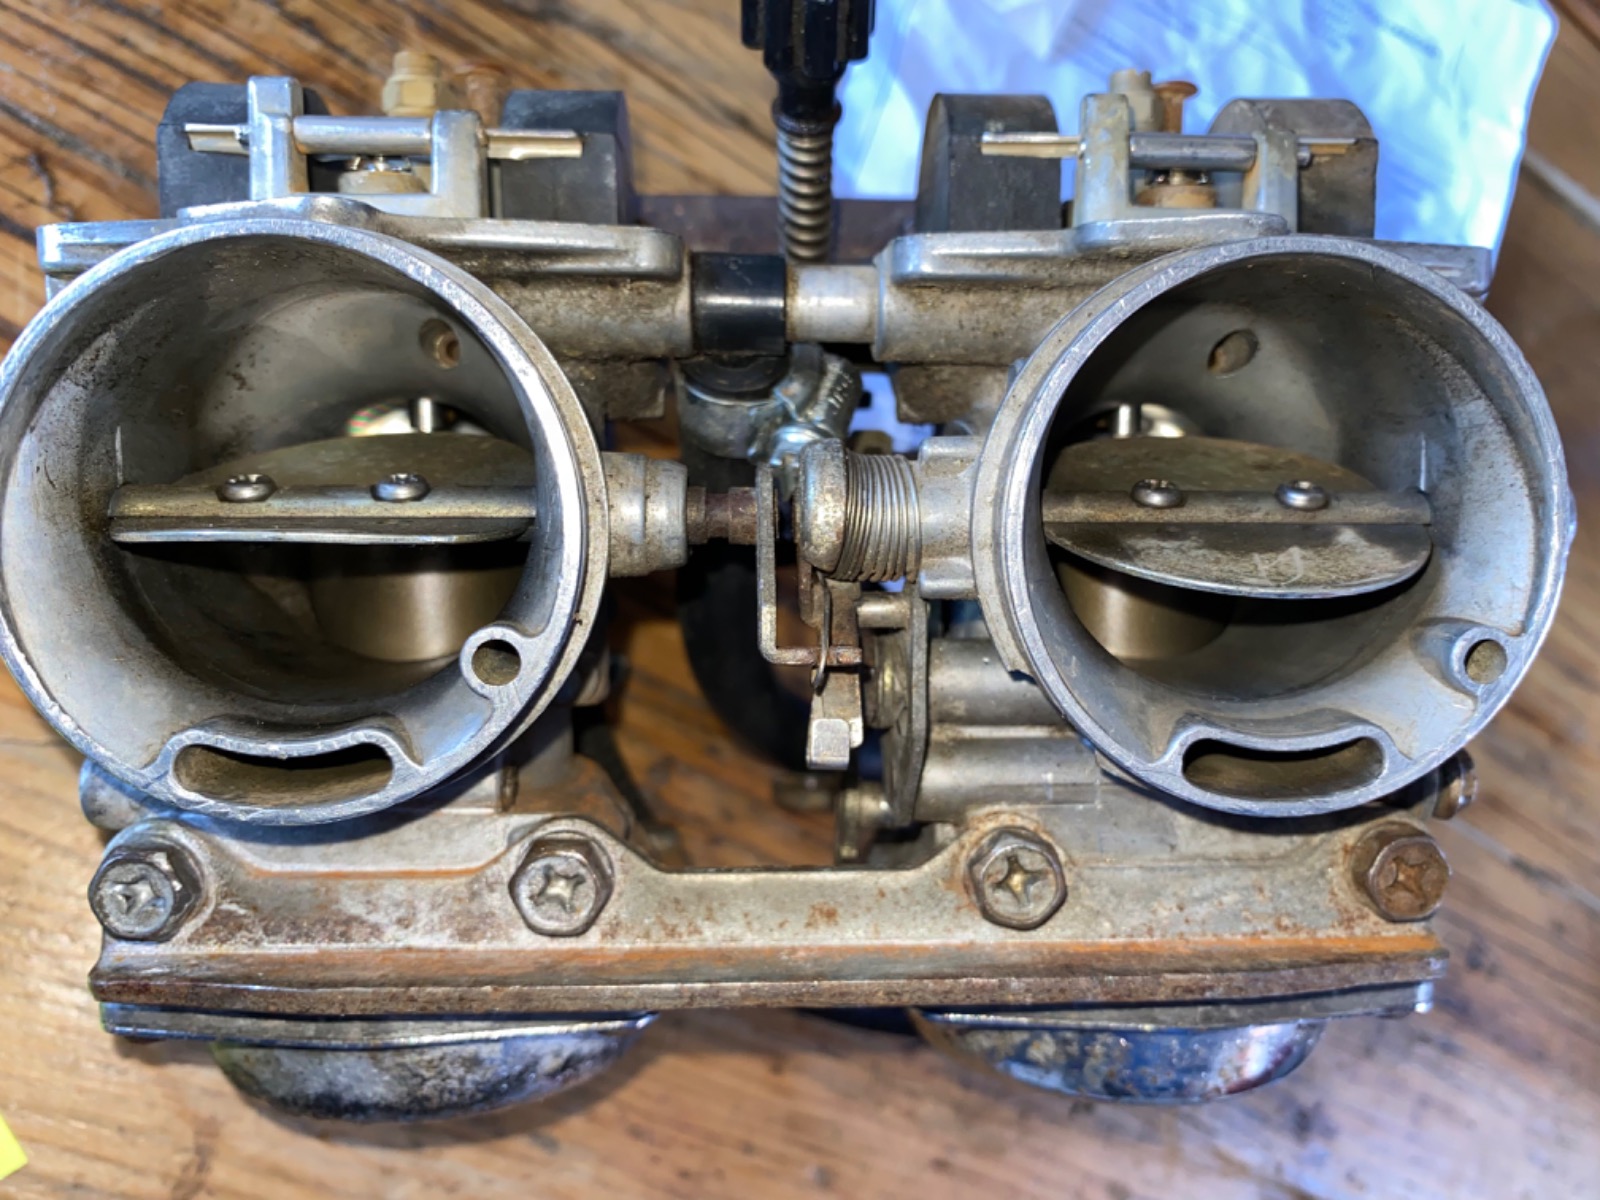
09 Mar 2023 16:01The float to the right is covered with brown gas varnish scum that must be removed. It weighs the float down, which causes it to sink, to a lower level in the float bowl.
Ed
Carb O-ring Kits : www.kzrider.com/forum/14-vendor-forum/62...rburetor-o-ring-kits
www.kzrider.com/forum/faq-wiki/618026-new-owner-things-to-know
1981 KZ750E2
www.kzrider.com/forum/11-projects/604901...z750e-project-thread
Carb O-ring Kits : www.kzrider.com/forum/14-vendor-forum/62...rburetor-o-ring-kits
www.kzrider.com/forum/faq-wiki/618026-new-owner-things-to-know
1981 KZ750E2
www.kzrider.com/forum/11-projects/604901...z750e-project-thread
The following user(s) said Thank You: Jimbo68
Please Log in or Create an account to join the conversation.
- SWest
-

- Offline
- Sustaining Member
-
Registered
- 10 22 2014
- Posts: 23627
- Thanks: 2984
Re: Replaced perished manifold boots now v high idle speed
09 Mar 2023 18:21
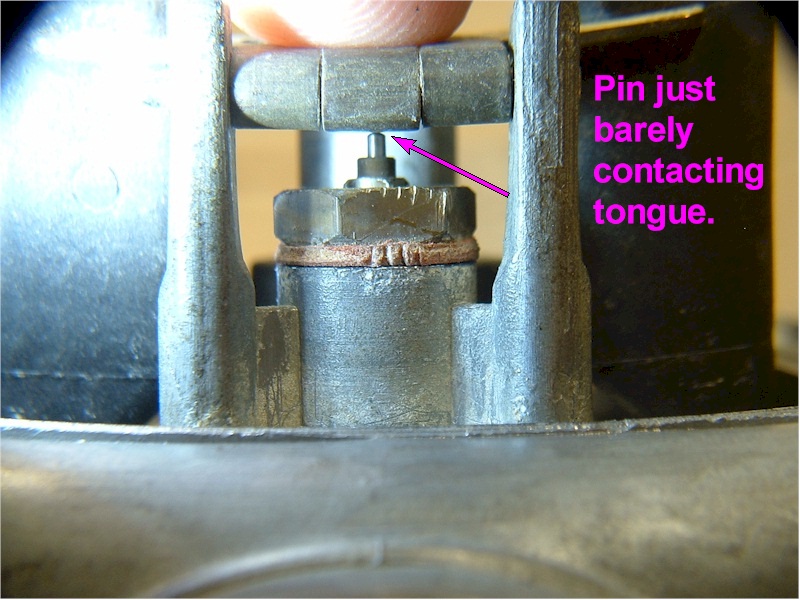
Can the pins be taken out? Some are a semi press fit and that's how the holders get broken. On my 33's the last 1/8" is pressed in. I dread having to remove them with a small punch. One was bent when I got them. Had to file one side of my new floats for it to fit without sticking.

Steve
Steve
Z1b1000 1975 Z1b
kzrider.com/forum/11-projects/598262-kz-...-will-it-live#672882
kzrider.com/forum/2-engine/597654-poser?start=240#704229
kzrider.com/forum/11-projects/598262-kz-...-will-it-live#672882
kzrider.com/forum/2-engine/597654-poser?start=240#704229
The following user(s) said Thank You: Jimbo68
Please Log in or Create an account to join the conversation.
- Jimbo68
-
Topic Author
- Offline
- User
-
Registered
- Posts: 103
- Thanks: 7
Re: Replaced perished manifold boots now v high idle speed
14 Mar 2023 09:34
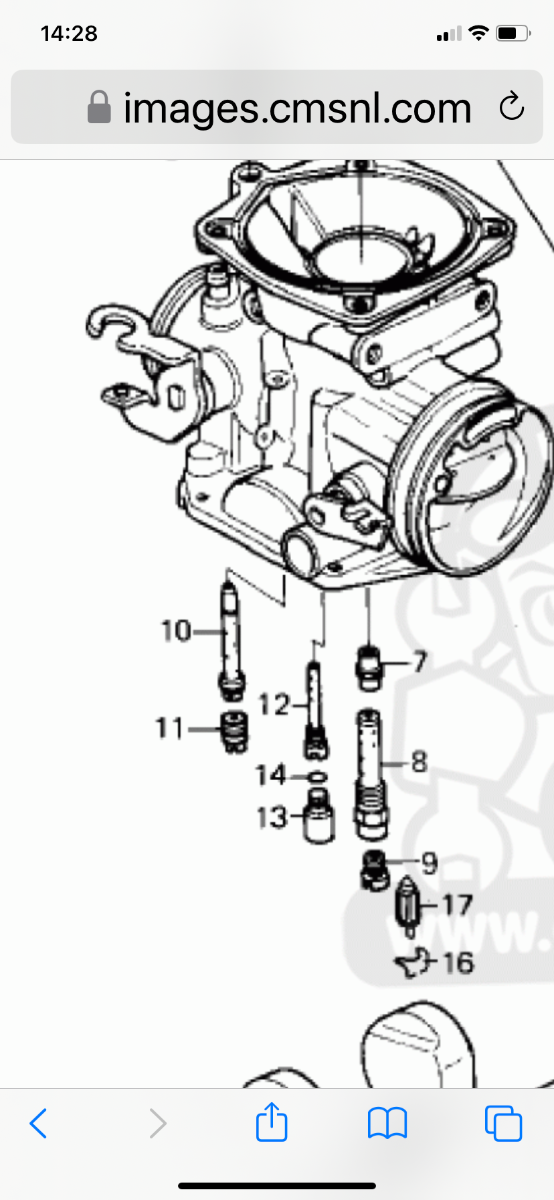
Hi there. I now have all the parts to put my carbs together and test. before I do, I am contemplating removing the jet parts (#7 to #14) in the diagram and skooshing with carb cleaner. However, I’m nervous. 1: removal of the o ring before cleaning might damage its integrity. 2: I might not get everything put back together properly. Is it straightforward? What are you views please?
1981 Kawasaki KZ440-A2
Please Log in or Create an account to join the conversation.
- Wookie58
-

- Away
- Moderator
-

Registered
- Posts: 5978
- Thanks: 3755
Re: Replaced perished manifold boots now v high idle speed
14 Mar 2023 09:49
Without removing the jets you won't be able to clean the passages fully, with regards the "O" rings it's best to replace them all when you have gone this far
1982 KZ1000 Ltd
www.kzrider.com/forum/11-projects/617631...-82-begins?start=192
kzrider.com/filebase-alias?view=download...d-fault-diagnosis&ca
www.kzrider.com/forum/11-projects/617631...-82-begins?start=192
kzrider.com/filebase-alias?view=download...d-fault-diagnosis&ca
The following user(s) said Thank You: Nessism
Please Log in or Create an account to join the conversation.
- Nessism
-
- Offline
- Sustaining Member
-
Registered
- Posts: 8050
- Thanks: 3432
Re: Replaced perished manifold boots now v high idle speed
14 Mar 2023 10:46 - 14 Mar 2023 13:14Without removing the jets you won't be able to clean the passages fully, with regards the "O" rings it's best to replace them all when you have gone this far
Exactly correct.
In addition to the part shown, the pilot screw passages, not shown, needs careful cleaning.
I have O-ring kits for those carbs, if you are in need.
Ed
Carb O-ring Kits : www.kzrider.com/forum/14-vendor-forum/62...rburetor-o-ring-kits
www.kzrider.com/forum/faq-wiki/618026-new-owner-things-to-know
1981 KZ750E2
www.kzrider.com/forum/11-projects/604901...z750e-project-thread
Carb O-ring Kits : www.kzrider.com/forum/14-vendor-forum/62...rburetor-o-ring-kits
www.kzrider.com/forum/faq-wiki/618026-new-owner-things-to-know
1981 KZ750E2
www.kzrider.com/forum/11-projects/604901...z750e-project-thread
Last edit: 14 Mar 2023 13:14 by Nessism.
Please Log in or Create an account to join the conversation.
- TexasKZ
-
- Offline
- Platinum Member
-
Registered
- Posts: 8138
- Thanks: 2646
Re: Replaced perished manifold boots now v high idle speed
14 Mar 2023 12:17
Unless you really enjoy taking the carbs off the bike, partially cleaning them, reinstalling them and then doing it over and over, then do it right the first time.
Thea carbs need to be separated from each other, then each carb needs to be completely disassembled. Completely disassembled. Having a small plastic container for each carb is an easy way to keep the parts for each carb separate. You can do one carb at a time so you can use the other as a pattern for reassembly. Do not be afraid to take lots of pics from a variety of angles as you disassemble. The pics can be a great aid during assembly.
The low speed passageways in the carb bodies are really tiny and can be clogged by a nearly microscopic bit of spoodge. ( Spoodge is similar to smegma.) Even after soaking in your favorite carburetor cleaning chemical, a tiny wire, I use an e string, may be needed to clear them. Then spray each passageway carefully with carb cleaner in a can with the straw installed. Wear eye protection. Carb cleaner can really damage your eyes. Carefully look through every jet to see if they are clear. Compressed air can be helpful, too, but if you are not careful, the air can shoot tiny parts into the next time zone.
1982 KZ1000 LTD parts donor
1981 KZ1000 LTD awaiting resurrection
2000 ZRX1100 not ridden enough
www.kzrider.com/11-projects/620336-anoth...uild-thread?start=24
1981 KZ1000 LTD awaiting resurrection
2000 ZRX1100 not ridden enough
www.kzrider.com/11-projects/620336-anoth...uild-thread?start=24
The following user(s) said Thank You: Jimbo68
Please Log in or Create an account to join the conversation.
- Wookie58
-
- Away
- Moderator
-
Registered
- Posts: 5978
- Thanks: 3755
Re: Replaced perished manifold boots now v high idle speed
14 Mar 2023 12:41
If you are holding small parts like jets when using compressed air, ideally wear gloves or ensure the tip of your blowgun isn't against your skin (air in your blood stream will ruin your day)
1982 KZ1000 Ltd
www.kzrider.com/forum/11-projects/617631...-82-begins?start=192
kzrider.com/filebase-alias?view=download...d-fault-diagnosis&ca
www.kzrider.com/forum/11-projects/617631...-82-begins?start=192
kzrider.com/filebase-alias?view=download...d-fault-diagnosis&ca
The following user(s) said Thank You: Jimbo68
Please Log in or Create an account to join the conversation.
- Jimbo68
-
Topic Author
- Offline
- User
-
Registered
- Posts: 103
- Thanks: 7
Re: Replaced perished manifold boots now v high idle speed
18 Mar 2023 01:56
It looks like one of the previous owners decided to bend the choke plate on the carb we found had a float coated with gunk. I guess it was constantly running lean.
any suggestions on how to flatten it back to how it should be? I thought the two screws once removed would release the plate and I could take a mallet to it, but no go.
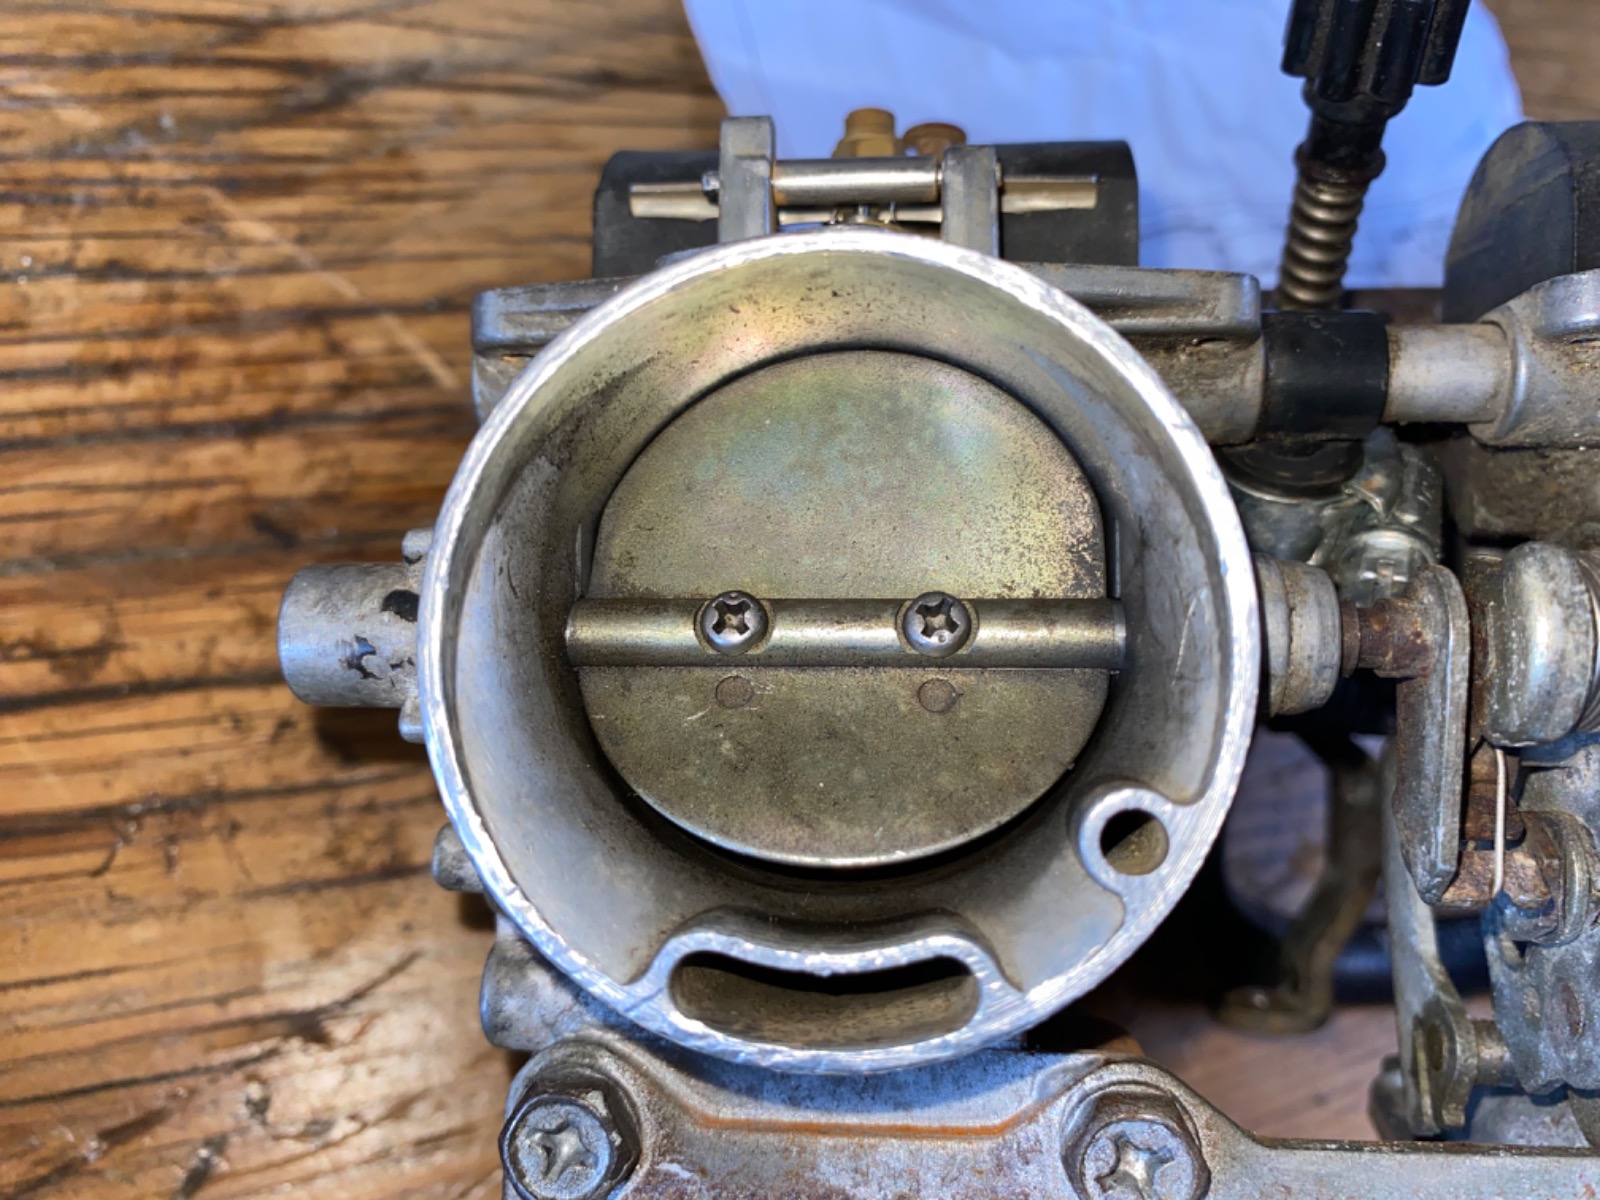
any suggestions on how to flatten it back to how it should be? I thought the two screws once removed would release the plate and I could take a mallet to it, but no go.
1981 Kawasaki KZ440-A2
Please Log in or Create an account to join the conversation.
Moderators: Street Fighter LTD