
And finally, Wookie's 82 begins !
- Joe S
-

- Offline
- User
-

Registered
- Posts: 19
- Thanks: 23
Re: And finally, Wookie's 82 begins !
02 Jan 2025 05:13 - 02 Jan 2025 05:14
Fantastic job so far! I appreciate you sticking to a no compromise build, even if it's taking longer than originally planned.
Everything seems well thought out (or corrected afterwards") ).
).
Well done, I await the next update!
Everything seems well thought out (or corrected afterwards
). Well done, I await the next update!
1982 KZ550 LTD
Verona, Ontario, Canada
Verona, Ontario, Canada
Last edit: 02 Jan 2025 05:14 by Joe S. Reason: Typo
The following user(s) said Thank You: Wookie58
Please Log in or Create an account to join the conversation.
- Wookie58
-
 Topic Author
- Away
- Moderator
-

Registered
- Posts: 6605
- Thanks: 4171
Re: And finally, Wookie's 82 begins !
12 Jan 2025 10:57
have had to "dig deep" in my enthusiasm bucket this weekend as the temp has hit an all time low (for here in the UK, I know for some of you it's tropical !) last couple of jobs done so the frame is now PC ready I put a couple of scallops in the cross tube on the frame for the wiring (originally the loom runs under this tube but now I have lifted the airbox it won't fit). The loom may of just fitted between the tube and the tank but I didn't want to find out it wouldn't fit after everything is painted and powder coated. Also as is common the mounting hole for the kick stand bolt was elongated so the bolt fitted "like a dick in a shirt sleeve" so I have sleeved it to be a much closer fit which has removed about 80% of the slop in the kick stand (the sleeve isn't a sloppy fit, I used a step drill to give the weld somewhere to go). Just need to sort a few brackets and the like and make some blanking plugs for the frame and it will be "off to the powder coater
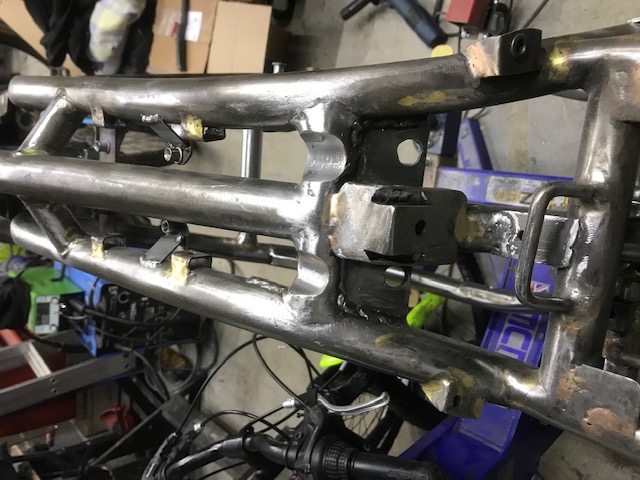
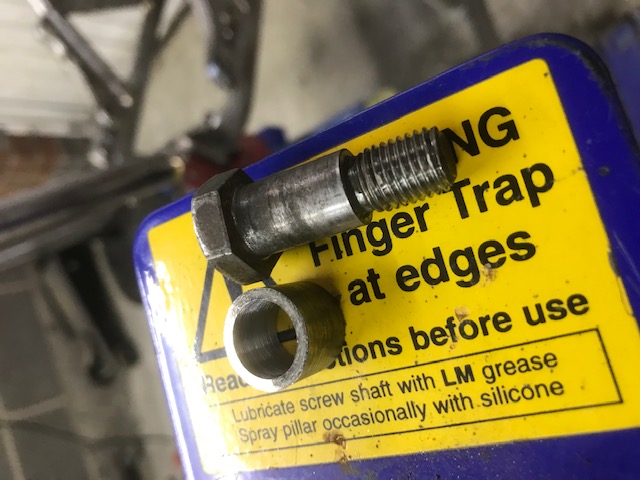
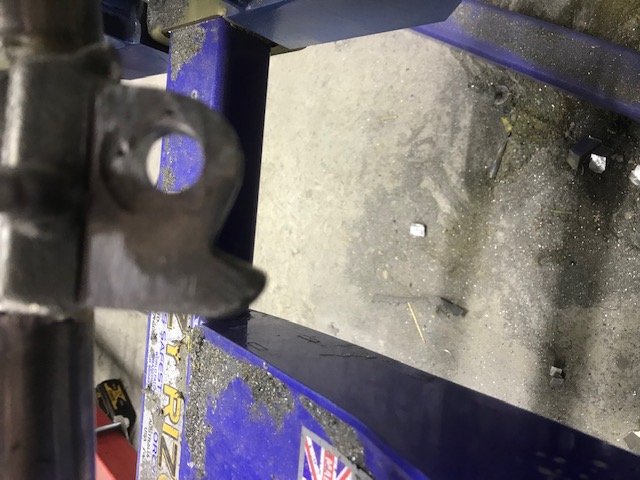
I put a couple of scallops in the cross tube on the frame for the wiring (originally the loom runs under this tube but now I have lifted the airbox it won't fit). The loom may of just fitted between the tube and the tank but I didn't want to find out it wouldn't fit after everything is painted and powder coated. Also as is common the mounting hole for the kick stand bolt was elongated so the bolt fitted "like a dick in a shirt sleeve" so I have sleeved it to be a much closer fit which has removed about 80% of the slop in the kick stand (the sleeve isn't a sloppy fit, I used a step drill to give the weld somewhere to go). Just need to sort a few brackets and the like and make some blanking plugs for the frame and it will be "off to the powder coater
1982 KZ1000 Ltd
www.kzrider.com/forum/11-projects/617631...-82-begins?start=192
kzrider.com/forum/faq-wiki/616810-electr...-fault-finding-guide
www.kzrider.com/forum/11-projects/617631...-82-begins?start=192
kzrider.com/forum/faq-wiki/616810-electr...-fault-finding-guide
The following user(s) said Thank You: MFP-Joe, calum, howardhb, Rolf1976_KZ900
Please Log in or Create an account to join the conversation.
- Saablord
-

- Offline
- User
-
Registered
- Posts: 266
- Thanks: 104
Re: And finally, Wookie's 82 begins !
22 Jan 2025 18:39
I found your project through your signature. Very nice build you have here (it makes it very hard to stay on the straight and narrow with my build hahaha).
You need some warm coveralls for those temperatures!
You need some warm coveralls for those temperatures!
The following user(s) said Thank You: Wookie58
Please Log in or Create an account to join the conversation.
- Scirocco
-
- Offline
- Premium Member
-

Registered
- Never change a running system
- Posts: 4397
- Thanks: 2262
Re: And finally, Wookie's 82 begins !
23 Jan 2025 16:17
Have to do the same sleave mod like you Wookie for my woobly side stand.
Nice job to the frame so far. Keep going, there is no bad weather only bad clothing.......

Nice job to the frame so far. Keep going, there is no bad weather only bad clothing.......
My 1975 Z 1 B 900 Project
www.kzrider.com/forum/11-projects/605133...ears-deep-sleep-mode
www.kzrider.com/forum/11-projects/605133...ears-deep-sleep-mode
The following user(s) said Thank You: Wookie58
Please Log in or Create an account to join the conversation.
- Wookie58
-
Topic Author
- Away
- Moderator
-
Registered
- Posts: 6605
- Thanks: 4171
Re: And finally, Wookie's 82 begins !
28 Jan 2025 11:43
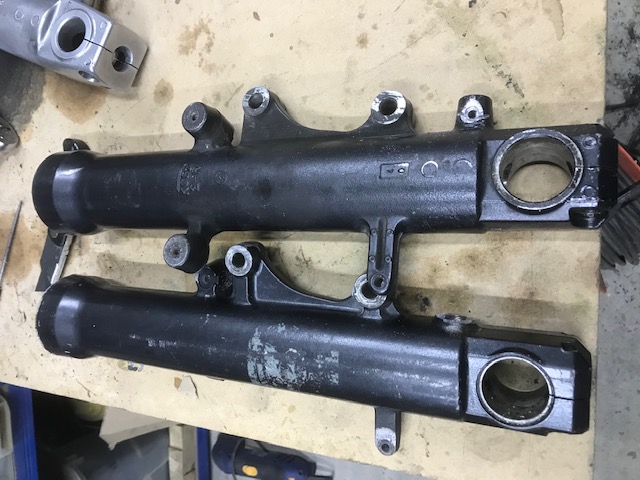
Things have definitely "turned a corner" in a good way this week the frame, wheels, rear spring and a box of small parts went to the powder coaters on Friday. He reckons 3-4 weeks as he has a lot on but that's not an issue as I have plenty to get on with (I did get quoted 7-10 days by another coater but for 40% more money  ). I have decided to celebrate by ordering all the seals, bearing, bushes etc required to overhaul my chassis components in the meantime. I started today with the forks (back to work tomorrow) I have a couple of things to do with these, I want to convert the rebound damping adjusters to being serviceable (I have had a little practice on one of the scrap 600 forks I bought for the tube extensions and it is definitely doable)
On another note my custom gauge faces turned up today and they are just what I wanted for sensible money so feeling really positive right now
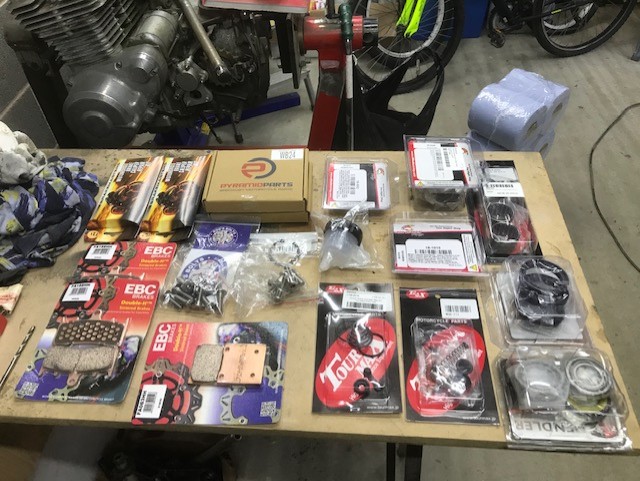

the frame, wheels, rear spring and a box of small parts went to the powder coaters on Friday. He reckons 3-4 weeks as he has a lot on but that's not an issue as I have plenty to get on with (I did get quoted 7-10 days by another coater but for 40% more money ). I have decided to celebrate by ordering all the seals, bearing, bushes etc required to overhaul my chassis components in the meantime. I started today with the forks (back to work tomorrow) I have a couple of things to do with these, I want to convert the rebound damping adjusters to being serviceable (I have had a little practice on one of the scrap 600 forks I bought for the tube extensions and it is definitely doable)On another note my custom gauge faces turned up today and they are just what I wanted for sensible money so feeling really positive right now
1982 KZ1000 Ltd
www.kzrider.com/forum/11-projects/617631...-82-begins?start=192
kzrider.com/forum/faq-wiki/616810-electr...-fault-finding-guide
www.kzrider.com/forum/11-projects/617631...-82-begins?start=192
kzrider.com/forum/faq-wiki/616810-electr...-fault-finding-guide
The following user(s) said Thank You: Injected, calum, howardhb, Rolf1976_KZ900, kimchella
Please Log in or Create an account to join the conversation.
- TexasKZ
-

- Offline
- Platinum Member
-

Registered
- Posts: 8302
- Thanks: 2741
Re: And finally, Wookie's 82 begins !
28 Jan 2025 15:25
Yeeeehaaaaw!!
1982 KZ1000 LTD parts donor
1981 KZ1000 LTD awaiting resurrection
2000 ZRX1100 not ridden enough
www.kzrider.com/forum/11-projects/620336...amateur-build-thread
1981 KZ1000 LTD awaiting resurrection
2000 ZRX1100 not ridden enough
www.kzrider.com/forum/11-projects/620336...amateur-build-thread
The following user(s) said Thank You: Wookie58
Please Log in or Create an account to join the conversation.
- Wookie58
-
Topic Author
- Away
- Moderator
-
Registered
- Posts: 6605
- Thanks: 4171
Re: And finally, Wookie's 82 begins !
08 Feb 2025 11:07
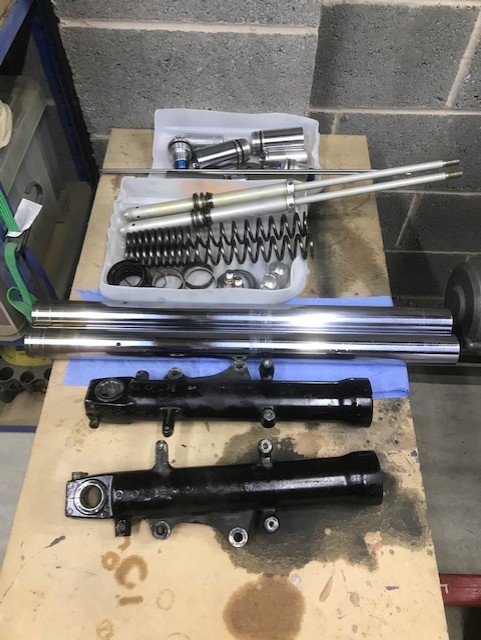
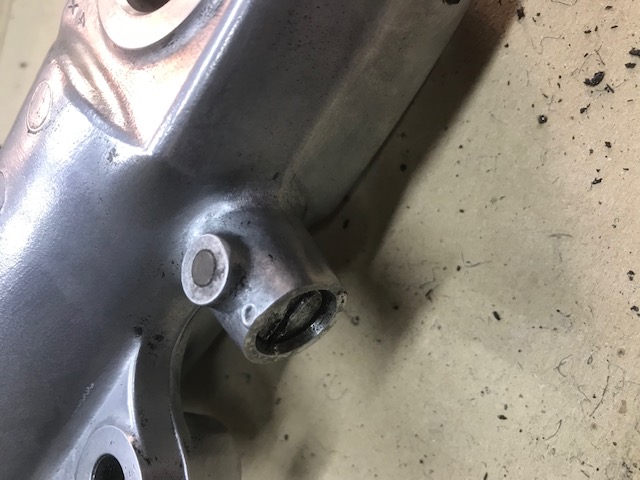
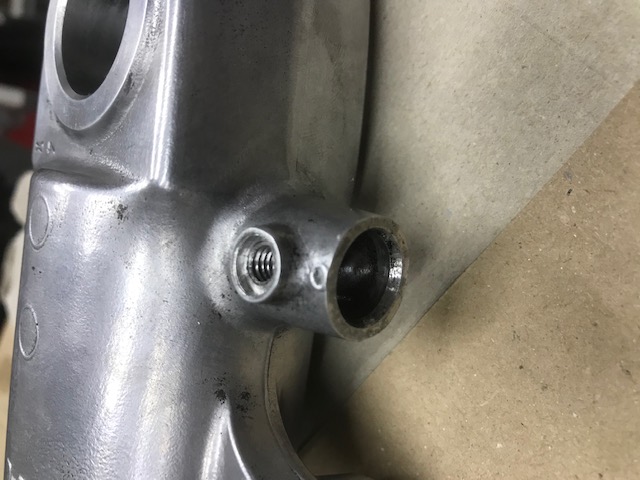
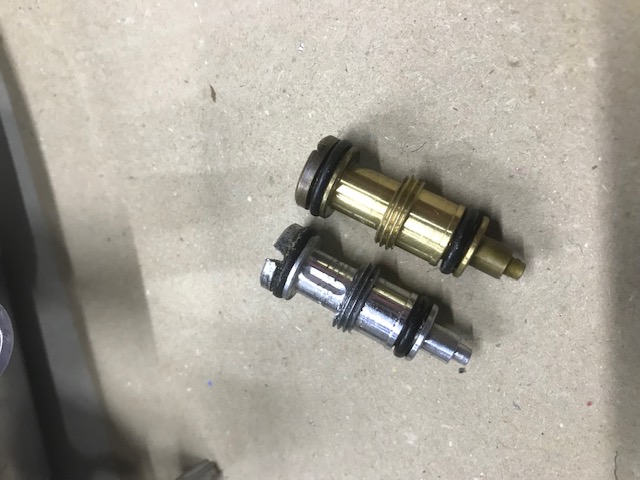
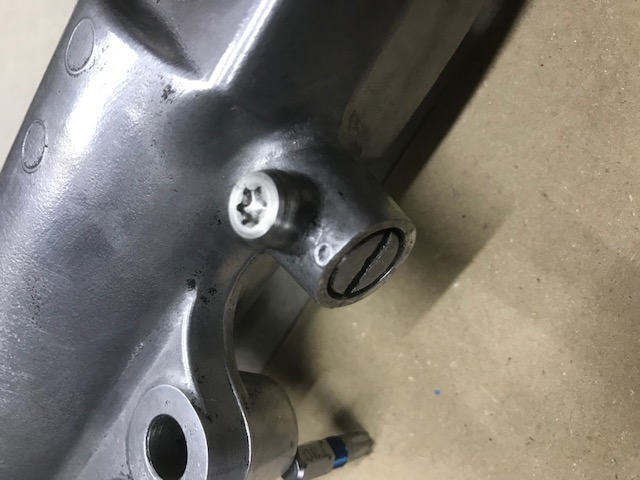
I have been cracking on with the forks over the last couple of days, first job was stripping the black paint (what a PITA) these bloody environmentalists have made paint stripper next to useless ("Nitromors" of old would have pulled it straight off !!!) then I moved on to the damper adjusters. I wanted these to be serviceable (they were quite stiff and one of the scrap 600 forks I have was seized solid) trying to free a seized one would be very difficult as the threaded part sits behind 2 "O" rings and obviously "heat" would be a no-no because of the seals. I had a practice on one of the 600 lowers which went to plan, drilled the factory plug (which is also a travel limiter that prevents the adjuster from coming out) then tapped it 4mm and used a bolt to pull the plug, removed the adjusted and sat smugly patting myself on the back.
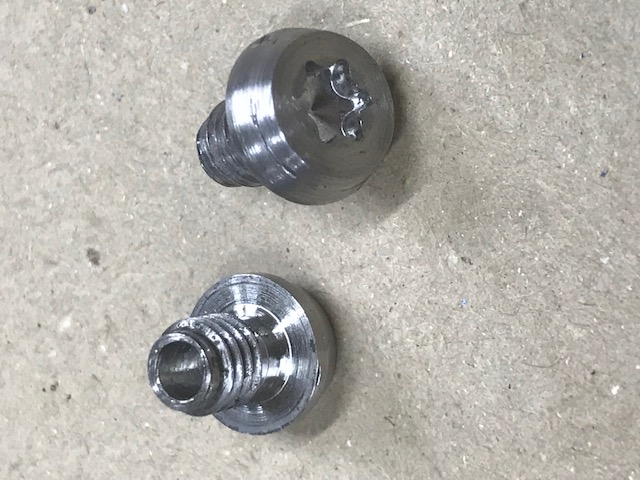
Next day full of confidence I started on the 900 forks that I am using, straight away it threw me a "curve ball" as the drill didn't feel right and made some strange noises !!!. Turns out the plug on the 900 houses a spring and ball bearing for a "click" function on the adjuster that the 600 doesn't have Now I could have used the 600 set up with no "de-tent" but thought I would give it a go !
First step was to tap the holes for the plugs at 6mm and add a rebate for an "O" ring. I then turned down some 6mm stainless bolts and drilled them to take a spring and ball bearing, turns out this worked exactly as intended so really happy.

Next day full of confidence I started on the 900 forks that I am using, straight away it threw me a "curve ball" as the drill didn't feel right and made some strange noises !!!. Turns out the plug on the 900 houses a spring and ball bearing for a "click" function on the adjuster that the 600 doesn't have
Now I could have used the 600 set up with no "de-tent" but thought I would give it a go ! First step was to tap the holes for the plugs at 6mm and add a rebate for an "O" ring. I then turned down some 6mm stainless bolts and drilled them to take a spring and ball bearing, turns out this worked exactly as intended so really happy.
1982 KZ1000 Ltd
www.kzrider.com/forum/11-projects/617631...-82-begins?start=192
kzrider.com/forum/faq-wiki/616810-electr...-fault-finding-guide
www.kzrider.com/forum/11-projects/617631...-82-begins?start=192
kzrider.com/forum/faq-wiki/616810-electr...-fault-finding-guide
The following user(s) said Thank You: ThatGPzGuy, Rolf1976_KZ900, kimchella
Please Log in or Create an account to join the conversation.
- Wookie58
-
Topic Author
- Away
- Moderator
-
Registered
- Posts: 6605
- Thanks: 4171
Re: And finally, Wookie's 82 begins !
08 Feb 2025 11:22
Staying with the forks I had checked the FSM ref disassembly and rebuilding as these are my first attempt at fully adjustable forks, here it referenced a OEM special tool for installing the bushes and seals, nice bit of kit but at $400 definitely not one for a "cheap Wookie" so head scratching time. I could find a couple of sources for 46mm ID pipe but my concern was pipe is "mass produced" and if slightly under 46mm it wouldn't fit over the tubes or would get stuck (both of which would be bad) so after a smoke and a coffee it hit me ! I have the lowers from those scrap 600 forks which are "tubes" and the right size. So after much hacking, turning and tweaking this is what I came up with, a main tube for tapping, a tube extension and separate fittings for the dished outer seal and the flat inner seal. I have re-fitted one of the old bushes in the inner seal fitting to drive the new bushes. Really happy with how these have come out
So to re-cap those bent 600 forks I bought for £25 have provided most of the material for the extensions - spare top caps with pre-load adjusters, practice piece for the damper adjuster conversion and a tool set for the seals and bushes - now that makes a cheap Wookie happy
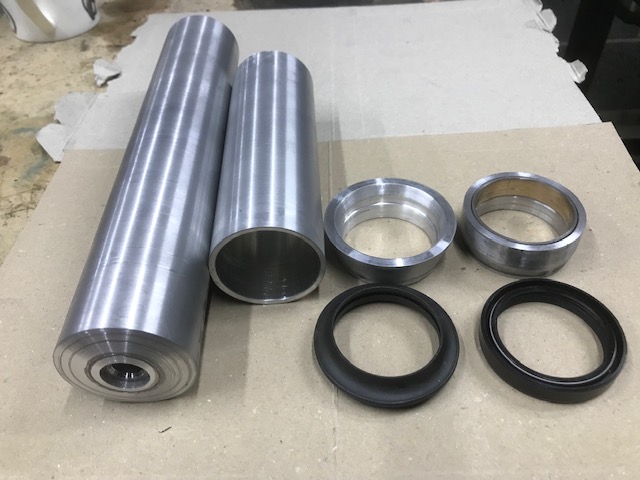
So to re-cap those bent 600 forks I bought for £25 have provided most of the material for the extensions - spare top caps with pre-load adjusters, practice piece for the damper adjuster conversion and a tool set for the seals and bushes - now that makes a cheap Wookie happy
1982 KZ1000 Ltd
www.kzrider.com/forum/11-projects/617631...-82-begins?start=192
kzrider.com/forum/faq-wiki/616810-electr...-fault-finding-guide
www.kzrider.com/forum/11-projects/617631...-82-begins?start=192
kzrider.com/forum/faq-wiki/616810-electr...-fault-finding-guide
The following user(s) said Thank You: MFP-Joe, sf4t7, Saablord, calum, howardhb, Rolf1976_KZ900, Quofan
Please Log in or Create an account to join the conversation.
- Rolf1976_KZ900
-
- Offline
- Sustaining Member
-
Registered
- Posts: 498
- Thanks: 261
Re: And finally, Wookie's 82 begins !
09 Feb 2025 01:32 - 09 Feb 2025 01:34
Nice work and smart ideas Wookie !! i use the plumber pipe and exhaust clamp sealdriver technique like in this video
Have you checked that when installing the oilseal that your driver only hit the outer part of the seal or will you make a chamfer ? im a little tired now in the morning so i can not figure it out. Are you going to use the old oil seal to drive in the new oil seal ?
Have you checked that when installing the oilseal that your driver only hit the outer part of the seal or will you make a chamfer ? im a little tired now in the morning so i can not figure it out. Are you going to use the old oil seal to drive in the new oil seal ?
Last edit: 09 Feb 2025 01:34 by Rolf1976_KZ900. Reason: spelling
The following user(s) said Thank You: Wookie58
Please Log in or Create an account to join the conversation.
- Wookie58
-
Topic Author
- Away
- Moderator
-
Registered
- Posts: 6605
- Thanks: 4171
Re: And finally, Wookie's 82 begins !
09 Feb 2025 02:20Nice work and smart ideas Wookie !! i use the plumber pipe and exhaust clamp sealdriver technique like in this video Looks like a good method
Have you checked that when installing the oilseal that your driver only hit the outer part of the seal or will you make a chamfer ? im a little tired now in the morning so i can not figure it out. Are you going to use the old oil seal to drive in the new oil seal ? The seal fittings for both seals sit correctly on the seals for this application, the fitting uses the old bush to drive the new as per the factory tool
1982 KZ1000 Ltd
www.kzrider.com/forum/11-projects/617631...-82-begins?start=192
kzrider.com/forum/faq-wiki/616810-electr...-fault-finding-guide
www.kzrider.com/forum/11-projects/617631...-82-begins?start=192
kzrider.com/forum/faq-wiki/616810-electr...-fault-finding-guide
The following user(s) said Thank You: Rolf1976_KZ900
Please Log in or Create an account to join the conversation.
- Rolf1976_KZ900
-
- Offline
- Sustaining Member
-
Registered
- Posts: 498
- Thanks: 261
Re: And finally, Wookie's 82 begins !
09 Feb 2025 02:52 - 09 Feb 2025 02:57But how will you get that oilseal further down in the forkleg Have you redused the outer diameter on the driver tool ?
Last edit: 09 Feb 2025 02:57 by Rolf1976_KZ900. Reason: adding text
Please Log in or Create an account to join the conversation.
- Wookie58
-
Topic Author
- Away
- Moderator
-
Registered
- Posts: 6605
- Thanks: 4171
Re: And finally, Wookie's 82 begins !
09 Feb 2025 10:22
The tool with the red ring is the larger tapered one for the outer dust seal, the one with the red arrows is a fraction smaller than the opening in the fork to allow it to fit inside to seat the bush and then the seal. The inner lip of the seal on the "driven" side of the seal is approx 0.5mm lower than the outer so a flat tool is fine (seal looks the same both sides but it isn't)
1982 KZ1000 Ltd
www.kzrider.com/forum/11-projects/617631...-82-begins?start=192
kzrider.com/forum/faq-wiki/616810-electr...-fault-finding-guide
www.kzrider.com/forum/11-projects/617631...-82-begins?start=192
kzrider.com/forum/faq-wiki/616810-electr...-fault-finding-guide
The following user(s) said Thank You: Rolf1976_KZ900, kimchella
Please Log in or Create an account to join the conversation.
Moderators: Street Fighter LTD