
fishnet stockings
- GP550kz
-
 Topic Author
- Offline
- User
-

Registered
- Posts: 19
- Thanks: 0
fishnet stockings
08 Apr 2006 20:22
Thought that might get your attention. Has anyone heard of using fishnets to create scales? If so how do i do it?
Please Log in or Create an account to join the conversation.
- mykznme
-
- Offline
- User
-
Registered
- Posts: 276
- Thanks: 1
Re: fishnet stockings
08 Apr 2006 21:31
i could give you a long how to or i could just link you to someone elses.
i think ill save my fingers;)
this should give you a pretty good idea.
hope it helps,
joe
www.novogate.com/exco/thread.php?forumid=8690&threadid=69807
i think ill save my fingers;)
this should give you a pretty good idea.
hope it helps,
joe
www.novogate.com/exco/thread.php?forumid=8690&threadid=69807
R.I.P. Odd Ivar
Please Log in or Create an account to join the conversation.
- btchalice
-
- Offline
- User
-
Registered
- Posts: 760
- Thanks: 7
Re: fishnet stockings
08 Apr 2006 22:25
or for those who dont want to regester to another forum i figured id cut and paste LGM graphics steps here
As requested I will do a step by step on a snakeskin graphic. I apologize for not having pictures but I don't have time to do another one just for a tutorial right now.
1. Prep your surface as required for the work.
2. Find a suitable scale like looking mask. Two good hints are either fishnet stockings or a hair net. You can find different sized weaves and openings. Fishnet stockings work a little better as the actual fabric weave is tighter, hair nets are knotted at every intersection and kind of look like a chain link fence.
3. Decide what you want your overall base color to be. For the guitar I did the snakeskin on I used purple. Base your project in that color.
3. Typically snake scales are more shades of the original base color. (some exceptions of course are snakes like coral snakes etc) So you will need a couple shades darker and lighter.
4. Stretch the stocking or hair net over your project. you can easily manipulate the material and have it look wavy or straight, depends on the look you're going for. I like the wavy look, it induces motion into the graphic. I tape all my edges down so that it is stretched over and less likely to move.
5. I like to start with my light color first, I freehand a pattern onto the project. Be sure to spray with your airbrush perpendicular to the surface, this will keep the stocking from moving on you. The pattern will look better if you make it symmetrical more or less. One thing to remember about snake skin is one scale = one color. You want your patterns to follow the pattern of the snake skin. If you don't follow the pattern, or if you let overspray onto the next "scales" to much it will look cartoonish. (the one I did suffers from this but there is a reason which I'll tell you about at the end)
6. Once you have your light color patterning done, move to the darkest shade, use this to outline the light pattern for a couple of "scale width's" apart.
7. Ok, now you have your basic snakeskin. However this will look pretty boring and lifeless if we leave it like this. The next step requires a thin transparent paint and a low air pressure.
8. I like to start with my highlights on this as they are harder to make show up bright. Pick one side to be a "light source" If your image is symettrical I like to make my light source appear like it's coming right down the middle to create some roundness on the graphic (afterall snakes are round aren't they)
Holding the airbrush very low and spraying directly across the top of the image will let paint magically fade beyond the height of the netting and highlight the far edges. Do this until you are happy with the amount of highlight, but don't overdo it.
9. Next using a transparent dark tone do the same thing from the opposite direction, this will build shadow. This is so important because a snake's scales are not flat, they are a convex curve.
10. Once you're happy with the highlights and shadows you can remove the netting. BE SURE YOU ARE HAPPY BEFORE YOU REMOVE THE NETTING THOUGH. You will never get the netting back on the exact same way if you aren't happy and you will have to touch everything up by hand.
Well, that's about it, clear it and you'll have a very cool and very simple graphic to do
Terry Meyer / Wichita KS
76 kz900 w/1000 motor TWZTD
I am not driving too fast, I'm flying too low.
76 kz900 w/1000 motor TWZTD
I am not driving too fast, I'm flying too low.
Please Log in or Create an account to join the conversation.
- kawtoy
-
- Offline
- User
-
Registered
- Posts: 806
- Thanks: 6
Re: fishnet stockings
09 Apr 2006 07:19
Make sure they fit tight. If they move even one mm then the paint job is ruined and you will have to start over. You will also need to do some highlighting with an airbrush to really get the effect you want. If you just paint the fishnet and leave it at that, it will look unfinished. Good luck!
Harley Davidson- Turning gas into noise without the harmful affects of horsepower for over 100 years.
Please Log in or Create an account to join the conversation.
- GP550kz
-
Topic Author
- Offline
- User
-
Registered
- Posts: 19
- Thanks: 0
Re: fishnet stockings
09 Apr 2006 17:31
Yea. That sounds way above my skill level. Maybe I can practice some and by winter I'll be ready. Thanks
Please Log in or Create an account to join the conversation.
- Jay_G
-
- Offline
- User
-
Registered
- Posts: 54
- Thanks: 0
Re: fishnet stockings
09 Apr 2006 21:54
Do you guys have any photos you could post up of this fishnet style? it sounds quite interesting
Please Log in or Create an account to join the conversation.
- mykznme
-
- Offline
- User
-
Registered
- Posts: 276
- Thanks: 1
Re: fishnet stockings
10 Apr 2006 04:38
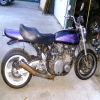
here is an example i pulled off google.
it isnt one of the best snakeskin jobs ive seen but its decent.

it isnt one of the best snakeskin jobs ive seen but its decent.
R.I.P. Odd Ivar
Please Log in or Create an account to join the conversation.
Moderators: Street Fighter LTD