
kz650c2 charging problem
- KZFreak
-
 Topic Author
- Offline
- Sustaining Member
-

Registered
- Posts: 20
- Thanks: 0
kz650c2 charging problem
04 Oct 2006 21:15
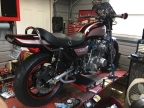
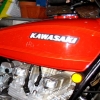
I recently bought a 1978 kz650c2 and it's pretty cherry. The only thing is, I'm getting voltage from the regulator, but when I plug the white wire with the red stripe back into the rest of the harness, no voltage goes into the battery. I've ohmed the wire from the regulator to the battery, and it checks out. The battery begins to lose voltage as soon as the key is turned on. Is this a short in the harness going to the handlebars, going to ground on the charging circuit? The bike runs pretty well when the battery is fully charged, but needs the carbs cleaned and synched. I'll post pics asap. Does anyone have an electrical schematic for this bike, or close to it? Much appreciated!
Shiny Side Up!!
Please Log in or Create an account to join the conversation.
- RetroRiceRocketRider
-

- Offline
- User
-

Registered
- ...bring in the machine that goes PING!
- Posts: 1641
- Thanks: 29
Re: kz650c2 charging problem
04 Oct 2006 21:33
Welcome to KZr KZFreak.
I'm not really good with electrical issues, but if you check in the filebase here on the site you'll find the wiring diagram for your bike:
Go to KZ Information at the top of the page,
select Filebase,
click on 1978,
then scroll down and select KZ650 B2/B2A (ignore the file directly above it of the KZ650 C2, it's only pics of the bike).
The diagram for the B2/C2 is located there, and downloadable as either a JPEG or PDF document so you can save it to your PC and print it out later if you want.")
I'm not really good with electrical issues, but if you check in the filebase here on the site you'll find the wiring diagram for your bike:
Go to KZ Information at the top of the page,
select Filebase,
click on 1978,
then scroll down and select KZ650 B2/B2A (ignore the file directly above it of the KZ650 C2, it's only pics of the bike).
The diagram for the B2/C2 is located there, and downloadable as either a JPEG or PDF document so you can save it to your PC and print it out later if you want.
Covina, So Calif!
78 KZ650-B2 = SOLD
84 ZN700 LTD = SOLD
84 ZX750 GPz = SOLD
89 GSX1100F Katana = SLEEPING
20 VN1700 Vulcan Vaquero (the Blue Cowboy)
Looking for my next project KZ
78 KZ650-B2 = SOLD
84 ZN700 LTD = SOLD
84 ZX750 GPz = SOLD
89 GSX1100F Katana = SLEEPING
20 VN1700 Vulcan Vaquero (the Blue Cowboy)
Looking for my next project KZ
Please Log in or Create an account to join the conversation.
- OKC_Kent
-
- Offline
- User
-
Registered
- Posts: 1719
- Thanks: 21
Re: kz650c2 charging problem
05 Oct 2006 01:27
KZFreak wrote:
Electrosport Fault Finding Diagram
Check the flowchart at the link in our Filebase and see if it helps you locate the charging problem. Make sure you start with a known good battery fully charged.
I recently bought a 1978 kz650c2 and it's pretty cherry. The only thing is, I'm getting voltage from the regulator, but when I plug the white wire with the red stripe back into the rest of the harness, no voltage goes into the battery. I've ohmed the wire from the regulator to the battery, and it checks out. The battery begins to lose voltage as soon as the key is turned on. Is this a short in the harness going to the handlebars, going to ground on the charging circuit? The bike runs pretty well when the battery is fully charged, but needs the carbs cleaned and synched. I'll post pics asap. Does anyone have an electrical schematic for this bike, or close to it? Much appreciated!
Electrosport Fault Finding Diagram
Check the flowchart at the link in our Filebase and see if it helps you locate the charging problem. Make sure you start with a known good battery fully charged.
Cashion, OK
78 KZ650 B2 85,000+ miles
78 KZ650 B2 85,000+ miles
Please Log in or Create an account to join the conversation.
- rstnick
-

- Offline
- Premium Member
-

Registered
- Posts: 4665
- Thanks: 564
Re: kz650c2 charging problem
05 Oct 2006 09:27
Welcome KZFreak. We'd love to see pics of your cerry 650!
Hope you figure out the charging problem. Could it be your battery is toast?
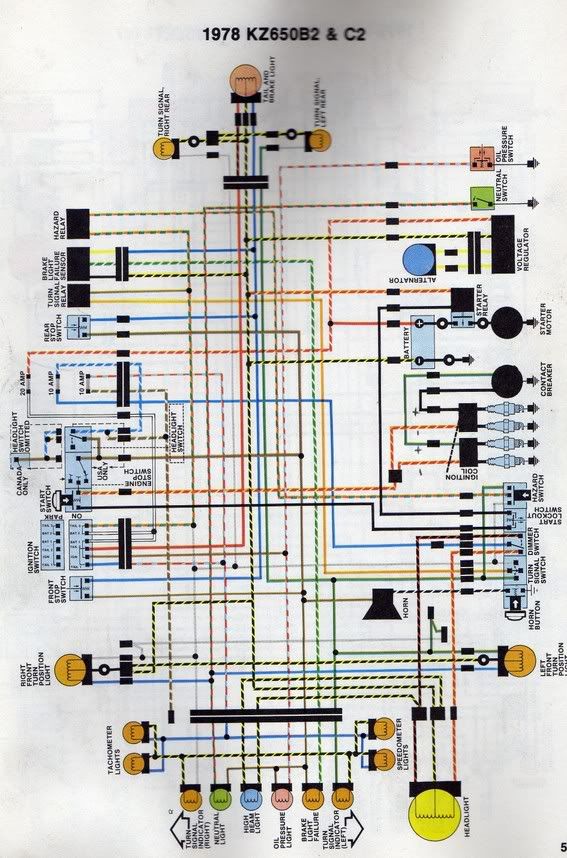
Here's a C2 wiring dia:
Post edited by: rstnick, at: 2006/10/05 12:28
Hope you figure out the charging problem. Could it be your battery is toast?
Here's a C2 wiring dia:
Post edited by: rstnick, at: 2006/10/05 12:28
Rob
CANADA
Need a key for your Kawasaki? PM me
1978 KZ650 C2, 130K kms, Delkevic ex, EI, CVK32, PMC easy clutch, ATK fork brace, steering damper, braced swingarm, ZRX shocks, 18" Z1R front wheel.
2000 ZRX1100
2011 Ninja 250R - Wife's
2005 z750s
1978 KZ1000 project
1983 KZ1000R2
CANADA
Need a key for your Kawasaki? PM me
1978 KZ650 C2, 130K kms, Delkevic ex, EI, CVK32, PMC easy clutch, ATK fork brace, steering damper, braced swingarm, ZRX shocks, 18" Z1R front wheel.
2000 ZRX1100
2011 Ninja 250R - Wife's
2005 z750s
1978 KZ1000 project
1983 KZ1000R2
Please Log in or Create an account to join the conversation.
- godsjester71
-

- Offline
- User
-
Registered
- Posts: 142
- Thanks: 1
Re: kz650c2 charging problem
05 Oct 2006 09:47
this should probably be moved to theElectrical area? We dont want to be poluting our normally scheduled frivolous derailment with this serious stuff. ")
Please Log in or Create an account to join the conversation.
- KZFreak
-
Topic Author
- Offline
- Sustaining Member
-
Registered
- Posts: 20
- Thanks: 0
Re: kz650c2 charging problem
05 Oct 2006 10:19
Hey, thanks for all the immediate help and interest, y'all. The schematic will help for sure, as I have yet to buy a manual. It's been awhile since I owned, or worked on, a motorcycle, but it's like riding a bicycle. You just have to remember to put your feet down before you fall over, right? Again, thanks from the Lone Star State! Y'all ROCK! Oh, the battery is brand new and I had it load tested. I charged it on 2A setting for probably 10 hours right after I bought the bike, and it took awhile for it to run down while running the machine, so I think it's fine. Hopefully I'll find another wire that got stripped by accident, like I did on the starter switch circuit. I'll post pics as soon as I can get it back together. Peace!
Shiny Side Up!!
Please Log in or Create an account to join the conversation.
- KZFreak
-
Topic Author
- Offline
- Sustaining Member
-
Registered
- Posts: 20
- Thanks: 0
Re: kz650c2 charging problem
06 Oct 2006 11:36
Hey,y'all. Forgot to mention that someone installed a Dyna S electronic ignition in this thing and did a pretty bad job of terminating the connections. I downloaded instructions from Dynatek and I'm about to dive into the wiring. Gotta charge the battery first, though! I'll be hollerin' if I get into any trouble, but I think I can handle it. The schematic I was directed to answered a bunch of questions for me... THANKS! Peace.
Shiny Side Up!!
Please Log in or Create an account to join the conversation.
- rstnick
-
- Offline
- Premium Member
-
Registered
- Posts: 4665
- Thanks: 564
Re: kz650c2 charging problem
07 Oct 2006 19:52
This may be of some help, if it'll attach:
KZ650 / Z650
DYNA S IGNITION SYSTEM TESTING
INSPECTION
Check that the rotor is not rubbing the modules or the wiring. Turn the rotor to the advanced position and release. It should snap back crisply. Check when motor is cold and again when hot. Make a timing mark on the case and Dyna S plate. Remove the Dyna S and check that the advancer is not rubbing the plate.
Inspect the cable for burned or pinched sections. Firmly pull on all splices and crimp terminals. Check that coil connections are tight and clean. Install split lock washers on screws.
Remove spark plug wires and inspect for corroded terminals and cracked insulation. Connect an ohmmeter to each end and gently pull and twist the wire to check for breaks. Check the spark plugs. Replace if excessively fouled - do not clean.
VOLTAGE TEST
First check the primary resistance of the ignition coils. They should be at least 3 ohms (remember to subtract the resistance of the meter leads). Replace coils that read an open or shorted primary before proceeding.
Rotate the motor so that the magnet in the rotor is pointing away from the modules. Turn on the ignition and measure the voltage between ground and coil (+). A reading of about 1 volt less than battery voltage is normal due to resistance in the wiring.
If the voltage is much lower, check for voltage drops across any switches, splices, connectors, circuit breakers, etc, that feed power to the coils. Do not leave the ignition on for more than about 5 minutes when doing this test as the coils may overheat and become damaged.
Measure the voltage between each coil (-) terminal and ground. This should measure in the range of 0.8 to 1.4 volts when the magnet is pointed away from the modules.
Rotate the motor until the magnet points at the sensor (the sensors located behind the raised rib on the face of the module). The voltage should go up to approx. the battery voltage. This indicates the module is switching on and off and is probably OK.
If the voltage stays low, check that the gap between the rotor and sensor is in the range of 0.025” to 0.040”. Gaps larger than 0.040” may cause the module not to switch. The voltage will also stay low if the output is shorted.
If the voltage stays high all the time, check that the mounting plate has a solid ground and that there is power going to the modules. If this is OK, then the module may be bad.
OHMMETER TEST
Disconnect to Dyna S wires from the coils. Connect the negative ohmmeter lead to the mounting plate and the positive lead to one of the coil negative ( - ) wires. This should read open (infinite ohms) on all ranges. Any other reading indicates damaged output. If the meter has diode test, the leads can be reversed and a diode drop of 0.5 to 0.6 volts will be read.
Note: Many low cost ohmmeters reverse the polarity of the leads inside the meter. This will cause false bad readings due to the resistance of the reverse diode described above.
Do not attempt to ohm between any other points, or with power applied to the module. Due to component tolerances, differences in meters. etc., these readings will vary greatly and are not reliable measurement.
COIL TEST
Remove all wire from the coils. Measure the primary resistance between tire(wire?) screw terminals. Measure the secondary resistance between the high voltage outputs. For single output coils measure the resistance between the high voltage output and either one of the screw terminals.
Accurate measurement of the primary resistance requires a good quality ohmmeter with a low ohms range. Readings will vary slightly from those listed below depending on the quality of the meter and the resistance of the meter leads. Damaged coils will typically have significantly different readings - open or shorted on the primary or secondary.
PRIMARY SECONDARY
RESISTANCE RESISTANCE
DC1-1 2.9- 3.2 ohms 13.5K - 14.5K
DC3-1 2.9- 3.2 ohms 13.5K - 14.5K
DC6-1 3.2-3.7 ohms 11.0K - 12.0K
DC7-1 4.8-5.2 ohms 17.0K - 18.0K
DC8-1 4.8-5.2 ohms 17.0K - 18.0K
DC10-1 4.8-5.2 ohms 13.5K - 14.5K
REPAIR
The Dyna S ignition is not user serviceable and must be returned to the factory for repair. Do not cut off the cable, remove the modules, or attempt to service as this may substantially increase the repair cost and / or void the warranty.
Post edited by: rstnick, at: 2006/10/07 23:02
Rob
CANADA
Need a key for your Kawasaki? PM me
1978 KZ650 C2, 130K kms, Delkevic ex, EI, CVK32, PMC easy clutch, ATK fork brace, steering damper, braced swingarm, ZRX shocks, 18" Z1R front wheel.
2000 ZRX1100
2011 Ninja 250R - Wife's
2005 z750s
1978 KZ1000 project
1983 KZ1000R2
CANADA
Need a key for your Kawasaki? PM me
1978 KZ650 C2, 130K kms, Delkevic ex, EI, CVK32, PMC easy clutch, ATK fork brace, steering damper, braced swingarm, ZRX shocks, 18" Z1R front wheel.
2000 ZRX1100
2011 Ninja 250R - Wife's
2005 z750s
1978 KZ1000 project
1983 KZ1000R2
Please Log in or Create an account to join the conversation.
Moderators: Street Fighter LTD