
1978 KZ1000 LTD - Charging System Troubleshooting
- SWest
-
- Offline
- Sustaining Member
-

Registered
- 10 22 2014
- Posts: 23779
- Thanks: 3045
Re: 1978 KZ1000 LTD - Charging System Troubleshooting
14 Jul 2026 21:38
What are you getting on each leg of the stator?
Z1b1000 1975 Z1b
kzrider.com/forum/11-projects/598262-kz-...-will-it-live#672882
kzrider.com/forum/2-engine/597654-poser?start=240#704229
kzrider.com/forum/11-projects/598262-kz-...-will-it-live#672882
kzrider.com/forum/2-engine/597654-poser?start=240#704229
Please Log in or Create an account to join the conversation.
- BlueKZ_3
-
 Topic Author
- Offline
- User
-

Registered
- Posts: 17
- Thanks: 1
Re: 1978 KZ1000 LTD - Charging System Troubleshooting
17 Jul 2026 14:10 - 17 Jul 2026 14:22
So here are the back probing measurements I took. I took two sets of measurements- one while the bike was warming up and the choke was on, and one when the bike was warm and the choke was off.
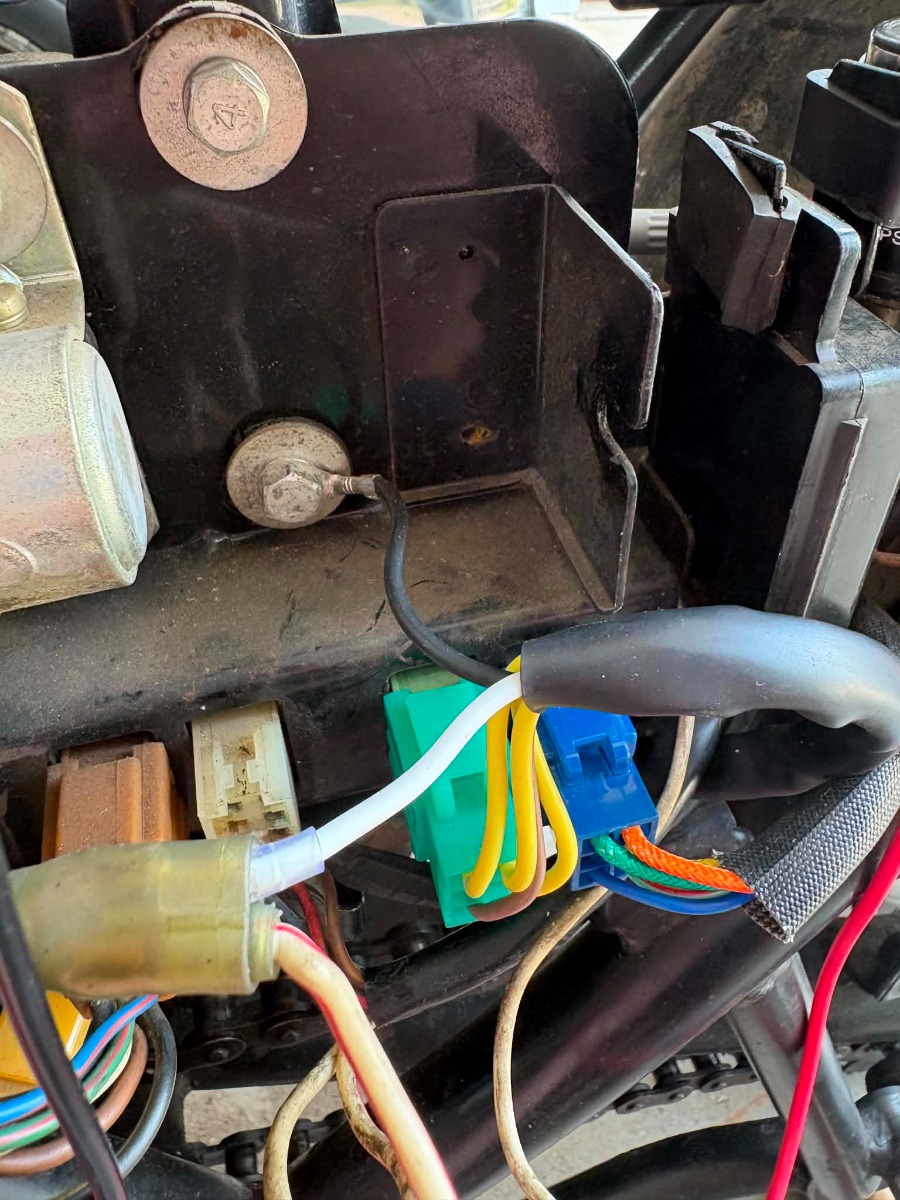
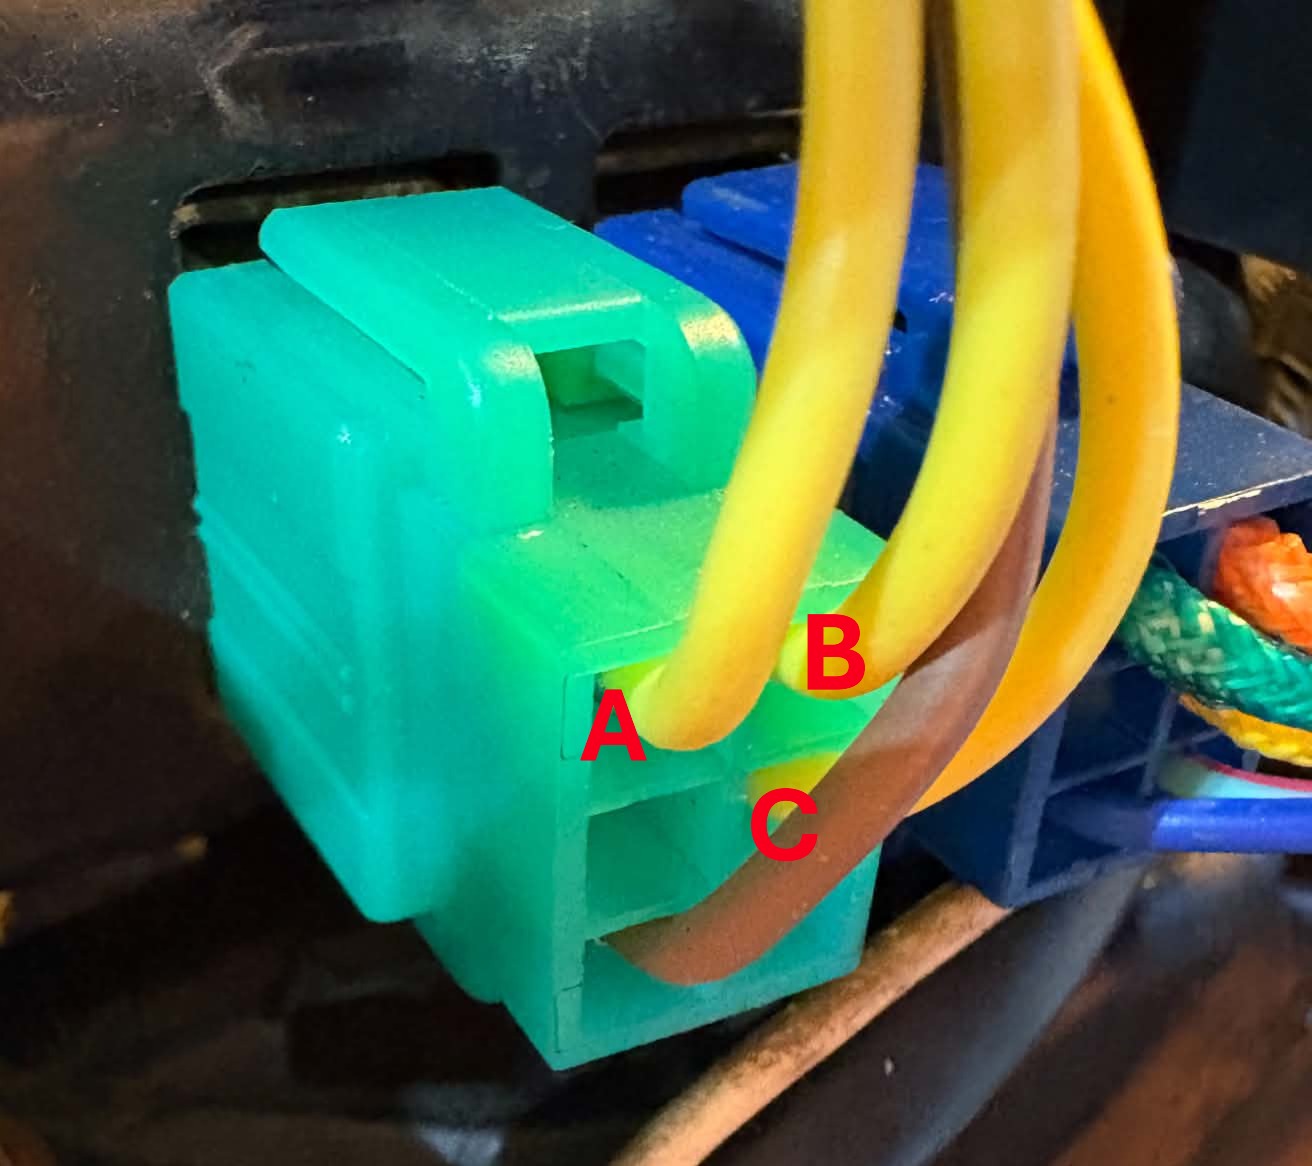
This is what my regulator/rectifier connections look like for reference:
Starting Battery Voltage: 13.04 V
AC VOLTAGE: WARMING UP / CHOKE ON
A/B Voltage at Idle: ~2.2 V
A/B Voltage at 3k RPM: ~0.430 V
A/C Voltage at Idle: ~2.7 V
A/C Voltage at 3k RPM: ~1.3 V
B/C Voltage at Idle: ~0.450 V
B/C Voltage at 3k RPM: ~0.480 V
AC VOLTAGE: WARM / CHOKE OFF
A/B Voltage at Idle: ~0.432 V
A/B Voltage at 3k RPM: ~0.430 V
A/C Voltage at Idle: ~0.443 V
A/C Voltage at 3k RPM: ~0.435
B/C Voltage at Idle: ~0.472 V
B/C Voltage at 3k RPM: ~0.488 V
A weird thing I noticed while the choke was on, measuring A/B: The AC voltage would drop from ~2.2 V to ~0.430 V, then stay low around that 0.430 V even after returning to idle. But if I fiddled with the choke by turning it almost off then back on again, the idle voltage would jump back up to that 2.2 V. The A/C measurement did something similar.
DC VOLTAGE: WARMING UP / CHOKE ON
Battery Voltage: 12.05 V
(+) Terminal and White Wire: 0.086 V
(+) Terminal and Brown Wire: 1.6 V
(-) Terminal and Black Wire: 2.8 V
DC VOLTAGE: WARM / CHOKE OFF
Battery Voltage: 11.74 V
(+) Terminal and White Wire: 0.081 V
(+) Terminal and Brown Wire: 1.5 V
(-) Terminal and Black Wire: 3.5 V
The DC voltage measurements for the brown and black wires are concerning.
Battery Voltage after Engine Killed: 11.48 V
Bike wasn't able to start again after I turned the engine off. After cranking a few times, the battery voltage dropped to 10.3 V.
This is what my regulator/rectifier connections look like for reference:
Starting Battery Voltage: 13.04 V
AC VOLTAGE: WARMING UP / CHOKE ON
A/B Voltage at Idle: ~2.2 V
A/B Voltage at 3k RPM: ~0.430 V
A/C Voltage at Idle: ~2.7 V
A/C Voltage at 3k RPM: ~1.3 V
B/C Voltage at Idle: ~0.450 V
B/C Voltage at 3k RPM: ~0.480 V
AC VOLTAGE: WARM / CHOKE OFF
A/B Voltage at Idle: ~0.432 V
A/B Voltage at 3k RPM: ~0.430 V
A/C Voltage at Idle: ~0.443 V
A/C Voltage at 3k RPM: ~0.435
B/C Voltage at Idle: ~0.472 V
B/C Voltage at 3k RPM: ~0.488 V
A weird thing I noticed while the choke was on, measuring A/B: The AC voltage would drop from ~2.2 V to ~0.430 V, then stay low around that 0.430 V even after returning to idle. But if I fiddled with the choke by turning it almost off then back on again, the idle voltage would jump back up to that 2.2 V. The A/C measurement did something similar.
DC VOLTAGE: WARMING UP / CHOKE ON
Battery Voltage: 12.05 V
(+) Terminal and White Wire: 0.086 V
(+) Terminal and Brown Wire: 1.6 V
(-) Terminal and Black Wire: 2.8 V
DC VOLTAGE: WARM / CHOKE OFF
Battery Voltage: 11.74 V
(+) Terminal and White Wire: 0.081 V
(+) Terminal and Brown Wire: 1.5 V
(-) Terminal and Black Wire: 3.5 V
The DC voltage measurements for the brown and black wires are concerning.
Battery Voltage after Engine Killed: 11.48 V
Bike wasn't able to start again after I turned the engine off. After cranking a few times, the battery voltage dropped to 10.3 V.
Last edit: 17 Jul 2026 14:22 by BlueKZ_3. Reason: My data tables did not format :(
Please Log in or Create an account to join the conversation.
- SWest
-
- Offline
- Sustaining Member
-
Registered
- 10 22 2014
- Posts: 23779
- Thanks: 3045
Re: 1978 KZ1000 LTD - Charging System Troubleshooting
17 Jul 2026 15:51
Run the bike with a charged battery. Check a/c voltage on the yellow wires unconnected to the bike. Test them one to the other in turn. They should read 40-50 v a/c at idle then above 70V a/c at high rpm. Then test each yellow wire to case to check for a short. If one is shorted one leg won't charge and keep the battery charged. Looking at the pics the Blue connector is where you should be testing. Orange, green and yellow go to the stator that's where you test running to check output. Hope you aren't using a Caltric R/R for they are Chinese junk.
 It could be sucking all the power the stator is putting out.
Z1b1000 1975 Z1b
kzrider.com/forum/11-projects/598262-kz-...-will-it-live#672882
kzrider.com/forum/2-engine/597654-poser?start=240#704229
kzrider.com/forum/11-projects/598262-kz-...-will-it-live#672882
kzrider.com/forum/2-engine/597654-poser?start=240#704229
Please Log in or Create an account to join the conversation.
- F64
-
- Offline
- User
-
Registered
- 81-KZ440D2
- Posts: 1233
- Thanks: 450
Re: 1978 KZ1000 LTD - Charging System Troubleshooting
17 Jul 2026 16:40
i'll chime in within a couple of hours.
right off the bat
your reg/rec is not getting any AC voltage from your rotor/stator
your ground wire to your reg/rec has too much resistance on it
your brown(sense wire) wire has too much resistance on it.
your charging system is not working.
right off the bat
your reg/rec is not getting any AC voltage from your rotor/stator
your ground wire to your reg/rec has too much resistance on it
your brown(sense wire) wire has too much resistance on it.
your charging system is not working.
81-KZ440-D2.
Louis Dudzik's GM HEI ignitor conversion installed 2015 s3.amazonaws.com/gpzweb/Ignition/GPZgmHEImod.html
Motogadget m-unit blue installed 2017.
LIC, NY
Louis Dudzik's GM HEI ignitor conversion installed 2015 s3.amazonaws.com/gpzweb/Ignition/GPZgmHEImod.html
Motogadget m-unit blue installed 2017.
LIC, NY
The following user(s) said Thank You: Wookie58
Please Log in or Create an account to join the conversation.
- SWest
-
- Offline
- Sustaining Member
-
Registered
- 10 22 2014
- Posts: 23779
- Thanks: 3045
Re: 1978 KZ1000 LTD - Charging System Troubleshooting
17 Jul 2026 19:02 - 17 Jul 2026 19:03I thought I said thati'll chime in within a couple of hours.
right off the bat
your reg/rec is not getting any AC voltage from your rotor/stator
your ground wire to your reg/rec has too much resistance on it
your brown(sense wire) wire has too much resistance on it.
your charging system is not working.

Z1b1000 1975 Z1b
kzrider.com/forum/11-projects/598262-kz-...-will-it-live#672882
kzrider.com/forum/2-engine/597654-poser?start=240#704229
kzrider.com/forum/11-projects/598262-kz-...-will-it-live#672882
kzrider.com/forum/2-engine/597654-poser?start=240#704229
Last edit: 17 Jul 2026 19:03 by SWest.
Please Log in or Create an account to join the conversation.
- F64
-
- Offline
- User
-
Registered
- 81-KZ440D2
- Posts: 1233
- Thanks: 450
Re: 1978 KZ1000 LTD - Charging System Troubleshooting
17 Jul 2026 21:32
and.....i accidetally erased everything i just typed.
which reg/rec did you buy?
disconnect the green reg/rec connector and take a picture of the bike's connector (not the reg/rec side of the connector).
I want to see the condition of the terminals.
do a quick meter test
meter on DC V
ignition key on
kill switch"run"
headlight on
motor not running
black probe on negative battery post
red probe on ring terminal in red circle( not on the bolt)
what is your voltage?
should be 0.0v dc
move your red probe to a bare metal part of the engine block
should be 0.0v dc as well
turn off bike.
that brown wire may also need a jumper going to a 12v+ source to overcome the high resistance.
It will need to be fused though.
i have to work the next few days
Wookie will chime in
and also SWest can help you with his stator tests mentioned above.
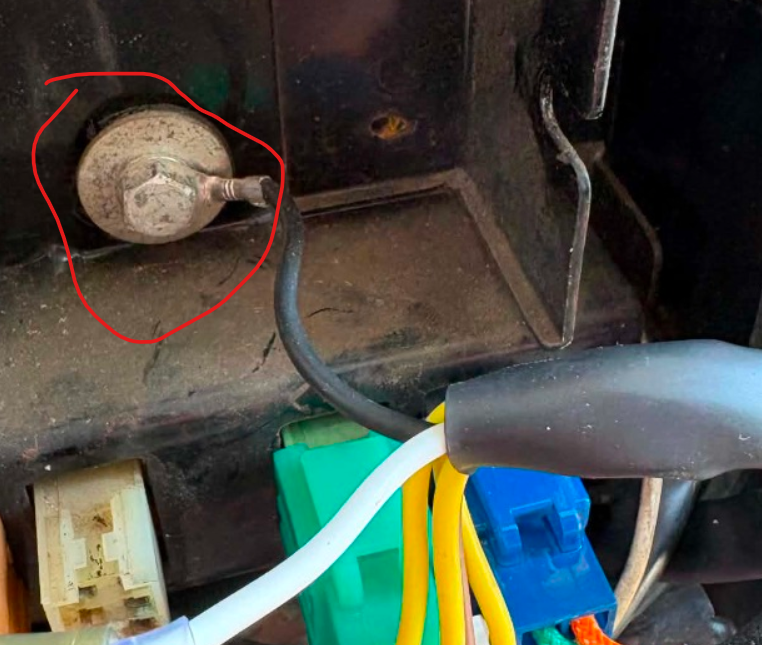
which reg/rec did you buy?
disconnect the green reg/rec connector and take a picture of the bike's connector (not the reg/rec side of the connector).
I want to see the condition of the terminals.
do a quick meter test
meter on DC V
ignition key on
kill switch"run"
headlight on
motor not running
black probe on negative battery post
red probe on ring terminal in red circle( not on the bolt)
what is your voltage?
should be 0.0v dc
move your red probe to a bare metal part of the engine block
should be 0.0v dc as well
turn off bike.
that brown wire may also need a jumper going to a 12v+ source to overcome the high resistance.
It will need to be fused though.
i have to work the next few days
Wookie will chime in
and also SWest can help you with his stator tests mentioned above.
81-KZ440-D2.
Louis Dudzik's GM HEI ignitor conversion installed 2015 s3.amazonaws.com/gpzweb/Ignition/GPZgmHEImod.html
Motogadget m-unit blue installed 2017.
LIC, NY
Louis Dudzik's GM HEI ignitor conversion installed 2015 s3.amazonaws.com/gpzweb/Ignition/GPZgmHEImod.html
Motogadget m-unit blue installed 2017.
LIC, NY
The following user(s) said Thank You: SWest, Wookie58
Please Log in or Create an account to join the conversation.
- BlueKZ_3
-
Topic Author
- Offline
- User
-
Registered
- Posts: 17
- Thanks: 1
Re: 1978 KZ1000 LTD - Charging System Troubleshooting
18 Jul 2026 20:31
I bought
this
reg/rec.
Here is the bike side connector:
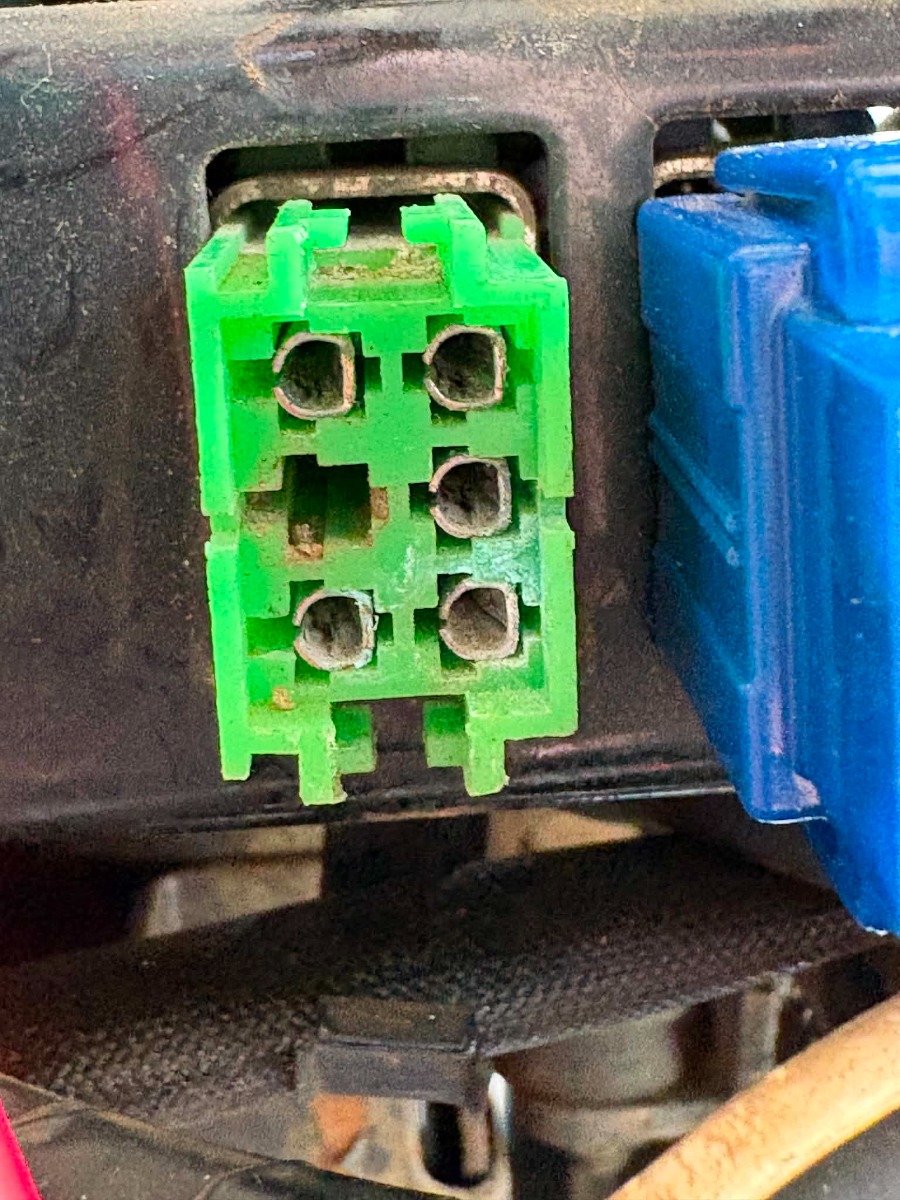
With the ignition on, killswitch on run, headlight on, and motor off:
I measured the DC voltage between the negative post and the black wire's ring terminal to be 11.90 V
and the DC voltage between the negative post and the engine case to be 0.01 V
I'm not sure if the bolt I chose to ground the black wire to is actually a good spot, but that's about all the wire could reach. The original unit's ground wire was much longer.
Moving on, I took AC voltage measurements directly in the bike's green terminal, with the reg/rec unplugged. I assumed this is what was meant by "yellow wires unconnected to the bike", let me know if I'm wrong.
A/B at Idle: ~21 V
A/B at 3k RPM: ~46 V
A/C at Idle: ~22 V
A/C at 3k RPM: ~44 V
B/C at Idle: ~22 V
B/C at 3k RPM: ~44 V
And then from the terminals to the engine case:
A: ~11.3 V
B: ~12.0 V
C: ~11.3 V
After that, I started to backprobe the alternator's blue connector but the bike died, so I will have to finish that part after the bike is charged again.
Here is the bike side connector:
With the ignition on, killswitch on run, headlight on, and motor off:
I measured the DC voltage between the negative post and the black wire's ring terminal to be 11.90 V
and the DC voltage between the negative post and the engine case to be 0.01 V
I'm not sure if the bolt I chose to ground the black wire to is actually a good spot, but that's about all the wire could reach. The original unit's ground wire was much longer.
Moving on, I took AC voltage measurements directly in the bike's green terminal, with the reg/rec unplugged. I assumed this is what was meant by "yellow wires unconnected to the bike", let me know if I'm wrong.
A/B at Idle: ~21 V
A/B at 3k RPM: ~46 V
A/C at Idle: ~22 V
A/C at 3k RPM: ~44 V
B/C at Idle: ~22 V
B/C at 3k RPM: ~44 V
And then from the terminals to the engine case:
A: ~11.3 V
B: ~12.0 V
C: ~11.3 V
After that, I started to backprobe the alternator's blue connector but the bike died, so I will have to finish that part after the bike is charged again.
Please Log in or Create an account to join the conversation.
- F64
-
- Offline
- User
-
Registered
- 81-KZ440D2
- Posts: 1233
- Thanks: 450
Re: 1978 KZ1000 LTD - Charging System Troubleshooting
19 Jul 2026 04:58
i'll just comment on your ground wire.
the black ground wire ring terminal has to be in direct contact to shiny metal.
it looks like you have a rubber insulator on that bolt..
your engine block has a very good ground connection as evidence by your meter reading.
you want that ring terminal to have at least that same 0.01v dc reading.
grab your meter
DC V
ignition key on
kill switch to "RUN"
headlight on
motor not running
black probe on battery negative
red probe on shiny metal near your current ring terminal mount
you could use the same bolt but you will have to remove the rubber washer and sand the paint under the bolt.
the bolt and ring terminal need to have direct contact with shiny metal
check the ring terminal with the red probe until you get 0.0V DC
you could also sand another area and put a new bolt or screw for that ring terminal.
you could always extend the ground wire to reach the original location.. just make sure to test with meter after you install the ground wire.
turn off bike and charge battery
you will also need to clean the corrosion on the green connector terminals.
The other members here can help you with that.
the black ground wire ring terminal has to be in direct contact to shiny metal.
it looks like you have a rubber insulator on that bolt..
your engine block has a very good ground connection as evidence by your meter reading.
you want that ring terminal to have at least that same 0.01v dc reading.
grab your meter
DC V
ignition key on
kill switch to "RUN"
headlight on
motor not running
black probe on battery negative
red probe on shiny metal near your current ring terminal mount
you could use the same bolt but you will have to remove the rubber washer and sand the paint under the bolt.
the bolt and ring terminal need to have direct contact with shiny metal
check the ring terminal with the red probe until you get 0.0V DC
you could also sand another area and put a new bolt or screw for that ring terminal.
you could always extend the ground wire to reach the original location.. just make sure to test with meter after you install the ground wire.
turn off bike and charge battery
you will also need to clean the corrosion on the green connector terminals.
The other members here can help you with that.
81-KZ440-D2.
Louis Dudzik's GM HEI ignitor conversion installed 2015 s3.amazonaws.com/gpzweb/Ignition/GPZgmHEImod.html
Motogadget m-unit blue installed 2017.
LIC, NY
Louis Dudzik's GM HEI ignitor conversion installed 2015 s3.amazonaws.com/gpzweb/Ignition/GPZgmHEImod.html
Motogadget m-unit blue installed 2017.
LIC, NY
Please Log in or Create an account to join the conversation.
- Kelly E
-
- Offline
- User
-
Registered
- Never Give Up. Never Surrender
- Posts: 572
- Thanks: 477
Re: 1978 KZ1000 LTD - Charging System Troubleshooting
21 Jul 2026 10:43
I clean connectors with battery terminal cleaner spray. Use gloves and hold the connector in a rag and spray the cleaner into it. It turns into yellow foam, let it soak for a minute. Rinse with non-clorinated brake cleaner and blow it dry with air.
When we resurrect a bike we do this to every connector on the bike.
When we resurrect a bike we do this to every connector on the bike.
The Rust Bros. Garage Collection
1974 Honda CB 550 K0
1975 Honda CB 400F Super Sport
1977 Kawasaki KZ 1000 LTD
1978 Kawasaki KL 250
1980 Suzuki GS 1100E
1983 Honda CB 1100F
1984 Honda Sabre 700
1984 Honda Interceptor 1000
1990 Moto Guzzi 1000
1994 Kawasaki ZG 1000 Concours
And more
1974 Honda CB 550 K0
1975 Honda CB 400F Super Sport
1977 Kawasaki KZ 1000 LTD
1978 Kawasaki KL 250
1980 Suzuki GS 1100E
1983 Honda CB 1100F
1984 Honda Sabre 700
1984 Honda Interceptor 1000
1990 Moto Guzzi 1000
1994 Kawasaki ZG 1000 Concours
And more
The following user(s) said Thank You: F64
Please Log in or Create an account to join the conversation.
- BlueKZ_3
-
Topic Author
- Offline
- User
-
Registered
- Posts: 17
- Thanks: 1
Re: 1978 KZ1000 LTD - Charging System Troubleshooting
21 Jul 2026 14:18
Here are my measurements of the stator's blue connector. I backprobed it with and without the reg/rec plugged in. I also took measurements of the unplugged stator connector.

As far as the black ground wire goes, I'm thinking I'll try extending the wire so it reaches to the designated ground point on the engine.
Once the bike is charged again I might plug in the original regulator and rectifier and take measurements, just to compare. I'll also go ahead and try that suggested terminal cleaning method.
As far as the black ground wire goes, I'm thinking I'll try extending the wire so it reaches to the designated ground point on the engine.
Once the bike is charged again I might plug in the original regulator and rectifier and take measurements, just to compare. I'll also go ahead and try that suggested terminal cleaning method.
Please Log in or Create an account to join the conversation.
- SWest
-
- Offline
- Sustaining Member
-
Registered
- 10 22 2014
- Posts: 23779
- Thanks: 3045
Re: 1978 KZ1000 LTD - Charging System Troubleshooting
21 Jul 2026 18:17
You should be getting at least 70 va/c at 4000 RPM with nothing connected. .
Z1b1000 1975 Z1b
kzrider.com/forum/11-projects/598262-kz-...-will-it-live#672882
kzrider.com/forum/2-engine/597654-poser?start=240#704229
kzrider.com/forum/11-projects/598262-kz-...-will-it-live#672882
kzrider.com/forum/2-engine/597654-poser?start=240#704229
Please Log in or Create an account to join the conversation.
- BlueKZ_3
-
Topic Author
- Offline
- User
-
Registered
- Posts: 17
- Thanks: 1
Re: 1978 KZ1000 LTD - Charging System Troubleshooting
29 Jul 2026 15:32
New Update:
Instead of testing the old reg/rec, I swapped in the old stator and took AC measurements of it unplugged from the bike. I'm still getting ~20 V at idle and ~50 V at 3k rpm. Does this point toward a weak rotor, since both the old and new stator aren't pumping out the right voltage?
Instead of testing the old reg/rec, I swapped in the old stator and took AC measurements of it unplugged from the bike. I'm still getting ~20 V at idle and ~50 V at 3k rpm. Does this point toward a weak rotor, since both the old and new stator aren't pumping out the right voltage?
Please Log in or Create an account to join the conversation.
Moderators: Street Fighter LTD