
Changing Valve Springs w/out removing head in KZ750-4
- hugo
-
 Topic Author
- Offline
- Sustaining Member
-

Registered
- '92 Zephyr 750
- Posts: 296
- Thanks: 86
Changing Valve Springs w/out removing head in KZ750-4
07 Jul 2020 15:30 - 07 Jul 2020 15:52
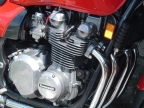
I have been chasing a mild buzz at low RPMs since I replaced valve stem oil seals removing the head. Bike is a '91 Zephyr 750. One thing wanted to verify is that I did not make a mistake installing some valve springs upside down. Of course, did not want to remove the whole head just for that, and then this thread happened a few weeks ago....
www.kzrider.com/forum/2-engine/613267-va...acement-cost?start=0
In the thread, Nessism provided a link to a guy who replaced valve stem oil seals w/out removing head, ......by using 4 x 2s, ratchet straps, and PVC socket as tools. Then Daftrusty proposed a more "scientific" finer approach by developing something like this..his picture (love the blue).
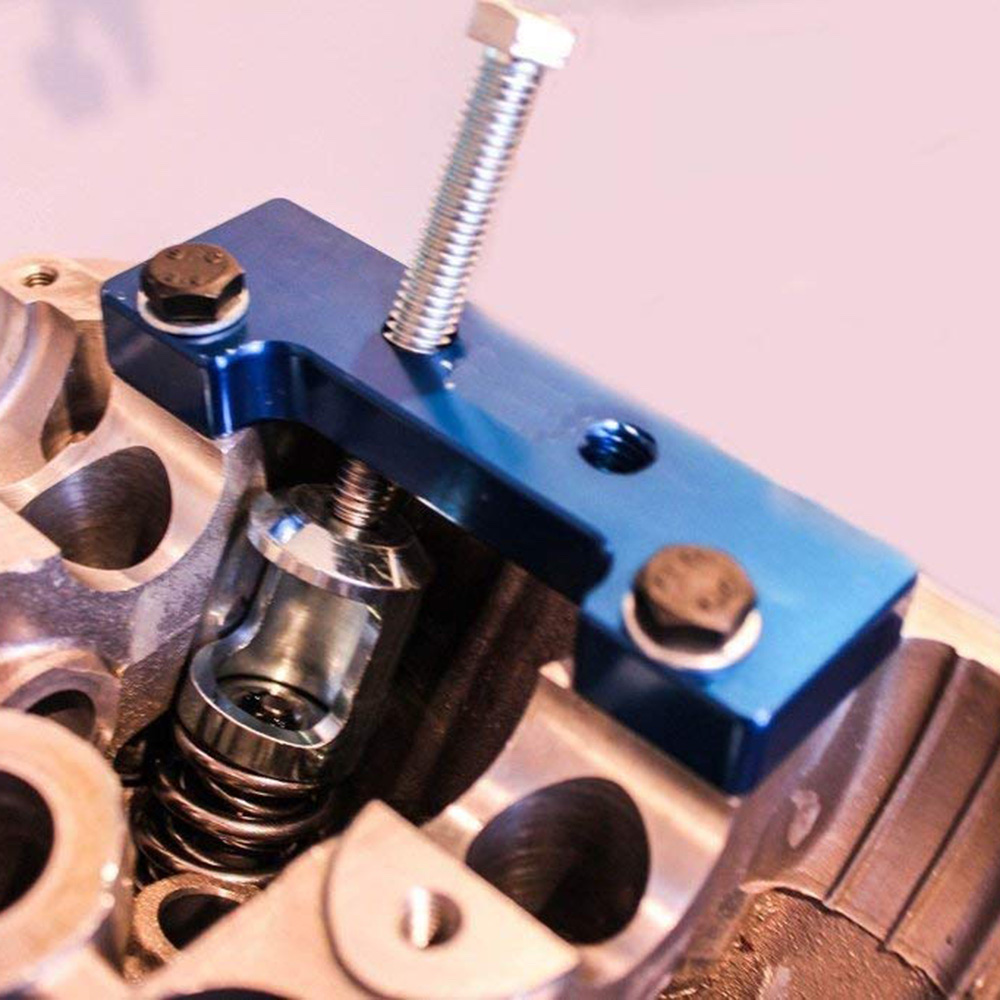
This tool in question is used on Honda/Accura DOHC, 16-valve head, liquid cooled engines. I found a new one for $15.00 so I ordered it knowing it would not fit the geometry of the KZ 750-4 head, but wanted to see how it was made, and at least could use the compressing open socket and bolt. Not knowing yet how I would proceed, I also ordered a 305mm(12 in.) x 127 mm (5 in.) x 10 mm plain aluminum plate (Honda/Accura tool plate is 15 mm thick).
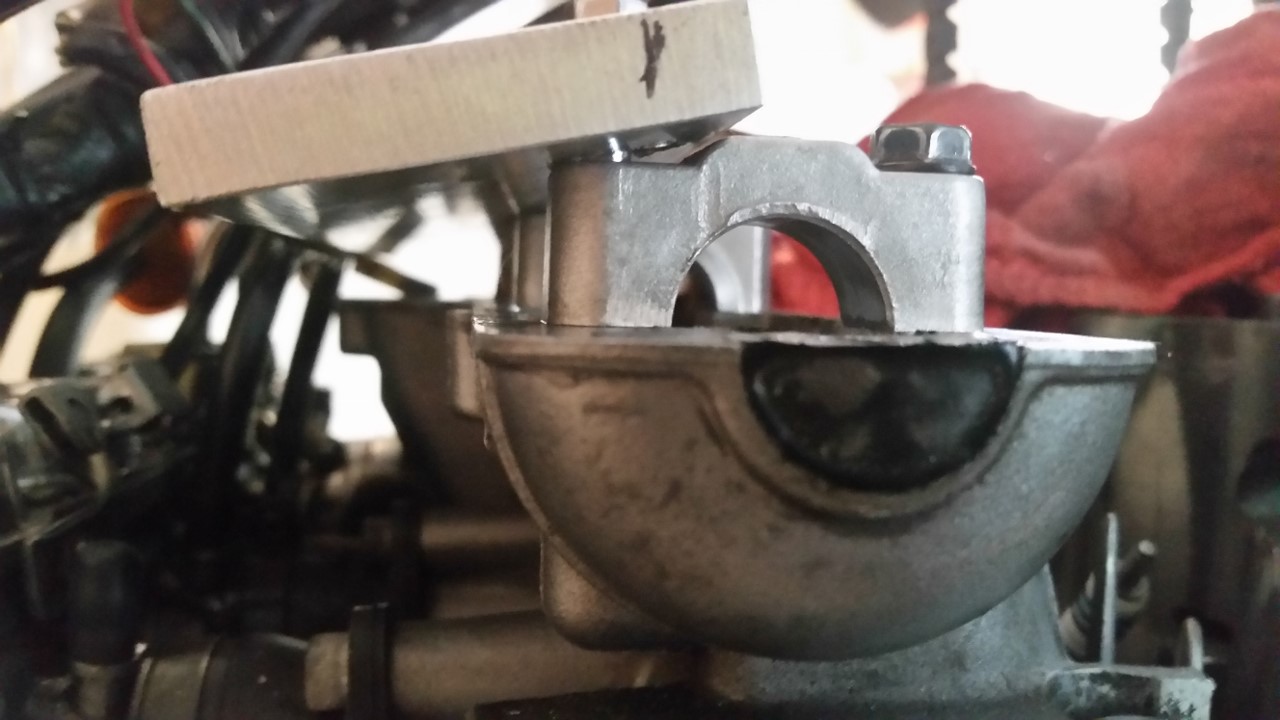
Almost immediately it was obvious the tool-to-be could not be bolted on to the camshaft bearing bottom caps, as in the Honda/Accura heads. The 750-4 has the bottom caps flushed with the head top, and would hardly allow any room for the spring compressing socket to spring retainers. Thus, the tool plate would have to mounted/bolted on the top bearing caps.
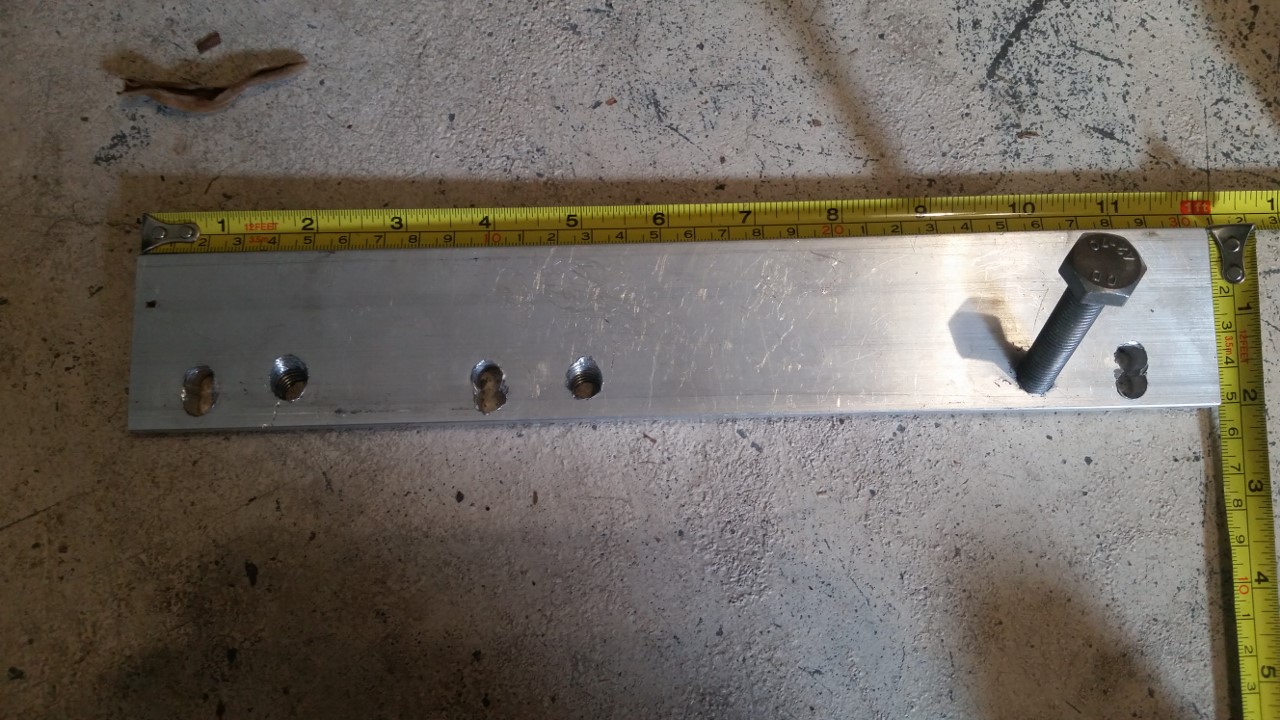
.....Once the valve cover was off, I placed the plate along the head and more or less marked, with a sharpie, where the holes shoud be, for the compressing angled bolt and bearing caps mounting bolts. The tricky part would be drilling and tapping the angled holes, which for this head, would have to be about 45 degrees. I purchased one of those angle drilling guide, as sold by Harbor Freight, however it proved useless in this case (or it was just me). In all fairness; those guides are advertised for wood, not metal
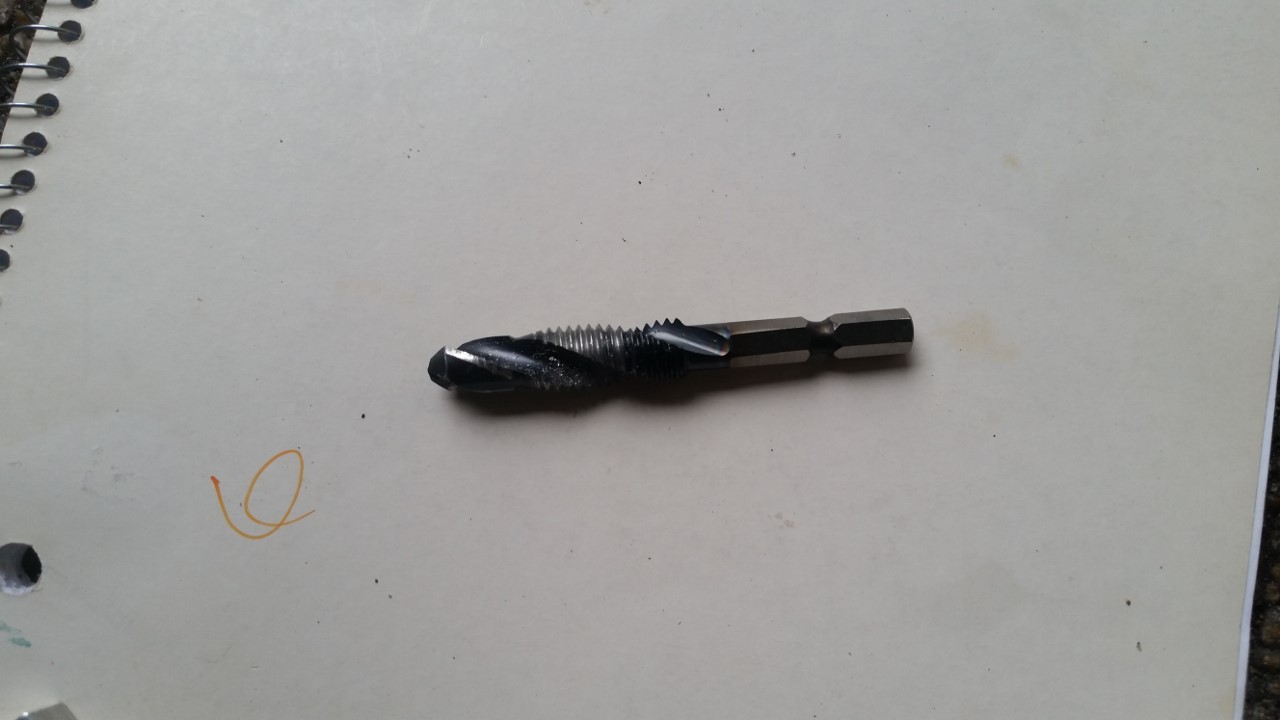
......so I had to drill/tap the holes by hand. I assumed the Honda/Accura tool was drilled at 45 degrees (incorrectly...more on that later), so I placed this tool and my plate side by side, and eye balled the leaning bolt to mimic the angle. Punched a dent on my mark, then started drilling with 5/32 bit at 45 degrees (...in my brain). Then switched to a bigger 3/8 drill bit (the Honda/Accura bolt is M10 x 58 mm x 1), and drilled a bigger angled hole before tapping. I had a hell of a time trying tapping at an angle with a regular tap. What saved the day was a drill/tap combination on same bit. The drill part acts as guide, the tap does the rest. It was very easy this way,....all by hand of course.
The
result;
OK, you can laugh at me, but was my first try, and was improvising as I went. It does look crude and cheesy, but it actually worked.........at the end.
Now bad news..........I thought the Honda/Accura tool angled bolt holes I was copying were at 45 degrees ...wrong....they were at 30 degrees! (16-valve heads tend to be pentroof, not hemisferical). I could set my plate flat on the edge of the top bearing caps, clearing the 'hump', but the holes angle was too vertical, needed more. Thus decided to move the plate forward on the caps, and get it to rest on the cap's 'hump' (where number and arrow are), that achieved the more appropriate angle. Drilled new mounting holes a bit south, and for locating the plate on the top bearing caps I used the longer M6 x 41 mm bolts from the Zephyr valve cover. I did not tightened them much, just snuggled them.
.............and this is what am talking about.
Normally, the holes for the bearing caps would have been 8 mm, but with the lean on the 'humps', I went to 10 mm. Primitive, unsightly, but it worked.
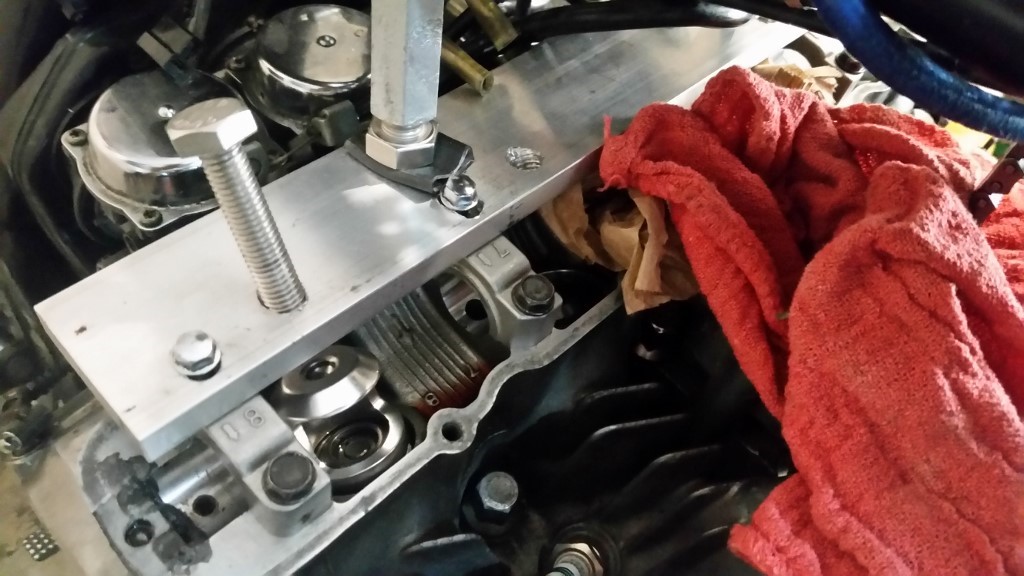
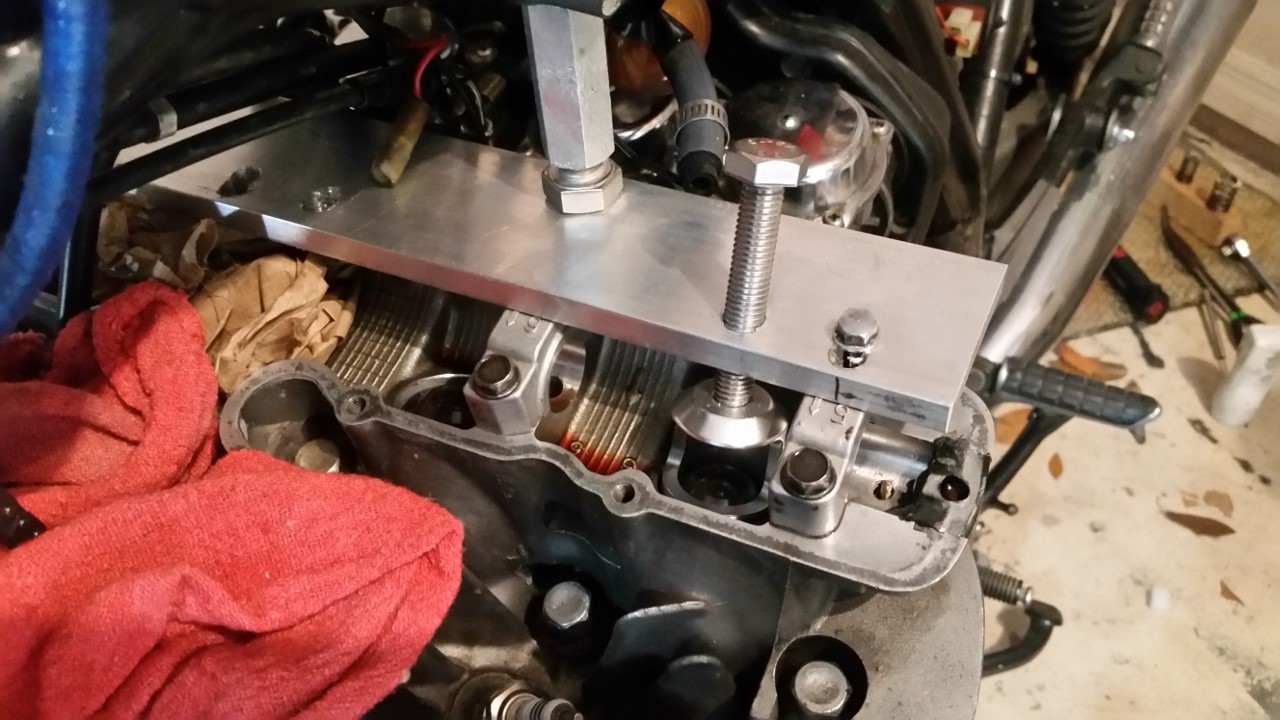
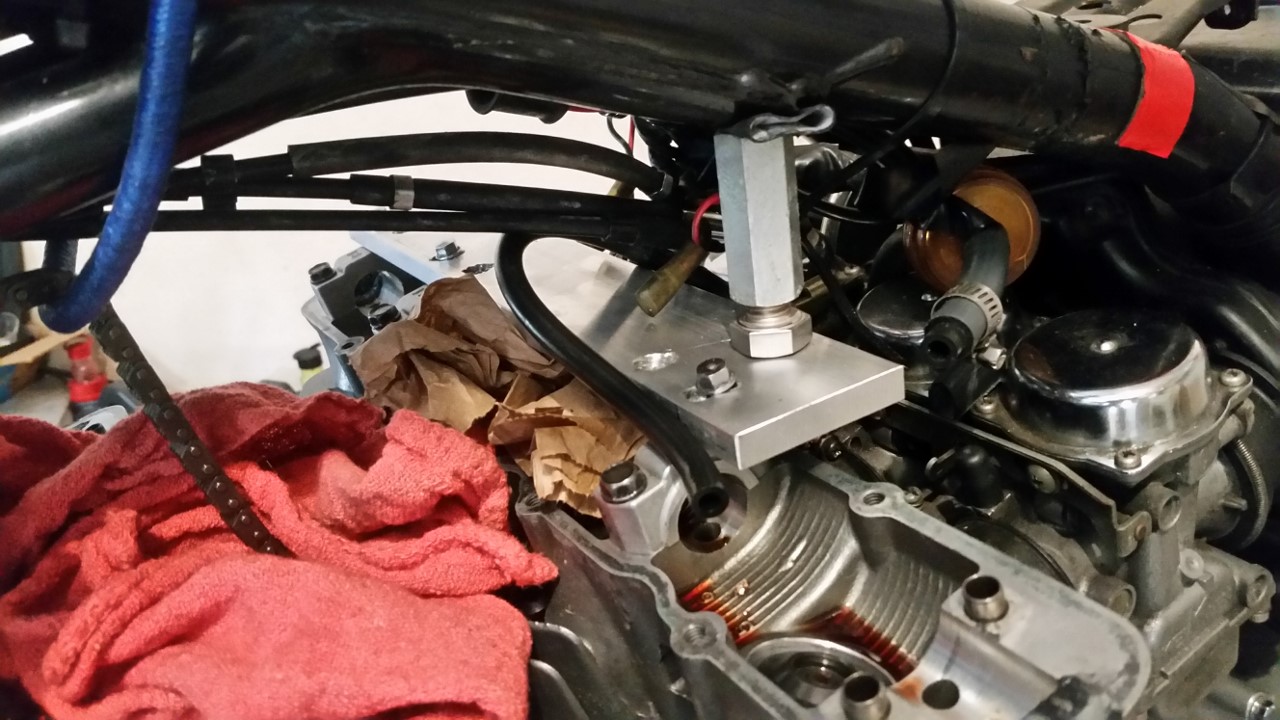
The extension nut and bolt you see wedging the plate to frame was only to divert stress on to the frame, from the bearing caps. It was probably unnecessary but I tend to be paranoid.
.......To recap; either drill the plate at 45 degrees and go flat on the caps, or 30 (easier) degrees and rest on the caps hump to gain the extra 15 degrees (...sort of)...these are all ball park figures, not instrumented..
The Honda/Accura tool socket is aluminum, light and short, having a circular indentation on top. This, coupled with the rounded tip of the M10 x 58 mm x 1 bolt made it possible NOT to require a perfect angle, as long as you can hit the indentation on top. Just those two parts were worth the $15.00 in my opinion, even if I only used the plate as reference.

The surgical procedure went rather well. Did not have to, but I chose to replace all the valve springs with new ones..... and now some unexpected details I'd like to mention.
I used the compressed air method to hold the valves, rather than feeding rope into the cylinders. I already had a 6 gallon compressor, and only acquired a leak-down tester to connect it to the cylinder plug holes, and used it as pressure regulator also. It was a straight bolt-on affair and worked well. However, Compressor could be noisy, although does not run all the time, only when it needs to cycle (...it never failed to make me jump in cheer terror when it kicked-in unexpectedly).
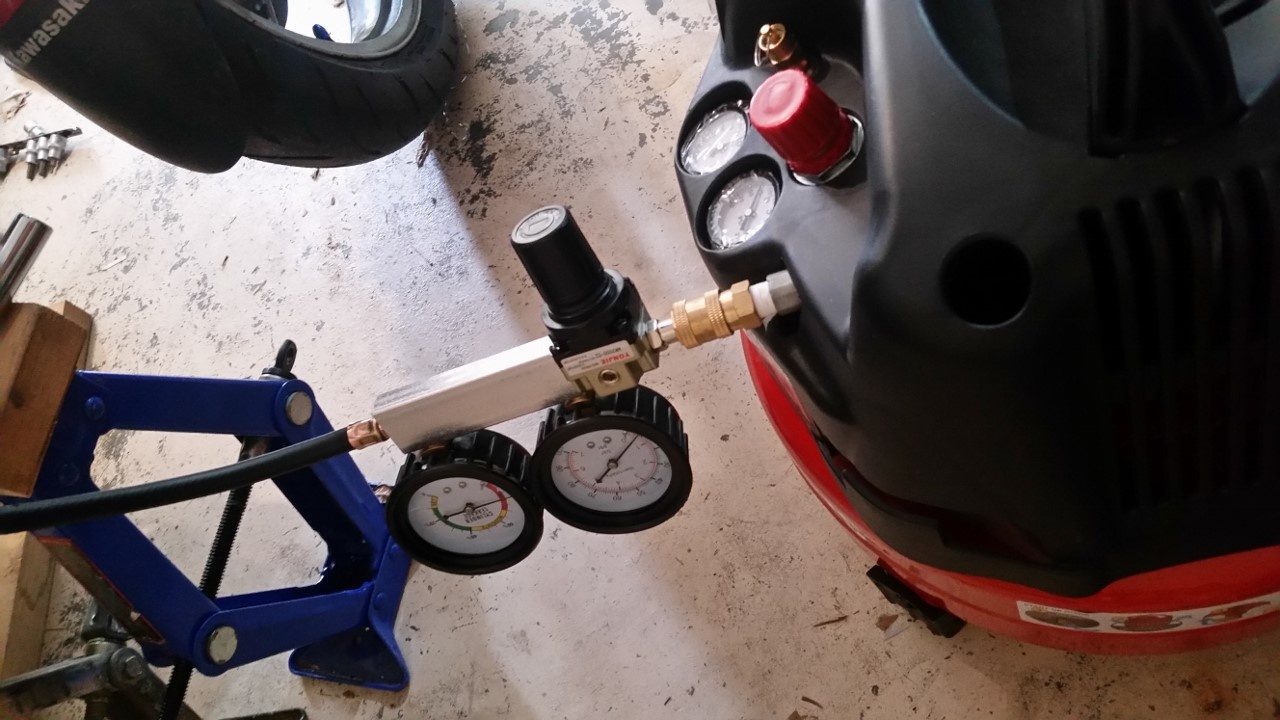
I was applying 40 psi (1.05 Kg/cm2) into cylinders, and quickly discovered this may not be enough initially to dislodge the keepers from the valve stems. At first, when compressing springs, the valves were opening and could hear the air hissing. Eventually dawned on my slow head & found the cure; before screwing the compressing bolt, wedged a box wrench between de plate tool and the compressing socket, and gave the ring retainers a quick mild smack with my fist on the other end of wrench.. I could feel the springing and dislodging of the keepers. First smack, air puffes. Second smack, nothing; ...time to compress the springs.
Also, did not know for sure if 40 psi (1.05 Kg/cm2) would not try to turn the crankshaft on either direction, thus applied this gizmo to the crankshaft nut, just in case. Probably quite unnecessary, but again, I was being paranoid (putting bike in gear an blocking rear tire would be smarter and simpler).
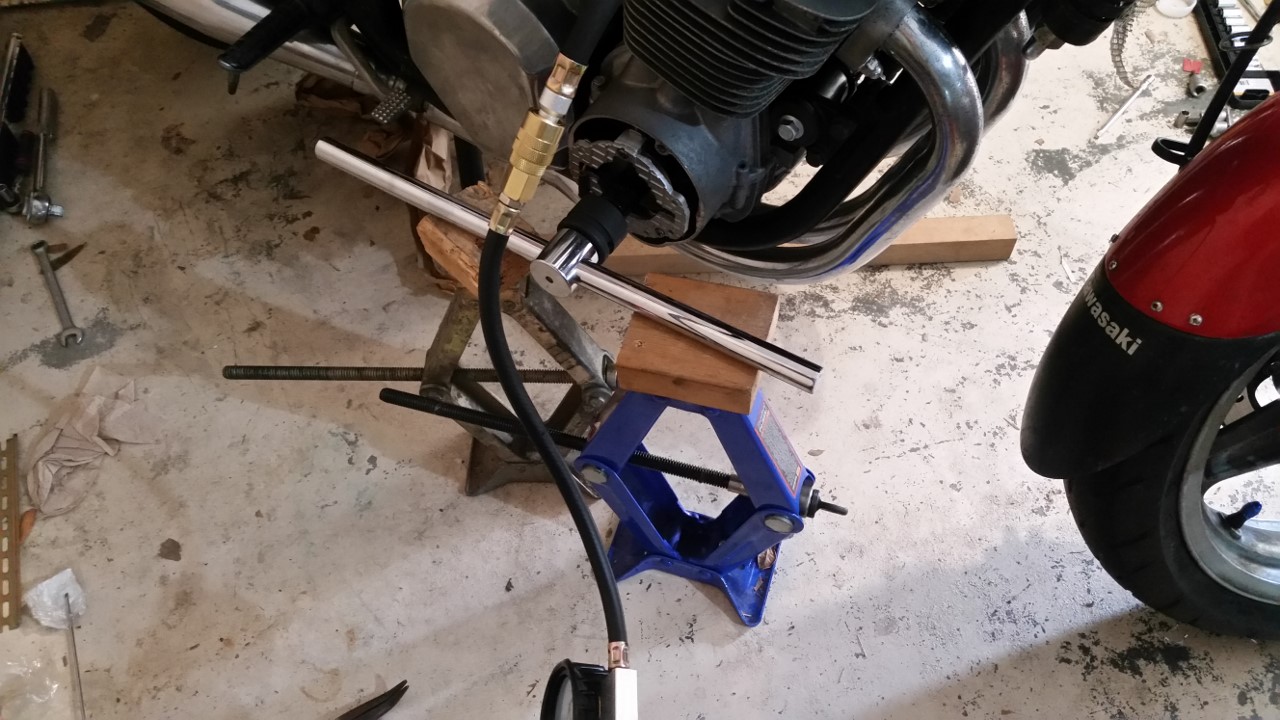
If I had to do this again, I would use a 380 mm (15 inch.) plate covering the whole width of head, and drill 4 pair of holes at proper distance to cover all intake or exhaust side at once. . As it was the tool worked, I just had to slide it around to cover all cylinders. .Of course, in the 750-4 head, the center camchain valley makes the bearing caps separation asymetrical. Also remember, I did not change valve oil seals, only springs, but is of course possible doing that too..with a little more involvement, plus labor.
I hope this may help anybody if interested in this method, if they need to, and somebody may improve on the tool or methodology..... and hopefully let us know about......
Thanks for watching
www.kzrider.com/forum/2-engine/613267-va...acement-cost?start=0
In the thread, Nessism provided a link to a guy who replaced valve stem oil seals w/out removing head, ......by using 4 x 2s, ratchet straps, and PVC socket as tools. Then Daftrusty proposed a more "scientific" finer approach by developing something like this..his picture (love the blue).
This tool in question is used on Honda/Accura DOHC, 16-valve head, liquid cooled engines. I found a new one for $15.00 so I ordered it knowing it would not fit the geometry of the KZ 750-4 head, but wanted to see how it was made, and at least could use the compressing open socket and bolt. Not knowing yet how I would proceed, I also ordered a 305mm(12 in.) x 127 mm (5 in.) x 10 mm plain aluminum plate (Honda/Accura tool plate is 15 mm thick).
Almost immediately it was obvious the tool-to-be could not be bolted on to the camshaft bearing bottom caps, as in the Honda/Accura heads. The 750-4 has the bottom caps flushed with the head top, and would hardly allow any room for the spring compressing socket to spring retainers. Thus, the tool plate would have to mounted/bolted on the top bearing caps.
.....Once the valve cover was off, I placed the plate along the head and more or less marked, with a sharpie, where the holes shoud be, for the compressing angled bolt and bearing caps mounting bolts. The tricky part would be drilling and tapping the angled holes, which for this head, would have to be about 45 degrees. I purchased one of those angle drilling guide, as sold by Harbor Freight, however it proved useless in this case (or it was just me). In all fairness; those guides are advertised for wood, not metal
......so I had to drill/tap the holes by hand. I assumed the Honda/Accura tool was drilled at 45 degrees (incorrectly...more on that later), so I placed this tool and my plate side by side, and eye balled the leaning bolt to mimic the angle. Punched a dent on my mark, then started drilling with 5/32 bit at 45 degrees (...in my brain). Then switched to a bigger 3/8 drill bit (the Honda/Accura bolt is M10 x 58 mm x 1), and drilled a bigger angled hole before tapping. I had a hell of a time trying tapping at an angle with a regular tap. What saved the day was a drill/tap combination on same bit. The drill part acts as guide, the tap does the rest. It was very easy this way,....all by hand of course.
The
result;
OK, you can laugh at me, but was my first try, and was improvising as I went. It does look crude and cheesy, but it actually worked.........at the end.
Now bad news..........I thought the Honda/Accura tool angled bolt holes I was copying were at 45 degrees ...wrong....they were at 30 degrees! (16-valve heads tend to be pentroof, not hemisferical). I could set my plate flat on the edge of the top bearing caps, clearing the 'hump', but the holes angle was too vertical, needed more. Thus decided to move the plate forward on the caps, and get it to rest on the cap's 'hump' (where number and arrow are), that achieved the more appropriate angle. Drilled new mounting holes a bit south, and for locating the plate on the top bearing caps I used the longer M6 x 41 mm bolts from the Zephyr valve cover. I did not tightened them much, just snuggled them.
.............and this is what am talking about.
Normally, the holes for the bearing caps would have been 8 mm, but with the lean on the 'humps', I went to 10 mm. Primitive, unsightly, but it worked.
The extension nut and bolt you see wedging the plate to frame was only to divert stress on to the frame, from the bearing caps. It was probably unnecessary but I tend to be paranoid.
.......To recap; either drill the plate at 45 degrees and go flat on the caps, or 30 (easier) degrees and rest on the caps hump to gain the extra 15 degrees (...sort of)...these are all ball park figures, not instrumented..
The Honda/Accura tool socket is aluminum, light and short, having a circular indentation on top. This, coupled with the rounded tip of the M10 x 58 mm x 1 bolt made it possible NOT to require a perfect angle, as long as you can hit the indentation on top. Just those two parts were worth the $15.00 in my opinion, even if I only used the plate as reference.
The surgical procedure went rather well. Did not have to, but I chose to replace all the valve springs with new ones..... and now some unexpected details I'd like to mention.
I used the compressed air method to hold the valves, rather than feeding rope into the cylinders. I already had a 6 gallon compressor, and only acquired a leak-down tester to connect it to the cylinder plug holes, and used it as pressure regulator also. It was a straight bolt-on affair and worked well. However, Compressor could be noisy, although does not run all the time, only when it needs to cycle (...it never failed to make me jump in cheer terror when it kicked-in unexpectedly).
I was applying 40 psi (1.05 Kg/cm2) into cylinders, and quickly discovered this may not be enough initially to dislodge the keepers from the valve stems. At first, when compressing springs, the valves were opening and could hear the air hissing. Eventually dawned on my slow head & found the cure; before screwing the compressing bolt, wedged a box wrench between de plate tool and the compressing socket, and gave the ring retainers a quick mild smack with my fist on the other end of wrench.. I could feel the springing and dislodging of the keepers. First smack, air puffes. Second smack, nothing; ...time to compress the springs.
Also, did not know for sure if 40 psi (1.05 Kg/cm2) would not try to turn the crankshaft on either direction, thus applied this gizmo to the crankshaft nut, just in case. Probably quite unnecessary, but again, I was being paranoid (putting bike in gear an blocking rear tire would be smarter and simpler).
If I had to do this again, I would use a 380 mm (15 inch.) plate covering the whole width of head, and drill 4 pair of holes at proper distance to cover all intake or exhaust side at once. . As it was the tool worked, I just had to slide it around to cover all cylinders. .Of course, in the 750-4 head, the center camchain valley makes the bearing caps separation asymetrical. Also remember, I did not change valve oil seals, only springs, but is of course possible doing that too..with a little more involvement, plus labor.
I hope this may help anybody if interested in this method, if they need to, and somebody may improve on the tool or methodology..... and hopefully let us know about......
Thanks for watching
Last edit: 07 Jul 2020 15:52 by hugo. Reason: correcting info
The following user(s) said Thank You: JR, Nessism, TexasKZ
Please Log in or Create an account to join the conversation.
- cb900f
-
- Offline
- User
-

Registered
- Posts: 111
- Thanks: 30
Re: Changing Valve Springs w/out removing head in KZ750-4
08 Jul 2020 12:13 - 08 Jul 2020 12:16
You can buy a 'plunger' style valve keeper removal/installation too for cheap on amazon and it's a lot simpler, quicker, and easier to use.
example: www.amazon.com/Lisle-36050-Keeper-Remove...id=1594235721&sr=8-1
example: www.amazon.com/Lisle-36050-Keeper-Remove...id=1594235721&sr=8-1
Last edit: 08 Jul 2020 12:16 by cb900f.
Please Log in or Create an account to join the conversation.
- Daftrusty
-

- Offline
- User
-
Registered
- Posts: 371
- Thanks: 206
Re: Changing Valve Springs w/out removing head in KZ750-4
08 Jul 2020 13:54
Nice job!
I’m glad to see that 40psi was enough to keep the valve seated, as I would have guessed 100 psi would be required.
I also learned the hard way during a leak down test, is that if the piston gets positioned any less than dead-on TDC, that 100psi will instantly cycle the engine. (Not surprising, but a frightening surprise) it is enough to surely snap the bolt off the end of the crank of a wrench was on it. After that happened, I also would jump every time my compressor kicked on.
I literally purchased some stiffer valve springs yesterday, so it renewed my interest in this very subject. So it’s ironic that you posted this when you did. Once my current home improvement project is finished, I’m going to start noodling around with making my own spring compressor.
1990 zr550
kz750e
650/750 6-speed Transmission Swap
kz750e
650/750 6-speed Transmission Swap
Please Log in or Create an account to join the conversation.
- M_a_t_t
-

- Offline
- Sustaining Member
-
Registered
- Posts: 254
- Thanks: 41
Re: Changing Valve Springs w/out removing head in KZ750-4
08 Jul 2020 14:23
Entirely different beast, but when I changed the valve seals on a SBC using compressed air I used ~30 psi and had no problem with the engine rotating in any position. Different valve/piston sizes might have a lot to do with it though.
83 KZ1100A (shaft)
17 Versys X 300 abs
81 kz650h1
81 kz750e2
90 Honda CBR600F (brother's)
17 Versys X 300 abs
81 kz650h1
81 kz750e2
90 Honda CBR600F (brother's)
Please Log in or Create an account to join the conversation.
- Scirocco
-

- Offline
- Premium Member
-

Registered
- Never change a running system
- Posts: 4397
- Thanks: 2260
Re: Changing Valve Springs w/out removing head in KZ750-4
08 Jul 2020 14:35
I change valve seals and springs with pistons on TDC Position, never need any compressed air for this task!!!
My 1975 Z 1 B 900 Project
www.kzrider.com/forum/11-projects/605133...ears-deep-sleep-mode
www.kzrider.com/forum/11-projects/605133...ears-deep-sleep-mode
Please Log in or Create an account to join the conversation.
- hugo
-
Topic Author
- Offline
- Sustaining Member
-
Registered
- '92 Zephyr 750
- Posts: 296
- Thanks: 86
Re: Changing Valve Springs w/out removing head in KZ750-4
08 Jul 2020 14:38 - 08 Jul 2020 14:47Daftrusty wrote: Nice job!
I’m glad to see that 40psi was enough to keep the valve seated, as I would have guessed 100 psi would be required.
I also learned the hard way during a leak down test, is that if the piston gets positioned any less than dead-on TDC, that 100psi will instantly cycle the engine. (Not surprising, but a frightening surprise) it is enough to surely snap the bolt off the end of the crank of a wrench was on it. After that happened, I also would jump every time my compressor kicked on.
I literally purchased some stiffer valve springs yesterday, so it renewed my interest in this very subject. So it’s ironic that you posted this when you did. Once my current home improvement project is finished, I’m going to start noodling around with making my own spring compressor.
Thanks Rusty, It was actually your original idea that compelled me to elaborate on it. It does work, and it made for a very intense, interesting. educational 'motorcycling' weekend, w/out actually riding. If they make a simple tool for liquid cooled engine, why could we not have our own for our beloved antiques?
Hope this makes it easier for your own project.
Last edit: 08 Jul 2020 14:47 by hugo.
Please Log in or Create an account to join the conversation.
- hugo
-
Topic Author
- Offline
- Sustaining Member
-
Registered
- '92 Zephyr 750
- Posts: 296
- Thanks: 86
Re: Changing Valve Springs w/out removing head in KZ750-4
08 Jul 2020 15:12M_a_t_t wrote: Entirely different beast, but when I changed the valve seals on a SBC using compressed air I used ~30 psi and had no problem with the engine rotating in any position. Different valve/piston sizes might have a lot to do with it though.
I don't think 40 psi would do it either, but did not know for sure so I played safe. As I said, bike in gear and blocking rear tire is probably enough insurance. 40 psi is enough to hold valves, but may not dislodge the keeper initially,, that's why I had to give it a mild smack first.
Please Log in or Create an account to join the conversation.
- Saablord
-

- Offline
- User
-
Registered
- Posts: 266
- Thanks: 104
Re: Changing Valve Springs w/out removing head in KZ750-4
16 Sep 2020 12:10
I hate you guys. I sent a panicked email to APE because i recently put those in a motor and had no idea valve springs were orientation specific... and ive rebuilt four inline 4's (two from cars, two KZs). yikes.
Doesn't matter. APE springs go either way")
Doesn't matter. APE springs go either way
Please Log in or Create an account to join the conversation.
Moderators: Street Fighter LTD