
1976 KZ400 D3 Grimey
- Jbosh
-
- Offline
- User
-

Registered
- 1982 Kz440 ltd D4
- Posts: 142
- Thanks: 5
Re: 1976 KZ400 D3 Grimey
05 Sep 2015 07:16 - 05 Sep 2015 07:17
Dan, this thread is reading like a novel! I'm suspecting tragedy however so do you mind finishing the tale for my hearts' sake? On another note, I get what you mean about the rear end. Personally, your English green with the duck bill version looks tight!! That said though, the cleared tank and satin black streamlined version is a thing of beauty. At the end of the day, I find myself drooling over the same bike twice lol. I hope your riding exam went well and you are enjoying the road! You've done some fantastic work on your 400.
As long as I get to learn something, I'm happy!
Last edit: 05 Sep 2015 07:17 by Jbosh.
Please Log in or Create an account to join the conversation.
- SWest
-

- Offline
- Sustaining Member
-

Registered
- 10 22 2014
- Posts: 23726
- Thanks: 3014
Re: 1976 KZ400 D3 Grimey
05 Sep 2015 07:48
So, what happened? :huh:
Steve
Steve
Z1b1000 1975 Z1b
kzrider.com/forum/11-projects/598262-kz-...-will-it-live#672882
kzrider.com/forum/2-engine/597654-poser?start=240#704229
kzrider.com/forum/11-projects/598262-kz-...-will-it-live#672882
kzrider.com/forum/2-engine/597654-poser?start=240#704229
Please Log in or Create an account to join the conversation.
- diggerdanh
-
 Topic Author
- Offline
- User
-
Registered
- Posts: 242
- Thanks: 89
Re: 1976 KZ400 D3 Grimey
08 Sep 2015 05:14
By late fall of 2012 I decided that now that I had the bike running well and in tip-top shape and I had learned a lot about working on bikes that I wanted to take the next step and do some relatively major work on the bike. I wanted to clear the triangle, that's what all the bikes on Bike Exif had right? To do so I would need to switch to pod filters, use a smaller battery and relocate the electronics somewhere else. I knew that I didn't want to try pods with the stock carbs so that meant a switch to some type of mechanical carbs like Amals or Mikuni VMs. The lithium ion batteries, like Ballistic, had been around awhile and people were having pretty good success with them. But they don't like overcharging and the nearly 40-year old charging system on the older bikes are known to overcharge. So the swap would also involve updating the regulator and rectifier to something more modern.
There were 2 or 3 guys on the Kawasaki Twins forum going through the same type of swap at the same time I was talking about it. One was using 30mm Amals (IIRC) and one using VM32 on his 440. I knew that I'd be able to get in the right ballpark as far as jetting.
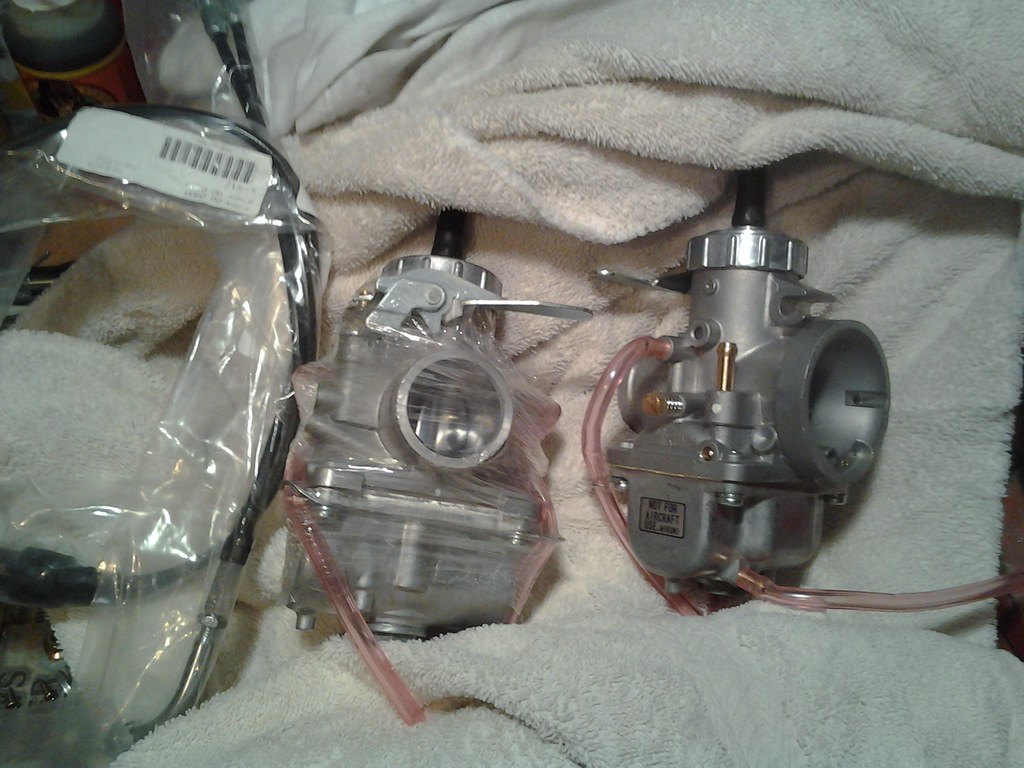
My mind was almost completely made up and then I found a pair of Mikuni VM30s on Ebay that were still in the plastic (guy bought them for a CB350 or 450 project but didn't use them) for $100.
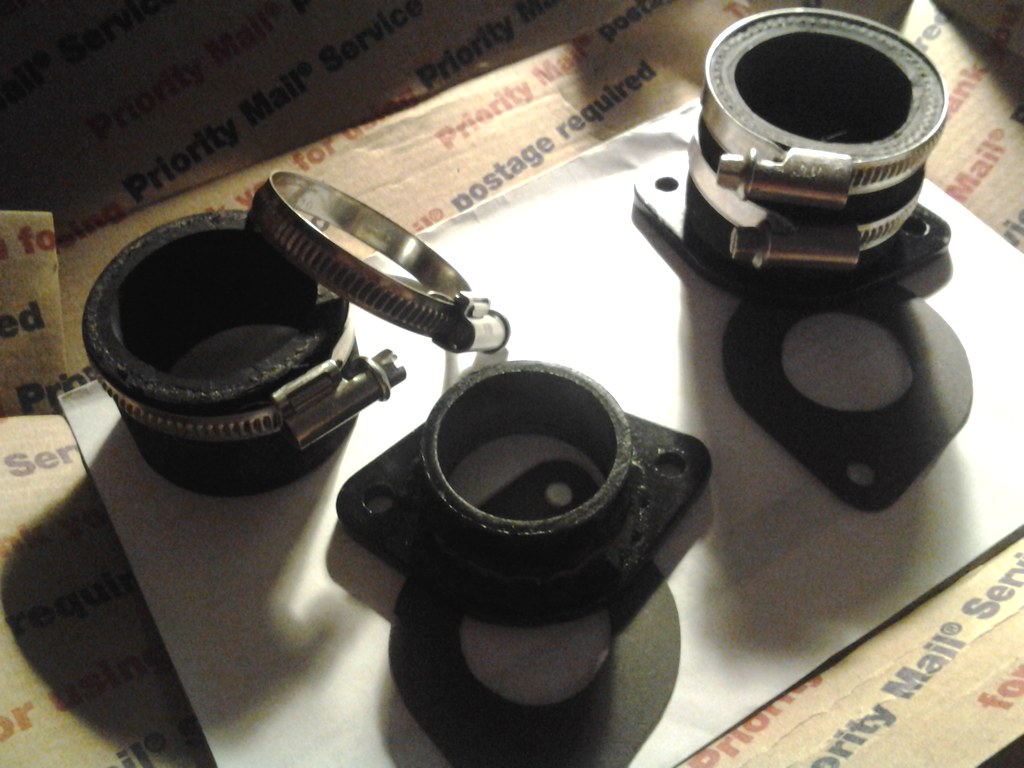
Another member of the forum, Jerry, began making custom intake boots as a replacement for the unobtainable stock boots for the early KZ400s.
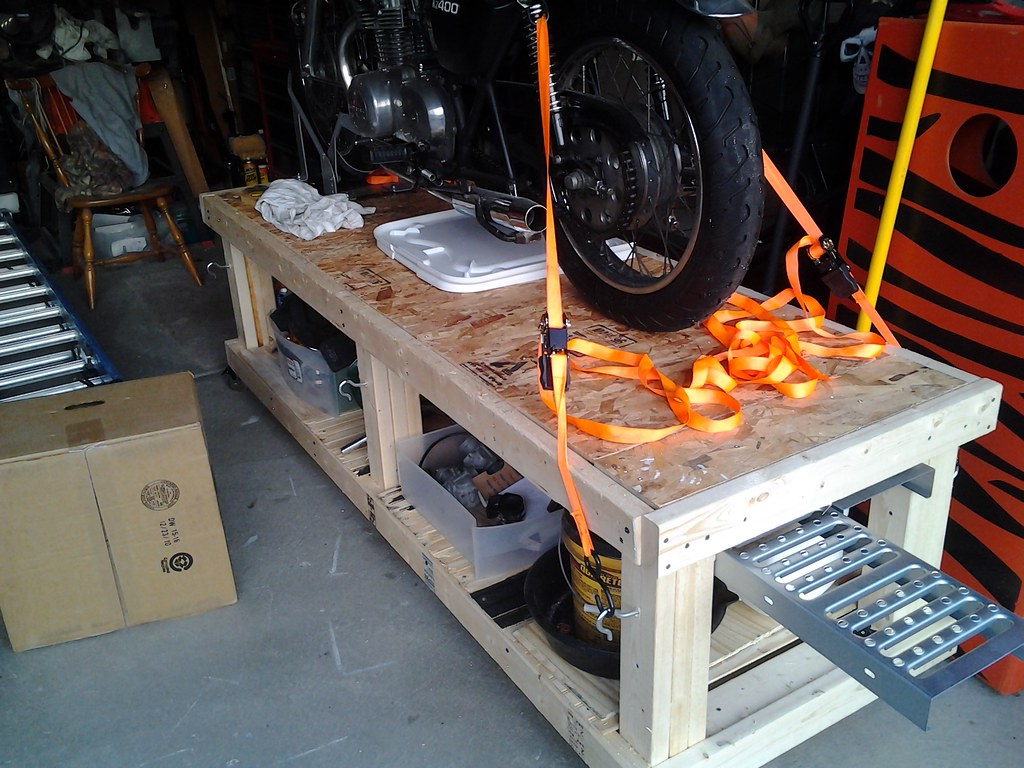
I started building a heavy duty bike bench from leftover materials from our basement remodel. It had eye-bolts for tie-downs, storage underneath and a shelf for storing ramps. It had locking rubber wheel casters too but they later disintegrated and were replaced with something a little heavier duty.

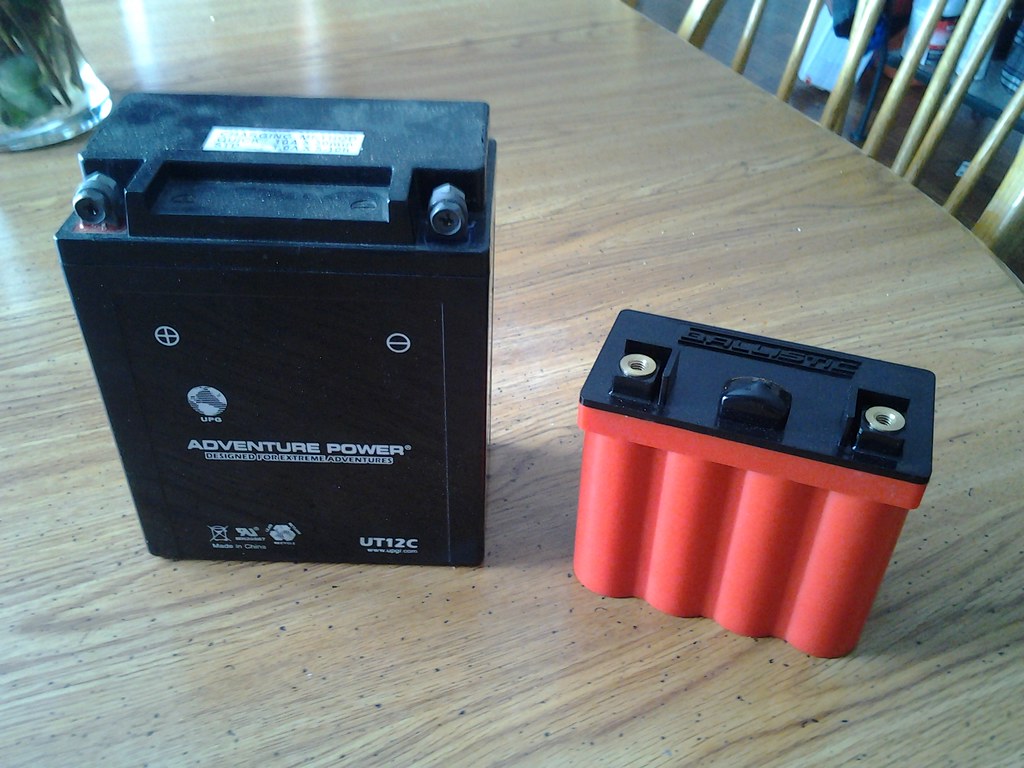
I bought a Ballistic 8-cell battery. It was almost 1/3 the size of the AGM it was to replace.
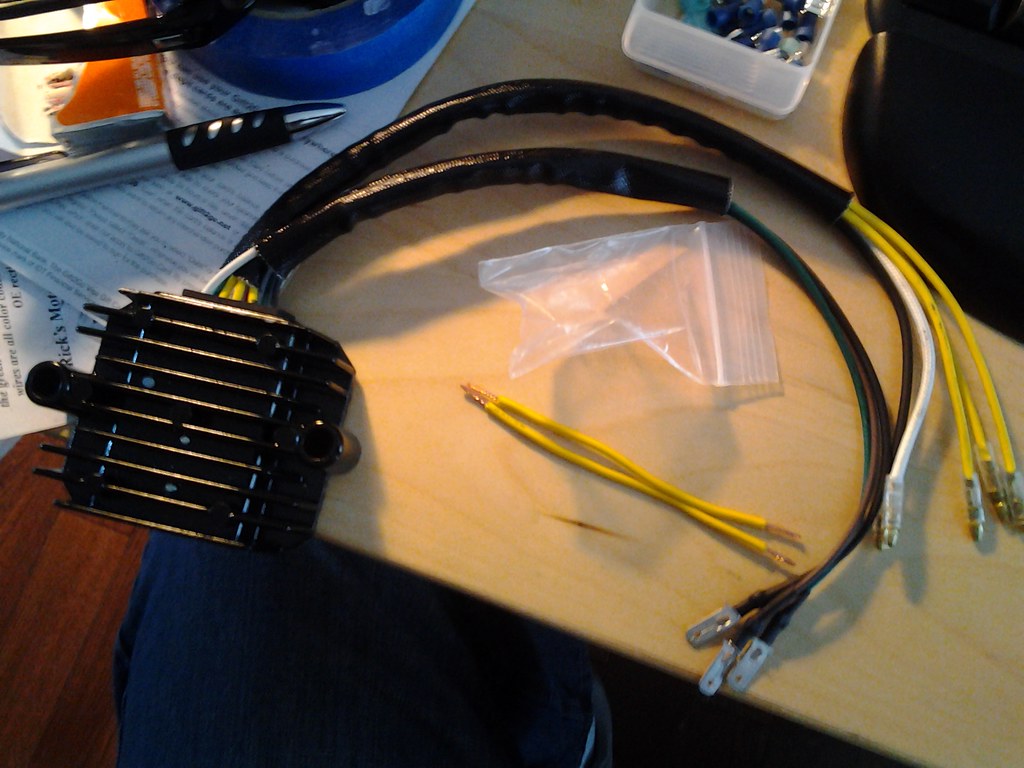
And a new Rick's Electronics Regulator/Rectifier combo.
Another Ebay steal was these Kawasaki NOS case guards for around $35.

One of the final pieces of the puzzle was what to do with the crankcase vent. I bought this sweet little stainless catch can from Pegasus Automotive for around $25(?).
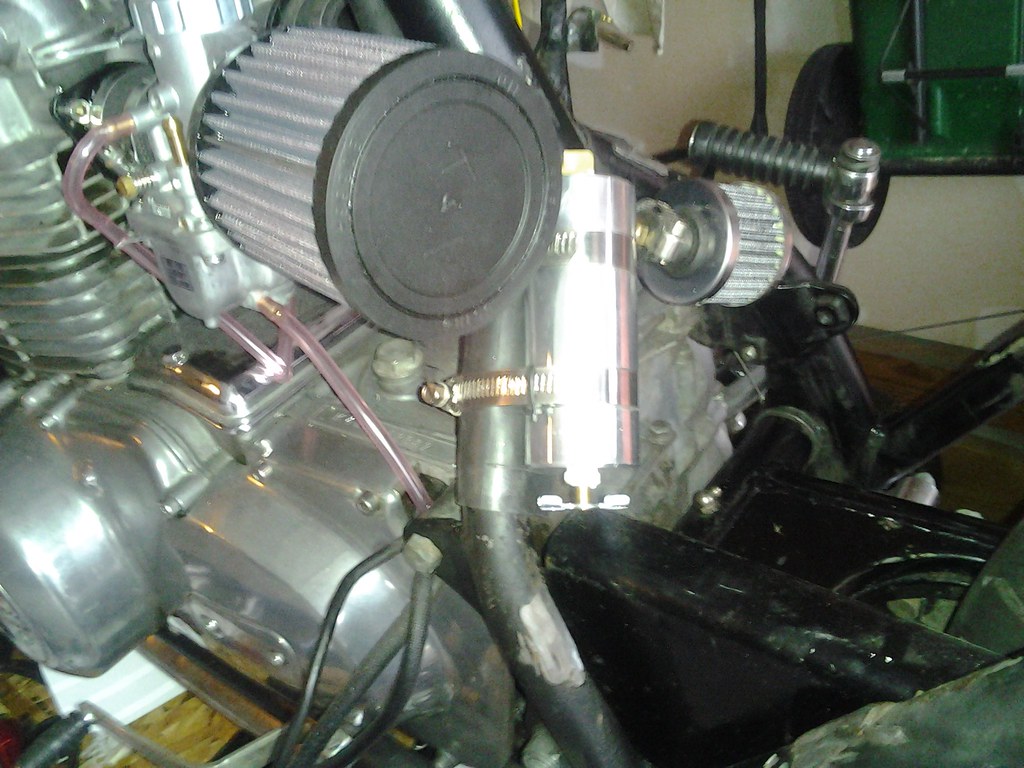
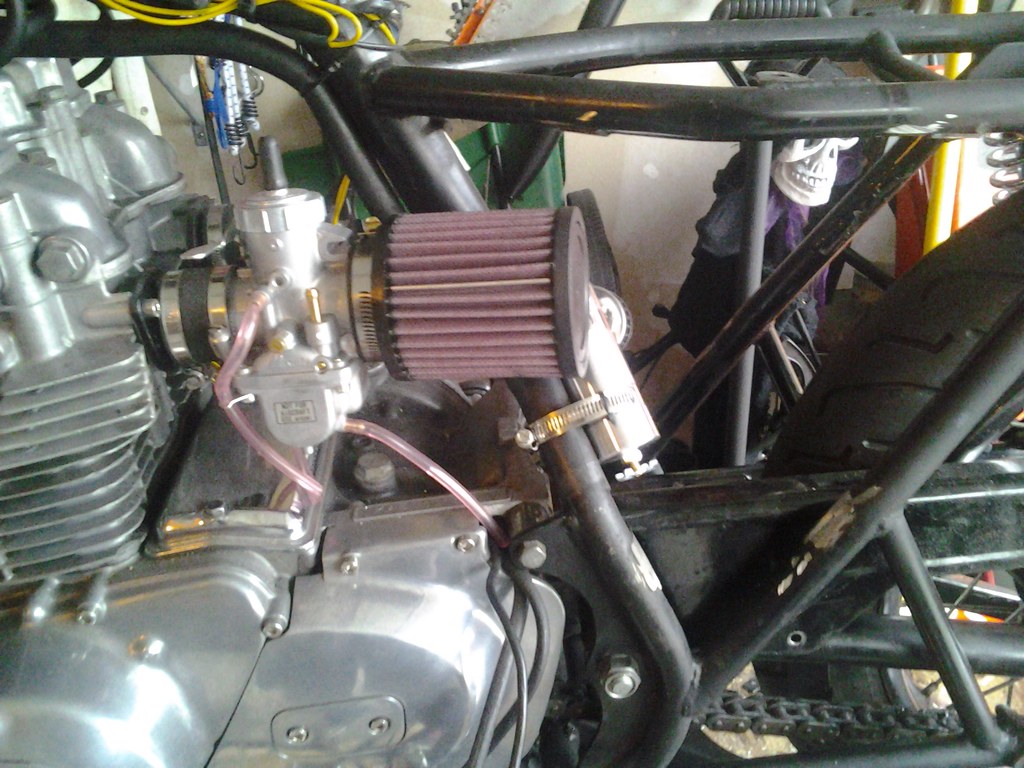
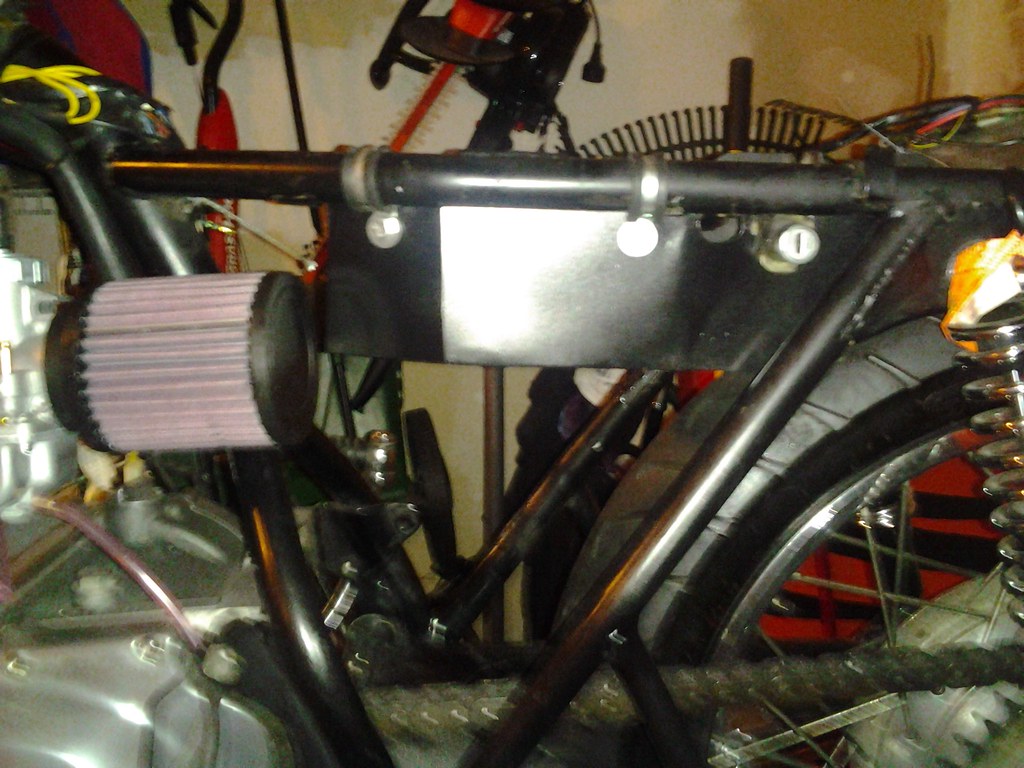
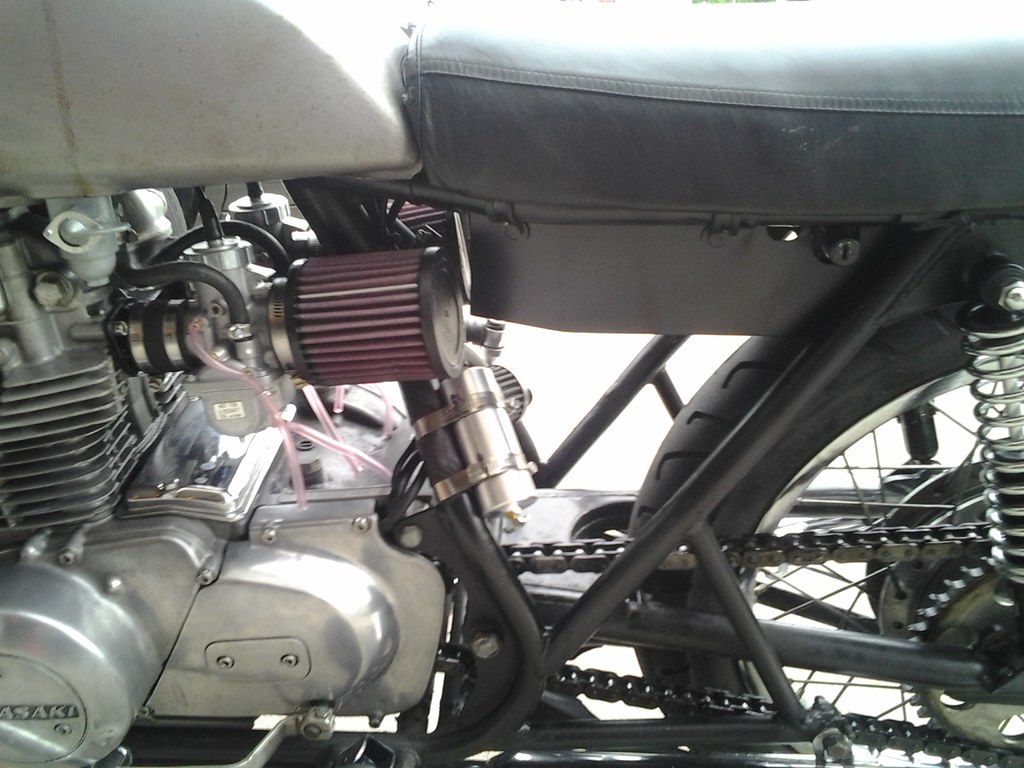
Because of the single downtube in the frame behind the motor I needed filters that had a 15-20 degree offset to angle them a bit outward, these big ol' K&N filters fit the bill.
It was time for surgery. All this stuff had to be moved or removed.
The new stuff on and mocked up.
Since I'm basically using the stock seat pan and not some kind of cafe seat with room under the hump for the battery I figured that the best solution would be some type of tray or box/compartment under the seat. That was my next task.
There were 2 or 3 guys on the Kawasaki Twins forum going through the same type of swap at the same time I was talking about it. One was using 30mm Amals (IIRC) and one using VM32 on his 440. I knew that I'd be able to get in the right ballpark as far as jetting.
My mind was almost completely made up and then I found a pair of Mikuni VM30s on Ebay that were still in the plastic (guy bought them for a CB350 or 450 project but didn't use them) for $100.
Another member of the forum, Jerry, began making custom intake boots as a replacement for the unobtainable stock boots for the early KZ400s.
I started building a heavy duty bike bench from leftover materials from our basement remodel. It had eye-bolts for tie-downs, storage underneath and a shelf for storing ramps. It had locking rubber wheel casters too but they later disintegrated and were replaced with something a little heavier duty.
I bought a Ballistic 8-cell battery. It was almost 1/3 the size of the AGM it was to replace.
And a new Rick's Electronics Regulator/Rectifier combo.
Another Ebay steal was these Kawasaki NOS case guards for around $35.
One of the final pieces of the puzzle was what to do with the crankcase vent. I bought this sweet little stainless catch can from Pegasus Automotive for around $25(?).
Because of the single downtube in the frame behind the motor I needed filters that had a 15-20 degree offset to angle them a bit outward, these big ol' K&N filters fit the bill.
It was time for surgery. All this stuff had to be moved or removed.
The new stuff on and mocked up.
Since I'm basically using the stock seat pan and not some kind of cafe seat with room under the hump for the battery I figured that the best solution would be some type of tray or box/compartment under the seat. That was my next task.
Please Log in or Create an account to join the conversation.
- diggerdanh
-
Topic Author
- Offline
- User
-
Registered
- Posts: 242
- Thanks: 89
Re: 1976 KZ400 D3 Grimey
08 Sep 2015 05:37
Since I don't weld (yet!) I was either going to need someone to build me an under seat tray or I would have to find other means to make it. I made my first mockup out of cardboard. Then one day while at the supermarket I saw a very large cutting board made of some type of plastic. Maybe I could make a tray from that? After some research I soon learned that there wasn't really a good glue for whatever type of plastic it was (I cannot remember of the top of my head) but I was still determined. I could use some small screws and just reinforce the corners with epoxy.
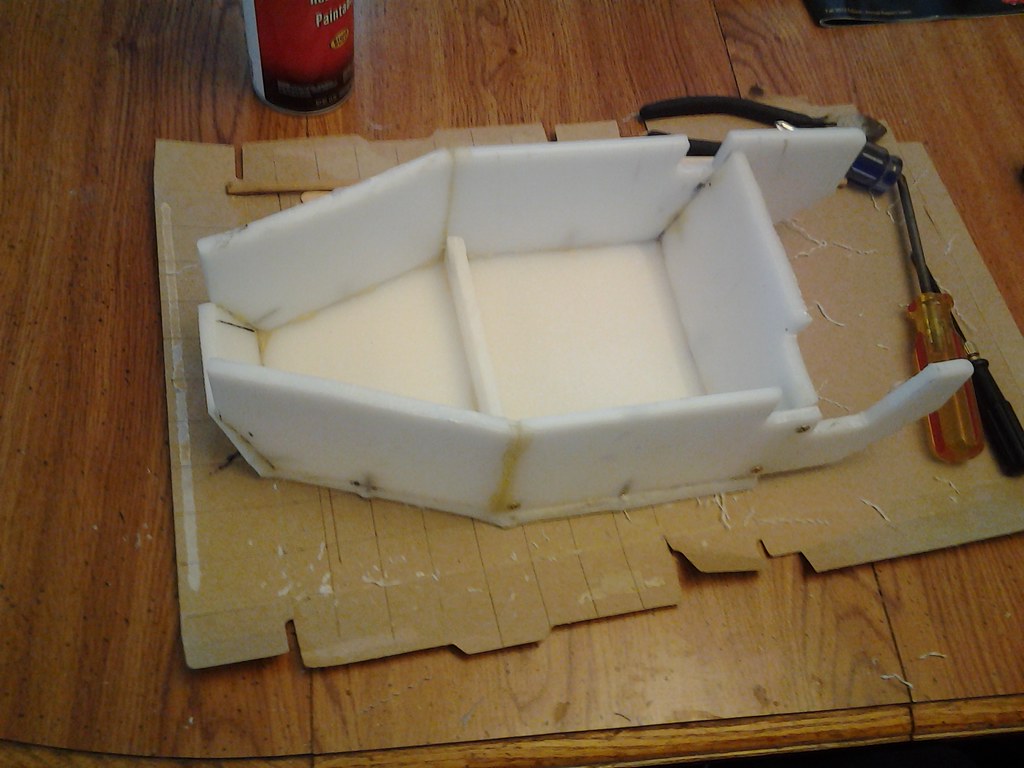
After some bondo and paint it was looking almost okay.
It fit the spot it needed to fit and I could get everything that I I needed into it.

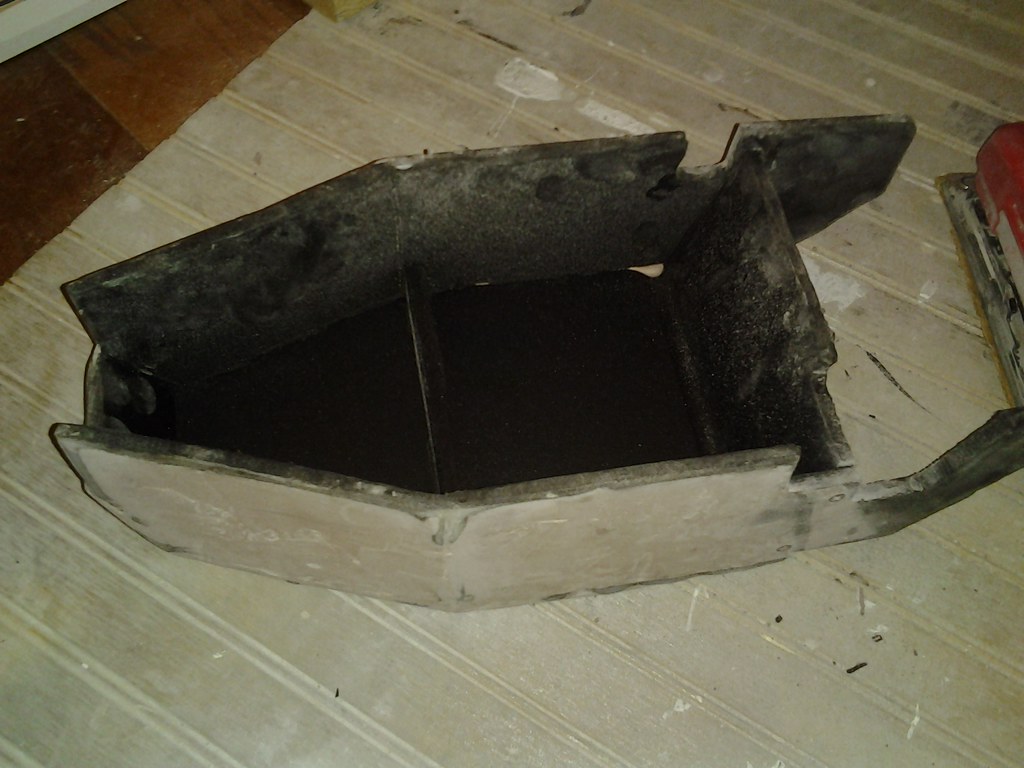
But it looked pretty bad and not something that I was okay with being on my bike. I'm no perfectionist but it was really bad. And the joints cracked apart the first time I put any stress on it trying to get it into place. My next two choices were to either buy some sheet metal and build a brake and rivet it together or pay someone to weld me up a tray. One of the members of DTT offered to do some light fabrication and welding and I took him up on the offer. I wanted a try to go under the seat but with a rear "shelf" that was hollow underneath as a place to mount the reg/rect and also act as a short fender to keep moisture away from the contents. I put together a model of what I wanted in Google SketchUp and sent it to him. A week or so later he sent me these pictures. Perfect.
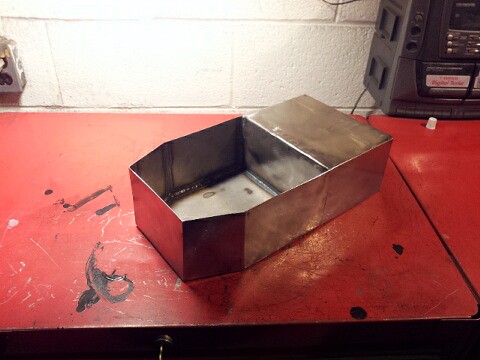

I had to trim it a little here and there to get it to fit perfectly but it was exactly what I wanted.
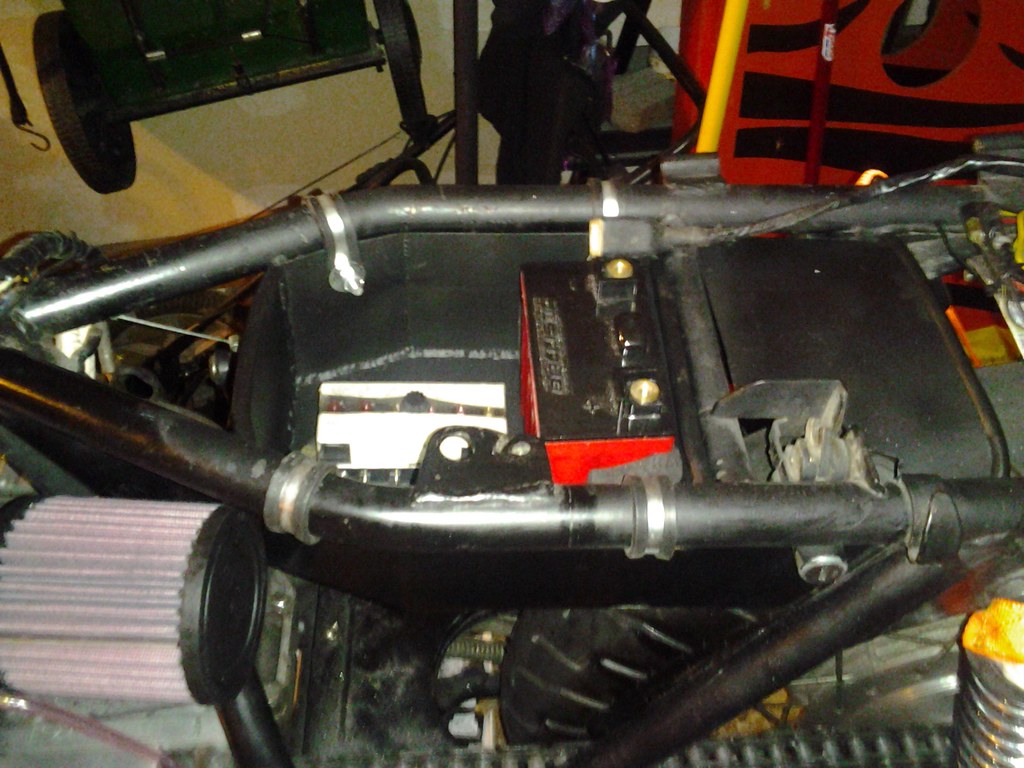
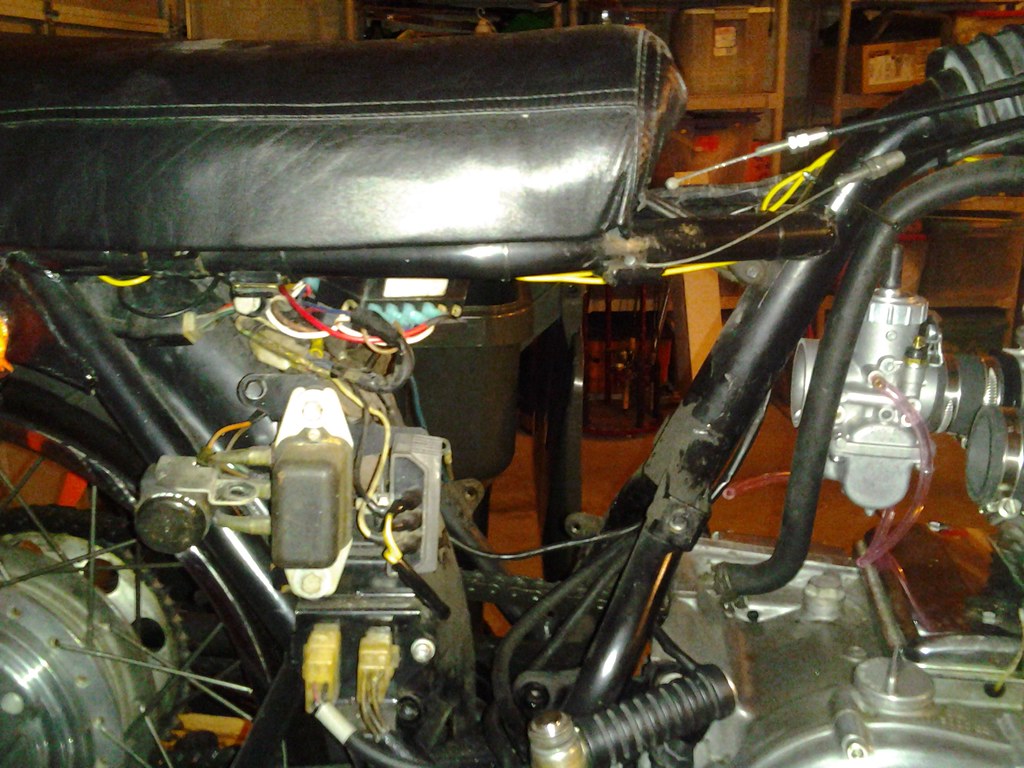
Everything fit. In fact, there was more room than I thought there would be. I was able to stand the battery up. If I were to lay it on its side I could probably remove another 2-3 inches from the height of the tray but it's fine for now.
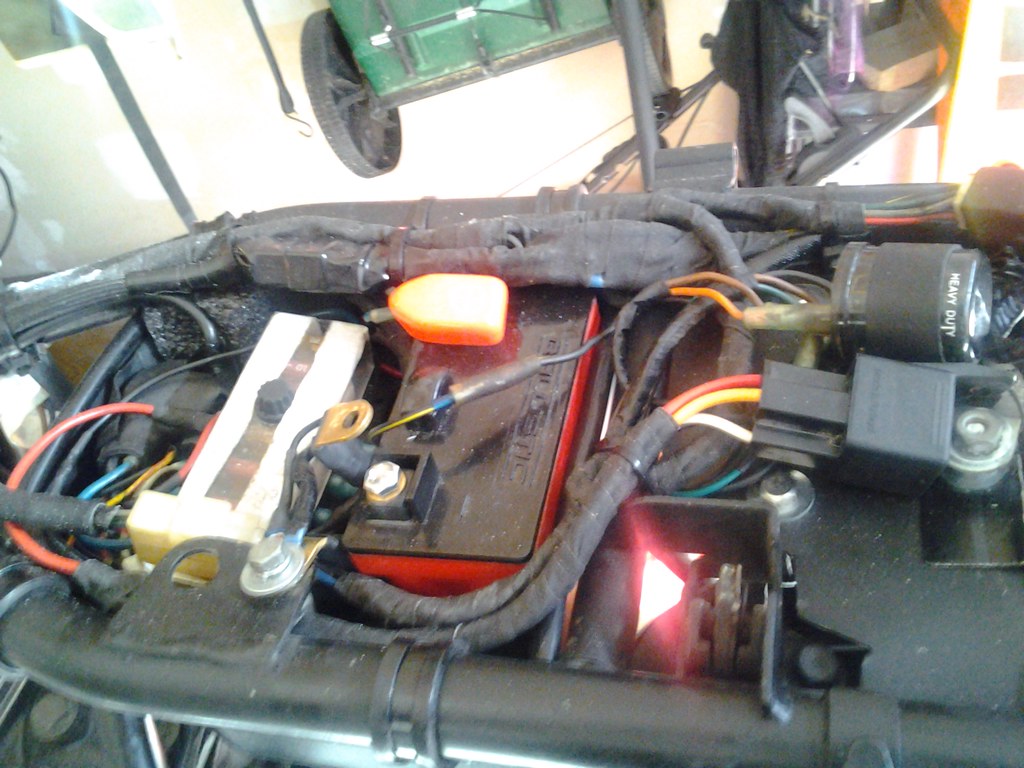
I used some of the foam from the battery packaging to keep everything in place. Most of the wiring was tidy-ed up later.


With all that done it was now time to get the carbs dialed in and make sure all my electronics re-arranging did no harm.
After some bondo and paint it was looking almost okay.
It fit the spot it needed to fit and I could get everything that I I needed into it.
But it looked pretty bad and not something that I was okay with being on my bike. I'm no perfectionist but it was really bad. And the joints cracked apart the first time I put any stress on it trying to get it into place. My next two choices were to either buy some sheet metal and build a brake and rivet it together or pay someone to weld me up a tray. One of the members of DTT offered to do some light fabrication and welding and I took him up on the offer. I wanted a try to go under the seat but with a rear "shelf" that was hollow underneath as a place to mount the reg/rect and also act as a short fender to keep moisture away from the contents. I put together a model of what I wanted in Google SketchUp and sent it to him. A week or so later he sent me these pictures. Perfect.
I had to trim it a little here and there to get it to fit perfectly but it was exactly what I wanted.
Everything fit. In fact, there was more room than I thought there would be. I was able to stand the battery up. If I were to lay it on its side I could probably remove another 2-3 inches from the height of the tray but it's fine for now.
I used some of the foam from the battery packaging to keep everything in place. Most of the wiring was tidy-ed up later.
With all that done it was now time to get the carbs dialed in and make sure all my electronics re-arranging did no harm.
Please Log in or Create an account to join the conversation.
- diggerdanh
-
Topic Author
- Offline
- User
-
Registered
- Posts: 242
- Thanks: 89
Re: 1976 KZ400 D3 Grimey
08 Sep 2015 06:25
Over the Spring of 2013 I got everything buttoned up, tested all the electrics and started getting the carbs dialed in. IIRC I started with 240 mains, 25 pilots, the 3.0 slide and everything else stock as they were shipped. I started there because another member of the Kawasaki Twins forum was running that setup and I figured it would get me close.
Standard jetting for VM30-83, Sudco part # 001-024
Main Jet: 4/042 #250
Pilot Jet: VM22/210 #40
Needle Jet: #159 P-5
Jet Needle: #6F5
Throttle Valve Cutaway: VM34/110 2.5 (slide)
Air Jet: BS30/97 2.0
Needle Valve Set: Vm34/39-3.3
Float Height: 22-24mm
However my carbs/bike hated the 3.0 slides, they just would not run. I went back to the 2.5 slides and it started right up. I've tried changing the pilot and it seems to like the 25 best. It is way too rich and fouls plugs if I use a 30 and 20 is way too lean and difficult to start. I've been between 200-240 on the mains and am currently using the 220s. I had a little stumble for the longest time about 1/4 throttle. I went up a clip on the needle earlier this year and that really smoothed things out.
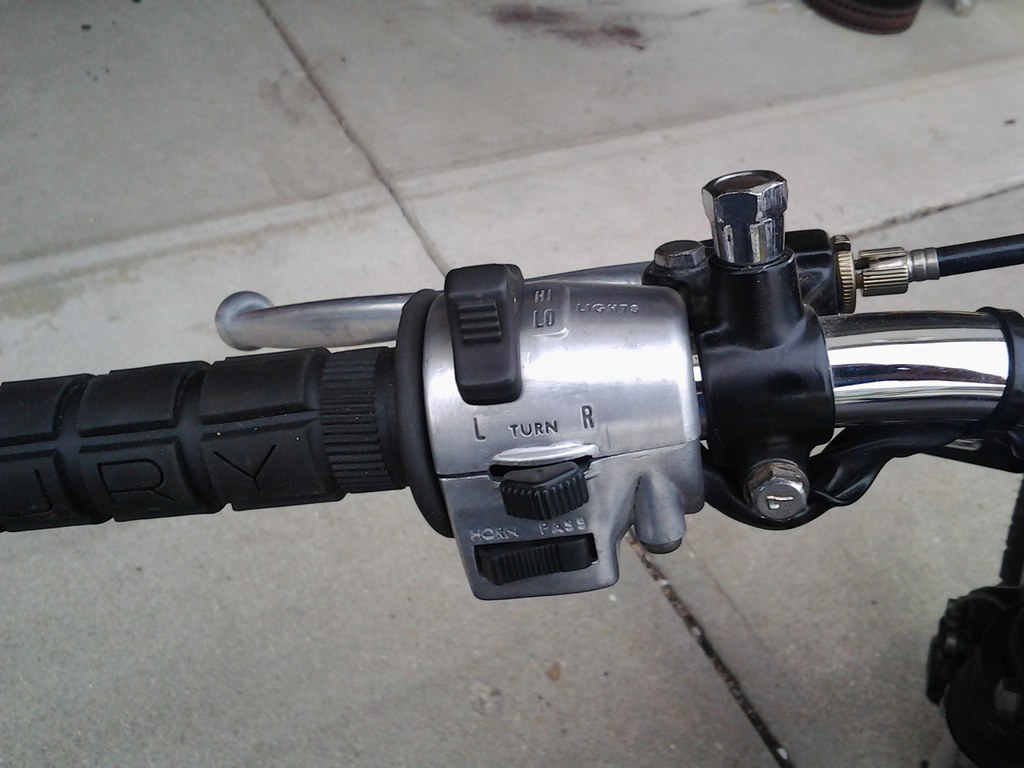
While I was getting everything put back together I touched up paint on the frame for the brackets I had cut off and I addressed some other cosmetic issues. I stripped the paint from the handlebar controls.
I painted the rear fender satin black to match the under seat tray and everything else.

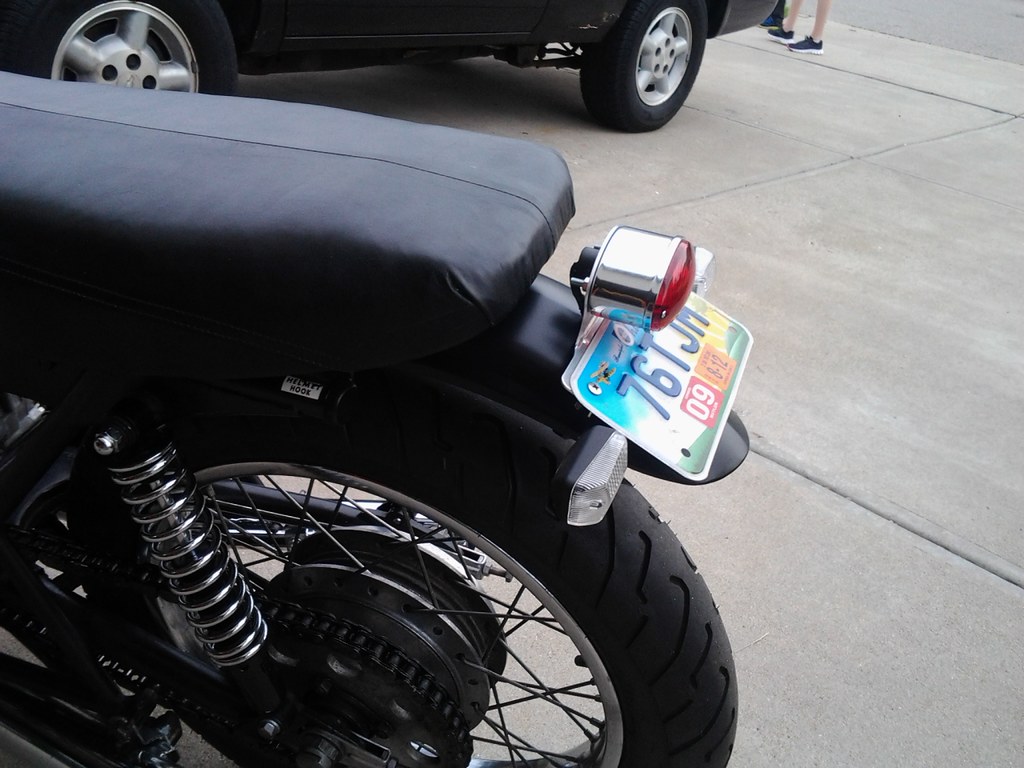
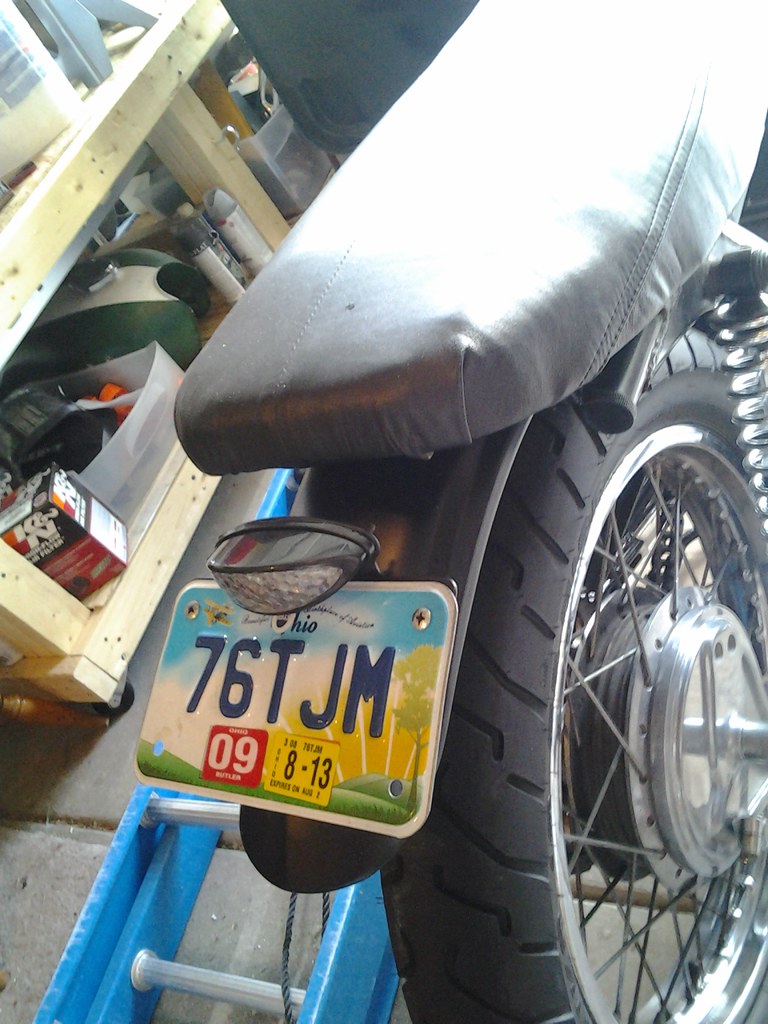
I put together a little tail light, turn signal, and license plate assembly for the rear fender that wasn't too ugly.
The battery / electronics tray was in and looked pretty good. The triangle was cleared.
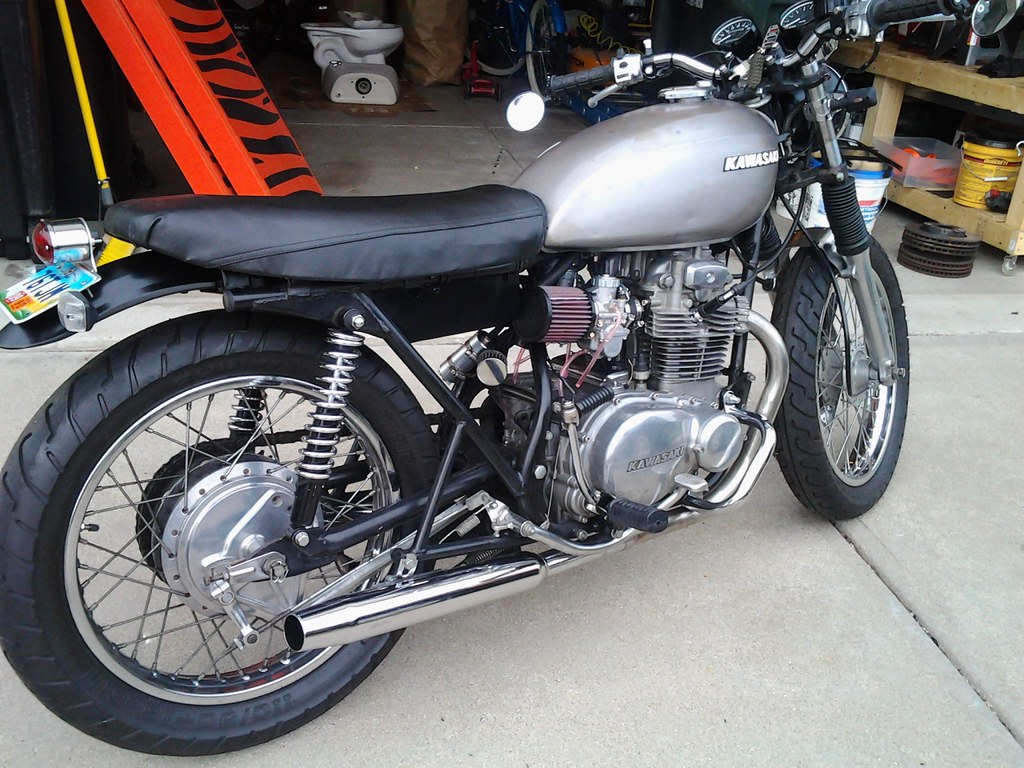
As a whole the bike was looking pretty good.
I bought a new integrated tail light / brake light / turn signal / license plate unit to further clean up the rear fender.
It was now the end of June 2013 but I had not had much time to ride because we were working on selling our house and buying a place a little further out with a nice piece of land and a great big out-building/barn/shop.
Around the first of August we moved into the new place and so did my bike.
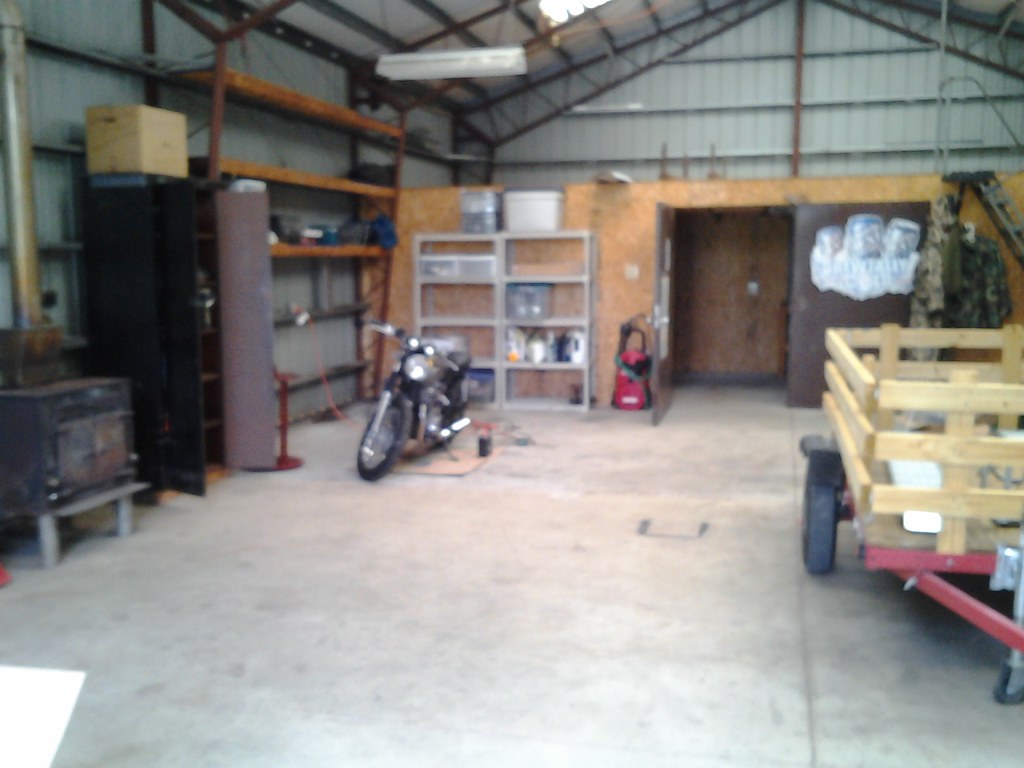
Though I now had a great big shop for working on the bike it took me a while to get used to all the work that needed to be done around the new home. Additionally we had to buy a lot of new stuff (big lawn mower, chainsaws, etc) that left little budget to spend on motorcycles.
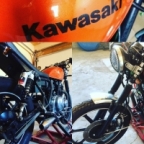
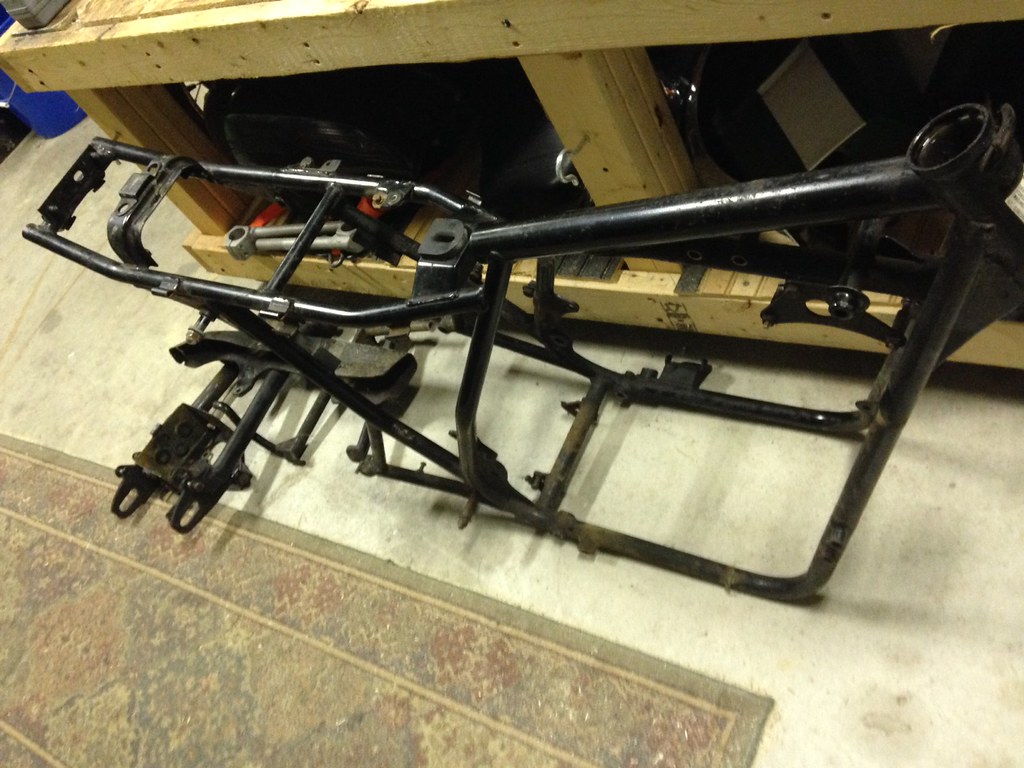
Fall came and went. Winter came and went. Spring came and went. Around June of 2014 I saw something on Craigslist that I could not pass up - a 1978 KZ400 B with about 17K miles for next to nothing. The PO, a 17 year old kid, bought it to build a cafe racer and it ran fine. The tore town the top end to fix oil leaks, lost his motivation, and bought another bike. I brought it home and proceeded to finish stripping it down. This one would become the scrambler that Kawasaki should have but never built - like the CL350/450 but a KZ400.

Ordering parts, painting the frame, replacing seals and bearings kept be busy. Around the same time my Dad rolled a 1972 Triumph Bonneville into the shop to start restoring it. Winter came again and the 76 KZ400 waited for spring.

Standard jetting for VM30-83, Sudco part # 001-024
Main Jet: 4/042 #250
Pilot Jet: VM22/210 #40
Needle Jet: #159 P-5
Jet Needle: #6F5
Throttle Valve Cutaway: VM34/110 2.5 (slide)
Air Jet: BS30/97 2.0
Needle Valve Set: Vm34/39-3.3
Float Height: 22-24mm
However my carbs/bike hated the 3.0 slides, they just would not run. I went back to the 2.5 slides and it started right up. I've tried changing the pilot and it seems to like the 25 best. It is way too rich and fouls plugs if I use a 30 and 20 is way too lean and difficult to start. I've been between 200-240 on the mains and am currently using the 220s. I had a little stumble for the longest time about 1/4 throttle. I went up a clip on the needle earlier this year and that really smoothed things out.
While I was getting everything put back together I touched up paint on the frame for the brackets I had cut off and I addressed some other cosmetic issues. I stripped the paint from the handlebar controls.
I painted the rear fender satin black to match the under seat tray and everything else.
I put together a little tail light, turn signal, and license plate assembly for the rear fender that wasn't too ugly.
The battery / electronics tray was in and looked pretty good. The triangle was cleared.
As a whole the bike was looking pretty good.
I bought a new integrated tail light / brake light / turn signal / license plate unit to further clean up the rear fender.
It was now the end of June 2013 but I had not had much time to ride because we were working on selling our house and buying a place a little further out with a nice piece of land and a great big out-building/barn/shop.
Around the first of August we moved into the new place and so did my bike.
Though I now had a great big shop for working on the bike it took me a while to get used to all the work that needed to be done around the new home. Additionally we had to buy a lot of new stuff (big lawn mower, chainsaws, etc) that left little budget to spend on motorcycles.
Fall came and went. Winter came and went. Spring came and went. Around June of 2014 I saw something on Craigslist that I could not pass up - a 1978 KZ400 B with about 17K miles for next to nothing. The PO, a 17 year old kid, bought it to build a cafe racer and it ran fine. The tore town the top end to fix oil leaks, lost his motivation, and bought another bike. I brought it home and proceeded to finish stripping it down. This one would become the scrambler that Kawasaki should have but never built - like the CL350/450 but a KZ400.
Ordering parts, painting the frame, replacing seals and bearings kept be busy. Around the same time my Dad rolled a 1972 Triumph Bonneville into the shop to start restoring it. Winter came again and the 76 KZ400 waited for spring.
Please Log in or Create an account to join the conversation.
- diggerdanh
-
Topic Author
- Offline
- User
-
Registered
- Posts: 242
- Thanks: 89
Re: 1976 KZ400 D3 Grimey
08 Sep 2015 06:45 - 08 Sep 2015 11:48
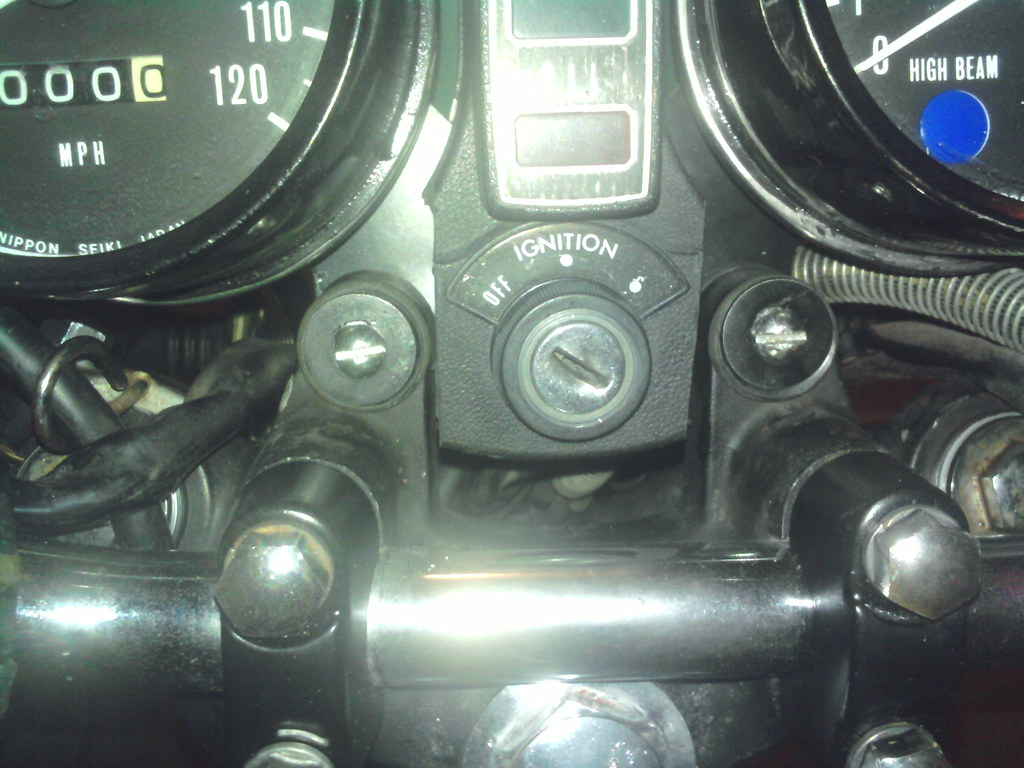
Spring 2015 is finally here and before it's warm enough to start on what seems to be an endless list of clean up things that need done around the yard I decide to update the tach and speedo to a pair of 2.5" mini gauges to clean up the front end some more. I also wanted to swap out the old sealed beam headlight for an H4 style and the simplest approach seemed to be a whole new headlight assembly, bucket and all.
My factory wiring to new tach/speedo diagram.

End result.

The front fender found its way back on the bike after a satin black paint job.

I have actually found time for the first time in a couple years to ride the thing and have been enjoying the heck out of it.
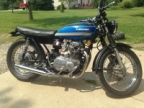
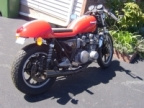
That pretty much brings us up to date. A couple weeks ago I swapped out the fork gaiters, the old ones were cracked and crumbling apart, for a pair of Rancho shock boots - look good and are cheaper. I replaced the old pair of dress socks I was using for pre-filters with a pair of K&N pre-filters more suited to the job. And I replaced the tank with a nice one that looks right.

What's left to do? Not a bunch. I'd like to swap out the fork springs for a pair of Progressive springs. Eventually I'll have to tear down the top end to try to fix the minor oil leaks. At some point I'll swap the brake lines for some braided lines. And that's really about it.
My factory wiring to new tach/speedo diagram.
End result.
The front fender found its way back on the bike after a satin black paint job.
I have actually found time for the first time in a couple years to ride the thing and have been enjoying the heck out of it.
That pretty much brings us up to date. A couple weeks ago I swapped out the fork gaiters, the old ones were cracked and crumbling apart, for a pair of Rancho shock boots - look good and are cheaper. I replaced the old pair of dress socks I was using for pre-filters with a pair of K&N pre-filters more suited to the job. And I replaced the tank with a nice one that looks right.
What's left to do? Not a bunch. I'd like to swap out the fork springs for a pair of Progressive springs. Eventually I'll have to tear down the top end to try to fix the minor oil leaks. At some point I'll swap the brake lines for some braided lines. And that's really about it.
Last edit: 08 Sep 2015 11:48 by diggerdanh.
Please Log in or Create an account to join the conversation.
- diggerdanh
-
Topic Author
- Offline
- User
-
Registered
- Posts: 242
- Thanks: 89
Re: 1976 KZ400 D3 Grimey
08 Sep 2015 12:03
Shimmy,
Remove the gauges and idiot lights from the bracket. If I remember correctly there are studs at the bottom of the bracket that feed through the two bosses on the top triple. Remove those and drill out the spots they were in so you can fit a bolt through each of them. Basically after that you can fit the bracket under the top triple instead of on top of it. Find some bolts, washers and something to use as spacers to hold it all together. You can see there that I used what look to be rubber washers that are about 1/4" thick. Later I added ones that were much thicker, or maybe even several of them stacked, to move the bracket down even lower. You may need to also lower your headlight depending on how low you go with the gauges.
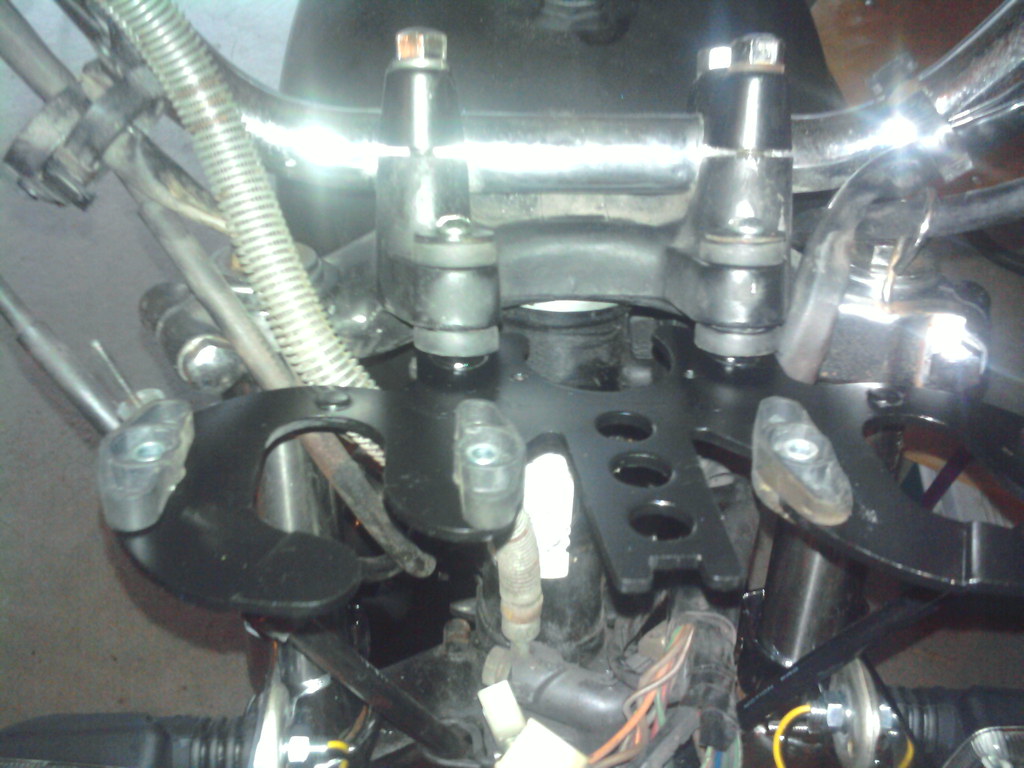
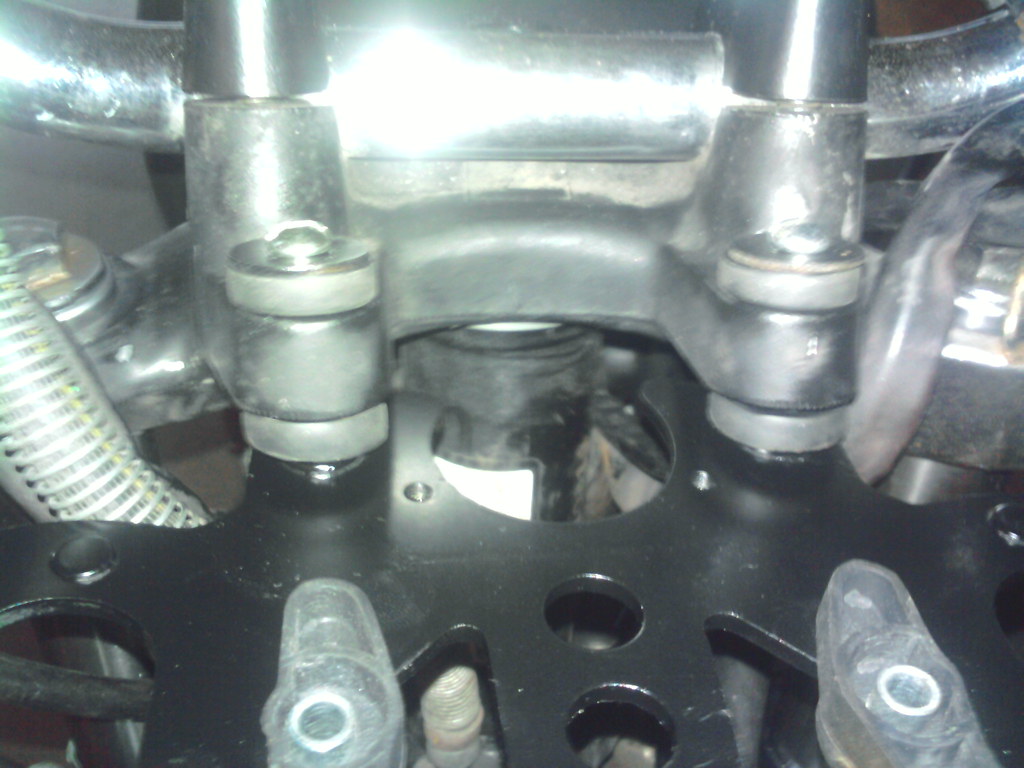
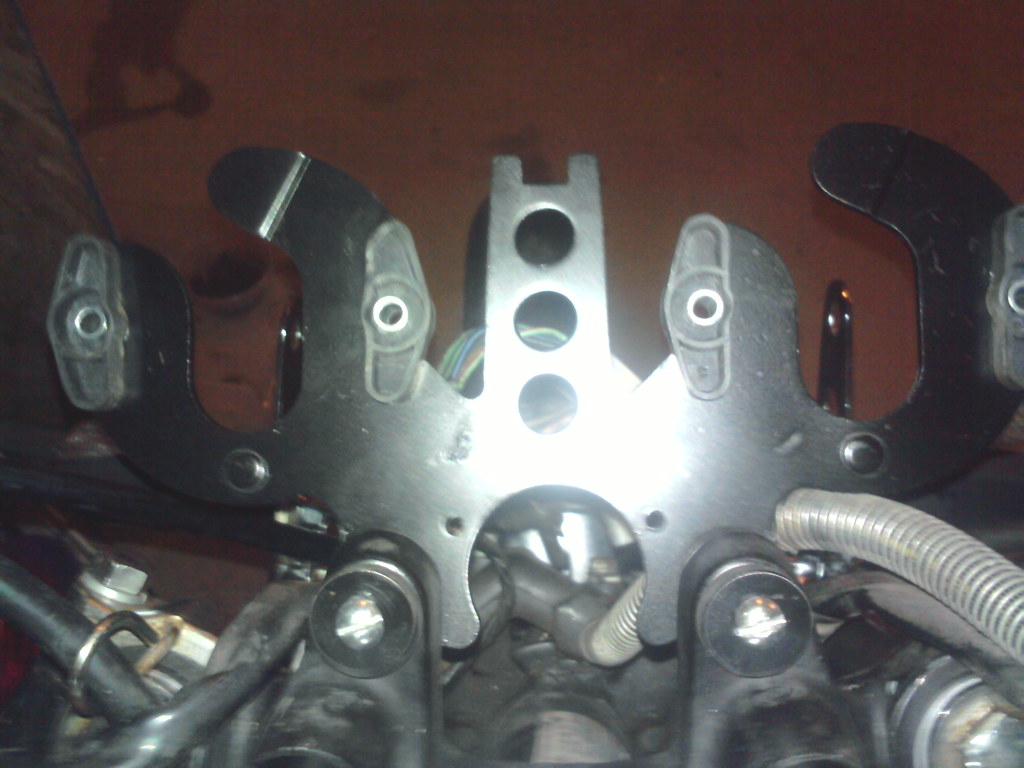
The other thing you'll have to address is the little housing that covers the idiot lights and the ignition. It is shaped like a bat wing and originally covered the studs that attached to the triple. With your gauges now lowered it will not fit. I simply cut the "wings" off so it would fit in between the two mounting points. You may want to try to salvage some of plastic you cut off and glue them back on to cover the sides that are now open. Hard to explain but you'll see what I mean in the pics.

Remove the gauges and idiot lights from the bracket. If I remember correctly there are studs at the bottom of the bracket that feed through the two bosses on the top triple. Remove those and drill out the spots they were in so you can fit a bolt through each of them. Basically after that you can fit the bracket under the top triple instead of on top of it. Find some bolts, washers and something to use as spacers to hold it all together. You can see there that I used what look to be rubber washers that are about 1/4" thick. Later I added ones that were much thicker, or maybe even several of them stacked, to move the bracket down even lower. You may need to also lower your headlight depending on how low you go with the gauges.
The other thing you'll have to address is the little housing that covers the idiot lights and the ignition. It is shaped like a bat wing and originally covered the studs that attached to the triple. With your gauges now lowered it will not fit. I simply cut the "wings" off so it would fit in between the two mounting points. You may want to try to salvage some of plastic you cut off and glue them back on to cover the sides that are now open. Hard to explain but you'll see what I mean in the pics.
The following user(s) said Thank You: Shimmy
Please Log in or Create an account to join the conversation.
- Shimmy
-
- Offline
- User
-
Registered
- Posts: 121
- Thanks: 15
Re: 1976 KZ400 D3 Grimey
08 Sep 2015 16:53
Very cool, I may look at doing that soon; the headlight's already lowered out of the way.
Good luck with the scrambler!
Good luck with the scrambler!
1980 KZ750 LTD
Edmonton, Alberta
Edmonton, Alberta
Please Log in or Create an account to join the conversation.
- SWest
-
- Offline
- Sustaining Member
-
Registered
- 10 22 2014
- Posts: 23726
- Thanks: 3014
Re: 1976 KZ400 D3 Grimey
08 Sep 2015 18:30
I'm glad you got rid of that trailer tail light. I think it looked better with the side covers tho. :whistle:
Steve
Steve
Z1b1000 1975 Z1b
kzrider.com/forum/11-projects/598262-kz-...-will-it-live#672882
kzrider.com/forum/2-engine/597654-poser?start=240#704229
kzrider.com/forum/11-projects/598262-kz-...-will-it-live#672882
kzrider.com/forum/2-engine/597654-poser?start=240#704229
Please Log in or Create an account to join the conversation.
- diggerdanh
-
Topic Author
- Offline
- User
-
Registered
- Posts: 242
- Thanks: 89
Re: 1976 KZ400 D3 Grimey
05 Jun 2017 08:52
I've had a small oil leak for a while now - as these early KZ400s will do. Because it ran pretty well I never did anything to the engine other than check timing, adjust timing chain and set valve clearance and with just a little leak did not feel like tearing into the engine to fix it. It seemed to be leaking from a couple different spots - one or two between the head and rocker box and another spot between the jugs and the head. Last year the leaks got a little worse and I wanted to try to clear it up before taking it out this year. Or at least take it back to just a small leak.
My plan was to remove the valve cover and rocker box and check/retorque the head bolts to see if that helped the leaks. So that is what I did yesterday evening. There was a service bulletin issued for the early KZ400s to help improve the oil leaks these engines exhibited. In looking through that bulletin I have found that at least some of the improved parts have been applied to this bike, the cam end caps have been. So that's good - it appears to have been well cared for early on.
I also found a source for at least some of the leakage - the o-ring seal for the rocker box, where it seals to the head was in pretty bad shape. It had deteriorated to nothing in a few places and what was left of it was very brittle and basically crumbled when I removed it. And the head bolts were not very tight (supposed to be 18 ft/lbs) so that might be another reason for leaks.
That part, the rocker box, went through several redesigns. Initially it came with a groove for the o-ring (which seems to be what mine has). That was found to leak so the next iteration was no groove and you were supposed to use sealant between it and the head. Then they added back a groove but instead of an o-ring you are supposed to use sealant. I did not have another o-ring in the gasket rebuild kit that I have and since they were superceded anyway in favor of sealant I applied a bead of black ultra rtv in the groove and put it back in place. I let everything sit overnight after torquing the head bolts and re-assembling everything else.
I will be testing it out during lunch break today. Hopefully the sealant and tightening up the head bolts will fix the oil leaks, or at least make them minor again. If not I will go ahead and take it back apart, pull the head, and reinstall with new gaskets and sealant.
Please Log in or Create an account to join the conversation.
- z1kzonly
-

- Offline
- User
-
Registered
- Sustaining Member
- Posts: 2815
- Thanks: 527
Re: 1976 KZ400 D3 Grimey
05 Jun 2017 09:47diggerdanh wrote: I recently swapped tanks to a new (to me) 1975 tank with a new repro gas cap. I liked the naked steel look but this just looks right. It now looks like a proper mid-70s Kawasaki. I practically stole the tank on Ebay - sorry and thanks if it was any of you all. The tank looks great in the pic but it has a few small scratches here and there, just minor stuff. But I think it's perfect for a nearly 40 year old motorcycle. It looks like someone recently re-cleared it - it has a lot of shine.

Other than a few odds and ends and regular maintenance I think I'm about done "building" (restoring/restomodding?) this bike after 4 years and way too much money. It's my first, I love it and I think I'll keep it forever - despite the lies I've told my wife about selling both bikes to fund the next one after I'm done with the scrambler. I'm sure the next one will be happy to join the herd.
Some day soon I'll post pics and details of the journey,
Hello D D! Cool little bike, I just picked one up without a title. It was Donated to Charity Fundings and sold as Salvage. (No Title) Looking for a similar title somewhere Close yr even 650. As long as 2 Cly. I find title I won't even re-stamp frame.
I see you have round slide Mikuni's on this one. Where they on early models? Or did you just fit them? What size are they 24-26-28? I need a set to start this bike I have. Not buying those junk condom diaphragm ones, they suck IMO unless nice shape. Friend has a pile of mikunis laying in a box.
But this was going to be an eBay money maker. Looks like all the parts seem to sell. As this little bike was all over Europe as well as japan and USA. Looks like a little dirt bike around town bike. Bungee cord on back to hold a 12 pack of beer.
Whatever, I need a title before I dis mantle it next winter.
Livin in "CheektaVegas, NY
Went thru 25 of these in 40 yrs.
I SOLD OUT! THE KAW BARN IS EMPTY.
More room for The Old Girl, Harley 75 FLH Electra Glide,
Old faithful! Points ign. Bendix Orig. carb.
Starts everytime!
Went thru 25 of these in 40 yrs.
I SOLD OUT! THE KAW BARN IS EMPTY.
More room for The Old Girl, Harley 75 FLH Electra Glide,
Old faithful! Points ign. Bendix Orig. carb.
Starts everytime!
Please Log in or Create an account to join the conversation.
- diggerdanh
-
Topic Author
- Offline
- User
-
Registered
- Posts: 242
- Thanks: 89
Re: 1976 KZ400 D3 Grimey
05 Jun 2017 09:59 - 05 Jun 2017 10:10
Thanks. Yes, I am running new VM30s on this one. They work really well.
I hope you come up with a title. It would be a shame to see it parted out. Though those parts will contribute to other 400s living on.
I hope you come up with a title. It would be a shame to see it parted out. Though those parts will contribute to other 400s living on.
Last edit: 05 Jun 2017 10:10 by diggerdanh.
Please Log in or Create an account to join the conversation.
Moderators: Street Fighter LTD