
Rearsets and Front End Complete !!
- HENRYJ
-
 Topic Author
- Offline
- User
-

Registered
- Posts: 49
- Thanks: 1
Re: Rearsets and Front End Complete !!
21 Apr 2006 22:28
For all of you who had questions...here goes:
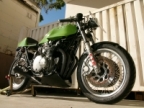
The rearsets were bought off of Ebay. They came off of a GSXR750. I drilled the mounting holes (one over the swing arm bolt, and one under the swingarm bolt) and fed the 8mm flanged-head mounting bolts in from the back side. I had to grind the heads down some in order to clear the swingarm. I did have to drop the swingarm out in order to feed the bolts in. Both sides are frame/lockwasher/nut/spacer/rearset bracket/lockwasher/nut. The spacer was necessary on the brake side to allow the brakelight switch and some of the brake cylinder. On the shifter side clearances are at a mininum. The shifter linkage was shortened and rethreaded to length. The part that actually mounts on the shaft was driven flush (when I say driven, I mean hammered on) and the shaft had a groove dremeled in to allow the locking bolt to clear. By mounting it on the end of the shaft it also allowed the shifter to clear the frame (barely). The part of the shifter that your toe actually goes under barely clears the kickstand when up, and I actually had to turn the kickstand spring around so that the spring winds are at the top to give a few extra mm spacing.
It remains 1 down 4 up.
The kickstarter clears the foot peg when pulled up, but bottoms out on the brake pedal itself. I have not tried kicking it over yet, but I would say it should still work with 85% of the stroke.(?)
The gauges and headlight were pretty simple. I pulled my forks out, and flipped my headlight mounts - right went upside down on the left, left went upside down on the right- .
The stock gauges consist of a metal frame with two threaded posts which go through the triple clamp. I simply sawed off the posts and drilled holes where they used to be. I then remounted them from the bottom of the triple clamp instead of the top. The only problem is that once you do this the top cover that is held on with the big plastic nut will not fit. So out came the dremel and I cut away the plastic untill if fit snugly against the triple clamp.
Viola`
The air tubes from the carbs to the air box are made from VERY thick flexible spa tubing available at the Home Depot. I opened up the holes in the airbox and they slide back and forth. When I need to remove the carbs I reach into the airbox, pull them into the airbox and it gives ample room to move the carbs. Two years now and no problems.
The seat is the standard seat with cut down foam, and professionally recovered. For the love of God guys...find a good upholstry shop for your seats, this one was only $40, and the guy had no pattern to go from, I just told him what I wanted. (Aircraft Interiors - Olive Branch, MS)
I really do love this bike and I would like to thank everyone here for the help, advice, and support that they have given along the way!
Ride safe!
Post edited by: HENRYJ, at: 2006/04/22 01:43
Please Log in or Create an account to join the conversation.
- HENRYJ
-
Topic Author
- Offline
- User
-
Registered
- Posts: 49
- Thanks: 1
Re: Rearsets and Front End Complete !!
21 Apr 2006 22:28
Posted twice for some reason???
Post edited by: HENRYJ, at: 2006/04/22 01:33
Post edited by: HENRYJ, at: 2006/04/22 01:33
Please Log in or Create an account to join the conversation.
- DanOz7Five0
-
- Offline
- User
-
Registered
- Posts: 347
- Thanks: 0
Re: Rearsets and Front End Complete !!
22 Apr 2006 08:31
Looks great. I want to do the guage flip now on mine.
Please Log in or Create an account to join the conversation.
- CruisingRam
-
- Offline
- User
-
Registered
- Posts: 643
- Thanks: 16
Re: Rearsets and Front End Complete !!
23 Apr 2006 02:12
What a killer bike! Two thumbs WAY up! Excellent work!
My only slightly - comment? some sort of "rock and rain" catcher to replace the fender- fork braces are a good idea anyway- they help prevent tank slapper! Maybe some kind of front hugger?
Just a safety tip though- otherwise- looks great!
My only slightly - comment? some sort of "rock and rain" catcher to replace the fender- fork braces are a good idea anyway- they help prevent tank slapper! Maybe some kind of front hugger?
Just a safety tip though- otherwise- looks great!
1975 Z1 B 900- soon to be heavily modded
Pahoa, Hawaii is my new hom
I am working hard to save up the shipping money to get my shop opened here in Hawaii
I hate electrical stuff.
Pahoa, Hawaii is my new hom
I am working hard to save up the shipping money to get my shop opened here in Hawaii
I hate electrical stuff.
Please Log in or Create an account to join the conversation.
- Werewolfx
-
- Offline
- User
-
Registered
- Posts: 163
- Thanks: 0
Re: Rearsets and Front End Complete !!
23 Apr 2006 15:52
Sounds like you put a lot of hard work into it..I kinda like your old "before any work was done" pic though, just looks like it needs paint there. Good work, none the less.")
Chris
Please Log in or Create an account to join the conversation.
- KZReeder
-

- Offline
- User
-
Registered
- Posts: 149
- Thanks: 1
Re: Rearsets and Front End Complete !!
23 Apr 2006 16:59
Cool bikes!
I love the cafe/hot-rod look. Where're you guys getting your fork gators... I'd like to get a set for my KZ1000st project...
Dutch! I love how see-through your bike is... where'd you hide your battery???
Thanks,
Claude
I love the cafe/hot-rod look. Where're you guys getting your fork gators... I'd like to get a set for my KZ1000st project...
Dutch! I love how see-through your bike is... where'd you hide your battery???
Thanks,
Claude
Please Log in or Create an account to join the conversation.
- dutchz
-
- Offline
- User
-
Registered
- Posts: 784
- Thanks: 4
Re: Rearsets and Front End Complete !!
24 Apr 2006 08:48
I think my gators are Norton Commando ones. I am going to try some different ones next time because these have to be stretched too much at the bottom and are starting to split at the seam. They're the perfect length though.
The battery is a small sealed type, it under the seat just behind the downtubes.
The battery is a small sealed type, it under the seat just behind the downtubes.
1974 Kawasaki Z1
Stock front hub and rear axle.
Stock front hub and rear axle.
Please Log in or Create an account to join the conversation.
Moderators: Street Fighter LTD