
And finally, Wookie's 82 begins !
- MFP-Joe
-

- Offline
- User
-

Registered
- forever 18 when on my bike
- Posts: 525
- Thanks: 674
Re: And finally, Wookie's 82 begins !
26 May 2026 08:45
Hello Guy, I understand your frustration all too well! It takes a great deal of fine-tuning—measuring, trial-and-error, and ultimately a good dose of luck—to make "bearing caps that don't match the cylinder head" fit properly... unfortunately, this succeeds all too rarely! But I am certain *you* will pull it off; you have the technical understanding, the patience, and the resources! I wish you the very best of luck!
(I once bought a Z1b that was in "running condition"... but when I performed a major service—including valve adjustment—a few weeks later, I discovered that the bearing caps for the exhaust camshaft hadn't been tightened down. When I did tighten them, the camshaft seized up completely. I actually got lucky in that instance, because the "problematic bearing cap" was geometrically compatible with the curvature/bearing saddle; it was "only" too short. I managed to resolve it using special shims—6 mm inner diameter, ranging in thickness from 0.01 to 0.03 mm—to dial in the measurements precisely so that I could properly secure the bearing cap, and everything ran smoothly again.)
But one cannot emphasize this enough:
Folks, do not buy used cylinder heads unless the original, matching bearing caps are included! The bearing bore was machined at the factory in conjunction with the bearing caps; EVERY single cylinder head is manufactured with minute, unique variations in the horizontal bore for the camshafts!
Greetings, Joe
The following user(s) said Thank You: sf4t7, Wookie58
Please Log in or Create an account to join the conversation.
- moizeau
-

- Offline
- User
-
Registered
- Posts: 64
- Thanks: 49
Re: And finally, Wookie's 82 begins !
26 May 2026 10:35
As are the lower cases and crank big cap
Please Log in or Create an account to join the conversation.
- Wookie58
-
 Topic Author
- Offline
- Moderator
-

Registered
- Posts: 6513
- Thanks: 4103
Re: And finally, Wookie's 82 begins !
26 May 2026 10:44indeed they are, however I had no reason to suspect anything was amiss!! Lesson learnt the hard way - hopefully I have saved the situationAs are the lower cases and crank big cap
1982 KZ1000 Ltd
www.kzrider.com/forum/11-projects/617631...-82-begins?start=192
kzrider.com/forum/faq-wiki/616810-electr...-fault-finding-guide
www.kzrider.com/forum/11-projects/617631...-82-begins?start=192
kzrider.com/forum/faq-wiki/616810-electr...-fault-finding-guide
Please Log in or Create an account to join the conversation.
- moizeau
-
- Offline
- User
-
Registered
- Posts: 64
- Thanks: 49
Re: And finally, Wookie's 82 begins !
26 May 2026 10:50 - 26 May 2026 10:50
Forgot to add, great job. I've just been rereading your painting. Itchy bum time here soon, never done it. What did you grind on the caps? A wise man (who we both know)told me for fore and aft cleareance the holes can be enlarged and the cams, under pressure from the valves will keep them central. Did you swap swap 1 and 3 caps to see if someone had sorted it before?
Last edit: 26 May 2026 10:50 by moizeau.
The following user(s) said Thank You: Wookie58
Please Log in or Create an account to join the conversation.
- Wookie58
-
Topic Author
- Offline
- Moderator
-
Registered
- Posts: 6513
- Thanks: 4103
Re: And finally, Wookie's 82 begins !
26 May 2026 10:58Yes I did try swopping 1 & 3, the bearing clearance on top is in spec, the issue was the sides. The last 1/4 turn on the bolts was pushing the ends of the bearing in and pinching the cam. I I used a small flap wheel in my pillar drill so I could stay square then took a little at a time until the caps would tighten down without pinchingForgot to add, great job. I've just been rereading your painting. Itchy bum time here soon, never done it. What did you grind on the caps? A wise man (who we both know)told me for fore and aft cleareance the holes can be enlarged and the cams, under pressure from the valves will keep them central. Did you swap swap 1 and 3 caps to see if someone had sorted it before?
1982 KZ1000 Ltd
www.kzrider.com/forum/11-projects/617631...-82-begins?start=192
kzrider.com/forum/faq-wiki/616810-electr...-fault-finding-guide
www.kzrider.com/forum/11-projects/617631...-82-begins?start=192
kzrider.com/forum/faq-wiki/616810-electr...-fault-finding-guide
The following user(s) said Thank You: moizeau
Please Log in or Create an account to join the conversation.
- TexasKZ
-

- Offline
- Platinum Member
-

Registered
- Posts: 8267
- Thanks: 2723
Re: And finally, Wookie's 82 begins !
26 May 2026 13:07
Wow! Good on you for checking the clearance. These old machines can hide a plethora of surprises.
1982 KZ1000 LTD parts donor
1981 KZ1000 LTD awaiting resurrection
2000 ZRX1100 not ridden enough
www.kzrider.com/forum/11-projects/620336...amateur-build-thread
1981 KZ1000 LTD awaiting resurrection
2000 ZRX1100 not ridden enough
www.kzrider.com/forum/11-projects/620336...amateur-build-thread
The following user(s) said Thank You: Wookie58
Please Log in or Create an account to join the conversation.
- Wookie58
-
Topic Author
- Offline
- Moderator
-
Registered
- Posts: 6513
- Thanks: 4103
Re: And finally, Wookie's 82 begins !
26 May 2026 13:27Ain't that the truth, if I had realised how little use it had had in the last 20 years I would have checked it a lot earlier in the process. Another head here complete with valves and no broken fins is around $500-$600 then add blasting and machining it would be more like $800 done and fitted !!!!!!!Wow! Good on you for checking the clearance. These old machines can hide a plethora of surprises.
1982 KZ1000 Ltd
www.kzrider.com/forum/11-projects/617631...-82-begins?start=192
kzrider.com/forum/faq-wiki/616810-electr...-fault-finding-guide
www.kzrider.com/forum/11-projects/617631...-82-begins?start=192
kzrider.com/forum/faq-wiki/616810-electr...-fault-finding-guide
Please Log in or Create an account to join the conversation.
- Wookie58
-
Topic Author
- Offline
- Moderator
-
Registered
- Posts: 6513
- Thanks: 4103
Re: And finally, Wookie's 82 begins !
08 Jun 2026 08:48
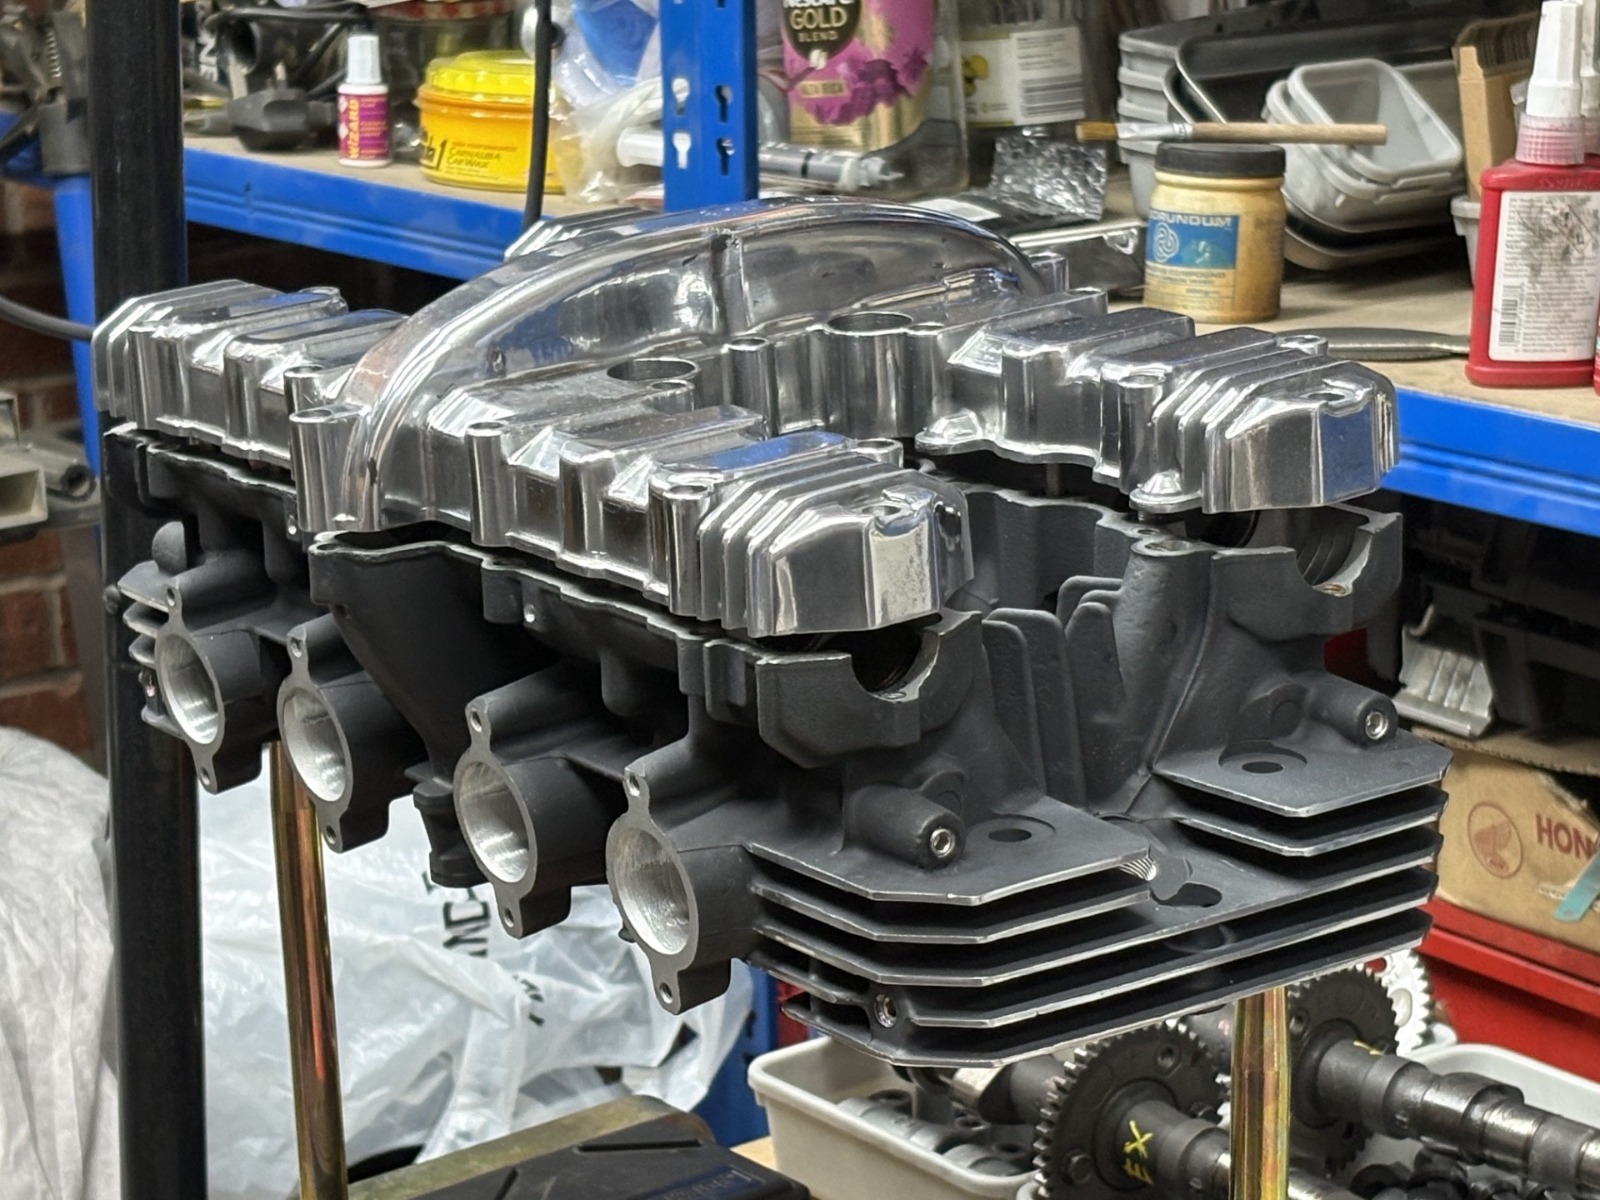
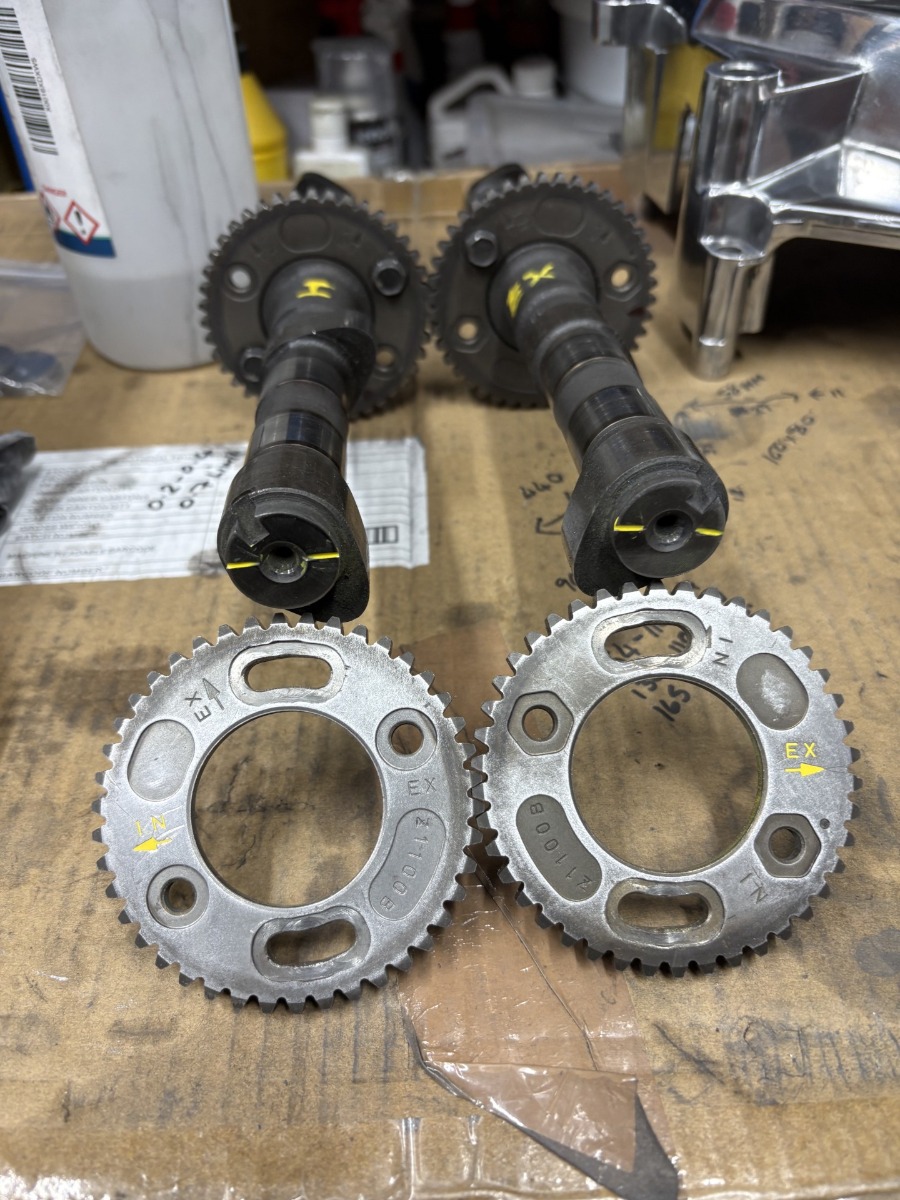
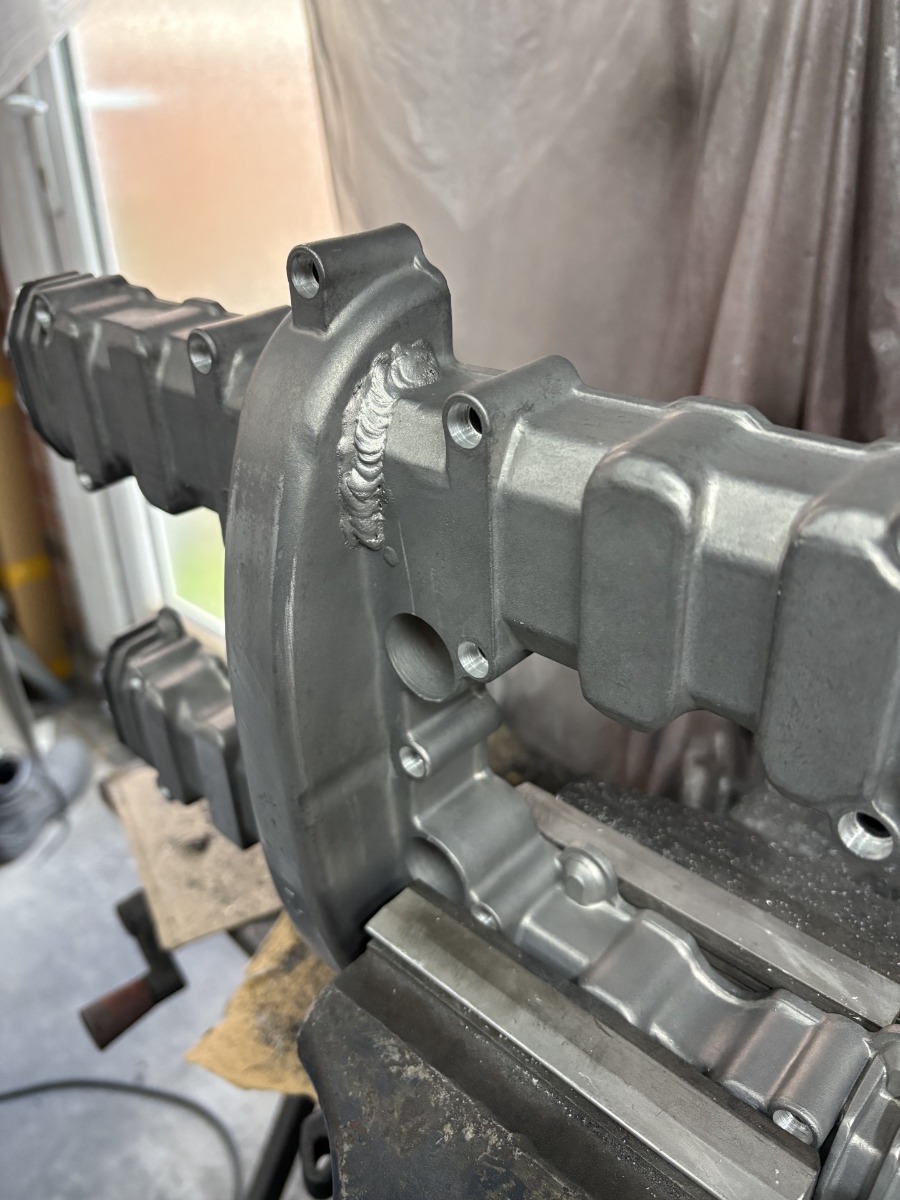
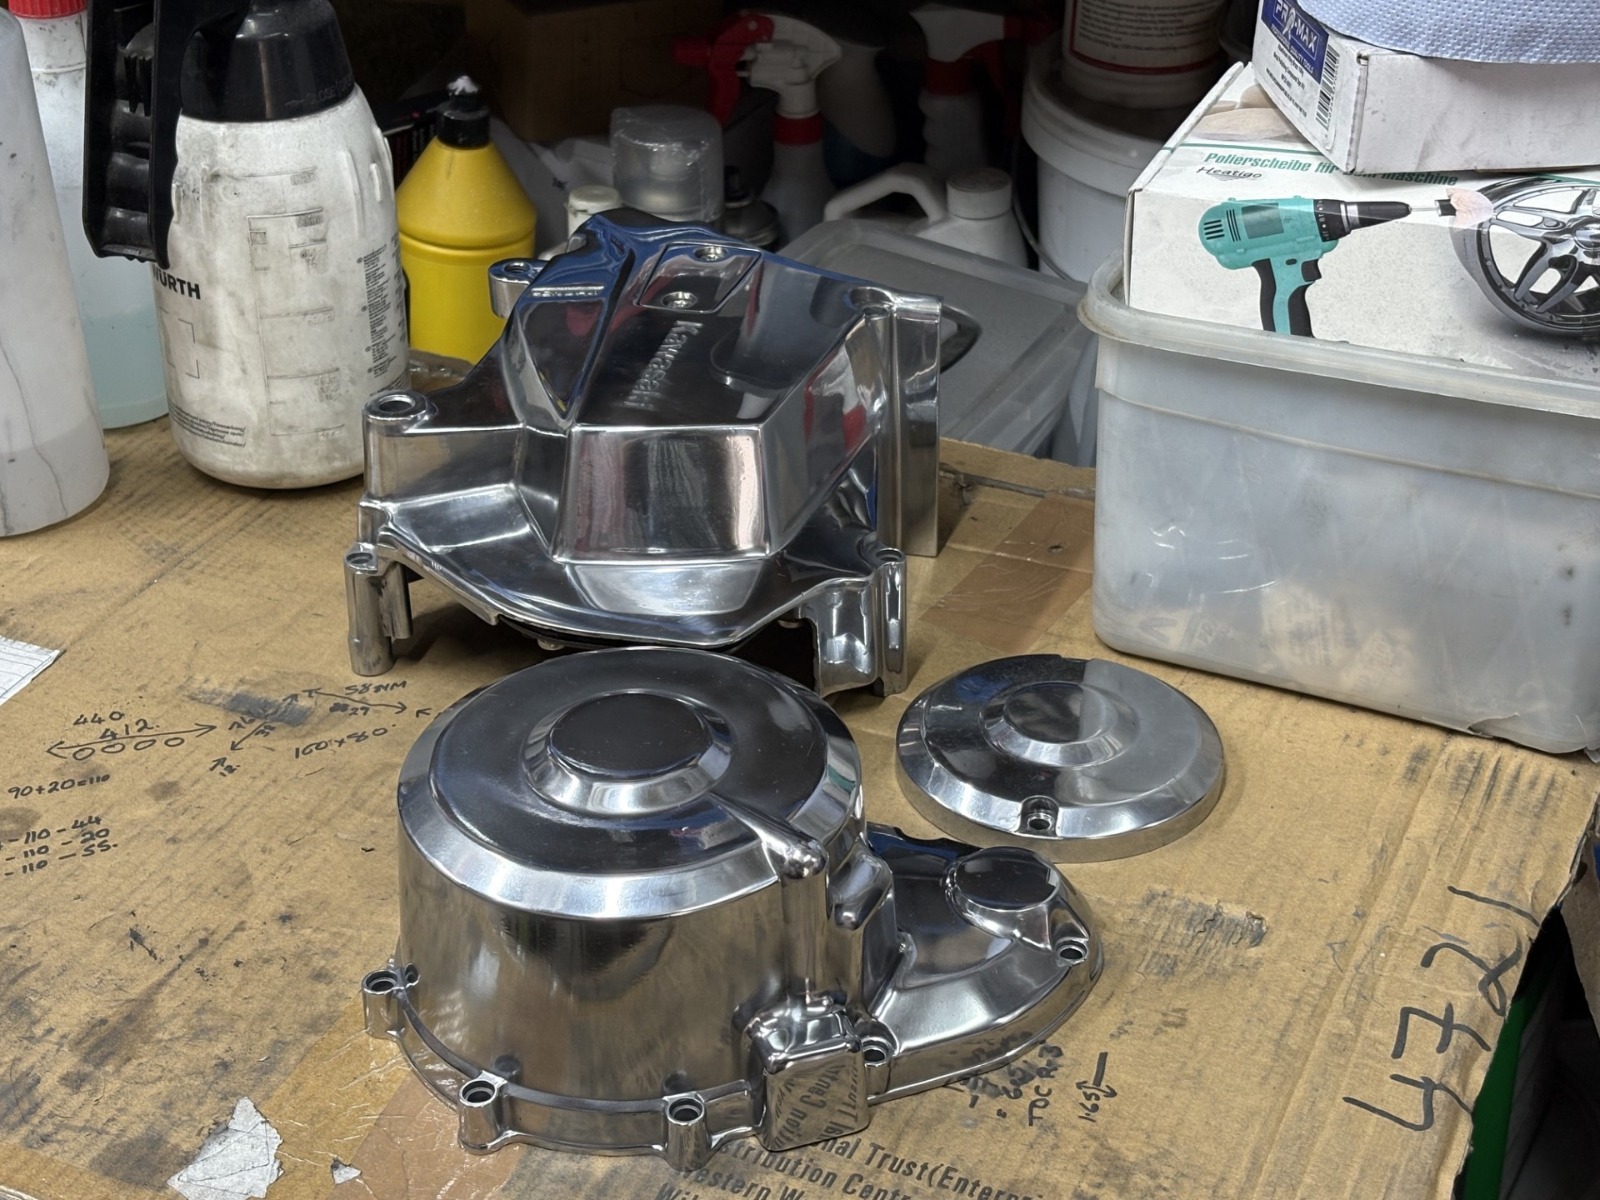
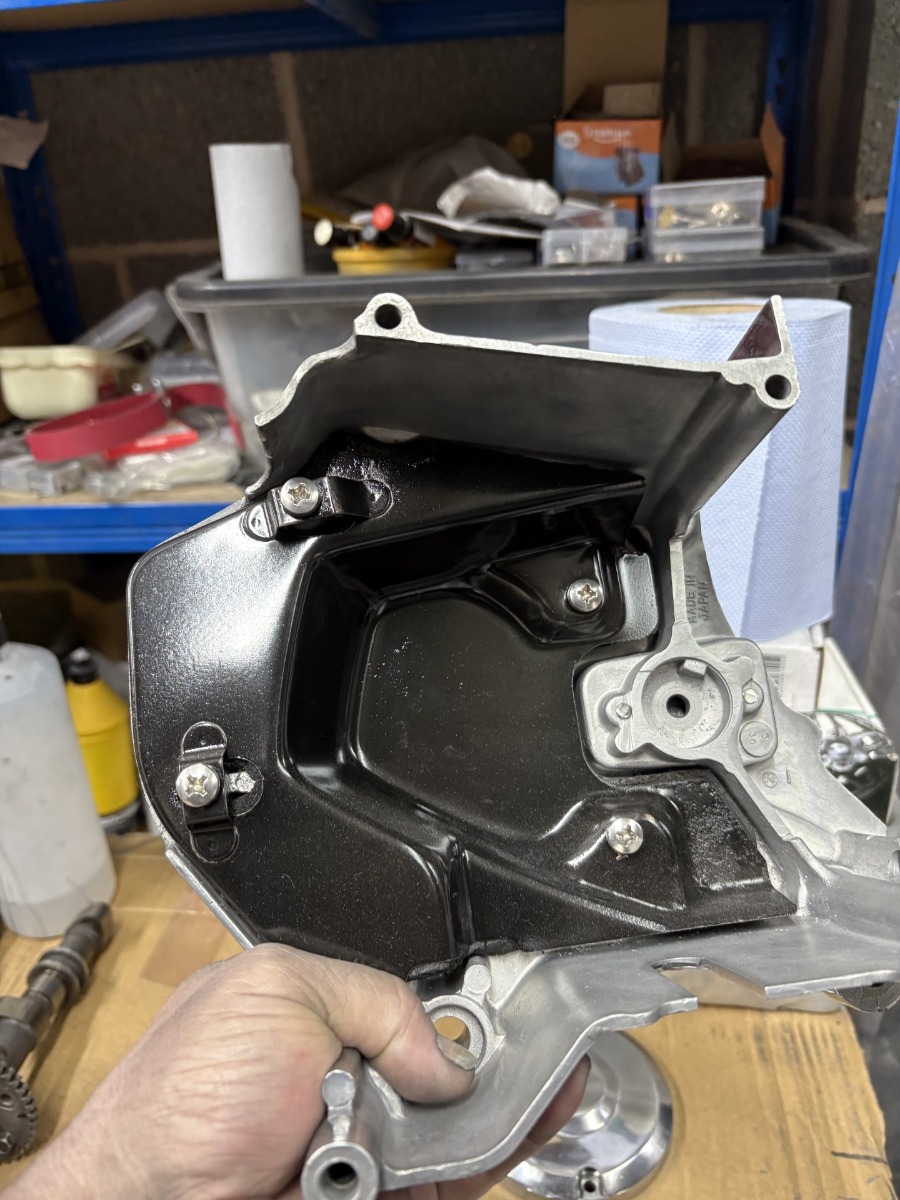
Well after the "calamity" of my last update I have dusted myself down and pushed forward. Having clearanced the bearing caps the bearings where lose in the caps because they were "pinched" and still had a slight "drag" where the caps and head meet. I decided to use loctite bearing locker to hold them in place just to be sure they didn't move and block the oil hole. Also I put a piece of paper on the bearing journal and then bolted the caps down while the locker set. This worked a treat as the paper "splayed" the bearings just a fraction which meant wants the locker was set the shells now sit correctlyin the caps and with the paper removed there is no longer any drag and the cams turn freely ") (I get this is not a "correct" resolution to the issue but I was too far down the road not to try) Head is now painted, fin edges polished and the lash set. I have also marked the lobe centres on the cams which will make timing easy once installed. Other than that lots of polishing. The cam cover was not in great shape and the Ebay seller neglected to mention it had been welded (was painted black so not obvious in the pics) I have managed to grind the welds back and polish it up so it looks pretty good now (these non vented covers are hard to find) albeit I have the best part of a full day in the cam cover alone. Also cleaned up and enamelled the sound deadener behind the sprocket cover which was in rough shape but salvageable. So that's it for now, I need to make a couple of tools and I should be able to complete the motor at the weekend. Just need Quofan to come over then to assist so I don't scratch anything when putting it back in. My engine lift will do the hard work
(I get this is not a "correct" resolution to the issue but I was too far down the road not to try) Head is now painted, fin edges polished and the lash set. I have also marked the lobe centres on the cams which will make timing easy once installed. Other than that lots of polishing. The cam cover was not in great shape and the Ebay seller neglected to mention it had been welded (was painted black so not obvious in the pics) I have managed to grind the welds back and polish it up so it looks pretty good now (these non vented covers are hard to find) albeit I have the best part of a full day in the cam cover alone. Also cleaned up and enamelled the sound deadener behind the sprocket cover which was in rough shape but salvageable. So that's it for now, I need to make a couple of tools and I should be able to complete the motor at the weekend. Just need Quofan to come over then to assist so I don't scratch anything when putting it back in. My engine lift will do the hard work
(I get this is not a "correct" resolution to the issue but I was too far down the road not to try) Head is now painted, fin edges polished and the lash set. I have also marked the lobe centres on the cams which will make timing easy once installed. Other than that lots of polishing. The cam cover was not in great shape and the Ebay seller neglected to mention it had been welded (was painted black so not obvious in the pics) I have managed to grind the welds back and polish it up so it looks pretty good now (these non vented covers are hard to find) albeit I have the best part of a full day in the cam cover alone. Also cleaned up and enamelled the sound deadener behind the sprocket cover which was in rough shape but salvageable. So that's it for now, I need to make a couple of tools and I should be able to complete the motor at the weekend. Just need Quofan to come over then to assist so I don't scratch anything when putting it back in. My engine lift will do the hard work
1982 KZ1000 Ltd
www.kzrider.com/forum/11-projects/617631...-82-begins?start=192
kzrider.com/forum/faq-wiki/616810-electr...-fault-finding-guide
www.kzrider.com/forum/11-projects/617631...-82-begins?start=192
kzrider.com/forum/faq-wiki/616810-electr...-fault-finding-guide
The following user(s) said Thank You: ThatGPzGuy, MFP-Joe, Quofan, kimchella
Please Log in or Create an account to join the conversation.
- Quofan
-
- Offline
- User
-
Registered
- Posts: 17
- Thanks: 15
Re: And finally, Wookie's 82 begins !
08 Jun 2026 09:52
Just Whatsapp me mate when you're ready and I'll come over. Just give me a bit of warning so I know when you need me.
The following user(s) said Thank You: Wookie58
Please Log in or Create an account to join the conversation.
- daveo
-
- Offline
- Premium Member
-

Registered
- Posts: 3156
- Thanks: 891
Re: And finally, Wookie's 82 begins !
08 Jun 2026 12:45
Reference screenshot of your May 7 post attachment below:
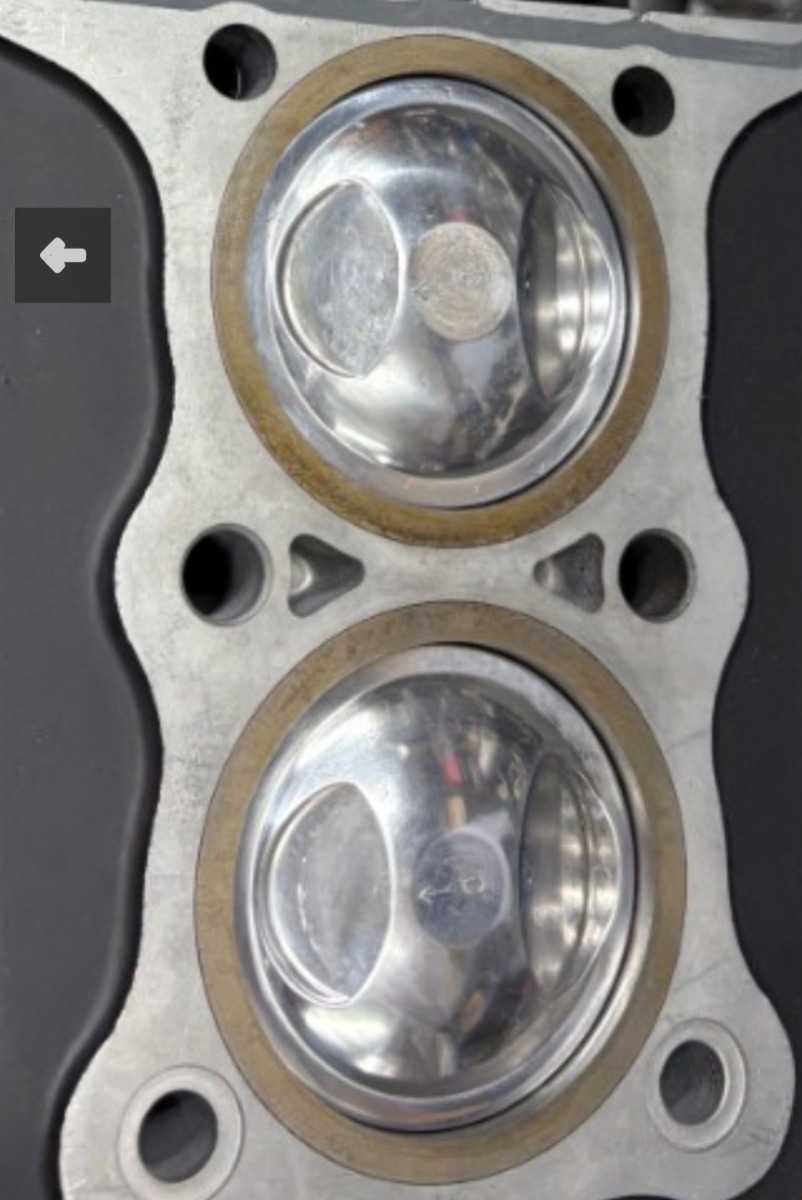
I'm curious what the measured distance of your valve pockets are compared with the reworked Wiseco pistons in my 84 J motor shown below:
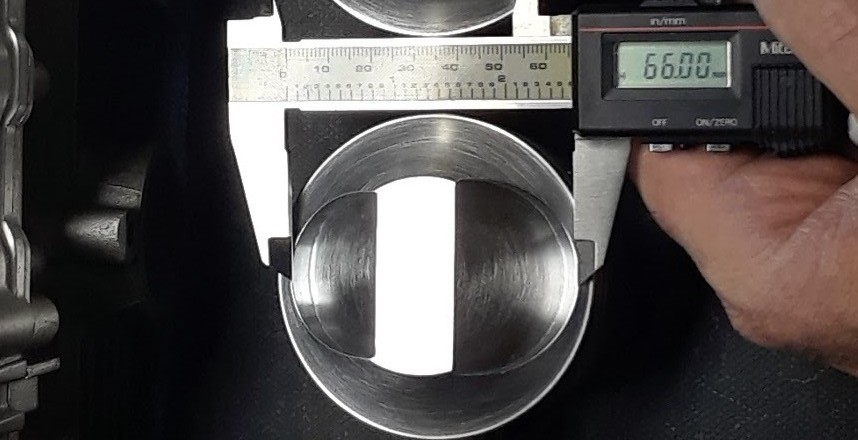
🙂
I'm curious what the measured distance of your valve pockets are compared with the reworked Wiseco pistons in my 84 J motor shown below:
🙂
1982 KZ1100-A2/1170cc sleeper 😀
Please Log in or Create an account to join the conversation.
- Wookie58
-
Topic Author
- Offline
- Moderator
-
Registered
- Posts: 6513
- Thanks: 4103
Re: And finally, Wookie's 82 begins !
08 Jun 2026 12:49I will measure tomorrow and let you know (mine are 72mm though - 1075)Reference screenshot of your May 7 post attachment below:
I'm curious what the measured distance of your valve pockets are compared with the reworked Wiseco pistons in my 84 J motor shown below:
🙂
1982 KZ1000 Ltd
www.kzrider.com/forum/11-projects/617631...-82-begins?start=192
kzrider.com/forum/faq-wiki/616810-electr...-fault-finding-guide
www.kzrider.com/forum/11-projects/617631...-82-begins?start=192
kzrider.com/forum/faq-wiki/616810-electr...-fault-finding-guide
Please Log in or Create an account to join the conversation.
- daveo
-
- Offline
- Premium Member
-
Registered
- Posts: 3156
- Thanks: 891
Re: And finally, Wookie's 82 begins !
08 Jun 2026 15:20 - 08 Jun 2026 20:32I will measure tomorrow and let you know (mine are 72mm though - 1075)Reference screenshot of your May 7 post attachment below:
I'm curious what the measured distance of your valve pockets are compared with the reworked Wiseco pistons in my 84 J motor shown below:
🙂
After looking closer at that piston screenshot, it appears your piston crown closely resembles a Wiseco 4502M07200 piston supplied with K10751 kits for 76-80 KZ900 and KZ1000 motors.
...vs. the 4548M07200 piston for the 81-83 KZ1000-J motors, and provided in the Wiseco K1076 kit shown below:
🤔
Hope I'm mistaken about this, but thought it best to share a potential concern...
Added notes:
1982 KZ1100-A2/1170cc sleeper 😀
Last edit: 08 Jun 2026 20:32 by daveo.
Please Log in or Create an account to join the conversation.
Moderators: Street Fighter LTD