
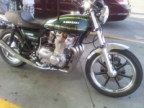
The Wounded Z
- Kidkawie
-

- Offline
- User
-

Registered
- I bleed premix
- Posts: 1911
- Thanks: 243
Re: The Wounded Z
28 Aug 2018 02:40
Good luck with the project!
Put a sticker over the damage on the tail
Put a sticker over the damage on the tail
1975 Z1 900
1994 KX250 Supermoto
2004 KX125
1994 KX250 Supermoto
2004 KX125
Please Log in or Create an account to join the conversation.
- 9er rider
-
- Offline
- Sustaining Member
-

Registered
- Keep a cool tool
- Posts: 575
- Thanks: 87
Re: The Wounded Z
28 Aug 2018 09:50 - 28 Aug 2018 09:59
Far Out. Ive become a quick glow fan myself as far as keeping the patina, No product better easy on the elbow's
76 kz 900 1075 76 kz 900 a4 78 kz 1000 ltd
Last edit: 28 Aug 2018 09:59 by 9er rider.
Please Log in or Create an account to join the conversation.
- AtLarge
-
- Offline
- User
-
Registered
- Posts: 187
- Thanks: 21
Re: The Wounded Z
28 Aug 2018 19:54
Nice save Slimjim. Best of luck on the resto.
1973 Honda CL70-K3
1975 Kawasaki 350 F9-C
1983 Kawasaki KZ750-K1
1994 BMW K1100RS
2008 Suzuki GSX1300-BKK8 #1120
1975 Kawasaki 350 F9-C
1983 Kawasaki KZ750-K1
1994 BMW K1100RS
2008 Suzuki GSX1300-BKK8 #1120
Please Log in or Create an account to join the conversation.
- slmjim+Z1BEBE
-
 Topic Author
- Offline
- User
-
Registered
- Enjoy Life! IT HAS AN EXPIRATION DATE!
- Posts: 1496
- Thanks: 983
Re: The Wounded Z
26 Sep 2018 05:42 - 26 Sep 2018 10:29
Sept. 25, 2018 update.
We moved The Wounded Z outside a few days ago to spray it off & give it a cursory washing with brushes and Simple Green. Necessary to get it clean enough to work on. Let it dry in the sun for a few hours, then into the service bay. We'd been squirting Magical Mystery Fluid (MMF) on every threaded fastener a couple of times a week for the past month. Time to turn some wrenches.
The three spark plugs came out two weeks before surprisingly easily; they were barely tighter than snug. Peering through the plug holes into the cylinders with a bore light had revealed nothing other than a few valves open and mysterious, inky darkness.
The exhaust system is destined for scrap. Not surprisingly, the carb boots are seriously deteriorated:
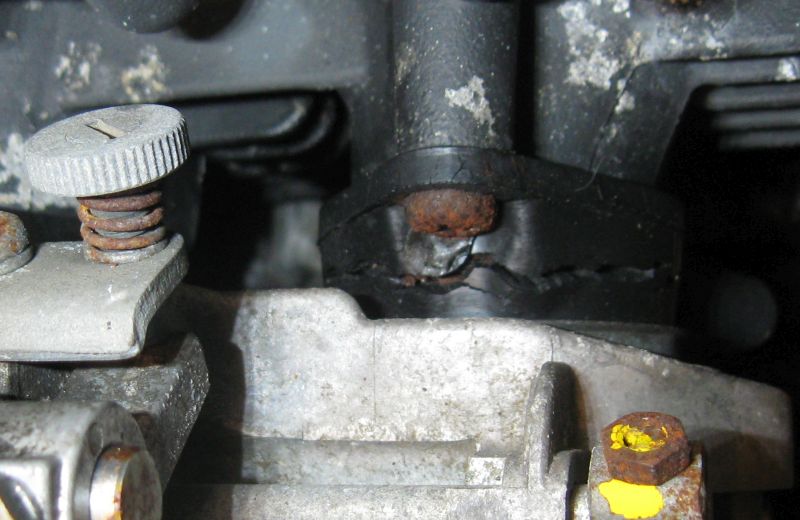
Something I hadn't noticed before now; the camchain tensioner is the later style:
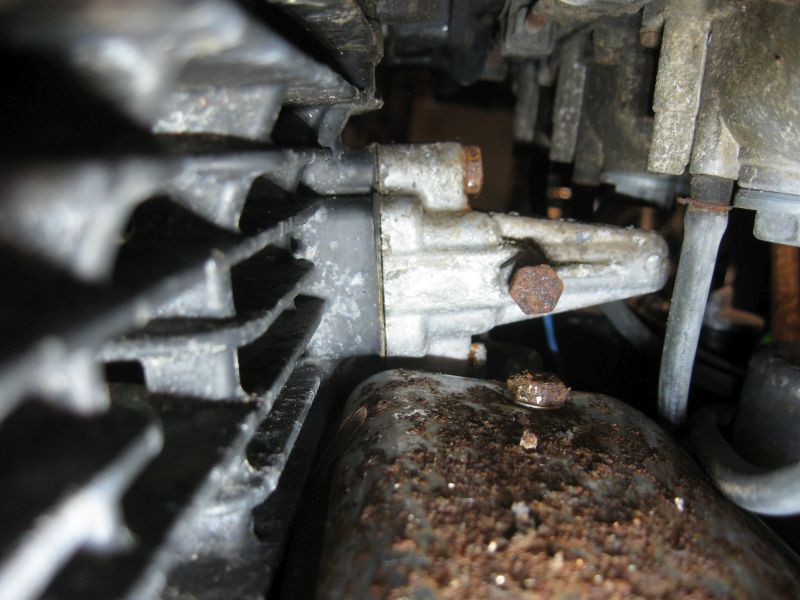
First light under the cam cover reveals no deterioration of the cams. Nice & clean, no rust:
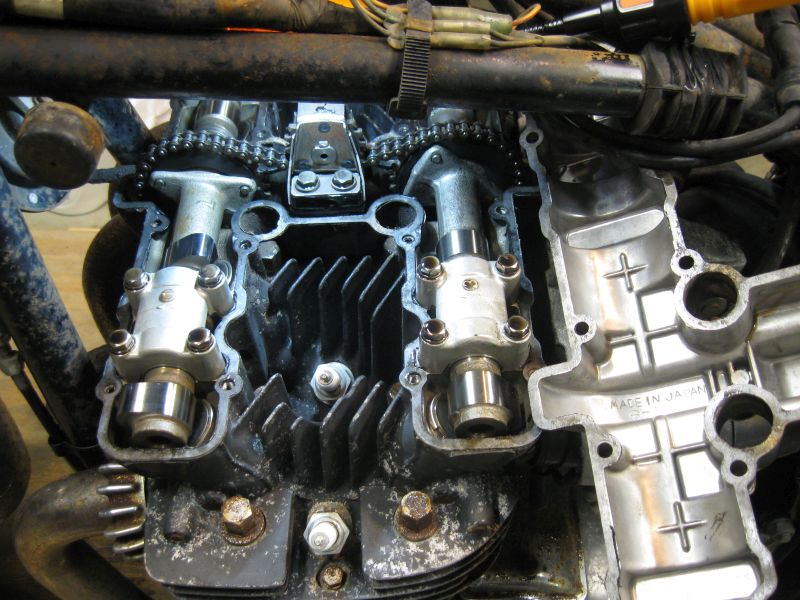
Underside of the cam cover is clean. The batch codes are even still there! Looks promising...:
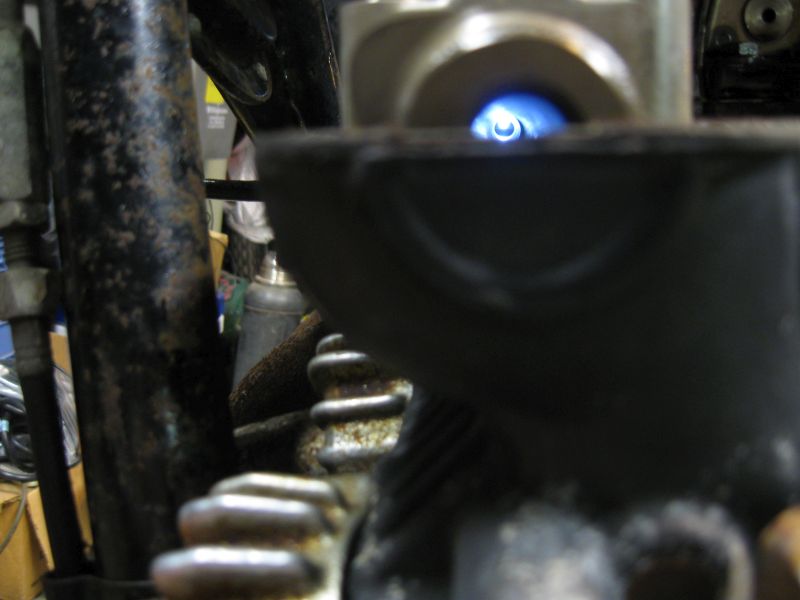
A borelight sez hollow cams! Gonna have to research when Mama Kaw went to solid cams. Thought it was much earlier than this:
According to Kaw Service Bulletin 4/900-3 dated 3/5/1976, motors commencing with ser. #Z1E-089122 had pry points cast into the cases at each end where the cylinders mate to the case surface. The same bulletin describes fabricating a suggested tool along with dimensions, whereas a 19" long piece of 1/2" bar stock is drilled and countersunk to make a cylinder lifter for motors that pre-date the casting change, as this motor does.
Chain, two bolts and a breaker bar can accomplish the same thing.
A bolt long enough to engage all the threads on the outside cylinder head bolt hole(s) of the cylinder casting is inserted through a chain link in the middle of the chain's length, with washers under the bolt head to keep it from pulling through the link. The bolt is then hand-tightened into an outer head bolt hole in the cylinder casting. A much larger long bolt is inserted through links at the free ends of the chain to create a closed loop. A head nut is then hand-tightened onto a corner stud. A breaker bar with a socket is run through the chain loop, with the socket placed on the head nut. Lifting the breaker bar utilizes the cylinder stud as a fulcrum, with the chain close to the bar's pivot. The resulting increase in leverage makes it quite easy to lift each end of the cylinder, breaking it free of the base gasket.
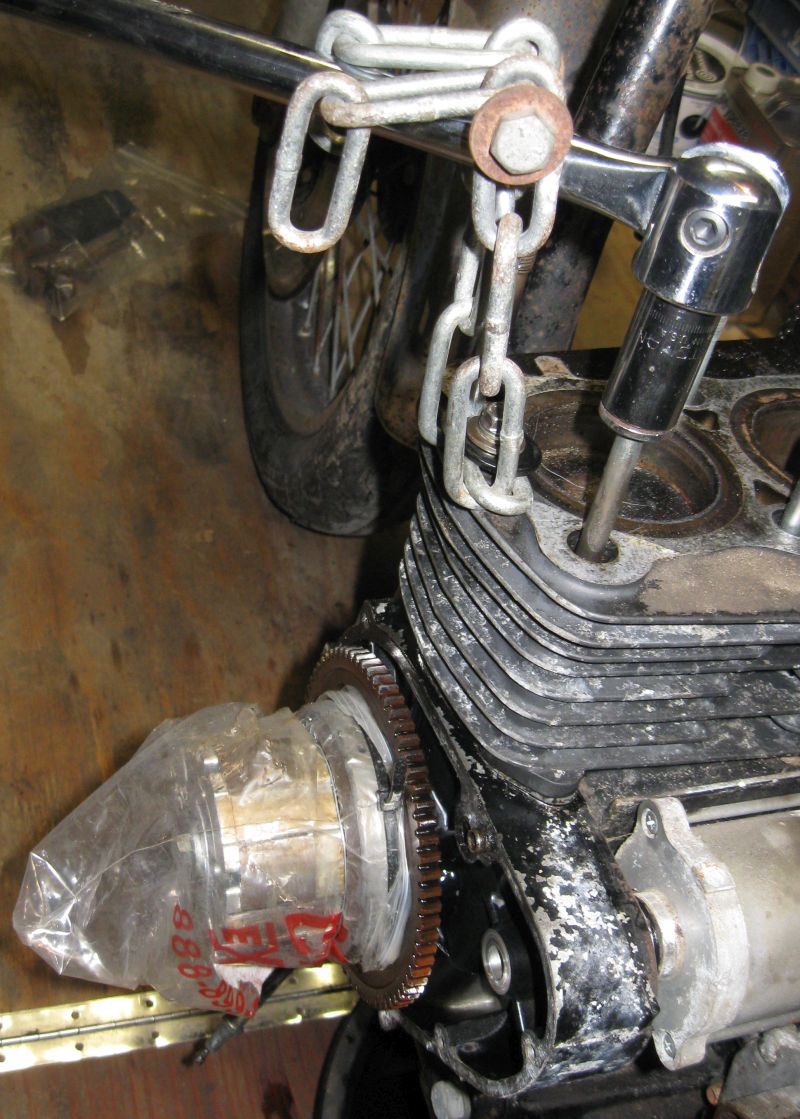
Works great on a motor that turns free. Not so much on one that's stuck.
We knew going into this bike that the motor was stuck. Just didn't know why. The #3 spark plug hole has the remains of a spark plug sans porcelain broken flush to the outer surface. We just figured that #3 had some rust and maybe some water in it.
When we pull the head, #1 & 2 look OK:
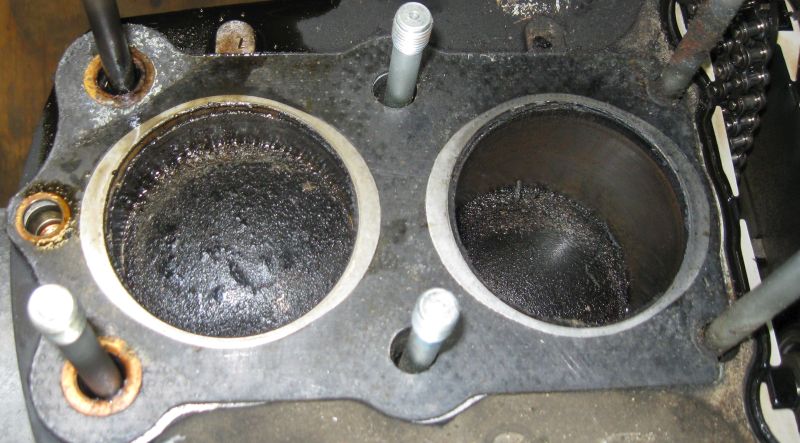
3 & 4 are another matter:
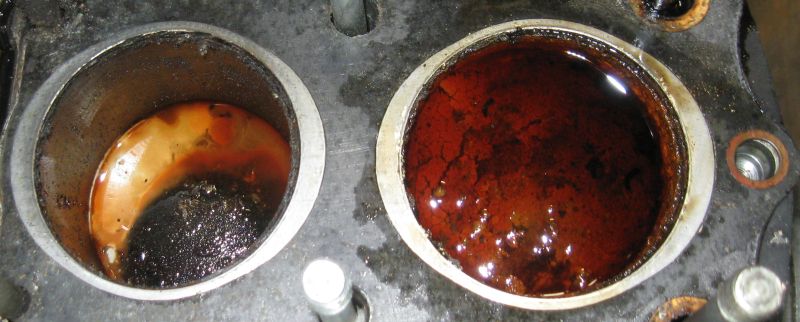
The milk in# 3 is no surprise; likely a mix of water that was already there, and the combination of MMF and other penetrants we've been squirting into the broken plug for the past few weeks. #4 was somewhat of a surprise though. Under that water and oil is about a 5mm layer of some sort of rusty, fluffy "stuff". Seemed like oil-saturated, fine sawdust permeated with rusty red color. About a shot glass full of fluffy stuff was spooned out after the liquid was removed.
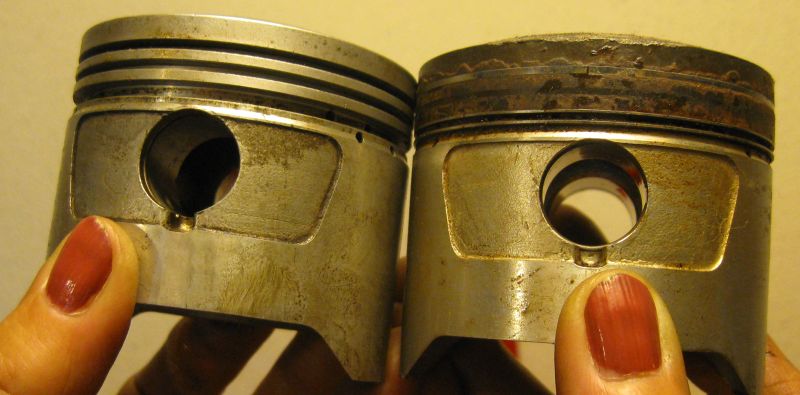
Now, we realize there's not one, but two stuck pistons.
We won't bore y'all with a blow-by-blow description of the ensuing seven hour struggle to free the jugs from the grasp of two pistons in rusted sleeves. #3 wasn't that bad. We were able to get #3 to BDC by lifting the cylinder enough that the stuck #4 piston arrived at TDC of the crank stroke, but not moving within it's bore. In other words, the crank throw for #4 was at TDC, #3 was at BDC, but the stuck #4 piston remained ~25mm below the deck of the jugs. That exposed the rings of #3 under it's sleeve enough to break the rings off, enabling #3 piston to travel freely in it's bore. #'s 1 and 2 moved fine. #4 was a major PITA; stuck tight. There wasn't enough upward travel available of the cylinder block before it hit the bottom of the head nut used for the cylinder block lifter fulcrum. No way at all to lift it off it by hand. Trying to do so just tilted the bike off the centerstand. We ended up using a machinist's hammer, wood block and "friendly persuasion" to drive #4 down enough to expose the piston pin under the lower edge of the sleeve. We were then able to pull the piston pin out from under the bottom edge of it's sleeve, finally freeing the jugs while the #4 piston remained firmly stuck in it's bore. A hydraulic press was then used to push the piston the rest of the way out of the cylinder.
A comparison of a clean piston and the freshly-removed #4 piston, presented courtesy of The Lovely Z1BEBE. How she does this stuff without chipping her war paint, er... nail polish is something I have yet to figure out. If you look closely the gap of the top compression ring can just be made out. The rust/varnish/creeping crud between & under the rings had practically made the piston one with it's sleeve:
The following day we're at it again. Now that the the jugs are off the motor spins free. No odd noises or grindy feels. Tranny shifts fine by hand. So we start removing covers. Of note is that so far, not one screw or bolt has broken anywhere on the bike. Patience, copious amounts of MMF applied over the course of weeks and a hand impact driver have made fastener removal pretty painless so far.
So we're to the point that we must remove the countershaft sprocket to get to the cover screws behind it.
The very rusty chain has been shedding flakes, red powder and protesting with squeaky noises when we were spinning the motor in gear. We start looking for a master link, but on first examination we don't see one. Bike is only showing 14,996 miles. Could it be the factory chain? I'm getting the cutoff wheel off the shelf when Z1BEBE says in her "WTF ???" voice "Look at this!":
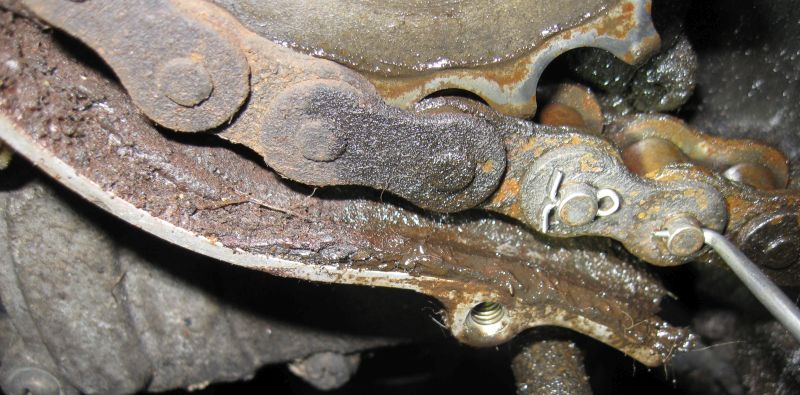
WTF??? is right! I've been doing Z1's since they were new, but I've never seen anything like that. That a master link is "retained" by cotter pins is bad enough, but only one??? That's the tip of a probe, showing the other hole is really there. Sure enough, once the pin was pulled, the sideplate was easily removed with needle nose pliers.
A pic of the master link once freed:
It looks like the brand name is Link Belt. #80 chain?:
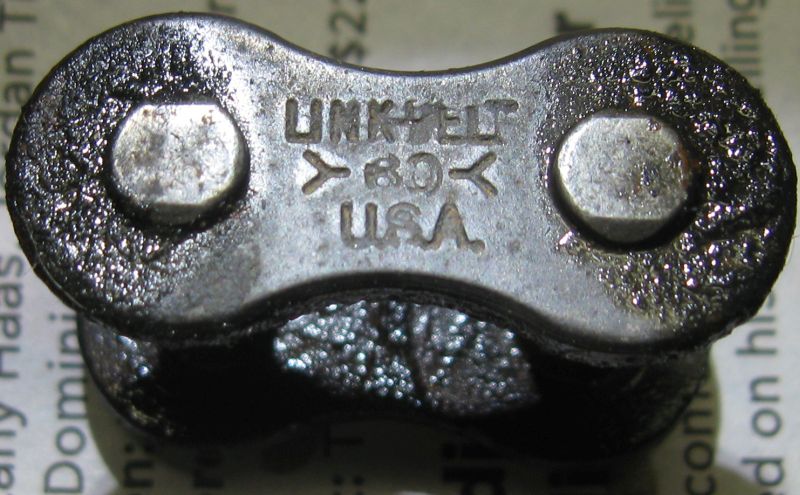
Best guess is this is some sort of farm implement chain that was an expeditious replacement for cost reduction. The fact that one of two cotter pins was MIA makes one wonder how conscientious the person was who installed the chain.
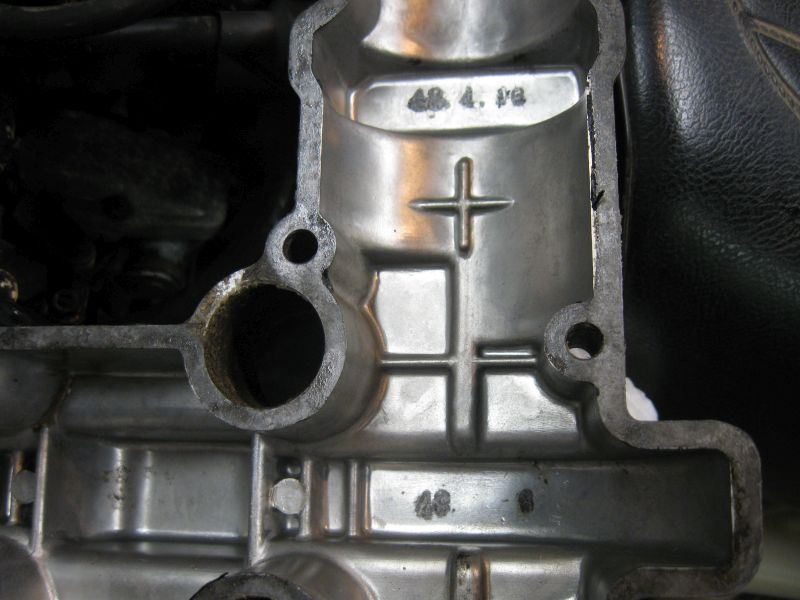
One last thing before we must close this update: while loosening the kickstart shaft cover screws I noticed a stamping in the motor case. It appears to be factory, but I've never seen anything stamped here:
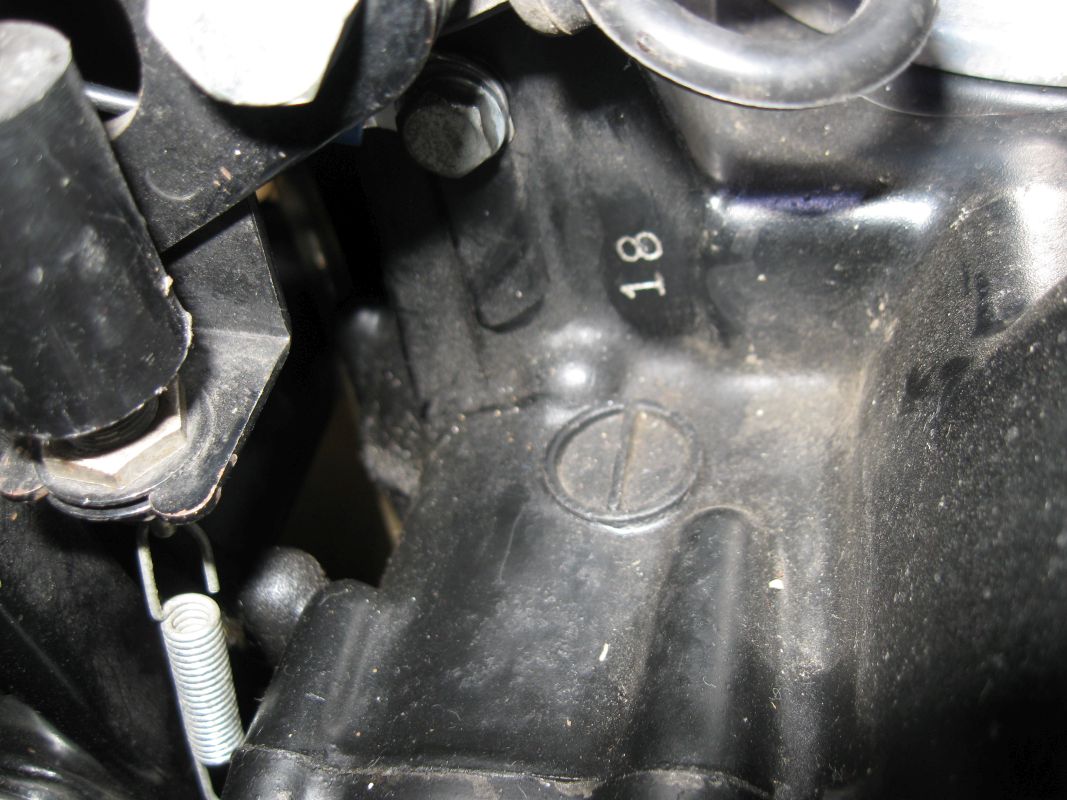
Anyone have any idea what it means?
More updates to follow.
Good Ridin'
slmjim & Z1BEBE
We moved The Wounded Z outside a few days ago to spray it off & give it a cursory washing with brushes and Simple Green. Necessary to get it clean enough to work on. Let it dry in the sun for a few hours, then into the service bay. We'd been squirting Magical Mystery Fluid (MMF) on every threaded fastener a couple of times a week for the past month. Time to turn some wrenches.
The three spark plugs came out two weeks before surprisingly easily; they were barely tighter than snug. Peering through the plug holes into the cylinders with a bore light had revealed nothing other than a few valves open and mysterious, inky darkness.
The exhaust system is destined for scrap. Not surprisingly, the carb boots are seriously deteriorated:
Something I hadn't noticed before now; the camchain tensioner is the later style:
First light under the cam cover reveals no deterioration of the cams. Nice & clean, no rust:
Underside of the cam cover is clean. The batch codes are even still there! Looks promising...:
A borelight sez hollow cams! Gonna have to research when Mama Kaw went to solid cams. Thought it was much earlier than this:
According to Kaw Service Bulletin 4/900-3 dated 3/5/1976, motors commencing with ser. #Z1E-089122 had pry points cast into the cases at each end where the cylinders mate to the case surface. The same bulletin describes fabricating a suggested tool along with dimensions, whereas a 19" long piece of 1/2" bar stock is drilled and countersunk to make a cylinder lifter for motors that pre-date the casting change, as this motor does.
Chain, two bolts and a breaker bar can accomplish the same thing.
A bolt long enough to engage all the threads on the outside cylinder head bolt hole(s) of the cylinder casting is inserted through a chain link in the middle of the chain's length, with washers under the bolt head to keep it from pulling through the link. The bolt is then hand-tightened into an outer head bolt hole in the cylinder casting. A much larger long bolt is inserted through links at the free ends of the chain to create a closed loop. A head nut is then hand-tightened onto a corner stud. A breaker bar with a socket is run through the chain loop, with the socket placed on the head nut. Lifting the breaker bar utilizes the cylinder stud as a fulcrum, with the chain close to the bar's pivot. The resulting increase in leverage makes it quite easy to lift each end of the cylinder, breaking it free of the base gasket.
Works great on a motor that turns free. Not so much on one that's stuck.
We knew going into this bike that the motor was stuck. Just didn't know why. The #3 spark plug hole has the remains of a spark plug sans porcelain broken flush to the outer surface. We just figured that #3 had some rust and maybe some water in it.
When we pull the head, #1 & 2 look OK:
3 & 4 are another matter:
The milk in# 3 is no surprise; likely a mix of water that was already there, and the combination of MMF and other penetrants we've been squirting into the broken plug for the past few weeks. #4 was somewhat of a surprise though. Under that water and oil is about a 5mm layer of some sort of rusty, fluffy "stuff". Seemed like oil-saturated, fine sawdust permeated with rusty red color. About a shot glass full of fluffy stuff was spooned out after the liquid was removed.
Now, we realize there's not one, but two stuck pistons.
We won't bore y'all with a blow-by-blow description of the ensuing seven hour struggle to free the jugs from the grasp of two pistons in rusted sleeves. #3 wasn't that bad. We were able to get #3 to BDC by lifting the cylinder enough that the stuck #4 piston arrived at TDC of the crank stroke, but not moving within it's bore. In other words, the crank throw for #4 was at TDC, #3 was at BDC, but the stuck #4 piston remained ~25mm below the deck of the jugs. That exposed the rings of #3 under it's sleeve enough to break the rings off, enabling #3 piston to travel freely in it's bore. #'s 1 and 2 moved fine. #4 was a major PITA; stuck tight. There wasn't enough upward travel available of the cylinder block before it hit the bottom of the head nut used for the cylinder block lifter fulcrum. No way at all to lift it off it by hand. Trying to do so just tilted the bike off the centerstand. We ended up using a machinist's hammer, wood block and "friendly persuasion" to drive #4 down enough to expose the piston pin under the lower edge of the sleeve. We were then able to pull the piston pin out from under the bottom edge of it's sleeve, finally freeing the jugs while the #4 piston remained firmly stuck in it's bore. A hydraulic press was then used to push the piston the rest of the way out of the cylinder.
A comparison of a clean piston and the freshly-removed #4 piston, presented courtesy of The Lovely Z1BEBE. How she does this stuff without chipping her war paint, er... nail polish is something I have yet to figure out. If you look closely the gap of the top compression ring can just be made out. The rust/varnish/creeping crud between & under the rings had practically made the piston one with it's sleeve:
The following day we're at it again. Now that the the jugs are off the motor spins free. No odd noises or grindy feels. Tranny shifts fine by hand. So we start removing covers. Of note is that so far, not one screw or bolt has broken anywhere on the bike. Patience, copious amounts of MMF applied over the course of weeks and a hand impact driver have made fastener removal pretty painless so far.
So we're to the point that we must remove the countershaft sprocket to get to the cover screws behind it.
The very rusty chain has been shedding flakes, red powder and protesting with squeaky noises when we were spinning the motor in gear. We start looking for a master link, but on first examination we don't see one. Bike is only showing 14,996 miles. Could it be the factory chain? I'm getting the cutoff wheel off the shelf when Z1BEBE says in her "WTF ???" voice "Look at this!":
WTF??? is right! I've been doing Z1's since they were new, but I've never seen anything like that. That a master link is "retained" by cotter pins is bad enough, but only one??? That's the tip of a probe, showing the other hole is really there. Sure enough, once the pin was pulled, the sideplate was easily removed with needle nose pliers.
A pic of the master link once freed:
It looks like the brand name is Link Belt. #80 chain?:
Best guess is this is some sort of farm implement chain that was an expeditious replacement for cost reduction. The fact that one of two cotter pins was MIA makes one wonder how conscientious the person was who installed the chain.
One last thing before we must close this update: while loosening the kickstart shaft cover screws I noticed a stamping in the motor case. It appears to be factory, but I've never seen anything stamped here:
Anyone have any idea what it means?
More updates to follow.
Good Ridin'
slmjim & Z1BEBE
A biker looks at your engine and chrome.
A Rider looks at your odometer and tags.
1973 ('72 builds) Z1 x2
1974 Z1-A x2
1975 Z1-B x2
1993 CB 750 Nighthawk x2
2009 ST1300A
www.kawasaki-z-classik.com
A Forum tightly focused on all things Z1 and Z2.
A Rider looks at your odometer and tags.
1973 ('72 builds) Z1 x2
1974 Z1-A x2
1975 Z1-B x2
1993 CB 750 Nighthawk x2
2009 ST1300A
www.kawasaki-z-classik.com
A Forum tightly focused on all things Z1 and Z2.
Last edit: 26 Sep 2018 10:29 by slmjim+Z1BEBE. Reason: Typos. Edit for clarity.
Please Log in or Create an account to join the conversation.
- TexasKZ
-

- Offline
- Platinum Member
-
Registered
- Posts: 8246
- Thanks: 2708
Re: The Wounded Z
26 Sep 2018 06:14
Just in case you want to replace that master link :whistle:
Looks like a pretty stout chain, though.
www.applied.com/c-brands/c-rexnord-corpo...ies-Link/p/102180783
Looks like a pretty stout chain, though.
www.applied.com/c-brands/c-rexnord-corpo...ies-Link/p/102180783
1982 KZ1000 LTD parts donor
1981 KZ1000 LTD awaiting resurrection
2000 ZRX1100 not ridden enough
www.kzrider.com/forum/11-projects/620336...amateur-build-thread
1981 KZ1000 LTD awaiting resurrection
2000 ZRX1100 not ridden enough
www.kzrider.com/forum/11-projects/620336...amateur-build-thread
Please Log in or Create an account to join the conversation.
- slmjim+Z1BEBE
-
Topic Author
- Offline
- User
-
Registered
- Enjoy Life! IT HAS AN EXPIRATION DATE!
- Posts: 1496
- Thanks: 983
Re: The Wounded Z
26 Sep 2018 07:06 - 26 Sep 2018 10:34TexasKZ wrote: Just in case you want to replace that master link :whistle:
Looks like a pretty stout chain, though.
www.applied.com/c-brands/c-rexnord-corpo...ies-Link/p/102180783
The pins aren't quad-staked. This is an implement chain at best, not something road worthy in our opinion.
Would you bet your life & well being on that rusty, squeaky, kinked chain?
I wouldn't bet mine. Fer damm sure not Z1BEBE's!
We would never consider running that crap chain on a Z1. Maybe on a 100 RPM stationary farm gadget, but not on any road bike where the Riders' life is on the line. The old chain is destined for scrap recycle.
We have some new, non O-ring Tsubaki and Enuma (EK) 630 chains on the shelf. When the time comes one of them will be placed into service.
Good Ridin'
slmjim
A biker looks at your engine and chrome.
A Rider looks at your odometer and tags.
1973 ('72 builds) Z1 x2
1974 Z1-A x2
1975 Z1-B x2
1993 CB 750 Nighthawk x2
2009 ST1300A
www.kawasaki-z-classik.com
A Forum tightly focused on all things Z1 and Z2.
A Rider looks at your odometer and tags.
1973 ('72 builds) Z1 x2
1974 Z1-A x2
1975 Z1-B x2
1993 CB 750 Nighthawk x2
2009 ST1300A
www.kawasaki-z-classik.com
A Forum tightly focused on all things Z1 and Z2.
Last edit: 26 Sep 2018 10:34 by slmjim+Z1BEBE. Reason: Clarity
Please Log in or Create an account to join the conversation.
- old_kaw
-

- Offline
- User
-
Registered
- Posts: 929
- Thanks: 270
Re: The Wounded Z
26 Sep 2018 14:43 - 26 Sep 2018 14:48slmjim+Z1BEBE wrote: Sept. 25, 2018 update.
WTF??? is right! I've been doing Z1's since they were new, but I've never seen anything like that. That a master link is "retained" by cotter pins is bad enough, but only one??? That's the tip of a probe, showing the other hole is really there. Sure enough, once the pin was pulled, the sideplate was easily removed with needle nose pliers.
A pic of the master link once freed:
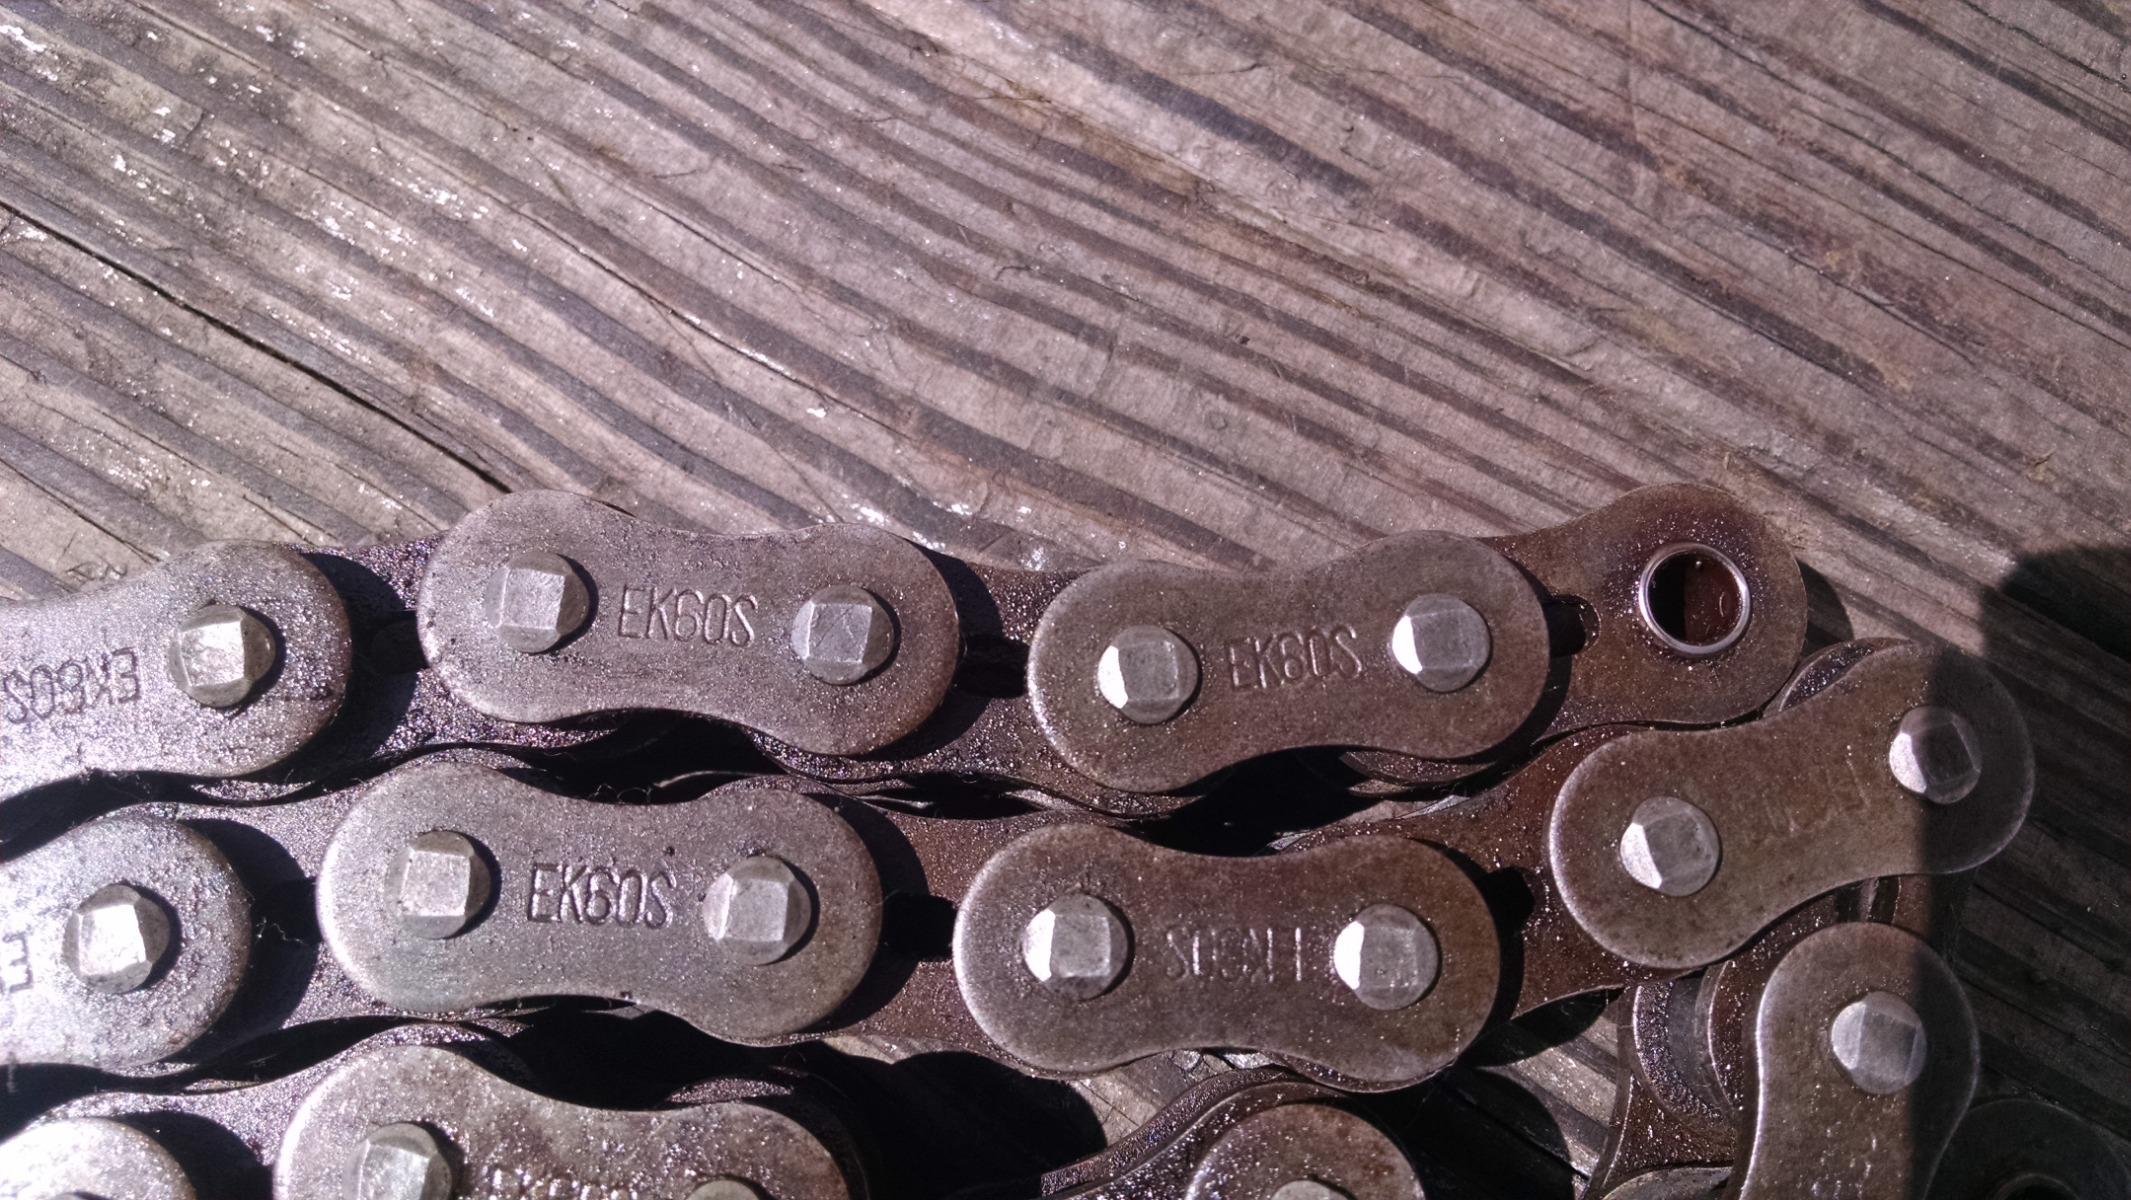
It looks like the brand name is Link Belt. #80 chain?:
Best guess is this is some sort of farm implement chain that was an expeditious replacement for cost reduction. The fact that one of two cotter pins was MIA makes one wonder how conscientious the person was who installed installed the chain.
That looks like a #60 chain to me Jim. 10' at tractor supply it's a LOT cheaper than my EK SRO 630 o-ring. That looks like 3/4# pitch plain Jane chain. Somewhere there is corn shucker that no longer shucks corn.
")
www.tractorsupply.com/tsc/product/roller-chain-size-60-10-ft
This was my OEM "endless" (no master link) EK 630 o-ring chain.
1981 Kawasaki Kz1000K1
Located in the Saint Louis, Missouri Area.
Located in the Saint Louis, Missouri Area.
Last edit: 26 Sep 2018 14:48 by old_kaw.
The following user(s) said Thank You: slmjim+Z1BEBE
Please Log in or Create an account to join the conversation.
- hardrockminer
-
- Offline
- Sustaining Member
-
Registered
- Posts: 3136
- Thanks: 1235
Re: The Wounded Z
26 Sep 2018 15:06
I wouldn't be too hard on the PO Slmjim. There are dumber people out there. Remember these?
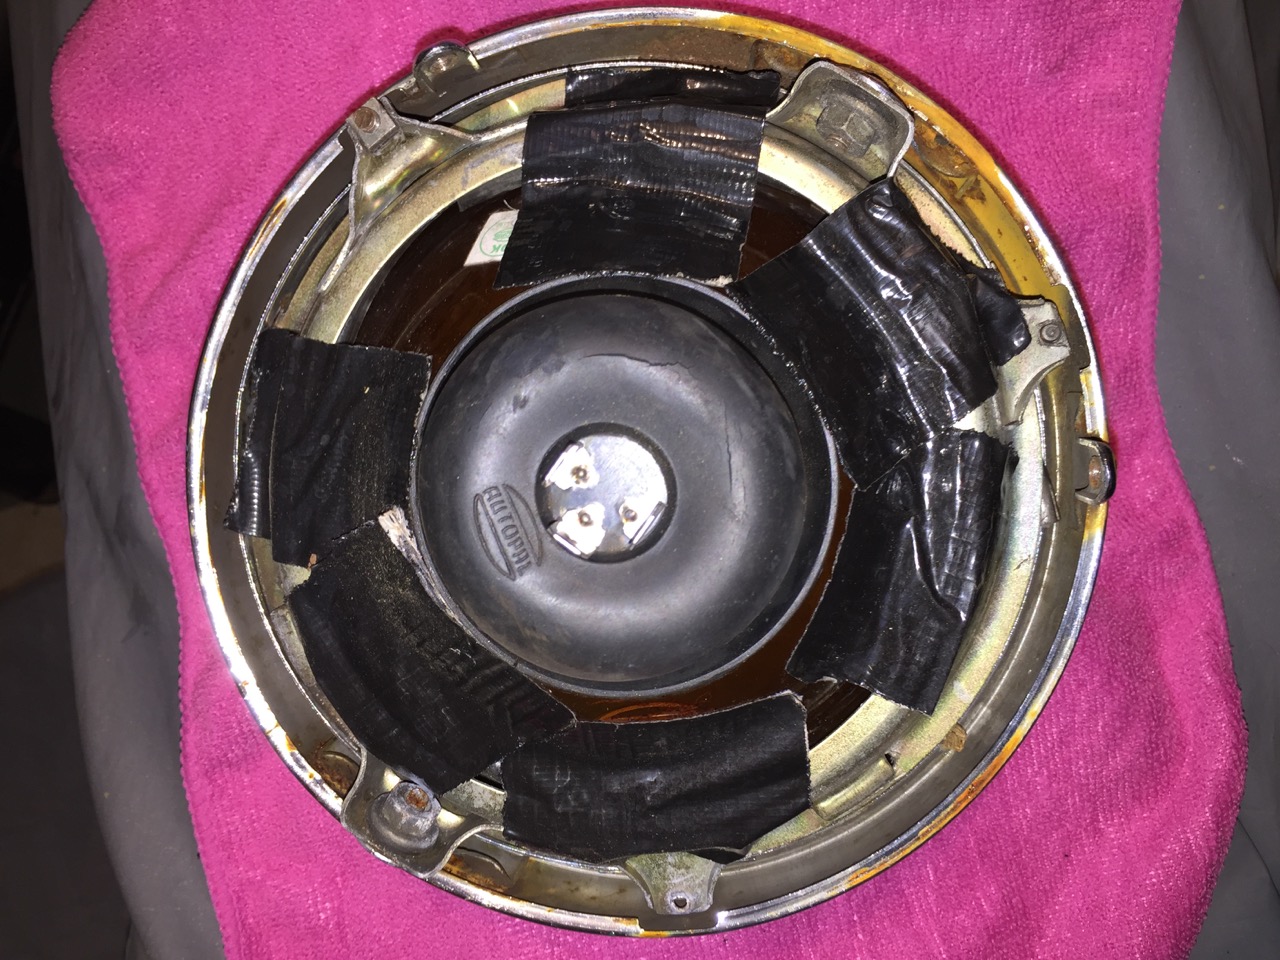
I have several restored bikes along with a 2006 Goldwing with a sidecar.
The following user(s) said Thank You: slmjim+Z1BEBE
Please Log in or Create an account to join the conversation.
- TexasKZ
-
- Offline
- Platinum Member
-
Registered
- Posts: 8246
- Thanks: 2708
Re: The Wounded Z
26 Sep 2018 15:08
Nope. I wouldn't trust that chain if it was brand new.
1982 KZ1000 LTD parts donor
1981 KZ1000 LTD awaiting resurrection
2000 ZRX1100 not ridden enough
www.kzrider.com/forum/11-projects/620336...amateur-build-thread
1981 KZ1000 LTD awaiting resurrection
2000 ZRX1100 not ridden enough
www.kzrider.com/forum/11-projects/620336...amateur-build-thread
The following user(s) said Thank You: slmjim+Z1BEBE
Please Log in or Create an account to join the conversation.
- slmjim+Z1BEBE
-
Topic Author
- Offline
- User
-
Registered
- Enjoy Life! IT HAS AN EXPIRATION DATE!
- Posts: 1496
- Thanks: 983
Re: The Wounded Z
27 Sep 2018 05:20 - 27 Sep 2018 05:22old_kaw wrote:
That looks like a #60 chain to me Jim. 10' at tractor supply it's a LOT cheaper than my EK SRO 630 o-ring. That looks like 3/4# pitch plain Jane chain. Somewhere there is corn shucker that no longer shucks corn.
www.tractorsupply.com/tsc/product/roller-chain-size-60-10-ft
This was my OEM "endless" (no master link) EK 630 o-ring chain.
"Somewhere there is corn shucker that no longer shucks corn.
":laugh: Thanks for the chuckle old_kaw. Agreed that the # is 60, not 80. Guess we're not familiar with alternative chain ID's.
hardrockminer wrote: I wouldn't be too hard on the PO Slmjim. There are dumber people out there. Remember these?
Don't remember the duct tape modification. Thanks for sharing that.

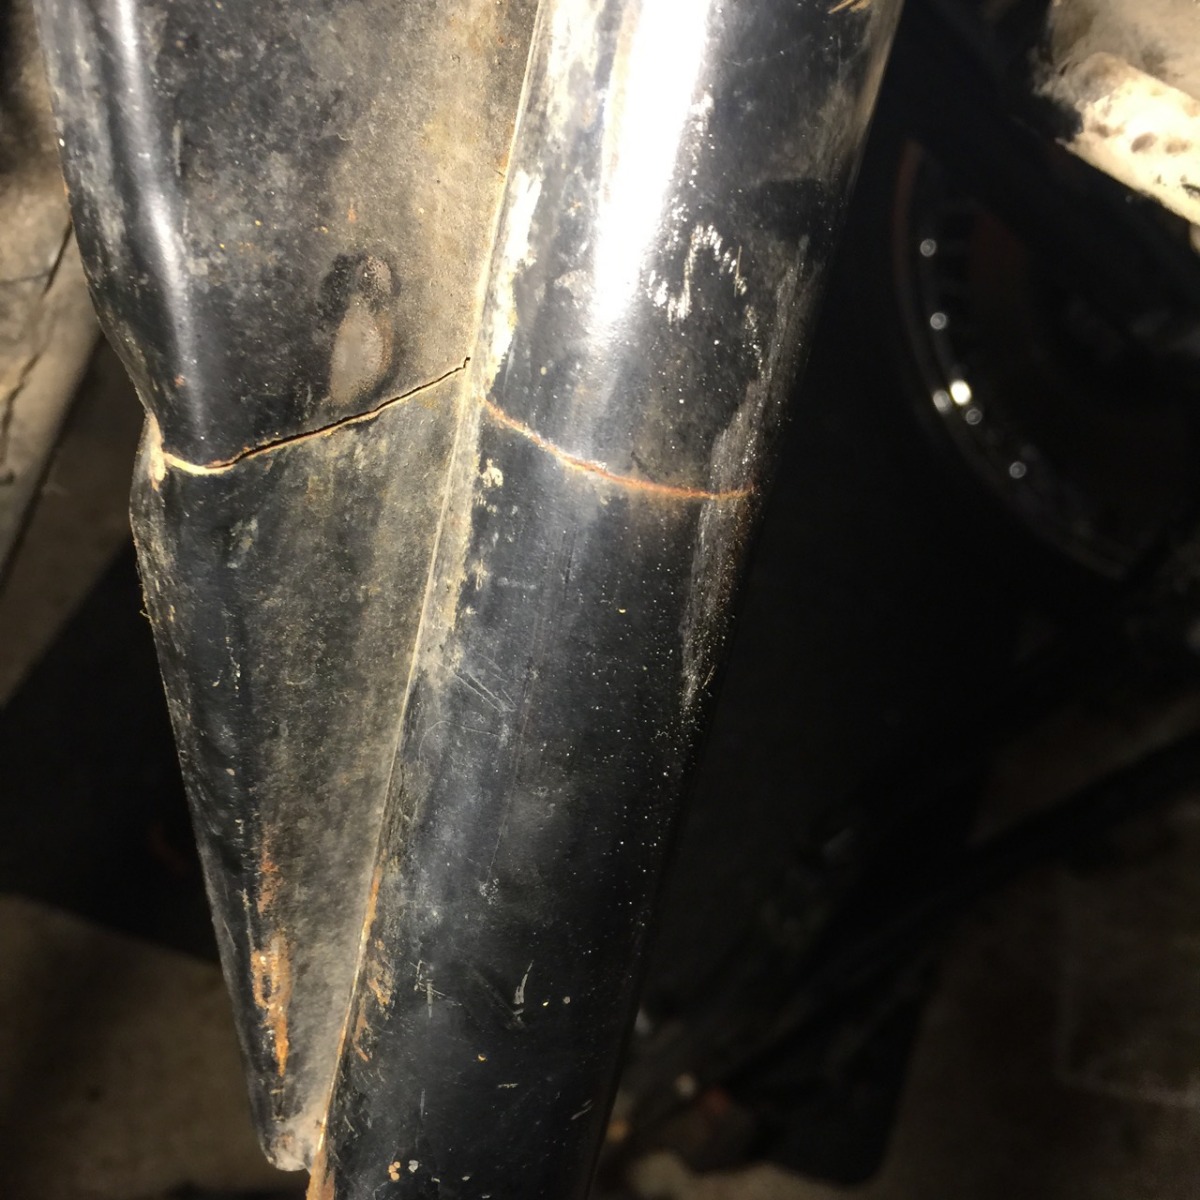
Do remember the frame & gusset crack from the other forum. We've heard rumors about frame cracks in that area but neither of us have never seen one in person.
Good Ridin'
slmjim & Z1BEBE
A biker looks at your engine and chrome.
A Rider looks at your odometer and tags.
1973 ('72 builds) Z1 x2
1974 Z1-A x2
1975 Z1-B x2
1993 CB 750 Nighthawk x2
2009 ST1300A
www.kawasaki-z-classik.com
A Forum tightly focused on all things Z1 and Z2.
A Rider looks at your odometer and tags.
1973 ('72 builds) Z1 x2
1974 Z1-A x2
1975 Z1-B x2
1993 CB 750 Nighthawk x2
2009 ST1300A
www.kawasaki-z-classik.com
A Forum tightly focused on all things Z1 and Z2.
Last edit: 27 Sep 2018 05:22 by slmjim+Z1BEBE.
Please Log in or Create an account to join the conversation.
- slmjim+Z1BEBE
-
Topic Author
- Offline
- User
-
Registered
- Enjoy Life! IT HAS AN EXPIRATION DATE!
- Posts: 1496
- Thanks: 983
Re: The Wounded Z
03 Apr 2019 05:19
Had to pause this project for a short time 'cause life got in the way. Things are back to what passes for normal now.
The motor cases, cylinder block, head & valve cover have all left the building. They're at the media blast place waiting to be soda blasted & neutralized following same.
Mileage as indicated by the odometer seems to be right, considering the lack of wear on the front camchain slider.
The plug hole with the broken spark plug had to have an insert, 'cause whoever broke it off had started it in crooked in the first place, egging the plug hole such that even after the remnants of the plug had been removed, the remaining threaded hole was no longer round. My local guy Steve Miles (one of the "M" 's from M&M Racing back in the day) accomplished the plug hole repair nicely in his shop, as well as cleaning up the chambers & being able to recover the #3 & #4 valve seats after exposure to water for however many years sat there. Only one valve had to be tipped a few thou, to arrive at all eight shims being in the 270 ~ 290 range.
Crank is straight according to a straight piece of drill rod. Shift forks straight & not burned. Gear dogs are in essentially pristine condition. No chips in any gear teeth. No rust anywhere on the internals, which had been a concern considering the amount of water that were in #3 & #4.
The inside of the pan held a mix of grey slime and thick, coal-black goo consistent with poor maintenance and exposure to water. Had to take the motor cases, cyl. block & head outside to de-grease and de-grime everything with special potion and a hose to get them clean enough to put them in the parts washer :tools-hammerdrill: .
The gauges will be going to ZResto so Bob can work his magic. He'll likely need to use his most powerful spell on them :mrgreen: .
Found some oddball wiring issues. There was a harness with a standard 8-pin Molex connector tucked behind the headlight. It had been spliced into the headlight and turn signal leads, which lead us to suspect the bike had been wired for a fairing. The splices were those hateful plier-clamped guillotine connectors that specialize in cutting through the insulation and nicking conductors. They'll be repaired/reinforced with heat-shrink.
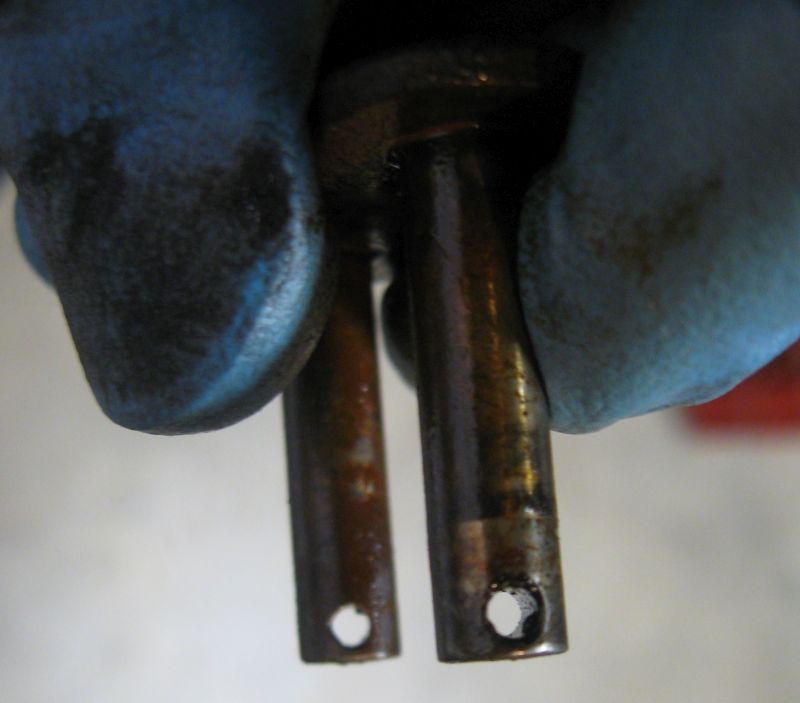
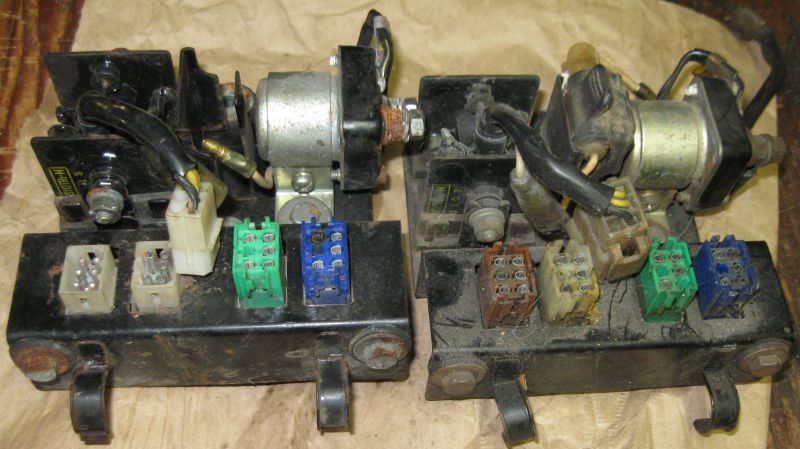
The most concerning wiring issue however, is the modifications made to the pin connectors on the right-side junction panel. Whoever did it did a clean job of it. Connector for the rectifier is on the right w/male pins. It's white on the OEM wiring but a completely different connector & pin design. Connector for the main harness on the left w/female pins. The connector should be the same design as the other three, but brown. See below:

A comparison of the problematic junction assy. on the left, a correct assy. on the right. The rectifier connector will be a fairly easy fix with a good used junction panel and bad/broken rectifier if I can find one. The connection for the main harness will be a problem, as I'll have to find some OEM pins and connector bodies.
We'll be posting something in the Wanted sub-forum to try to piece something together.
Next steps will be to get the frame stripped & clean enough to have it media blasted to prep it for paint. The place tells me that they fully understand the need to protect the OEM VIN tag, and that they can cover it with "blast tape" to do so. Many of the smaller pieces that show no-or-less rust we can do ourselves with paint stripper and electrolysis.
More to come as progress is made.
Good Ridin'
slmjim & Z1BEBE
The motor cases, cylinder block, head & valve cover have all left the building. They're at the media blast place waiting to be soda blasted & neutralized following same.
Mileage as indicated by the odometer seems to be right, considering the lack of wear on the front camchain slider.
The plug hole with the broken spark plug had to have an insert, 'cause whoever broke it off had started it in crooked in the first place, egging the plug hole such that even after the remnants of the plug had been removed, the remaining threaded hole was no longer round. My local guy Steve Miles (one of the "M" 's from M&M Racing back in the day) accomplished the plug hole repair nicely in his shop, as well as cleaning up the chambers & being able to recover the #3 & #4 valve seats after exposure to water for however many years sat there. Only one valve had to be tipped a few thou, to arrive at all eight shims being in the 270 ~ 290 range.
Crank is straight according to a straight piece of drill rod. Shift forks straight & not burned. Gear dogs are in essentially pristine condition. No chips in any gear teeth. No rust anywhere on the internals, which had been a concern considering the amount of water that were in #3 & #4.
The inside of the pan held a mix of grey slime and thick, coal-black goo consistent with poor maintenance and exposure to water. Had to take the motor cases, cyl. block & head outside to de-grease and de-grime everything with special potion and a hose to get them clean enough to put them in the parts washer :tools-hammerdrill: .
The gauges will be going to ZResto so Bob can work his magic. He'll likely need to use his most powerful spell on them :mrgreen: .
Found some oddball wiring issues. There was a harness with a standard 8-pin Molex connector tucked behind the headlight. It had been spliced into the headlight and turn signal leads, which lead us to suspect the bike had been wired for a fairing. The splices were those hateful plier-clamped guillotine connectors that specialize in cutting through the insulation and nicking conductors. They'll be repaired/reinforced with heat-shrink.
The most concerning wiring issue however, is the modifications made to the pin connectors on the right-side junction panel. Whoever did it did a clean job of it. Connector for the rectifier is on the right w/male pins. It's white on the OEM wiring but a completely different connector & pin design. Connector for the main harness on the left w/female pins. The connector should be the same design as the other three, but brown. See below:
A comparison of the problematic junction assy. on the left, a correct assy. on the right. The rectifier connector will be a fairly easy fix with a good used junction panel and bad/broken rectifier if I can find one. The connection for the main harness will be a problem, as I'll have to find some OEM pins and connector bodies.
We'll be posting something in the Wanted sub-forum to try to piece something together.
Next steps will be to get the frame stripped & clean enough to have it media blasted to prep it for paint. The place tells me that they fully understand the need to protect the OEM VIN tag, and that they can cover it with "blast tape" to do so. Many of the smaller pieces that show no-or-less rust we can do ourselves with paint stripper and electrolysis.
More to come as progress is made.
Good Ridin'
slmjim & Z1BEBE
A biker looks at your engine and chrome.
A Rider looks at your odometer and tags.
1973 ('72 builds) Z1 x2
1974 Z1-A x2
1975 Z1-B x2
1993 CB 750 Nighthawk x2
2009 ST1300A
www.kawasaki-z-classik.com
A Forum tightly focused on all things Z1 and Z2.
A Rider looks at your odometer and tags.
1973 ('72 builds) Z1 x2
1974 Z1-A x2
1975 Z1-B x2
1993 CB 750 Nighthawk x2
2009 ST1300A
www.kawasaki-z-classik.com
A Forum tightly focused on all things Z1 and Z2.
The following user(s) said Thank You: gordone
Please Log in or Create an account to join the conversation.
- gordone
-

- Offline
- Sustaining Member
-
Registered
- Posts: 1533
- Thanks: 93
Re: The Wounded Z
27 Apr 2019 04:59
Reading each word you post in these project ")
Keep up the good work!
Looking forward to follow your project
Keep up the good work!
Looking forward to follow your project
1981 KZ650-D4, with 1981 z750L engine (Wiensco 810 big bore).
Project:
www.kzrider.com/forum/11-projects/607213...sr-1981-z750l-engine
Project:
www.kzrider.com/forum/11-projects/607213...sr-1981-z750l-engine
Please Log in or Create an account to join the conversation.
Moderators: Street Fighter LTD