
1981 KZ1000 J-to-K build
- 531blackbanshee
-
- Offline
- Vendor
-

Vendors
- Posts: 7444
- Thanks: 796
Re: 1981 KZ1000 J-to-K build
06 May 2016 06:18
makes sense,
leon
leon
skiatook,oklahoma 1980 z1r,1978 kz 1000 z1r x 3,
1976 kz 900 x 3
i make what i can,and save the rest!
billybiltit.blogspot.com/
www.kzrider.com/forum/5-chassis/325862-triple-tree-custom-work
kzrider.com/forum/5-chassis/294594-frame-bracing?limitstart=0
1976 kz 900 x 3
i make what i can,and save the rest!
billybiltit.blogspot.com/
www.kzrider.com/forum/5-chassis/325862-triple-tree-custom-work
kzrider.com/forum/5-chassis/294594-frame-bracing?limitstart=0
Please Log in or Create an account to join the conversation.
- Shdwdrgn
-
 Topic Author
- Offline
- User
-

Registered
- Posts: 611
- Thanks: 24
Re: 1981 KZ1000 J-to-K build
13 May 2016 20:55
My time this week has been split up... We hit a deer out on the highway late Saturday night, but I built my own offroad bumper and pushbar, which took most of the force. She still rolled off the driver's side, crumpling the hood and fender, banging both doors, and wiping out the grill and headlight. I've been replacing bits here and there, just got in the new hood and grill pieces tonight, so will be finishing up repairs tomorrow.
In the meantime, I took Thursday off from work. Got the front tire flipped around the right way, picked up a new chain, and spent the rest of the day cleaning, taping off, and painting the front wheel. Basically what I did was leave a bare aluminum ring around the outer edge, plus the inside lip. I figure this will reduce the amount of paint scuffing when the tires need changed, and that one narrow stripe of bright metal looks pretty good. I finished pulling off the tape today and bolting the brake discs back in place tonight. Once I clean up the speedometer pick-up, I can finish assembling the front wheel back on the bike. If I have any free time, I'm going to try and get the rear wheel taped off on Sunday, however there's another rain storm moving in, so I'll probably have to paint it later in the week. At least if I have the prep work done, I can do the painting some evening after work.
In the meantime, I took Thursday off from work. Got the front tire flipped around the right way, picked up a new chain, and spent the rest of the day cleaning, taping off, and painting the front wheel. Basically what I did was leave a bare aluminum ring around the outer edge, plus the inside lip. I figure this will reduce the amount of paint scuffing when the tires need changed, and that one narrow stripe of bright metal looks pretty good. I finished pulling off the tape today and bolting the brake discs back in place tonight. Once I clean up the speedometer pick-up, I can finish assembling the front wheel back on the bike. If I have any free time, I'm going to try and get the rear wheel taped off on Sunday, however there's another rain storm moving in, so I'll probably have to paint it later in the week. At least if I have the prep work done, I can do the painting some evening after work.
1981 KZ1000-JK1
She's a beautiful mess, and I've made her all mine
She's a beautiful mess, and I've made her all mine
Please Log in or Create an account to join the conversation.
- Shdwdrgn
-
Topic Author
- Offline
- User
-
Registered
- Posts: 611
- Thanks: 24
Re: 1981 KZ1000 J-to-K build
22 May 2016 20:21
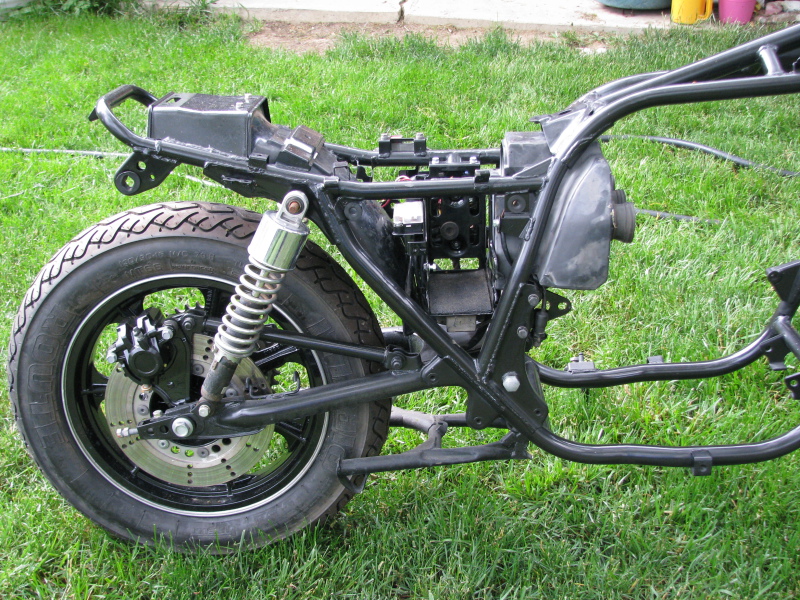
Finished up the rear wheel and stripped off the tape this morning. Finally had everything ready to go, so I reassembled the rear axle, finally getting everything in the right order and direction. A very close inspection will make it apparent that I hand-cut the line for the bare silver stripe on the wheels, however step back a few feet and it looks just fine.
I don't remember if I mentioned this, and you can't see it in the photos, but there was a problem with the paint over the Winter. I'm not sure exactly what it is, my guess is tree pollen, but something coated a number of areas on the frame and made the paint feel like sandpaper. I had an idea today though... I have one of those polishing kits for headlights, so I took the fine foam polishing disc and started working on one of the smaller pieces. Amazingly, it cleaned right up and showed the nice coat of paint underneath, so with much more confidence I started working on the frame. I've gotten through about half of it, but after the cleanup followed by some rubbing compound, I have the original shine back in most of the places I've worked. The one exception it the top 'platform' area of the swingarm. I got rid of the coating, but even the rubbing compound isn't really bringing back the shine. At least the areas that show are looking much better now!
So the last thing to finish up on the wheels is the brakes. I'll hit all three units with a fast pass of the sandblaster to clean them up and knock loose and flakes of paint, then give them the old gloss-black treatment. I'll have to be really careful not to spill any brake fluid on the fresh paint, but after its had a few months to cure I won't be quite so worried about it. I also need to fill the forks, and then go through and re-tighten all the bolts. I know I didn't snug down several because I expected to take things apart again, but at this stage I believe the main framework is pretty well set.
After I finish that up, I'll head back to the engine, which is still lying in pieces all over my garage floor. I need to clean up and paint the casing, then start reassembling everything. The real problem there is that since the bike sits outside, I need to have ALL the engine parts ready to bolt up at once. Can't have rain getting inside the crank. It'll be a lot of work to finish up before it shows any real progress, but then I'll be down to mostly smaller parts left to clean and paint, and some things can be removed and painted later, if I get antsy to get her started up.
1981 KZ1000-JK1
She's a beautiful mess, and I've made her all mine
She's a beautiful mess, and I've made her all mine
Please Log in or Create an account to join the conversation.
- Shdwdrgn
-
Topic Author
- Offline
- User
-
Registered
- Posts: 611
- Thanks: 24
Re: 1981 KZ1000 J-to-K build
26 May 2016 11:41
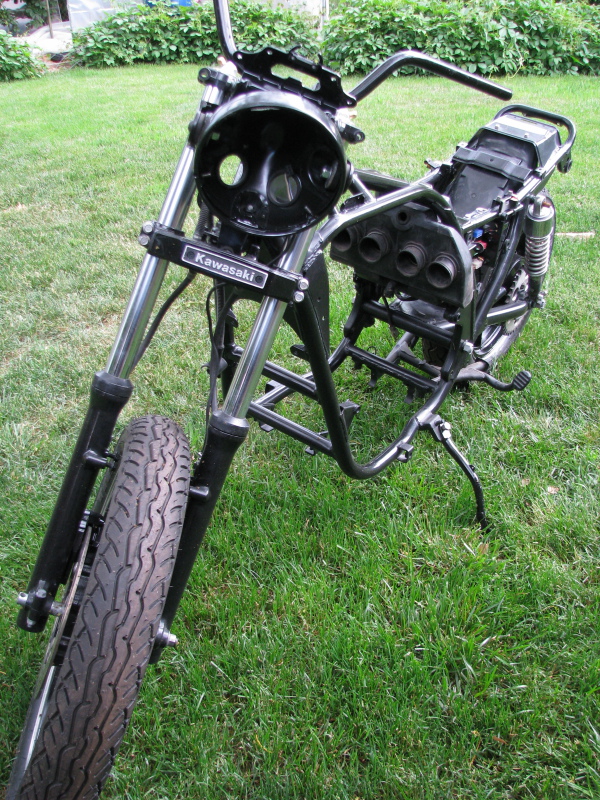
Last night I pulled the box or parts from the garage and brought it out to the patio by the bike. Going through it, it occurred to me that there's really not a lot of parts left here! I've got the front and rear fender and chain guard which need to have the chrome sandblasted. I have the battery box and the handlebar controls that need cleaned up and mounted in place (and I need some new grips and mirrors). And then I have both wiring harnesses, which I need to go through and pick out the best sections of each so there's no unneeded splices. And then I have the engine and pipes, which will be the largest pieces left to clean up and paint. And there's just not much more than that. Yeah there's still a lot of work to go, but it's all really just cleaning and painting as needed.
I also finished opening up the ring on the speedo last night, so that's apart now. Oddly, even though the ring appeared stock, it looks like there are greasy finger smudges inside the glass. Now I'm worried that by cleaning up the speedo, the tach is going to look dirty in comparison, so I may end up pulling it apart also just to clean the glass. Ah well, at least I have the technique down now.
Three-day weekend coming up, looks like everyone has already planned out my weekend for me. I might get a whole day to myself to work on the bike. Good thing is that after next week, work will slow down and I can start taking off some more time to dedicate to the bike. I still need to get a new bag of sand, but then maybe I can spend a whole day sandblasting.
Oh yeah, and I still have to experiment with paint colors to figure out how I'm going to finish off the tank, side covers, and fenders.
1981 KZ1000-JK1
She's a beautiful mess, and I've made her all mine
She's a beautiful mess, and I've made her all mine
Please Log in or Create an account to join the conversation.
- Shdwdrgn
-
Topic Author
- Offline
- User
-
Registered
- Posts: 611
- Thanks: 24
Re: 1981 KZ1000 J-to-K build
29 May 2016 15:33
Making some nice progress so far this weekend. I finished cleaning and painting the brackets for the front brake, plus I got the rear brake cylinder painted and mounted with new pads. We have a big storm rolling overhead right now so I'm not going to pull out the sandblasting stuff unless it blows over, otherwise I'll get the front brake cylinders cleaned and painted tomorrow, and then I want to get started on the battery box.
It's really handy to have an Ace hardware a block away with a great selection of metric stainless bolts. Some of these bolts are either mis-matched or just rusting out, so I run and grab new ones as needed. Just picked up a couple more this morning for the rear inner fender, so that is mounted up now..
One more bit of exciting news -- I think I found a color to use for the engine and pipes. Originally I wanted to stay with gloxx black on the frame, and flat black on the engine, however after seeing how quickly the frame can lose its shine, I realized that the difference wouldn't be noticeable without constant cleaning. Yesterday I spotted a cast-iron color spray paint, and grabbed a can to try. WOW, I'm impressed! Not only is this a nice dark gray that will still stand out from the black, but after I hit it with a clearcoat it now looks like a metalflake color with a nice rich sparkle. The only problem I had was mixing duplicolor paint with a rustoleum clearcoat, the clear looks like it got rained on, and a second coat didn't help. However rustoleum also makes the same cast iron color in an engine paint, if I can find someone around here that carries it, so I won't have to worry about mixing when I start working on the engine parts. And I also found that VHT makes a cast iron in the 2000-degree exhaust pipe paints, which means I have everything I need to make this work.
My plan right now is to finish up the brakes, get the battery box mounted, and start working through the wiring harness. Since I'm converting from a J to a K, there are a number of differences. I *think* I bought all the different pieces needed to complete the change, but I'd like to find out before I start working on the engine so I have time to order whatever is missing. I can clean up and paint the new engine case one of these weekends, and give it a week or two to harden up before I start transferring parts, then hopefully finish up the engine and electrical together.
So close... almost there...
1981 KZ1000-JK1
She's a beautiful mess, and I've made her all mine
She's a beautiful mess, and I've made her all mine
Please Log in or Create an account to join the conversation.
- Shdwdrgn
-
Topic Author
- Offline
- User
-
Registered
- Posts: 611
- Thanks: 24
Re: 1981 KZ1000 J-to-K build
03 Jun 2016 17:34
It's too bad I don't get much of a chance to work on the bike during the week. Ah well. Got home tonight and sorted out a pile of pieces to sandblast over the weekend. I have a couple of frame brackets that I can whip out pretty quick, then I'll start on the battery box. I got one of them pulled apart, all of the electronics are off, but there's so many odd angles to the pieces that it'll probably take some time to fully clean up. And there's a lot of surface rust on the bottom, so I'll get that cleaned as well as possible before hitting it with the rustoleum.
Once I get through the smaller pieces, I also have the aluminum panels that the foot pegs attach to. Quite a bit of grease on the backs sides to clean up, but otherwise the pieces should be easy to finish off. Will definitely have to put down a thick coat of clear on those. After that I can get back on the fenders and chain guard again (blasting through chrome takes a LONG time with my little gun).
I'm starting to get down to the extra parts now. I have a rear swingarm complete with the brake, rear wheel, plus extra rear fenders and a gas tank. And I'm going to have a lot of extra wiring pieces, plus most of a motor. Just gotta get mine all put back together first to make sure I don't short myself any bolts.
1981 KZ1000-JK1
She's a beautiful mess, and I've made her all mine
She's a beautiful mess, and I've made her all mine
Please Log in or Create an account to join the conversation.
- Shdwdrgn
-
Topic Author
- Offline
- User
-
Registered
- Posts: 611
- Thanks: 24
Re: 1981 KZ1000 J-to-K build
03 Jun 2016 20:10
Since the stickers are mostly gone or removed, I've been thinking of ideas for small details. For example, the brakes all have a small flat round spot on the face that looks like of bare now. I was thinking of doing a simple stencil on the spots, but I couldn't really find any existing logos that stood out to me (the 70's and 80's styling seems kinda boring these days). Figured I'd make up my own real quick. It's just a simple Arial Black font in italic, but I thought it had a nice look, and the spacing should make for an easy stencil.

1981 KZ1000-JK1
She's a beautiful mess, and I've made her all mine
She's a beautiful mess, and I've made her all mine
Please Log in or Create an account to join the conversation.
- Shdwdrgn
-
Topic Author
- Offline
- User
-
Registered
- Posts: 611
- Thanks: 24
Re: 1981 KZ1000 J-to-K build
08 Jun 2016 20:16
Today was a mixed assortment of luck... I've been working on the aluminum panels that hold the foot pegs. Decided to invert the original two-tone, with the center in cast iron and the outside in black. The pieces were cleaned up, primered, and had the cast-iron paint applied. Today it as dry enough to tape over, so I masked both pieces and started painting. Got one piece finished, and had just finished up the last coat of black on the second piece when it slipped off my hanger wire, crashing to the floor and embedding dirt and sand into the fresh paint. :ohmy: So now I have to wait a few days for the paint to harden up, then clean it up and paint it again. I'm not a happy camper.
On the other hand, I've been looking for the door to the battery box for the past week. Finally found it today! Got it cleaned up and painted, just have to wait for it to dry.
I took today off work to work on the bike. Started out routing the wires to the main panel on the back of the battery box. Had to re-do it a couple times, finally figured out I had to put the battery box in place first, THEN add the plates to hold all the plugs in place. Also had to run to the hardware store to get some more bolts. Way too many sets of bolts on this bike were all mixed sizes. I had three out of four of the bolts to hold the top of the battery box to the frame, and every one of them were different. Ah well, the bolts won't all be stock but at least they'll all be equal sizes.
I also cleaned up the air box and got the clips bolted in place. I swear I should have a huge pile of extra frame bolts somewhere, but I have no clue where they all went to. Anyway, looks like I'll need a fresh air filter, but otherwise the box is in good shape. I've been debating what to do with the chrome side panels for the air box... I could either stick with gloss black, go with cast iron to frame in the carb (which was painted flat black), or hit it with some lens tinting paint to make it look like black chrome. I like the idea of the black chrome, but I'm not sure how well the paint will stick to a polished chrome piece, so I will likely go with the gloss black.
I almost finished up the front nameplate this weekend. The silver paint I found turned out really sharp looking, but was a little thick. I had previously cleaned up and painted the piece gloss black. To finish off the silver, I took a smooth piece of cardboard, sprayed some silver across it, and pressed the nameplate into it like a stamp. Unfortunately some of the silver ran back into the grooves a little, so it's not quite perfect. Once again, I'm waiting a few days for the paint to dry up so I can sand it down, hit it with another quick coat of black, then try the silver again (lighter this time). Once I get a good clean silver laid down, I'll cover the whole thing in clearcoat.
Had to run for another bag of sandblasting sand today. That last bag went *really* fast, but at least they're cheap. This will be the fourth bag of sand I've used on the bike. I also finally got started on the motor today! Took both halves of the bottom case out and hosed them down with the paint stripper. I've gone through two coats, plus a rinse of engine degreaser, but still have a bit of paint to work through. The original paint had a lot of chips in it, and I didn't want to get too thick of a coat built up on the engine. Figured it was best to just strip it all and start clean. While I was out getting the sand, I also checked for engine paints, but so far I haven't found anyone carrying a primer in high-temp. I also can't find anyone carrying the cast-iron color in rust-oleum, although I did find a store that has the 500-degree paint in VHT (but not the 2000-degree for the pipes). I may end up having to order this stuff online.
1981 KZ1000-JK1
She's a beautiful mess, and I've made her all mine
She's a beautiful mess, and I've made her all mine
Please Log in or Create an account to join the conversation.
- Shdwdrgn
-
Topic Author
- Offline
- User
-
Registered
- Posts: 611
- Thanks: 24
Re: 1981 KZ1000 J-to-K build
12 Jun 2016 20:14
Apparently we're going to skip right over Spring and dive straight into Summer this year... ugh so hot this weekend! Not even the middle of June and we're already in the mid-90's.
Well I finished up the left foot peg plate and got it mounted up on the bike. I wish that cast-iron color were just a little darker, but I am really liking the contrast with the gloss black. The right side board has been repainted, now I'm just trying to figure out what I'm going to do with that section that had the oil information sticker. I have an idea... In accordance with my nick, I want to do a bit of a dragon theme on the bike. One of the things I've worked on is a template for scales that isn't the basic fishnet type paint job. I have a good size template to use on the tank and fenders, but I was thinking if I cut the size in half, I could spray the scales on the area where the oil sticker was at using the cast-iron color, then over-shoot it with some lens tint so the scales are more subtle. I did a test paint yesterday, but ran into two problems. First, the VHT tint seems to get a couple shades darker as it dries. Second, after it dries it has a purple tone when the light bounces off of it. I'll have to find another brand and see if I can find something that looks more black, but the idea appears to work. Maybe I'll use this to fill in those circles on the brakes as well?
Something that bugs me -- the original bolts to hold the foot peg plates to the bike are really short. I mean there's only about 5/16" of thread that actually goes into the bike, even though the mounting holes appear to be threaded for about an inch of depth. Considering how much weight can ride on those bolts, I think I'm going to grab some from the hardware store that are another 5 and 10mm in length, and see how deep the threads actually go.
So I've hosed down the engine case with paint stripper, grease cleaner, and more paint stripper. I hosed down the cylinder jugs and the top cover of the cams with grease cleaner. The top cover for the cams got sandblasted on the top, cleaned some more, then primered and painted -- my first large piece with the cast-iron color! The jugs got a bit more cleaning, and I started masking off the gasket area on one side. In between all of that, I was working on scraping the old gasket material off the top and bottom case halves. Such a pain, I can see this is going to take some time to get through all the surfaces, but at least this is something I can tackle in short bursts after work in the evenings. Most of the original black paint has been removed, still need to scrape it off in spots where the stripper didn't seem to want to get it. I'm not going to get completely anal about cleaning up the case, since there's a lot of area that will never be seen again once the engine is reassembled, but I'll keep working on it for as long as my patience allows.
The local stores carry the Duplicolor cast iron color paint and primer in the 500 degree engine series. I haven't really heard much from folks on how well this brand holds up, but I would think something with a ceramic base should do well over time? Guess I'll just have to wait and see... I've also been looking for the VHT brand as they are the only ones I could find that have the 2000-degree paint for the pipes in the cast-iron color. I did find a store that carries the high-temp primer, so that's a start.
I hear my neighbor starting up his bike every morning for work. Friday it was 73 degrees when I drove in. God I can't wait to be able to ride to work again.
1981 KZ1000-JK1
She's a beautiful mess, and I've made her all mine
She's a beautiful mess, and I've made her all mine
Please Log in or Create an account to join the conversation.
- Shdwdrgn
-
Topic Author
- Offline
- User
-
Registered
- Posts: 611
- Thanks: 24
Re: 1981 KZ1000 J-to-K build
13 Jun 2016 21:44
Well that's going faster than expected. Sat down with the top case half after work tonight, managed to get all the gasket surfaces cleaned up and started working on the last bits of old paint. This paint is so thick in spots it almost looks like it was plasti-dipped, but once I can get under it the paint seems to chip right off.
I'm guessing I will need to assemble the bottom case and jugs all together before sliding the assembly into the frame, it just doesn't look like there's enough clearance to assemble those pieces once the bottom case is on the bike. So I'll need to finish cleaning both case halves, the jugs, and the oil pan -- pretty much everything up to the top of the cylinders, That shouldn't be bad, and once that's all done I can some time to work on the piece that holds the cams. It is by far the nastiest of all the engine pieces and will take some work to get prepped for paint.
I'm guessing I will need to assemble the bottom case and jugs all together before sliding the assembly into the frame, it just doesn't look like there's enough clearance to assemble those pieces once the bottom case is on the bike. So I'll need to finish cleaning both case halves, the jugs, and the oil pan -- pretty much everything up to the top of the cylinders, That shouldn't be bad, and once that's all done I can some time to work on the piece that holds the cams. It is by far the nastiest of all the engine pieces and will take some work to get prepped for paint.
1981 KZ1000-JK1
She's a beautiful mess, and I've made her all mine
She's a beautiful mess, and I've made her all mine
Please Log in or Create an account to join the conversation.
- Shdwdrgn
-
Topic Author
- Offline
- User
-
Registered
- Posts: 611
- Thanks: 24
Re: 1981 KZ1000 J-to-K build
16 Jun 2016 11:27
I've been reading up on curing the engine paint, seems like a lot of varied results. Last night I baked a couple small parts in the over -- meant to do 200 degrees for 20 minutes, but forgot about them and they baked for about 50 minutes instead. Duplicolor recommends 7 days for curing, but I've been reading some info that suggests multiple bakings will make the stuff last a lot longer. And then there's the guy who let it cure for only three days, poured gasoline over his part, then complained about how horrible the product was... yeah right buddy.
Some folks said the paint was still soft after baking it. Some said it wrinkled at 225 degrees while others baked at 300 with no problems. I know some products recommend running the engine three times, in progressively longer runs. I think I'm going to try a bit of everything. My plan is to bake parts for 20 minutes at 200, then 40 minutes at 250, and finally 60 minutes at 300. Probably overkill, but since the carbs were also completely stripped down, I figure there will be some gas spillage while I dial them back in again. I figure I'll try it with these smaller parts first and see how they hold up to a gas spill.
Back to the bike, I finished cleaning up the old gaskets, and have done some more work on the old paint. There's a good chance I can get some large pieces painted this weekend, then I can hang the pieces on the frame and see how the color scheme is really going to look. And I need to start playing with the candy color spray paints again, since I'll need to get the tank and fenders done soon.
1981 KZ1000-JK1
She's a beautiful mess, and I've made her all mine
She's a beautiful mess, and I've made her all mine
Please Log in or Create an account to join the conversation.
- Shdwdrgn
-
Topic Author
- Offline
- User
-
Registered
- Posts: 611
- Thanks: 24
Re: 1981 KZ1000 J-to-K build
17 Jun 2016 20:16
Very interesting... I was digging around on google for color ideas and ran across some pics of a bike done with VHT burnt orange. Not exactly what I was looking for, but definitely caught my attention. Lo and behold, I already have a can of that color! I painted a patch on a sign this morning to see what it looked like, but was really disappointed as the color had too much of the 'burnt' to it and was dull and lifeless. I thought maybe a little coat of the duplicolor metal cast orange might liven it up a bit, but the can was almost empty so I only got a small patch done, but it was enough to see that while the color was much darker than I wanted, it really brought something out.
I hit the stores this evening to try and find more of the duplicolor... everybody is carrying red, blue, and purple. None of the other colors any more. I came back home to ponder what I could do, then it hit me to try putting some clearcoat over the top of the burnt orange I had previously laid down. WOW! Not only did it brighten up the color a lot, but it made it sparkle in the sunlight.
Suddenly there is a lot of potential in this color. Not only that, but it solves one of my biggest problems -- my experience with the duplicolor is that those metalcast paints are REALLY finicky, I mean like if you're not perfect with the coverage it shows. I have some plans for some detail work, and I hated the idea of trying to get every layer perfect in one pass. Well the VHT goes on like a regular coat of paint. Overlapping is smooth and it all blends together as expected, so it should be really easy to put down my layers. And all of the auto stores I visited tonight carry this color, so getting supplies will be easy. It's also given me an idea for the scales on the foot peg board -- tomorrow I'll experiment and see how that orange goes on over the top of a gloss black. I might be able to get that subtle look I wanted without resorting to the lens tinting to darken it up.
This weekend in addition to starting on painting engine pieces, I also want to clean up a fender and start laying down some paint so I can experiment. I know *what* I want to do on the fenders, the question is how precise I can get with rattle cans.
Oh yeah, and baking the engine parts is looking very promising. Even after the first bake the paint felt really hard. I did a second back at 250 last night, but I'm not sure it changed anything. The paint is hard, I can run my fingernail across it and not leave a mark. My wife wasn't too happy about me baking the rest of the pieces, but she did agree that it has only a very faint smell. This orange color is also an engine paint as requires baking, so I guess we'll see if I can fit the whole gas tank in there without scratching up fresh paint.
1981 KZ1000-JK1
She's a beautiful mess, and I've made her all mine
She's a beautiful mess, and I've made her all mine
Please Log in or Create an account to join the conversation.
Moderators: Street Fighter LTD