
Custom Fabbed Seat KZ650 - *Update PICS* APR 23
- dutchz
-
- Offline
- User
-

Registered
- Posts: 784
- Thanks: 4
Re: Custom Fabbed Seat KZ650 - *Update PICS* APR 23
08 May 2006 22:28
Here's a mockup again, now with the desired three layers of foam. After trimming all three layers, I used a coarse sanding sponge (also 3M) to blocksand all around the seatpan for a uniform, smooth edge.

Post edited by: dutchz, at: 2006/05/09 01:58
Post edited by: dutchz, at: 2006/05/09 01:58
1974 Kawasaki Z1
Stock front hub and rear axle.
Stock front hub and rear axle.
Please Log in or Create an account to join the conversation.
- dutchz
-
- Offline
- User
-
Registered
- Posts: 784
- Thanks: 4
Re: Custom Fabbed Seat KZ650 - *Update PICS* APR 23
08 May 2006 22:31
After softening up the edge of the top layer of foam some with the sanding sponge, I proceeded to trace the seat onto the vinyl with the illustreous sharpie, then sprayed the marked section and the top (not sides) with the spray glue. Let it set up, press it on and smooth it out nicely. Make sure not to trap any bubbles.

1974 Kawasaki Z1
Stock front hub and rear axle.
Stock front hub and rear axle.
Please Log in or Create an account to join the conversation.
- dutchz
-
- Offline
- User
-
Registered
- Posts: 784
- Thanks: 4
Re: Custom Fabbed Seat KZ650 - *Update PICS* APR 23
08 May 2006 22:39
Don't have any pictures of the next step, because glue was everywhere and didn't want to get any on the camera. Besides, I was well into my second sixpack and needed all my concentration to get the vinyl neatly stretched around the corners :whistle:.
Anyway, I first glued all four sides down, one by one. Then I proceeded to wrap the vinyl tightly around the edge of the seatpan. The hard part is, you have to let the glue set up, then stretch the vinyl, get the folds at the corners as small and tight as possible, trim some small v-cuts and glue it down onto the bottom of the pan. I will state the obvious by saying this is a messy job, and, the top of the seat looks much better than the bottom.
The result:
1974 Kawasaki Z1
Stock front hub and rear axle.
Stock front hub and rear axle.
Please Log in or Create an account to join the conversation.
- dutchz
-
- Offline
- User
-
Registered
- Posts: 784
- Thanks: 4
Re: Custom Fabbed Seat KZ650 - *Update PICS* APR 23
08 May 2006 22:45
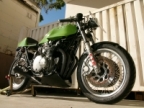
Next morning I mounted the seatpan onto the seatbase with some velcro, shot one more picture and went for a ride. It's pretty comfortable and I can move around a lot better in corners than I could on the rubber yoga mat (too sticky). Also, there's anough of a lip on the back to keep me on the seat, in case you were wondering!

Post edited by: dutchz, at: 2006/05/09 02:00
Post edited by: dutchz, at: 2006/05/09 02:00
1974 Kawasaki Z1
Stock front hub and rear axle.
Stock front hub and rear axle.
Please Log in or Create an account to join the conversation.
- dutchz
-
- Offline
- User
-
Registered
- Posts: 784
- Thanks: 4
Re: Custom Fabbed Seat KZ650 - *Update PICS* APR 23
08 May 2006 22:54
daylight closeup

1974 Kawasaki Z1
Stock front hub and rear axle.
Stock front hub and rear axle.
Please Log in or Create an account to join the conversation.
- KZReeder
-

- Offline
- User
-
Registered
- Posts: 149
- Thanks: 1
Re: Custom Fabbed Seat KZ650 - *Update PICS* APR 23
09 May 2006 03:16
Very nice... I love that vintage-stripped-down-go-fast look. I think I'm going to steal your idea for relocating the battery. :whistle: I want that area under the seat completely see-thru on my bike too.
Nice Bike!")
Nice Bike!
Please Log in or Create an account to join the conversation.
- MattBlack
-
 Topic Author
- Offline
- User
-
Registered
- Posts: 100
- Thanks: 0
Re: Custom Fabbed Seat KZ650 - *Update PICS* APR 23
11 May 2006 14:54
Hey Dutchz, thanks for adding all that. I love seeing other custom seat jobs. I'm at the stage of covering mine now. Gonna paint everythign first though with a good rust paint so if it gets wet I won't have my pan rust from the inside out.
Please Log in or Create an account to join the conversation.
- dutchz
-
- Offline
- User
-
Registered
- Posts: 784
- Thanks: 4
Re: Custom Fabbed Seat KZ650 - *Update PICS* APR 23
11 May 2006 19:15
Cool man, look forward to seeing the result when you're done!
1974 Kawasaki Z1
Stock front hub and rear axle.
Stock front hub and rear axle.
Please Log in or Create an account to join the conversation.
- JUSTICE114
-
- Offline
- User
-
Registered
- Posts: 194
- Thanks: 1
Re: Custom Fabbed Seat KZ650 - *Update PICS* APR 23
11 May 2006 20:11
Might be a repeat question, but where did you hide your battery at? Nice Bike!
Please Log in or Create an account to join the conversation.
- dutchz
-
- Offline
- User
-
Registered
- Posts: 784
- Thanks: 4
Re: Custom Fabbed Seat KZ650 - *Update PICS* APR 23
12 May 2006 09:07
Yes, you are not alone... Maybe I should post a little battery thread, hmm.
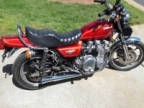
You can see it just behind the tank underneath the seat. Some of the pictures in this thread show it pretty good. It's a 12V/3A sealed scooter battery. The regulator/rectifier is mounted to the bottom of the little tray it sits in.
You can see it just behind the tank underneath the seat. Some of the pictures in this thread show it pretty good. It's a 12V/3A sealed scooter battery. The regulator/rectifier is mounted to the bottom of the little tray it sits in.
1974 Kawasaki Z1
Stock front hub and rear axle.
Stock front hub and rear axle.
Please Log in or Create an account to join the conversation.
- ltdrider
-
- Offline
- User
-
Registered
- Posts: 1232
- Thanks: 18
Re: Custom Fabbed Seat KZ650 - *Update PICS* APR 23
12 May 2006 09:36
Real Nice photo record of the work, dutchz!
Your step-by-step posting is super-informative.
Thanks!
Your step-by-step posting is super-informative.
Thanks!
'76 KZ900 LTD (Blaze)
'96 Voyager XII (Dark Star)
'79 KZ650 Cafe Project (Dirty Kurt)
Greensboro, NC
'96 Voyager XII (Dark Star)
'79 KZ650 Cafe Project (Dirty Kurt)
Greensboro, NC
Please Log in or Create an account to join the conversation.
- KitNYC
-

- Offline
- User
-
Registered
- Posts: 123
- Thanks: 1
Re: Custom Fabbed Seat KZ650 - *Update PICS* APR 23
12 May 2006 10:35
That's a nice lookin' bobber you got there, DutchZ!
Cheers,
-Kit
Cheers,
-Kit
Please Log in or Create an account to join the conversation.
Moderators: Street Fighter LTD