
Stripped cam bearing threads - shim under buckets
- kevski
-

- Offline
- User
-

Registered
- Posts: 431
- Thanks: 160
Re: Stripped cam bearing threads - shim under buckets
05 Jan 2018 08:35
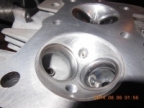
No eBay APP ID and/or Cert ID defined in Kunena configurationIn your picture you have a big sert this as you say will destroy the locating dowel holes, in the link i have put up is time serts these have the same external thread as helicoils and are solid, the top lip just requires machining down slightly to enable it to be used without destroying the hole, if you wish they can then have a slot put in them to allow the use of a screwdriver to apply them, i would rather buy these as they are only a keyboard away , they will do the same as the inserts you are making and will leave more time to get on with other jobs on the motor, the shouldered stud system in my previous post was done around 14 years ago and is still going strong, and the whole time i owned that particular bike i thrashed it hard .
Please Log in or Create an account to join the conversation.
- Kray-Z
-
 Topic Author
- Offline
- User
-
Registered
- I need more power Scotty....
- Posts: 583
- Thanks: 107
Re: Stripped cam bearing threads - shim under buckets
05 Jan 2018 14:16 - 05 Jan 2018 14:51
That is interesting kevski, I never knew of those before. The synchronized threads are a plus, making the wall thicker on average. Doesn't say what tap to use, but I'd imagine M8 x 1.0. I hope not the damn expensive and hard to get Heli Coil taps, anyway.
Good alternative for anyone without machine tools with only a few stripped threads to fix, but still requires modifying the inserts for screwdriver install, removing the lip if it interferes, trimming off the locking portion, etc. All the holes on this head were damaged, and unsuccessfully repaired before, so lots of work to do no matter what inserts we use. This head is on it's 10th life already. It has been more than just thrashed - it went through at least 3 rebuilds and has been off the bike and stripped and re-assembled / valve seals at least a half dozen times, and cams in and out dozens of times. And a 125 mph impact and rebound off of a guard rail at the race track....if it weren't a bathtub with a fresh valve job, porting, polished chambers, relief cuts for big cams, dry block oil feeds, surface machined, etc... we wouldn't bother with one this bad.
I still prefer our custom inserts for a few reasons - we control how long / deep, and there will never be a problem with installing them or securing them (I don't like / trust the "locking from the bottom by expanding the last few rolled threads into the base metal" as the time - sert specs say), and ours are still cheaper....just takes a little more time (I'm counting the time to order them, picking up the parcel and paying customs, taxes, and duty, shipping and handling....
And, we have the machines and materials already....
2-04 R1, 81 CSR1000, 81 LTD1000, 2-83 GPz1100, 3-79CBX, 81 CBX, 3-XS650, 84 Venture, +parts
Quote "speed costs money...how fast do you want to go?" (Which Z movie?)
Universal formula for how many motorcycles one should own = n + 1, where n is how many motorcycles you own right now....
Quote "speed costs money...how fast do you want to go?" (Which Z movie?)
Universal formula for how many motorcycles one should own = n + 1, where n is how many motorcycles you own right now....
Last edit: 05 Jan 2018 14:51 by Kray-Z.
Please Log in or Create an account to join the conversation.
- Nessism
-

- Offline
- Sustaining Member
-

Registered
- Posts: 7756
- Thanks: 3146
Re: Stripped cam bearing threads - shim under buckets
06 Jan 2018 05:20
Nifty repair work! Nicely done.
Did you use thread locker on the outside of the insert before install? Sink it to below the dowel recess? How many threads did you lose due to the installation slot?
Did you use thread locker on the outside of the insert before install? Sink it to below the dowel recess? How many threads did you lose due to the installation slot?
Ed
Carb O-ring Kits : www.kzrider.com/forum/3-carburetor/61807...-o-ring-kits?start=0
www.kzrider.com/forum/faq-wiki/618026-new-owner-things-to-know
1981 KZ750E2
www.kzrider.com/forum/11-projects/604901...z750e-project-thread
Carb O-ring Kits : www.kzrider.com/forum/3-carburetor/61807...-o-ring-kits?start=0
www.kzrider.com/forum/faq-wiki/618026-new-owner-things-to-know
1981 KZ750E2
www.kzrider.com/forum/11-projects/604901...z750e-project-thread
The following user(s) said Thank You: Kray-Z
Please Log in or Create an account to join the conversation.
- TexasKZ
-

- Offline
- Platinum Member
-
Registered
- Posts: 7939
- Thanks: 2511
Re: Stripped cam bearing threads - shim under buckets
06 Jan 2018 08:26
How tight do the inserts need to be, and how tight do you set the nuts that hold it all together? Cam cover clearance ?
1982 KZ1000 LTD parts donor
1981 KZ1000 LTD awaiting resurrection
2000 ZRX1100 not ridden enough
www.kzrider.com/11-projects/620336-anoth...uild-thread?start=24
1981 KZ1000 LTD awaiting resurrection
2000 ZRX1100 not ridden enough
www.kzrider.com/11-projects/620336-anoth...uild-thread?start=24
The following user(s) said Thank You: Kray-Z
Please Log in or Create an account to join the conversation.
- kevski
-
- Offline
- User
-
Registered
- Posts: 431
- Thanks: 160
Re: Stripped cam bearing threads - shim under buckets
06 Jan 2018 11:44 - 06 Jan 2018 11:58
With the time-serts if you buy the kit and follow the instructions and use the supplied tools it will lock into to the hole you are repairing.
The time-sert external thread is a 7mm fine pitch i believe which is the reason they are able to synchronize it with the standard 6mm used in these and most other Jap engines, they come in various lengths and can be trimmed to suit if you are confident enough to do it.
I have the kit to make inserts just find it time consuming, when i could be doing other things, so would rather get pre-made ones.
I have never used thread locker, even on my own stud system, but with those every one is bespoke and when tightened in lock themselves in place due to the shape of the stud and the lower part of internal thread.
It's good to see how others get around these problems when they arise, we need more thinking outside of the box ideas to keep these old motors going, i have come across people that are so blinkered that give up when issues happen.
Last edit: 06 Jan 2018 11:58 by kevski.
The following user(s) said Thank You: Kray-Z
Please Log in or Create an account to join the conversation.
- Kray-Z
-
Topic Author
- Offline
- User
-
Registered
- I need more power Scotty....
- Posts: 583
- Thanks: 107
Re: Stripped cam bearing threads - shim under buckets
15 Jan 2018 17:15
The owner of this head finished up drilling and tapping the head for the inserts on a Bridgeport - style vertical milling machine this past weekend. It went very well. For anyone interested, the spacing of the cam cap bolts (each cap) is 38 x 40 mm, and I'll have to go back out to the shop in a few days to get the spacing between the caps (I forget). It is bitterly cold here (-33 C overnight), so I've shut the main heaters off and left the shop at just above freezing until it warms up a bit outside. I'll sand / prep bodywork in the basement of the house, and fix tattered wiring looms in the kitchen until then....
A few notes....
1. We are going to run the studs through the H cover, just tall enough with drilled and spot faced cover, sealing washers, spacers, and external nuts and use them to hold the cover with a few of the original cover bolts blocked off (the owner's plan is to use 12 point ARP nuts for appearances). The studs will be installed thus: coat the stud threads with moly grease - turn the stud in by hand until it bottoms - back the stud out 1/2 turn - install cam bearing caps, washers and nuts - gradually tighten each nut 1/2 turn evenly until all the caps are fully seated on the head - torque to 8 ft-lbs. (96 in-lbs) in 2 stages - install top spacers above nuts - install cam cover and gasket- install sealing washers and top nuts - torque top nuts to 70 in-lbs.
Not for everyone, we know, but this is more a race engine than daily commuter. There are other ways to use studs without putting holes in the cam cover....I'll explain some of those in a later post.
2. We must use permanent thread lock adhesive (such as red Lock-Tite) when installing the thread inserts. We make sure each insert will fit properly (test fit) before cleaning the parts with contact cleaner, then apply the thread locking adhesive. The adhesive is necessary as the top of the holes where the Heli-Coils had pulled out didn't have much aluminum left to cut new 5/16 " UNF threads. The fact that our inserts go in all the way to the bottom of the holes, are one-piece solid parts of high strength steel, and are "glued" in place will make them much stronger than the original threads,
3. The owner was doing all the work drilling and tapping the head, and didn't take nearly enough photos. I was too busy cleaning and rebuilding old Amal Concentric carbs and trying to get rusted / seized Norton "Iso-Elastic" engine / transmission mounts, and swing arm pivots out of a bike that sat (and rusted) since 1986. I have to earn the money to keep the heat and lights going somedays. I'll get some photos of the faux milling machine set-ups and do a proper write up when the weather improves a bit.
4. The inserts still have to be test-fit and glued in place. The owner will order the studs from the manufacturer soon. For now we will be using the standard bolts to check our work. I also have to plasti-gauge the cam bearings to be sure the alignment of the caps is acceptable. If not, I'll have to work carefully to precisely correct or re-locate the dowel / knock pins. I'm hoping that won't be needed!!!!!
5. I will be using the same stud system on my own KZ-J 1394 big block and my "Beater II" 's new street / strip KZ-J 1170 engine (made out of discarded used / reconditioned racing parts). My heads don't have stripped threads, so no need to install the inserts. The studs will keep the original threads safe from damages over the harsh life my "experimental" racing engines will see in the future....
2-04 R1, 81 CSR1000, 81 LTD1000, 2-83 GPz1100, 3-79CBX, 81 CBX, 3-XS650, 84 Venture, +parts
Quote "speed costs money...how fast do you want to go?" (Which Z movie?)
Universal formula for how many motorcycles one should own = n + 1, where n is how many motorcycles you own right now....
Quote "speed costs money...how fast do you want to go?" (Which Z movie?)
Universal formula for how many motorcycles one should own = n + 1, where n is how many motorcycles you own right now....
Please Log in or Create an account to join the conversation.
- Kray-Z
-
Topic Author
- Offline
- User
-
Registered
- I need more power Scotty....
- Posts: 583
- Thanks: 107
Re: Stripped cam bearing threads - shim under buckets
15 Jan 2018 18:27Nessism wrote: Nifty repair work! Nicely done.
Did you use thread locker on the outside of the insert before install? Sink it to below the dowel recess? How many threads did you lose due to the installation slot?
Hi Ed, thank you.
Yes, thread locker is a must. The inserts are installed flush to the bottom of the dowel recess, and extend all the way down to the bottom of the holes in the head. The total depth we used to drill and tap is 1.125". The dowel recess is supposed to be 8 mm deep, but this head varied from 0.302 to 0.330". The screwdriver slot cut into the end of the insert doesn't really affect the insert once installed, so not really losing any thread engagement / height. the slots are cut two threads deep (at most 3) into the inserts, and are 0.050" wide.
I have some spare virgin low mile bathtub GPz1100 engines and heads I've been hording for future projects, and the owner of this damaged one wanted to buy one of those from me to replace his goofed one. I said I preferred to try and fix his old one (and all the good performance work that has gone into it prior to discovering how hopelessly bad the cap threads were) before parting with one of my nice unmolested spares......
2-04 R1, 81 CSR1000, 81 LTD1000, 2-83 GPz1100, 3-79CBX, 81 CBX, 3-XS650, 84 Venture, +parts
Quote "speed costs money...how fast do you want to go?" (Which Z movie?)
Universal formula for how many motorcycles one should own = n + 1, where n is how many motorcycles you own right now....
Quote "speed costs money...how fast do you want to go?" (Which Z movie?)
Universal formula for how many motorcycles one should own = n + 1, where n is how many motorcycles you own right now....
Please Log in or Create an account to join the conversation.
- Kray-Z
-
Topic Author
- Offline
- User
-
Registered
- I need more power Scotty....
- Posts: 583
- Thanks: 107
Re: Stripped cam bearing threads - shim under buckets
15 Jan 2018 18:48kevski wrote:
I have never used thread locker, even on my own stud system, but with those every one is bespoke and when tightened in lock themselves in place due to the shape of the stud and the lower part of internal thread.
It's good to see how others get around these problems when they arise, we need more thinking outside of the box ideas to keep these old motors going, i have come across people that are so blinkered that give up when issues happen.
I generally stay away from thread locker, gasket glue, RTV, etc. but sometimes it is unavoidable....
Heck, I obtain most of my "discount" parts from others "so blinkered that give up when issues happen" - they see insurmountable problems - I see affordable opportunities with a good challenge and some potential fun...
Besides, after spending more on tools and shop equipment than I spent on my first house and car, I can't really justify any excuse why I can't repair stuff like that.....
2-04 R1, 81 CSR1000, 81 LTD1000, 2-83 GPz1100, 3-79CBX, 81 CBX, 3-XS650, 84 Venture, +parts
Quote "speed costs money...how fast do you want to go?" (Which Z movie?)
Universal formula for how many motorcycles one should own = n + 1, where n is how many motorcycles you own right now....
Quote "speed costs money...how fast do you want to go?" (Which Z movie?)
Universal formula for how many motorcycles one should own = n + 1, where n is how many motorcycles you own right now....
Please Log in or Create an account to join the conversation.
- kevski
-
- Offline
- User
-
Registered
- Posts: 431
- Thanks: 160
Re: Stripped cam bearing threads - shim under buckets
16 Jan 2018 12:04
Must say i am not keen on the idea of running the studs through the cover, there is the potential for 16 seperate oil leaks, i have always used a nut and slim serated washer on the caps, and machined a little relief into the cover to allow for the extra height of the stud and nut system. Would like to see pictures when it is done though.
Please Log in or Create an account to join the conversation.
- RLBuddi
-

- Offline
- User
-
Registered
- Posts: 99
- Thanks: 2
Re: Stripped cam bearing threads - shim under buckets
27 Aug 2018 03:18
Is this correct size for 1982 KZ1100 Spectre D1 camshaft cap thread repair?? If not, what is correct size?? Please and thanks!!!!
Please Log in or Create an account to join the conversation.
- daveo
-

- Offline
- Premium Member
-

Registered
- Posts: 2930
- Thanks: 755
Re: Stripped cam bearing threads - shim under buckets
27 Aug 2018 07:54
Thread Size, M6 x 1.00
kzrider.com/forum/2-engine/557244-gpz-11...t-torque-specs-again
When using a camshaft hold-down device such as vice-grips or other means, there should be no issue using the factory owner's manual torque spec. provided the threads have not been previously stressed to the point of pulling out, IMO.
kzrider.com/forum/2-engine/557244-gpz-11...t-torque-specs-again
When using a camshaft hold-down device such as vice-grips or other means, there should be no issue using the factory owner's manual torque spec. provided the threads have not been previously stressed to the point of pulling out, IMO.
1982 KZ1100-A2
Please Log in or Create an account to join the conversation.
- VTEC
-

- Offline
- User
-
Registered
- Posts: 558
- Thanks: 80
Re: Stripped cam bearing threads - shim under buckets
27 Aug 2018 16:20 - 27 Aug 2018 16:25
I've been thinking, next time I have the cam cover off, drilling the cam cap holes a bit deeper, running through with a tap, and using a set of the next size longer bolts.
This should eliminate any future problems, as opposed to helicoil every hole.
A few extra threads can make a major difference in strength.
This should eliminate any future problems, as opposed to helicoil every hole.
A few extra threads can make a major difference in strength.
KZ1000-K2
ZRX1100
XR400R
ZRX1100
XR400R
Last edit: 27 Aug 2018 16:25 by VTEC.
The following user(s) said Thank You: Scirocco
Please Log in or Create an account to join the conversation.
Moderators: Street Fighter LTD