
Stripped cam bearing threads - shim under buckets
- Nessism
-

- Away
- Sustaining Member
-

Registered
- Posts: 7756
- Thanks: 3146
Re: Stripped cam bearing threads - shim under buckets
13 Dec 2017 05:08 - 13 Dec 2017 10:11
Some duct tape on the jaws help protect from scratching, for those that care...
This photo comes from the Suzuki GS850 manual but the technique works perfectly on my KZ750 as well.
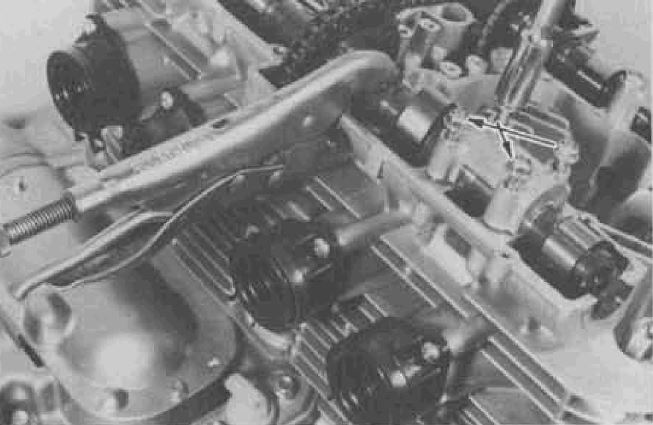
This photo comes from the Suzuki GS850 manual but the technique works perfectly on my KZ750 as well.
Ed
Carb O-ring Kits : www.kzrider.com/forum/3-carburetor/61807...-o-ring-kits?start=0
www.kzrider.com/forum/faq-wiki/618026-new-owner-things-to-know
1981 KZ750E2
www.kzrider.com/forum/11-projects/604901...z750e-project-thread
Carb O-ring Kits : www.kzrider.com/forum/3-carburetor/61807...-o-ring-kits?start=0
www.kzrider.com/forum/faq-wiki/618026-new-owner-things-to-know
1981 KZ750E2
www.kzrider.com/forum/11-projects/604901...z750e-project-thread
Attachments:
Last edit: 13 Dec 2017 10:11 by Nessism.
The following user(s) said Thank You: loudhvx
Please Log in or Create an account to join the conversation.
- loudhvx
-
- Offline
- KZr Legend
-

Registered
- Posts: 10864
- Thanks: 1619
Re: Stripped cam bearing threads - shim under buckets
13 Dec 2017 09:31
The 550's specify 104 in-lbs (8.7 ft-lbs).
1981 KZ550 D1 gpz.
Kz550 valve train warning.
Other links.
Kz550 valve train warning.
Other links.
Please Log in or Create an account to join the conversation.
- kevski
-

- Offline
- User
-

Registered
- Posts: 431
- Thanks: 160
Re: Stripped cam bearing threads - shim under buckets
13 Dec 2017 10:05
One of the problems is there are different torque settings for chrome plated bolts and the plain bolt the chrome ones need the lower torque settings, unfortunately some do not read the specs right and the chrome bolts end up getting tightened to much and start to strip the threads.,
here is a picture of a repaired head i done in 2004 and its still going after many thousands of miles, it's a shouldered stud system 8 with the shoulder just under the level of the cam caps and 8 with the shoulder just under the level of the locating dowels, the head was tapped out to 8mm to the bottom of the stud holes this lightly scratches the dowel locations but not enough to affect dowel fitting, shouldered studs made up, fitted caps fitted nuts torqued tops of studs trimmed off, cam cover needed a little milling inside just to give space for the nuts, and like i said all put back together and 13 years later it's still running.

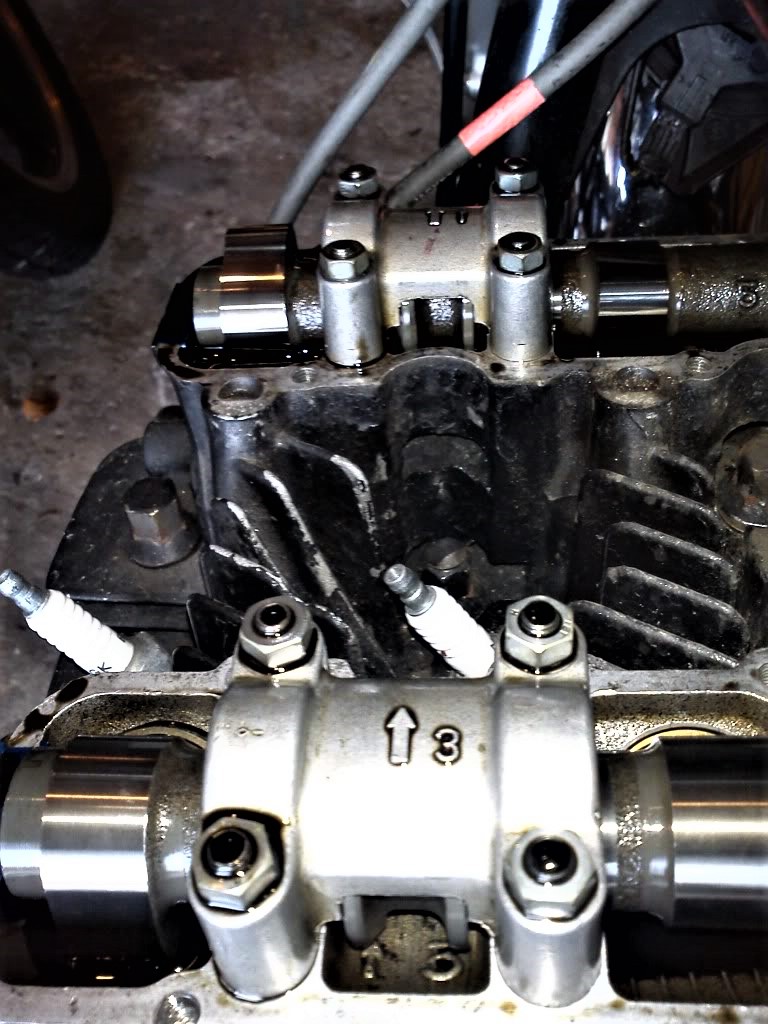
here is a picture of a repaired head i done in 2004 and its still going after many thousands of miles, it's a shouldered stud system 8 with the shoulder just under the level of the cam caps and 8 with the shoulder just under the level of the locating dowels, the head was tapped out to 8mm to the bottom of the stud holes this lightly scratches the dowel locations but not enough to affect dowel fitting, shouldered studs made up, fitted caps fitted nuts torqued tops of studs trimmed off, cam cover needed a little milling inside just to give space for the nuts, and like i said all put back together and 13 years later it's still running.
Attachments:
The following user(s) said Thank You: Kray-Z
Please Log in or Create an account to join the conversation.
- RonKZ650
-

- Offline
- User
-
Registered
- Posts: 3711
- Thanks: 247
Re: Stripped cam bearing threads - shim under buckets
14 Dec 2017 19:51
The manual calling for too much torque has caused many a stripped thread, but I've never had problem after installing helicoils. Stay with normal 6mm bolt torque values of about 65 in/lb there will be no problems. The exhaust side all want to strip for some reason. Don't know if less aluminum threads on that cam or what, but the exhaust side is more a problem than the intake for some reason.
321,000 miles on KZ's that I can remember. Not going to see any more.
Please Log in or Create an account to join the conversation.
- Kray-Z
-
 Topic Author
- Offline
- User
-
Registered
- I need more power Scotty....
- Posts: 583
- Thanks: 107
Re: Stripped cam bearing threads - shim under buckets
18 Dec 2017 14:15TexasKZ wrote: Kay-Z,
Are you going to install a stud and nut system in the botched heads?
Yes....installing a "stud" system is definitely part of the "insurance" plan on an engine that might have the cams out a few dozen times in it's life....
I'm drawing on experience with automotive racing engines that had extremely high valve spring loads.......I'll be explaining how to do it in this thread when the time comes....this engine may produce near 200 HP someday in the future.....
KZ1000 / 1100 FSM torque spec for cam bearing retainers. is 12 ft-lbs.......I did one that way (on my first KZ1000LTD) when I first got the manual, and it went OK, but later went back to analyze what the maximum torque on a M6 could be - answer from my fastener specialist was 9 ft-lbs, maximum.....
2-04 R1, 81 CSR1000, 81 LTD1000, 2-83 GPz1100, 3-79CBX, 81 CBX, 3-XS650, 84 Venture, +parts
Quote "speed costs money...how fast do you want to go?" (Which Z movie?)
Universal formula for how many motorcycles one should own = n + 1, where n is how many motorcycles you own right now....
Quote "speed costs money...how fast do you want to go?" (Which Z movie?)
Universal formula for how many motorcycles one should own = n + 1, where n is how many motorcycles you own right now....
Please Log in or Create an account to join the conversation.
- Kray-Z
-
Topic Author
- Offline
- User
-
Registered
- I need more power Scotty....
- Posts: 583
- Thanks: 107
Re: Stripped cam bearing threads - shim under buckets
18 Dec 2017 14:34
One more before heading out to the shop today - all of you who recognize that pulling the cams down against the springs with only a few threads in aluminum available, and have come up with your own procedures and methods to avert stripping out the threads already know the cause......
I'll be looking also at a remedy after the damage is done, and a few suggestions to prevent the problem before, during, and after.....
Last Time I saw a used and barely usable bare GPz1100 bathtub head on e-bay, it sold for $650-ish USD........I think it already had a few cam bolts stripped out, too....
2-04 R1, 81 CSR1000, 81 LTD1000, 2-83 GPz1100, 3-79CBX, 81 CBX, 3-XS650, 84 Venture, +parts
Quote "speed costs money...how fast do you want to go?" (Which Z movie?)
Universal formula for how many motorcycles one should own = n + 1, where n is how many motorcycles you own right now....
Quote "speed costs money...how fast do you want to go?" (Which Z movie?)
Universal formula for how many motorcycles one should own = n + 1, where n is how many motorcycles you own right now....
Please Log in or Create an account to join the conversation.
- ThatGPzGuy
-

- Offline
- Sustaining Member
-
Registered
- More Sparky than Speed Racer
- Posts: 1495
- Thanks: 394
Re: Stripped cam bearing threads - shim under buckets
18 Dec 2017 17:39
I used barrel inserts to fix the few I had on mine. You need to drill out to the correct size and re-tap but then the inserts are metal and will not pull out like aluminum. You can get them at McMaster Carr along with the tool and the correct size bottom tap. After you have done it a few times you become very good at being very careful when tightening the cap bolts.
Jim
North GA
2016 Yamaha FJR1300ES
1982 GPz750 R1
1974 Kawasaki H1
1976 Kawasaki KZ400
1979 Yamaha XS650 cafe'
2001 KZ1000P
2001 Yamaha YZ426
1981 Honda XR200 stroked in an '89 CR125 chassis
1965 Mustang
1967 Triumph GT6
1976 Bronco
"If you didn't build it, it's not really yours"
North GA
2016 Yamaha FJR1300ES
1982 GPz750 R1
1974 Kawasaki H1
1976 Kawasaki KZ400
1979 Yamaha XS650 cafe'
2001 KZ1000P
2001 Yamaha YZ426
1981 Honda XR200 stroked in an '89 CR125 chassis
1965 Mustang
1967 Triumph GT6
1976 Bronco
"If you didn't build it, it's not really yours"
Please Log in or Create an account to join the conversation.
- Kray-Z
-
Topic Author
- Offline
- User
-
Registered
- I need more power Scotty....
- Posts: 583
- Thanks: 107
Re: Stripped cam bearing threads - shim under buckets
19 Dec 2017 14:17
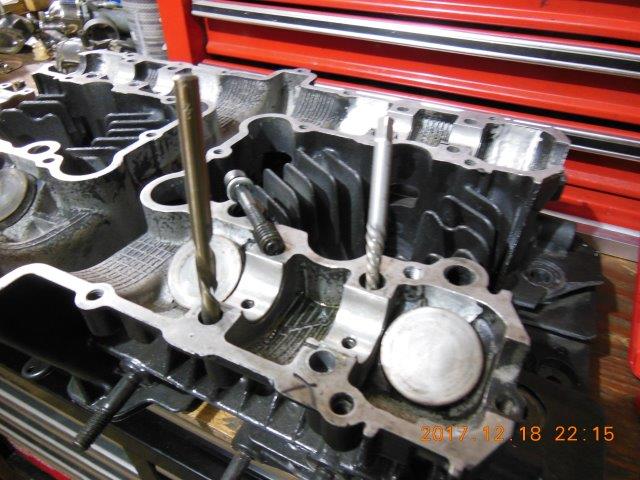
Ok, so we started before I thought this might be a good shop project to document in the forum. So I missed photo opportunities to show this GPz1100 “bathtub” shim under bucket head as it was received, and when we removed the remnants of the 1st owner’s repairs to the cam cap threads. Namely, the old repair had been by using standard Helicoils. The Helicoils had been “doubled up” (tandem) to extend the repair as far down into the head as possible, but even so, the top portion of the Helicoils had mostly pulled out with numerous camshaft removals and installations using the stock bolts. We found that one “Time-Sert” type thread repair had been installed, also. To save this head from the scrap pile, we decided to repair the head using different tactics:
1. remove all the failed old Helicoils without further damage to the head
2. fabricate (for reasons I will explain later) and install custom made solid one piece threaded steel repair inserts. These will be much stronger than a Helicoil repair overall, particularly when only the top few threads are engaged, as when using bolts, or in this particular case, when the head’s aluminum has been so heavily damaged previously and the part is on its last chance at life)
3. replace the OEM M6 cam cap bolts with a system of studs and flanged nuts to pull down and retain the cam caps with as little as possible wear and stress to the cylinder head for the potentially dozens of times were cams will be removed and installed in this particular head.
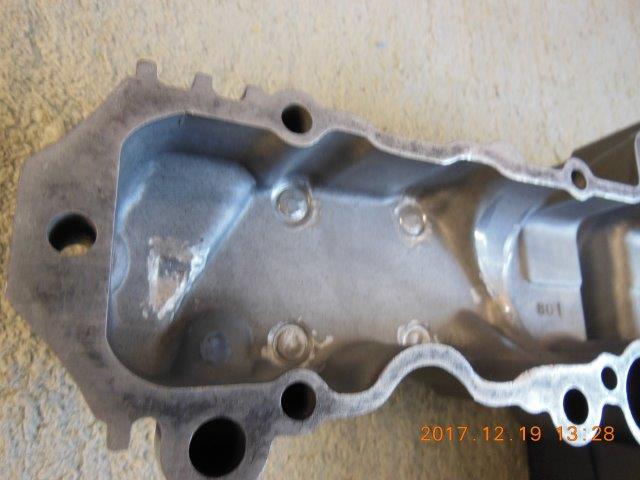
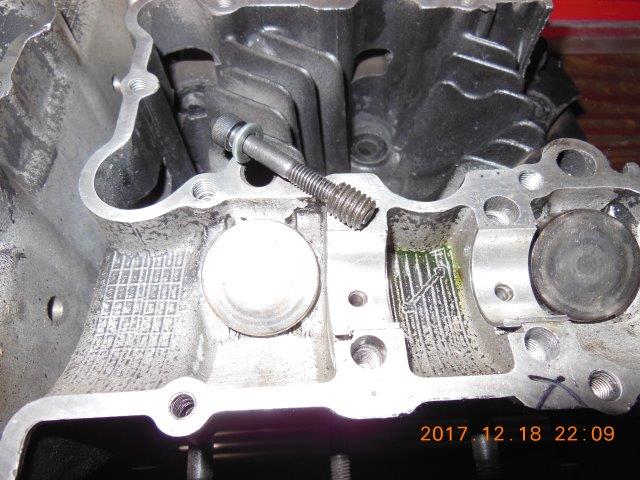
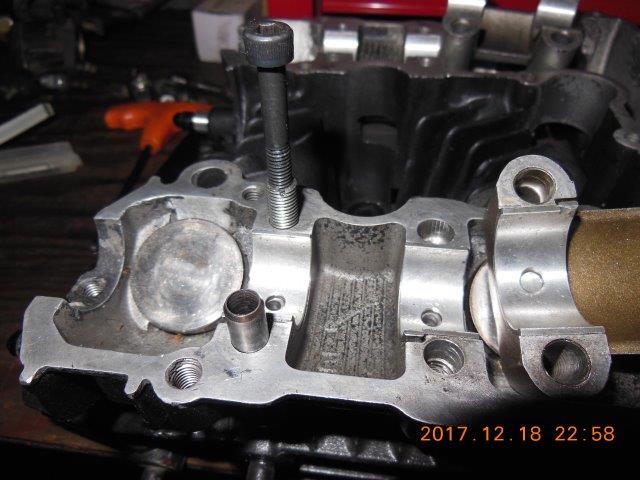
First, I dug out an old H – cover (cam cover) to show what can happen if your cam cap threads fail:
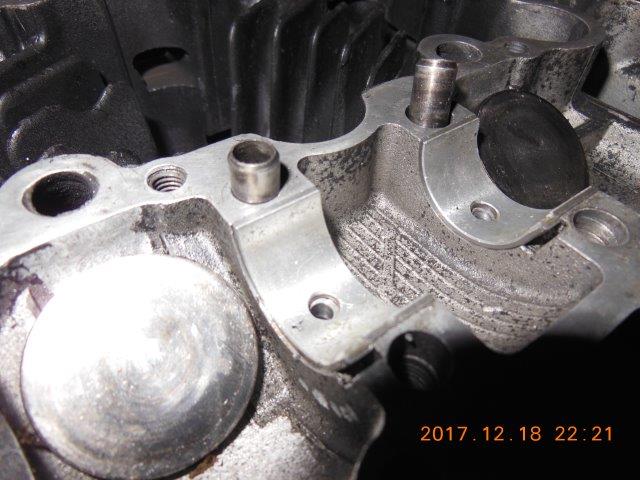
Next, the GPz head. Notice to add to the problems, many of the precision machined and critical cap 8 mm alignment dowel holes have been damaged as well. This is especially a problem on the caps that also function as the cam end thrust bearings. So we had to take stock of which dowel holes were still in good enough shape to maintain cap alignments – we needed at least two good dowel locations per cap. Thankfully, we determined that there was enough useable locations left to save the head:
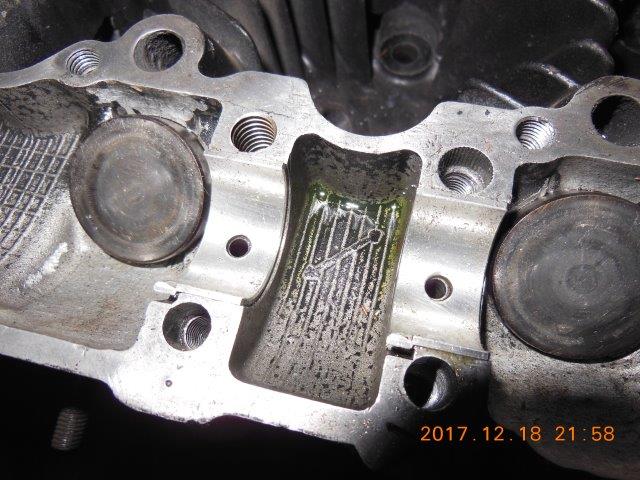
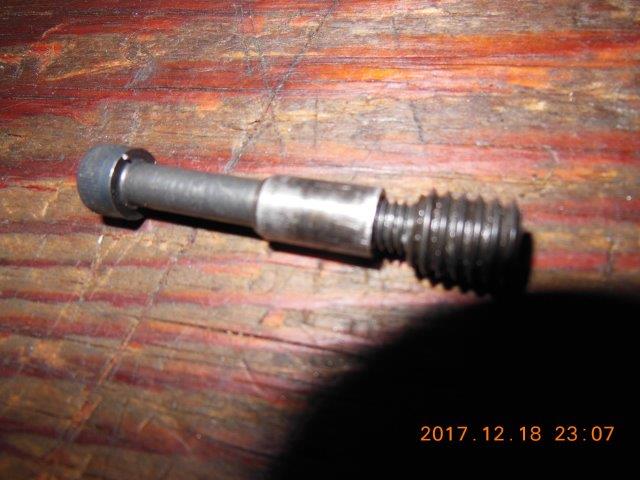
You can see here the one location were the large diameter “Time-Sert” had been used, upper left. Note the large threads (3/8” NC, actually, about 9.5 mm diameter) all the way to the top of the hole:
Here is the “Time-Sert” insert we pulled out. We will have no real choice but to re-install it later:
How the “Time-Sert” works. Basically it is a very strong piece of threaded rod that has the stock size M6 x 1.0 thread of the standard cap bolts drilled and tapped through it. A very good idea that our repair will be based on. The “Time-Sert” is installed with a standard flat screwdriver via a slot cut in one end:
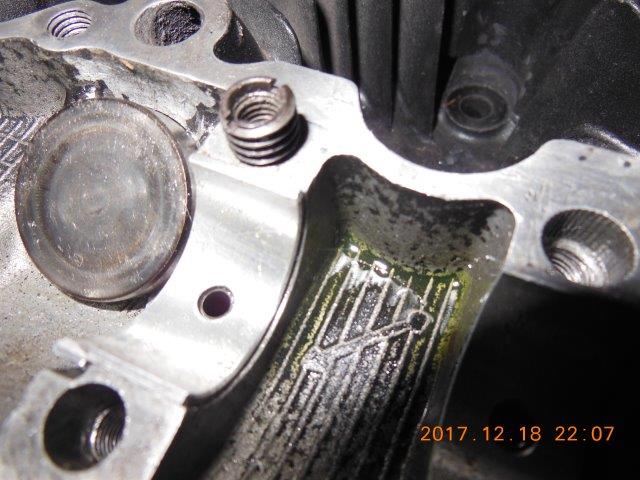
So why not install them in all the holes? First, actual “Time-Sert” type inserts are expensive and hard to get where we live. Second, as this photo shows, doing so will obliterate all the critical alignment dowels:
[I HAVE TO BREAK THE POST HERE FOR SIZE LIMITATIONS]
1. remove all the failed old Helicoils without further damage to the head
2. fabricate (for reasons I will explain later) and install custom made solid one piece threaded steel repair inserts. These will be much stronger than a Helicoil repair overall, particularly when only the top few threads are engaged, as when using bolts, or in this particular case, when the head’s aluminum has been so heavily damaged previously and the part is on its last chance at life)
3. replace the OEM M6 cam cap bolts with a system of studs and flanged nuts to pull down and retain the cam caps with as little as possible wear and stress to the cylinder head for the potentially dozens of times were cams will be removed and installed in this particular head.
First, I dug out an old H – cover (cam cover) to show what can happen if your cam cap threads fail:
Next, the GPz head. Notice to add to the problems, many of the precision machined and critical cap 8 mm alignment dowel holes have been damaged as well. This is especially a problem on the caps that also function as the cam end thrust bearings. So we had to take stock of which dowel holes were still in good enough shape to maintain cap alignments – we needed at least two good dowel locations per cap. Thankfully, we determined that there was enough useable locations left to save the head:
You can see here the one location were the large diameter “Time-Sert” had been used, upper left. Note the large threads (3/8” NC, actually, about 9.5 mm diameter) all the way to the top of the hole:
Here is the “Time-Sert” insert we pulled out. We will have no real choice but to re-install it later:
How the “Time-Sert” works. Basically it is a very strong piece of threaded rod that has the stock size M6 x 1.0 thread of the standard cap bolts drilled and tapped through it. A very good idea that our repair will be based on. The “Time-Sert” is installed with a standard flat screwdriver via a slot cut in one end:
So why not install them in all the holes? First, actual “Time-Sert” type inserts are expensive and hard to get where we live. Second, as this photo shows, doing so will obliterate all the critical alignment dowels:
[I HAVE TO BREAK THE POST HERE FOR SIZE LIMITATIONS]
2-04 R1, 81 CSR1000, 81 LTD1000, 2-83 GPz1100, 3-79CBX, 81 CBX, 3-XS650, 84 Venture, +parts
Quote "speed costs money...how fast do you want to go?" (Which Z movie?)
Universal formula for how many motorcycles one should own = n + 1, where n is how many motorcycles you own right now....
Quote "speed costs money...how fast do you want to go?" (Which Z movie?)
Universal formula for how many motorcycles one should own = n + 1, where n is how many motorcycles you own right now....
Attachments:
Please Log in or Create an account to join the conversation.
- Kray-Z
-
Topic Author
- Offline
- User
-
Registered
- I need more power Scotty....
- Posts: 583
- Thanks: 107
Re: Stripped cam bearing threads - shim under buckets
19 Dec 2017 14:21
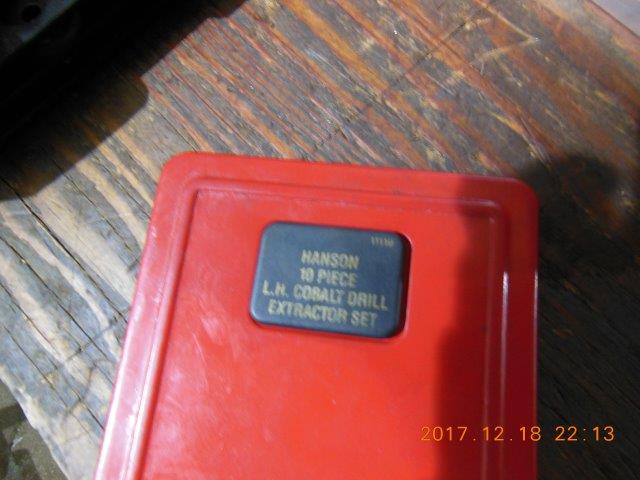
Next came the sketchy task of carefully removing the old Helicoils. Usually, if the end of the coil can be grasped with a needlenose plier, most times pulling up on the coil will unwrap it and it comes right out. But in aluminum, it usually takes some of the part out with it. Because we have deeply recessed tandem inserted coils and have so little original material left to hold our repairs in place, we had to think of less intrusive ways to get the old coils out. This kit, manufactured by Hanson and sold under various brands, has saved my ____ many times!
It consists of well thought out and even better manufactured reverse direction spiral flute extractors and if those don’t do it, several cobalt coated HSS reverse twist drills with aggressive flute angles and extremely sharp cutting edges:
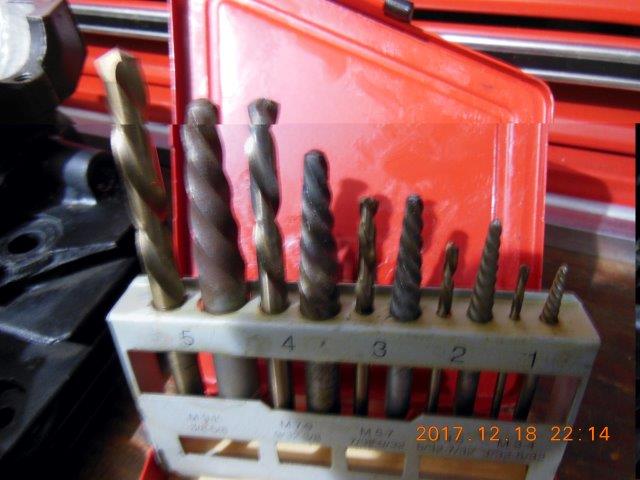
The method here is to try the extractors first, by hand using a tap handle, to grab the near end of the Helicoil and turn it out. The extractor will catch the coil and twisting it in the reverse direction loosens the coil from the insert threads in the head, so once it starts coming out, it keeps getting easier to remove the rest of the way. If the coil doesn’t catch with the extractor, the reverse twist drill will gouge into the coil, and then twist it out. Do this at very slow speed in a controllable electric drill motor – a cordless drill is probably best. Don’t use an air drill!
Next time (couple of days), I’ll explain our custom thread repair inserts and how to make them:

It consists of well thought out and even better manufactured reverse direction spiral flute extractors and if those don’t do it, several cobalt coated HSS reverse twist drills with aggressive flute angles and extremely sharp cutting edges:
The method here is to try the extractors first, by hand using a tap handle, to grab the near end of the Helicoil and turn it out. The extractor will catch the coil and twisting it in the reverse direction loosens the coil from the insert threads in the head, so once it starts coming out, it keeps getting easier to remove the rest of the way. If the coil doesn’t catch with the extractor, the reverse twist drill will gouge into the coil, and then twist it out. Do this at very slow speed in a controllable electric drill motor – a cordless drill is probably best. Don’t use an air drill!
Next time (couple of days), I’ll explain our custom thread repair inserts and how to make them:
2-04 R1, 81 CSR1000, 81 LTD1000, 2-83 GPz1100, 3-79CBX, 81 CBX, 3-XS650, 84 Venture, +parts
Quote "speed costs money...how fast do you want to go?" (Which Z movie?)
Universal formula for how many motorcycles one should own = n + 1, where n is how many motorcycles you own right now....
Quote "speed costs money...how fast do you want to go?" (Which Z movie?)
Universal formula for how many motorcycles one should own = n + 1, where n is how many motorcycles you own right now....
The following user(s) said Thank You: slmjim+Z1BEBE
Please Log in or Create an account to join the conversation.
- kevski
-
- Offline
- User
-
Registered
- Posts: 431
- Thanks: 160
Re: Stripped cam bearing threads - shim under buckets
20 Dec 2017 13:15 - 20 Dec 2017 13:20
That's not a time/sert that is some sort of big/sert i have a lot of these but would never use them in that location, you can get time/serts with the same external thread as the helicoil and in various lenghts they have a lip at the top which can be ground down slightly to allow it to go down the locating dowel holes, there are only two locating dowels per cap in diagonal positions well on older models at least, it looks like you have your work cut out on that one due to some previous owners botching, years ago i made some inserts with the dowels built in for someone in Norway it took multiple attempts to get it right but it was successful . good luck with that one.
Last edit: 20 Dec 2017 13:20 by kevski.
Please Log in or Create an account to join the conversation.
- Kray-Z
-
Topic Author
- Offline
- User
-
Registered
- I need more power Scotty....
- Posts: 583
- Thanks: 107
Re: Stripped cam bearing threads - shim under buckets
05 Jan 2018 07:11
More than a couple of days….had to get some other stuff done, and damn, it is cold here.
First, yes, I have called the Barrel type insert a “Time-Sert” type insert. Sorry, that isn’t entirely correct. A true “Time Sert” is the same idea, but is recognizable as a “Time-Sert” by having small steel prongs protruding from the top that are used to lock the barrel insert in place after being threaded in to the correct depth. I have the habit of calling all barrel type inserts “Time-Serts”. The one in the picture in my previous posts looks like one of the type available from McMaster Carr’s catalogue. McMaster’s price is about 1/10 of what our local retailers charge for those. But the outside threads are 3/8 NC, way too big to keep the alignment pins intact.
Someone else on here said they could get solid thread repair inserts the same outer diameter as a Heli-Coil…where? I have never seen such a beast. In fact, all the inserts I could find would require destroying the dowel pin holes. Do the math here, and in order to get a threaded insert inside the 8 mm diameter dowel pin holes, you will end up with an insert with minimum wall thickness of 0.021”. Under normal circumstances, that thickness of steel would easily break when torqued to 9 ft-lbs (108 in-lbs).
So here is the theory behind what we are doing. The idea is to use a common thread type for the outer part of the inserts. This is so a standard size tap can be used in the head. We chose 5/16” NF, as it is readily available, and so is grade 8 or better grades of high strength steel threaded rod. McMaster Carr to the rescue, we order the stuff in 3 ft. lengths. 5/16” NF was the best compromise, as the largest size of rod that is smaller than the 8 mm dowel pins (knock pins to many, BTW), and the fine thread kept as much insert wall thickness as we were going to get.
But what about that 0.021” wall thickness? Well, that does present some difficulties. First, if we had tried to simply drill and thread the inside of the 5/16” NF rod to M6 x 1.0, the stresses of running the tap would almost certainly have broken the thin steel if the rod wasn’t re-enforced somehow while the threads are being cut. So we made an internally threaded sleeve out of ½” diameter free machining steel stock to go on the outside of the rod while drilling and tapping the inside. The sleeve keeps everything in place and prevents breakage. Also, the sleeve was made 0.800” long, the length of our finished inserts. Handy for cutting the 5/16” rod to length after drilling and threading each insert.
Second, we still have a relatively weak 0.021” wall insert. Well, that won’t be a problem for two reasons. One – we will carefully bond the inserts in the head using high strength lock tight thread adhesive (red Locktite). That should make them nearly as strong as a stainless steel Heli-Coil insert. Two, because we will be using studs rather than bolts to fasten the cam bearing caps, the peak stress on the inserts will be considerably reduced.
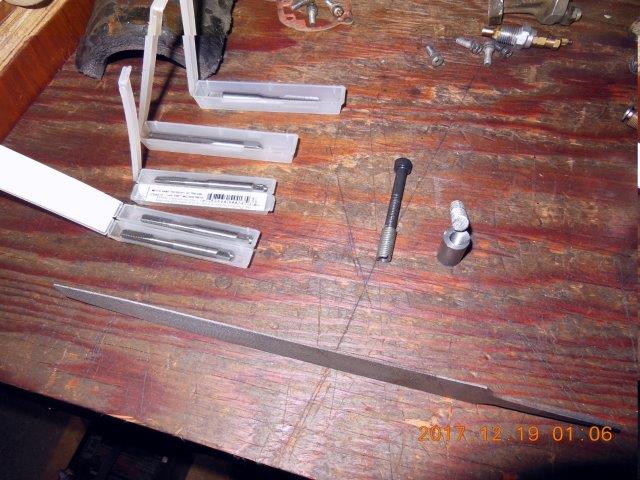
On to making the inserts (for this head, we needed 15 of them). First, here are the basic tools. One each quality HSS taps.
• 5/16 NF Plug or Taper
• 5/16 NF Bottoming
• M6 x 1.0 Plug or Taper
• M6 x 1.0 Bottoming
• Edge cutting fine flat file the same thickness as your flat blade / slotted screwdriver used to turn the inserts into the head later – shown is a wedge file. A flat jeweler’s file will work.
• A test M6 x 1.0 bolt
• Our 5/16” NF threaded sleeve.
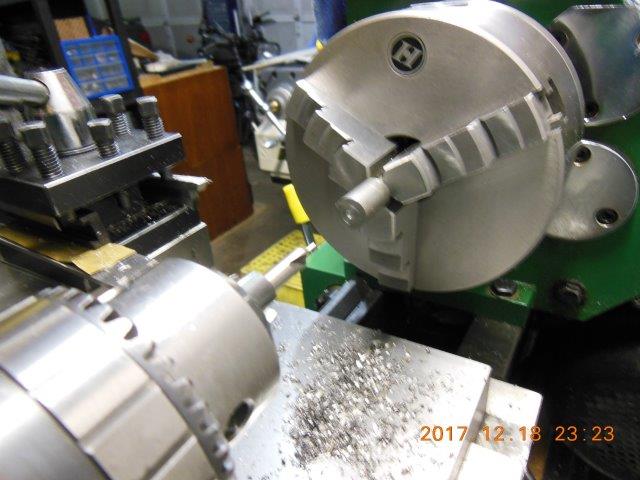
Step 1, make our threaded sleeve. O.D. is ½”, drilled and tapped through the center 5/16” National Fine, on a lathe. 0.800” long.
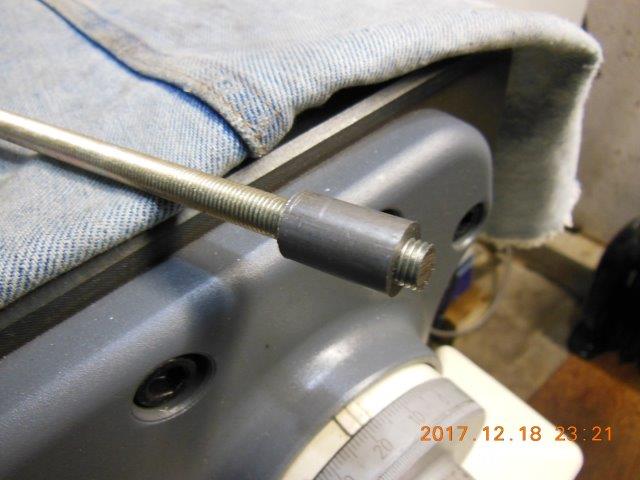
Step 2, thread sleeve onto threaded rod until flush with the end, then chuck rod (not insert) into the lathe chuck with the sleeve butted up tight against the jaws. If the end of the rod needs to be faced square, leave enough rod protruding to face flat to end of the sleeve.
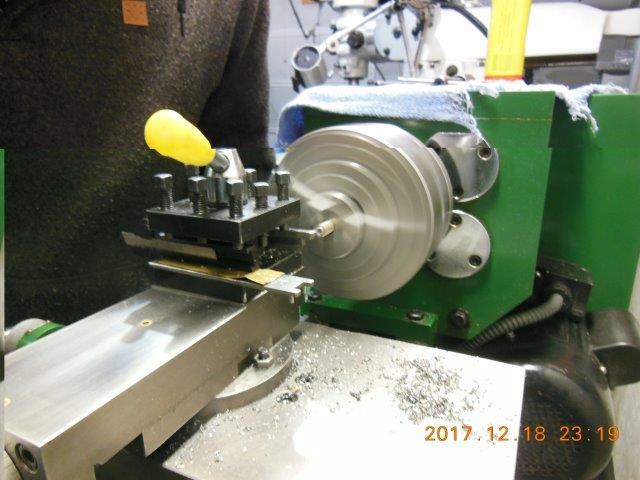
Step 3, center drill to guide the tap drill. Here you can see how the sleeve is NOT in the chuck.
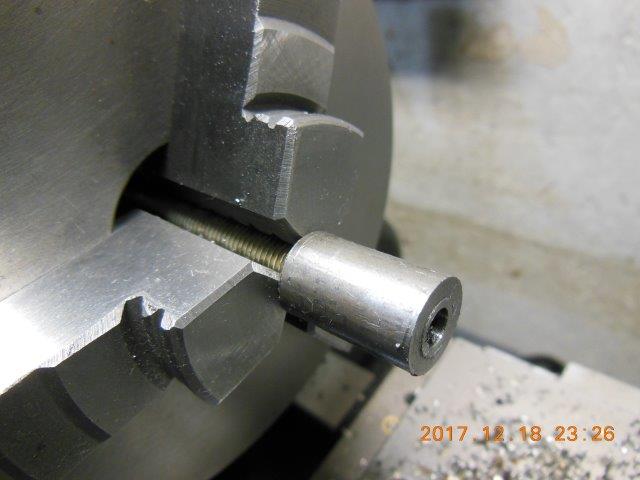
Step 4, drill to the correct tap drill – for M6 x 1.0 that is listed as 5.00 mm, or a no. 8 drill. No. 8 is actually slightly oversize, so we used a no. 9 drill to keep as much wall thickness as possible. Drill only 0.900” deep, as it is necessary to end face the rod and start a new center – drilled hole in the unused portion of the threaded rod every time. Otherwise, the drill will tend to wander off center with each additional insert made.
Post broken here for size limits, continued below…
First, yes, I have called the Barrel type insert a “Time-Sert” type insert. Sorry, that isn’t entirely correct. A true “Time Sert” is the same idea, but is recognizable as a “Time-Sert” by having small steel prongs protruding from the top that are used to lock the barrel insert in place after being threaded in to the correct depth. I have the habit of calling all barrel type inserts “Time-Serts”. The one in the picture in my previous posts looks like one of the type available from McMaster Carr’s catalogue. McMaster’s price is about 1/10 of what our local retailers charge for those. But the outside threads are 3/8 NC, way too big to keep the alignment pins intact.
Someone else on here said they could get solid thread repair inserts the same outer diameter as a Heli-Coil…where? I have never seen such a beast. In fact, all the inserts I could find would require destroying the dowel pin holes. Do the math here, and in order to get a threaded insert inside the 8 mm diameter dowel pin holes, you will end up with an insert with minimum wall thickness of 0.021”. Under normal circumstances, that thickness of steel would easily break when torqued to 9 ft-lbs (108 in-lbs).
So here is the theory behind what we are doing. The idea is to use a common thread type for the outer part of the inserts. This is so a standard size tap can be used in the head. We chose 5/16” NF, as it is readily available, and so is grade 8 or better grades of high strength steel threaded rod. McMaster Carr to the rescue, we order the stuff in 3 ft. lengths. 5/16” NF was the best compromise, as the largest size of rod that is smaller than the 8 mm dowel pins (knock pins to many, BTW), and the fine thread kept as much insert wall thickness as we were going to get.
But what about that 0.021” wall thickness? Well, that does present some difficulties. First, if we had tried to simply drill and thread the inside of the 5/16” NF rod to M6 x 1.0, the stresses of running the tap would almost certainly have broken the thin steel if the rod wasn’t re-enforced somehow while the threads are being cut. So we made an internally threaded sleeve out of ½” diameter free machining steel stock to go on the outside of the rod while drilling and tapping the inside. The sleeve keeps everything in place and prevents breakage. Also, the sleeve was made 0.800” long, the length of our finished inserts. Handy for cutting the 5/16” rod to length after drilling and threading each insert.
Second, we still have a relatively weak 0.021” wall insert. Well, that won’t be a problem for two reasons. One – we will carefully bond the inserts in the head using high strength lock tight thread adhesive (red Locktite). That should make them nearly as strong as a stainless steel Heli-Coil insert. Two, because we will be using studs rather than bolts to fasten the cam bearing caps, the peak stress on the inserts will be considerably reduced.
On to making the inserts (for this head, we needed 15 of them). First, here are the basic tools. One each quality HSS taps.
• 5/16 NF Plug or Taper
• 5/16 NF Bottoming
• M6 x 1.0 Plug or Taper
• M6 x 1.0 Bottoming
• Edge cutting fine flat file the same thickness as your flat blade / slotted screwdriver used to turn the inserts into the head later – shown is a wedge file. A flat jeweler’s file will work.
• A test M6 x 1.0 bolt
• Our 5/16” NF threaded sleeve.
Step 1, make our threaded sleeve. O.D. is ½”, drilled and tapped through the center 5/16” National Fine, on a lathe. 0.800” long.
Step 2, thread sleeve onto threaded rod until flush with the end, then chuck rod (not insert) into the lathe chuck with the sleeve butted up tight against the jaws. If the end of the rod needs to be faced square, leave enough rod protruding to face flat to end of the sleeve.
Step 3, center drill to guide the tap drill. Here you can see how the sleeve is NOT in the chuck.
Step 4, drill to the correct tap drill – for M6 x 1.0 that is listed as 5.00 mm, or a no. 8 drill. No. 8 is actually slightly oversize, so we used a no. 9 drill to keep as much wall thickness as possible. Drill only 0.900” deep, as it is necessary to end face the rod and start a new center – drilled hole in the unused portion of the threaded rod every time. Otherwise, the drill will tend to wander off center with each additional insert made.
Post broken here for size limits, continued below…
2-04 R1, 81 CSR1000, 81 LTD1000, 2-83 GPz1100, 3-79CBX, 81 CBX, 3-XS650, 84 Venture, +parts
Quote "speed costs money...how fast do you want to go?" (Which Z movie?)
Universal formula for how many motorcycles one should own = n + 1, where n is how many motorcycles you own right now....
Quote "speed costs money...how fast do you want to go?" (Which Z movie?)
Universal formula for how many motorcycles one should own = n + 1, where n is how many motorcycles you own right now....
Please Log in or Create an account to join the conversation.
- Kray-Z
-
Topic Author
- Offline
- User
-
Registered
- I need more power Scotty....
- Posts: 583
- Thanks: 107
Re: Stripped cam bearing threads - shim under buckets
05 Jan 2018 07:18
Continued from above….
Step 5, cut internal thread M6 x 1.0, using only a sharp tap. An aside – how do you know if a tap is sharp? Easy – how much resistance is felt when cutting threads.
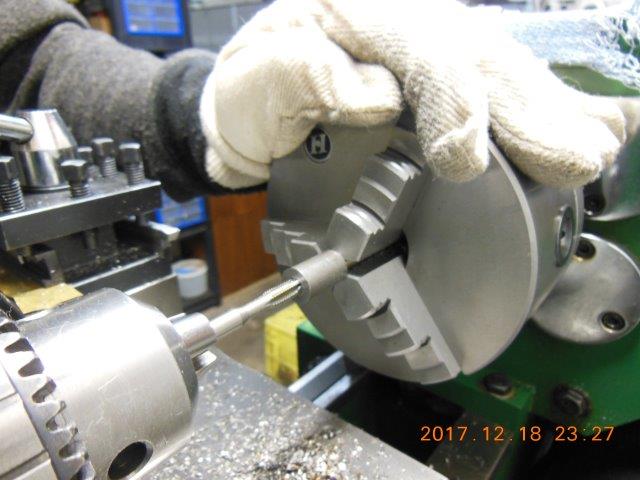
And a warning – as an experienced former tool and die machinist, this is the best advice possible for taps and dies. For making new threads, only buy high quality high speed steel (HSS) or better taps and dies from an industrial supplier of machine tools. Always buy at least two at a time, for each size you need for the job. Only use one at a time (keep unused ones new in their containers until the old one is worn out), and mark used taps as used. Use plenty of the correct type of tapping / cutting fluid for the material being tapped, and clean out chips and debris often with compressed air or a strong shop vac. The old “turn 1, back out ¼ turn” isn’t really true. Actually, with abrasive materials like cast iron, mild steels, and aluminum, constantly backing out the tap will quickly dull the cutting edges. Some expensive taps are manufactured to go in all the way without any backing required. So most of the time, only back out when you feel chips binding the tap slightly. Then remove the tap completely, clear all the chips, re-oil, and continue. A tap is getting dull when it STARTS to resist turning / cutting easily. As soon as you notice an increase in the force needed to turn the tap (or die), remove and discard the tap. Don’t believe for a second that you should keep it around – throw it in the scrap bin right away. Dull taps are the ones that break off inside your most valuable parts in the worst possible locations. Don’t use your expensive HSS taps to thread chase previously tapped holes, either. Buy proper thread chasing tools for that.
Step 6, carefully cut off the rod at 0.800”. We used an ordinary hacksaw following the rule that at least two and preferably three teeth of the blade are in contact at all times, so we used a 48 tooth / inch blade. Clean up the cut end with a file, use your thin file to cut a slot in the filed end as shown below, and test fit by threading the completed insert over your test bolt.
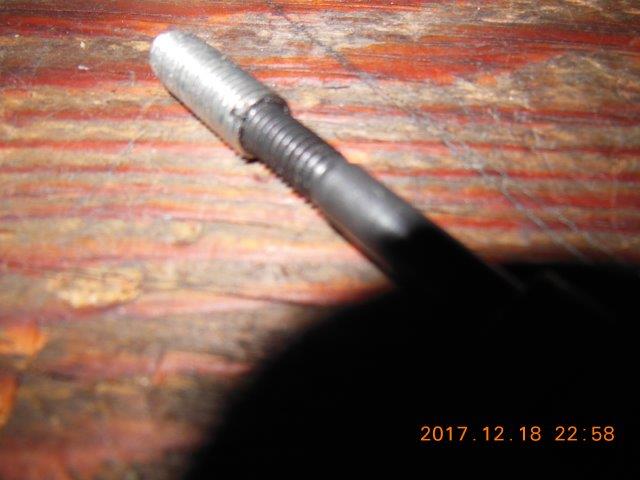
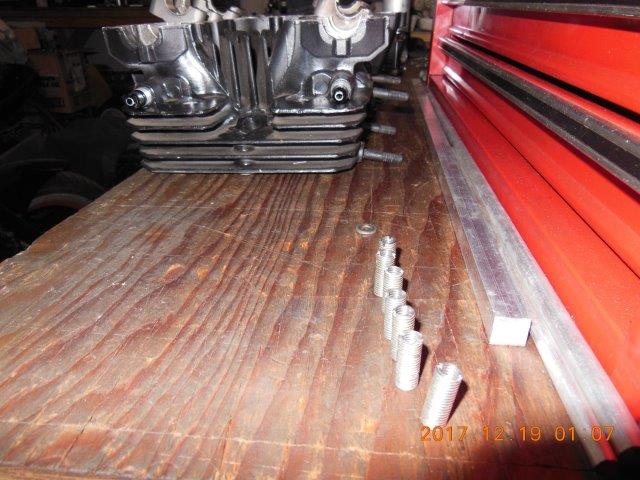
Repeat for as many inserts as needed (we made one extra in the end). You can see here that the completed inserts fit neatly into the 8 mm dowel pin holes
So 8 down – 8 more to go…
Next, tapping the head for 5/16” NF….
Step 5, cut internal thread M6 x 1.0, using only a sharp tap. An aside – how do you know if a tap is sharp? Easy – how much resistance is felt when cutting threads.
And a warning – as an experienced former tool and die machinist, this is the best advice possible for taps and dies. For making new threads, only buy high quality high speed steel (HSS) or better taps and dies from an industrial supplier of machine tools. Always buy at least two at a time, for each size you need for the job. Only use one at a time (keep unused ones new in their containers until the old one is worn out), and mark used taps as used. Use plenty of the correct type of tapping / cutting fluid for the material being tapped, and clean out chips and debris often with compressed air or a strong shop vac. The old “turn 1, back out ¼ turn” isn’t really true. Actually, with abrasive materials like cast iron, mild steels, and aluminum, constantly backing out the tap will quickly dull the cutting edges. Some expensive taps are manufactured to go in all the way without any backing required. So most of the time, only back out when you feel chips binding the tap slightly. Then remove the tap completely, clear all the chips, re-oil, and continue. A tap is getting dull when it STARTS to resist turning / cutting easily. As soon as you notice an increase in the force needed to turn the tap (or die), remove and discard the tap. Don’t believe for a second that you should keep it around – throw it in the scrap bin right away. Dull taps are the ones that break off inside your most valuable parts in the worst possible locations. Don’t use your expensive HSS taps to thread chase previously tapped holes, either. Buy proper thread chasing tools for that.
Step 6, carefully cut off the rod at 0.800”. We used an ordinary hacksaw following the rule that at least two and preferably three teeth of the blade are in contact at all times, so we used a 48 tooth / inch blade. Clean up the cut end with a file, use your thin file to cut a slot in the filed end as shown below, and test fit by threading the completed insert over your test bolt.
Repeat for as many inserts as needed (we made one extra in the end). You can see here that the completed inserts fit neatly into the 8 mm dowel pin holes
So 8 down – 8 more to go…
Next, tapping the head for 5/16” NF….
2-04 R1, 81 CSR1000, 81 LTD1000, 2-83 GPz1100, 3-79CBX, 81 CBX, 3-XS650, 84 Venture, +parts
Quote "speed costs money...how fast do you want to go?" (Which Z movie?)
Universal formula for how many motorcycles one should own = n + 1, where n is how many motorcycles you own right now....
Quote "speed costs money...how fast do you want to go?" (Which Z movie?)
Universal formula for how many motorcycles one should own = n + 1, where n is how many motorcycles you own right now....
Please Log in or Create an account to join the conversation.
Moderators: Street Fighter LTD