
Adjust Clutch
- chenner32
-
 Topic Author
- Offline
- User
-

Registered
- Posts: 25
- Thanks: 0
Adjust Clutch
27 Jul 2011 19:04
It seems as if my bike in 1st gear with clutch disengaged is partially in gear. I went to adjust the clutch and I noticed that my bike does not follow same clutch adjustment bolt as others. I have taken off the panel and have access at the clutch lever. But how do I adjust it?
1983 Kawasaki KZ750F1 Shaft Drive (Work in progress)
Please Log in or Create an account to join the conversation.
- chenner32
-
Topic Author
- Offline
- User
-
Registered
- Posts: 25
- Thanks: 0
Re: Adjust Clutch
27 Jul 2011 19:06Attachment clutch.jpg not found
1983 Kawasaki KZ750F1 Shaft Drive (Work in progress)
Attachments:
Please Log in or Create an account to join the conversation.
- martin_csr
-
- Offline
- User
-
Registered
- Posts: 8018
- Thanks: 1645
Last edit: 15 Feb 2013 11:03 by martin_csr.
Please Log in or Create an account to join the conversation.
- MFolks
-

- Offline
- User
-
Registered
- Posts: 6650
- Thanks: 541
Re: Adjust Clutch
28 Jul 2011 13:47
This covers clutch cable replacement, and toward the bottom,the adjustment process:
Clutch Cable Replacement On Some Kawasaki Motorcycles
With Proper Mechanism Adjustments
1.About mid way down the clutch cable is an adjuster; shorten the cable as much as possible.
2.Remove the small cover on the left side of the sprocket cover and loosen up the lock nut on the clutch throw out mechanism.
3.Remove the shifter lever; the sprocket cover, and lay the cover on some rags or news papers.
4.Have on hand a small cotter pin that will be needed to prevent the new clutch cable from coming out of the throw out mechanism.
5.At the left handlebar turn in the slack adjusters for the clutch cable and then take out the pivot bolt.
6.New clutch cables may or may not have lubrication; now's the time to either hang the new cable up overnight so heavy oil can flow through it or buy a cable luber kit with the special clamp and can of spray lube.
7.Attach the cable to the cover's throw out mechanism and secure it with a new cotter pin.
8. While you're in there, check the wiring from the alternator(YELLOW WIRES, or any wires from the alternator), remove the excess chain lube from the clutch push rod and check the wire routing that goes above the engine sprocket.
9. Check the lock washer for cracks on the engine sprocket and any "Hooking" of the sprocket teeth.
10 Route the clutch cable the same way the old one was and connect the cable to the clutch lever; and the pivot bolt gets re-installed.
11.Carefully install the sprocket cover, making sure the push rod is engaged and then tighten up the cover.
12.Adjusting the clutch play and cable tension is real easy; using a flat bladed screwdriver, turn the slotted screw clockwise(to the right) until it becomes hard to turn; then turn it counterclockwise(to the left) 1/4 turn and tighten the lock nut. On some Kawasaki’s, the adjustment will turn the opposite way, so keep this in mind.
13.The mid way cable adjuster and lever slack adjuster may need to be adjusted for correct cable slack.
14.My factory shop manual lists 2-3mm as the correct play in the lever after the cable has been properly tensioned.
15.Re-install the covers, and shifter lever, start the engine to check the shifting action.
16.These engines have a shifting lock out to prevent moving in any gear higher than second unless the engine is running and proper shifting is done.
1982 GPZ1100 B2
General Dynamics/Convair 1983-1993
GLCM BGM-109 Tomahawk, AGM-129A Advanced Cruise Missile (ACM)
General Dynamics/Convair 1983-1993
GLCM BGM-109 Tomahawk, AGM-129A Advanced Cruise Missile (ACM)
Please Log in or Create an account to join the conversation.
- chenner32
-
Topic Author
- Offline
- User
-
Registered
- Posts: 25
- Thanks: 0
Re: Adjust Clutch
28 Jul 2011 19:30
I can't find the clutch adjustment bolt. My clutch cover does not have a window for the nut and bolt. Even when I take it off I still can't find the bolt. I checked under the seat as martin suggested and I found nothing.
Any ideas where the bolt or how to adjust the clutch on a 83' Kaw KZ750F1 shaft
Any ideas where the bolt or how to adjust the clutch on a 83' Kaw KZ750F1 shaft
1983 Kawasaki KZ750F1 Shaft Drive (Work in progress)
Please Log in or Create an account to join the conversation.
- MFolks
-
- Offline
- User
-
Registered
- Posts: 6650
- Thanks: 541
Re: Adjust Clutch
28 Jul 2011 20:39
The clutch rod adjustment will be on the LEFT SIDE of the engine, about where the foot peg is. it's got a small cover with two small fasteners, remove them, and you should see the adjustment bolt for the throw out mechanism.
1982 GPZ1100 B2
General Dynamics/Convair 1983-1993
GLCM BGM-109 Tomahawk, AGM-129A Advanced Cruise Missile (ACM)
General Dynamics/Convair 1983-1993
GLCM BGM-109 Tomahawk, AGM-129A Advanced Cruise Missile (ACM)
Please Log in or Create an account to join the conversation.
- chenner32
-
Topic Author
- Offline
- User
-
Registered
- Posts: 25
- Thanks: 0
Re: Adjust Clutch
28 Jul 2011 23:10
Thanks, I'll check tomorrow.
1983 Kawasaki KZ750F1 Shaft Drive (Work in progress)
Please Log in or Create an account to join the conversation.
- JR
-
- Offline
- Sustaining Member
-

Registered
- Posts: 2951
- Thanks: 464
Re: Adjust Clutch
28 Jul 2011 23:16 - 28 Jul 2011 23:17chenner32 wrote: It seems as if my bike in 1st gear with clutch disengaged is partially in gear.
Sounds normal to me. Bike on center stand, put it in first, keep clutch lever pulled in and rear wheel rotates. Normal for a chain driven bike. Probably same for a shaftie
1980 kz750E1, Delkevic exhaust
Last edit: 28 Jul 2011 23:17 by JR.
Please Log in or Create an account to join the conversation.
- Motor Head
-

- Offline
- User
-
Registered
- FIX UP YOUR BIKE RIGHT AND CHEAP
- Posts: 5137
- Thanks: 393
Re: Adjust Clutch
28 Jul 2011 23:31
I looked at the diagram you have here, and went to the parts diagrams. I don't see the usual parts for your model. I'm wondering if this model, the only adjustment is cable freeplay like most all of the newer 80 something forward bikes. Is this where KAw changed? Look at the worm syle of gear to push on the rod, no where is a there a adjustment that I could find.
Got a camera? Can you post pictures of you left sprocket cover?
Got a camera? Can you post pictures of you left sprocket cover?
1982 KZ1000LTD K2 Vance & Hines 4-1 ACCEL COILS Added Vetter fairing & Bags. FOX Racing rear Shocks, Braced Swing-arm, Fork Brace, Progressive Fork Springs RT Gold Emulators, APE Valve Springs, 1166 Big Bore kit, RS34's, GPZ cams.
1980 KZ550LTD C1 Stock SOLD Miss it
1979 MAZDA RX7 in the works, 13B...
1980 KZ550LTD C1 Stock SOLD Miss it
1979 MAZDA RX7 in the works, 13B...
Please Log in or Create an account to join the conversation.
- chenner32
-
Topic Author
- Offline
- User
-
Registered
- Posts: 25
- Thanks: 0
Re: Adjust Clutch
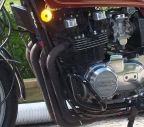
29 Jul 2011 00:01 - 29 Jul 2011 00:02Attachment 409018705_o_2011-07-28.jpg not found
Sure thing.
1983 Kawasaki KZ750F1 Shaft Drive (Work in progress)
Attachments:
Last edit: 29 Jul 2011 00:02 by chenner32.
Please Log in or Create an account to join the conversation.
- Motor Head
-
- Offline
- User
-
Registered
- FIX UP YOUR BIKE RIGHT AND CHEAP
- Posts: 5137
- Thanks: 393
Re: Adjust Clutch
29 Jul 2011 00:15
Yep that pretty much confirms for me what I was seeing in the diagrams. I believe the only adjustment will be the freeplay in the cable. Set at either the lever, and/ or the ferule nut set mid point in the cable. This is probably near the frame down tube.
The usual cover and the lock nut, flat blade adjustment is not on your bike.
The usual cover and the lock nut, flat blade adjustment is not on your bike.
1982 KZ1000LTD K2 Vance & Hines 4-1 ACCEL COILS Added Vetter fairing & Bags. FOX Racing rear Shocks, Braced Swing-arm, Fork Brace, Progressive Fork Springs RT Gold Emulators, APE Valve Springs, 1166 Big Bore kit, RS34's, GPZ cams.
1980 KZ550LTD C1 Stock SOLD Miss it
1979 MAZDA RX7 in the works, 13B...
1980 KZ550LTD C1 Stock SOLD Miss it
1979 MAZDA RX7 in the works, 13B...
Please Log in or Create an account to join the conversation.
- martin_csr
-
- Offline
- User
-
Registered
- Posts: 8018
- Thanks: 1645
Last edit: 22 Jan 2013 05:05 by martin_csr.
The following user(s) said Thank You: ZeffRides
Please Log in or Create an account to join the conversation.
Moderators: Street Fighter LTD