
CLUTCH COVER BOLTS
- P21
-
 Topic Author
- Offline
- User
- Posts: 471
- Thanks: 34
CLUTCH COVER BOLTS
23 Nov 2010 17:09
gettin ready to install my new clutch soon and the manual is not clear on torque settings on the cover plate (9-bolts)
any advise and thanks for your help fellow riders
and also have a Happy Thanksgiving
All Ride Safe
any advise and thanks for your help fellow riders
and also have a Happy Thanksgiving
All Ride Safe
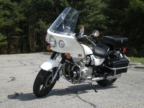
Kawasaki KZ 1000 Police (2002) P21
Please Log in or Create an account to join the conversation.
- timebomb33
-
- Offline
- User
- Posts: 4288
- Thanks: 10
Re: CLUTCH COVER BOLTS
23 Nov 2010 17:47
if i was using a tourque wrench i'd set it for about 7 ftlbs or 84 inchlbs
1973 z1 2-1974z1-a,2-1975z1-b dragbikes1015cc+1393cc, 1977kz1000,1978kz1000,1981kz1000j, 1997 zx-11, 2000 z12r,1428turbo nitrous pro-mod and a shit load of parts thats all for now leader sask.,CANADA
I THINK MY POWERBAND BROKE
I THINK MY POWERBAND BROKE
Please Log in or Create an account to join the conversation.
- MFolks
-

- Offline
- User
- Posts: 6650
- Thanks: 541
Re: CLUTCH COVER BOLTS
23 Nov 2010 19:43
When putting steel screws/bolts into Aluminum, use the silver anti-seize to prevent galling.
1982 GPZ1100 B2
General Dynamics/Convair 1983-1993
GLCM BGM-109 Tomahawk, AGM-129A Advanced Cruise Missile (ACM)
General Dynamics/Convair 1983-1993
GLCM BGM-109 Tomahawk, AGM-129A Advanced Cruise Missile (ACM)
Please Log in or Create an account to join the conversation.
- TerryK
-

- Offline
- User
- Posts: 608
- Thanks: 2
Re: CLUTCH COVER BOLTS
23 Nov 2010 20:16
P21 wrote:
Are you talking about the Phillips screws on the clutch cover?
gettin ready to install my new clutch soon and the manual is not clear on torque settings on the cover plate (9-bolts)
any advise and thanks for your help fellow riders
and also have a Happy Thanksgiving
All Ride Safe
Are you talking about the Phillips screws on the clutch cover?
1977 KZ1000
GSXR swingarm and rear brake
WM6 rear Akront rim
Wiseco 1075c pistons
33 smoothbores
stage 3 Web Cams
Head porting
Dyna S ignition
Lockhart oil cooler
Wiseco header
1980 Z1R drag bike
1200cc
38 Flatslides, .
500' cams
7" slick
Dyan 4000 SP ignition
etc
Ontario, Canada
GSXR swingarm and rear brake
WM6 rear Akront rim
Wiseco 1075c pistons
33 smoothbores
stage 3 Web Cams
Head porting
Dyna S ignition
Lockhart oil cooler
Wiseco header
1980 Z1R drag bike
1200cc
38 Flatslides, .
500' cams
7" slick
Dyan 4000 SP ignition
etc
Ontario, Canada
Please Log in or Create an account to join the conversation.
- P21
-
Topic Author
- Offline
- User
- Posts: 471
- Thanks: 34
Re: CLUTCH COVER BOLTS
26 Nov 2010 16:41
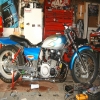
Update........we are back on the road again. :woohoo:
new friction plates
new steel plates
new springs and bolts
better than new now.
this job was easy compared to my harley that i also ride.
the truth is this KZ rocks and it puts a big grin on my face when ride it.
new friction plates
new steel plates
new springs and bolts
better than new now.
this job was easy compared to my harley that i also ride.
the truth is this KZ rocks and it puts a big grin on my face when ride it.
Kawasaki KZ 1000 Police (2002) P21
Please Log in or Create an account to join the conversation.
- trianglelaguna
-

- Offline
- User
- New and improved - extra strength
- Posts: 8724
- Thanks: 236
Re: CLUTCH COVER BOLTS
26 Nov 2010 17:28
good job.....on the sprocket side is a small cover for pushrod adjustment...did you need to re-set the play?
it helps with anew set of pates to let the thing reset....
it helps with anew set of pates to let the thing reset....
1976 KZ900
2003 ZX12R
2007 FZ1000
2004 ninja 250R for wife
2003 ZX12R
2007 FZ1000
2004 ninja 250R for wife
Please Log in or Create an account to join the conversation.
- MFolks
-
- Offline
- User
- Posts: 6650
- Thanks: 541
Re: CLUTCH COVER BOLTS
26 Nov 2010 19:01
Print this out for when time comes to replace the clutch cable and re-adjust the clutch push rod:
Clutch Cable Replacement On some Kawasaki Motorcycles
1.About mid way down the clutch cable is an adjuster; shorten the cable as much as possible.
2.Remove the small cover on the left side of the sprocket cover and loosen up the lock nut on the clutch throw out mechanism.
3.Remove the shifter lever; the sprocket cover, and lay the cover on some rags or news papers.
4.Have on hand a small cotter pin that will be needed to prevent the new clutch cable from coming out of the throw out mechanism.
5.At the left handlebar turn in the slack adjusters for the clutch cable and then take out the pivot bolt.
6.New clutch cables may or may not have lubrication; now's the time to either hang the new cable up overnight so heavy oil can flow through it or buy a cable luber kit with the special clamp and can of spray lube.
7.Attach the cable to the cover's throw out mechanism and secure it with a new cotter pin.
8. While you're in there, check the wiring from the alternator(YELLOW WIRES), remove the excess chain lube from the clutch push rod and check the wire routing that goes above the engine sprocket.
9. Check the lock washer for cracks on the engine sprocket and any "Hooking" of the sprocket teeth.
10 Route the clutch cable the same way the old one was and connect the cable to the clutch lever; and the pivot bolt gets re-installed.
11.Carefully install the sprocket cover, making sure the push rod is engaged and then tighten up the cover.
12.Adjusting the clutch play and cable tension is real easy; using a flat bladed screwdriver, turn the slotted screw clockwise(to the right) until it becomes hard to turn; then turn it counterclockwise(to the left) 1/4 turn and tighten the lock nut.
13.The mid way cable adjuster and lever slack adjuster may need to be adjusted for correct cable slack.
14.My factory shop manual lists 2-3mm as the correct play in the lever after the cable has been properly tensioned.
15.Re-install the covers, and shifter lever, start the engine to check the shifting action.
16.These engines have a shifting lock out to prevent moving in any gear higher than second unless the engine is running and proper shifting is done.
1982 GPZ1100 B2
General Dynamics/Convair 1983-1993
GLCM BGM-109 Tomahawk, AGM-129A Advanced Cruise Missile (ACM)
General Dynamics/Convair 1983-1993
GLCM BGM-109 Tomahawk, AGM-129A Advanced Cruise Missile (ACM)
Please Log in or Create an account to join the conversation.
- P21
-
Topic Author
- Offline
- User
- Posts: 471
- Thanks: 34
Re: CLUTCH COVER BOLTS
26 Nov 2010 21:17
trianglelaguna wrote:
your answer is yes, you must do that with a new clutch pack
good job.....on the sprocket side is a small cover for pushrod adjustment...did you need to re-set the play?
it helps with anew set of pates to let the thing reset....
your answer is yes, you must do that with a new clutch pack
Kawasaki KZ 1000 Police (2002) P21
Please Log in or Create an account to join the conversation.
- P21
-
Topic Author
- Offline
- User
- Posts: 471
- Thanks: 34
Re: CLUTCH COVER BOLTS
26 Nov 2010 21:19
MFolks wrote:
great write up thanks
Print this out for when time comes to replace the clutch cable and re-adjust the clutch push rod:
Clutch Cable Replacement On some Kawasaki Motorcycles
1.About mid way down the clutch cable is an adjuster; shorten the cable as much as possible.
2.Remove the small cover on the left side of the sprocket cover and loosen up the lock nut on the clutch throw out mechanism.
3.Remove the shifter lever; the sprocket cover, and lay the cover on some rags or news papers.
4.Have on hand a small cotter pin that will be needed to prevent the new clutch cable from coming out of the throw out mechanism.
5.At the left handlebar turn in the slack adjusters for the clutch cable and then take out the pivot bolt.
6.New clutch cables may or may not have lubrication; now's the time to either hang the new cable up overnight so heavy oil can flow through it or buy a cable luber kit with the special clamp and can of spray lube.
7.Attach the cable to the cover's throw out mechanism and secure it with a new cotter pin.
8. While you're in there, check the wiring from the alternator(YELLOW WIRES), remove the excess chain lube from the clutch push rod and check the wire routing that goes above the engine sprocket.
9. Check the lock washer for cracks on the engine sprocket and any "Hooking" of the sprocket teeth.
10 Route the clutch cable the same way the old one was and connect the cable to the clutch lever; and the pivot bolt gets re-installed.
11.Carefully install the sprocket cover, making sure the push rod is engaged and then tighten up the cover.
12.Adjusting the clutch play and cable tension is real easy; using a flat bladed screwdriver, turn the slotted screw clockwise(to the right) until it becomes hard to turn; then turn it counterclockwise(to the left) 1/4 turn and tighten the lock nut.
13.The mid way cable adjuster and lever slack adjuster may need to be adjusted for correct cable slack.
14.My factory shop manual lists 2-3mm as the correct play in the lever after the cable has been properly tensioned.
15.Re-install the covers, and shifter lever, start the engine to check the shifting action.
16.These engines have a shifting lock out to prevent moving in any gear higher than second unless the engine is running and proper shifting is done.
great write up thanks
Kawasaki KZ 1000 Police (2002) P21
Please Log in or Create an account to join the conversation.
- MFolks
-
- Offline
- User
- Posts: 6650
- Thanks: 541
Re: CLUTCH COVER BOLTS
26 Nov 2010 22:24
I have many procedures written up, they cover:
1.Starter motor troubleshooting.
2.Over running starter clutch replacement.
3.Checking the ignition coils and proper sparkplug wire routing.
4.Ignition pick up(pulsing coil) checkout.
5.Clutch replacement.
6.Fuse and fuse holder replacement.
7.Alternator trouble shooting.
8.Clutch cable replacement and cable adjustment.
1982 GPZ1100 B2
General Dynamics/Convair 1983-1993
GLCM BGM-109 Tomahawk, AGM-129A Advanced Cruise Missile (ACM)
General Dynamics/Convair 1983-1993
GLCM BGM-109 Tomahawk, AGM-129A Advanced Cruise Missile (ACM)
Please Log in or Create an account to join the conversation.
- Mollylab
-

- Offline
- User
- Posts: 4
- Thanks: 0
Re: CLUTCH COVER BOLTS
08 Nov 2011 22:02
Hi,
did you get the torque setting of 7 ft lbs or 84 inch lbs from the Kawasaki manual?
I am wondering the same question for my '79 KZ 1000, I couldn't find how much torque to tighten the clutch cover bolts, any help would be appreciated.
Thanks.
did you get the torque setting of 7 ft lbs or 84 inch lbs from the Kawasaki manual?
I am wondering the same question for my '79 KZ 1000, I couldn't find how much torque to tighten the clutch cover bolts, any help would be appreciated.
Thanks.
Please Log in or Create an account to join the conversation.
- 750steve
-
- Offline
- User
- Posts: 584
- Thanks: 3
Re: CLUTCH COVER BOLTS
08 Nov 2011 22:22MFolks wrote: I have many procedures written up, they cover:
1.Starter motor troubleshooting.
2.Over running starter clutch replacement.
3.Checking the ignition coils and proper sparkplug wire routing.
4.Ignition pick up(pulsing coil) checkout.
5.Clutch replacement.
6.Fuse and fuse holder replacement.
7.Alternator trouble shooting.
8.Clutch cable replacement and cable adjustment.
Where are they? I need to get reading!
07 ZX6R Race Bike
1977 Z750 B2 Twin
1976 Z650 B1
1977 Z750 B2 Twin
1976 Z650 B1
Please Log in or Create an account to join the conversation.