
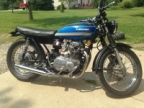
1978 KZ400 B1 - Scramber to be
- diggerdanh
-
 Topic Author
- Offline
- User
-

Registered
- Posts: 242
- Thanks: 89
Re: 1978 KZ400 B1 - Scramber to be
20 Feb 2017 06:25
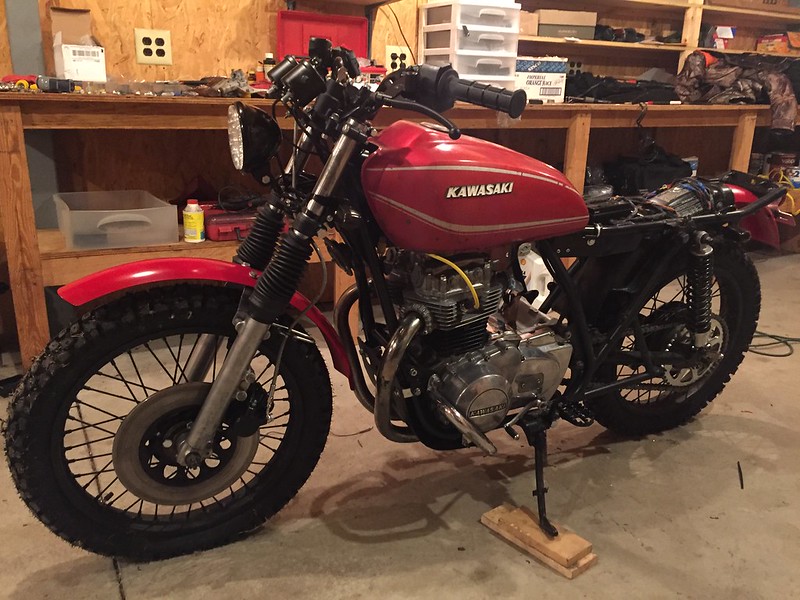
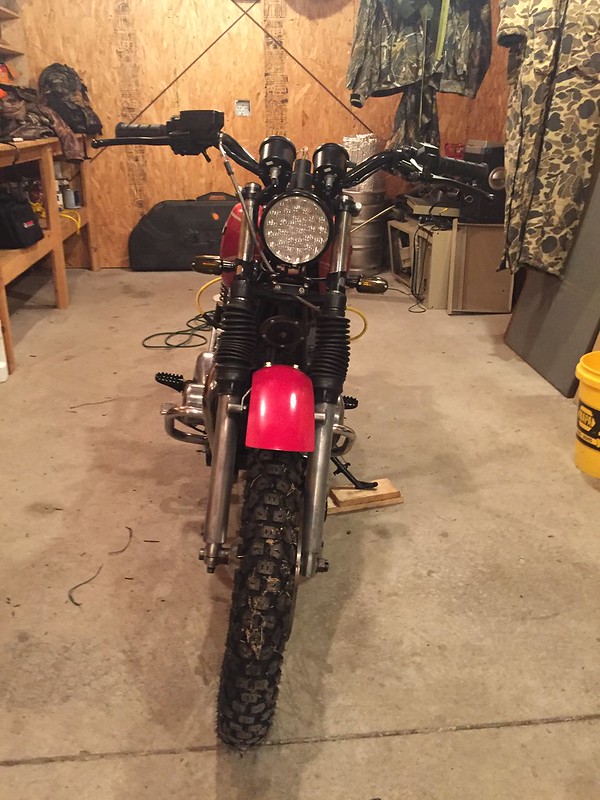
New headlight mounted. This is an 5-1/4" bottom mount LED headlight. Another ebay purchase. I went back and forth quite a bit on whether to go with a traditional side-mounted 6.5-7" headlight (with plenty of room in the bucket for stuffing wiring) or with a smaller, cleaner 5-1/4" bottom mounted unit. I bought a cheap one, though the bucket is metal and it seems pretty solid, to try it out.
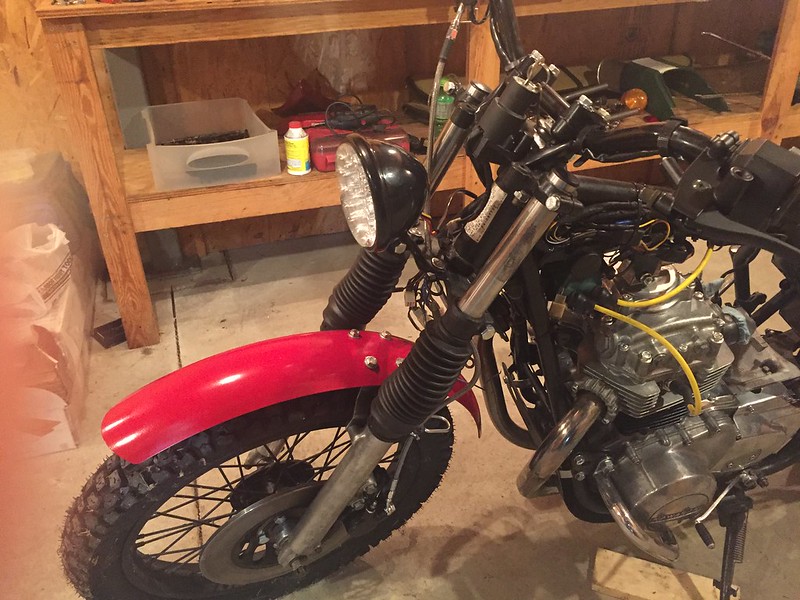

The headlight may be sticking out a little too far. I'll be able to tell better once I have gauges mounted. If so I can pull it back in about an inch or so by flipping the bracket around where it is mounted to the old bosses for the brake splitter.
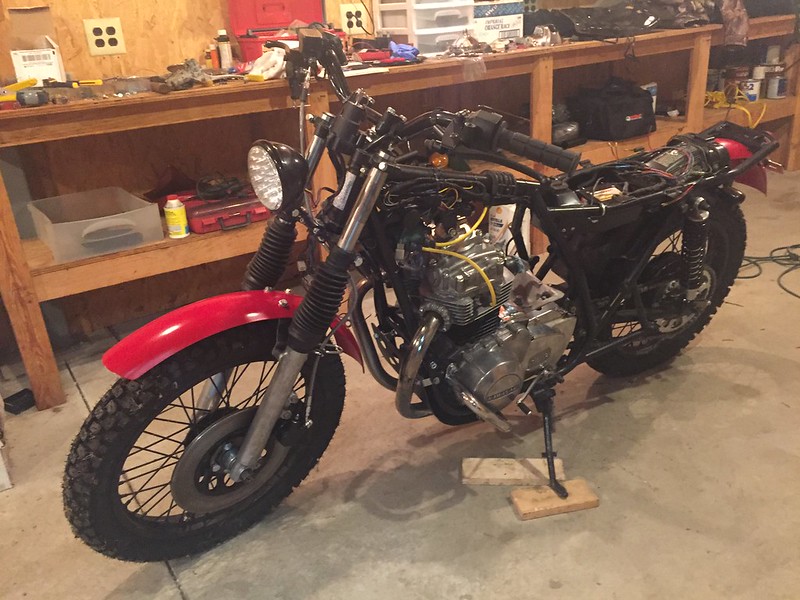
It is coming along. Next I have to wire up the tail light, rear turn signals and headlight. I tested them all previously when I was putting the wiring harness back in so I do not foresee any issues, just a matter of shortening/lengthening wires where necessary, adding some connectors and making it look neat. After that will be footpegs, figuring out where to put front turn signals, adding guages, ... and the list is still quite long. But with recent progress I may have this thing on the road by late spring / early summer.
The headlight may be sticking out a little too far. I'll be able to tell better once I have gauges mounted. If so I can pull it back in about an inch or so by flipping the bracket around where it is mounted to the old bosses for the brake splitter.
It is coming along. Next I have to wire up the tail light, rear turn signals and headlight. I tested them all previously when I was putting the wiring harness back in so I do not foresee any issues, just a matter of shortening/lengthening wires where necessary, adding some connectors and making it look neat. After that will be footpegs, figuring out where to put front turn signals, adding guages, ... and the list is still quite long. But with recent progress I may have this thing on the road by late spring / early summer.
Please Log in or Create an account to join the conversation.
- kzcurt
-
- Offline
- User
-
Registered
- Posts: 170
- Thanks: 21
Re: 1978 KZ400 B1 - Scramber to be
20 Feb 2017 10:35
Wow looks great! Always wanted to do that to one.
Flag carrier #23
9 @ 50-2053,
9 @ 50-2053,
The following user(s) said Thank You: GPz550D1, diggerdanh
Please Log in or Create an account to join the conversation.
- AtLarge
-
- Offline
- User
-
Registered
- Posts: 187
- Thanks: 21
Re: 1978 KZ400 B1 - Scramber to be
20 Feb 2017 17:08
You have come a long way on your bike Dan and it looks great!
1973 Honda CL70-K3
1975 Kawasaki 350 F9-C
1983 Kawasaki KZ750-K1
1994 BMW K1100RS
2008 Suzuki GSX1300-BKK8 #1120
1975 Kawasaki 350 F9-C
1983 Kawasaki KZ750-K1
1994 BMW K1100RS
2008 Suzuki GSX1300-BKK8 #1120
The following user(s) said Thank You: GPz550D1, diggerdanh
Please Log in or Create an account to join the conversation.
- diggerdanh
-
Topic Author
- Offline
- User
-
Registered
- Posts: 242
- Thanks: 89
Re: 1978 KZ400 B1 - Scramber to be
21 Feb 2017 06:00
Thanks, gents.
Last night I wired up the tail light, rear turn signals and headlight without any problems as expected. New MX style footpegs should be arriving today. Tonight I need to change an oxygen sensor in my son's car but I hope to get the footpegs mounted and the front turn signals mounted and wired up.
Last night I wired up the tail light, rear turn signals and headlight without any problems as expected. New MX style footpegs should be arriving today. Tonight I need to change an oxygen sensor in my son's car but I hope to get the footpegs mounted and the front turn signals mounted and wired up.
Please Log in or Create an account to join the conversation.
- diggerdanh
-
Topic Author
- Offline
- User
-
Registered
- Posts: 242
- Thanks: 89
Re: 1978 KZ400 B1 - Scramber to be
22 Feb 2017 06:13
New footpegs look great but I unfortunately ran into another misplaced bolt by the PO. I only have one front footpeg bolt. I spent most of the free time I had trying to hunt it down so I did not get much else done. I hope to stop by the hardware store today at lunch to round up another pair.
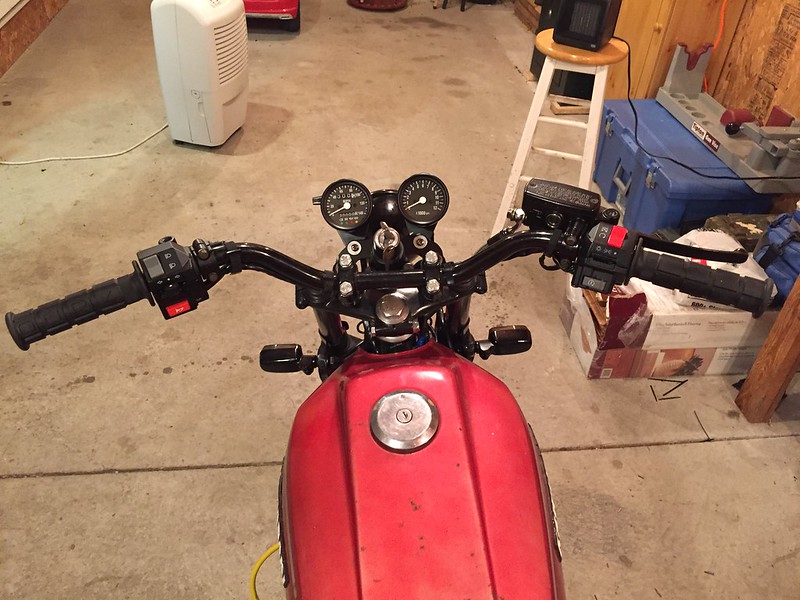
However I did get the speedo and tach ordered. I'm going with the same 2.5" black pair from Dime City Cycles that I used on my 76 KZ400. They look the part and the small size in addition to the speedo having integrated dummy lights really cleans up the front end of the bike. They should be here before the weekend. So I'm hoping that by the end of the weekend I should have the gauges in place and everything electrical on the bike will be complete.
However I did get the speedo and tach ordered. I'm going with the same 2.5" black pair from Dime City Cycles that I used on my 76 KZ400. They look the part and the small size in addition to the speedo having integrated dummy lights really cleans up the front end of the bike. They should be here before the weekend. So I'm hoping that by the end of the weekend I should have the gauges in place and everything electrical on the bike will be complete.
Please Log in or Create an account to join the conversation.
- diggerdanh
-
Topic Author
- Offline
- User
-
Registered
- Posts: 242
- Thanks: 89
Re: 1978 KZ400 B1 - Scramber to be
01 Mar 2017 07:52
Small update so I don't lose any steam. I got the front turn signals mounted and the new speedo and tach mounted. The turn signals were mounted to the forks using a cheap pair of headlight ears that I trimmed down. I mounted the gauges using the stock bracket but trimmed it up a bit and modified it to sit under the mounting holes of the top triple instead of above them. I have not wired up the front turn signals or the gauges yet, that will be my chore this week. The turn signals should be easy, just need to crimp on a few bullet connectors so they mate up to the factory harness. The gauges will be a little more difficult. I've cut off the wiring and stock connectors from the original tach and speedo and I'll need to splice and solder the wires from the new gauges together with those so they will plug into the factory harness. I did the same thing (used the same guages) with my other KZ400, though I bought another set of gauges off ebay to sacrifice the connections so I could keep the old stock ones which were still nice. The stock gauges for this bike are not in good shape so I don't mind cutting them up. I'll post pics once I have everything wired up and looking good.
I had my mind set on buying a new pair of VM28s since I had a pretty good experience switching over to VM30s on my other KZ400. But now I'm rethinking that a bit and may try using the original CV carbs first and building an airbox under the electronics tray. The PO said that the had inspected the diaphragms and intake boots and they were in good shape. I can always switch over to the Mikunis if the stock carbs prove to be troublesome.
I had my mind set on buying a new pair of VM28s since I had a pretty good experience switching over to VM30s on my other KZ400. But now I'm rethinking that a bit and may try using the original CV carbs first and building an airbox under the electronics tray. The PO said that the had inspected the diaphragms and intake boots and they were in good shape. I can always switch over to the Mikunis if the stock carbs prove to be troublesome.
Please Log in or Create an account to join the conversation.
- diggerdanh
-
Topic Author
- Offline
- User
-
Registered
- Posts: 242
- Thanks: 89
Re: 1978 KZ400 B1 - Scramber to be
02 Mar 2017 05:44
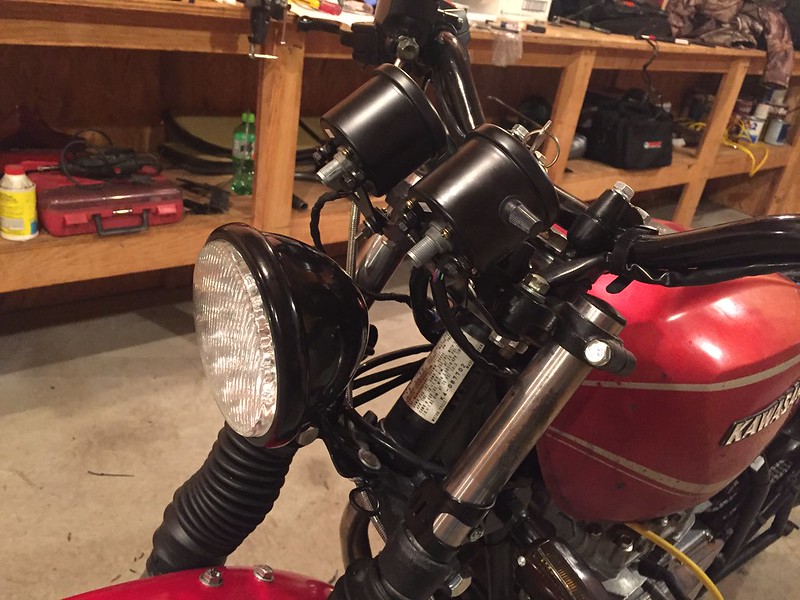
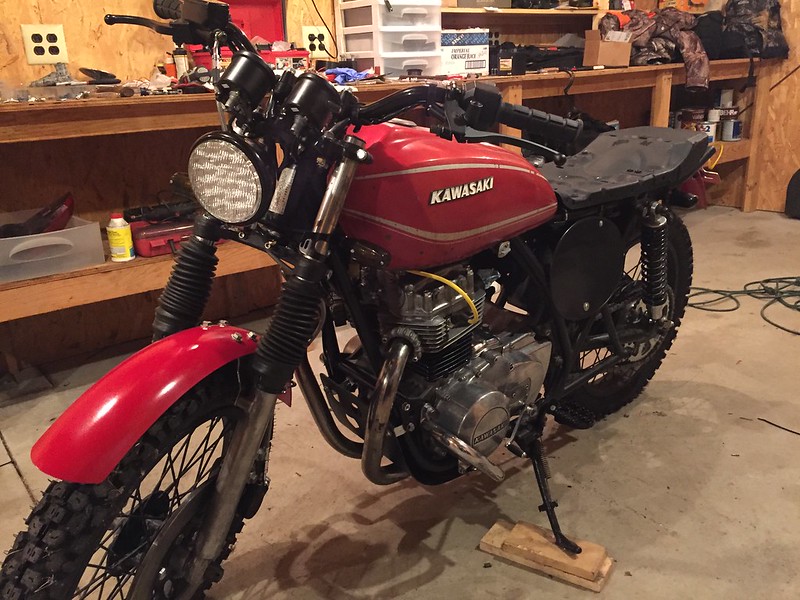
Front turn signals and gauges are wired up and everything appears to be working properly.
Popped the tank on just to make sure it fit properly over the bundles of wiring.
How I mounted the front turn signals - the cut down cheapo headlight ears turned backwards so the lights are behind the forks. The mounting hole is way too big for the small stalk of the turn signals but a large fender washer on each side fix that. And an old lug nut works well as a spacer:
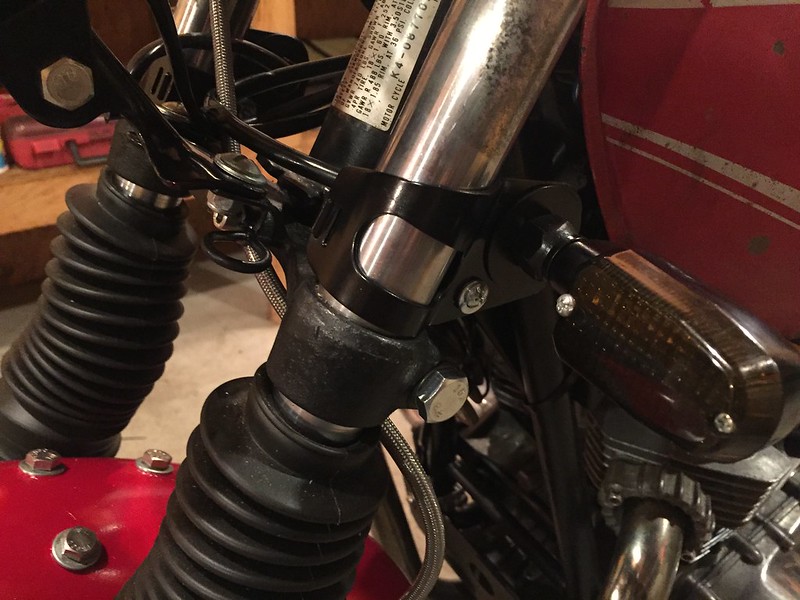
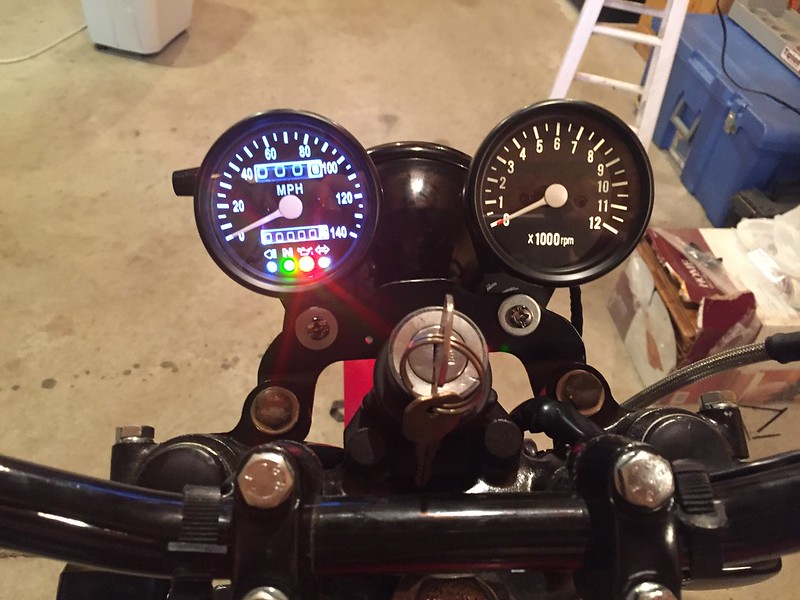
Gauges in place:
Lights on. The back light is different between the speedo and tach - much brighter on the speedo than the tach, I'm not sure if it bothers me yet or not. Rather than buying them both from the same source I bought the tach from a different place to save $10. Guess they were not exactly the same.
I still need to make a bracket to go between the speedo and tach as both are only mounted at a single point,
The LED headlight is pretty bright, though I have not tried it outside yet. New technology but old school look.

Popped the tank on just to make sure it fit properly over the bundles of wiring.
How I mounted the front turn signals - the cut down cheapo headlight ears turned backwards so the lights are behind the forks. The mounting hole is way too big for the small stalk of the turn signals but a large fender washer on each side fix that. And an old lug nut works well as a spacer:
Gauges in place:
Lights on. The back light is different between the speedo and tach - much brighter on the speedo than the tach, I'm not sure if it bothers me yet or not. Rather than buying them both from the same source I bought the tach from a different place to save $10. Guess they were not exactly the same.
I still need to make a bracket to go between the speedo and tach as both are only mounted at a single point,
The LED headlight is pretty bright, though I have not tried it outside yet. New technology but old school look.
The following user(s) said Thank You: GPz550D1
Please Log in or Create an account to join the conversation.
- diggerdanh
-
Topic Author
- Offline
- User
-
Registered
- Posts: 242
- Thanks: 89
Re: 1978 KZ400 B1 - Scramber to be
02 Mar 2017 05:46 - 02 Mar 2017 05:55
Couple more. In the top pic you can see the MX style footpegs.
Last edit: 02 Mar 2017 05:55 by diggerdanh.
Please Log in or Create an account to join the conversation.
- diggerdanh
-
Topic Author
- Offline
- User
-
Registered
- Posts: 242
- Thanks: 89
Re: 1978 KZ400 B1 - Scramber to be
02 Mar 2017 05:54
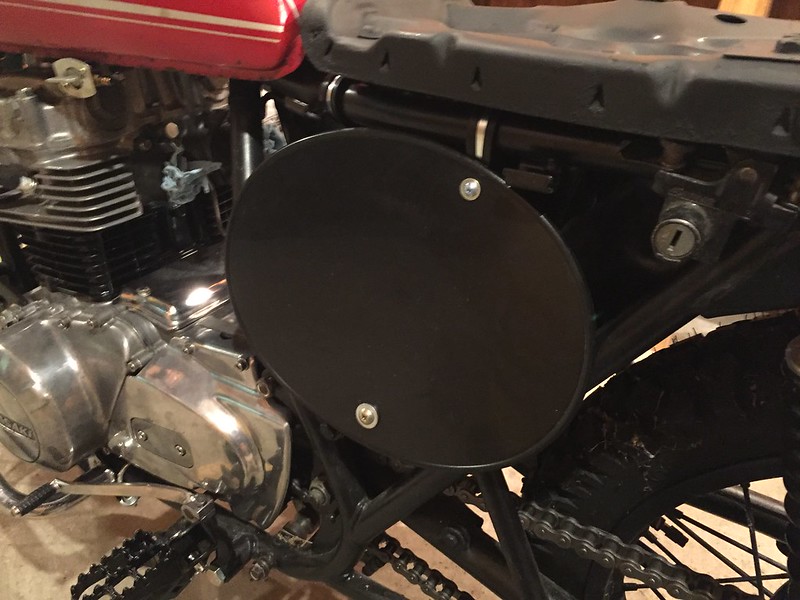
Next up is to clean and inspect the old carbs, intake boots and airbox boots, figure out what I'm doing for an airbox, mount MX number plates as side covers, and make some modifications to the stock seat pan.
If the old carbs work out then my remaining spend for this bike is just new cables and fabricating the exhaust. That would be great.
If the old carbs work out then my remaining spend for this bike is just new cables and fabricating the exhaust. That would be great.
Please Log in or Create an account to join the conversation.
- kzcurt
-
- Offline
- User
-
Registered
- Posts: 170
- Thanks: 21
Re: 1978 KZ400 B1 - Scramber to be
02 Mar 2017 06:18
Really nice look you have going there!
Flag carrier #23
9 @ 50-2053,
9 @ 50-2053,
The following user(s) said Thank You: GPz550D1, diggerdanh
Please Log in or Create an account to join the conversation.
- diggerdanh
-
Topic Author
- Offline
- User
-
Registered
- Posts: 242
- Thanks: 89
Re: 1978 KZ400 B1 - Scramber to be
06 Mar 2017 07:39
Did not get as much done this weekend as I had hoped. I did get some modifications done to the seat pan to fill some gaps at the rear so it follows the frame better. That is also now devoid of rust and primed and painted. I also got some brackets for the side panels cleaned up, primed and painted. I hope to figure out mounting for the MX number plates as side panels this week. I'll also be on the hunt for seat padding and a seat covering. I used black leather from an old coat I picked up from Goodwill for my last bike. I plan to do something similar this time too.
I set about disassembling and inspecting the stock carbs yesterday and everything appeared to be functional and pretty clean inside though they will need to be split and completely disassembled replacing all gaskets, o-rings, etc. And I was disappointed that while one of the diaphragms was in good shape the other had quite a sizable hole in it. So I set everything aside and began to think about whether to buy gaskets, o-rings, and diaphragms for the old carbs or go ahead and move to Mikuni VM-28s. I'm still debating this.
I set about disassembling and inspecting the stock carbs yesterday and everything appeared to be functional and pretty clean inside though they will need to be split and completely disassembled replacing all gaskets, o-rings, etc. And I was disappointed that while one of the diaphragms was in good shape the other had quite a sizable hole in it. So I set everything aside and began to think about whether to buy gaskets, o-rings, and diaphragms for the old carbs or go ahead and move to Mikuni VM-28s. I'm still debating this.
Please Log in or Create an account to join the conversation.
- diggerdanh
-
Topic Author
- Offline
- User
-
Registered
- Posts: 242
- Thanks: 89
Re: 1978 KZ400 B1 - Scramber to be
09 Mar 2017 06:25
More small updates.
I still have not completely decided on repairing the old carbs vs buying VM28s. I'm leaning toward the VM28s though - after some calculations I should be out only about an additional $50 or so going with the Mikunis. And that's assuming that all the old carbs need are diaphragms, gaskets and o-rings and will work well after that.
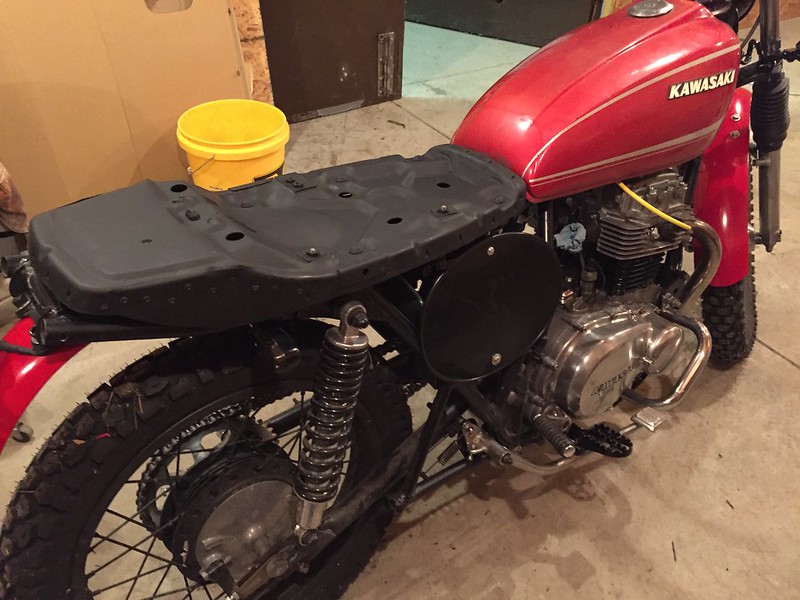
In the meantime I have modified the stock seat pan and test fitted it to the bike and mounted the MX style side covers. The stock pan is not flat at the rear like in this pic, it bends upward at maybe a 30 degree angle because the 78 uses a tail piece. I did not get the tail piece for this bike and really did not want to use it anyway. I cut some reliefs in the side of the pan at that step and bent the back down to be flat. I then cut some strips of sheet metal, you can see where it is riveted to the pan in the pictures, to fill the gaps so the sides of the pan followed the frame rail better. I found the hinges and latch and latch plate in the boxes of parts and it is all fastened together as it should be. There was some surface rust on the pan but a wire wheel cleaned it up and a couple coats of rustproof coating and it looks good.
With the seat pan in place I was finally able to sit on it and make vroom-vroom noises") - I even stood up on the pegs and balanced it a bit. This bike is pretty light, I cannot wait to ride it around the fields in the back yard and get it muddy.
- I even stood up on the pegs and balanced it a bit. This bike is pretty light, I cannot wait to ride it around the fields in the back yard and get it muddy.

All the brackets are still in place for the original side covers, so I could go back to them later if I'd like, but I like the slim look the number plates give it. They are mounted using a bolt through the bottom grommet for the stock side cover and a p-clamp at the top of the frame rail. The plates will have a number on them, they'll have a white background with red trim and black numbers - I'm thinking 78 since the bike is a 1978 model.
Next up is to get some foam and create some seat padding and then find some suitable black leather to cover it.
I still have not completely decided on repairing the old carbs vs buying VM28s. I'm leaning toward the VM28s though - after some calculations I should be out only about an additional $50 or so going with the Mikunis. And that's assuming that all the old carbs need are diaphragms, gaskets and o-rings and will work well after that.
In the meantime I have modified the stock seat pan and test fitted it to the bike and mounted the MX style side covers. The stock pan is not flat at the rear like in this pic, it bends upward at maybe a 30 degree angle because the 78 uses a tail piece. I did not get the tail piece for this bike and really did not want to use it anyway. I cut some reliefs in the side of the pan at that step and bent the back down to be flat. I then cut some strips of sheet metal, you can see where it is riveted to the pan in the pictures, to fill the gaps so the sides of the pan followed the frame rail better. I found the hinges and latch and latch plate in the boxes of parts and it is all fastened together as it should be. There was some surface rust on the pan but a wire wheel cleaned it up and a couple coats of rustproof coating and it looks good.
With the seat pan in place I was finally able to sit on it and make vroom-vroom noises
- I even stood up on the pegs and balanced it a bit. This bike is pretty light, I cannot wait to ride it around the fields in the back yard and get it muddy.
All the brackets are still in place for the original side covers, so I could go back to them later if I'd like, but I like the slim look the number plates give it. They are mounted using a bolt through the bottom grommet for the stock side cover and a p-clamp at the top of the frame rail. The plates will have a number on them, they'll have a white background with red trim and black numbers - I'm thinking 78 since the bike is a 1978 model.
Next up is to get some foam and create some seat padding and then find some suitable black leather to cover it.
Please Log in or Create an account to join the conversation.
Moderators: Street Fighter LTD