
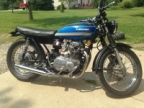
1978 KZ400 B1 - Scramber to be
- diggerdanh
-
 Topic Author
- Offline
- User
-

Registered
- Posts: 242
- Thanks: 89
Re: 1978 KZ400 B1 - Scramber to be
08 Dec 2016 07:33 - 08 Dec 2016 07:37
Electronics tray has been "fabricated" and installed. I guess you can call it that - if you call using a couple of 2x4s as a metal brake and rivets to hold everything together fabricating. It looks okay but it will be behind the side panels so it will not be visible.
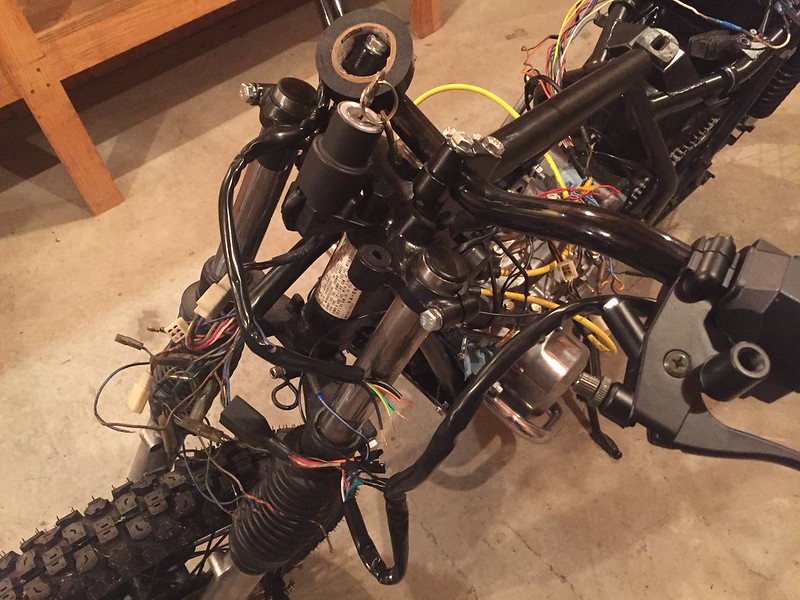
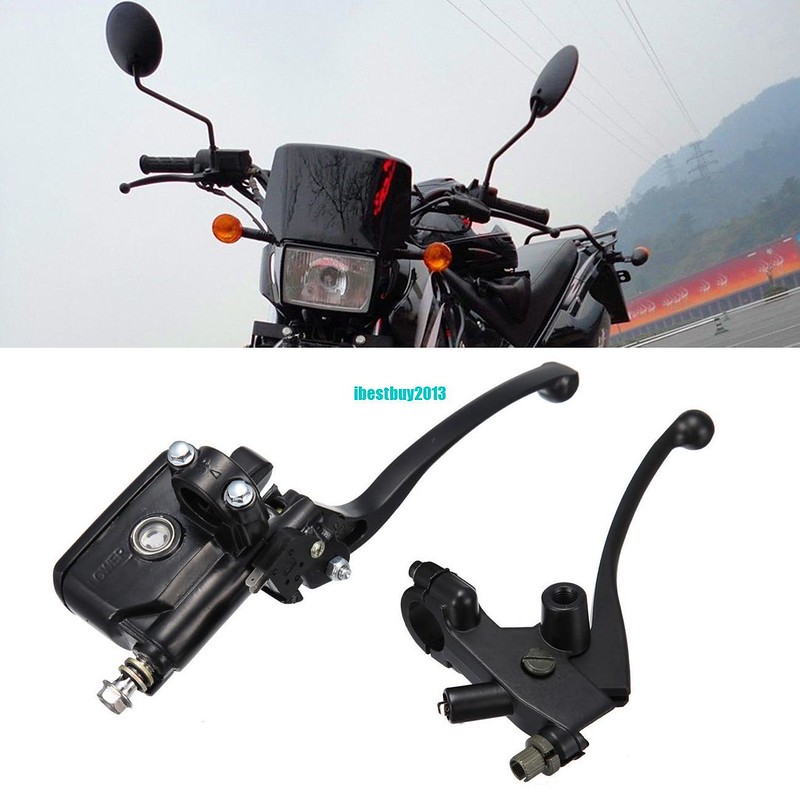
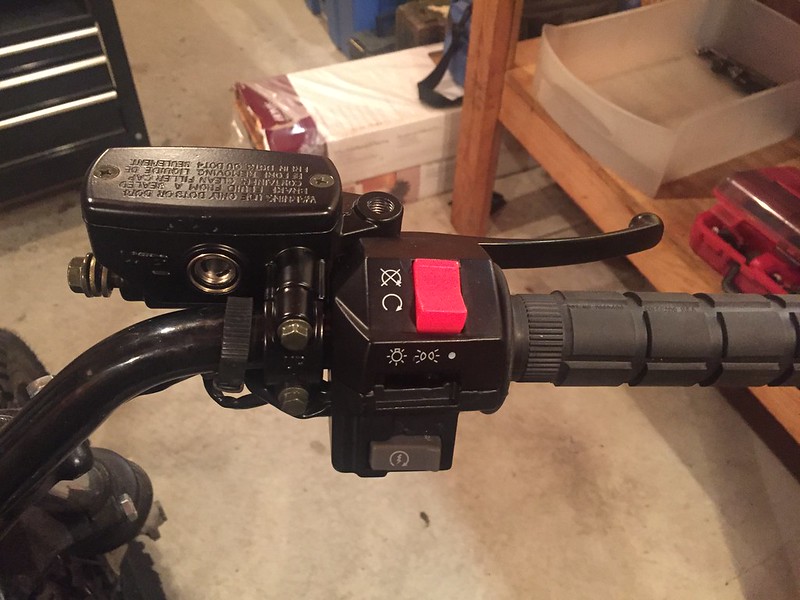
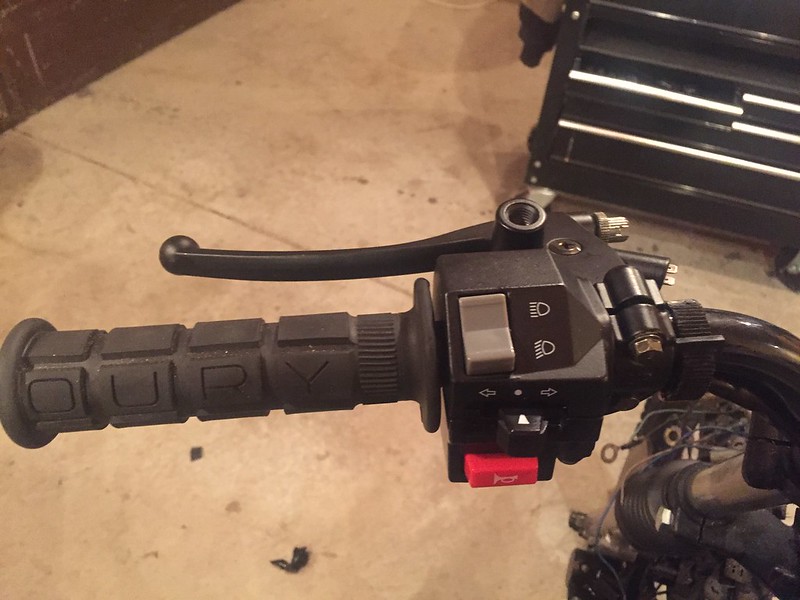
Front caliper was disassembled, cleaned and installed - though I still need to order new brake pads and order a stainless brake line to run from the MC to the caliper. I'm ditching the splitter because I'm using an MC with an integrated switch. I decided to purchase a new inexpensive set of universal MC/lever and clutch perch to replace the originals. They look similar to the stock stuff except they are black and as mentioned previously the MC includes the brake switch. You can see part of the clutch perch in the first pic below. I'll post better pics of them and the new controls once I have everything all wired up and the install is complete.
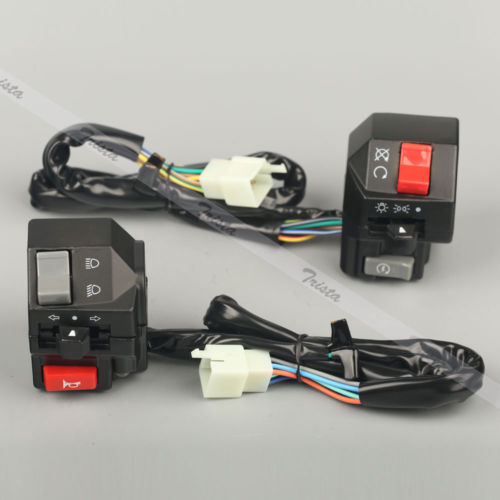
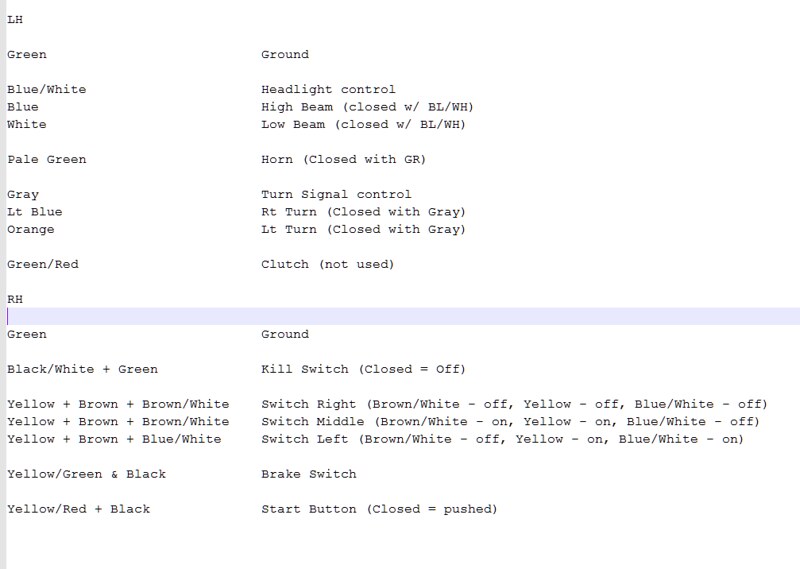
I also opted for a pair of inexpensive universal handlebar controls rather than try to refurbish the old ones. It was going to be a lot of work to clean up the old ones. They are not the super cheap plastic type - they do have aluminum housings but they are not the replicas of the originals that would have cost about $100 for the pair. I think it is money well spent. The only issue I have with them is that they use some pretty thin guage wire but I hope that will not be too much of an issue. The other pain in the butt is that they do not come with any type of wiring diagram so I had to spend some time with a multimeter to figure it out.
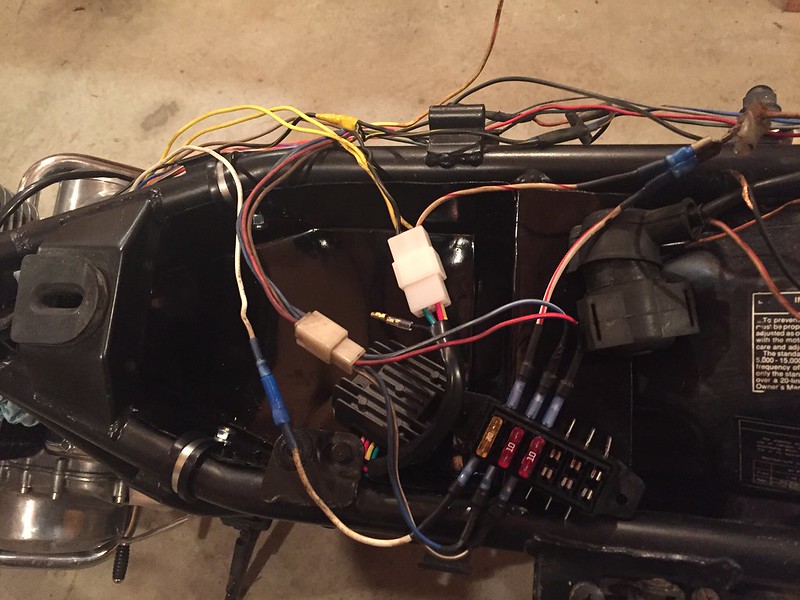
Other new additions were a new reg/rect, a new ATC fuse block, and an electronic flasher. And I cleaned up and painted the old ignition housing.
After getting the controls loosely in place it is time to connect them to the wiring harness and get everything wired up. I took a few pics of the mess last night. I have the left hand controls temporarily wired in and most of the other major stuff in place now, I just need to temporarily wire up the left hand controls and a few other small details and then I ought to be able to hook up a battery and test lights, the controls, ignition, etc. to make sure I have everything hooked up correctly and everything works properly. I may even try bumping over the engine to check the starter and solenoid. I'm probably a day or two away from that.
There is still plenty left to do and I'm hopeful to be done by spring but at this point it seems my to-do list is still growing faster than my done list as I keep adding small things that I've forgotten about.

Below are pics of the MC/clutch perch and controls that I ordered. And below that is the wiring diagram for the controls
Front caliper was disassembled, cleaned and installed - though I still need to order new brake pads and order a stainless brake line to run from the MC to the caliper. I'm ditching the splitter because I'm using an MC with an integrated switch. I decided to purchase a new inexpensive set of universal MC/lever and clutch perch to replace the originals. They look similar to the stock stuff except they are black and as mentioned previously the MC includes the brake switch. You can see part of the clutch perch in the first pic below. I'll post better pics of them and the new controls once I have everything all wired up and the install is complete.
I also opted for a pair of inexpensive universal handlebar controls rather than try to refurbish the old ones. It was going to be a lot of work to clean up the old ones. They are not the super cheap plastic type - they do have aluminum housings but they are not the replicas of the originals that would have cost about $100 for the pair. I think it is money well spent. The only issue I have with them is that they use some pretty thin guage wire but I hope that will not be too much of an issue. The other pain in the butt is that they do not come with any type of wiring diagram so I had to spend some time with a multimeter to figure it out.
Other new additions were a new reg/rect, a new ATC fuse block, and an electronic flasher. And I cleaned up and painted the old ignition housing.
After getting the controls loosely in place it is time to connect them to the wiring harness and get everything wired up. I took a few pics of the mess last night. I have the left hand controls temporarily wired in and most of the other major stuff in place now, I just need to temporarily wire up the left hand controls and a few other small details and then I ought to be able to hook up a battery and test lights, the controls, ignition, etc. to make sure I have everything hooked up correctly and everything works properly. I may even try bumping over the engine to check the starter and solenoid. I'm probably a day or two away from that.
There is still plenty left to do and I'm hopeful to be done by spring but at this point it seems my to-do list is still growing faster than my done list as I keep adding small things that I've forgotten about.
Below are pics of the MC/clutch perch and controls that I ordered. And below that is the wiring diagram for the controls
Last edit: 08 Dec 2016 07:37 by diggerdanh.
Please Log in or Create an account to join the conversation.
- loudhvx
-
- Offline
- KZr Legend
-

Registered
- Posts: 10863
- Thanks: 1622
Re: 1978 KZ400 B1 - Scramber to be
08 Dec 2016 08:35 - 08 Dec 2016 08:38
Looks good! ")
I like the kill switch icons. Either you are turning circles or you're not.")
They should have been a smiley face and skull and crossbones. :laugh:
I like the kill switch icons. Either you are turning circles or you're not.
They should have been a smiley face and skull and crossbones. :laugh:
1981 KZ550 D1 gpz.
Kz550 valve train warning.
Other links.
Kz550 valve train warning.
Other links.
Last edit: 08 Dec 2016 08:38 by loudhvx.
The following user(s) said Thank You: diggerdanh
Please Log in or Create an account to join the conversation.
- diggerdanh
-
Topic Author
- Offline
- User
-
Registered
- Posts: 242
- Thanks: 89
Re: 1978 KZ400 B1 - Scramber to be
05 Jan 2017 09:03
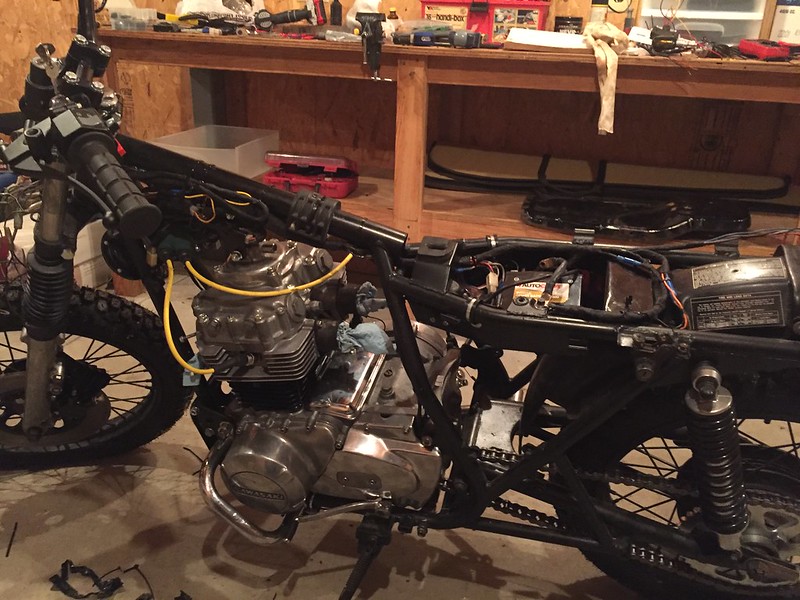
Well, it took 4 weeks time but I probably spent a good 3 days of total time getting the wiring worked out (mostly). That was a lot of work. I reused much of the stock wiring harness but had changes like the aftermarket controls, regulator, using a later 440 electronic igntion, moving as much of the electronics as possible into the tray, etc. I'll need to finish tidying up the front head lamp area and rear harness once I get gauges, head light, turn indicators, and tail light sorted. But mocked up headlight, tail light and turn indicators work as they should.
New handlebar controls are in place and everything works properly. I had to spend a lot of time testing these things with a multimeter both before putting them on the bike and after to figure out how it all worked and get it wired into the bike's harness properly.
Battery Box/Electronics tray. The battery in place is just for mockup - it is out of my son's LT80 but it is the exact same size as the Ballistic battery I intend to use. It did power lights and switches okay but I have not tried to kick over the bike with it yet, but I may just to find out if it will do so.
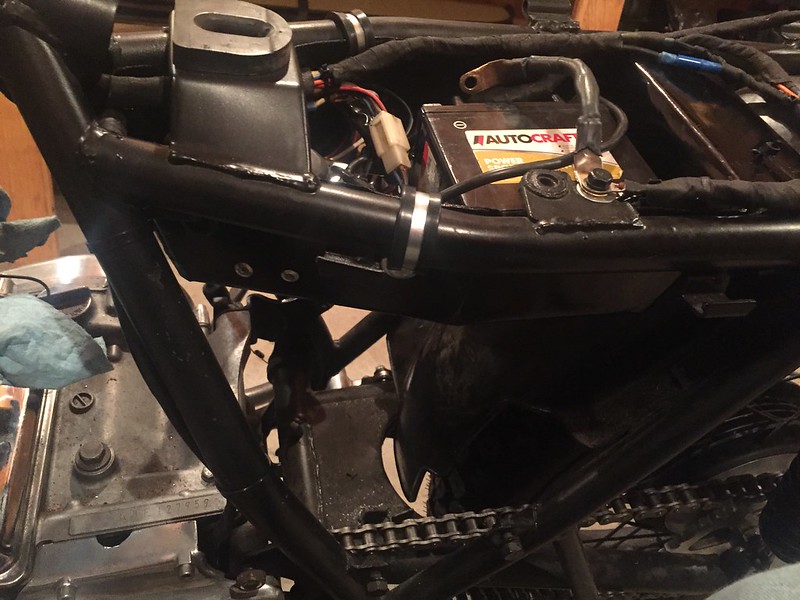
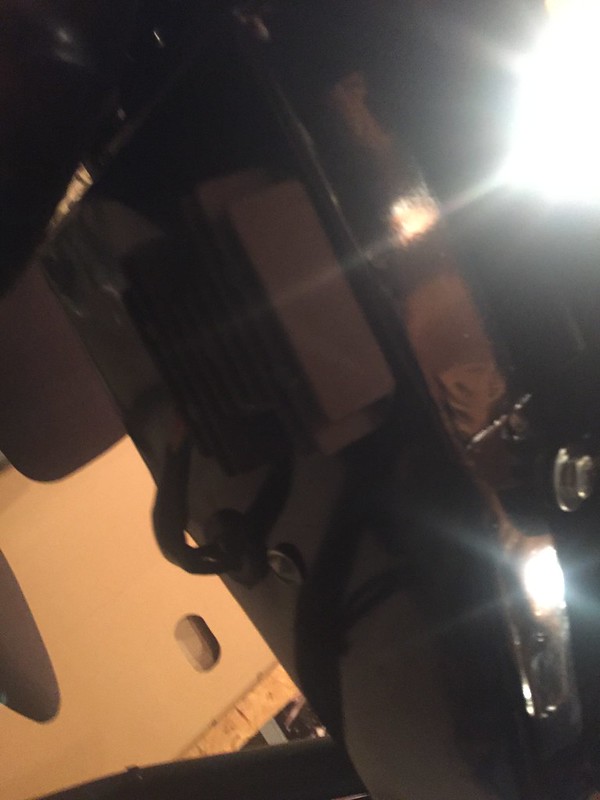
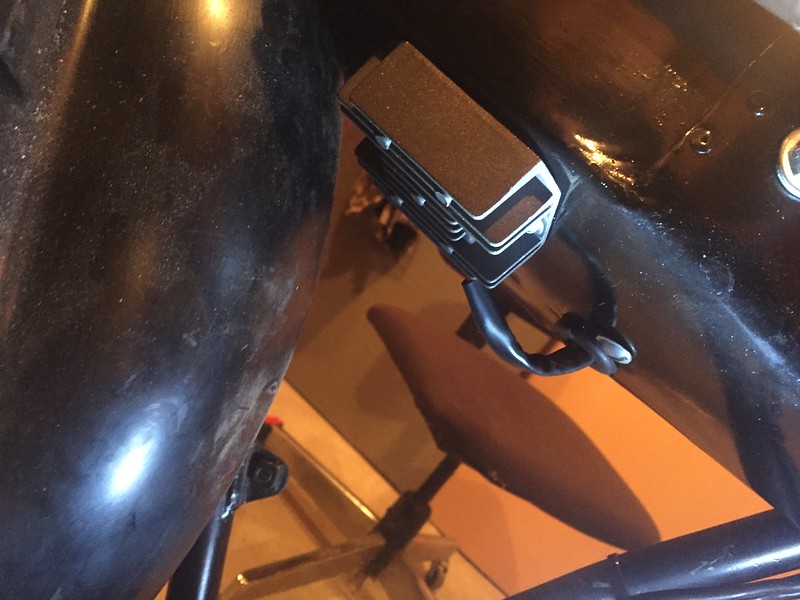
Regulator mounted underneath the tray
New handlebar controls are in place and everything works properly. I had to spend a lot of time testing these things with a multimeter both before putting them on the bike and after to figure out how it all worked and get it wired into the bike's harness properly.
Battery Box/Electronics tray. The battery in place is just for mockup - it is out of my son's LT80 but it is the exact same size as the Ballistic battery I intend to use. It did power lights and switches okay but I have not tried to kick over the bike with it yet, but I may just to find out if it will do so.
Regulator mounted underneath the tray
Please Log in or Create an account to join the conversation.
- diggerdanh
-
Topic Author
- Offline
- User
-
Registered
- Posts: 242
- Thanks: 89
Re: 1978 KZ400 B1 - Scramber to be
05 Jan 2017 09:06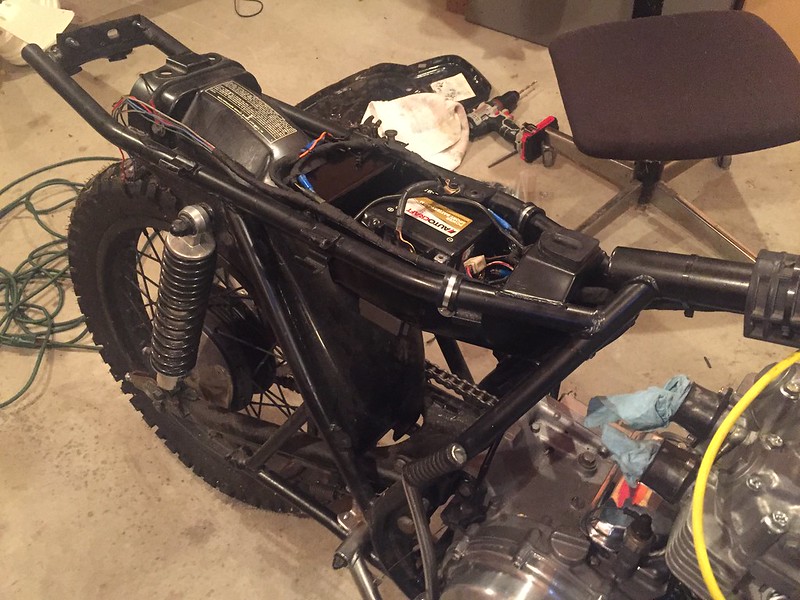
Next up is front brake. I will be using a one piece braided stainless line from the MC to the caliper since the RH control that I used has an integrated switch so I have no need to include the factory splitter with its switch.
Please Log in or Create an account to join the conversation.
- cbrianroll
-

- Offline
- User
-
Registered
- Posts: 82
- Thanks: 6
Re: 1978 KZ400 B1 - Scramber to be
05 Jan 2017 13:22
Looking good man! I'm still debating which direction to take my 1980 kz550ltd, as of now it's stripped and awaiting paint.
1980 kz550ltd
The following user(s) said Thank You: GPz550D1
Please Log in or Create an account to join the conversation.
- diggerdanh
-
Topic Author
- Offline
- User
-
Registered
- Posts: 242
- Thanks: 89
Re: 1978 KZ400 B1 - Scramber to be
17 Jan 2017 08:23
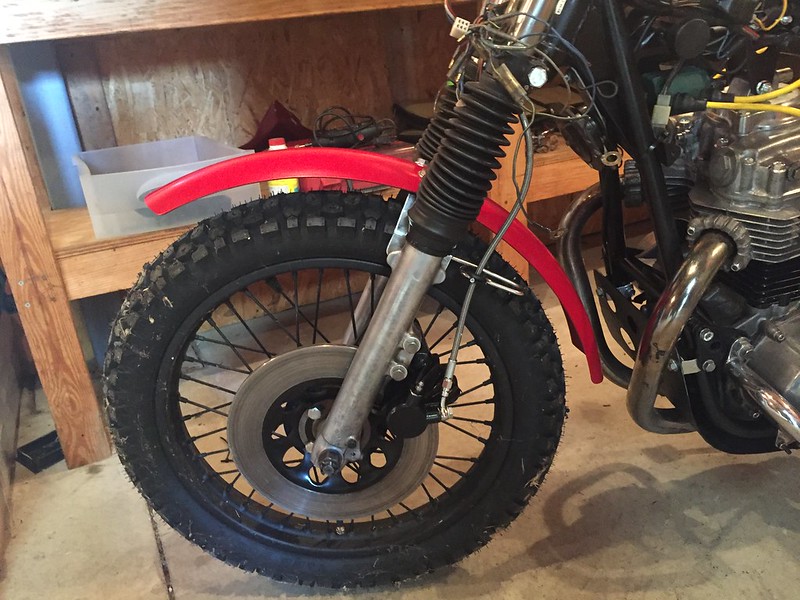
New brake pads, new braided stainless 1-piece brake line, everything connected, brakes bled. I ground down the rivets holding the fender brace to the old fender and removed the brace. Cleaned the brace up with a wire wheel and put it in place.

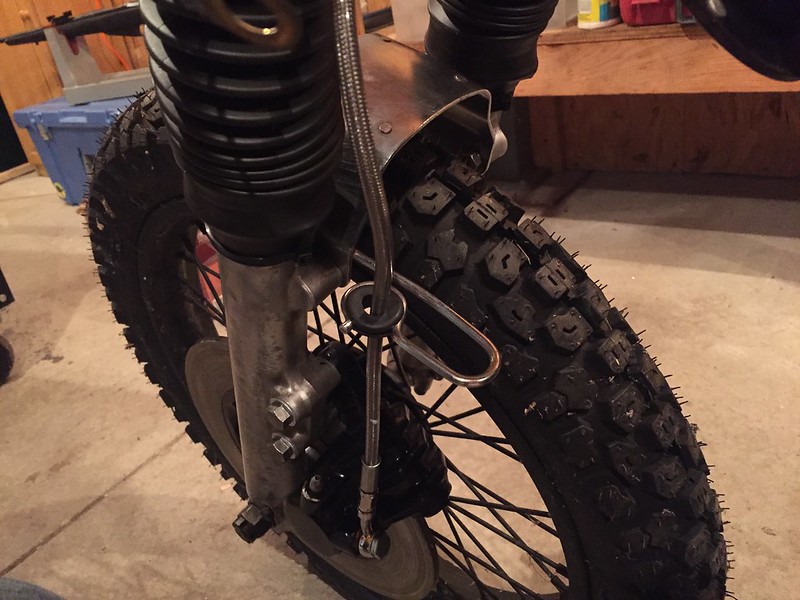
Man those lower fork legs look quite grungy in that last pic. I may need to pull them off and polish them up a little more.
Next up is figuring out front and rear fenders. I'm going to go aluminum, fiberglass or plastic for both to help hold down weight. I'm looking for something vintage or vintage looking as most modern motocross/enduro bike fenders have too many angles in them. I have a plastic front fender on the way and have several others bookmarked on Ebay. Once a rear fender is in place I'll work on the rear lights. I have a pretty cool vintage tail/brake light on my shelf that my Dad pulled off a 72 Triumph Bonneville that he was restoring. It was not original to the bike but it's still pretty cool and could look good on this bike.
Please Log in or Create an account to join the conversation.
- diggerdanh
-
Topic Author
- Offline
- User
-
Registered
- Posts: 242
- Thanks: 89
Re: 1978 KZ400 B1 - Scramber to be
17 Jan 2017 08:46
I bought the brake line and banjo fittings from a company called Inline Tube (
motorcitymusclecar
on Ebay)
They sell clear coated stainless braided -3an brake hose in lots of different lengths. Measure how much you need and then order along with a a couple of banjo fittings and you're good to go. I ordered a 28" line along with two 35 degree fittings for around $33 with free shipping. I already had new banjo bolts and copper washers for both ends on hand. They shipped within 2 days of placing the order and I received the package 2 days later (4 days total from ordering) - YMMV as I am only a state away.
Their brake hose was the best bargain around - $14 for the 28" hose, about half the cost I found from other places. Their banjo fittings were about $9.50 each, I could have gotten them a couple dollars cheaper each from somewhere else (like Summit Racing) but I would have had to pay shipping/handling/tax and if I remember correctly their minimum shipping charge was about $10.
This was about the most economical option for the lines and fittings other than buying bulk lines and fittings and fabricating it myself. It was at least $15 less than getting everything from Jegs, Summit, Z1 Enterprises. Not saying that it is the exact same stuff or as nice as what you can get somewhere else but it is good enough for me. Additionally $15 savings might not seem like much, and in most cases I would agree especially if this was the only thing I was updating or just one of a few. But I'm finding myself buying little bits all the time with this bike so I need to save a few dollars here and there where I can.
The following user(s) said Thank You: Rave71
Please Log in or Create an account to join the conversation.
- ThatGPzGuy
-
- Offline
- Sustaining Member
-

Registered
- More Sparky than Speed Racer
- Posts: 1524
- Thanks: 402
Re: 1978 KZ400 B1 - Scramber to be
18 Jan 2017 04:18diggerdanh wrote: I bought the brake line and banjo fittings from a company called Inline Tube ( motorcitymusclecar on Ebay)
Dan, how did you attach the fittings to the hoses? Or did the vendor do that?
Jim
North GA
2016 Yamaha FJR1300ES
1982 GPz750 R1
1974 Kawasaki H1
1976 Kawasaki KZ400
1979 Yamaha XS650 cafe'
2001 KZ1000P (sold)
2001 Yamaha YZ426
1981 Honda XR200 stroked in an '89 CR125 chassis
1965 Mustang
1967 Triumph GT6
1976 Bronco
"If you didn't build it, it's not really yours"
North GA
2016 Yamaha FJR1300ES
1982 GPz750 R1
1974 Kawasaki H1
1976 Kawasaki KZ400
1979 Yamaha XS650 cafe'
2001 KZ1000P (sold)
2001 Yamaha YZ426
1981 Honda XR200 stroked in an '89 CR125 chassis
1965 Mustang
1967 Triumph GT6
1976 Bronco
"If you didn't build it, it's not really yours"
Please Log in or Create an account to join the conversation.
- diggerdanh
-
Topic Author
- Offline
- User
-
Registered
- Posts: 242
- Thanks: 89
Re: 1978 KZ400 B1 - Scramber to be
18 Jan 2017 05:59 - 18 Jan 2017 06:00
No eBay APP ID and/or Cert ID defined in Kunena configurationNo eBay APP ID and/or Cert ID defined in Kunena configurationJim,
The hose came assembled with the -3an straight fittings on each end.
I just needed to buy the -3an to 10mm banjo fittings and screw then into the straight fitting on each end. They simply tighten on with a wrench. I held the banjo fittings in a vice with wood blocks and tightened down the ends of the hoses.
I bought two 35-degree fittings but a 45-degree or a 90-degree may look better or allow for better routing at the MC.
Hope that helps.
Thanks,
Dan
Last edit: 18 Jan 2017 06:00 by diggerdanh.
The following user(s) said Thank You: ThatGPzGuy
Please Log in or Create an account to join the conversation.
- diggerdanh
-
Topic Author
- Offline
- User
-
Registered
- Posts: 242
- Thanks: 89
Re: 1978 KZ400 B1 - Scramber to be
06 Feb 2017 06:18
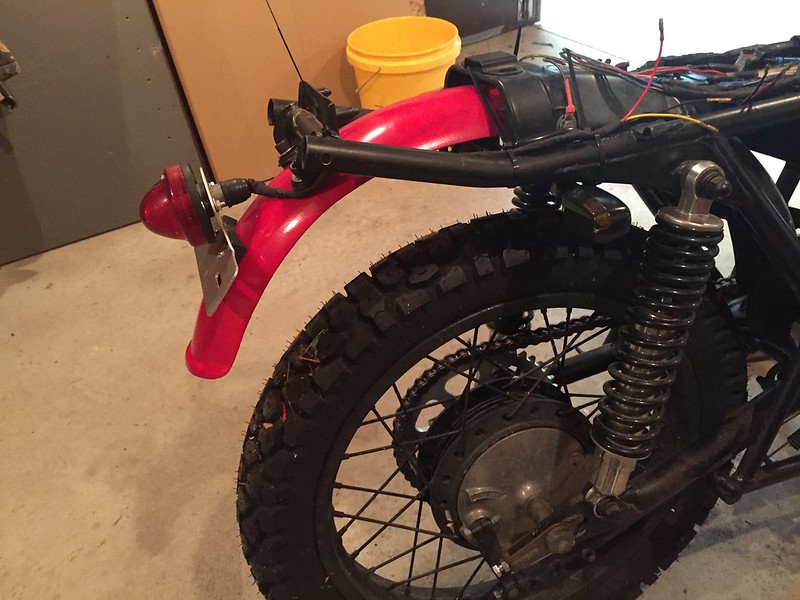
Front and rear fenders are installed as well as tail light assembly. Now I just need to remove them, paint them the red-ish color of the tank and reinstall. I'll post pics after they are back on.
Front fender was an NOS aftermarket fiberglass fender from what looks to be the 70s or 80s that was still in the plastic with a paper tag. It fit perfectly and looks like it was made for this bike. I got that on ebay for $8 shipped. Rear fender is a newish plastic motocross replacement fender I picked up for about $12 shipped. I prefer the fiberglass fender but you don't see much of the plastic one since it is the rear and it fits and looks fine.
I also bought some oval plastic motocross number plates that I'll be using for side covers. Still working on color combinations because I'd like it more understated than flashy but those will go on eventually too.
Along with painting and re-mounting the fenders the next step is some rear turn signals, I had nothing laying around that worked well so I'll have to order something. After the rear turn signals its on to headlight, front turn signals, and gauges.
Please Log in or Create an account to join the conversation.
- diggerdanh
-
Topic Author
- Offline
- User
-
Registered
- Posts: 242
- Thanks: 89
Re: 1978 KZ400 B1 - Scramber to be
20 Feb 2017 06:06 - 20 Feb 2017 06:27
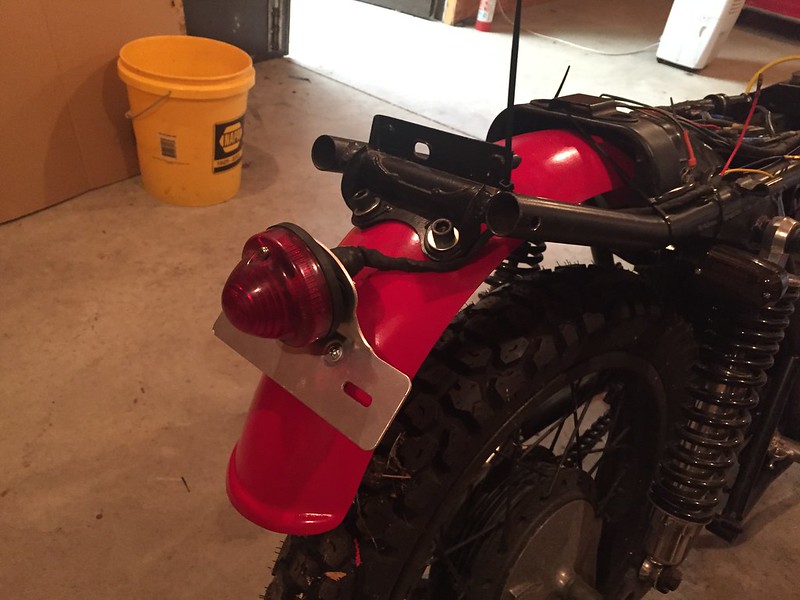
Front fender painted and mounted. This was the NOS fiberglass aftermarket MX fender. I got it to sit a little higher than the stock fender with the use of some rubber washers as spacers between the fender and fork brace.

Last edit: 20 Feb 2017 06:27 by diggerdanh.
Please Log in or Create an account to join the conversation.
- diggerdanh
-
Topic Author
- Offline
- User
-
Registered
- Posts: 242
- Thanks: 89
Re: 1978 KZ400 B1 - Scramber to be
20 Feb 2017 06:10
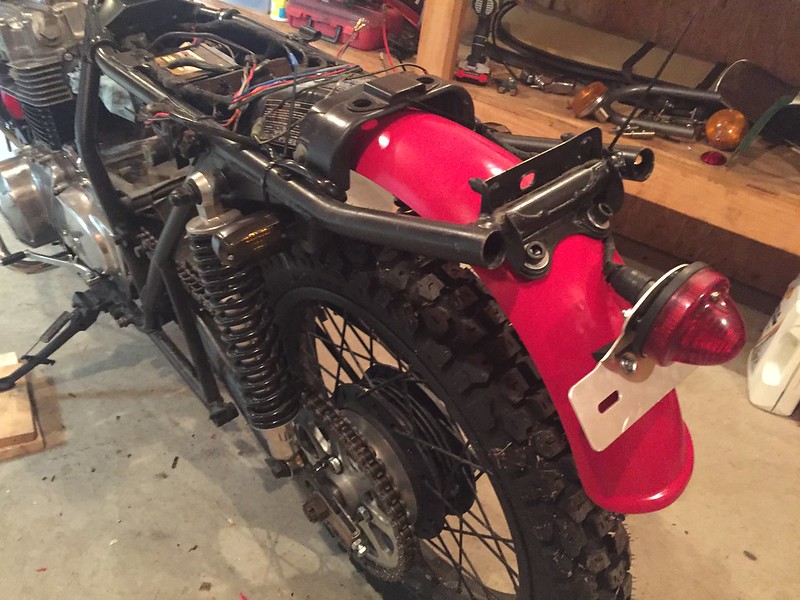
Rear fender painted and mounted. This was the newish platic MX fender that I bought from ebay. It is not as nice as the front one but it's mostly hidden and will work and look fine. Taillight mounted on the rear fender. Turn signals mounted tucked in on brackets just behind the rear shocks.
Please Log in or Create an account to join the conversation.
Moderators: Street Fighter LTD