
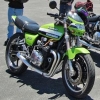
85 KZ1000P Chopper Project with *Pictures*!
- Allshookup
-
 Topic Author
- Offline
- User
-

Registered
- Posts: 75
- Thanks: 0
Re: 85 KZ1000P Chopper Project with *Pictures*!
22 Jul 2007 11:42
The Progressive shocks are much stiffer then the factory ones so it look like I will have about 3 or 4 inches of travel. The shocks are adjustable and are currently set as low as possible if I need more I can always move it up a few clicks.
Please Log in or Create an account to join the conversation.
- Mark Wing
-
- Offline
- User
-
Registered
- Posts: 1697
- Thanks: 22
Re: 85 KZ1000P Chopper Project with *Pictures*!
22 Jul 2007 13:24
I like where your going with it too. It should have a cool paint job to go with the cool bike, flat black would be selling it short I think. It's your bike though so.... Have fun with it it's looking cool.
Mark

Post edited by: Mark Wing, at: 2007/07/22 16:28
Mark
Post edited by: Mark Wing, at: 2007/07/22 16:28
Jesus loves you Everyone else thinks your an ***
77 KZ650 C1 with ZX7 forks, GPZ mono rear, wider 18 police wheels and Yoshimura motor.
Yorba Linda Cal.
77 KZ650 C1 with ZX7 forks, GPZ mono rear, wider 18 police wheels and Yoshimura motor.
Yorba Linda Cal.
Please Log in or Create an account to join the conversation.
- Allshookup
-
Topic Author
- Offline
- User
-
Registered
- Posts: 75
- Thanks: 0
Re: 85 KZ1000P Chopper Project with *Pictures*!
28 Jul 2007 08:52
As of right now I'm going to paint it Satin Black not flat black. The flat black is just the primer.
I have had several people ask me about the rake I did so I will try to explain the best I can. I am in know way an expert so use this info at your own risk!
I wanted the bike to have a level look, what I mean by that is I wanted the bottom of the frame to be parallel to the ground. I didn't want the front of the bike to be higher then the rear.
First off I swapped the rear shocks for a set progressive shocks that were about 2 or 3 inches lower. That made the frame about 4 or 5 inches off the ground but the front was now around 6 or 7 inches higher. So I put 6 to 7 inches of blocks under the front of the frame, next after bracing the forks I cut the neck from the bottom up
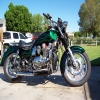
 this is not a picture of my bike but it gives you the idea.
At first nothing happened but as I cut higher the bike slowly started to lower to the blocks as the front of the bike pushed forward. After the bike was resting on the blocks I welded a brace into the gap that was created then for extra reinforcement I welded a 1/8" 4x4 (approximate) steal plate on each side.
Here is a nice article that helped,
Old School Raking Your Neck
I hope this helps.
I have had several people ask me about the rake I did so I will try to explain the best I can. I am in know way an expert so use this info at your own risk!
I wanted the bike to have a level look, what I mean by that is I wanted the bottom of the frame to be parallel to the ground. I didn't want the front of the bike to be higher then the rear.
First off I swapped the rear shocks for a set progressive shocks that were about 2 or 3 inches lower. That made the frame about 4 or 5 inches off the ground but the front was now around 6 or 7 inches higher. So I put 6 to 7 inches of blocks under the front of the frame, next after bracing the forks I cut the neck from the bottom up
At first nothing happened but as I cut higher the bike slowly started to lower to the blocks as the front of the bike pushed forward. After the bike was resting on the blocks I welded a brace into the gap that was created then for extra reinforcement I welded a 1/8" 4x4 (approximate) steal plate on each side.
Here is a nice article that helped,
Old School Raking Your Neck
I hope this helps.
Please Log in or Create an account to join the conversation.
- Allshookup
-
Topic Author
- Offline
- User
-
Registered
- Posts: 75
- Thanks: 0
Re: 85 KZ1000P Chopper Project with *Pictures*!
29 Jul 2007 15:51
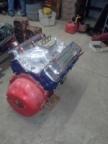
Here is the updated picture of my engine. I just finished painting it last night. I still need to polish the covers but the paint came out great IMO.
[img size=400]http://www.strypedforever.com/WebPictures/KZRider/Engine before.jpg[/img]
[img size=400]http://www.strypedforever.com/WebPictures/KZRider/Engine after.jpg[/img]
Step one I soaked it with engine degreaser then scrubbed it with a brush, then washed it off with a garden hose.
Step two I again soaked it with engine degreaser then let it sit for an hour. Then I took it down to the local car wash and blasted the heck out of it! Took it back to the garage and dried it buy blowing it off with an air compressor.
Step three after taping it off I sprayed it with Dupli-Color "DH 1602 High Heat Black" good for 1200* that was coat one then I sprayed it with Dupli-Color "DE 1635 Ford Semi-Gloss Black" good for 500*
Step four after it dried I went back and sanded/filed the fins back to the aluminum.
All in all I think it took a little over 4 hours!
Post edited by: Allshookup, at: 2007/07/29 19:55
Please Log in or Create an account to join the conversation.
- dastardize
-

- Offline
- User
-
Registered
- Posts: 23
- Thanks: 0
Re: 85 KZ1000P Chopper Project with *Pictures*!
15 Nov 2007 13:55
WOW!!! That looks amazing, one question though...what are your plans for the tailight and plate mounts???
1979 kz650 hardtail
4 into 1
pods
4 into 1
pods
Please Log in or Create an account to join the conversation.
- SandRacer
-
- Offline
- User
-
Registered
- Posts: 36
- Thanks: 0
Re: 85 KZ1000P Chopper Project with *Pictures*!
26 Nov 2007 07:57
Nice job on the motor. Keep the pics coming. I have a soft spot when it comes to 1000P's and I'm always on the lookout for new ideas for the 440 chop I'm building.
Please Log in or Create an account to join the conversation.
- John T
-
- Offline
- User
-
Registered
- Posts: 83
- Thanks: 2
Re: 85 KZ1000P Chopper Project with *Pictures*!
05 Jan 2008 18:26
Allshookup wrote:
Looks great.
thanks for the link on raking the neck...
now I got another project.... :dry:
Question: How does the bike handle with the "old school" rake job? can you get around a corner OK or hit semi high speed without any death wobble or other "pucker factor" ? :lol:
-john
Let me know what you think of my chopper project.
Looks great.
thanks for the link on raking the neck...
now I got another project.... :dry:
Question: How does the bike handle with the "old school" rake job? can you get around a corner OK or hit semi high speed without any death wobble or other "pucker factor" ? :lol:
-john
True Wisdom Only Comes From Pain.
Please Log in or Create an account to join the conversation.
- Allshookup
-
Topic Author
- Offline
- User
-
Registered
- Posts: 75
- Thanks: 0
Re: 85 KZ1000P Chopper Project with *Pictures*!
12 Mar 2009 20:55
I will have to post some new pictures...
I have had the bike up to 60+ without any problems at all. Handles great.
I have had the bike up to 60+ without any problems at all. Handles great.
Please Log in or Create an account to join the conversation.
- PLUMMEN
-
- Offline
- User
-
Registered
- Posts: 7986
- Thanks: 104
Re: 85 KZ1000P Chopper Project with *Pictures*!
12 Mar 2009 21:23
Allshookup wrote: ")
motor turned out nice!Here is the updated picture of my engine. I just finished painting it last night. I still need to polish the covers but the paint came out great IMO.
[img size=400]http://www.strypedforever.com/WebPictures/KZRider/Engine before.jpg[/img]
[img size=400]http://www.strypedforever.com/WebPictures/KZRider/Engine after.jpg[/img]
Step one I soaked it with engine degreaser then scrubbed it with a brush, then washed it off with a garden hose.
Step two I again soaked it with engine degreaser then let it sit for an hour. Then I took it down to the local car wash and blasted the heck out of it! Took it back to the garage and dried it buy blowing it off with an air compressor.
Step three after taping it off I sprayed it with Dupli-Color "DH 1602 High Heat Black" good for 1200* that was coat one then I sprayed it with Dupli-Color "DE 1635 Ford Semi-Gloss Black" good for 500*
Step four after it dried I went back and sanded/filed the fins back to the aluminum.
All in all I think it took a little over 4 hours!
Post edited by: Allshookup, at: 2007/07/29 19:55
Still recovering,some days are better than others.
Please Log in or Create an account to join the conversation.
- irishwill
-
- Offline
- User
-
Registered
- Posts: 597
- Thanks: 6

- irishwill
-
- Offline
- User
-
Registered
- Posts: 597
- Thanks: 6
Re: 85 KZ1000P Chopper Project with *Pictures*!
15 Mar 2009 13:55
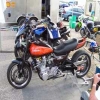
Nice work...I like when people take there own Ideas and make them work...
here is one before/after I built for a buddy.
Please Log in or Create an account to join the conversation.
Moderators: Street Fighter LTD