
Disassembling Meters
- ffltstn
-
 Topic Author
- Offline
- User
-

Registered
- Posts: 44
- Thanks: 3
Disassembling Meters
02 Apr 2015 19:07
Both my meters are rusty and the rubber dampers are hard and brittle.
Can they be taken completely apart, easily and safely, So I can sand and paint the housings?
Or should I just tape off and paint?
If I can't find the damper suggestions on what to use in place?
Thanks,
Ken
Can they be taken completely apart, easily and safely, So I can sand and paint the housings?
Or should I just tape off and paint?
If I can't find the damper suggestions on what to use in place?
Thanks,
Ken
'82 KZ1000
'95 Voyager XII
'98 Vulcan 750
'95 Voyager XII
'98 Vulcan 750
Please Log in or Create an account to join the conversation.
- SWest
-

- Offline
- Sustaining Member
-

Registered
- 10 22 2014
- Posts: 23665
- Thanks: 2967
Re: Disassembling Meters
02 Apr 2015 19:18
If they are still working and look good, don't open them. I cut fuel line to use for dampers.
Steve
Steve
Z1b1000 1975 Z1b
kzrider.com/forum/11-projects/598262-kz-...-will-it-live#672882
kzrider.com/forum/2-engine/597654-poser?start=240#704229
kzrider.com/forum/11-projects/598262-kz-...-will-it-live#672882
kzrider.com/forum/2-engine/597654-poser?start=240#704229
Please Log in or Create an account to join the conversation.
- TexasKZ
-

- Offline
- Platinum Member
-
Registered
- Posts: 8107
- Thanks: 2632
Re: Disassembling Meters
02 Apr 2015 21:13
There is at least one thread on gauge restoration around here. It is not very complicated, but does require a great deal of patience and care.
1982 KZ1000 LTD parts donor
1981 KZ1000 LTD awaiting resurrection
2000 ZRX1100 not ridden enough
www.kzrider.com/11-projects/620336-anoth...uild-thread?start=24
1981 KZ1000 LTD awaiting resurrection
2000 ZRX1100 not ridden enough
www.kzrider.com/11-projects/620336-anoth...uild-thread?start=24
Please Log in or Create an account to join the conversation.
- ffltstn
-
Topic Author
- Offline
- User
-
Registered
- Posts: 44
- Thanks: 3
Re: Disassembling Meters
03 Apr 2015 05:59
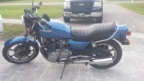
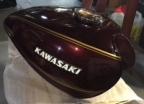
I am able to be careful not always patient enough lol. This is what I'm working with, think I'll tape them off and sand and paint. The dampers are about $25 each but I need something to put there so I may have to bite the bullet.
'82 KZ1000
'95 Voyager XII
'98 Vulcan 750
'95 Voyager XII
'98 Vulcan 750
Please Log in or Create an account to join the conversation.
- martin_csr
-

- Offline
- User
-
Registered
- Posts: 7994
- Thanks: 1644
Re: Disassembling Meters
03 Apr 2015 06:06 - 08 Apr 2015 02:44
To open them you have to either cut or un-crimp the clamping ring as it is pressed in place at the factory. wiredgeorge over at wgcarbs may have a how-to w/ pics linked on his site somewhere. Or it may still be here somewhere, perhaps in the archives.
Dampers. mousepad material, maybe weatherstripping insulation from the hardware store.
Z1-Resto
Dampers. mousepad material, maybe weatherstripping insulation from the hardware store.
Z1-Resto
Last edit: 08 Apr 2015 02:44 by martin_csr.
Please Log in or Create an account to join the conversation.
- ffltstn
-
Topic Author
- Offline
- User
-
Registered
- Posts: 44
- Thanks: 3
Re: Disassembling Meters
03 Apr 2015 06:15
Ok thanks, I'm not tearing into them that much. I can make them look good just will take more time.
Thanks
Thanks
'82 KZ1000
'95 Voyager XII
'98 Vulcan 750
'95 Voyager XII
'98 Vulcan 750
Please Log in or Create an account to join the conversation.
- SWest
-
- Offline
- Sustaining Member
-
Registered
- 10 22 2014
- Posts: 23665
- Thanks: 2967
Re: Disassembling Meters
03 Apr 2015 07:24
I had to get into mine. Only temperary fix. Put in a new dace plate, stopped the needle from jumping around but now it lies. Will buy new ones.


Steve
Steve
Z1b1000 1975 Z1b
kzrider.com/forum/11-projects/598262-kz-...-will-it-live#672882
kzrider.com/forum/2-engine/597654-poser?start=240#704229
kzrider.com/forum/11-projects/598262-kz-...-will-it-live#672882
kzrider.com/forum/2-engine/597654-poser?start=240#704229
Please Log in or Create an account to join the conversation.
- davido
-

- Offline
- User
-
Registered
- Posts: 1578
- Thanks: 291
Re: Disassembling Meters
03 Apr 2015 09:53
This article worked for me.


This is how they came out

This is how they came out
www.kzrider.com/forum/11-projects/594313-csr1000-project-build
CB550 (1978)
CB500/4 (1972)*
KZ1000CSR (1981)
XT 600E (1999)
TDM900 (2003)
CB550 (1978)
CB500/4 (1972)*
KZ1000CSR (1981)
XT 600E (1999)
TDM900 (2003)
Please Log in or Create an account to join the conversation.
- KZQ
-

- Offline
- Administrator
-

Registered
- Walking Behind the Corn May Not Be All That!
- Posts: 4887
- Thanks: 1696
Re: Disassembling Meters
03 Apr 2015 13:27
Hi Ken,
You sent a message that you were having problems posting pictures.
Here's a good discussion about posting pics on KZR:
www.kzrider.com/forum/8-about-the-site/5...posting-pics-is-easy
Good Luck
Bill
You sent a message that you were having problems posting pictures.
Here's a good discussion about posting pics on KZR:
www.kzrider.com/forum/8-about-the-site/5...posting-pics-is-easy
Good Luck
Bill
www.KZ1300.com
Riders:
1968 BSA 441 Shooting Star, 1970 BSA 650 Lightning, 1974 W3, 1976 KZ900, 1979 KZ750 Twin, 1979 KZ750 Twin Trike, 1981 KZ1300, 1982 KZ1100 Spectre, 2000 Valkyrie, 2009 Yamaha Roadliner S. 1983 GL 1100
Projects:
1985 ZN1300
Riders:
1968 BSA 441 Shooting Star, 1970 BSA 650 Lightning, 1974 W3, 1976 KZ900, 1979 KZ750 Twin, 1979 KZ750 Twin Trike, 1981 KZ1300, 1982 KZ1100 Spectre, 2000 Valkyrie, 2009 Yamaha Roadliner S. 1983 GL 1100
Projects:
1985 ZN1300
Please Log in or Create an account to join the conversation.
- jakedude
-

- Offline
- User
-
Registered
- Posts: 201
- Thanks: 30
Re: Disassembling Meters
03 Apr 2015 14:17
Nothing lasts, nothing is finished, and nothing is perfect.
Please Log in or Create an account to join the conversation.
- missionkz
-
- Offline
- Sustaining Member
-
Registered
- Posts: 1618
- Thanks: 184
Re: Disassembling Meters
03 Apr 2015 17:10
I pulled one of my old original speedo instruments apart. Yes, by peeling that rotten seam apart.
I did it to see if the drive inside was acting up (needle bounce of +7mph and -7mph at 55mph to 60mph) and I wanted to replace the inked face, which also had multiple cracks with light shining through at night.....
The seam wasn't bad, just took time.
The hardest part was pulling that damn, SOB speedo needle off the stem.... good God!!! X100.
I could not believe how stuck it was and was shocked I did not destroy the needle trying to pry it off.
I did get it off after a solid 45 mins.... by dismantling the entire drive gear assembly to the odometer and trip OD so I could get under the needle and pry it up using the frame for leverage with two small screw drivers from two sides.
If had the money I would have just bought another speedo.
The cool thing was if I wanted to, I could have set the odometer back to zero with NO effort.
I didn't.....
Bruce
1977 KZ1000A1
2016 Triumph T120 Bonneville
Far North East Metro Denver Colorado
1977 KZ1000A1
2016 Triumph T120 Bonneville
Far North East Metro Denver Colorado
Please Log in or Create an account to join the conversation.
- SWest
-
- Offline
- Sustaining Member
-
Registered
- 10 22 2014
- Posts: 23665
- Thanks: 2967
Re: Disassembling Meters
03 Apr 2015 17:16
I used my cheap valve adjusting tool and the screws as a fulcrum. You have to be under the brass bushing so you won't destroy the needle. Third time in for me. I'll just buy new ones and put these on eBay, parts or not working.
Steve
Steve
Z1b1000 1975 Z1b
kzrider.com/forum/11-projects/598262-kz-...-will-it-live#672882
kzrider.com/forum/2-engine/597654-poser?start=240#704229
kzrider.com/forum/11-projects/598262-kz-...-will-it-live#672882
kzrider.com/forum/2-engine/597654-poser?start=240#704229
The following user(s) said Thank You: missionkz
Please Log in or Create an account to join the conversation.
Moderators: Street Fighter LTD