
Exhaust gasket removal
- lowie182
-
 Topic Author
- Offline
- User
-

Registered
- Posts: 28
- Thanks: 0
Exhaust gasket removal
08 Mar 2014 08:21
hey all, i apologize in advance if this thread is somewhere but i checked my service manual, the file base here, and searched the forum and could find nothing on removing the exhaust gaskets.
how would i go about removing those little copper gaskets? i have new ones and tired getting the old ones out with a pick for a little while. i didnt want to damage the head so i havent tried much anything else, a friend said to put a small screw in it (like a oil main seal) but thats a little ridiculous considering the size of the gasket.
any help would be much appreciated.
1981 KZ550 C2 parts bike (2010-Present)
1981 KZ550 C2 rental/back-up bike (2010-Present)
1981 KZ750 H2 Daily Driver (2012-Present)
1981 KZ550 C2 rental/back-up bike (2010-Present)
1981 KZ750 H2 Daily Driver (2012-Present)
Please Log in or Create an account to join the conversation.
- turboking
-
- Offline
- User
-
Registered
- Posts: 631
- Thanks: 106
Re: Exhaust gasket removal
08 Mar 2014 09:31
I always used a L shaped pick with a sharp point.... never had any problem :blink: Pry away :blink: the head is tougher than you think :S
2005 Kawasaki mean streak
2000 325 H.P. mcXpress turbo Hayabusa
1979 kz 1000 mk II ATP turbo
1975 Z1 960 cc Mr. Turbo
1975 Z1 1428 big block ATP turbo
1976 Kz900 1103 cc ATP turbo
1985 GS 1150E
1983 GS 1100E
1997 Suzuki Bandit 1200S
2001 Kawasaki EX 500 Ninja
1972 Honda cb750 (836cc turbo)
2000 325 H.P. mcXpress turbo Hayabusa
1979 kz 1000 mk II ATP turbo
1975 Z1 960 cc Mr. Turbo
1975 Z1 1428 big block ATP turbo
1976 Kz900 1103 cc ATP turbo
1985 GS 1150E
1983 GS 1100E
1997 Suzuki Bandit 1200S
2001 Kawasaki EX 500 Ninja
1972 Honda cb750 (836cc turbo)
The following user(s) said Thank You: wireman
Please Log in or Create an account to join the conversation.
- MFolks
-

- Offline
- User
-
Registered
- Posts: 6650
- Thanks: 541
Re: Exhaust gasket removal
08 Mar 2014 09:52
If you can get a machinist's scribe, it's got a nice 90 degree bend on it. I got mine some years ago at Sears, in the tool section.
1982 GPZ1100 B2
General Dynamics/Convair 1983-1993
GLCM BGM-109 Tomahawk, AGM-129A Advanced Cruise Missile (ACM)
General Dynamics/Convair 1983-1993
GLCM BGM-109 Tomahawk, AGM-129A Advanced Cruise Missile (ACM)
Please Log in or Create an account to join the conversation.
- Patton
-

- Offline
- KZr Legend
-

Registered
- Posts: 18567
- Thanks: 2103
Please Log in or Create an account to join the conversation.
- lowie182
-
Topic Author
- Offline
- User
-
Registered
- Posts: 28
- Thanks: 0
Re: Exhaust gasket removal
08 Mar 2014 10:40
thanks ya ill try pickin at it again, i just didnt want to go ahead and screw up the aluminum, knowing my luck i will anyways hahahaha well ill let you know either tonight or tomorrow if i get them out, btw im putting on a vance&hines from z1, other than it being in way of the filter n such how do you guys like the V&H? i wont be able to hear mine until the snow is gone, around may.... april if im lucky ahahah also heard i should be very carefull to clean exhaust of any grease or fingerprints before first warm up or it could burn them into the chrome? is this true? sounds like it could be.
thanks again.
thanks again.
1981 KZ550 C2 parts bike (2010-Present)
1981 KZ550 C2 rental/back-up bike (2010-Present)
1981 KZ750 H2 Daily Driver (2012-Present)
1981 KZ550 C2 rental/back-up bike (2010-Present)
1981 KZ750 H2 Daily Driver (2012-Present)
Please Log in or Create an account to join the conversation.
- undiablo
-

- Offline
- User
-
Registered
- Posts: 434
- Thanks: 64
Re: Exhaust gasket removal
08 Mar 2014 10:42
Yes, it is true. Clean them really good before starting the engine.
Kawasaki KZ 750/4 LTD 1981
Kawasaki KLR 650 2011
Argentina - Buenos Aires
Kawasaki KLR 650 2011
Argentina - Buenos Aires
Please Log in or Create an account to join the conversation.
- Patton
-
- Offline
- KZr Legend
-
Registered
- Posts: 18567
- Thanks: 2103
Re: Exhaust gasket removal
08 Mar 2014 12:33
Before installing brand new headers, I sprayed numerous coats of VHT paint inside each one, layered nice and thick.
Used two large cans for the four pipes, spray into the end where the exhaust enters. It runs out the muffler end. And have been very well-pleased with the protection it has provided against any discoloration.
And this includes riding smoking hot for prolonged periods at off and on bumper-to-bumper pace down A1A during Daytona Bike Week.
I thought for sure the pipes would blue, but they didn't. And are still looking fresh and gleaming shiney white chrome after several years riding, including spirited highway cruising, and occasional acceleration exercises.
All the above being with K&N filter in stock air box with perfectly tuned 29 smoothbores, and Vance&Hines exhaust system.
Check out the Z1 in my signature. Pipes look the same today.
========================================
Installation of exhaust system.
Assure the old exhaust gaskets are removed from the head, as they are sometimes so encrusted into the head you don't realize they're still there.
Also check for a second old gasket encrusted in the exhaust port.
Sometimes, two old gaskets are used during reassembly instead of one new gasket.
Would always use new copper crush gaskets.
Usually the split collars are okay to reinstall (after cleaning with wire brush).
Split collars come in slightly different lengths.
The correct length is required for particular brand exhaust system being fitted.
For example, a brand new exhaust system typically includes new split collars, perhaps slightly longer than the stock collars to compensate for a thinner flange on the new headers.
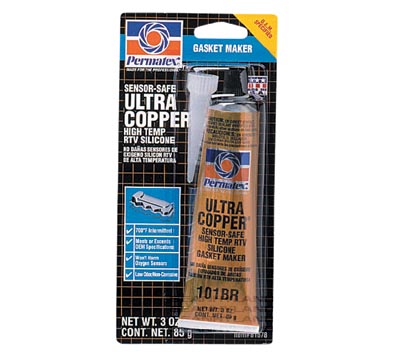
After removing all old gaskets, and cleaning the engine exhaust port recess areas with q-tips and acetone, use a dab of Permatex high-temp copper silicone to hold each new gasket in its place inside the port. Let the Permatex set up for a few minutes so it will hold the gaskets in place while you're busy keeping all the collars and clamps together and pushing the header into position without parts falling all over. For me, grease is just too messy and imo less effective toward enhancing the seal.
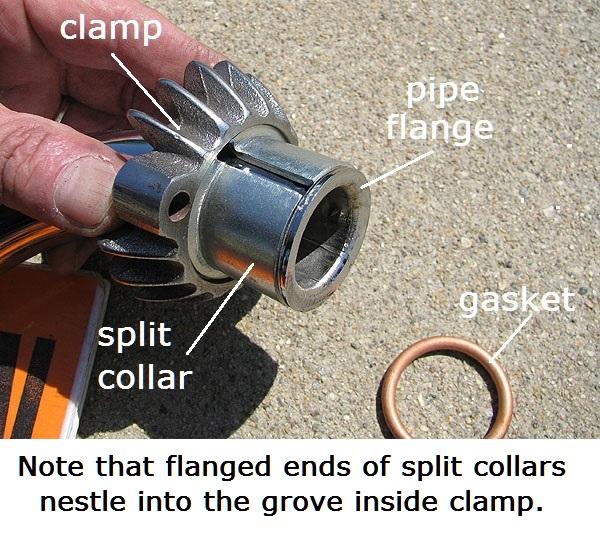
Fit a pair of split collars onto each header pipe with the small non-flared end pointing toward the engine to press against the flared ends of the header pipes.
The flared ends of the split collars fit into recesses in the exhaust clamps.
In other words, the split collars are positioned with the plain end abutting the header flange and with the other end (the curved end) snugly fitted inside the clamp channel. Sometimes it requires some maneuvering to assure close snug fit at the clamp/collar interface.
If preferred, may use masking tape or rubber bands to hold the split collars in place together on the pipe during the installation.
Then it's much easier to lift and maneuver the header into position when only having to fool with the clamps and assuring fitment at all the clamp/collar interfaces.
So with exhaust clamps hanging loosely around header pipes and new copper gaskets fitted inside the head recesses with a dab of hi-temp sealant holding them in position, and split collars taped in position, hold the headers in place on the head against the gaskets.
While holding everything in position, loosely start the clamp holder nuts onto the exhaust studs, and assure all parts being properly fitted and aligned before tightening the exhaust stud nuts against the collars.
Clamps press against split collars.
Split collars press against header flanges.
Header flanges press against copper gaskets.
Good Fortune!")
Used two large cans for the four pipes, spray into the end where the exhaust enters. It runs out the muffler end. And have been very well-pleased with the protection it has provided against any discoloration.
And this includes riding smoking hot for prolonged periods at off and on bumper-to-bumper pace down A1A during Daytona Bike Week.
I thought for sure the pipes would blue, but they didn't. And are still looking fresh and gleaming shiney white chrome after several years riding, including spirited highway cruising, and occasional acceleration exercises.
All the above being with K&N filter in stock air box with perfectly tuned 29 smoothbores, and Vance&Hines exhaust system.
Check out the Z1 in my signature. Pipes look the same today.
========================================
Installation of exhaust system.
Assure the old exhaust gaskets are removed from the head, as they are sometimes so encrusted into the head you don't realize they're still there.
Also check for a second old gasket encrusted in the exhaust port.
Sometimes, two old gaskets are used during reassembly instead of one new gasket.
Would always use new copper crush gaskets.
Usually the split collars are okay to reinstall (after cleaning with wire brush).
Split collars come in slightly different lengths.
The correct length is required for particular brand exhaust system being fitted.
For example, a brand new exhaust system typically includes new split collars, perhaps slightly longer than the stock collars to compensate for a thinner flange on the new headers.
After removing all old gaskets, and cleaning the engine exhaust port recess areas with q-tips and acetone, use a dab of Permatex high-temp copper silicone to hold each new gasket in its place inside the port. Let the Permatex set up for a few minutes so it will hold the gaskets in place while you're busy keeping all the collars and clamps together and pushing the header into position without parts falling all over. For me, grease is just too messy and imo less effective toward enhancing the seal.
Fit a pair of split collars onto each header pipe with the small non-flared end pointing toward the engine to press against the flared ends of the header pipes.
The flared ends of the split collars fit into recesses in the exhaust clamps.
In other words, the split collars are positioned with the plain end abutting the header flange and with the other end (the curved end) snugly fitted inside the clamp channel. Sometimes it requires some maneuvering to assure close snug fit at the clamp/collar interface.
If preferred, may use masking tape or rubber bands to hold the split collars in place together on the pipe during the installation.
Then it's much easier to lift and maneuver the header into position when only having to fool with the clamps and assuring fitment at all the clamp/collar interfaces.
So with exhaust clamps hanging loosely around header pipes and new copper gaskets fitted inside the head recesses with a dab of hi-temp sealant holding them in position, and split collars taped in position, hold the headers in place on the head against the gaskets.
While holding everything in position, loosely start the clamp holder nuts onto the exhaust studs, and assure all parts being properly fitted and aligned before tightening the exhaust stud nuts against the collars.
Clamps press against split collars.
Split collars press against header flanges.
Header flanges press against copper gaskets.
Good Fortune!
1973 Z1
KZ900 LTD
KZ900 LTD
Please Log in or Create an account to join the conversation.
- Patton
-
- Offline
- KZr Legend
-
Registered
- Posts: 18567
- Thanks: 2103
Re: Exhaust gasket removal
08 Mar 2014 12:42
To eliminate the majority of vibration transfer to frame, small rubber motor mounts may be fitted as part of the installation.
Have enjoyed this diy rubber mounting system for many years without issue.
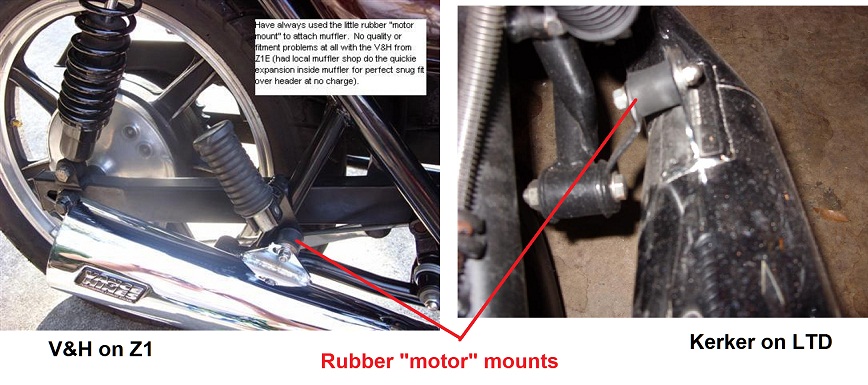
Good Fortune!
Have enjoyed this diy rubber mounting system for many years without issue.
Good Fortune!
1973 Z1
KZ900 LTD
KZ900 LTD
Please Log in or Create an account to join the conversation.
- Patton
-
- Offline
- KZr Legend
-
Registered
- Posts: 18567
- Thanks: 2103
Re: Exhaust gasket removal
08 Mar 2014 13:05
The horror stories about too tight fitment between canister and header on V-H may result simply from the chrome plating being a little too thick.
No clamp is used or needed at the muffler/header connection.
Took my new V&H to the local muffler shop guy who put an expander tool in the canister and with one quick adjustment had it fitting perfectly and with no chrome damage whatever, actually no visual difference at all, just a nice easy snug perfect fit. Took about 5 seconds. Slick as a whistle. He just smiled and said, "I'd marry that!" Installation did not require any lube or sealant of any kind, and no leaks whatever. This cure seemed almost miraculous compared to the alternatives.
IMO grinding is not the answer. Would also forget about super heating canister to fit onto frozen header, because once it cools, it becomes permanent thereby disallowing necessary fitment adjustments.
Believe extra thick chrome is a good thing. And dreaded the prospect of attempting to sand or grind chrome from a circular surface, whether inside the canister or on outside of the header, and manage to maintain the perfect circle needed for precise fitment with no leakage. A cylinder hone might do okay inside the canister -- but still removes the chrome.
Save your time, energy, muffler, and dremmel wheel. Forget about the ham-fisted neanderthal grinding method, and just pay a quick visit to your local muffler shop.
If the canister tab is slightly misaligned, may be easily adapted to fit by fashioning a short metal strap between it and the rear peg bolt.
If an exhaust clamp is difficult to fit over a header flange because of a rough spot on the flange, a quick light hit with file or dremel is okay -- won't take much.
More info in this link:
www.kzrider.com/forum/2-engine/259775-exhaust-help#259901
Good Fortune!
1973 Z1
KZ900 LTD
KZ900 LTD
The following user(s) said Thank You: lowie182
Please Log in or Create an account to join the conversation.
- lowie182
-
Topic Author
- Offline
- User
-
Registered
- Posts: 28
- Thanks: 0
Re: Exhaust gasket removal
09 Mar 2014 15:44
ya those gaskets popped right out once i tried it again with a bit more confidence, and muffler fitment i just pulled it out of the box today and i happened to get one that was pretty much a crushfit already, plus in mocking it up i noticed it completly clears the oil bung and filter carrier on my 750H2 but also clears the center stand! im very impressed with the fitment of this exhaust.
1981 KZ550 C2 parts bike (2010-Present)
1981 KZ550 C2 rental/back-up bike (2010-Present)
1981 KZ750 H2 Daily Driver (2012-Present)
1981 KZ550 C2 rental/back-up bike (2010-Present)
1981 KZ750 H2 Daily Driver (2012-Present)
Please Log in or Create an account to join the conversation.
Moderators: Street Fighter LTD