
1980 kz750 cafe
- pappy750
-
 Topic Author
- Offline
- User
-

Registered
- Posts: 50
- Thanks: 2
1980 kz750 cafe
02 May 2013 05:50 - 08 Jun 2014 14:18
I already have a "new member" topic going and now i'm committed to this project since I just blew half a weeks pay check on parts and doo dads. :pinch:
kzrider.com/forum/10-new-members/584587-...z-750-alabama#585169
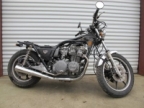
this is what I started with
1980 Kawasaki KZ750 LTD with title
starter motor kicks over and has good compression
extra parts:
K&N Air Filter
dyno jet kit
Vance & Hines Cluth Fibers{I need a tutorial ASAP, my manual isn't doing anything for me]
tank badges, gas cap that fits ignition key
-tail light, 1 rear stock blinker, 2 front stock blinkers without mounting backs, 4 aftermarket blinkers
-clymer service maual
- extra fender
- oil filter
:blink: all for $600
I have put a new battery, cleaned the spark plugs, carbs, oil, oil filter,sand paper a bit of rust
the parts are the following pictures and most will be painted and still deciding on color :silly:
all of this was around $200 so it's an $800 bike when those parts come in.
recovering that seat will raise it even higher
that tank needs paint and I'm horrible at that the only think I trusted myself with was the battery holder :huh:
brake fluid
and possible clutch work, if I can get a tutorial I could probably do it myself. that side casing to get to the clutch is giving me a hard time and doesn't want to come off even when I follow the maintenance guide.
kzrider.com/forum/10-new-members/584587-...z-750-alabama#585169
this is what I started with
Attachment 3Me3Fb3L65N85Ge5Mbd3n0a0f3f6c087c1a29.jpg not found
1980 Kawasaki KZ750 LTD with title
starter motor kicks over and has good compression
extra parts:
K&N Air Filter
dyno jet kit
Vance & Hines Cluth Fibers{I need a tutorial ASAP, my manual isn't doing anything for me]
tank badges, gas cap that fits ignition key
-tail light, 1 rear stock blinker, 2 front stock blinkers without mounting backs, 4 aftermarket blinkers
-clymer service maual
- extra fender
- oil filter
:blink: all for $600
I have put a new battery, cleaned the spark plugs, carbs, oil, oil filter,sand paper a bit of rust
the parts are the following pictures and most will be painted and still deciding on color :silly:
Attachment Screenshot2013-05-01at11.52.52PM.png not found
Attachment Screenshot2013-05-02at3.42.24AM.png not found
Attachment Screenshot2013-05-02at3.44.59AM.png not found
Attachment Screenshot2013-05-02at3.45.22AM.png not found
Attachment Screenshot2013-05-02at3.45.57AM.png not found
Attachment Screenshot2013-05-02at3.44.13AM.png not found
all of this was around $200 so it's an $800 bike when those parts come in.
recovering that seat will raise it even higher
that tank needs paint and I'm horrible at that the only think I trusted myself with was the battery holder :huh:
brake fluid
and possible clutch work, if I can get a tutorial I could probably do it myself. that side casing to get to the clutch is giving me a hard time and doesn't want to come off even when I follow the maintenance guide.
Last edit: 08 Jun 2014 14:18 by pappy750.
Please Log in or Create an account to join the conversation.
- Patton
-

- Offline
- KZr Legend
-

Registered
- Posts: 18567
- Thanks: 2103
Re: 1980 kz750 short tail project
02 May 2013 09:29 - 02 May 2013 09:29A better manual might help. And it's available as a free download.pappy750 wrote: ...clymer service maual....
Access the site via the following link, then scroll down to and click on "The Bible."
kz.bike-night.com/
Good Fortune!
")
1973 Z1
KZ900 LTD
KZ900 LTD
Last edit: 02 May 2013 09:29 by Patton.
Please Log in or Create an account to join the conversation.
- Jrbrownie00
-

- Offline
- User
-
Registered
- Posts: 122
- Thanks: 9
Re: 1980 kz750 short tail project
02 May 2013 12:55
where is that brake master cylinder from?
82' kz750 ltd.
Please Log in or Create an account to join the conversation.
- pappy750
-
Topic Author
- Offline
- User
-
Registered
- Posts: 50
- Thanks: 2
Re: 1980 kz750 short tail project
02 May 2013 14:28
thanks for the link!
and that master cylinder is just aftermarket i got off ebay from a trusted seller and has the right bore size, mirror thread size, and handle bar fit.
and that master cylinder is just aftermarket i got off ebay from a trusted seller and has the right bore size, mirror thread size, and handle bar fit.
Please Log in or Create an account to join the conversation.
- Jrbrownie00
-
- Offline
- User
-
Registered
- Posts: 122
- Thanks: 9
Re: 1980 kz750 short tail project
02 May 2013 14:54
I sent you a private message. I'd really like to pic that up.
82' kz750 ltd.
Please Log in or Create an account to join the conversation.
- pappy750
-
Topic Author
- Offline
- User
-
Registered
- Posts: 50
- Thanks: 2
Re: 1980 kz750 short tail project
02 May 2013 15:00 - 02 May 2013 15:13
I contacted you through pm with the sellers page, hope he has some left for you . his shipping takes a while but the product is cheap in price and not cheap in quality.
Last edit: 02 May 2013 15:13 by pappy750. Reason: misunderstanding
Please Log in or Create an account to join the conversation.
- pappy750
-
Topic Author
- Offline
- User
-
Registered
- Posts: 50
- Thanks: 2
Re: 1980 kz750 short tail project
07 May 2013 02:35 - 07 May 2013 02:42
so the tail came in first then the rear blinker
the tail is in good shape and is going to need some mounting fabrication to hold it in place but I dont mind doing it.
the blinker on the other hand is not what I expected
its HUGE like off of a 1000 or something.
im not too sure if Im going to try and find another one that matches the smaller or bigger one. or changing it all together because of these bad boys
they have blinkers on the end and give it an edge that im looking for and I would only need to get an adapter for the left side since they are just the size of throttle sleeve for a snug fit on the 7/8th handle bars.
I also have been thinking of straight bars but I'll see how it rides with the slight bend bars.
has anyone played around with the position of the bars similar to the slight bend style i have now?
I tried but I have been building enduro's for the past 3 years so this style is new to me.
Im playing with the tail light trying to figure out with the now pushed forward back end.
it wil have a more snug fit if I end up doing this or melting grooves in the orignal to make it fit im not to sure
IF ANYONE HAS ANY SUGGESTIONS TO A TAIL LIGHT IT WOULD BE WELCOMED!!!! :woohoo:
tank and seat are 2 days away in the mail.
more pics to come
")
Attachment tumblr_mmew9nLMdw1qfxf5ao1_1280.jpg not found
the tail is in good shape and is going to need some mounting fabrication to hold it in place but I dont mind doing it.
the blinker on the other hand is not what I expected
Attachment tumblr_mmew9nLMdw1qfxf5ao2_1280-1.jpg not found
its HUGE like off of a 1000 or something.
im not too sure if Im going to try and find another one that matches the smaller or bigger one. or changing it all together because of these bad boys
Attachment T2eC16VHJGE9nm3p3guBRKPTmhJhw60_3.JPG not found
they have blinkers on the end and give it an edge that im looking for and I would only need to get an adapter for the left side since they are just the size of throttle sleeve for a snug fit on the 7/8th handle bars.
I also have been thinking of straight bars but I'll see how it rides with the slight bend bars.
has anyone played around with the position of the bars similar to the slight bend style i have now?
I tried but I have been building enduro's for the past 3 years so this style is new to me.
Im playing with the tail light trying to figure out with the now pushed forward back end.
Attachment image-1.jpeg not found
it wil have a more snug fit if I end up doing this or melting grooves in the orignal to make it fit im not to sure
IF ANYONE HAS ANY SUGGESTIONS TO A TAIL LIGHT IT WOULD BE WELCOMED!!!! :woohoo:
tank and seat are 2 days away in the mail.
more pics to come
Last edit: 07 May 2013 02:42 by pappy750.
Please Log in or Create an account to join the conversation.
- pappy750
-
Topic Author
- Offline
- User
-
Registered
- Posts: 50
- Thanks: 2
Re: 1980 kz750 short tail project
07 May 2013 18:17
seat came in, realized im going to have to cut just a tiny bit off the back :whistle:
and then when im redoing the seat im going to add a litte bit more foam on the back to fill this gap
Attachment photo1-1.JPG not found
Attachment photo2-1.JPG not found
and then when im redoing the seat im going to add a litte bit more foam on the back to fill this gap
Attachment photo3.JPG not found
Attachment photo4.JPG not found
Please Log in or Create an account to join the conversation.
- pappy750
-
Topic Author
- Offline
- User
-
Registered
- Posts: 50
- Thanks: 2
Re: 1980 kz750 short tail project
08 May 2013 02:01
more work done, made an extremely simple bracket for the tail light next step is to cut the frame so the plastic can drop down and fit snug
it fits pretty good, I had to take the cool little trim piece off but oh well at least its safe.
Attachment photo1-2.JPG not found
Attachment photo3-1.JPG not found
Attachment photo2-2.JPG not found
it fits pretty good, I had to take the cool little trim piece off but oh well at least its safe.
Please Log in or Create an account to join the conversation.
- pappy750
-
Topic Author
- Offline
- User
-
Registered
- Posts: 50
- Thanks: 2
Re: 1980 kz750 short tail project
08 May 2013 02:01
more work done, made an extremely simple bracket for the tail light next step is to cut the frame so the plastic can drop down and fit snug
it fits pretty good, I had to take the cool little trim piece off but oh well at least its safe.
Attachment photo1-2.JPG not found
Attachment photo3-1.JPG not found
Attachment photo2-2.JPG not found
Attachment photo4-1.JPG not found
it fits pretty good, I had to take the cool little trim piece off but oh well at least its safe.
Please Log in or Create an account to join the conversation.
- pappy750
-
Topic Author
- Offline
- User
-
Registered
- Posts: 50
- Thanks: 2
Re: 1980 kz750 short tail project
10 May 2013 00:32Attachment photo.JPG not found
tank came in
Please Log in or Create an account to join the conversation.
- pappy750
-
Topic Author
- Offline
- User
-
Registered
- Posts: 50
- Thanks: 2
Re: 1980 kz750 short tail project
11 May 2013 02:52
she cranked but is idleing way to high at 5,000 rpm!!! 
immediately cut it off and plan to investigate tomorrow
I know all the vaccum tubes are connected, im going to trim one tube that had a small fray just to make sure
I took the carbs off and nothing seems to be seized
I have been going back and forth through the manuals and no one every goes into detail about how many times you should screw the jets in so I have no idea if that could be an issue
the throttle cable and everything sit just fine and the adjustment completely closed seal when throttle is not engaged
any suggestions would help, Im going to go through the carb holders to check for leaks too
Please Log in or Create an account to join the conversation.
Moderators: Street Fighter LTD