
'76 KZ900 (ZRX1200R) Build
- 4TheKZ1000
-

- User
-

Public
- Thanks: 0
Re: '76 KZ900 (ZRX1200R) Build
23 Dec 2012 22:19racer54 wrote: There's a funnybike that is using the M90 blower. Tried to find the article on his build but can't seem to find it.
was that Randy from RE Racing ?????
Please Log in or Create an account to join the conversation.
- NakedFun
-
 Topic Author
- Offline
- User
-
Registered
- Posts: 1130
- Thanks: 120
Re: '76 KZ900 (ZRX1200R) Build
23 Dec 2012 22:38
I assume you meant an engine machine shop?
Cory
Cory
2008 Kawasaki Concours 14
1999 Kawasaki ZRX1100
1976 Kawasaki KZ900
1999 Kawasaki ZRX1100
1976 Kawasaki KZ900
Please Log in or Create an account to join the conversation.
- Hollywoodmx
-

- Offline
- User
-
Registered
- Posts: 562
- Thanks: 16
Re: '76 KZ900 (ZRX1200R) Build
25 Dec 2012 00:41
Wow crazy awesome thread. If it was me I would get it running and working and tackle the advancements later. I have the same problem in a smaller scale. I'm trying to build 2 bikes, I get in all these parts, I have to do some light fab work I just dont have enough time and the fab parts are slow going.
- 82 GPz1100injection
- 77 Kz1075 Supercharged
- 81 Yamaha TR-1
- 81 Yamaha xv920
Calgary
- 77 Kz1075 Supercharged
- 81 Yamaha TR-1
- 81 Yamaha xv920
Calgary
The following user(s) said Thank You: wireman
Please Log in or Create an account to join the conversation.
- racer54
-

- Offline
- Sustaining Member
-

Registered
- Posts: 1903
- Thanks: 114
Re: '76 KZ900 (ZRX1200R) Build
25 Dec 2012 01:23
Can't find the thread on the funnybike but he's on Dragbike.com. He did a long build project on what he was doing and all the troubles and seccesses he had. It was interesting to read but also a lot of work.
1980 LTD (changed over the years), 1979 LTD (being rebuilt), 1977 KZ turbo and various KZ's in various states of build. KLX110
Please Log in or Create an account to join the conversation.
- NakedFun
-
Topic Author
- Offline
- User
-
Registered
- Posts: 1130
- Thanks: 120
Re: '76 KZ900 (ZRX1200R) Build
03 Jan 2013 17:23 - 03 Jan 2013 17:24
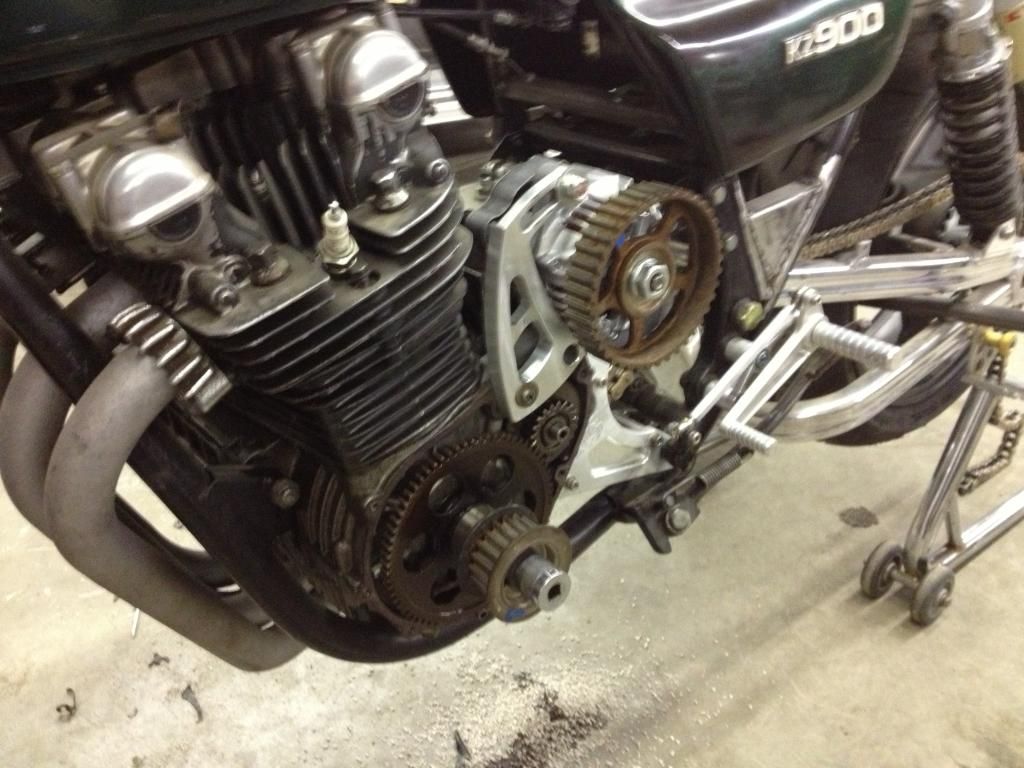
So I was sick (still am.... :sick: ) during my visit to Memphis, TN this week, however was feeling OK enough to make my trip to the salvage yard. Looky what I found....
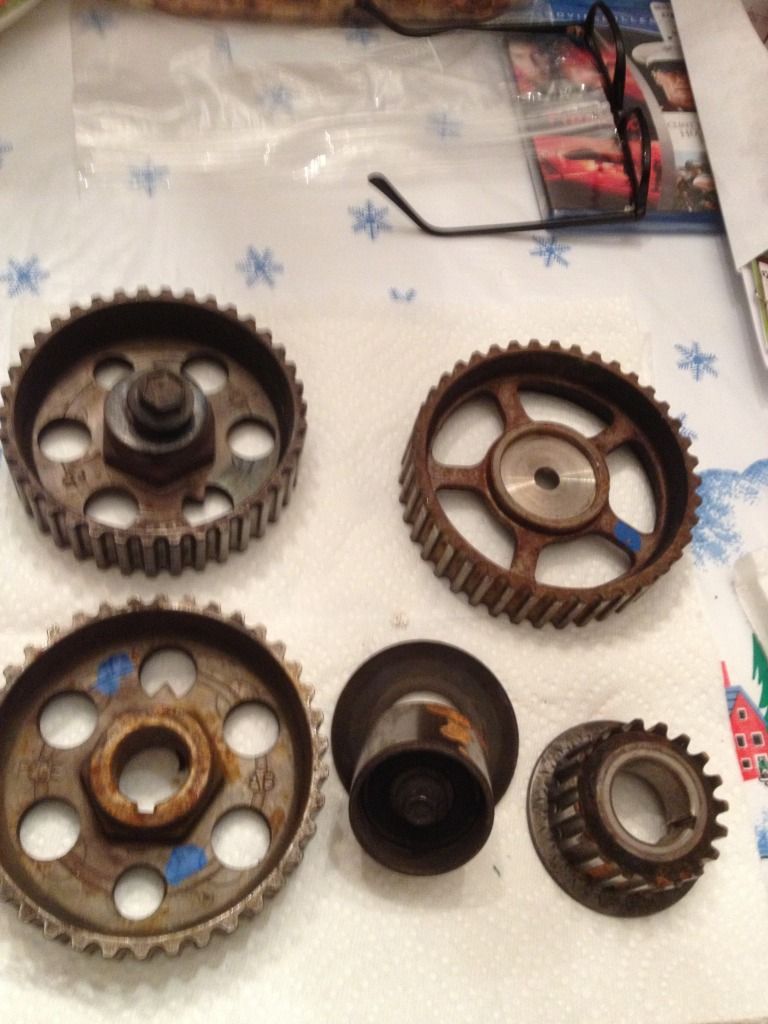
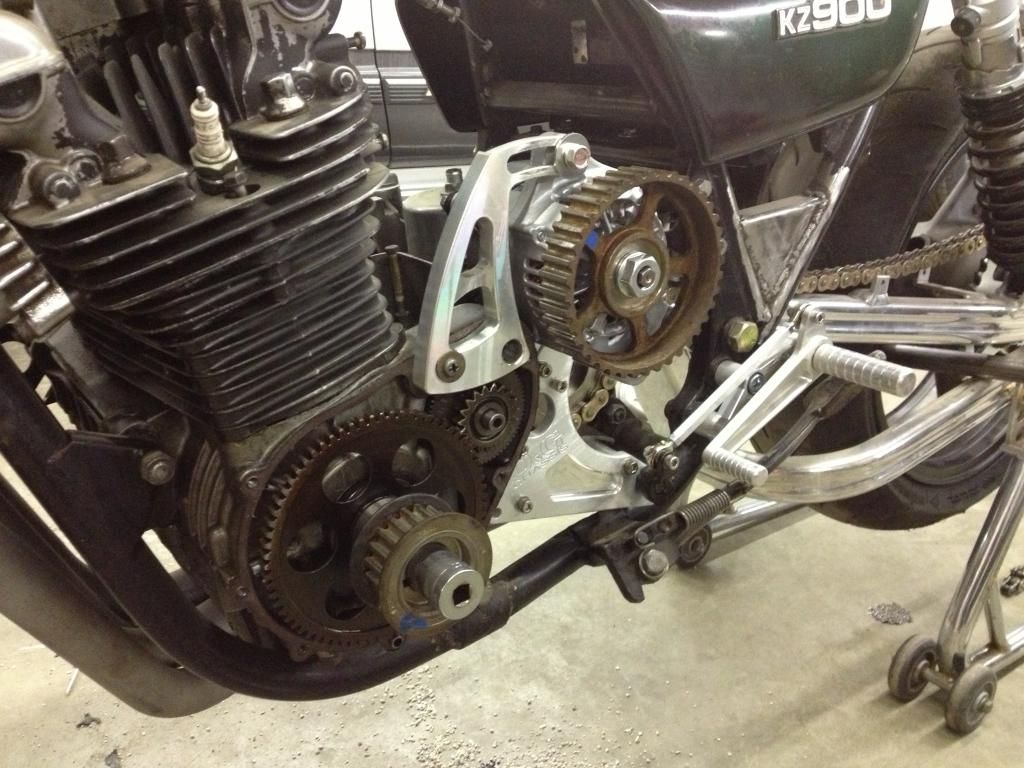
Going to end up using the large cut out sprocket in the upper RH corner from the Ford Escort GT (1.8L DOHC) Exhaust cam and the lower RH sprocket from the Ford Escort LX (1.9L SOHC. The large sprocket will go on the alternator and the smaller sprocket on the crankshaft. My only concern is this....
How hard would it be to find a stock KZ900 charging rotor / flywheel if I screw up my stocker? I think I understand how the stock one is assembled, and would like to cut it apart to make my pully drive snout. I am afraid if something goes wrong, can I get another one cheap enough? Thoughts?
Cory
2008 Kawasaki Concours 14
1999 Kawasaki ZRX1100
1976 Kawasaki KZ900
1999 Kawasaki ZRX1100
1976 Kawasaki KZ900
Last edit: 03 Jan 2013 17:24 by NakedFun.
Please Log in or Create an account to join the conversation.
- NakedFun
-
Topic Author
- Offline
- User
-
Registered
- Posts: 1130
- Thanks: 120
Re: '76 KZ900 (ZRX1200R) Build
04 Jan 2013 13:22 - 04 Jan 2013 20:56
So after sniffing around it appears the charging rotor / flywheel isn't hard to get, but is expensive! So I think I will try and turn a pulley snout / shaft / mount from a blank of steel and go from there, keeping my stock rotor in resusable condition.
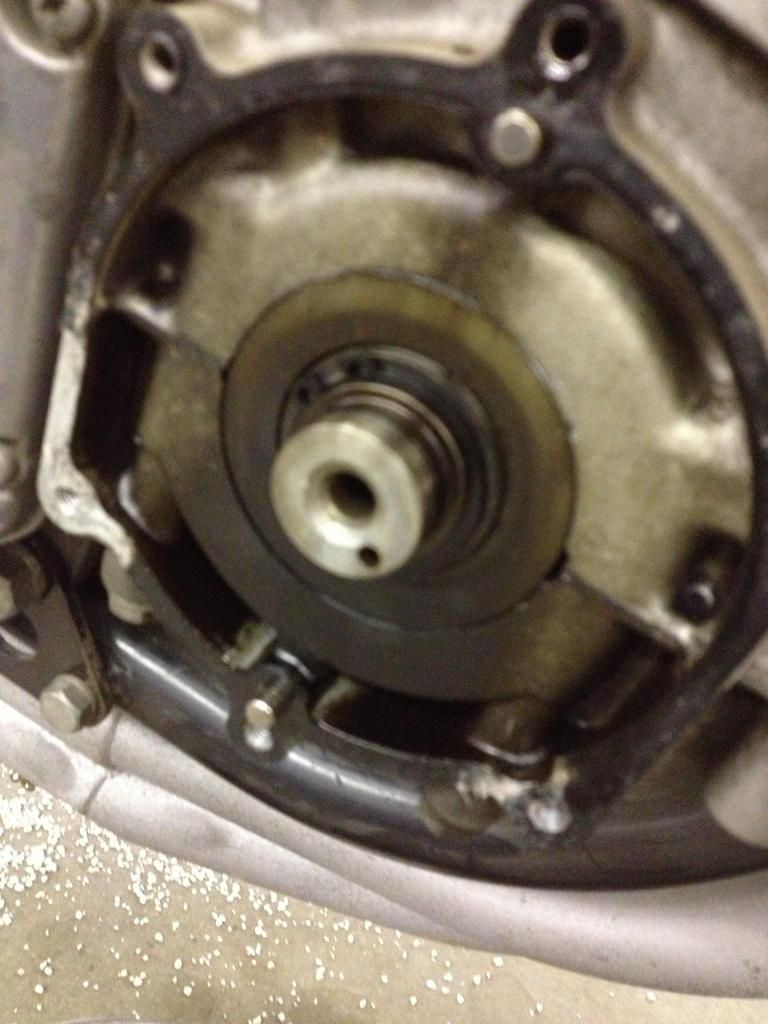
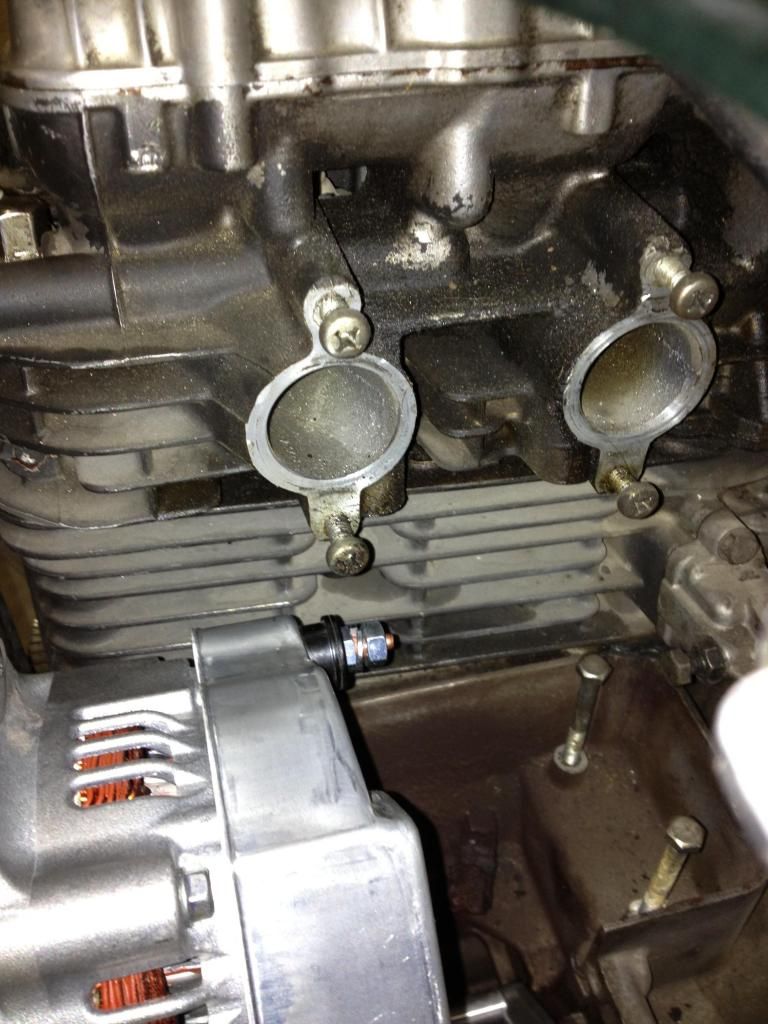
Does anyone have pictures of the stock rotor bore? I assume there is a taper and a keyway cut into it? I am concerned about milling or lathing a taper as if you don't get it right, you risk damaging the crank shaft.
Cory
Does anyone have pictures of the stock rotor bore? I assume there is a taper and a keyway cut into it? I am concerned about milling or lathing a taper as if you don't get it right, you risk damaging the crank shaft.
Cory
2008 Kawasaki Concours 14
1999 Kawasaki ZRX1100
1976 Kawasaki KZ900
1999 Kawasaki ZRX1100
1976 Kawasaki KZ900
Last edit: 04 Jan 2013 20:56 by Patton.
Please Log in or Create an account to join the conversation.
- Patton
-

- Offline
- KZr Legend
-

Registered
- Posts: 18568
- Thanks: 2101
Re: '76 KZ900 (ZRX1200R) Build
04 Jan 2013 20:55
If interested in the possible purchase of a damaged, cheap stock rotor that might be available for sale, could start a topic in KZr's "Classifieds-Wanted" forum.
Good Fortune!")
Good Fortune!
1973 Z1
KZ900 LTD
KZ900 LTD
Please Log in or Create an account to join the conversation.
- kzz1king
-
- Offline
- User
-
Registered
- Posts: 822
- Thanks: 52
Re: '76 KZ900 (ZRX1200R) Build
04 Jan 2013 20:56
A old crank would also be nice for test fitting.
Wayne
Wayne
74 Z1 1075, 29 smoothbores, owned and ridden since 1976
Home built KZ1000 turbo setup
www.kzrider.com/forum/11-projects/532476...s-budget-turbo-build
www.kzrider.com/forum/11-projects/532489-74-z-makeover
Home built KZ1000 turbo setup
www.kzrider.com/forum/11-projects/532476...s-budget-turbo-build
www.kzrider.com/forum/11-projects/532489-74-z-makeover
Please Log in or Create an account to join the conversation.
- NakedFun
-
Topic Author
- Offline
- User
-
Registered
- Posts: 1130
- Thanks: 120
Re: '76 KZ900 (ZRX1200R) Build
04 Jan 2013 22:16
Patton,
Yeah I was thinking that as well. Going to take a closer look at the rotor bore and see if it may be easier to try and machine the drive snout from scratch.
Cory
Yeah I was thinking that as well. Going to take a closer look at the rotor bore and see if it may be easier to try and machine the drive snout from scratch.
Cory
2008 Kawasaki Concours 14
1999 Kawasaki ZRX1100
1976 Kawasaki KZ900
1999 Kawasaki ZRX1100
1976 Kawasaki KZ900
Please Log in or Create an account to join the conversation.
- NakedFun
-
Topic Author
- Offline
- User
-
Registered
- Posts: 1130
- Thanks: 120
Re: '76 KZ900 (ZRX1200R) Build
27 Jan 2013 23:17
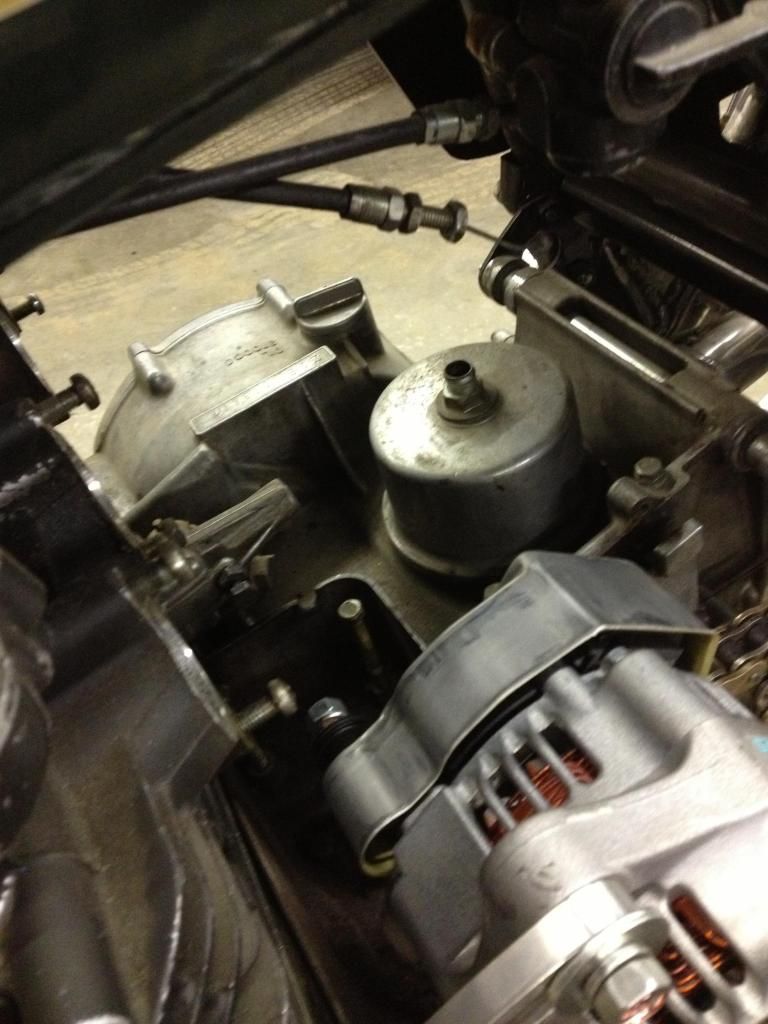
So I got to play with the bike this weekend. So I first, I tried my luck at getting that sheared ignition rotor alignment dowel. Well, I did get it drilled and tapped with a 3mm x 0.6 tap. I first took out my inner bearing race driver kit. I took a 9/16"-12 bolt, cut it short and drilled a 1/8" through the center. Putting the 3mm pan head screw through from the thread side of the 9/16"-12 bolt and screwed it into the remaining dowel. Then I threaded the 9/16"-12 bolt into the slide hammer receptor. I had also removed the ignition housing to expose the end of the crank. I used the propane torch to heat the crank near the dowel. Just heated it a little, and then tap, tap, tap.....
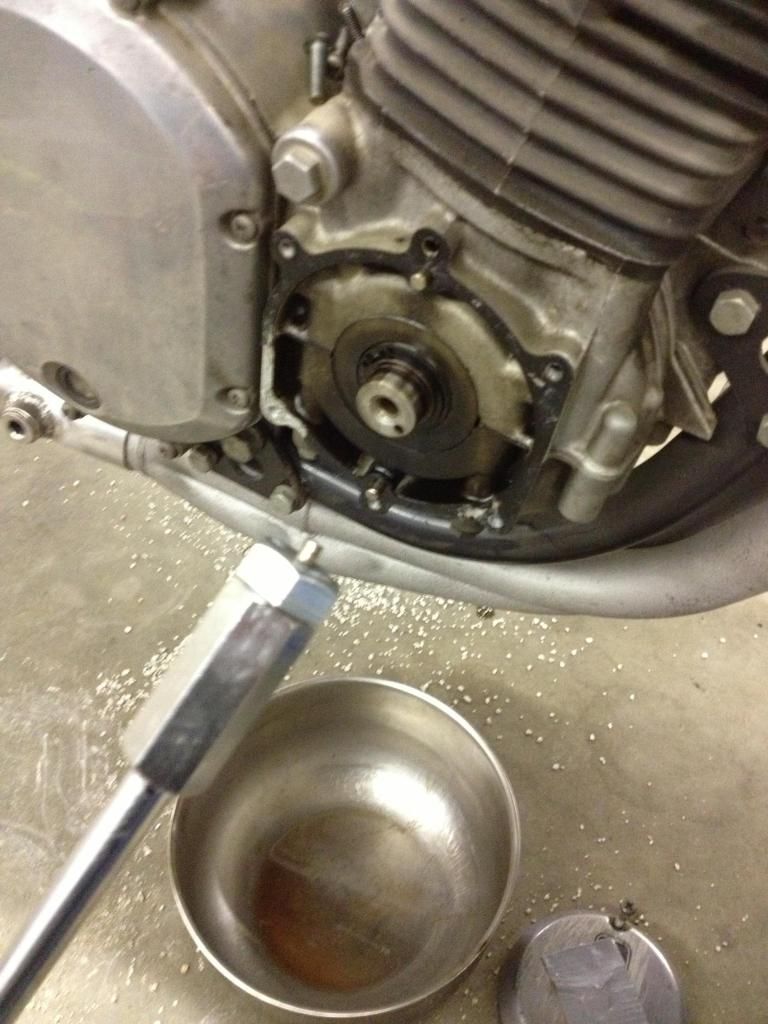
Leaving it open for my replacement 4mm x 8mm dowel which is on its way.....
So onto my Gilmer belt drive.... I finally got my 15.1mm drill bit and opened up the sprocket hub. I then called for the assistance from my brother and his lathe, and trimmed up the back side of the sprocket to add clearance. Voila' We have a Gilmer drive sprocket on an alternator.
So I am using the tensioner bracket to index the alternator and try out different positions. First tried out a higher position to aid in leg clearance.
But I ran into an issue with carb clearance. I'll bring my carbs next time to ensure my current position works.
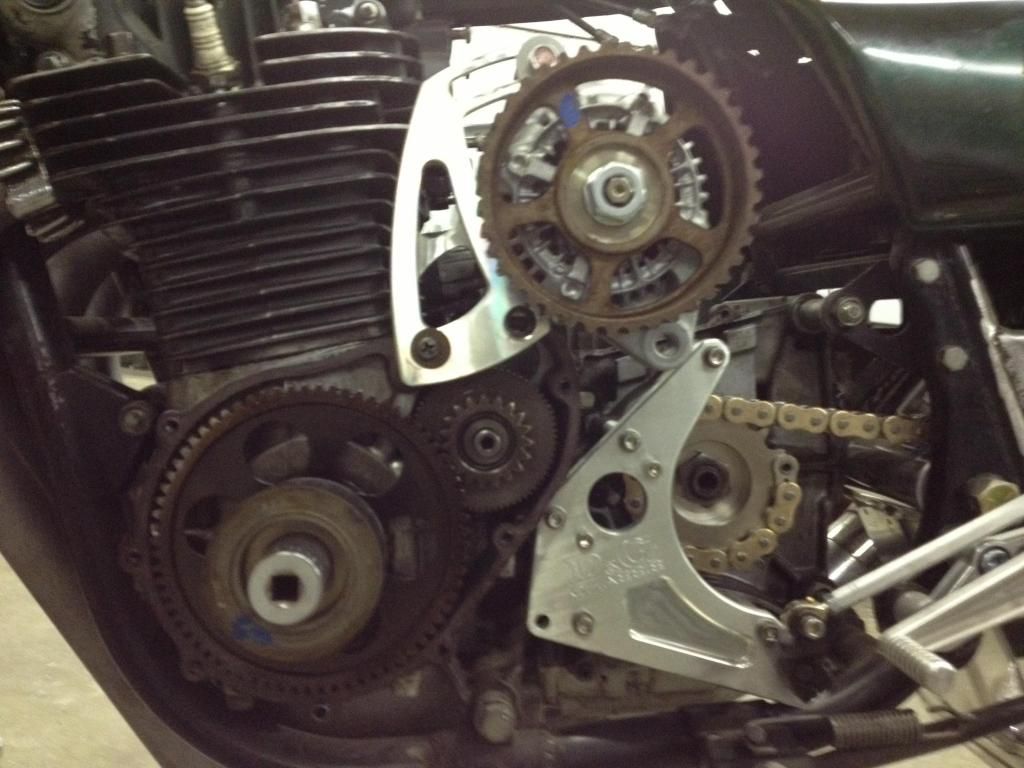
So I rotated it backwards and lowered it. This should work I think. I can take the larger 8mm bolt that the alternator will be supported with and pivot on, will be tapped into the drag clutch pusher plate. Will use an aluminum spacer to get that correct. Will need to check for carb spacing as well....
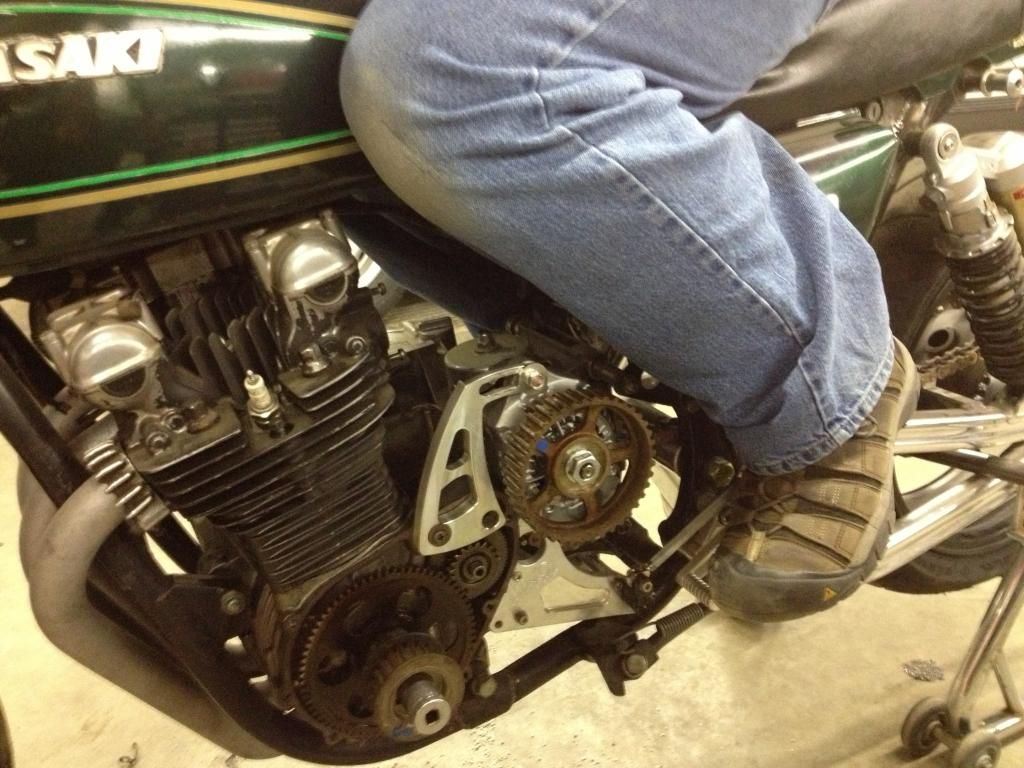
The space will be closer to my leg, so I'll have to make a guard that wraps nice and close over the alternator sprocket and belt. Like to keep my leg and pants on while riding....
It looks like I'll have to cut the bracket that is the tension bracket, and have it TIG'd into the stock cover. It looks like the shaft that will be made for the crank will have to be around 45mm long. The cover will be cut back about 2" and have a seal placed in the cover plate that will be TIG'd in as well.
Last thing, put on my milled drive hub and my larger 46 tooth sprocket. I checked chain alignment. I want to get you opinions on something. My chain to frame clearance to chain rivet head is .109". Does this seem OK? If I flip the sprocket around, I can get .125" clearance. What are your thoughts?
Cory
Leaving it open for my replacement 4mm x 8mm dowel which is on its way.....
So onto my Gilmer belt drive.... I finally got my 15.1mm drill bit and opened up the sprocket hub. I then called for the assistance from my brother and his lathe, and trimmed up the back side of the sprocket to add clearance. Voila' We have a Gilmer drive sprocket on an alternator.
So I am using the tensioner bracket to index the alternator and try out different positions. First tried out a higher position to aid in leg clearance.
But I ran into an issue with carb clearance. I'll bring my carbs next time to ensure my current position works.
So I rotated it backwards and lowered it. This should work I think. I can take the larger 8mm bolt that the alternator will be supported with and pivot on, will be tapped into the drag clutch pusher plate. Will use an aluminum spacer to get that correct. Will need to check for carb spacing as well....
The space will be closer to my leg, so I'll have to make a guard that wraps nice and close over the alternator sprocket and belt. Like to keep my leg and pants on while riding....
It looks like I'll have to cut the bracket that is the tension bracket, and have it TIG'd into the stock cover. It looks like the shaft that will be made for the crank will have to be around 45mm long. The cover will be cut back about 2" and have a seal placed in the cover plate that will be TIG'd in as well.
Last thing, put on my milled drive hub and my larger 46 tooth sprocket. I checked chain alignment. I want to get you opinions on something. My chain to frame clearance to chain rivet head is .109". Does this seem OK? If I flip the sprocket around, I can get .125" clearance. What are your thoughts?
Cory
2008 Kawasaki Concours 14
1999 Kawasaki ZRX1100
1976 Kawasaki KZ900
1999 Kawasaki ZRX1100
1976 Kawasaki KZ900
Please Log in or Create an account to join the conversation.
- NakedFun
-
Topic Author
- Offline
- User
-
Registered
- Posts: 1130
- Thanks: 120
Re: '76 KZ900 (ZRX1200R) Build
17 Feb 2013 23:38
So been a long time since updating, but working on the belt drive and making poor wheel choices.... :sick:
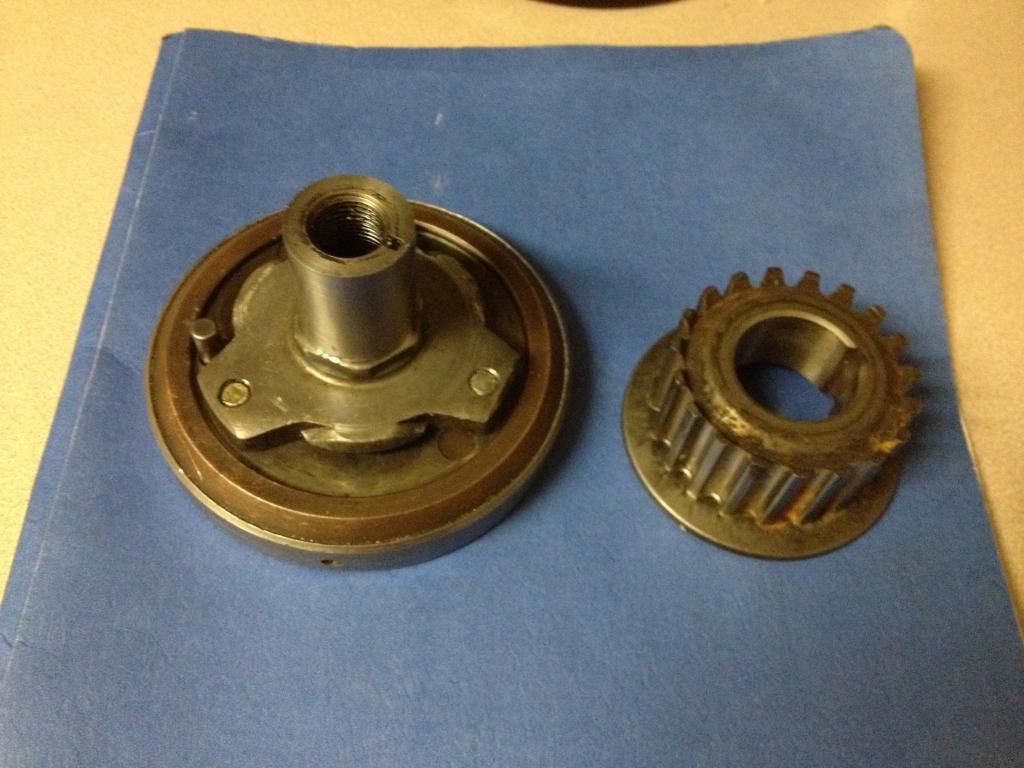
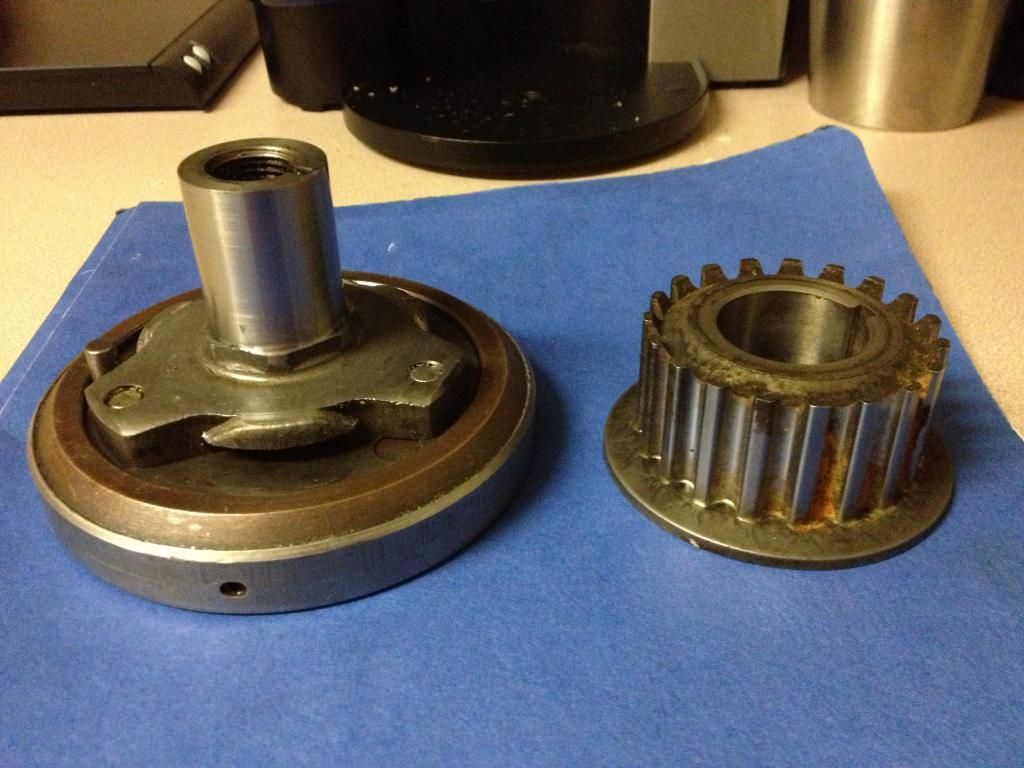
So the belt drive is coming along, however thanks to my brother's help, ended up using my stock KZ900 rotor to make my pulley drive shaft. It is quite the concoction of components. Interesting once you cut through a few things....
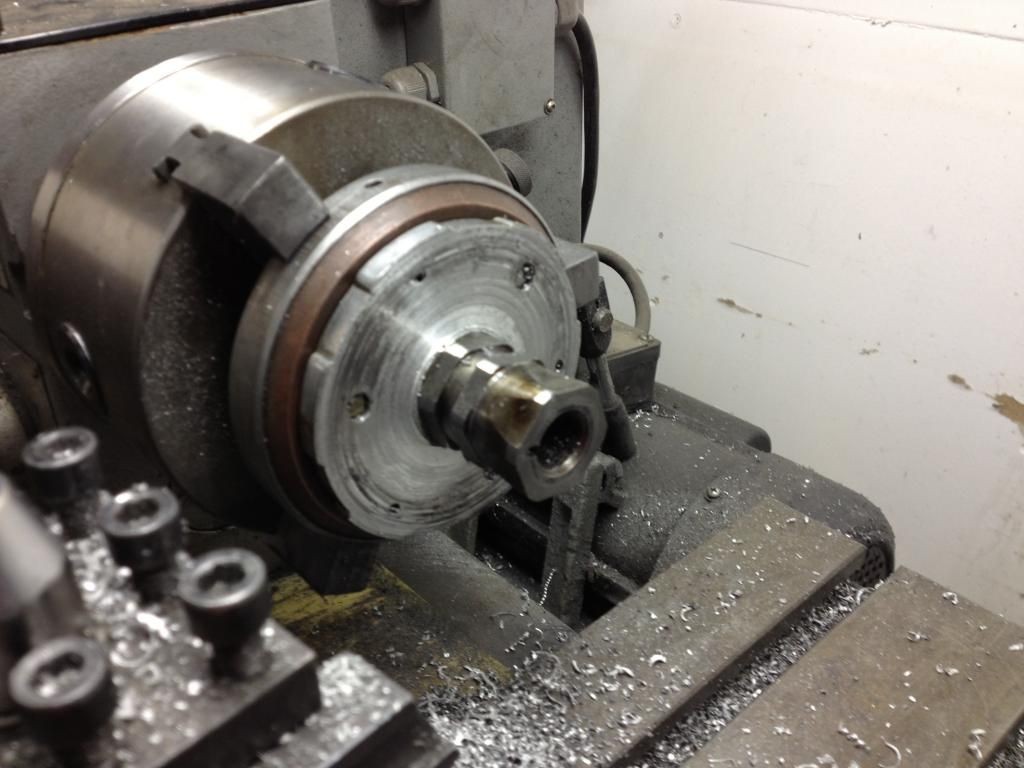
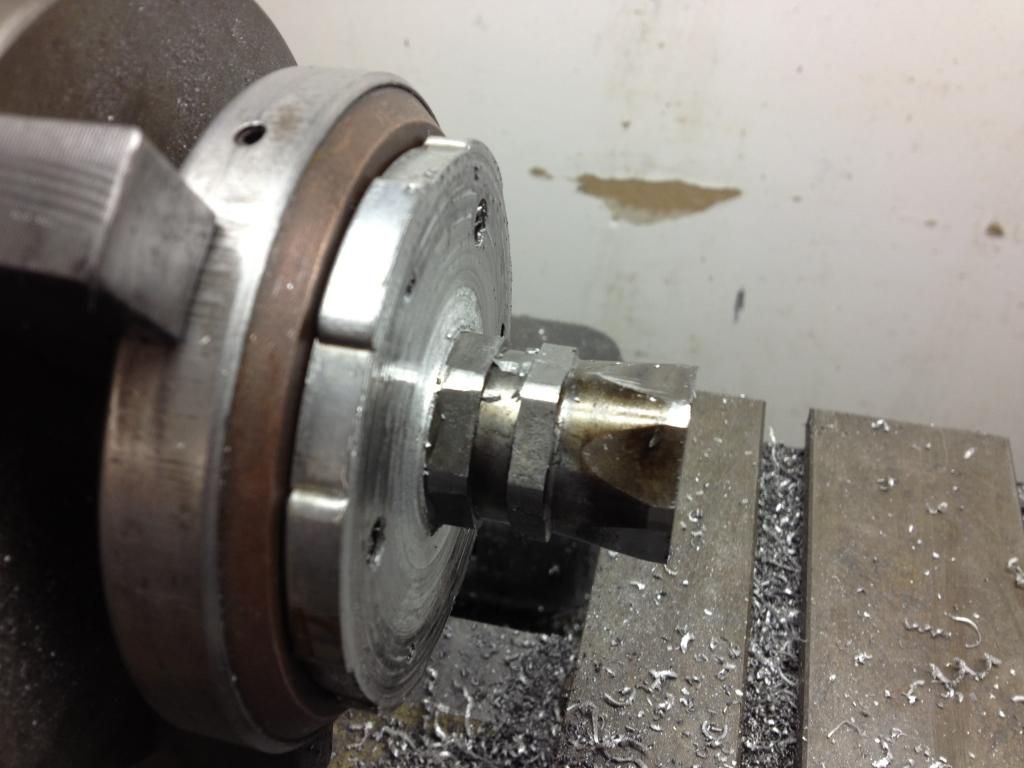
So now I have a drive shaft with a 1.004" OD. My issue now is that my pulley has a ID of 1.104". So now I need to figure out how to bush the shaft to the pulley, and have some feature to key both to the shaft as to not rotate but allow removal.
Any thoughts on how best to make this connection? I may try to find another Gilmer "L" size pulley...
As far as my question from 3 weeks ago, does .115-.125" chain to frame clearance sound OK? I have heard 3-4mm is the standard, so this follows that logic...
Cory
So the belt drive is coming along, however thanks to my brother's help, ended up using my stock KZ900 rotor to make my pulley drive shaft. It is quite the concoction of components. Interesting once you cut through a few things....
So now I have a drive shaft with a 1.004" OD. My issue now is that my pulley has a ID of 1.104". So now I need to figure out how to bush the shaft to the pulley, and have some feature to key both to the shaft as to not rotate but allow removal.
Any thoughts on how best to make this connection? I may try to find another Gilmer "L" size pulley...
As far as my question from 3 weeks ago, does .115-.125" chain to frame clearance sound OK? I have heard 3-4mm is the standard, so this follows that logic...
Cory
2008 Kawasaki Concours 14
1999 Kawasaki ZRX1100
1976 Kawasaki KZ900
1999 Kawasaki ZRX1100
1976 Kawasaki KZ900
Please Log in or Create an account to join the conversation.
- wireman
-
- Offline
- User
-
Registered
- The most interesting prick in the world
- Posts: 4736
- Thanks: 299
Re: '76 KZ900 (ZRX1200R) Build
18 Feb 2013 01:28
Id find a way to run a full width woodruff key from top/bottem on outside of the hub you made.
Have you decided what the actual drive ratio needs to be as far as pulley sizes?")
Have you decided what the actual drive ratio needs to be as far as pulley sizes?
posting from deep under a non-descript barn in an undisclosed location southwest of Omaha.
Please Log in or Create an account to join the conversation.
Moderators: Street Fighter LTD