
BACKYARD BOBBER!!!!
- uglee
-
 Topic Author
- Offline
- User
-

Registered
- New 2da game but Tru 2this thang!!!!!
- Posts: 161
- Thanks: 0
BACKYARD BOBBER!!!!
22 Nov 2010 19:26
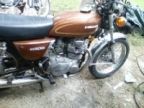
This is the start of my 1976 kz 400 project.
Please Log in or Create an account to join the conversation.
- uglee
-
Topic Author
- Offline
- User
-
Registered
- New 2da game but Tru 2this thang!!!!!
- Posts: 161
- Thanks: 0

- uglee
-
Topic Author
- Offline
- User
-
Registered
- New 2da game but Tru 2this thang!!!!!
- Posts: 161
- Thanks: 0

- uglee
-
Topic Author
- Offline
- User
-
Registered
- New 2da game but Tru 2this thang!!!!!
- Posts: 161
- Thanks: 0
Re: BACKYARD BOBBER!!!!
22 Nov 2010 19:34
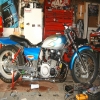
The old girls Heart!!!Gonna polish it up myself....
 [/img]
Please Log in or Create an account to join the conversation.
- uglee
-
Topic Author
- Offline
- User
-
Registered
- New 2da game but Tru 2this thang!!!!!
- Posts: 161
- Thanks: 0
Re: BACKYARD BOBBER!!!!
22 Nov 2010 19:36
got started without any power tools!!!
 [/img]
wat you guys think bout 10 minutes of rubbing???
wat you guys think bout 10 minutes of rubbing???
Please Log in or Create an account to join the conversation.
- timebomb33
-
- Offline
- User
-
Registered
- Posts: 4284
- Thanks: 10
Re: BACKYARD BOBBER!!!!
23 Nov 2010 11:14
sometimes i enjoy ten minutes of rubbing that is if i don't get caught. sorry did i say that out loud. inside voice, tim ,inside voice.
1973 z1 2-1974z1-a,2-1975z1-b dragbikes1015cc+1393cc, 1977kz1000,1978kz1000,1981kz1000j, 1997 zx-11, 2000 z12r,1428turbo nitrous pro-mod and a shit load of parts thats all for now leader sask.,CANADA
I THINK MY POWERBAND BROKE
I THINK MY POWERBAND BROKE
Please Log in or Create an account to join the conversation.
- uglee
-
Topic Author
- Offline
- User
-
Registered
- New 2da game but Tru 2this thang!!!!!
- Posts: 161
- Thanks: 0
Re: BACKYARD BOBBER!!!!
24 Nov 2010 07:48
need some help with this hardtail kit!!!!HELP ME PLEASE!!! Where do i get my alinments to make sure this scooter rides right????
Please Log in or Create an account to join the conversation.
- uglee
-
Topic Author
- Offline
- User
-
Registered
- New 2da game but Tru 2this thang!!!!!
- Posts: 161
- Thanks: 0

- uglee
-
Topic Author
- Offline
- User
-
Registered
- New 2da game but Tru 2this thang!!!!!
- Posts: 161
- Thanks: 0
Re: BACKYARD BOBBER!!!!
24 Nov 2010 08:06
yeah i know the string ain't cool!!!! but it's wat i'm working with!!!!!
Please Log in or Create an account to join the conversation.
- uglee
-
Topic Author
- Offline
- User
-
Registered
- New 2da game but Tru 2this thang!!!!!
- Posts: 161
- Thanks: 0
Re: BACKYARD BOBBER!!!!
25 Nov 2010 16:07
so you guys gotta tell me is there a wrong way to do this?? 1. placed frame on level...2. trying to attatch uppre tubes first....3. will attempt to place lower tubes to axcel plate while keeping the distace at 9 1/4 inches and have the makeshift axle level also... is this the proper way to attatch this hardtail kit????
Please Log in or Create an account to join the conversation.
- subby
-

- Offline
- User
-
Registered
- Posts: 36
- Thanks: 0
Re: BACKYARD BOBBER!!!!
26 Nov 2010 02:40
I don’t know how other people do frames or mods to them but this is how I tackle this sought of thing…
I use X Y Z planes…To explain,
I have the frame bolted welded or what ever way you wish to a build table or board in your case, to make it permanent (I like to weld it to the build table so it’s there in the same spot “alwaysâ€, until finished).
On the build table in one corner is a “permanent†reference point, the position you do your measurements from along the table. I use a laser level line to achieve my X Y Z plane (pictured below) from this point.
In other words… if you wanted to know the exact position of the top mounting studs on the rear shocks it would read something like this (for example)…
Rear Shock L/R stud mount centre: Upper
Outer edge:
Left: X 855mm, Y 654mm, Z 325mm… Right: X 855mm, Y 654mm, Z 575mm…
Inner edge:
Left: X 855mm, Y 654mm, Z 375mm… Right: X 855mm, Y 654mm, Z 525mm…
Stud length: 50mm
Stud diameter: 15mm
Thread: M10 x 1.75
Thread length: 10mm
Stud through welded frame points, 30mm protrusion, thread outer.
(This is how I write it others may differ, please ignore the numbers there just off the top of my head for a rough example)
I hope this make sense (I could be wrong but it works for me). It may seem overly complicated but if you go down to the mm you cant go wrong, and one 10th of a mm then you definitely can’t go wrong…
There are probably simpler ways although I feel this way you will definitely have an accurate or “true†frame and that’s what’s needed on a bike, isn’t it?
A straight frame!

Uploaded with ImageShack.us
in the stable:
1981 Kawasaki KZ750
1980 Suzuki GS1000
1980 Suzuki GSX750
1982 Yamaha XJ650 TURBO (3 of)
1981 Kawasaki KZ750
1980 Suzuki GS1000
1980 Suzuki GSX750
1982 Yamaha XJ650 TURBO (3 of)
Please Log in or Create an account to join the conversation.
- subby
-
- Offline
- User
-
Registered
- Posts: 36
- Thanks: 0
Re: BACKYARD BOBBER!!!!
26 Nov 2010 03:29 - 26 Nov 2010 03:32
This may help a little as well, some pics and a small section from a chopper book I have.
Shows build tables with frame and rear end jig (forgot to mention the jig part of the table oops :blush: )….

(from the chopper book)
I’ve found that I can better control the accuracy of placing the fixtures and vertical uprights if I work from the rear of the jig
towards the front. Figure 4 is another snapshot of the jig with a vertical upright welded in place that serves to hold a piece
of tube stock for the rear axle placement.
On this particular jig I wasn’t concerned with actually mounting a rear wheel but if you want to do this the rear axle fixture
will have to be a ‘U’ shaped affair with two uprights, one on each side, to hold the ends of the axle and the axle plates.
And again like all other parts this upright has to be perfectly plumb and square to the bed rails.

Uploaded with ImageShack.us
This is a close-up of the rear axle upright showing that it’s nothing fancy, just a piece of rectangular tubing with a hole bored to
house a piece of bar stock. The axle plates are sandwiched between two shaft collars on each side. That little piece of tubing at the
ends of the wishbones is just a temporary spacer to aid in alignment.
You’ll also notice on this particular jig a piece of 1x2 inch rectangular tubing running perpendicular to, and on top of, the main base
rails. I call these members the transverse frame rails and these will actually carry the lower frame side rails. The actual dimension of
these cross members, spacers or offsets as they are sometimes called will vary in dimension from one frame design to another. For
some frames they will be mounted on the flat while for others they will need to be upright.

in the stable:
1981 Kawasaki KZ750
1980 Suzuki GS1000
1980 Suzuki GSX750
1982 Yamaha XJ650 TURBO (3 of)
1981 Kawasaki KZ750
1980 Suzuki GS1000
1980 Suzuki GSX750
1982 Yamaha XJ650 TURBO (3 of)
Last edit: 26 Nov 2010 03:32 by subby.
Please Log in or Create an account to join the conversation.
Moderators: Street Fighter LTD