I was the lucky one with the 78 KZ400 B1 that tried this swap. DoctoRot asked me to get a write up going if I could get this sorted. And well no doubt we got ourselves a workaround.
Just as before a mill lathe is gonna be handy. I had to make my own axle spacer, but potentially something similar could be found, modified ...
What you are going to need:
78' KZ400
Wheel
Disk
Right Fork
Axle
Speedo
80 - 83 KZ440
Left Fork or just the Boot
Caliper
The game plan:
1. Create a custom axle spacer.
Thickness: 0.08"
Outside Diameter (OD): 1.265"
Inside Diameter (ID): 0.670"
2. Modify and swap only the left fork boot which contains the caliper bosses.
a. Open the axle diameter to 17mm
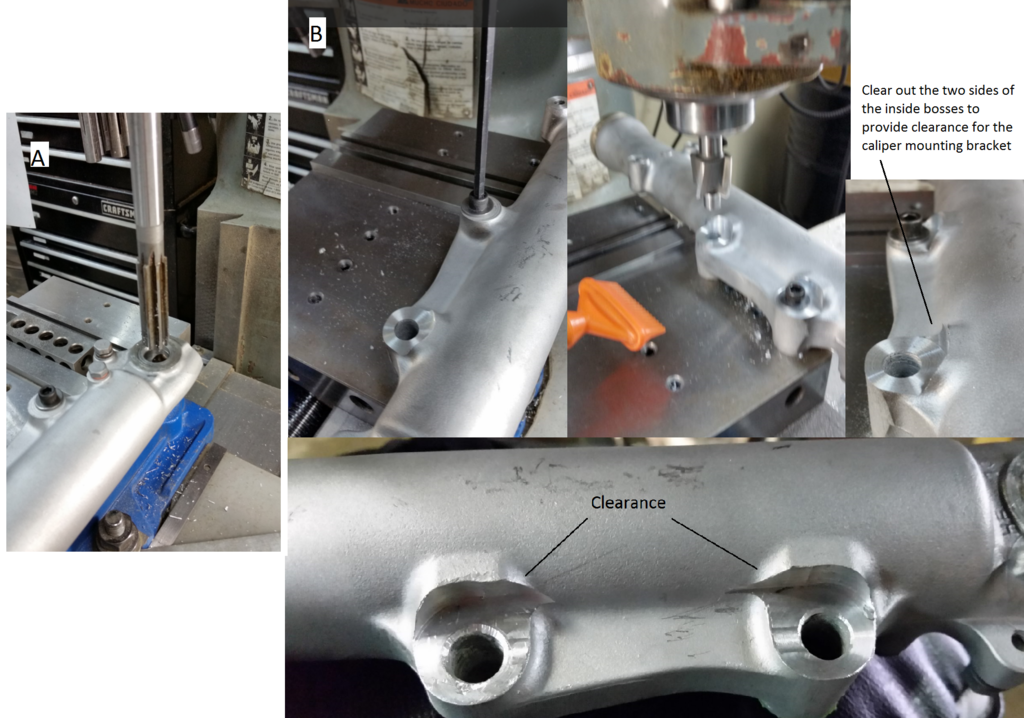
b. Mill down caliper bosses by 0.36" and clear out the side of the boss for the caliper mounting plate
c. Mill down the fender mounting bosses by 0.10"
d. Grind down the speedo stop
3. File, mill, or grind down the caliper mounting plate to allow clearance for mounting
So as soon as I got my KZ440 forks I realized the axle diam. was too small. So I thought open them both up, use the original axle and call it a day. But unfortunately the axles are different. The 78' KZ400 has axle pinch bolts on its right fork while the 80' KZ440 is a solid axle mount. And of course then the axle bolts themselves are different to accommodate these two axle mounting styles. The pinch bolts help you to align your axle with the forks to prevent binding, which sounds like a better axle to me. Dunno why the early 80s 440 uses that flush style. Would love to hear any opinions on pros/cons.

The KZ400 axle will tighten everything against your left fork and then the right fork would pinch the collar of the axle. This allows you to have some error with your axle spacers which wont bind your forks if your wheel is not perfectly centered. To me it seems like the 440 axle would bind the forks if your collars are too big or too small because it clamps both forks against your wheel hub, bearings, and spacers.
So first thing first take apart your KZ440 fork and grab just the fork boot, the rest of the parts can go in your spares bin, the spring is different tho so watch out. While you're at it and fresh at breaking open old rusty forks go ahead and take your original KZ400 left fork apart. Discard the left KZ400 fork boot and keep everything else (spring, damper, tube, damper cover, and the little spring… EVERYTHING)
1. The thickness is easy to figure out by comparing the two forks. You'll see the only difference is that the critical wheel facing side is a little smaller, get the difference and lets roll. The spacer should be 0.08" thick.
To make the spacer I took a square piece of steel drilled a hole in the middle to the ID (inside diameter) of the collar then turned it on a lathe to the OD. To get the thickness I used a surface grinder. The material does not have to be steel, aluminum should work fine and be easier to cut. If this fabrication is too much maybe a washer(s) or something could work?
To roughly center the original disk in the caliper I took off around 0.36" +/- 0.01 wont hurt any (mine was a little over 0.35").
a. Use a 17mm reamer or cutter, a little over should not be a problem. Mine was under and I had to jam feeler stock in with the reamer to get my dimension.
b. The amount to mill on the caliper mounting bosses should be 0.36" which for me was the thickness of the caliper mounting plate. I just kinda held it up to the bike with the 440 boot in there and eyeballed it. Looked like the face of the 440's caliper mounting bosses lined up the with the face of the caliper mounting plate.
Luckily my vice already had holes that lined up. But its really easy to drill and tap holes in your vice if you can stomach it (noo my precious vice noo) or figure out another mounting method. I used a counter bore with a replaceable pilot which I turned down to just fit the ID of the boss making the alignment easy and accurate. For the diameter of the counterbore cutter I found something close to the OD of the caliper mounting boss. A little over is okay, but def nothing smaller. The last thing here is the mounting plate clearance. After you finish your depth cut take out the counterbore pilot and clear out the top of the boss towards the inside of mounting plate. I was rushing and forgot to take out the pilot on my second cut breaking it off in the mounting hole. You can see the difference, luckily for me I got away without any show stopping damage.
c. Mill down your fender mounts by 0.10"
d. Grind off a little bit of the speedo stop so it doesn’t hit the speedo.
The last thing is just to take a touch off the caliper mounting plate to make it flush at the top mounting hole which will hit the inside of the caliper's top mounting boss on the fork boot.
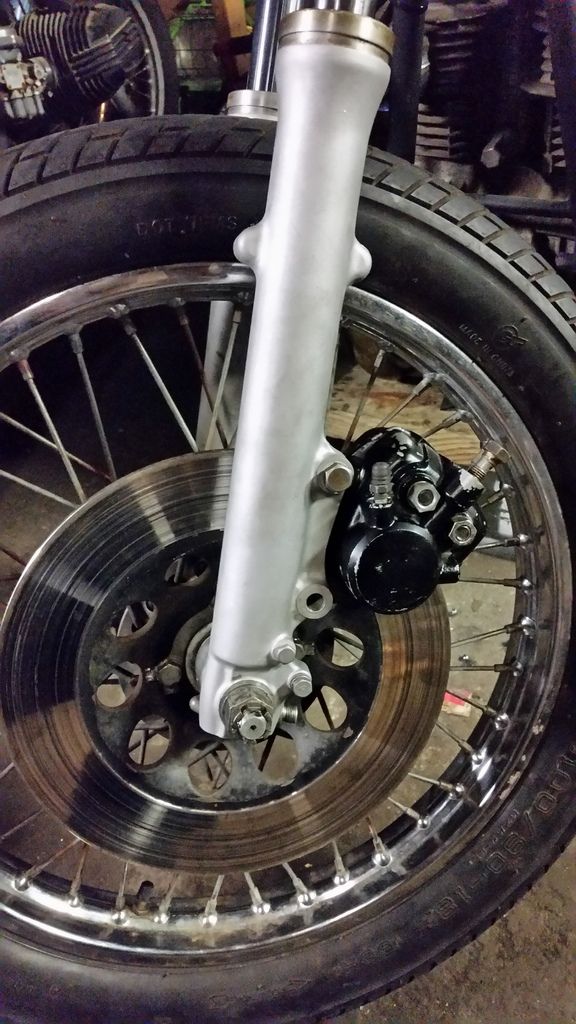
Okay now its time for the fun part. Reassemble the left fork using the modified fork boot from the KZ440 and all the original guts, springs, dampers, tubes, caps, spacers from your KZ400 fork. This will ensure the heights and everything else will be stock with the forks except for of course the left fork boot. Mount your front axel as you would before and slip on the custom spacer between the boot and speedo. Tighten up the axle, mount the caliper, and bask in the glory of a job well done.
I went ahead and junked the original caliper, got a used 2013 Ninja 300 caliper from ebay for cheap. Got rid of the hydraulic brake light pressure switch and put in a steel braided line. And of course moved the wires over from the pressure switch to the micro switch on the new caliper.
Hopefully no one ever has to do this, but if you do and have any questions feel free to hit me up.
Maybe the next upgrade will be to a dual disk with the next model (mid 80s) caliper.
Want to give a shout out and big thank you to DoctoRot for getting his guide together and getting me going on this. THANKS!