
1979 KZ400 B Restoration/Recommission
- adam73bgt
-
 Topic Author
- Offline
- User
-

Registered
- Posts: 41
- Thanks: 24
Re: 1979 KZ400 B Restoration/Recommission
05 Nov 2023 15:48
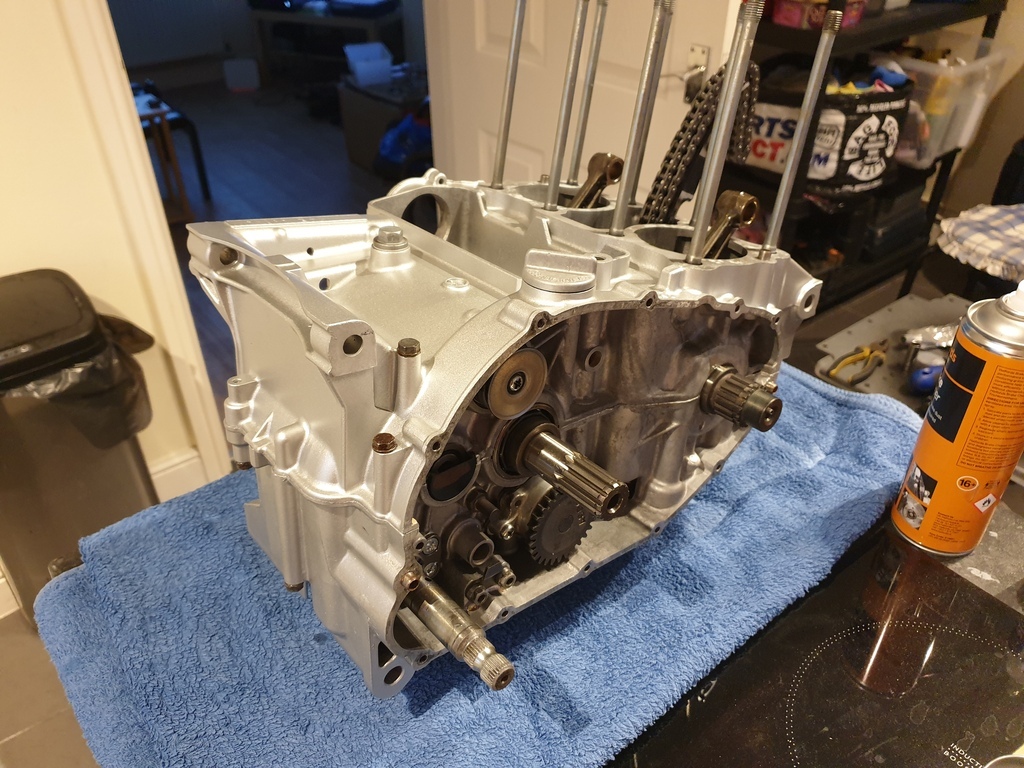
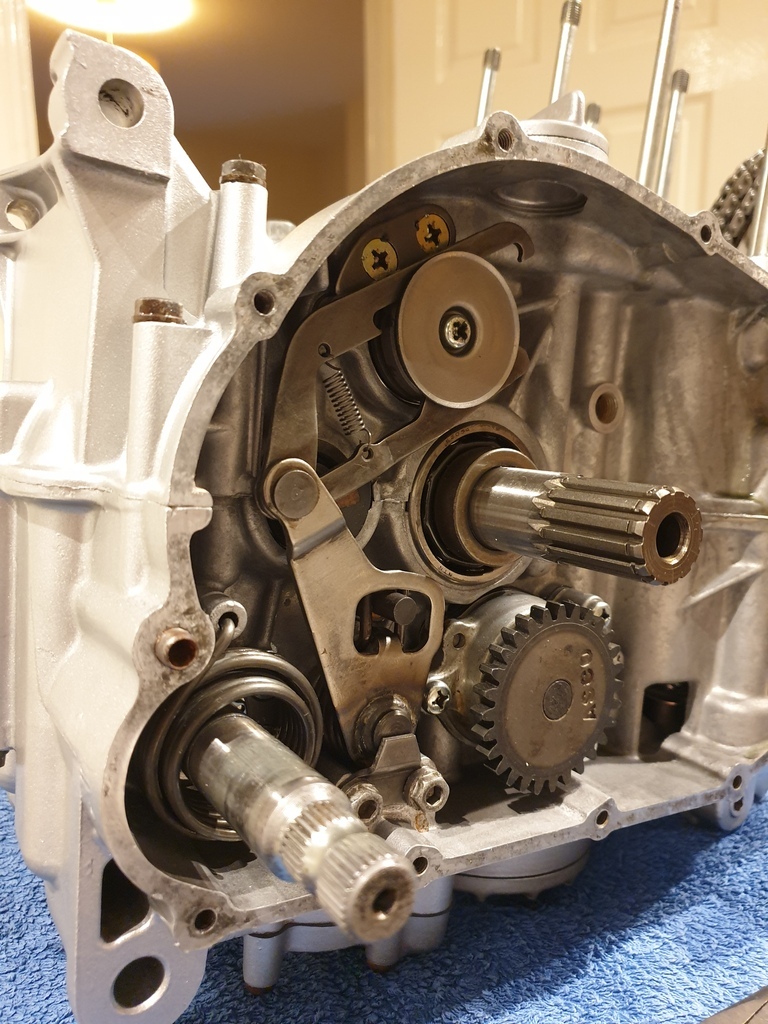
Next I was able to install new needle bearings in the upper crankcase for the selector drum and fit that along with the forks
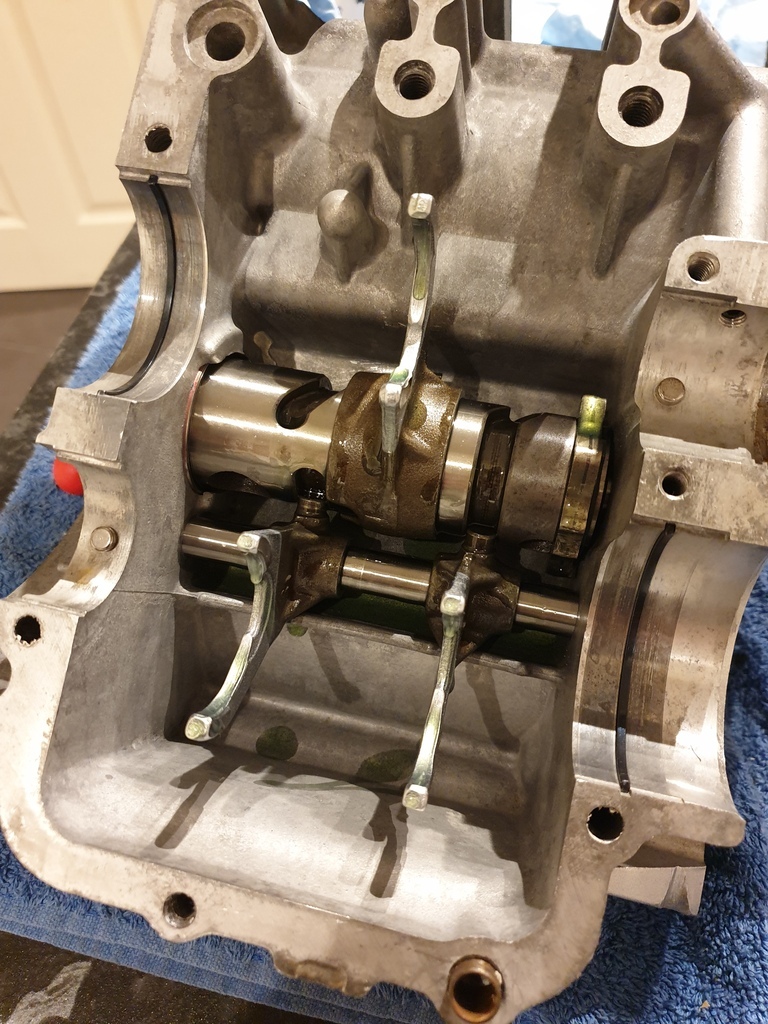
Before carefully dropping the gears into place as well
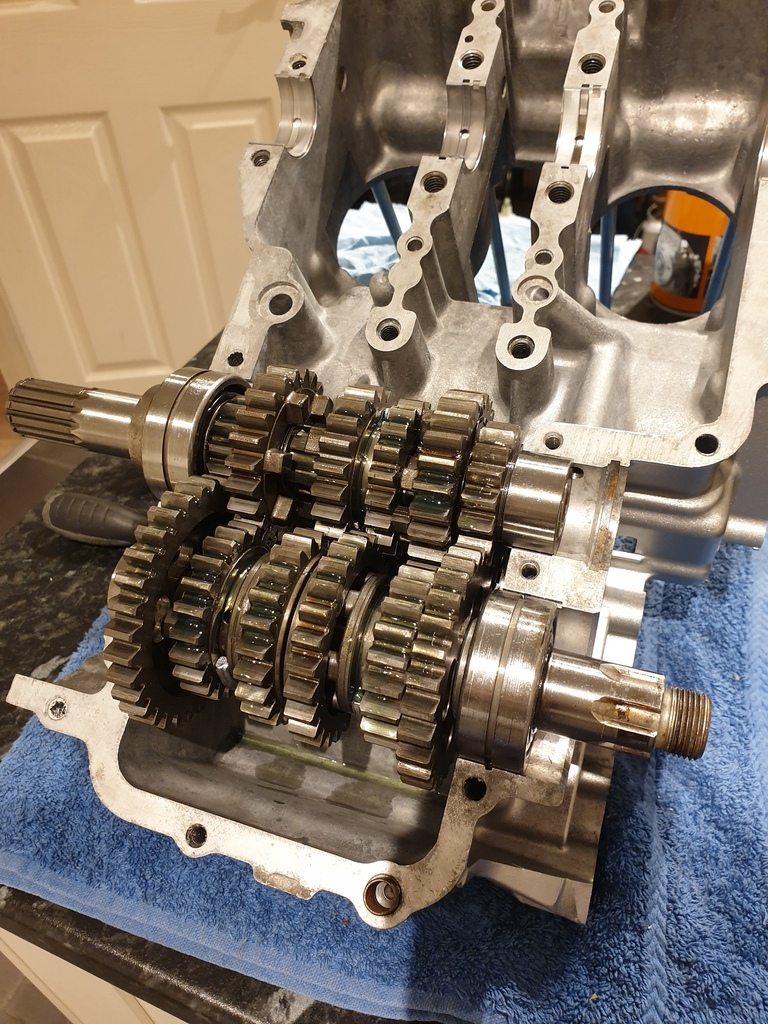
This is my first time doing this so it's all been a bit of a learning experience, one thing I nearly missed is that the kickstarter shaft and pawl had to go together in a certain orientation. I hadn't noticed this when I cleaned and re-assembled them so that got re-aligned and fitted, very glad I caught it now and not after the crankcases had been assembled!
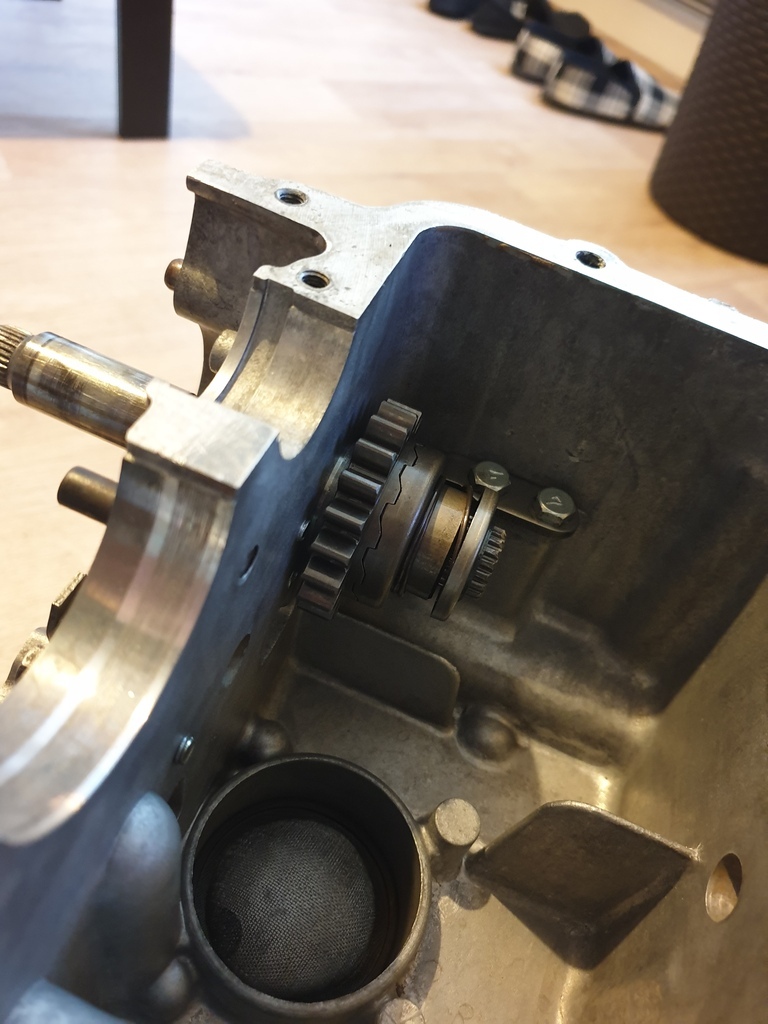
Most recent job I've done is check the piston ring gaps which were all fine, and installed the rings to the pistons
I had a minor debacle with the oilway plugs for the crankshaft so I have some new replacements for those coming, but that should be the last thing stopping me from installing the crank and getting the bottom end all assembled

Before carefully dropping the gears into place as well
This is my first time doing this so it's all been a bit of a learning experience, one thing I nearly missed is that the kickstarter shaft and pawl had to go together in a certain orientation. I hadn't noticed this when I cleaned and re-assembled them so that got re-aligned and fitted, very glad I caught it now and not after the crankcases had been assembled!
Most recent job I've done is check the piston ring gaps which were all fine, and installed the rings to the pistons
I had a minor debacle with the oilway plugs for the crankshaft so I have some new replacements for those coming, but that should be the last thing stopping me from installing the crank and getting the bottom end all assembled
1979 KZ400 B2
4 Wheeled Projects:
1973 MG BGT
2000 Alfa Romeo 166
2003 Chrysler Crossfire
4 Wheeled Projects:
1973 MG BGT
2000 Alfa Romeo 166
2003 Chrysler Crossfire
The following user(s) said Thank You: ThatGPzGuy, Nessism, Nerdy, howardhb, Wookie58, Moose1800
Please Log in or Create an account to join the conversation.
- Moose1800
-
- Offline
- Sustaining Member
-

Registered
- Posts: 302
- Thanks: 284
Re: 1979 KZ400 B Restoration/Recommission
06 Nov 2023 05:55
Great documentation well done !!
Please Log in or Create an account to join the conversation.
- Michel3007
-

- Offline
- User
-
Registered
- Posts: 92
- Thanks: 15
Re: 1979 KZ400 B Restoration/Recommission
06 Nov 2023 08:38
Hi Adam,
Well done on this recommission ! Since your engine is still apart, would you mind telling me the diameter of the crankcase holes where the cylinder sleeves are supposed to fit in ? I need this measurement in order to know if I can get a kz440 cylinder block on a kz400 later model engine. That would be super helpful.
Cheers,
KZ 750 H2 LTD 1981
GPZ750R1 1982
GPZ750R1 1982
Please Log in or Create an account to join the conversation.
- adam73bgt
-
Topic Author
- Offline
- User
-
Registered
- Posts: 41
- Thanks: 24
Re: 1979 KZ400 B Restoration/Recommission
08 Nov 2023 13:59
Thanks ")
Michel, just took a rough measurement, I get around 75mm for the diameter, hope that helps?
Michel, just took a rough measurement, I get around 75mm for the diameter, hope that helps?
1979 KZ400 B2
4 Wheeled Projects:
1973 MG BGT
2000 Alfa Romeo 166
2003 Chrysler Crossfire
4 Wheeled Projects:
1973 MG BGT
2000 Alfa Romeo 166
2003 Chrysler Crossfire
The following user(s) said Thank You: Michel3007
Please Log in or Create an account to join the conversation.
- Michel3007
-
- Offline
- User
-
Registered
- Posts: 92
- Thanks: 15
Re: 1979 KZ400 B Restoration/Recommission
08 Nov 2023 23:55
Thank you Adam. I had somebody else give me the diameter (76mm) so I hope yours is on 75+ because I went ahead and bought a 440 cylinder block 
It's doneanyways so I'll see when it's time to install it...
It's doneanyways so I'll see when it's time to install it...
KZ 750 H2 LTD 1981
GPZ750R1 1982
GPZ750R1 1982
Please Log in or Create an account to join the conversation.
- adam73bgt
-
Topic Author
- Offline
- User
-
Registered
- Posts: 41
- Thanks: 24
Re: 1979 KZ400 B Restoration/Recommission
08 Dec 2023 11:41
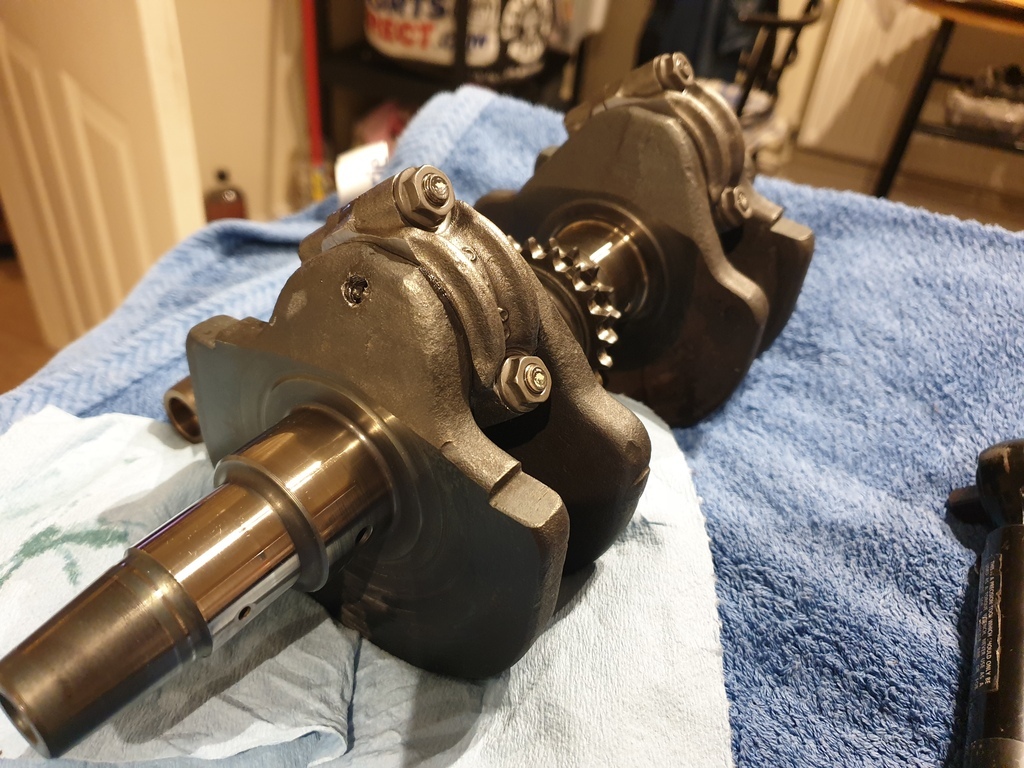
I was waiting on some parts in my last post but they eventually turned up and I could get on with re-assembling the engine. First up was the crank, minor debacle with the oilway plugs now resolved, and conrods installed
I then installed the crank into the upper crankcase but made an error which I thankfully later caught before I joined the crankcases. I did get stuck waiting for parts here again as I was missing an O ring for the oil feed into the balancer assembly
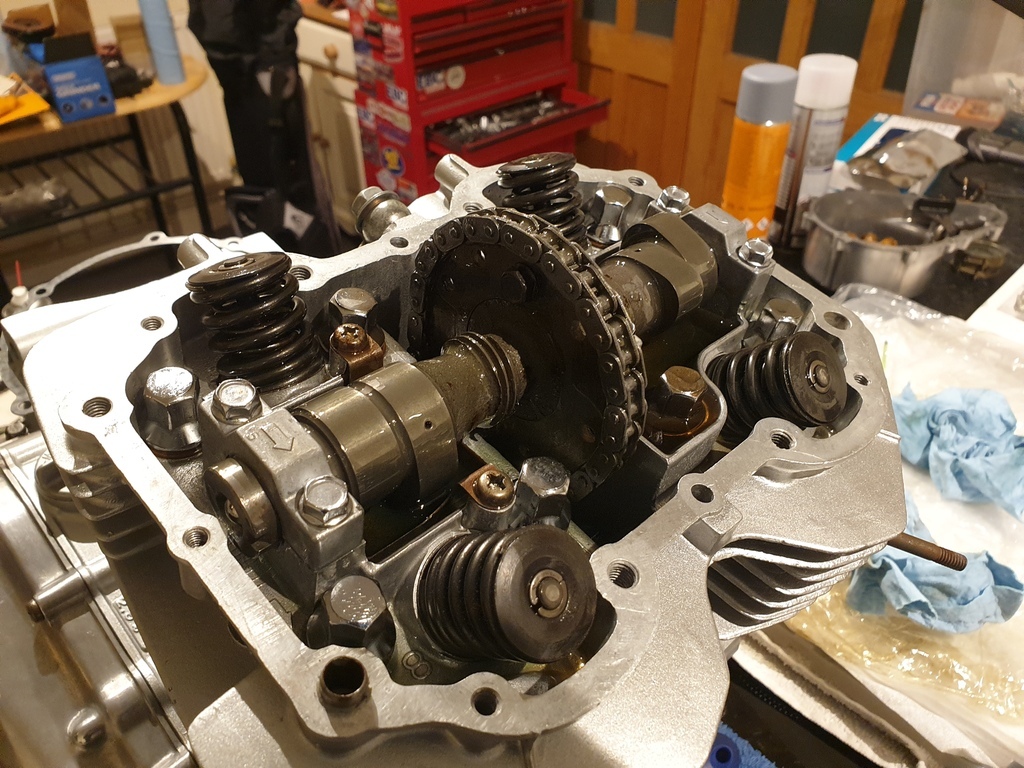
In the meantime I did a little renovation work on the valve adjustment and chain tensioner caps, these were all fairly corroded. Some 240 grit paper got most of that off, refined with a bit of 480 grit then finished off with some polish

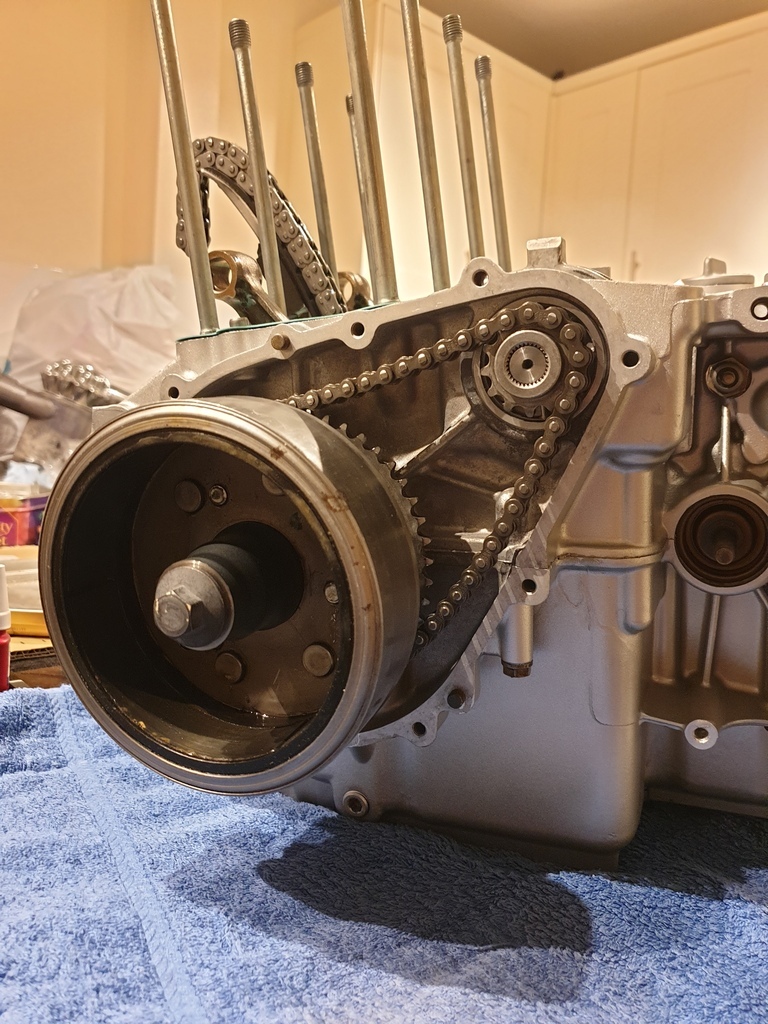
So I'd made a couple of mistakes with the engine balancer assembly. First thing was I'd put the chain on the "wrong" way round so the bright links weren't on the same side as the little hole in the sprockets. Not the end of the world but made it a bit trickier to time them up.
I did time each of the weights to each other correctly, and I had the crankshaft in the correct orientation with the flywheel webs up, but I'd missed that the weights needed to be timed to the crank which is a really obvious thing to miss in hindsight! With my error spotted, I took the balancer assembly back off, re-mounted the chain so the bright links were on the right side to make things easier, then noted the small marks on the balancer assembly mounting block that are supposed to be matched with the bright links (the manual wasn't very clear on this).
Got it all reinstalled, torqued up, happy days. In the meantime the missing O ring arrived, I cleaned up the mounting faces, made sure the bearings were oiled, put a thin smear of permatex grey on the mating surface and it looks something like an engine again
I then installed the crank into the upper crankcase but made an error which I thankfully later caught before I joined the crankcases. I did get stuck waiting for parts here again as I was missing an O ring for the oil feed into the balancer assembly
In the meantime I did a little renovation work on the valve adjustment and chain tensioner caps, these were all fairly corroded. Some 240 grit paper got most of that off, refined with a bit of 480 grit then finished off with some polish
So I'd made a couple of mistakes with the engine balancer assembly. First thing was I'd put the chain on the "wrong" way round so the bright links weren't on the same side as the little hole in the sprockets. Not the end of the world but made it a bit trickier to time them up.
I did time each of the weights to each other correctly, and I had the crankshaft in the correct orientation with the flywheel webs up, but I'd missed that the weights needed to be timed to the crank which is a really obvious thing to miss in hindsight! With my error spotted, I took the balancer assembly back off, re-mounted the chain so the bright links were on the right side to make things easier, then noted the small marks on the balancer assembly mounting block that are supposed to be matched with the bright links (the manual wasn't very clear on this).
Got it all reinstalled, torqued up, happy days. In the meantime the missing O ring arrived, I cleaned up the mounting faces, made sure the bearings were oiled, put a thin smear of permatex grey on the mating surface and it looks something like an engine again
1979 KZ400 B2
4 Wheeled Projects:
1973 MG BGT
2000 Alfa Romeo 166
2003 Chrysler Crossfire
4 Wheeled Projects:
1973 MG BGT
2000 Alfa Romeo 166
2003 Chrysler Crossfire
Please Log in or Create an account to join the conversation.
- adam73bgt
-
Topic Author
- Offline
- User
-
Registered
- Posts: 41
- Thanks: 24
Re: 1979 KZ400 B Restoration/Recommission
08 Dec 2023 11:51
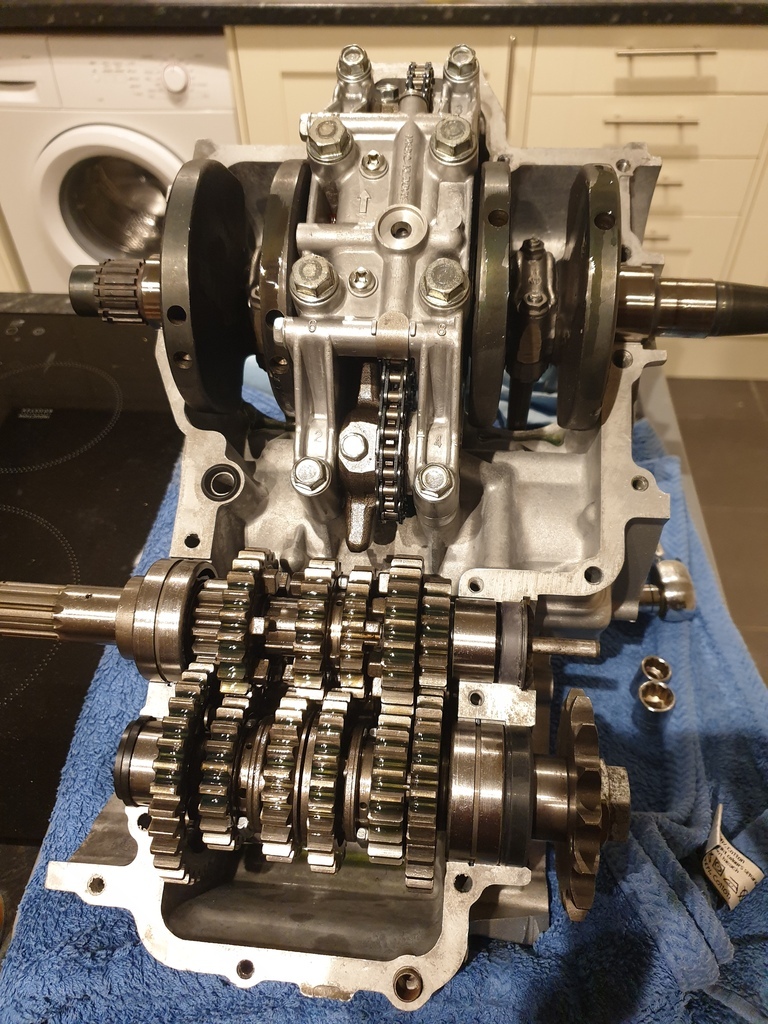
Things have gone together pretty quickly since getting the crankcases back together, gear change shaft went in and engaged with the shift drum. I also took a few attempts at fitting the kickstart spring, in the end I had to go and buy a better pair of needlenose pliers to get it in and stay in but it works nicely now
On the other side, I got the alternator rotor on and mocked up the starter and chain at the same time. The starter chain was in a bit of a bad way when I got the bike but given a thorough cleanup it looks like it's still got life in it
Pistons went on the rods nicely, and thankfully didn't lose a circlip into the crankcase haha
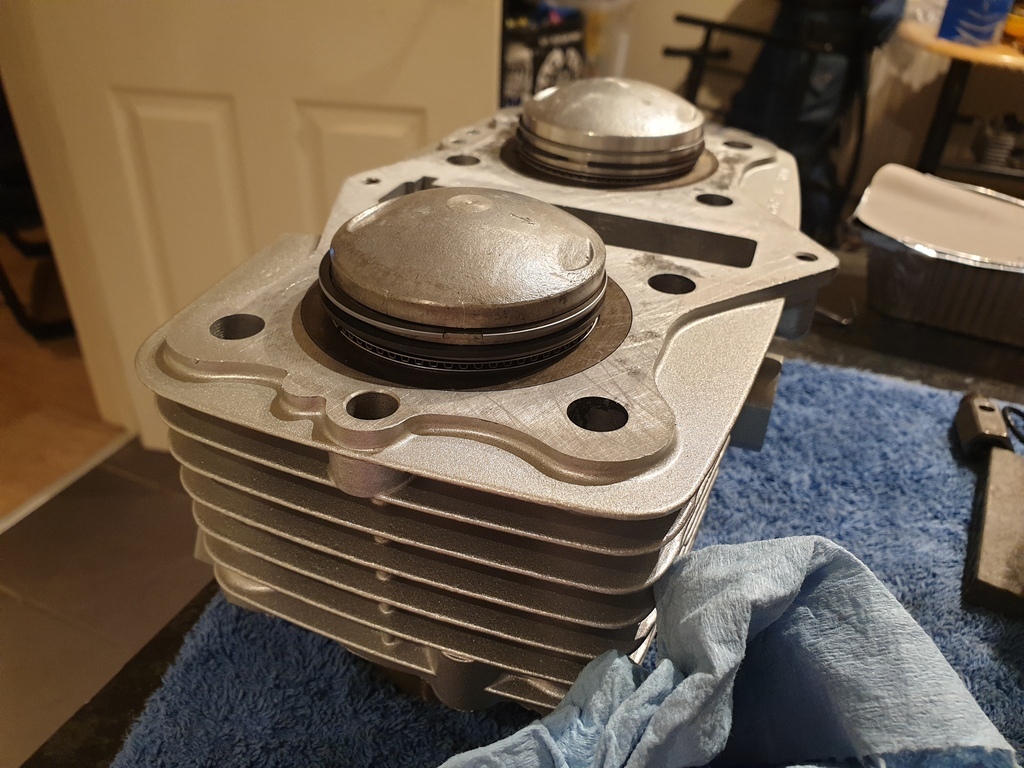
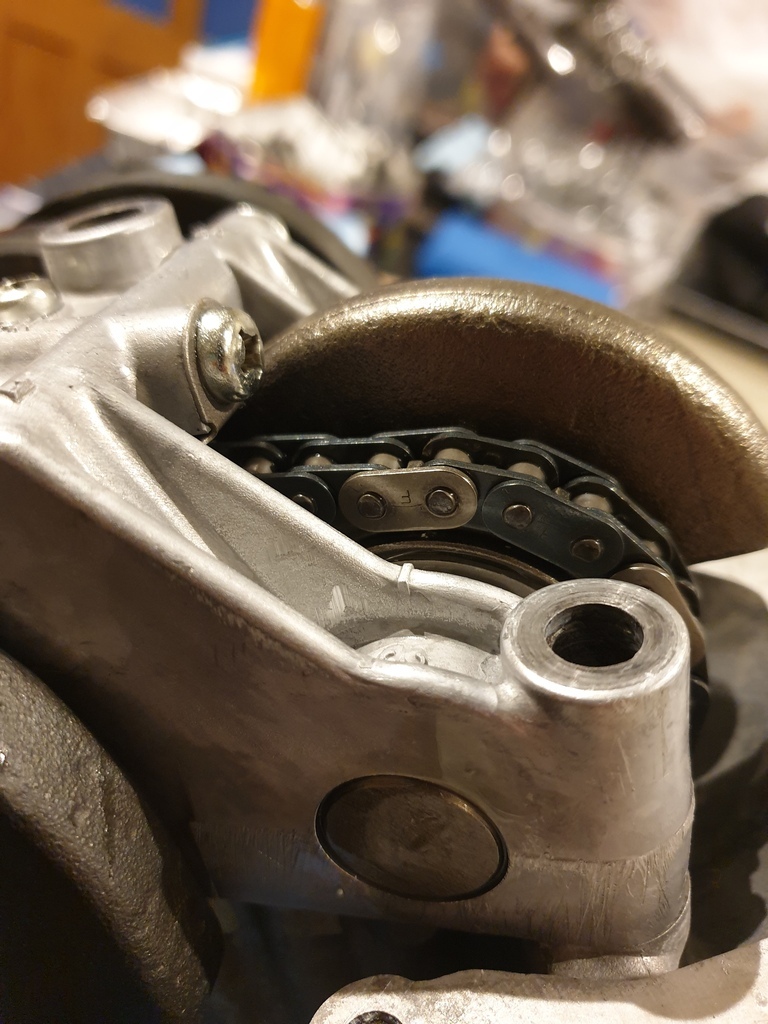
[img]https://img.retro-rides.org/i/v/adam73bgt/9ae48ecaee89.jpg[/.img] The cylinder barrels were a bit more tricky, I ended up using a couple of cable ties to help as piston ring compressors but got there in the end. I also realised I forot to fit the rear cam chain guide but was able to lift the barrels up again and get the guide in with its location pins [img]https://img.retro-rides.org/i/v/adam73bgt/b94f261ea1f6.jpg[/img]
With my girlfriend helping feed the timing chain through, it was a pretty simple job to pop the head on top as well and torqued it down, I'm pretty happy with how it's shaping up

On the other side, I got the alternator rotor on and mocked up the starter and chain at the same time. The starter chain was in a bit of a bad way when I got the bike but given a thorough cleanup it looks like it's still got life in it
Pistons went on the rods nicely, and thankfully didn't lose a circlip into the crankcase haha
[img]https://img.retro-rides.org/i/v/adam73bgt/9ae48ecaee89.jpg[/.img] The cylinder barrels were a bit more tricky, I ended up using a couple of cable ties to help as piston ring compressors but got there in the end. I also realised I forot to fit the rear cam chain guide but was able to lift the barrels up again and get the guide in with its location pins [img]https://img.retro-rides.org/i/v/adam73bgt/b94f261ea1f6.jpg[/img]
With my girlfriend helping feed the timing chain through, it was a pretty simple job to pop the head on top as well and torqued it down, I'm pretty happy with how it's shaping up
1979 KZ400 B2
4 Wheeled Projects:
1973 MG BGT
2000 Alfa Romeo 166
2003 Chrysler Crossfire
4 Wheeled Projects:
1973 MG BGT
2000 Alfa Romeo 166
2003 Chrysler Crossfire
The following user(s) said Thank You: ThatGPzGuy, Nerdy
Please Log in or Create an account to join the conversation.
- adam73bgt
-
Topic Author
- Offline
- User
-
Registered
- Posts: 41
- Thanks: 24
Re: 1979 KZ400 B Restoration/Recommission
10 Mar 2025 15:55
Well I accidentally forgot to update this for quite some time! I still have the bike and unfortunately still haven't ridden it, it's just down to the last couple of snagging issues. In the meantime I'd better do a bit of a catch up of what's happened in the year or so since my last update...
The rest of the engine build went quite smoothly, clutch and primary drive went in, had to get a new secondhand timing advance unit as the original was rusted solid from being sat for years with no cover.
I did really luck out in finding an NOS camshaft on CMSNL if I recall correctly. The original and a secondhand one I'd tried both had significant signs of wear, so when the NOS one appeared, I had to get it!
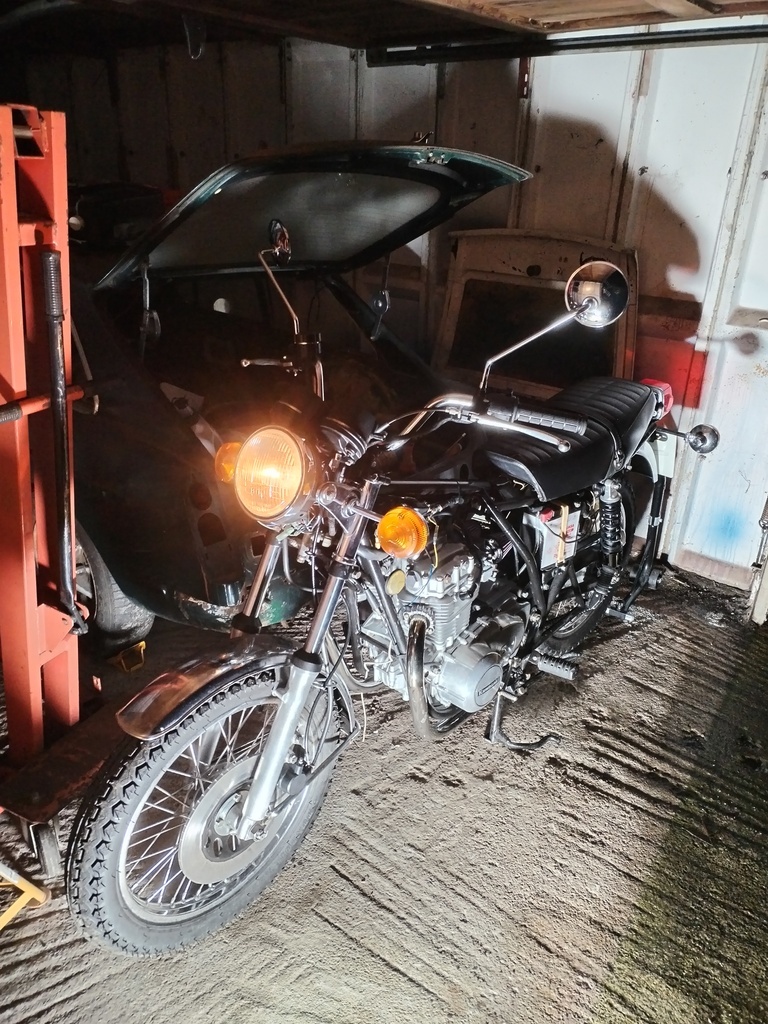
After that it was just finishing up the assembly of the engine covers with some new JIS zinc plated screws and I could finally get it off my kitchen counter and on to a wheel dolly to transport out to the garage haha

The rest of the engine build went quite smoothly, clutch and primary drive went in, had to get a new secondhand timing advance unit as the original was rusted solid from being sat for years with no cover.
I did really luck out in finding an NOS camshaft on CMSNL if I recall correctly. The original and a secondhand one I'd tried both had significant signs of wear, so when the NOS one appeared, I had to get it!
After that it was just finishing up the assembly of the engine covers with some new JIS zinc plated screws and I could finally get it off my kitchen counter and on to a wheel dolly to transport out to the garage haha
1979 KZ400 B2
4 Wheeled Projects:
1973 MG BGT
2000 Alfa Romeo 166
2003 Chrysler Crossfire
4 Wheeled Projects:
1973 MG BGT
2000 Alfa Romeo 166
2003 Chrysler Crossfire
Please Log in or Create an account to join the conversation.
- adam73bgt
-
Topic Author
- Offline
- User
-
Registered
- Posts: 41
- Thanks: 24
Re: 1979 KZ400 B Restoration/Recommission
10 Mar 2025 16:07
Mid December 2023 and I roped a mate into helping me get the engine into the frame without scratching up the paint on either
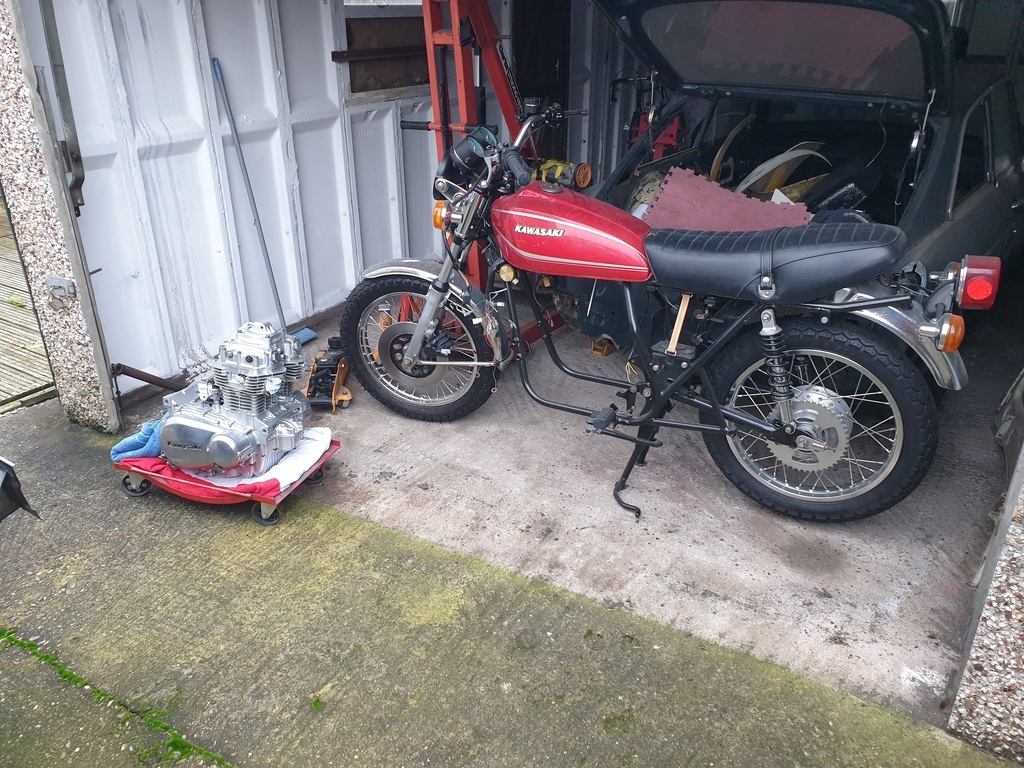
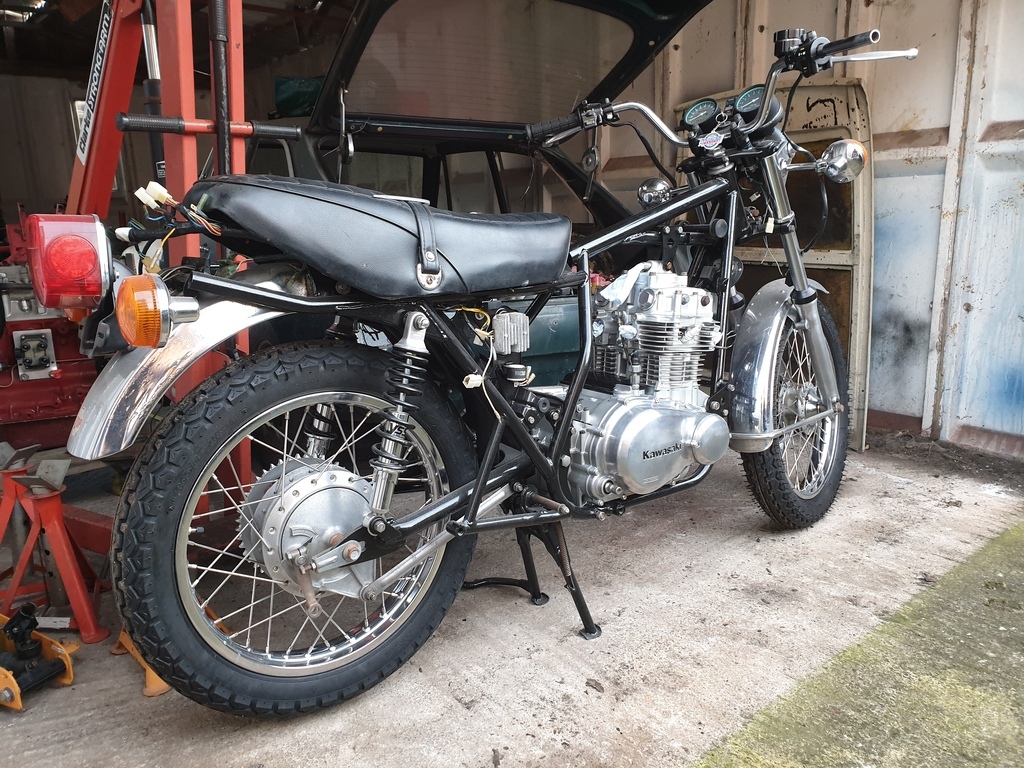
As I seem to recall it went quite easily with the two of us able to manipulate it into position and get the mounting bolts through.
From there it was really a case of starting to put everything back on the bike that I'd taken off. Kick start and rear brake levers were pretty straightforward, and I could start laying the wiring loom out properly, seeing if I could remember how it was routed..

On the other side, the chain and sprockets went on as well as the clutch cover and cable. This was my first time adjusting a cable clutch and I found it a bit difficult but eventually I just went back and followed the workshop manual guide step by step until it was working smoothly.
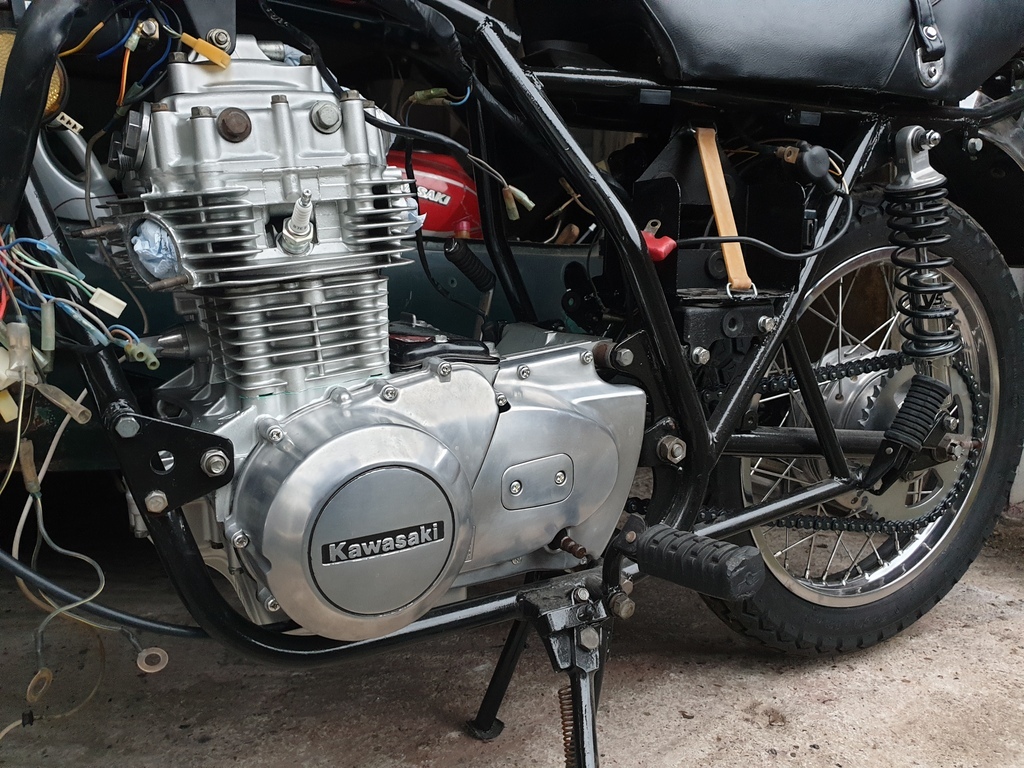
I bought some universal carb mount rubbers as I'm converting to Mikuni carbs, I had to modify these slightly to fit the hole spacing on the bike but that went pretty smoothly. I also polished up the exhaust downpipes and fitted them. Considering how rusty the silencers were, the downpipes came up a treat! At some point I need to find a shop that will weld on some suitable silencers to make it a proper system again.
As I seem to recall it went quite easily with the two of us able to manipulate it into position and get the mounting bolts through.
From there it was really a case of starting to put everything back on the bike that I'd taken off. Kick start and rear brake levers were pretty straightforward, and I could start laying the wiring loom out properly, seeing if I could remember how it was routed..
On the other side, the chain and sprockets went on as well as the clutch cover and cable. This was my first time adjusting a cable clutch and I found it a bit difficult but eventually I just went back and followed the workshop manual guide step by step until it was working smoothly.
I bought some universal carb mount rubbers as I'm converting to Mikuni carbs, I had to modify these slightly to fit the hole spacing on the bike but that went pretty smoothly. I also polished up the exhaust downpipes and fitted them. Considering how rusty the silencers were, the downpipes came up a treat! At some point I need to find a shop that will weld on some suitable silencers to make it a proper system again.
1979 KZ400 B2
4 Wheeled Projects:
1973 MG BGT
2000 Alfa Romeo 166
2003 Chrysler Crossfire
4 Wheeled Projects:
1973 MG BGT
2000 Alfa Romeo 166
2003 Chrysler Crossfire
Please Log in or Create an account to join the conversation.
- adam73bgt
-
Topic Author
- Offline
- User
-
Registered
- Posts: 41
- Thanks: 24
Re: 1979 KZ400 B Restoration/Recommission
10 Mar 2025 16:17
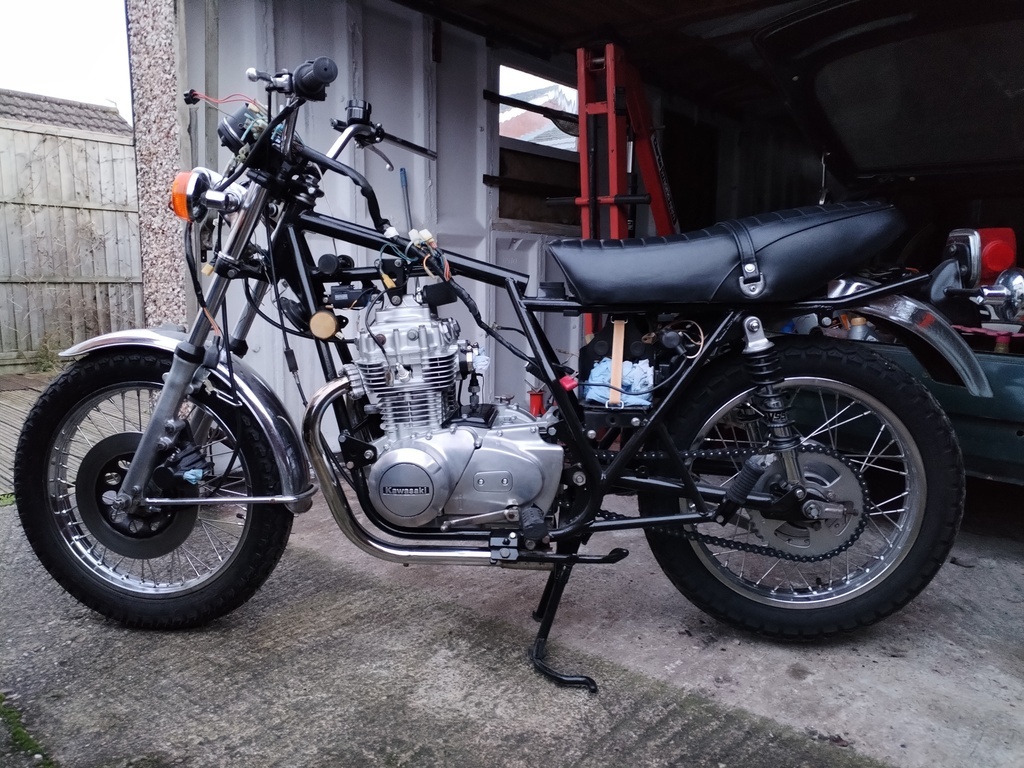
Moving into January '24 I was picking up a fair bit of momentum on the KZ. After a couple of false starts, I sent off the original front brake hoses to HEL performance to have some new braided lines made up which fitted perfectly and eventually I got them bled too.
I'd also reached out to a local painter to sort the tank and other bits. I had originally planned to either rock the "patina" look or do a rattle can paint job myself, but with how the bike was progressing, decided it deserved something a little better haha
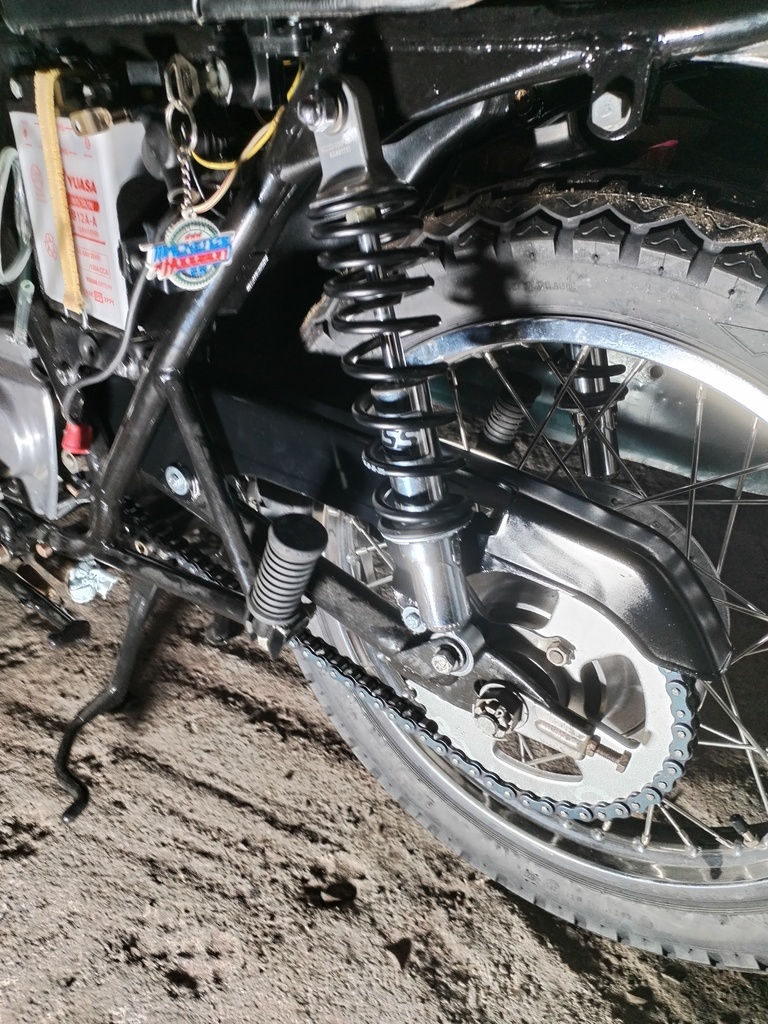
There were a load of small jobs like setting the rear brake play, setting the chain tension etc.
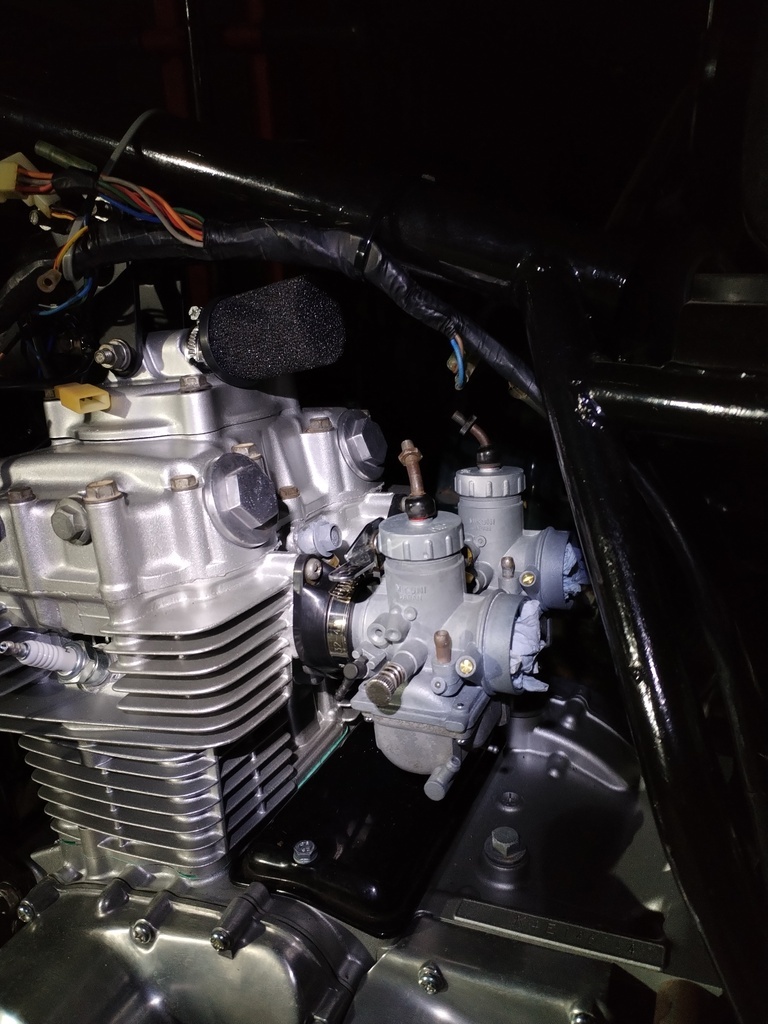
Finished off the rebuild of the Mikuni's which look right at home on the bike (but are a part of the headache that means it isn't running just yet!)
The chain guard needed a bit of repair work using some carefully applied JB weld, and I gave it a few coats of gloss black to tidy it up for now
I did also have a bit of an issue around this time with the front caliper bleed screw leaking, but a new screw seemed to stop it. I have had more recent issues with the front caliper however which I'll get to later on..
I'd also reached out to a local painter to sort the tank and other bits. I had originally planned to either rock the "patina" look or do a rattle can paint job myself, but with how the bike was progressing, decided it deserved something a little better haha
There were a load of small jobs like setting the rear brake play, setting the chain tension etc.
Finished off the rebuild of the Mikuni's which look right at home on the bike (but are a part of the headache that means it isn't running just yet!)
The chain guard needed a bit of repair work using some carefully applied JB weld, and I gave it a few coats of gloss black to tidy it up for now
I did also have a bit of an issue around this time with the front caliper bleed screw leaking, but a new screw seemed to stop it. I have had more recent issues with the front caliper however which I'll get to later on..
1979 KZ400 B2
4 Wheeled Projects:
1973 MG BGT
2000 Alfa Romeo 166
2003 Chrysler Crossfire
4 Wheeled Projects:
1973 MG BGT
2000 Alfa Romeo 166
2003 Chrysler Crossfire
Please Log in or Create an account to join the conversation.
- adam73bgt
-
Topic Author
- Offline
- User
-
Registered
- Posts: 41
- Thanks: 24
Re: 1979 KZ400 B Restoration/Recommission
10 Mar 2025 16:38
Fast forward to March '24 and I did some minor wiring repairs near the ignition switch, it had been cut by a previous owner for some reason and there were some wires where the insulation had been damaged, allowing corrosion to start in the copper core, so any affected wires got cut out and new ones soldered in.
With that done, I could hook up the battery for the first time in probably a couple of decades to see what worked and what didn't

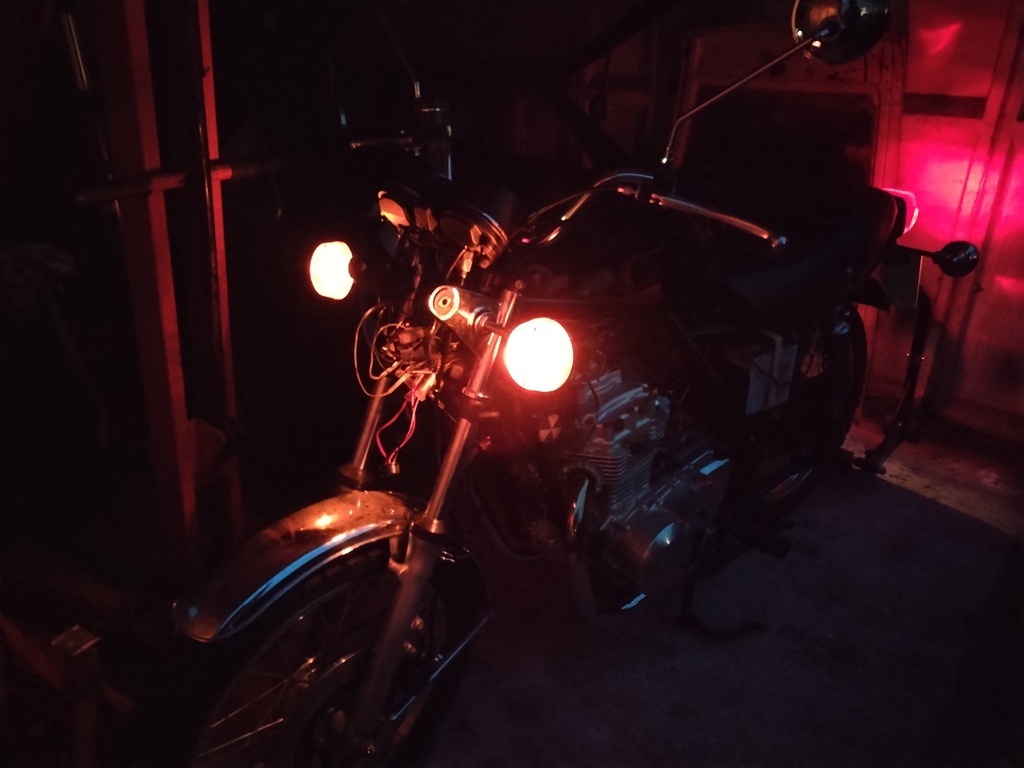
Headlight working on both lo and hi, tail and brake light working off both levers, gauge and tell tales work and it even cranked over nicely too
On the downsides, I had no horn and no indicators but soon set about investigating what I'd probably done wrong.
Started off at the switchgear, re-cleaning the contacts and doing continuity checks with the multimeter to make sure everything was connected as it should be. No problems there. Focusing more on the indicators, I wondered if the missing indicator buzzer could be causing an issue, bridged the plug and nothing changed.
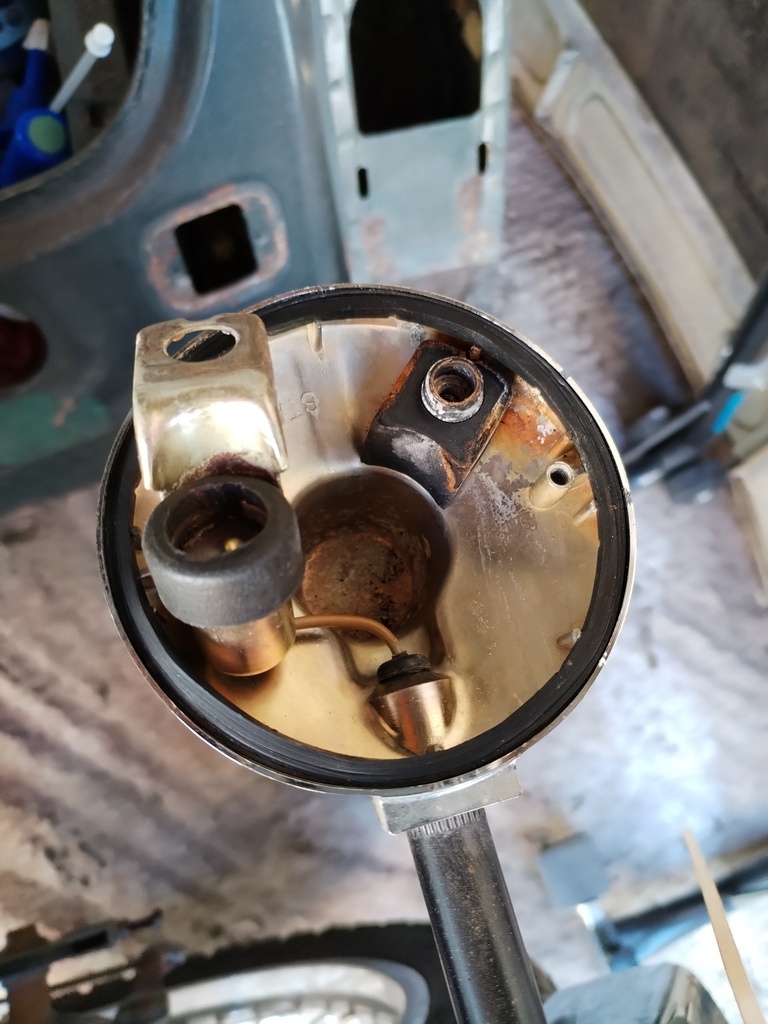
The odd thing was that the wiring diagram for the bike, showed the front indicators as having three connections, two powers and an earth, but there are only two wires going to each indicator. The indicators are bolted to metal brackets which are on the forks, but they're also rubber insulated.
Touched a wire from the body of the indicator to part of the frame and got a flash of light
 the indicators had no earths. Moved a couple of wires around up front and got this
Being a US import, it's set up to use the indicators as running lights. I've unplugged this for now to give it a more European look, I'm not sure if it's actually necessarily illegal to have amber running lights in the UK but I figured it might be confusing for the typical UK motorist and I'd rather know they're definitely aware when I'm indicating!
Now what is missing from that above photo are rear indicators, and any flashing of the indicators.
So the next day I had a look at the rears, the short version is that I faffed around a bit with them but ultimately it was an earthing issue again. Partly due to the elaborate internal connection between the bulb holder and the indicator housing having some corrosion in it which can't have been helping the connection
And partly because when I refurbed the rear bracket that holds the indicators and the tailight, I painted over the interface where the indicators fit on, took a bit of that paint off and there was light. They also flashed slowly, I think this will speed up when the bike is actually running though.
The horn issue turned out to just be a dead horn. I substituted in one of the horns of my Crossfire and it worked on the button, so bought a suitable replacement horn and that was that sorted.
With that done, I could hook up the battery for the first time in probably a couple of decades to see what worked and what didn't
Headlight working on both lo and hi, tail and brake light working off both levers, gauge and tell tales work and it even cranked over nicely too
On the downsides, I had no horn and no indicators but soon set about investigating what I'd probably done wrong.
Started off at the switchgear, re-cleaning the contacts and doing continuity checks with the multimeter to make sure everything was connected as it should be. No problems there. Focusing more on the indicators, I wondered if the missing indicator buzzer could be causing an issue, bridged the plug and nothing changed.
The odd thing was that the wiring diagram for the bike, showed the front indicators as having three connections, two powers and an earth, but there are only two wires going to each indicator. The indicators are bolted to metal brackets which are on the forks, but they're also rubber insulated.
Touched a wire from the body of the indicator to part of the frame and got a flash of light
Being a US import, it's set up to use the indicators as running lights. I've unplugged this for now to give it a more European look, I'm not sure if it's actually necessarily illegal to have amber running lights in the UK but I figured it might be confusing for the typical UK motorist and I'd rather know they're definitely aware when I'm indicating!
Now what is missing from that above photo are rear indicators, and any flashing of the indicators.
So the next day I had a look at the rears, the short version is that I faffed around a bit with them but ultimately it was an earthing issue again. Partly due to the elaborate internal connection between the bulb holder and the indicator housing having some corrosion in it which can't have been helping the connection
And partly because when I refurbed the rear bracket that holds the indicators and the tailight, I painted over the interface where the indicators fit on, took a bit of that paint off and there was light. They also flashed slowly, I think this will speed up when the bike is actually running though.
The horn issue turned out to just be a dead horn. I substituted in one of the horns of my Crossfire and it worked on the button, so bought a suitable replacement horn and that was that sorted.
1979 KZ400 B2
4 Wheeled Projects:
1973 MG BGT
2000 Alfa Romeo 166
2003 Chrysler Crossfire
4 Wheeled Projects:
1973 MG BGT
2000 Alfa Romeo 166
2003 Chrysler Crossfire
The following user(s) said Thank You: Nerdy, Wookie58, kimchella
Please Log in or Create an account to join the conversation.
- Nerdy
-
- Away
- Sustaining Member
-
Registered
- Posts: 1173
- Thanks: 494
Re: 1979 KZ400 B Restoration/Recommission
10 Mar 2025 18:09
Excellent work!! That engine looks amazing.

Re: the exhaust - the OD (outer diameter) of the header pipes is 1.5"; it should be easy to find a set of mufflers you can install with clamps, rather than welding. Welding requires clean metal (so no plating) and the final product will look nice fore and aft of the join but the weld itself will be prone to rust. You could have the whole system replated to mitigate the rust but that will be $$$.
Re: the exhaust - the OD (outer diameter) of the header pipes is 1.5"; it should be easy to find a set of mufflers you can install with clamps, rather than welding. Welding requires clean metal (so no plating) and the final product will look nice fore and aft of the join but the weld itself will be prone to rust. You could have the whole system replated to mitigate the rust but that will be $$$.
1967 Yamaha YCS1 Bonanza
1980 KZ440B
1981 Yamaha XT250H
1981 KZ440 LTD project bike
1981 GPz550
2013 Yamaha FZ6R
The following user(s) said Thank You: adam73bgt
Please Log in or Create an account to join the conversation.
Moderators: Street Fighter LTD