
Dueling Kz400's
- 650ed
-
- Offline
- User
-

Registered
- Posts: 15334
- Thanks: 2833
Re: Dueling Kz400's
08 Oct 2019 18:52
I read about the same broken bolt problem in 2005 just before removing the carbs from my 1977 KZ650 to replace the carb holders. I decided to try soaking the carb holder bolts with Kroil before tackling the job. An engineer friend of mine told me about Kroil; I had never used it before, but I figured it couldn't hurt. I soaked the carb holder bolts for 3 days applying Kroil once a day. To my very happy surprise when I removed the bolts they came out with no problems at all. Maybe the bolts would have come out without Kroil, but since then I have used Kroil whenever I find a bolt difficult to budge, and it has always worked well for me. Ed

1977 KZ650-C1 Original Owner - Stock (with additional invisible FIAMM horn)
The following user(s) said Thank You: loudhvx
Please Log in or Create an account to join the conversation.
- loudhvx
-
 Topic Author
- Offline
- KZr Legend
-

Registered
- Posts: 10863
- Thanks: 1622
Re: Dueling Kz400's
08 Oct 2019 19:02
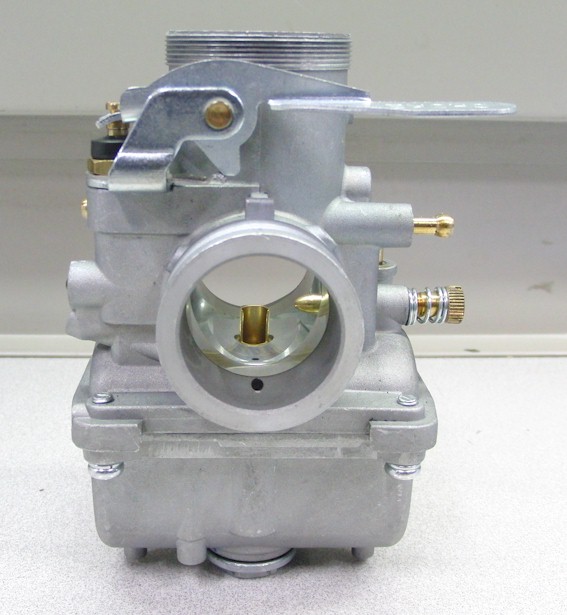
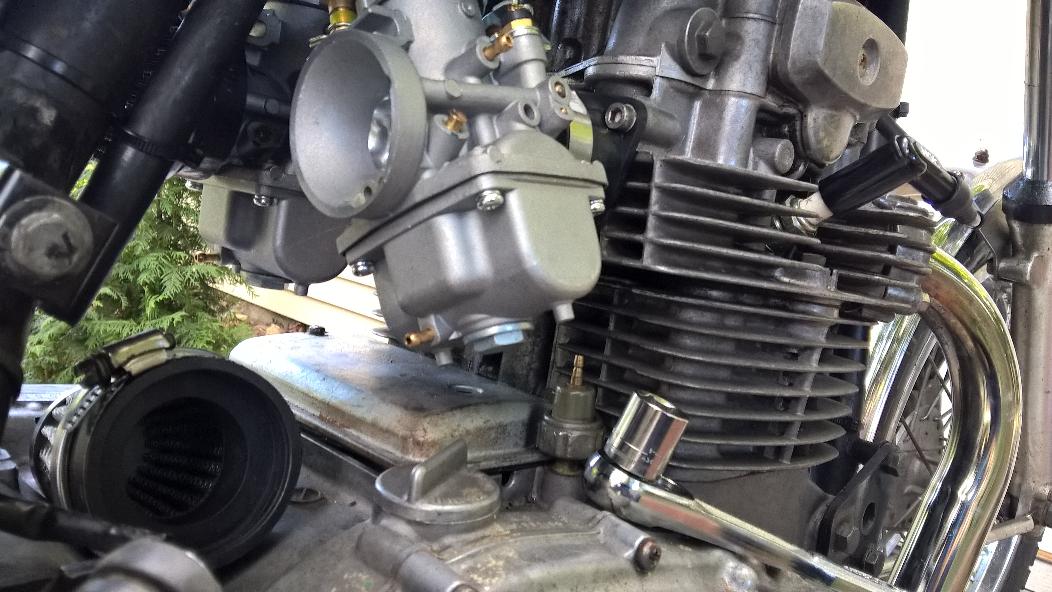
So after getting all the screws out, we installed brand new carb holders on the D3, but we didn't have any carbs to install. We did some research and found that some companies were selling dual Mikuni VM-30 kits, but they were pretty far out of the budget. We found these Chinese "replica" VM30's for sale at much less than 1/2 the price.
Everybody online that has had any experience with them absolutely recommends against them that they cannot be made to work. "DO NOT BUY!" is the usually comment we see. So naturally we bought two of them. The main theme of this bike is to spend no money unless absolutely necessary, and we like a challenge.
Everybody online that has had any experience with them absolutely recommends against them that they cannot be made to work. "DO NOT BUY!" is the usually comment we see. So naturally we bought two of them. The main theme of this bike is to spend no money unless absolutely necessary, and we like a challenge.
1981 KZ550 D1 gpz.
Kz550 valve train warning.
Other links.
Kz550 valve train warning.
Other links.
Please Log in or Create an account to join the conversation.
- loudhvx
-
Topic Author
- Offline
- KZr Legend
-
Registered
- Posts: 10863
- Thanks: 1622
Re: Dueling Kz400's
08 Oct 2019 19:12 - 08 Oct 2019 20:02
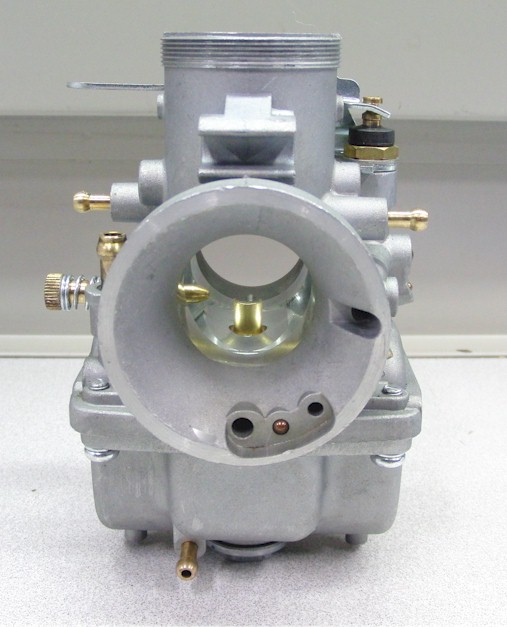
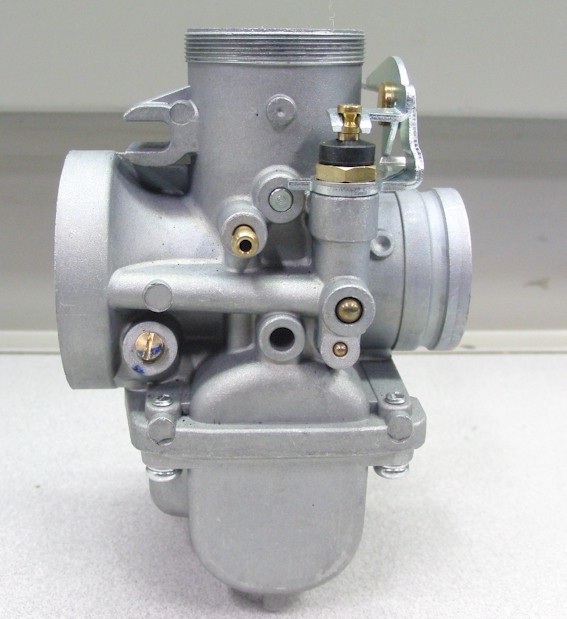
Well, I have to say they were about what I expected. We didn't see too many details about what is actually wrong with these carbs so we didn't really know what to look for. While they do appear to be similar to VM30's, there are a few noticeable differences at least cosmetically.
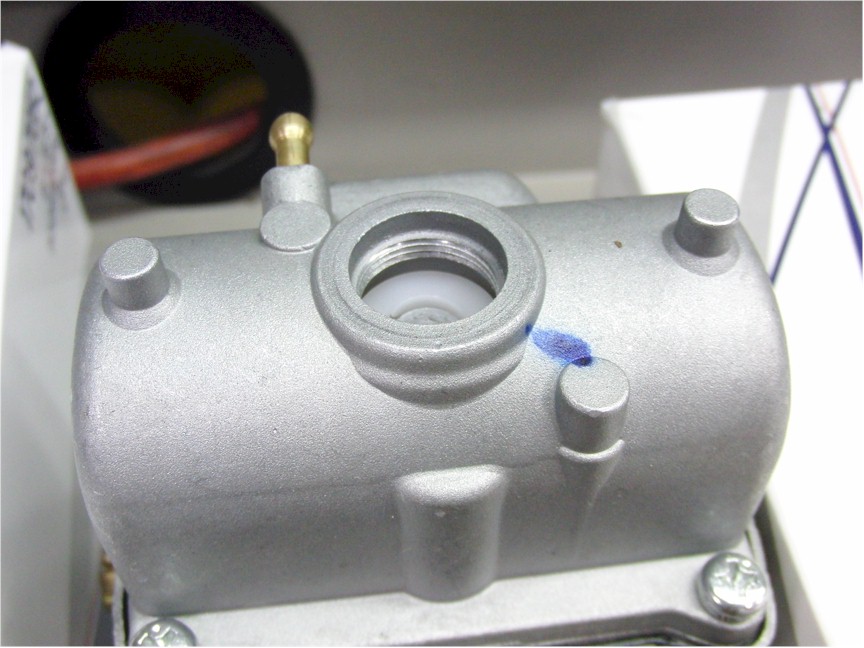
I don't have any experience with actual brand new Mikuni carbs to compare with, but I will say the construction of these replica carbs seem decent. I'm surprised I haven't had to actually "fix" anything on them yet. They hold gas and don't seem to overflow. There is no easy way to check fuel level without some adapter for the bottom jet-access door. But they seem to be set at a workable level. The pipe at the bottom is just an overflow.
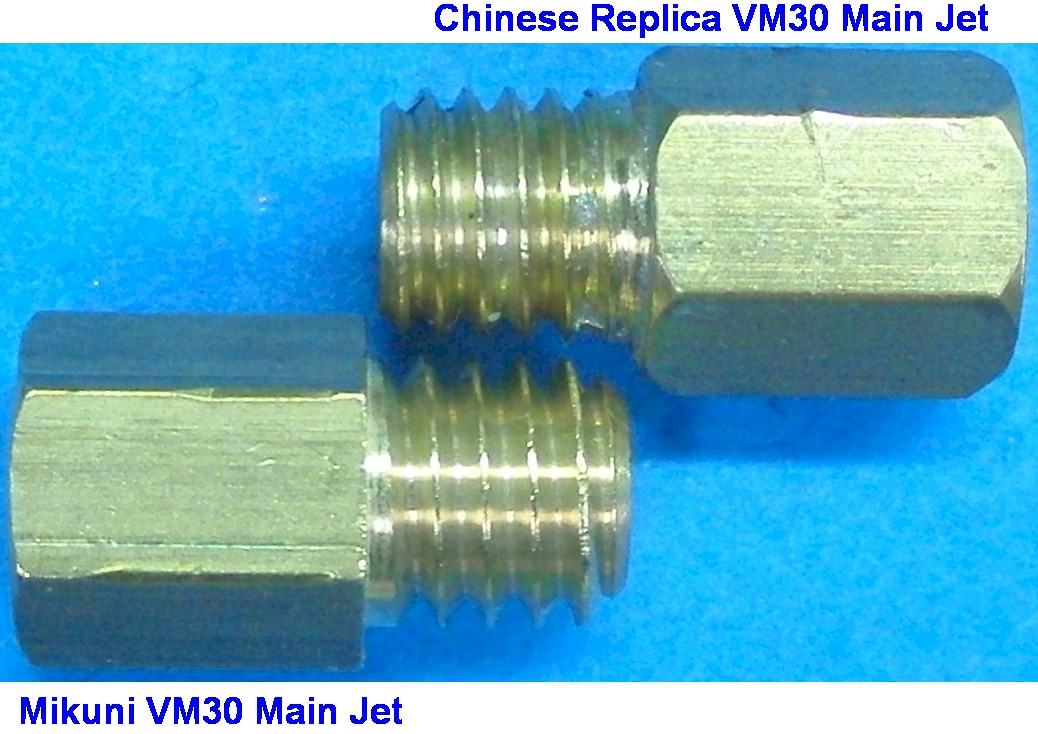
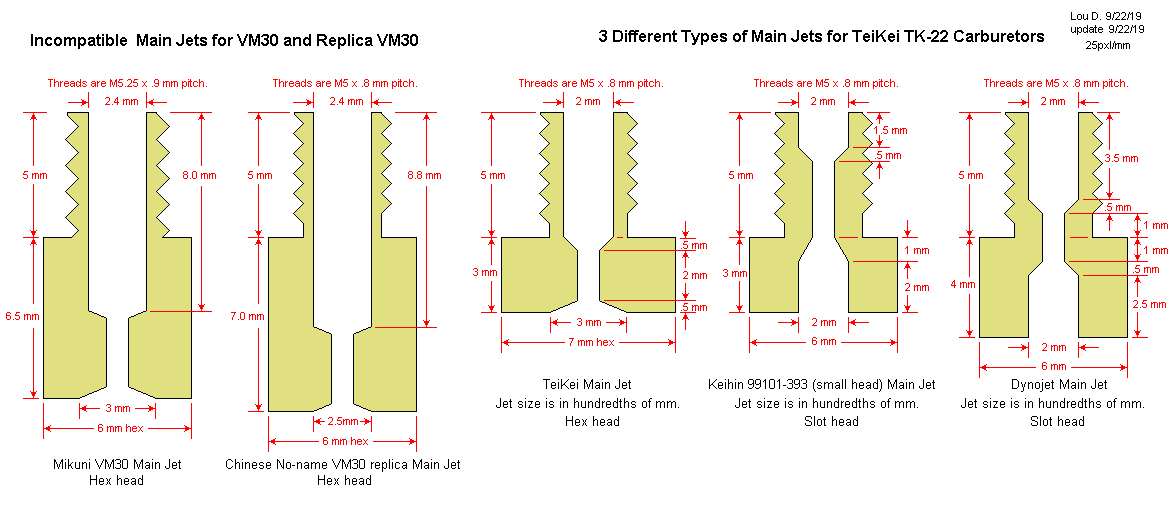
The main difference that effects us is the main jets are a different thread than real VM30 main jets.
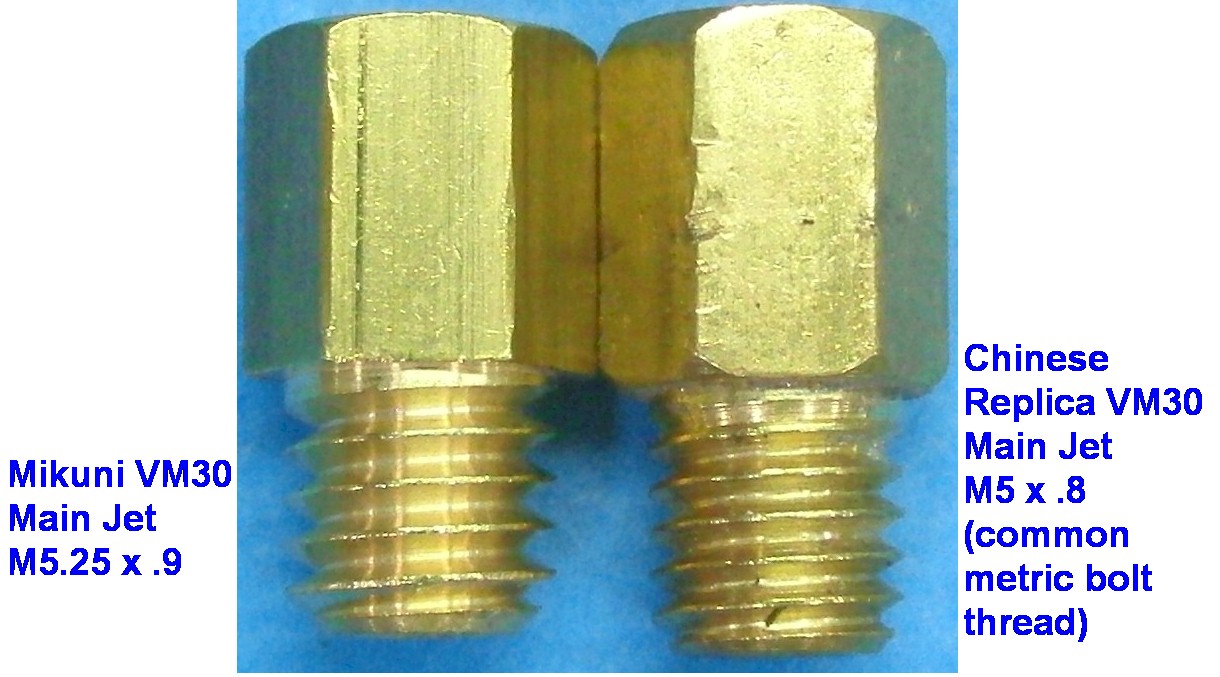
At first this was a bummer since we couldn't find any replacement mains available. But then it occurred to me, if I was going to make a knockoff carb, I wouldn't go to the trouble of making some proprietary main jet, I'd make it use some commonly available main jet. So sure enough, the main jets from the TK22/ Dynojet / Keihin thread right in and seem to work ok.
And I have a boat load of TK22-compatible main jets... so we lucked out there.
As you can see, though, the internal structure of the main jets are pretty different. We'll see if this ends up being a problem or not.
I don't have any experience with actual brand new Mikuni carbs to compare with, but I will say the construction of these replica carbs seem decent. I'm surprised I haven't had to actually "fix" anything on them yet. They hold gas and don't seem to overflow. There is no easy way to check fuel level without some adapter for the bottom jet-access door. But they seem to be set at a workable level. The pipe at the bottom is just an overflow.
The main difference that effects us is the main jets are a different thread than real VM30 main jets.
At first this was a bummer since we couldn't find any replacement mains available. But then it occurred to me, if I was going to make a knockoff carb, I wouldn't go to the trouble of making some proprietary main jet, I'd make it use some commonly available main jet. So sure enough, the main jets from the TK22/ Dynojet / Keihin thread right in and seem to work ok.
And I have a boat load of TK22-compatible main jets... so we lucked out there.
As you can see, though, the internal structure of the main jets are pretty different. We'll see if this ends up being a problem or not.
1981 KZ550 D1 gpz.
Kz550 valve train warning.
Other links.
Kz550 valve train warning.
Other links.
Last edit: 08 Oct 2019 20:02 by loudhvx.
Please Log in or Create an account to join the conversation.
- loudhvx
-
Topic Author
- Offline
- KZr Legend
-
Registered
- Posts: 10863
- Thanks: 1622
Re: Dueling Kz400's
08 Oct 2019 19:20 - 08 Oct 2019 20:00
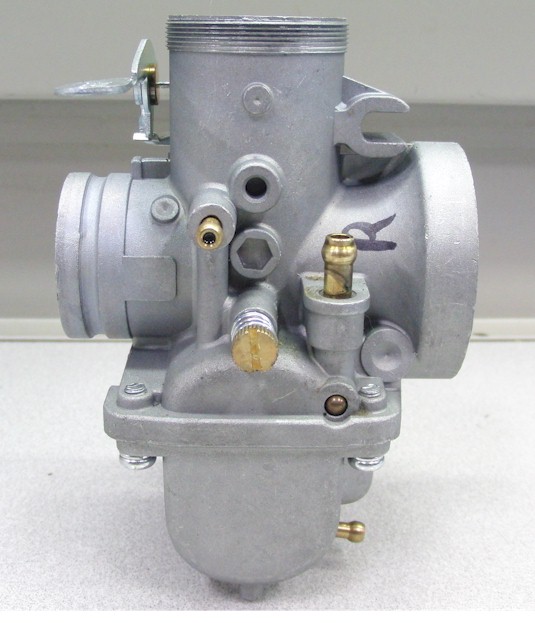
One thing that's real nice... main jet changes take less than 5 minutes with that access plug on the bottom. We just loosen the carb holder clamp, tilt the carb out, and a 17mm wrench takes out the plug.
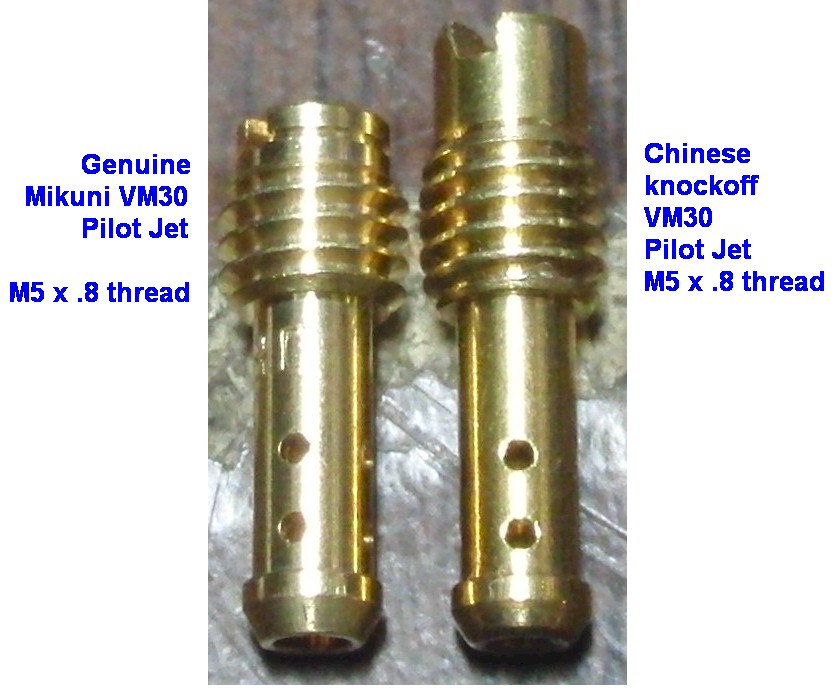
The pilot jets are directly swappable with easy-to-get real Mikuni pilot jets. They are not exactly the same, but almost the same.
Oh, and yes, we are using the dreaded cheapo, no-name pods that can actually block the intake ports. We are going to try to tackle the challenges of those at the same time.
1981 KZ550 D1 gpz.
Kz550 valve train warning.
Other links.
Kz550 valve train warning.
Other links.
Last edit: 08 Oct 2019 20:00 by loudhvx.
Please Log in or Create an account to join the conversation.
- loudhvx
-
Topic Author
- Offline
- KZr Legend
-
Registered
- Posts: 10863
- Thanks: 1622
Re: Dueling Kz400's
08 Oct 2019 19:30 - 08 Oct 2019 19:59
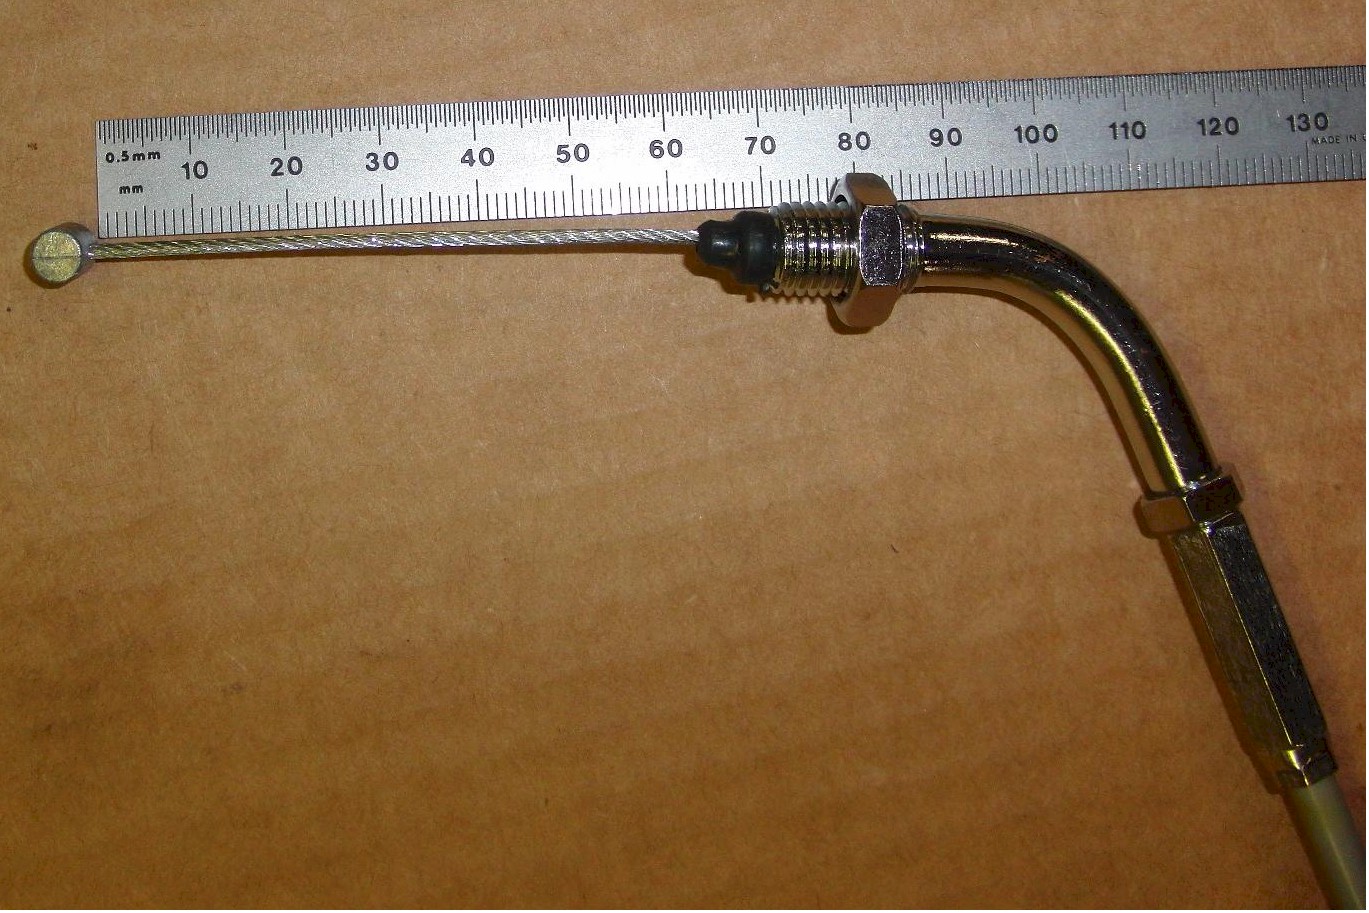
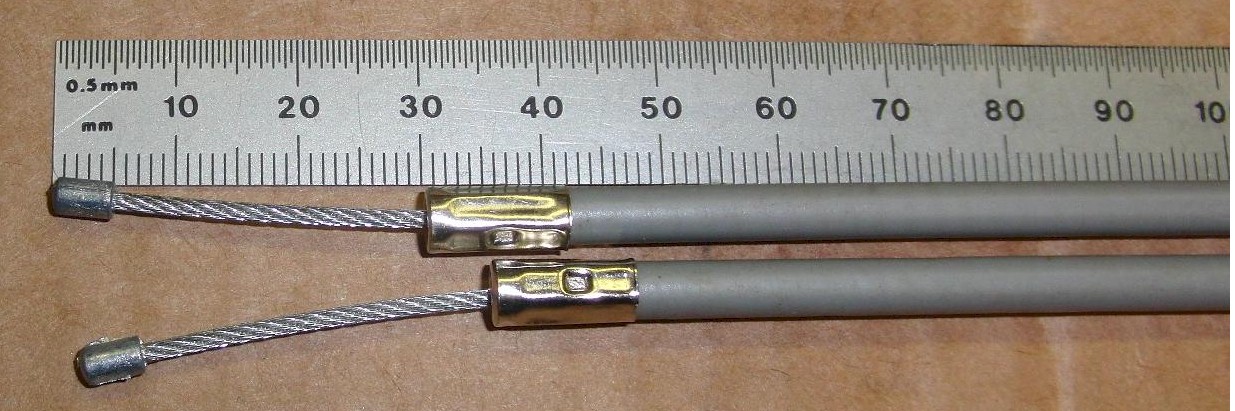
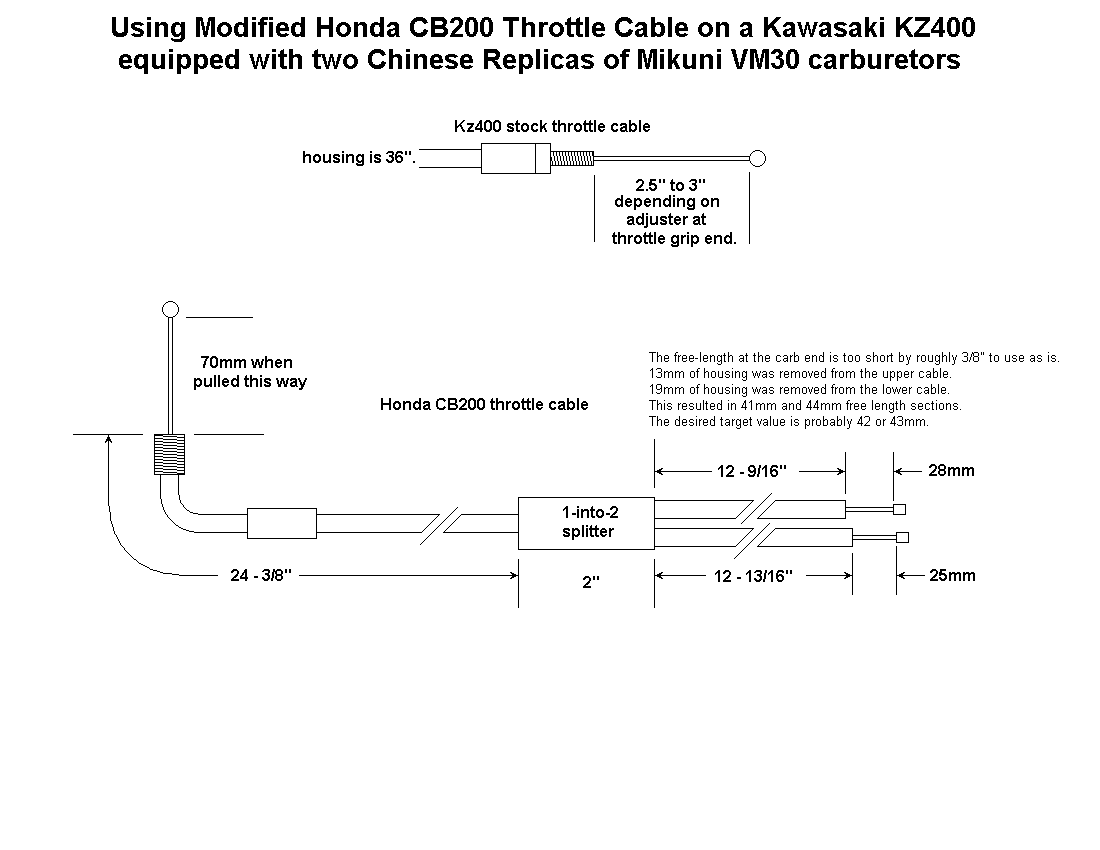
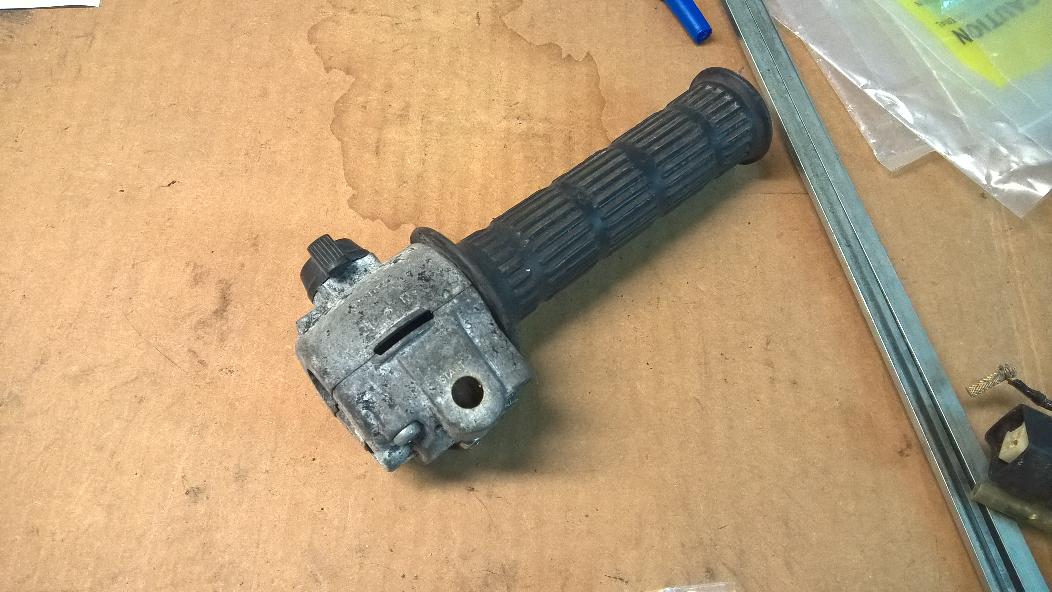
One of the main challenges are what to do about the throttle cables. Some kits include a 1-into-2 cable and others kits don't.
We took a big chance and bought a very low-priced Honda CB200 throttle cable assembly which comes with a splitter. Well it works, but requires a bit of modification to work correctly. The CB200 does not have enough travel in the slide end of the cable. So we had to take out a dremel and remove a bit of the throttle housing. I would recommend cutting the cable and removing the housing to do it precisely. Then re-solder new ends on at the carb end. We dinked around with removeing tiny bits and pieces of housing while trying to protect the cable. It worked, but took a long time and is very tedious.
This allowed us to use the stock Kz400 throttle assembly, but it also allows you to use one of the racing throttles that have 1/4-turn from idle to full. The stock throttle feels a lot nicer, though, so even though it is rat-rod ugly, we are going to use it.
1981 KZ550 D1 gpz.
Kz550 valve train warning.
Other links.
Kz550 valve train warning.
Other links.
Last edit: 08 Oct 2019 19:59 by loudhvx.
The following user(s) said Thank You: Siderx
Please Log in or Create an account to join the conversation.
- loudhvx
-
Topic Author
- Offline
- KZr Legend
-
Registered
- Posts: 10863
- Thanks: 1622
Re: Dueling Kz400's
08 Oct 2019 19:34
Thanks Ed, yeah we have Kroil at work and use it periodically. It does seem good. My buddy only had liquid wrench so we used that and heat and light tapping and let it set for days... all tricks I've used in the past, but these carb holders screws are some of the worst on Kz's. It's the only screws on Kz's that I ever have trouble with. Even the brake caliper bolts and bleeders came loose for me after some struggle. I don't know if it's condensation fwhile running on cold days or what, and it's always the one on the far right, which leads me to believe it's from sitting parhked in the rain.
1981 KZ550 D1 gpz.
Kz550 valve train warning.
Other links.
Kz550 valve train warning.
Other links.
Please Log in or Create an account to join the conversation.
- loudhvx
-
Topic Author
- Offline
- KZr Legend
-
Registered
- Posts: 10863
- Thanks: 1622
Re: Dueling Kz400's
09 Oct 2019 06:43 - 09 Oct 2019 06:52
The Chinese VM30 carbs come with unmarked jets.
I was able to measure the mains to be approximately 137 to 140,
and the pilots to be approximately 45 to 47.
Many thanks to Diggerdanh for posting the details of his dual-VM jetting. Here is his build thread... very inspiring, by the way.
www.kzrider.com/forum/11-projects/598619...ramber-to-be?start=0
He saved me some time in getting a starting point for these carbs. Now, since the carbs are not actual Mikuni's, it's not clear that his jetting recommendations apply to these carbs, but it was a starting point at least. He mentioned #25 and #30 pilots so I ordered some #30 pilots to start with. The mains, being near 140, are in the range diggerdanh mentioned so I tried them first.
On the initial fire up, back in July, of the D3 with the Chinese carbs, it ran terrible. It barely started after kicking for what seemed like hours. It was probably only a few minutes in 95 deg heat and very high humidity. It took starting fluid to really make it catch, then it held a very high and unsteady idle. I could tell the jetting was pretty far off but it seemed so erratic I suspected the battery was damaged from deep-cycling, due to the earlier posted , non-functional (to say the least) charging system.
Sure enough, the battery which had 12v a few minutes earlier after coming off the charger, was down to 7 or 8 volts.
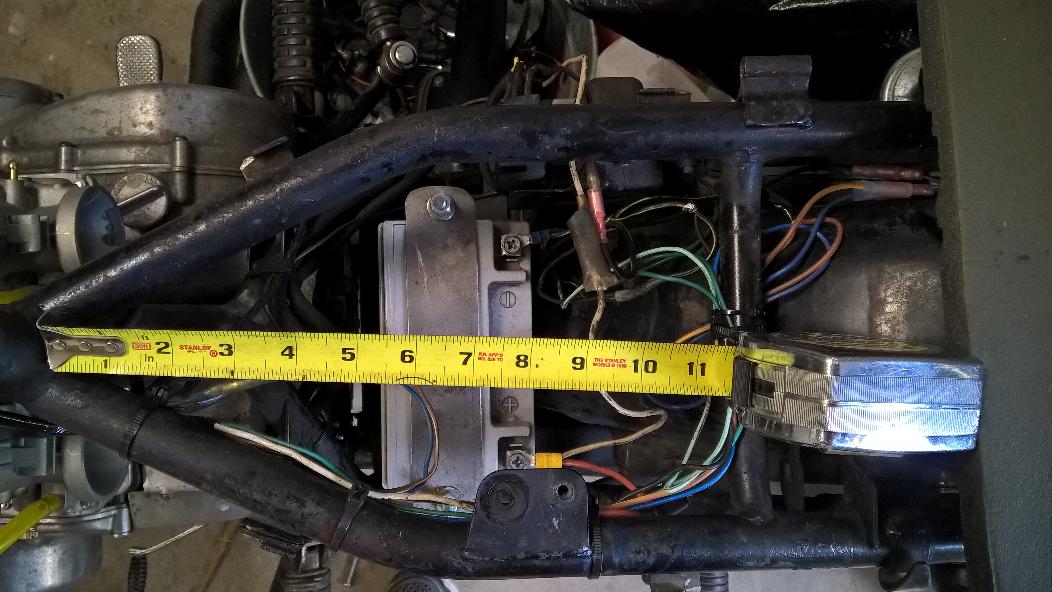
So let's just rewire it and put in a smaller, lighter battery, in a less conspicuous location.
First some measurments...
I was able to measure the mains to be approximately 137 to 140,
and the pilots to be approximately 45 to 47.
Many thanks to Diggerdanh for posting the details of his dual-VM jetting. Here is his build thread... very inspiring, by the way.
www.kzrider.com/forum/11-projects/598619...ramber-to-be?start=0
He saved me some time in getting a starting point for these carbs. Now, since the carbs are not actual Mikuni's, it's not clear that his jetting recommendations apply to these carbs, but it was a starting point at least. He mentioned #25 and #30 pilots so I ordered some #30 pilots to start with. The mains, being near 140, are in the range diggerdanh mentioned so I tried them first.
On the initial fire up, back in July, of the D3 with the Chinese carbs, it ran terrible. It barely started after kicking for what seemed like hours. It was probably only a few minutes in 95 deg heat and very high humidity. It took starting fluid to really make it catch, then it held a very high and unsteady idle. I could tell the jetting was pretty far off but it seemed so erratic I suspected the battery was damaged from deep-cycling, due to the earlier posted , non-functional (to say the least) charging system.
Sure enough, the battery which had 12v a few minutes earlier after coming off the charger, was down to 7 or 8 volts.
So let's just rewire it and put in a smaller, lighter battery, in a less conspicuous location.
First some measurments...
1981 KZ550 D1 gpz.
Kz550 valve train warning.
Other links.
Kz550 valve train warning.
Other links.
Last edit: 09 Oct 2019 06:52 by loudhvx.
Please Log in or Create an account to join the conversation.
- loudhvx
-
Topic Author
- Offline
- KZr Legend
-
Registered
- Posts: 10863
- Thanks: 1622
Re: Dueling Kz400's
09 Oct 2019 06:54 - 09 Oct 2019 07:51
The battery is a used item. It is from a computer backup system we use at work. We get rid of failed backup unit from time to time, but some of the batteries are still good, so but my buddy and I scavenged some of the batteries over the years. Once fully re-charged, they make a very handy 12v source for projects. So we thought we'd throw one in the bike. At least it was free.
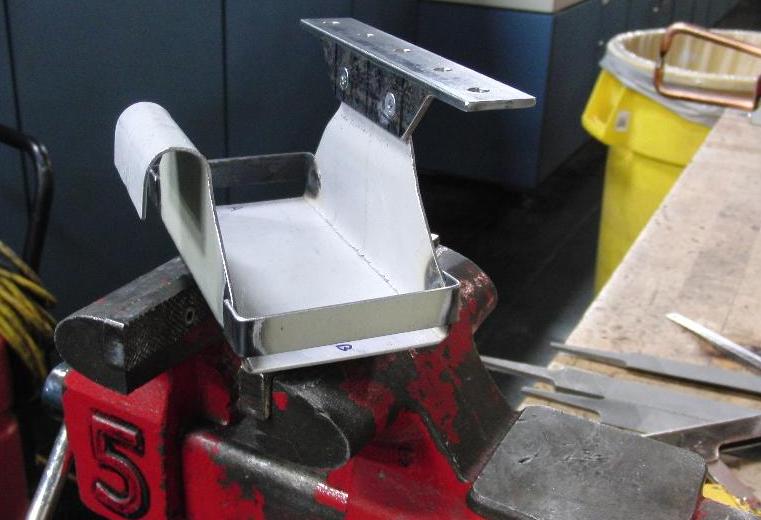
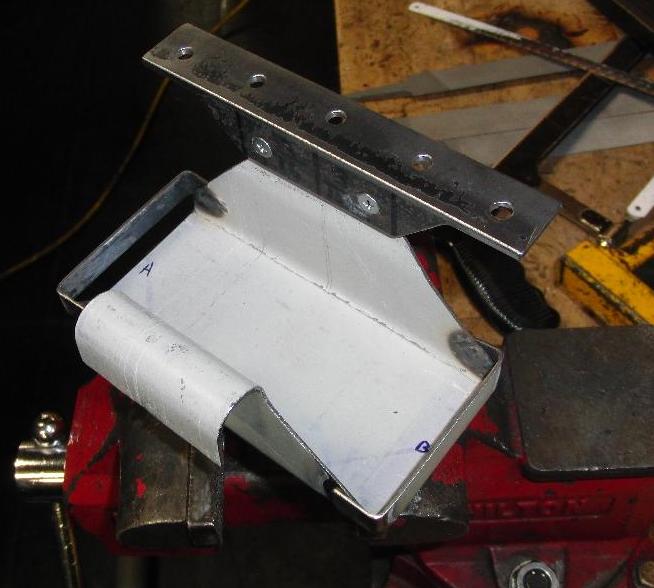
These batteries can be had for very cheap at industrial battery supply stores... like $10 or less sometimes, but for anyone wanting to use them be aware, they are not designed for automotive use. That is, their armor is very thin as the battery is meant to be fully supported by cushions of some sort and not really meant to be vibrated. So we made sure to make a very flat, supportive base on the battery box and fully enclose a holder around the perimeter. Then we put some thin adhesive, soft rubber pads on the bottom and side supports. The whole thing gently "hugs" the battery.
Our budget demands pulling scrap out of the dumpster and using whatever came on the bike, since that's what we have. So I hacked out and bent up some sheet metal scraps from some discarded machine parts at work. My buddy finished a couple welds and painted it.
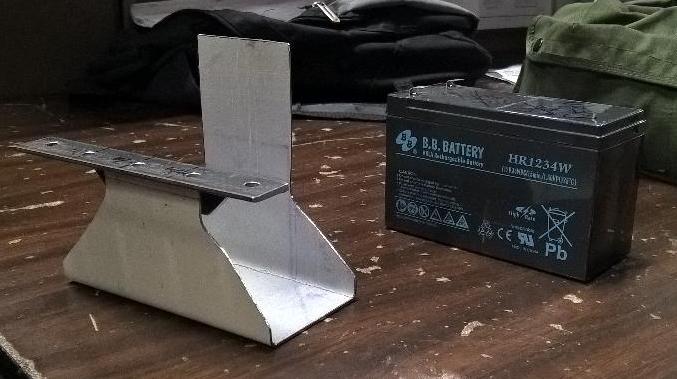
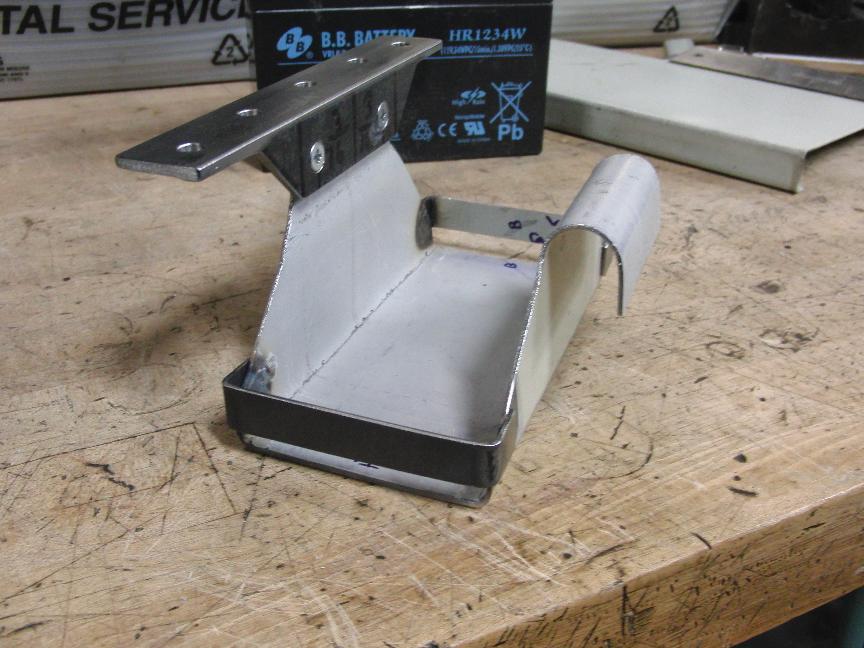
We used a Harbor Freight spot welder to assemble the parts, but I'm not convinced it's strong enough for permanent welds. My buddy will tack it with the tig to secure the side bands.
These batteries can be had for very cheap at industrial battery supply stores... like $10 or less sometimes, but for anyone wanting to use them be aware, they are not designed for automotive use. That is, their armor is very thin as the battery is meant to be fully supported by cushions of some sort and not really meant to be vibrated. So we made sure to make a very flat, supportive base on the battery box and fully enclose a holder around the perimeter. Then we put some thin adhesive, soft rubber pads on the bottom and side supports. The whole thing gently "hugs" the battery.
Our budget demands pulling scrap out of the dumpster and using whatever came on the bike, since that's what we have. So I hacked out and bent up some sheet metal scraps from some discarded machine parts at work. My buddy finished a couple welds and painted it.
We used a Harbor Freight spot welder to assemble the parts, but I'm not convinced it's strong enough for permanent welds. My buddy will tack it with the tig to secure the side bands.
1981 KZ550 D1 gpz.
Kz550 valve train warning.
Other links.
Kz550 valve train warning.
Other links.
Last edit: 09 Oct 2019 07:51 by loudhvx.
Please Log in or Create an account to join the conversation.
- loudhvx
-
Topic Author
- Offline
- KZr Legend
-
Registered
- Posts: 10863
- Thanks: 1622
Re: Dueling Kz400's
09 Oct 2019 07:06 - 09 Oct 2019 08:01
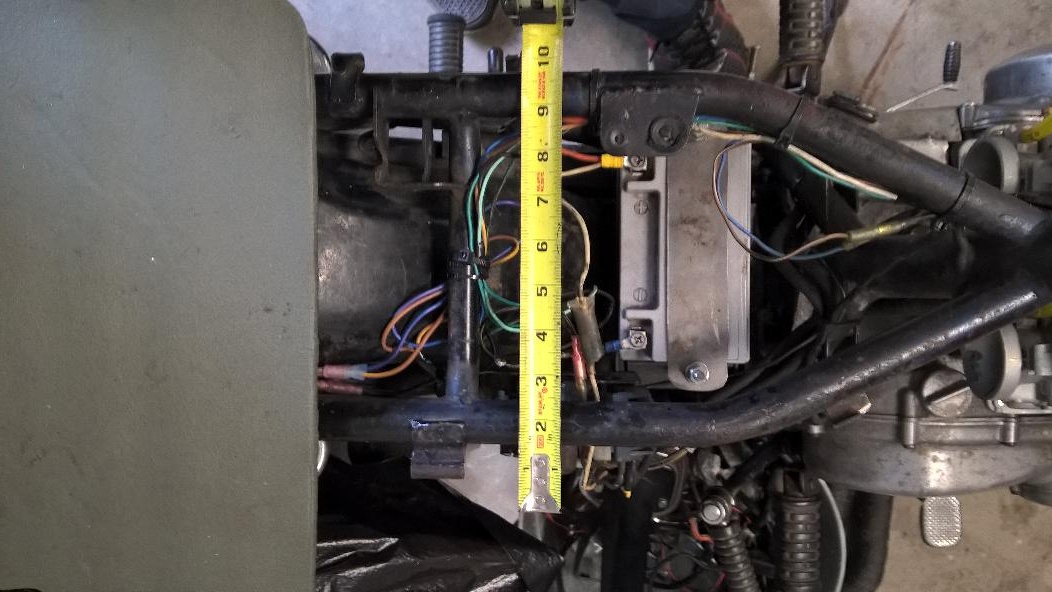
We don't want to cut anything on the frame if we can help it, so this design worked out nicely. The battery was the exact right size to fit between a frame spar and the old mounting tabs for the old battery box, (which no longer exists). It also allows us to relocate all of the electrical parts under the seat, out of view. It gives nice easy access to everything by simply lifting the seat.
The only thing we had to add was one tab that my buddy tigged onto the far-side frame rail as a mirror of the factory tab on the near-side frame rail.
We didn't want to cut off the connectors from the sub-harnesses to keep them intact. If we had, the wiring would have been a bit neater, so it's not pretty, but it's out of sight and the re-wire only took a few hours. We didn't have to buy any wire since we have a lot of good scraps from other Kz re-wire jobs, and we already had the connectors. So at least, again, it was basically free and fast.
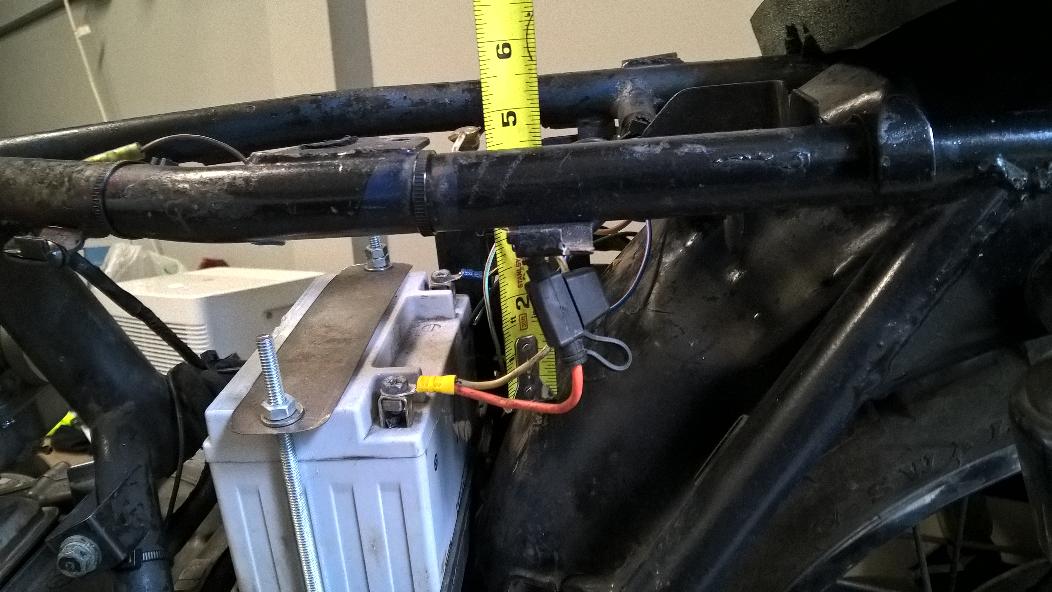
The green bungie is temporary, We'll fab a nicer strap when we know the battery holds up.
We will probably make a solid-state regulator to replace the mechanical one.
There is a decent amount of space between the top of the frame rails and the bottom of the seat pan... about 3/4" to 1". But just to be on the safe side, I situated the battery so that the positive terminal is underneath the document holder of the bike. That is a plastic cover which is another layer of insulation against a possible short. It shouldn't matter since there is almost a 1/8" clearance from the terminal to the document holder, and another 1/8" to the seat pan.
The only thing we had to add was one tab that my buddy tigged onto the far-side frame rail as a mirror of the factory tab on the near-side frame rail.
We didn't want to cut off the connectors from the sub-harnesses to keep them intact. If we had, the wiring would have been a bit neater, so it's not pretty, but it's out of sight and the re-wire only took a few hours. We didn't have to buy any wire since we have a lot of good scraps from other Kz re-wire jobs, and we already had the connectors. So at least, again, it was basically free and fast.
The green bungie is temporary, We'll fab a nicer strap when we know the battery holds up.
We will probably make a solid-state regulator to replace the mechanical one.
There is a decent amount of space between the top of the frame rails and the bottom of the seat pan... about 3/4" to 1". But just to be on the safe side, I situated the battery so that the positive terminal is underneath the document holder of the bike. That is a plastic cover which is another layer of insulation against a possible short. It shouldn't matter since there is almost a 1/8" clearance from the terminal to the document holder, and another 1/8" to the seat pan.
1981 KZ550 D1 gpz.
Kz550 valve train warning.
Other links.
Kz550 valve train warning.
Other links.
Last edit: 09 Oct 2019 08:01 by loudhvx.
Please Log in or Create an account to join the conversation.
- loudhvx
-
Topic Author
- Offline
- KZr Legend
-
Registered
- Posts: 10863
- Thanks: 1622
Re: Dueling Kz400's
09 Oct 2019 07:31 - 09 Oct 2019 07:33
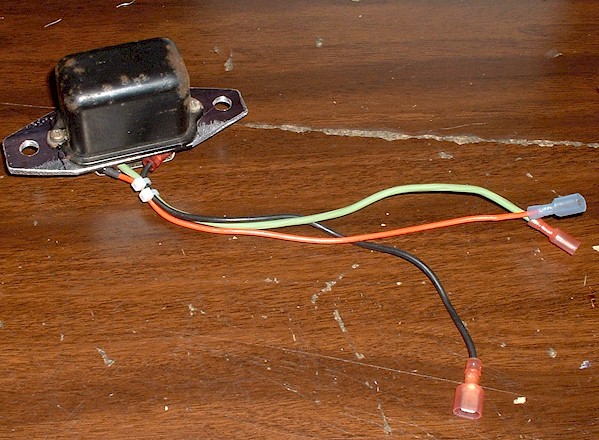
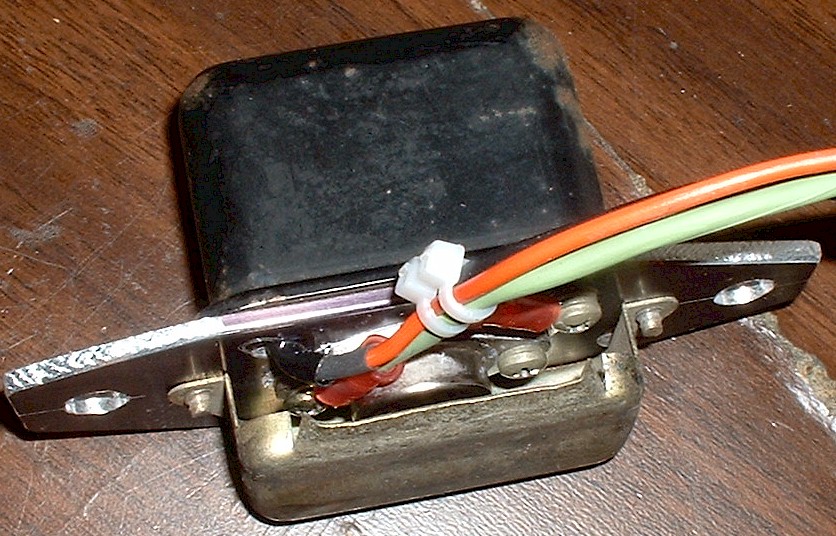
Years ago I designed a Kz400 regulator around some parts I already had. I was able to mount it in the stock regulator box. We will probably make a couple of these for the current D3 and D4, but it may be awhile. Here are some details.
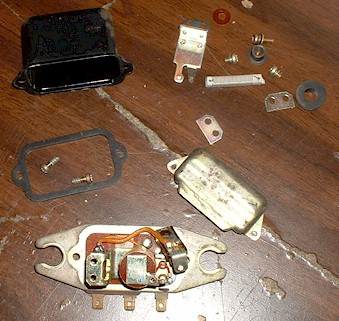
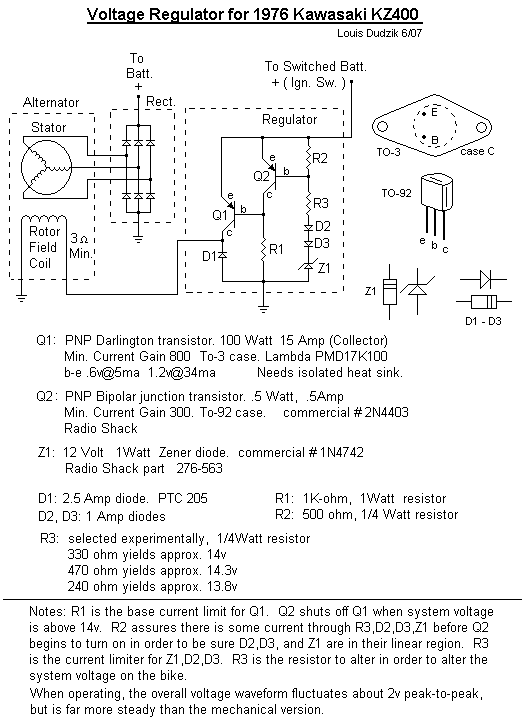
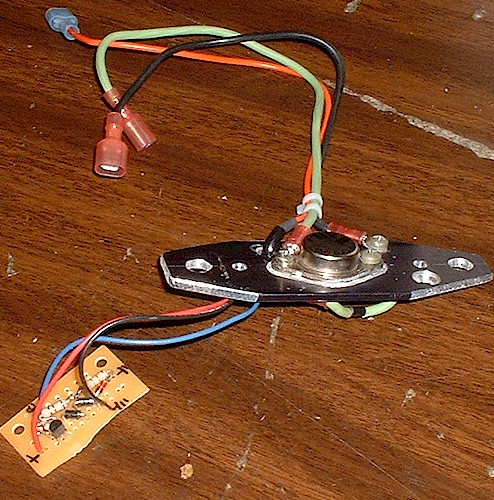
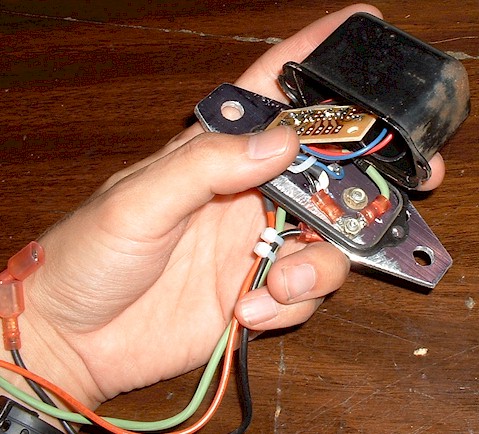
1981 KZ550 D1 gpz.
Kz550 valve train warning.
Other links.
Kz550 valve train warning.
Other links.
Last edit: 09 Oct 2019 07:33 by loudhvx.
The following user(s) said Thank You: Siderx
Please Log in or Create an account to join the conversation.
- loudhvx
-
Topic Author
- Offline
- KZr Legend
-
Registered
- Posts: 10863
- Thanks: 1622
Re: Dueling Kz400's
09 Oct 2019 07:47
So after the rewire and new (used) battery, it starts far more easily. After a quick clean and adjustment of the points it holds a steady idle, but that's about all. Any throttle causes it to stop firing and if you close the throttle fast enough, the engine will catch and hold idle again. So it's very rich and we will need to do some jetting, as expected.
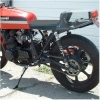
With cut-off open headers it's loud-as-F and the neighbors have been pretty generous in not complaining. The wrapped headers that came with the bike are garbage. They are single-wall aftermarket pipes that the previous owner cobbled together by using a single pop-rivet to hold the flange onto the pipe. That probably lasted 5 minutes. The flanges were deteriorated so we swapped the D4 header pipes onto the D3. So the D4 has the D3 carbs and the D3 has the D4 exhaust.
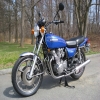
Here's a reminder of what it looked like.
Here's the pop-riveted flange.
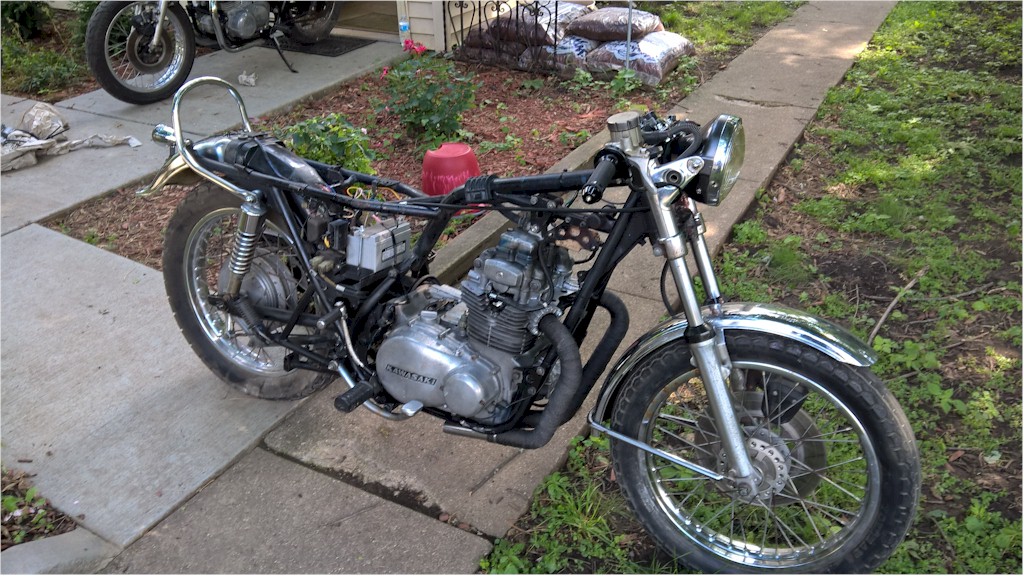
D4 headers on the D3, with electrical finished, for now.
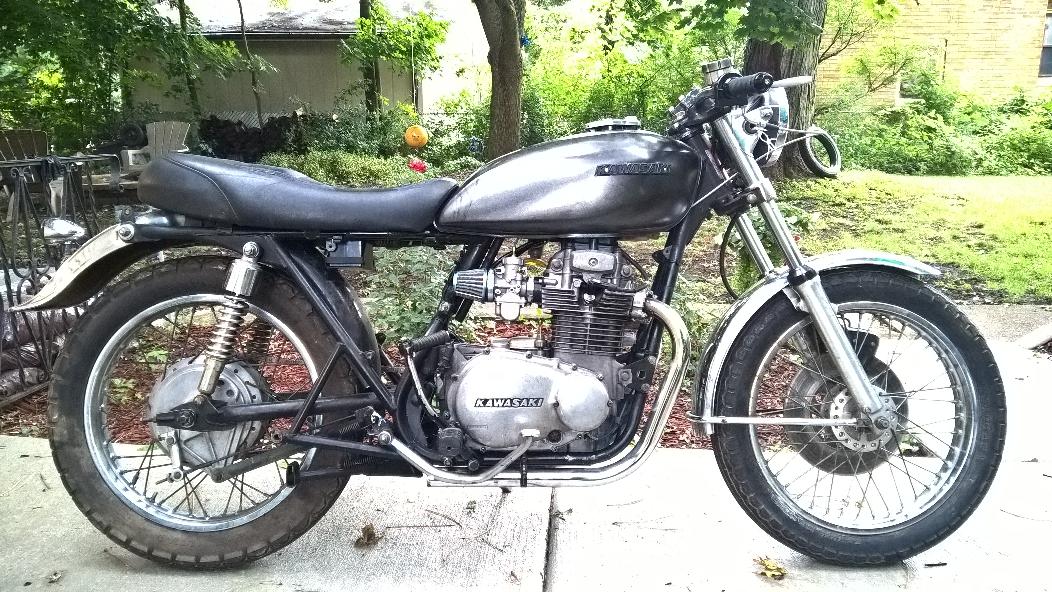
With cut-off open headers it's loud-as-F and the neighbors have been pretty generous in not complaining. The wrapped headers that came with the bike are garbage. They are single-wall aftermarket pipes that the previous owner cobbled together by using a single pop-rivet to hold the flange onto the pipe. That probably lasted 5 minutes. The flanges were deteriorated so we swapped the D4 header pipes onto the D3. So the D4 has the D3 carbs and the D3 has the D4 exhaust.
Here's a reminder of what it looked like.
Here's the pop-riveted flange.
D4 headers on the D3, with electrical finished, for now.
1981 KZ550 D1 gpz.
Kz550 valve train warning.
Other links.
Kz550 valve train warning.
Other links.
Please Log in or Create an account to join the conversation.
- loudhvx
-
Topic Author
- Offline
- KZr Legend
-
Registered
- Posts: 10863
- Thanks: 1622
Re: Dueling Kz400's
10 Oct 2019 08:16 - 10 Oct 2019 08:54
Well, I would have liked to start jetting the bike, but it has come all to clear that the open headers are just too damn loud. I thought maybe for a rat-rod loud pipes might be appropriate, and I still want a louder-than-stock exhaust, but this thing gave me a headache. Our workspace is sometimes between two garages and the sound just reverberates back and forth through my skull. And again, the neighbors have been very patient so far, but no reason to push it.
The D4 has factory exhaust and it basically is the Prius of motorcycles. You could sneak up on a sleeping prairie dog and not even wake him up with that bike.
I wasn't planning to have to make an exhaust and the season is quickly coming to an end, so this is going to be slapped together fast and sloppy. Also, the allotment for an exhaust in the budget is exactly $0.00. It's going to get a little ugly.
So we made an exhaust using what we had, and luckily, we actually had the most important part, the factory, double-wall headers that someone hacked off. I wouldn't have sawed off pristine factory mufflers, but was glad to have the headers. They are very high quality even though they are heavy. Being double-wall will protect against bluing during the jetting trials.
My buddy just finished re-furbishing a U-Haul camper (they were available for a short time in the 70's and 80's) and had a chrome table leg that was a bit rusty. We decided that we would be able to make two mufflers out of that.
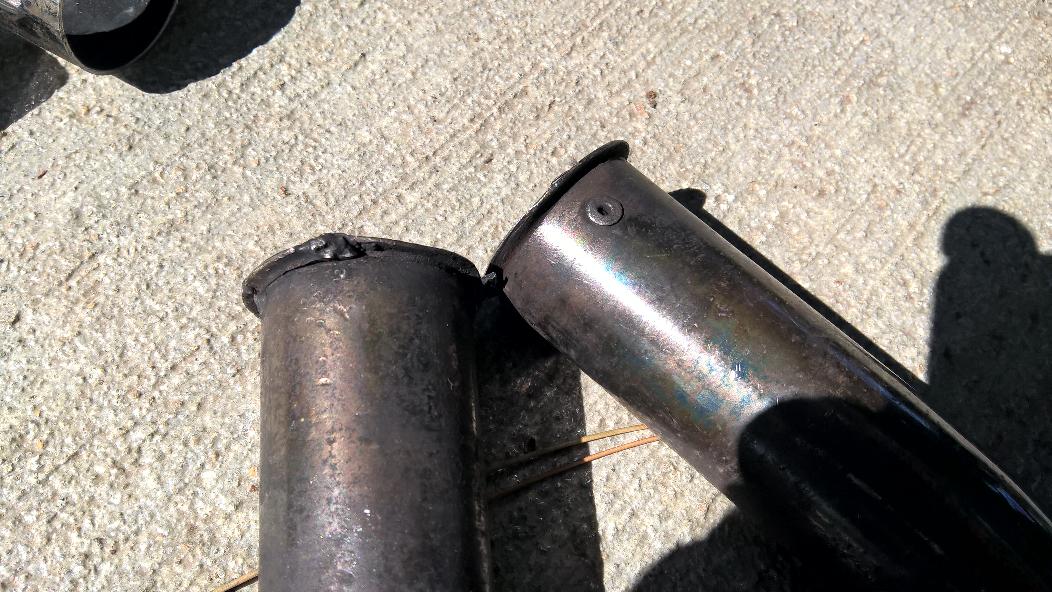
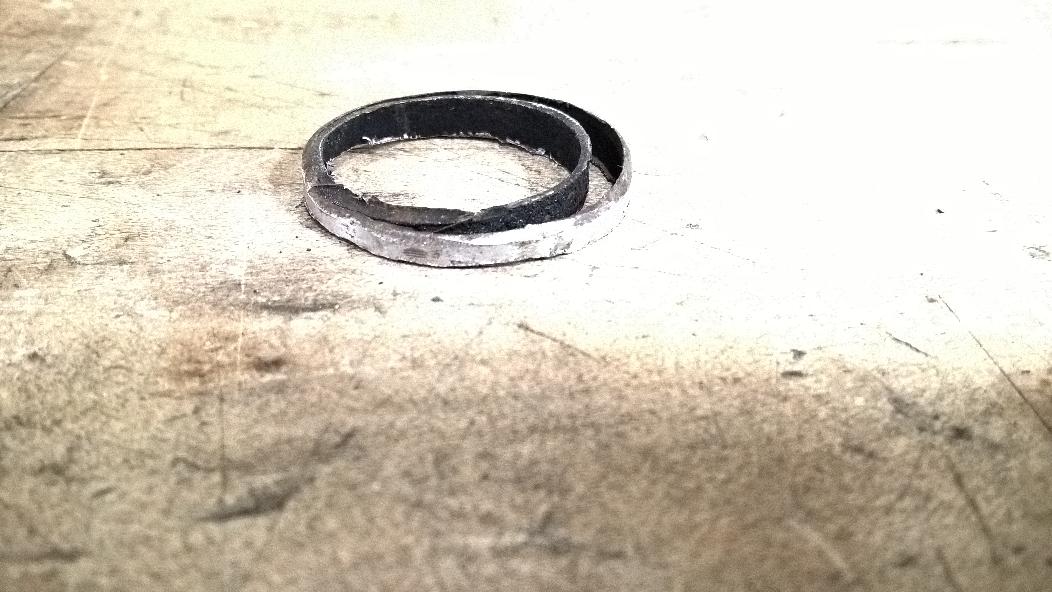
First, I had to square up the cutoff's on the headers. Notice the tube-within-a-tube. The inner tube is not necessarily centered and seems tacked to one wall at key places to prevent noise.
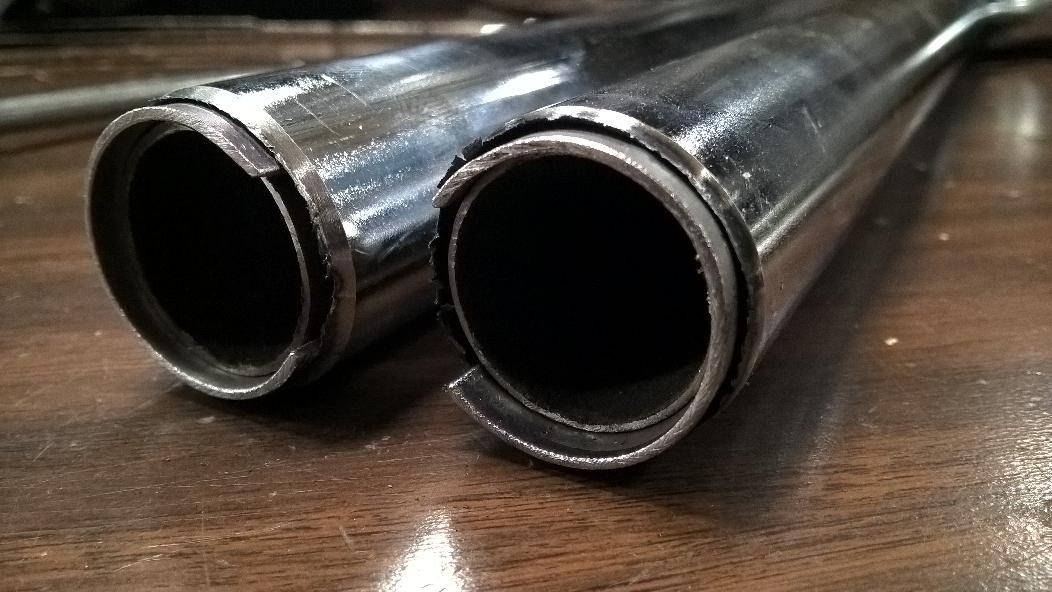
I cut out some shims to center the inner-tube before welding on the extensions.
I cut some extensions from the crappy headers that came with the bike to extend the factory headers a bit.
The extended part is only single-wall.
The D4 has factory exhaust and it basically is the Prius of motorcycles. You could sneak up on a sleeping prairie dog and not even wake him up with that bike.
I wasn't planning to have to make an exhaust and the season is quickly coming to an end, so this is going to be slapped together fast and sloppy. Also, the allotment for an exhaust in the budget is exactly $0.00. It's going to get a little ugly.
So we made an exhaust using what we had, and luckily, we actually had the most important part, the factory, double-wall headers that someone hacked off. I wouldn't have sawed off pristine factory mufflers, but was glad to have the headers. They are very high quality even though they are heavy. Being double-wall will protect against bluing during the jetting trials.
My buddy just finished re-furbishing a U-Haul camper (they were available for a short time in the 70's and 80's) and had a chrome table leg that was a bit rusty. We decided that we would be able to make two mufflers out of that.
First, I had to square up the cutoff's on the headers. Notice the tube-within-a-tube. The inner tube is not necessarily centered and seems tacked to one wall at key places to prevent noise.
I cut out some shims to center the inner-tube before welding on the extensions.
I cut some extensions from the crappy headers that came with the bike to extend the factory headers a bit.
The extended part is only single-wall.
1981 KZ550 D1 gpz.
Kz550 valve train warning.
Other links.
Kz550 valve train warning.
Other links.
Last edit: 10 Oct 2019 08:54 by loudhvx.
Please Log in or Create an account to join the conversation.
Moderators: Street Fighter LTD