
1981 KZ1000 J-to-K build
- SWest
-

- Offline
- Sustaining Member
-

Registered
- 10 22 2014
- Posts: 23615
- Thanks: 2985
Re: 1981 KZ1000 J-to-K build
10 Mar 2018 08:59
One thing at a time. ")
Steve
Steve
Z1b1000 1975 Z1b
kzrider.com/forum/11-projects/598262-kz-...-will-it-live#672882
kzrider.com/forum/2-engine/597654-poser?start=240#704229
kzrider.com/forum/11-projects/598262-kz-...-will-it-live#672882
kzrider.com/forum/2-engine/597654-poser?start=240#704229
Please Log in or Create an account to join the conversation.
- Shdwdrgn
-
 Topic Author
- Offline
- User
-

Registered
- Posts: 611
- Thanks: 24
Re: 1981 KZ1000 J-to-K build
10 Mar 2018 17:53
All right, I think I ran into my first 'gotcha' with mixing parts between the J and K, but it also probably explains some things. I got the carbs rebuilt, cleaned the plugs of all the carbon from trying to run it last year, and finally got it to fire up. The usual smoke for the first couple minutes and then that cleared up and as the engine warmed it started running pretty smoothly -- as long as I kept the RPMs above 3000. Yeah it won't idle at all. And it won't start unless I give it a small squirt of starting fluid (even after it was hot).
Once I decided I wasn't going to have any luck with it, I cleaned up and came inside, and it occurred to me to check the manual. Bloody hell the jets are different sizes between the J (127.5) and K (122.5)! The new jets I just put in are the larger ones, and I about 99% positive I kept the slides together with the original carbs. I am now running the K carbs which means the needle on the slides is smaller, so the carbs are probably passing through a lot of excess fuel?
So I need an opinion... Either way I have to pull the carbs out again. The easiest thing would be to pop the top covers and swap the slides to that the needles match the current jets. Would that work or are there other significant differences between the carbs that would cause a problem with this swap? The alternative is draining the carbs again so I can flip them and open up the bottom, but the problem here is that all of the old sets of jets have been mixed together and I can only really read the numbers on a couple of them, so I don't really know that I can match the 122.5's to make a full set again. Ugh I wonder if there is also a difference in the idle jets? Will have to check the manual again for that. Anyway, I have the K carbs on the bike and have to stick with those because I found broken bits on the J carbs. So what are the chances that swapping the slides will solve the problem with the incorrect main jet size?
Otherwise it seems promising. Unlike last year, once it warmed up and got all the crap blown out it was running nice and smooth. It felt like all four cylinders were running equally and I had the same amount of heat on each side. Now if I can just get it to run smoothly at idle. Oh speaking of which, the rebuild kit came with new idle screws as well, which I lightly seated and backed out 2.5 turns. I believe that's the right starting point?
I almost forgot, I scored on ebay today! The tail project requires building a new seat, for which I need a new pan to start with that I can cut to fit around the tail. I've had a watch running on ebay for about a year and a half now, and the only other pan I've seen was rusted so horribly that I wasn't going to touch it. Well a new pan popped up this week for $15 plus shipping. OK cool I'll keep an eye on it. Someone threw up a bid on Thursday and considering how few of these I've seen I thought I was going to have to fight for it. I put in my bid this afternoon about half an hour before the auction ended and was surprised to see that I was the top bidder for only $15.50. I came back in right before it ended to find that I was STILL the top bidder, and scored the pan for about $26 total. Holy cow I might actually be able to work on the new seat after I get the bike rolling! Yeah it's been a day of ups and downs, but progress is being made.
1981 KZ1000-JK1
She's a beautiful mess, and I've made her all mine
She's a beautiful mess, and I've made her all mine
Please Log in or Create an account to join the conversation.
- Shdwdrgn
-
Topic Author
- Offline
- User
-
Registered
- Posts: 611
- Thanks: 24
Re: 1981 KZ1000 J-to-K build
11 Mar 2018 15:29
Took a closer look at the jets I pulled out of the K carbs yesterday, and as a matter of fact I *can* read the size stamps on that set, and they are all clearly marked as 122.5. Sweet! Dropped them in some pine-sol for a few hours and they look decently clean. Since it was only one more step to drain the carbs after pulling them off the bike again, I decided to go ahead and put the right jets in place. The original idle jets are clogged badly, but I found one of the originals clean enough to read and re-checked the numbers in the manual again. It turns out those jets ARE the same size for both carbs so I was able to keep the new ones in there. Finally the air screws... yeah that one is harder since nothing seems to be stamped on them, but the numbers in the manual do seem to call for different part numbers so I cleaned up the originals with some fine steel wool and dropped them back in place.
So now ALL of the jets should be properly sized for the K carbs and everything should be matched up. Got the bike fired up again but it still doesn't want to idle. Best guess is that the idle passages inside the carb may be clogged although I did take care to clean everything as best I could last year when I set up this set. That doesn't mean I got everything though. I had some sea foam sitting on the shelf so I threw a bit of that in the tank. Also noticed more rust from the tank seems to have soaked into the gas so I'm really glad I have the paper filter inline now. I decided to just let it run until the tank was as empty as possible and noticed I was having more troubles as it got towards the bottom but I think it is almost completely dry now. At least I can't keep it running more than a few seconds and there's no sound of sloshing in the tank. I'm headed out to check on a computer and on my way home filling up my two gas cans so I can put some fresh stuff in the tank and fill it up at least 1/4 of the way... get some pressure in the line and then see how it runs. Since all of the gas I had in the tank and the garage had sat over the Winter it might possibly just need some fresh octane.
So now ALL of the jets should be properly sized for the K carbs and everything should be matched up. Got the bike fired up again but it still doesn't want to idle. Best guess is that the idle passages inside the carb may be clogged although I did take care to clean everything as best I could last year when I set up this set. That doesn't mean I got everything though. I had some sea foam sitting on the shelf so I threw a bit of that in the tank. Also noticed more rust from the tank seems to have soaked into the gas so I'm really glad I have the paper filter inline now. I decided to just let it run until the tank was as empty as possible and noticed I was having more troubles as it got towards the bottom but I think it is almost completely dry now. At least I can't keep it running more than a few seconds and there's no sound of sloshing in the tank. I'm headed out to check on a computer and on my way home filling up my two gas cans so I can put some fresh stuff in the tank and fill it up at least 1/4 of the way... get some pressure in the line and then see how it runs. Since all of the gas I had in the tank and the garage had sat over the Winter it might possibly just need some fresh octane.
1981 KZ1000-JK1
She's a beautiful mess, and I've made her all mine
She's a beautiful mess, and I've made her all mine
Please Log in or Create an account to join the conversation.
- Shdwdrgn
-
Topic Author
- Offline
- User
-
Registered
- Posts: 611
- Thanks: 24
Re: 1981 KZ1000 J-to-K build
11 Mar 2018 20:01
ho
ly
crap
I GOT TO RIDE IT DOWN THE STREET!!!
All right so it wasn't quite that earth-shattering, but damnit I'm happy. I got about 1.5 gallons of fresh gas in the tank, fired it up and had even worse problems with holding an RPM and there was a lot of backfiring on one side. Once I got it warmed up again I noticed the right side was cooler so I checked the pipe temp and figured #4 wasn't firing. Popped the plug and it was wet so I hit it with the brass brush and put it back in. That did the trick, fired it back up and the RPM's shot up to around 4500 so I killed it and pulled the idle screw back out several turns. I played with it for about 20 minutes before it finally started calming down and settling into a smoother run and I managed to set the idle to about 1k which was just high enough to keep it running steady. Plus it was actually starting without the ether so if it died on the street I wouldn't have to push it back. Well hell, time to pull it out from beside the garage and see if I can actually make her run.
So the clutch feels much different than the Yamaha. Might actually be a little too mushy, maybe I have it tightened down too far (I have to let it out almost completely before it grabs). Got her rolling, and yeah this is definitely a heavy bike, and just has a completely different feel than the Yamaha had. It will take a little time to get used to it but I made a few trips up and down my street without any problems. One thing did come up that worried me -- when I got to the end of the street and started turning around I heard a grinding. I was feathering the clutch at the time and was afraid the noise had come from the transmission, but no I got moving again and there were no other odd sounds. Ok..? Made a couple more trips up and down, then once again heard that sound while turning in the same direction. WTH? Oh crap, the center stand is dropping because I never got the spring back on it! Kicked up tight again st the pipes and didn't have any other issues while I was moving. Brought it back to the house and briefly considered leaving it parked on the street, then thought better of it. No plates, not even a headlight, yeah this is just screaming for a cop to give me a ticket. So she's tucked back up beside the garage again.
Getting a load on the engine seems to have been really good for clearing the cobwebs. I never got above second gear but by the time I parked it I was able to start it without throttle, and she popped right up at 1000rpm. It will be interesting to see how it starts again tomorrow once it is cold. I also need to check the oil level since it still throws a lot of smoke when I first start it. But the most important thing is that it DOES idle now, which means I can start working on adjusting the air screws and getting the carbs balanced. Oh I just thought to look, it appears the actual idle speed SHOULD be set at 1000 rpm. Well hot damn. And that explains why she was really loping when I tried to let it drop below that. So I'm actually in better shape than I thought.
The other issue that I'll have to watch is that it hesitates really badly when I crank the throttle. Considering how much change there has been to the way it's been running today, I'm fairly confident there was some gunk still plugging the carb passages, but it is definitely getting pushed out now. So perhaps a little more riding will clear out the rest and solve this problem too. I should probably also check again for vacuum leaks, but then if it's running well enough that I can balance the carbs that will at least give me a good starting point for troubleshooting. So much more work to do and I'll have very little free time until April, but I'll squeeze in what I can and try to get her ready to get new plates. By next month we might even have some decent riding weather, or at least good enough to make some trips around town and try to shake loose any problems.
Last night I went to bed bummed out about the mix-up with the jets. Tonight I'm too excited to sleep. What a turn around!
1981 KZ1000-JK1
She's a beautiful mess, and I've made her all mine
She's a beautiful mess, and I've made her all mine
Please Log in or Create an account to join the conversation.
- SWest
-
- Offline
- Sustaining Member
-
Registered
- 10 22 2014
- Posts: 23615
- Thanks: 2985
Re: 1981 KZ1000 J-to-K build
11 Mar 2018 20:15
It'll run better once the rings seat and you get more time on it. :woohoo:
Steve
Steve
Z1b1000 1975 Z1b
kzrider.com/forum/11-projects/598262-kz-...-will-it-live#672882
kzrider.com/forum/2-engine/597654-poser?start=240#704229
kzrider.com/forum/11-projects/598262-kz-...-will-it-live#672882
kzrider.com/forum/2-engine/597654-poser?start=240#704229
Please Log in or Create an account to join the conversation.
- TexasKZ
-

- Offline
- Platinum Member
-
Registered
- Posts: 8130
- Thanks: 2640
Re: 1981 KZ1000 J-to-K build
11 Mar 2018 21:23
Congratulations! That ride must have felt great.
1982 KZ1000 LTD parts donor
1981 KZ1000 LTD awaiting resurrection
2000 ZRX1100 not ridden enough
www.kzrider.com/11-projects/620336-anoth...uild-thread?start=24
1981 KZ1000 LTD awaiting resurrection
2000 ZRX1100 not ridden enough
www.kzrider.com/11-projects/620336-anoth...uild-thread?start=24
Please Log in or Create an account to join the conversation.
- Shdwdrgn
-
Topic Author
- Offline
- User
-
Registered
- Posts: 611
- Thanks: 24
Re: 1981 KZ1000 J-to-K build
12 Mar 2018 19:49
Well not so much luck cold starting it today, had to give it another shot of ether. I didn't run it for long, decided to start working on the headlight. Got the new one screwed into the brackets, but I can't seem to find that long screw for adjusting the aim. Ugh. I'll have to keep looking around, I know I had it somewhere, just gotta figure out where I stashed it. And I need to figure out where to lay all the wires inside the headlight shell so that the light can fit in there too.
I like the looks of the turn signals I got, but they don't have running lights in them. I found some short amber LED strips on ebay that are wired for automotive use, I think I might be able to lay them inside the turn signals away from the existing light bulb. Just have to see if they put out enough light to use as running lights.
Called my insurance agent today, getting that set up and maybe I can get plates later this week or next. Get it road legal and next time I have the engine warmed up I can actually take it out on the street. So.. a little bit at a time...
1981 KZ1000-JK1
She's a beautiful mess, and I've made her all mine
She's a beautiful mess, and I've made her all mine
Please Log in or Create an account to join the conversation.
- Shdwdrgn
-
Topic Author
- Offline
- User
-
Registered
- Posts: 611
- Thanks: 24
Re: 1981 KZ1000 J-to-K build
14 Mar 2018 12:13 - 14 Mar 2018 12:14
Got my new plates today so I can ride it on the street now. Messed around with the center stand for about half an hour but could not figure out a way to get that spring stretched. There's just nothing in that area to put a pry bar against. Finally gave up and just took it off for now. I was able to get the headlight to fit back into the housing without much fight except I knocked the wire loose for the front-left turn signal, so now I have to pull it again. Ah well at least I got things in place now for riding.
So I took her out for a loop around town. I have a 4-lane street a couple blocks away so I could take it up to 45mph at least. It just does not want to idle for crap, and hesitates a lot when cracking the throttle. Even sitting in neutral it will barely stay running below 1500rpm and it you touch the throttle it jumps up to about 3200rpm and then slowly sinks back down. I can only guess there is an issue with the idle circuit in the carbs, but would appreciate any input you guys might have for me. I did check for vacuum leaks around those rubber intake boots and it all appears nice and tight now so any further issues must be inside the carbs.
While riding it I tried taking notice of how everything else was doing. Tires were soft and when I got home I only had 20-25psi in them, so got both topped off. Next time I'll have to see how the forks feel. The transmission is nice and smooth. I took it up to 4th gear and it shifts nice and clean going up and back down. Having trouble taking off but I blame that on the idle issues. Surprisingly I even managed to get the handlebars lined up well with the wheel. I should probably check the chain again too. Riding it was nice and comfortable too, although it was a short ride. I have long legs so I've always felt cramped up on motorcycles -- will have to see how it goes once I can get out for an hour. I also plan to get a case guard at some point just to put some foot pegs on. That should let me stretch out when I'm on the highway, I hope.
So yeah, if I can just solve this idle issue I think she's in good shape to go out riding more. It was supposed to be 70 degrees today which was why I took the day off from work. Supposedly it is 66 now, which is about 10 higher than when I rode out earlier. Maybe I'll try taking another loop.
1981 KZ1000-JK1
She's a beautiful mess, and I've made her all mine
She's a beautiful mess, and I've made her all mine
Last edit: 14 Mar 2018 12:14 by Shdwdrgn.
Please Log in or Create an account to join the conversation.
- SWest
-
- Offline
- Sustaining Member
-
Registered
- 10 22 2014
- Posts: 23615
- Thanks: 2985
Re: 1981 KZ1000 J-to-K build
14 Mar 2018 14:13
Try putting the spring on first before putting the bolts in. You should then be able to use the stand as a lever. How's the spark advance? Pics of the plugs?
Steve
Steve
Z1b1000 1975 Z1b
kzrider.com/forum/11-projects/598262-kz-...-will-it-live#672882
kzrider.com/forum/2-engine/597654-poser?start=240#704229
kzrider.com/forum/11-projects/598262-kz-...-will-it-live#672882
kzrider.com/forum/2-engine/597654-poser?start=240#704229
Please Log in or Create an account to join the conversation.
- Shdwdrgn
-
Topic Author
- Offline
- User
-
Registered
- Posts: 611
- Thanks: 24
Re: 1981 KZ1000 J-to-K build
14 Mar 2018 15:13
I think I found it. #4 plug was still running wet so I turned the air screw in a full turn and ran it for a few minutes and it started idling again. Took it out for about 40 minutes and had no trouble with it holding an idle when I had to stop. Sure makes it a lot easier to take off again!
So I have 35 miles on it now, have been up to 50mph and all the way through 5th gear. There's still some hesitation when I crack the throttle but I have not yet even tried to balance the carbs (maybe this weekend). When I got back home I looked at the #4 plug again and now it looks normal -- basically a medium-brown color and no longer wet. I'll check the other plugs too when I get a chance and see how they look. Should be a good indicator of whether the four cylinders are running somewhat evenly. It is certainly running a lot smoother now. Earlier I was hearing a lot of popping in the pipes while coasting along at about 4000rpm, but that is gone now. There is still some unevenness while cruising though, makes me think the other air screws may also need closed up a bit more, but again that all comes back to actually tuning the carbs.
I also started getting a bit of oil leakage on the four corners of the top of the head, probably coming from those silver plugs that fit in at the ends of the cams. I gave the small bolts each a little tweak and it looks like it is drying up now. After I get a bit more mileage on it I'll re-check all of the main head bolts again -- I believe those are supposed to be torqued while hot? I also lost one of the seat pins. Forgot that I didn't have any cotter pins that small and one must have fallen out while I was riding around. Got some wire through the other one now though so I don't lose it too. I also noticed when I fired it up this morning that it is no longer blowing smoke. Hope that continues!
As for the center stand, I actually did try working with it after I pulled the bolts out. There's just not a lot of room to move it around even with the right pipe out of the way. I'll get back to it at some point, for now there's a lot of other items I still need to deal with.
1981 KZ1000-JK1
She's a beautiful mess, and I've made her all mine
She's a beautiful mess, and I've made her all mine
Please Log in or Create an account to join the conversation.
- Shdwdrgn
-
Topic Author
- Offline
- User
-
Registered
- Posts: 611
- Thanks: 24
Re: 1981 KZ1000 J-to-K build
15 Mar 2018 07:51
Well there's a sign... Went out this morning and noticed gas on the ground under the bike, but it wasn't leaking from the petcock like I expected. Instead it was all coming out of carb #4. Considering the excess gas problem yesterday this makes me think that the float is stuck or not sealing on that carb. Looks like I'll be taking them apart again. Maybe while they are still sitting on the bike I'll re-check the float levels. Even though they checked out on the bench they might sit differently on the bike.
Glad I got out yesterday. Weather is turning to crap again. Rain this afternoon and then the temps drop back into the 50's again for awhile. Ah well, Summer is coming soon...
Glad I got out yesterday. Weather is turning to crap again. Rain this afternoon and then the temps drop back into the 50's again for awhile. Ah well, Summer is coming soon...
1981 KZ1000-JK1
She's a beautiful mess, and I've made her all mine
She's a beautiful mess, and I've made her all mine
Please Log in or Create an account to join the conversation.
- Shdwdrgn
-
Topic Author
- Offline
- User
-
Registered
- Posts: 611
- Thanks: 24
Re: 1981 KZ1000 J-to-K build
15 Mar 2018 21:47
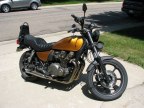
I was looking back and noticed I've been posting pics of small bits, but haven't actually posted a shot of the whole bike in some time. So for those who are curious, here's how she's looking right now...
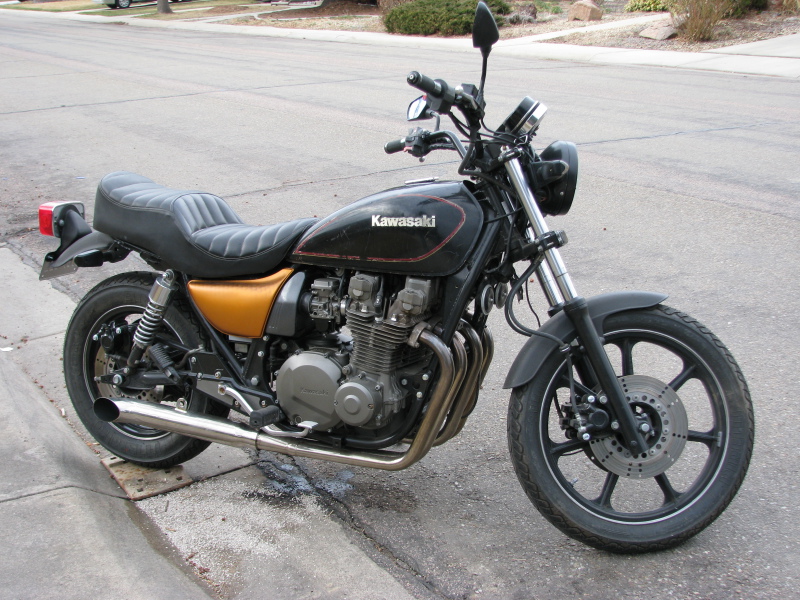
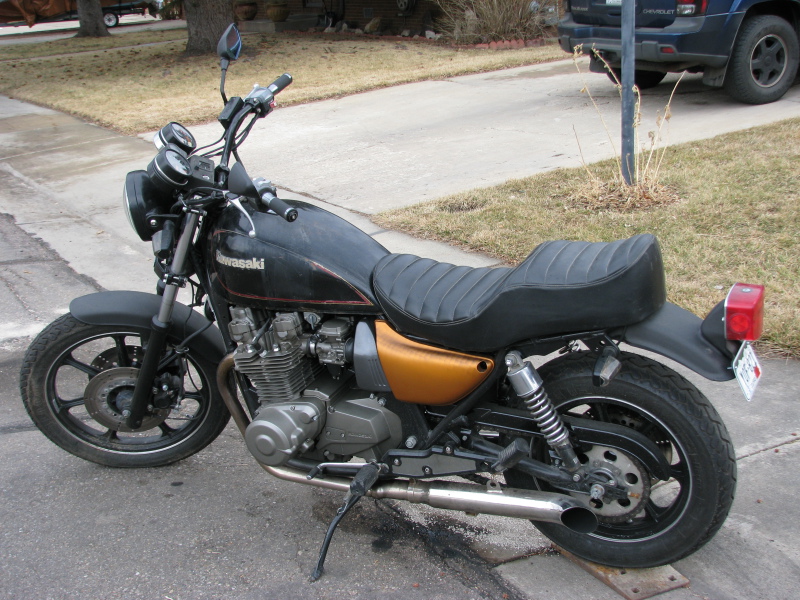
So the major eyesores are the old black tank and the chrome pipes. The tank will be a Summer project but this will suffice for now so I can at least ride it. I plan to tackle the pipes after I fix the gas leak problem and we get some more warm weather again. I want to angle the pipes upwards at the rear to follow the line of the foot peg plate, but I'm not quite sure where to put the angle at. The easiest thing would be to have the header pipe bent and slide the muffler on straight, but that might put the muffler too close to the foot pegs. The other option is to cut a V slot in the muffler just behind where it expands, then weld it back closed again... not too much work but I don't know if that would have any effect on the exhaust. As someone who has melted their shoes being the passenger on a bike with the pipe too close to the foot pegs ... yeah I'd prefer to leave extra clearance there. I need to make a choice and get that done, then I can sandblast the chrome and get some paint on them. I plan on having the pipes match the color of the engine. And at some point I still have to pull apart the tach and get it repainted to match the speedo (all black, but the assembly ring will stay chrome). Hmm I should have painted the rear sprocket cast-iron gray too. Oh well, give it a couple thousand miles of road grime and nobody will see it anyway.
So the major eyesores are the old black tank and the chrome pipes. The tank will be a Summer project but this will suffice for now so I can at least ride it. I plan to tackle the pipes after I fix the gas leak problem and we get some more warm weather again. I want to angle the pipes upwards at the rear to follow the line of the foot peg plate, but I'm not quite sure where to put the angle at. The easiest thing would be to have the header pipe bent and slide the muffler on straight, but that might put the muffler too close to the foot pegs. The other option is to cut a V slot in the muffler just behind where it expands, then weld it back closed again... not too much work but I don't know if that would have any effect on the exhaust. As someone who has melted their shoes being the passenger on a bike with the pipe too close to the foot pegs ... yeah I'd prefer to leave extra clearance there. I need to make a choice and get that done, then I can sandblast the chrome and get some paint on them. I plan on having the pipes match the color of the engine. And at some point I still have to pull apart the tach and get it repainted to match the speedo (all black, but the assembly ring will stay chrome). Hmm I should have painted the rear sprocket cast-iron gray too. Oh well, give it a couple thousand miles of road grime and nobody will see it anyway.
1981 KZ1000-JK1
She's a beautiful mess, and I've made her all mine
She's a beautiful mess, and I've made her all mine
Please Log in or Create an account to join the conversation.
Moderators: Street Fighter LTD