Welcome, Guest
Username: Password: Remember me
  • Page:
  • 1
  • 2

TOPIC:

REBUILDABLE KONI SHOCKS? 02 Apr 2006 16:11 #36214

  • neilage66
  • neilage66's Avatar Topic Author
  • Offline
  • User
  • Posts: 378
  • Thank you received: 5
Another tidbit from IKON in Australia which contradicts what The Fish has said...the 7610's require/hold 85 ml of shock oil.

Fish has said 130 cc's (1 cc = 1 ml). I'm sure different models need different quantities of oil.

I guess if The Fish reads this post, he could check and see what model his instructions cover and we'd know something for sure.

Mr Fish...I still don't have any instructions. If you have a way to post them or email them...or even snail mail them, please let me know! Thanks.

Please Log in or Create an account to join the conversation.

REBUILDABLE KONI SHOCKS? 03 Apr 2006 19:12 #36543

  • The Fish
  • The Fish's Avatar
  • Offline
  • User
  • Posts: 298
  • Thank you received: 6
Ill see what I can do with the installation instructions.
The rebuild kits that I have are made by Lakewood and are labled as for all Koni shocks. These are probably for the earlier Konis.
I'll check at the shop tomorrow.
Fish

Please Log in or Create an account to join the conversation.

Koni shock rebuild pics 05 Aug 2006 14:36 #67333

  • neilage66
  • neilage66's Avatar Topic Author
  • Offline
  • User
  • Posts: 378
  • Thank you received: 5
Finally got around to rebuilding my old Koni's today and have pics of assembly with new seal kits for y'all. :whistle:

I still need to compress and fit the springs, but I'm pondering my options for this operation ie: make a fixture or use ratchet tie downs or seek professional help. ;)

I'll "get er done" soon and get you final pics. :)

btw...these will go back on Rufus from whence they came. :P

www.imagestation.com/album/pictures.html?id=2103392595


Enjoy, and feel free to ask any questions if you are pondering this type of repair.

Post edited by: neilage66, at: 2006/08/05 17:38

Please Log in or Create an account to join the conversation.

Koni shock rebuild pics 27 Sep 2007 10:14 #173176

  • rstnick
  • rstnick's Avatar
  • Offline
  • User
  • Posts: 4366
  • Thank you received: 376
I've got the seal kit (no insructions) and some springs comin. This is going to be a Winter project for me.

Any more tips or step by step instructions still if your head you could jot down?
B)
Rob
CANADA

Need a key for your Kawasaki? PM me

1978 KZ650 C2, 130K kms, Delkevic ex, EI, CVK32, PMC easy clutch, ATK fork brace, steering damper, braced swingarm, 18" Z1R front wheel.
2000 ZRX1100
2011 Ninja 250R
2005 z750s

Please Log in or Create an account to join the conversation.

Koni shock rebuild pics 02 Mar 2008 09:20 #197927

  • rstnick
  • rstnick's Avatar
  • Offline
  • User
  • Posts: 4366
  • Thank you received: 376
Well I finished rebuilding my leaking shock.
Special thanks to Neil for all the advise and info he gave me.

I did run into a few differences in my rebuild, so I'll add them here.

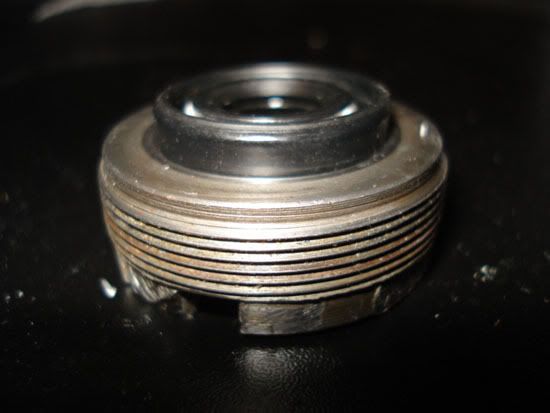
Looks like my top gland nut is different than Neil's. I just compared his pictures with my parts, and the top nut looks different from above. Also, from below, the nut on mine has an inside edge that prevents the seal from seating into the nut all the way. Here are some pix showing the edge, and the seal seated in the nut:


I thought that clamping it might seat it, but it didn't. Then when trying to assemble it as is, while sliding the nut and seal over the shaft, the seal pulled out. I tried being careful, but no luck. I even let the silicone dry for over 24 hrs., as per instrutions.
Seams I may have a different version of shock, possably earlier.
I ended up removing the edge at work on a lathe we have. Turns out the edge was a separate piece pressed into the gland nut, and glued/bonded with the same blue goop used to hold the old seal in. I didn't notice the gland nut was two pieces, and it kind of explains the picture of Neil's gland nut.

I got it all back together, and all seems fine. I haven't put it back on the bike yet as I'm doing a swingarm swap next week.
The seal seated fine, and stayed in the gland nut during re-assembly.
Adding the fluid was a little tricky, as I first put the 85ml dirrectly into the body first, then slid the interior guts down. This caused the fluid to rise, and want to spill out, of course. I was hoping the fluid would seep through the holes as I lowered the guts.
I ended up pouring some of the fluid into the internals from the body, then lowered the internals in. This worked.
I didn't take any pictures, other than the two above of the gland nut and seal, because Neil had documented his rebuild with pix. He did a much more thorough job than I did on cleaning and rebuilding.
The springs I bought off ebay were too narrow to fit, so I reused the old spring. The reason I wanted to switch the spring is because the coating is off in some spots, and rust started developing. So overall my shocks are not too pritty, but should function fine.
I did check with MG Cycles who sold us the seals if they had another seal kit that is for different Koni types, and they said they didn't.

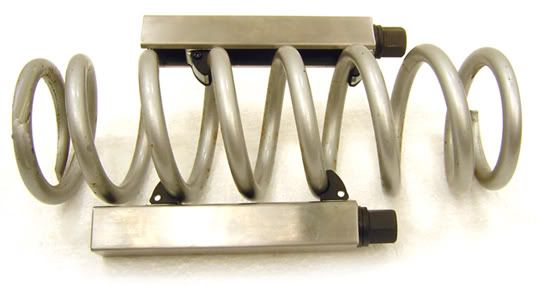
These Shock Spring Commpressors I bought off ebay helped a lot during disassebly and re-assembly:


Post edited by: rstnick, at: 2008/03/02 12:32
Rob
CANADA

Need a key for your Kawasaki? PM me

1978 KZ650 C2, 130K kms, Delkevic ex, EI, CVK32, PMC easy clutch, ATK fork brace, steering damper, braced swingarm, 18" Z1R front wheel.
2000 ZRX1100
2011 Ninja 250R
2005 z750s
Attachments:

Please Log in or Create an account to join the conversation.

Koni shock rebuild pics 02 Mar 2008 22:34 #198080

  • bkitchen
  • bkitchen's Avatar
  • Offline
  • User
  • Posts: 231
  • Thank you received: 0
Hey I live in Hebron, Kentucky! I never realized there headquarters was here. I might have to go and check them out.

Please Log in or Create an account to join the conversation.

  • Page:
  • 1
  • 2
Powered by Kunena Forum