
1980 E-2
- Chaotic Reason
-
 Topic Author
- Offline
- User
-

Registered
- Posts: 384
- Thanks: 15
1980 E-2
05 Jul 2011 15:27 - 05 Jul 2011 15:31
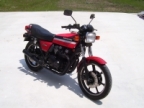
When I got the bike, one of the stipulations was that it would be running. Well, it was, but not well. This is what it was after I spent the afternoon sanding and painting it. It's just a rattlecan job, but it's a ton better than what it was.
This is what it did when it sat for a couple of days.
This is where a lot of it was coming from:
And here are a few just to show you what else I was working with:
I scraped off a bit with my key just to see if it would come off.
So I started the tear down this weekend. Off came all the peripherals, the carbs to be rebuilt, the brakes to be flushed and gone over, and pretty much all the wiring to be redone. Because I don't think fuse boxes should look like this:
I did a little soda blasting to see what it could do, and was pleasantly surprised with the results:
I plan to do a lot more, but the tear down was the most important thing, so I got it down to about here:
The carbs weren't as dirty as I'd thought they'd be on the insides, but the rebuild kit is still on the way from Z1, so it's going to all get redone. I have the gasket kit, but whenever I take anything off, the gaskets really don't look all that bad. I'd say someone did a lot of work to it before my PO got it, and then he just let it set outside and didn't do anything to it but let it rust.
I don't really have a garage where I can take everything apart and let it set, so I have to do little bits here and there to get it running right. You know, little things like, rewiring it, putting the vacuum lines back on it. The big line coming off the airbox was blocked off, and the lines from the half moons were just bridged across to each other. I couldn't insert anymore photos, so it's attached at the bottom.
The main thing giving me problems though is to replace the shift shaft seal. If I'm reading the manual right, I have to pretty much take off the drive shaft to get the casing off to even get the bloody thing out. I've never had a shaft drive before, so this is going to be fun! (Only slightly sarcastic in saying that.)
I'm going to turn it into more of a cruiser than a cafe racer. Throw on some forward controls, see what the bars feel like then. I might go a tad bigger with them, but nothing over the top. I'll drop the rear end 2-3 inches, and work out a different exhaust. The stock one is definitely on the heavy side.
A little bit here, a little bit there, and I'll get her the way I know she can be. All input, help, and suggestions are greatly appreciated!
Michael
Attachment DSCF0808_2011-07-05.JPG not found
This is what it did when it sat for a couple of days.
Attachment DSCF0809_2011-07-05.JPG not found
This is where a lot of it was coming from:
Attachment DSCF0861.JPG not found
And here are a few just to show you what else I was working with:
I scraped off a bit with my key just to see if it would come off.
Attachment DSCF0817_2011-07-05.JPG not found
Attachment DSCF0818_2011-07-05.JPG not found
Attachment DSCF0832_2011-07-05.JPG not found
So I started the tear down this weekend. Off came all the peripherals, the carbs to be rebuilt, the brakes to be flushed and gone over, and pretty much all the wiring to be redone. Because I don't think fuse boxes should look like this:
Attachment DSCF0877.JPG not found
I did a little soda blasting to see what it could do, and was pleasantly surprised with the results:
Attachment DSCF0901.JPG not found
I plan to do a lot more, but the tear down was the most important thing, so I got it down to about here:
Attachment DSCF0907.JPG not found
The carbs weren't as dirty as I'd thought they'd be on the insides, but the rebuild kit is still on the way from Z1, so it's going to all get redone. I have the gasket kit, but whenever I take anything off, the gaskets really don't look all that bad. I'd say someone did a lot of work to it before my PO got it, and then he just let it set outside and didn't do anything to it but let it rust.
I don't really have a garage where I can take everything apart and let it set, so I have to do little bits here and there to get it running right. You know, little things like, rewiring it, putting the vacuum lines back on it. The big line coming off the airbox was blocked off, and the lines from the half moons were just bridged across to each other. I couldn't insert anymore photos, so it's attached at the bottom.
The main thing giving me problems though is to replace the shift shaft seal. If I'm reading the manual right, I have to pretty much take off the drive shaft to get the casing off to even get the bloody thing out. I've never had a shaft drive before, so this is going to be fun! (Only slightly sarcastic in saying that.)
I'm going to turn it into more of a cruiser than a cafe racer. Throw on some forward controls, see what the bars feel like then. I might go a tad bigger with them, but nothing over the top. I'll drop the rear end 2-3 inches, and work out a different exhaust. The stock one is definitely on the heavy side.
A little bit here, a little bit there, and I'll get her the way I know she can be. All input, help, and suggestions are greatly appreciated!
Michael
Michael
1980 KZ1000 shaft drive
1980 KZ1000 shaft drive
Last edit: 05 Jul 2011 15:31 by Chaotic Reason.
Please Log in or Create an account to join the conversation.
- KZ250LTD
-

- Offline
- User
-
Registered
- Posts: 1311
- Thanks: 16
Re: 1980 E-2
05 Jul 2011 21:08Yes, if you end up having to take the front gear cover off, you do need to pull the rear wheel to allow the drive-shaft to be pulled back. Also, don't lose the little pin holding the shaft onto the front gears. It is a real PITA for a little seal, some guys have had luck with digging the old one out from the outside and putting the new one on, I ended up going the whole wayChaotic Reason wrote: The main thing giving me problems though is to replace the shift shaft seal. If I'm reading the manual right, I have to pretty much take off the drive shaft to get the casing off to even get the bloody thing out. I've never had a shaft drive before, so this is going to be fun! (Only slightly sarcastic in saying that.)
Michael

79 KZ1000ST
Past:
Many.
Past:
Many.
The following user(s) said Thank You: Chaotic Reason
Please Log in or Create an account to join the conversation.
- Chaotic Reason
-
Topic Author
- Offline
- User
-
Registered
- Posts: 384
- Thanks: 15
Re: 1980 E-2
10 Jul 2011 00:47 - 10 Jul 2011 01:10
Removed the head on my E-2 today to replace the gaskets.
I was inspecting all the parts in the area because i was hearing a slight grinding sound when I would give it some gas, and noticed that the sprockets had a bit of play.
When it was idling, there was no sound, only when I would give it gas. I noticed on the sprockets that are part of the cam chain tensioning system, when I hold the rod that the sprocket is on, I can feel a slight play in the bearings of that sprocket. I can feel this play in both of the sprockets, front and rear.
So if I'm holding the rod horizontal, and looking at the sprocket on a vertical axis, I can move the sprockets slightly away from vertical, in both directions.
Is this normal? I'm posting this on my iPod, so I can't upload any photos till tonight, but does this sound like normal wear and tear? I know, when in doubt, replace it, but I'm broke! HELP!!!
Ps, I also noticed that one of the wee rubber blocks was not on one side of the rod holding the sprocket in place. Where can you even get those??? Can I just make one? Or does it have to be specific material, thickness, and so on?
Attachment DSCF0914.JPG not found
Attachment DSCF0915.JPG not found
I was inspecting all the parts in the area because i was hearing a slight grinding sound when I would give it some gas, and noticed that the sprockets had a bit of play.
Attachment DSCF0916.JPG not found
When it was idling, there was no sound, only when I would give it gas. I noticed on the sprockets that are part of the cam chain tensioning system, when I hold the rod that the sprocket is on, I can feel a slight play in the bearings of that sprocket. I can feel this play in both of the sprockets, front and rear.
Attachment DSCF0917.JPG not found
So if I'm holding the rod horizontal, and looking at the sprocket on a vertical axis, I can move the sprockets slightly away from vertical, in both directions.
Is this normal? I'm posting this on my iPod, so I can't upload any photos till tonight, but does this sound like normal wear and tear? I know, when in doubt, replace it, but I'm broke! HELP!!!
Ps, I also noticed that one of the wee rubber blocks was not on one side of the rod holding the sprocket in place. Where can you even get those??? Can I just make one? Or does it have to be specific material, thickness, and so on?
Michael
1980 KZ1000 shaft drive
1980 KZ1000 shaft drive
Last edit: 10 Jul 2011 01:10 by Chaotic Reason.
Please Log in or Create an account to join the conversation.
- MFolks
-

- Offline
- User
-
Registered
- Posts: 6650
- Thanks: 541
Re: 1980 E-2
10 Jul 2011 01:24
I'd think Z1 could get you what you'll need to replace the idler sprocket. My understanding is it should not have any side to side movement indicating worn bearings. As for the rubber block, again Z1 would be where I'd look first.
Other websites:
www.redlinecycle.com
www.kzzone.com
www.dynoman.net
www.oldkaw.com
www.reproductiondecals.com
www.z-power.co.uk
www.zpower.com.au
Other websites:
www.redlinecycle.com
www.kzzone.com
www.dynoman.net
www.oldkaw.com
www.reproductiondecals.com
www.z-power.co.uk
www.zpower.com.au
1982 GPZ1100 B2
General Dynamics/Convair 1983-1993
GLCM BGM-109 Tomahawk, AGM-129A Advanced Cruise Missile (ACM)
General Dynamics/Convair 1983-1993
GLCM BGM-109 Tomahawk, AGM-129A Advanced Cruise Missile (ACM)
The following user(s) said Thank You: Chaotic Reason
Please Log in or Create an account to join the conversation.
- Link14
-

- Offline
- User
-
Registered
- Posts: 575
- Thanks: 6
Re: 1980 E-2
10 Jul 2011 01:33
If the cam idler sprocket is still in one piece, i.e. the needle bearing and the sprocket with the rubber spacer in between are solid, you should be ok. If the sprocket is separating from the needle bearing, you'll have to replace. You'll pay dearly for OEM idler sprockets.
I got a new Liska sprocket from Z1 enterprises. They are about 2/3's the cost of OEM and solid. I've heard they are a little noisier than the OEM ones. Z1 enterprises also carrys the rubber blocks too.
I got a new Liska sprocket from Z1 enterprises. They are about 2/3's the cost of OEM and solid. I've heard they are a little noisier than the OEM ones. Z1 enterprises also carrys the rubber blocks too.
The following user(s) said Thank You: Chaotic Reason
Please Log in or Create an account to join the conversation.
- Chaotic Reason
-
Topic Author
- Offline
- User
-
Registered
- Posts: 384
- Thanks: 15
Re: 1980 E-2
10 Jul 2011 01:37 - 10 Jul 2011 12:02
Yeah, they do. I was curious as to whether it was normal to have a slight play in it, first engine that I've ever taken down this far. Z1 is great! They are very knowledgeable, helpful, and their shipping is lightning fast! I was just hoping to try to avoid the $390 that 2 of them plus the top idler assembly will cost. 
Michael
1980 KZ1000 shaft drive
1980 KZ1000 shaft drive
Last edit: 10 Jul 2011 12:02 by Chaotic Reason.
Please Log in or Create an account to join the conversation.
- GPz550D1
-
- Offline
- User
-
Registered
- Posts: 254
- Thanks: 22
Re: 1980 E-2
10 Jul 2011 10:09 - 10 Jul 2011 13:24
You can get those two idler sprockets, Kawasaki part # 12057-002 much cheaper than $390. $114.05 each from Ronayers.com if you are interested. Maybe a bit longer to ship, if you can wait. The other 12053-1035 top idler sprocket is also $114.05. I have done business with both Z1 Enterprises and Ronayers.com and have nothing but good things to say about both places.
1981 KZ550-D1
Last edit: 10 Jul 2011 13:24 by GPz550D1.
Please Log in or Create an account to join the conversation.
- KZ_Rage
-

- Offline
- User
-
Registered
- Kentucky Bourbon Barrel Ale
- Posts: 891
- Thanks: 19
Re: 1980 E-2
10 Jul 2011 11:17 - 10 Jul 2011 11:18Chaotic Reason wrote: When I got the bike, one of the stipulations was that it would be running. Well, it was, but not well. This is what it was after I spent the afternoon sanding and painting it. It's just a rattlecan job, but it's a ton better than what it was.
The carbs weren't as dirty as I'd thought they'd be on the insides, but the rebuild kit is still on the way from Z1, so it's going to all get redone. I have the gasket kit, but whenever I take anything off, the gaskets really don't look all that bad. I'd say someone did a lot of work to it before my PO got it, and then he just let it set outside and didn't do anything to it but let it rust.
I don't really have a garage where I can take everything apart and let it set, so I have to do little bits here and there to get it running right. You know, little things like, rewiring it, putting the vacuum lines back on it. The big line coming off the airbox was blocked off, and the lines from the half moons were just bridged across to each other. I couldn't insert anymore photos, so it's attached at the bottom.
The main thing giving me problems though is to replace the shift shaft seal. If I'm reading the manual right, I have to pretty much take off the drive shaft to get the casing off to even get the bloody thing out. I've never had a shaft drive before, so this is going to be fun! (Only slightly sarcastic in saying that.)
I'm going to turn it into more of a cruiser than a cafe racer. Throw on some forward controls, see what the bars feel like then. I might go a tad bigger with them, but nothing over the top. I'll drop the rear end 2-3 inches, and work out a different exhaust. The stock one is definitely on the heavy side.
A little bit here, a little bit there, and I'll get her the way I know she can be. All input, help, and suggestions are greatly appreciated!
Michael
Good to see things coming along!
The carbs are rarely as bad inside as out if drained.
The vacuum lines you described are part of the EGR system, unless you have the valve still you would be better off not changing much from the way you found it.

Just leave the big hose going from side to side, you can plug the connection at the air box if you want to eliminate that tube. As for the small vacuum lines you can just cap those on the carb. Really need to see a before shot to advise properly. You don't need the EGR valve or its tubing, if it is bad then reconnecting it will just add trouble.
I got lucky and so far my seal is still holding so can't offer any been there, done that advice. Tim would be your source as he went the Full Monty on that one! :lol:
Just take your time and have patience if this season gets shortened by the work you are doing to it. Better to be right than ruin your day so to speak later on.
1979 KZ1000E1 SOLD!
1984 KZ550F2 SOLD!
2006 ZG1000A6F (Totaled)
2001 ZRX1200R (Sold)
2001 Sprint 955i ST (daily rider)
1984 KZ550F2 SOLD!
2006 ZG1000A6F (Totaled)
2001 ZRX1200R (Sold)
2001 Sprint 955i ST (daily rider)
Last edit: 10 Jul 2011 11:18 by KZ_Rage.
The following user(s) said Thank You: Chaotic Reason
Please Log in or Create an account to join the conversation.
- Chaotic Reason
-
Topic Author
- Offline
- User
-
Registered
- Posts: 384
- Thanks: 15
Re: 1980 E-2
10 Jul 2011 13:27
Thanks Jim. It's pretty much what I'm reading about those vacuum lines and that valve. (leave it alone, is pretty much the consensus.) My only thing is that my petcock is the vacuum type and it would only work if it was on Prime. The vacuum hose was hooked up, but I don't think it did anything. So I thought I would have to restore the system or get a different petcock. So I gor a different petcock to see if that would work, but the joy of the shaft's unique design carries thru to the gas tank as well! There's no male to screw the new petcock onto, and the oval hole will need to be reamed out to accept the stem. Looks like I'm sending the new petcock back and getting a rebiuld kit for mine.
Michael
1980 KZ1000 shaft drive
1980 KZ1000 shaft drive
Please Log in or Create an account to join the conversation.
- Chaotic Reason
-
Topic Author
- Offline
- User
-
Registered
- Posts: 384
- Thanks: 15
Re: 1980 E-2
11 Jul 2011 00:59
Carb cleaner to the rescue!!!
After soaking overnight, I soda blasted everything. Unfortunately, it was getting dark and I needed to clean everything up for me to come home, so I don't have any comparison shots to show you post blasting. Have to wait till I can get back out to my families place, where I'm working on the bike, to take them.
After the kind encouragement of many wonderfully talented individuals of this site, I am going to follow their advice and do a much more intensive rebuild than I was hoping to do. Next time I go out to work on it, the engine is coming out of the frame, the forks are coming off, the drive axle is coming off. I'm going to tear the engine apart and replace all my chain guides, put on a new chain, install new sprockets, new gaskets, and do whatever it'll take to make the bike last at least another 30 years. Slowly, cause I'm broke, but doing what I can, as I can.
Thank you everyone for your help. Your experience and expertise are greatly appreciated.
Attachment DSCF0919.JPG not found
After soaking overnight, I soda blasted everything. Unfortunately, it was getting dark and I needed to clean everything up for me to come home, so I don't have any comparison shots to show you post blasting. Have to wait till I can get back out to my families place, where I'm working on the bike, to take them.
After the kind encouragement of many wonderfully talented individuals of this site, I am going to follow their advice and do a much more intensive rebuild than I was hoping to do. Next time I go out to work on it, the engine is coming out of the frame, the forks are coming off, the drive axle is coming off. I'm going to tear the engine apart and replace all my chain guides, put on a new chain, install new sprockets, new gaskets, and do whatever it'll take to make the bike last at least another 30 years. Slowly, cause I'm broke, but doing what I can, as I can.
Thank you everyone for your help. Your experience and expertise are greatly appreciated.
Michael
1980 KZ1000 shaft drive
1980 KZ1000 shaft drive
Please Log in or Create an account to join the conversation.
- MFolks
-
- Offline
- User
-
Registered
- Posts: 6650
- Thanks: 541
Re: 1980 E-2
11 Jul 2011 01:06
The older bikes used the glass tubed fuses that can fail with no warning, Here's more information:
Fuse And Fuse Holder Designations
1. The older Kawasaki’s use a glass tubed fuse with the designation of AGX 1” long. Most good auto parts stores can get them for you. They are ¼” in diameter.
2. The more common AGC is 1 ¼” long and may not fit the smaller fuse clips. Again, ¼” in diameter.
3. To clean and polish the fuse clips, I use a cotton swab(Q- Tip) and some Brasso metal cleaner or Turtle Wax Chrome Polish. I suppose any good metal polish would work.
4. These fuses can fail internally but look good, only by removing them from the clip and electrically continuity checking with either a self powered test light, or a multimeter set on OHMS can they be determined to be in good shape. Never have a multimeter set on Ohms when testing for voltage as it can destroy the meter!
5. A physical inspection of the metal end caps for tightness will tell you if the fuse is serviceable.
6. Most modern motorcycles are now using the automobile “Blade” style fuse with the designation of ATC or ATO.
7. The reduced sized “Mini” Blade style fuse holder uses the ATM size of fuses.
8. If the fuse and fuse holder overheat, it could soften or anneal the grip of the clip, it might require squeezing the clip to restore the tightness.
9. A list of where to purchase “Blade” style fuses and holders:
www.waytekwire.com order.waytekwire.com/productdetail2/M50/...20%20%20%208%20FUSE/
www.rallylights.com www.rallylights.com/detail.aspx?ID=765
www.delcity.net/store/6!way-fuse-blocks/p_10822.a_1
10. A source for the glass tubed AGX fuses:
www.boatownerswarehouse.com/browse.cfm/2,4986.html
1982 GPZ1100 B2
General Dynamics/Convair 1983-1993
GLCM BGM-109 Tomahawk, AGM-129A Advanced Cruise Missile (ACM)
General Dynamics/Convair 1983-1993
GLCM BGM-109 Tomahawk, AGM-129A Advanced Cruise Missile (ACM)
The following user(s) said Thank You: Chaotic Reason
Please Log in or Create an account to join the conversation.
- Chaotic Reason
-
Topic Author
- Offline
- User
-
Registered
- Posts: 384
- Thanks: 15
Re: 1980 E-2
11 Jul 2011 01:45
Thanks mate, I was going to switch it out to blade fuses because of some posts I had read on site. Thank you for the links, they will definitely come in handy! And those are some awesome tips about the tubed fuses. I really appreciate the heads up.
Michael
1980 KZ1000 shaft drive
1980 KZ1000 shaft drive
Please Log in or Create an account to join the conversation.
Moderators: Street Fighter LTD