Welcome, Guest
Username: Password: Remember me
  • Page:
  • 1

TOPIC:

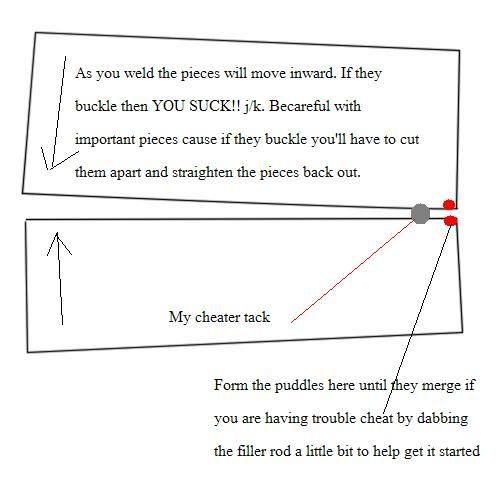
Oxy-acetylene welding 17 Oct 2007 15:10 #176750

  • Makarth
  • Makarth's Avatar Topic Author
  • Offline
  • User
  • Posts: 229
  • Thank you received: 1
*gasp* long time no talk guys. Any whoo i've been taking aircraft welding here at MTSU and i figured what the heck i might as well share what meager amount of knowledge i have to others. This is a sad attempt to make a tutorial but cut me some slack i just got back from flying red-eye from SoCal to Murfreesboro. I'll start with basic picks and then explain tomorow, that way there will be a nice teaser and someone can get the chance to flame me :evil:

aight here goes


1977 kz1000 - Megasquirt project @ 40% wiring, plenum, and exhaust<--(done!)

Please Log in or Create an account to join the conversation.

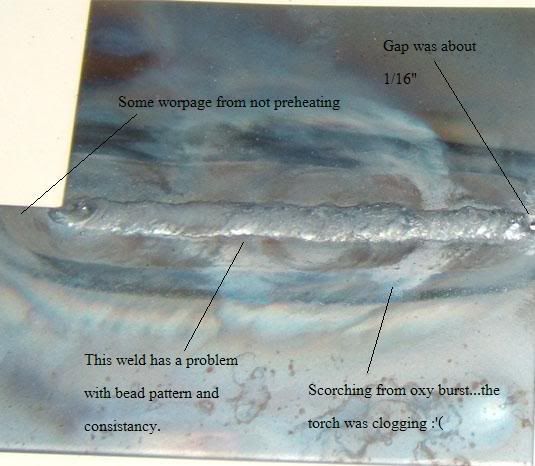
Oxy-acetylene welding 17 Oct 2007 16:43 #176765

  • KaZooCruiser
  • KaZooCruiser's Avatar
  • Offline
  • User
  • Posts: 456
  • Thank you received: 7
Makarth wrote:

and someone can get the chance to flame me :evil:


I think anyone attempting to flame a guy holding a gas wrench who isn't afraid to use it is in for a serious searing. The attempt would probably *cough* backfire on him.

Thanks for the information.

B) <--wearing safety goggles

Post edited by: KaZooCruiser, at: 2007/10/17 19:44

Please Log in or Create an account to join the conversation.

Oxy-acetylene welding 17 Oct 2007 18:02 #176776

  • ten6
  • ten6's Avatar
  • Offline
  • User
  • Posts: 146
  • Thank you received: 0
Thanks for the info...anything else you have would be appreciated...I used to weld in a local metal fab outfit but it was all pre-set machines for hot roll, aluminum and stainless. I could lay a mean bead but never touched a torch...:P
Michigan City, Indiana
Firefighter MCFD IAFF Local #475
(3) KZ650s (1) 1996 Vulcan 1500A (1) 1978 KZ1000 (1) 1986 Yamaha Radian 600
2000 Dodge Ram 4x4
1960 Chevy Bel-Air

Please Log in or Create an account to join the conversation.

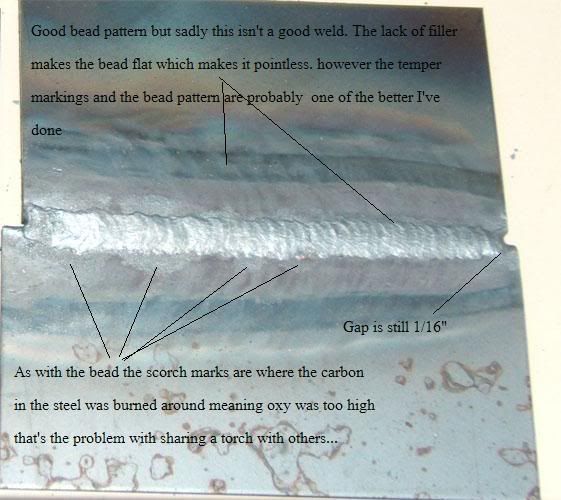
Oxy-acetylene welding 17 Oct 2007 20:11 #176804

  • Makarth
  • Makarth's Avatar Topic Author
  • Offline
  • User
  • Posts: 229
  • Thank you received: 1
i'll go over making a bead and butt welding tomorrow. Im glad some people are interested. Welding is alot of fun IMO and you gotta love the scent of burning steel.

edit: what i forgot to add is that all welding with oxy-acetylene is done using a neutral flame. if it's carborizing it can add carbon to the steel changing its chemistry and hardness. Same goes for an oxidizing flame which will actually burn away the carbon and make the steel brittle. oxidizing flame will usually make a rushing noise and the inner cone will become concave and pointed like a knife sharpened pencil tip. Also it should be noted that usually 5 psi on both oxy and acetylene is enough to do normal welding. ALWAYS REMEMBER TO NEVER EXCEED 15 PSI ON ACETYLENE !!! IT BECOMES VERY DANGEROUS AND VOLATILE!!! IT SHOULD ALSO BE NOTED THAT ACETYLENE BECOMES REACTIVE AT 30 PSI!! meaning you sneeze on it, it will explode. Sorry for the caps.

Post edited by: Makarth, at: 2007/10/17 23:24

1977 kz1000 - Megasquirt project @ 40% wiring, plenum, and exhaust<--(done!)

Please Log in or Create an account to join the conversation.

Oxy-acetylene welding 17 Oct 2007 20:32 #176815

  • jjdwoodman
  • jjdwoodman's Avatar
  • Offline
  • User
  • Live free, or die.
  • Posts: 386
  • Thank you received: 1
caps are well deserved!

not near as loud as a 30psi sneeze!

Don't forget to include unequal thickness metals and dissimilar metals Inquiring minds want to know!B) (yes Kazoo, those are SHADED safety glasses!)
77 650b
81 550 Mostly there
83 ZN1300 Voyager

Please Log in or Create an account to join the conversation.

Oxy-acetylene welding 17 Oct 2007 20:39 #176817

  • Makarth
  • Makarth's Avatar Topic Author
  • Offline
  • User
  • Posts: 229
  • Thank you received: 1
unequal thicknesses should be easily explained.. dissimilar metals i think can only be braised.... i think :dry: lol

Post edited by: Makarth, at: 2007/10/17 23:39

Post edited by: Makarth, at: 2007/10/17 23:40

1977 kz1000 - Megasquirt project @ 40% wiring, plenum, and exhaust<--(done!)

Please Log in or Create an account to join the conversation.

Oxy-acetylene welding 24 Oct 2007 16:49 #177957

  • Makarth
  • Makarth's Avatar Topic Author
  • Offline
  • User
  • Posts: 229
  • Thank you received: 1
Here's a picture of puddle practicing


I favor crescent because of the behavior of the puddle. Personally i think crescent makes a prettier weld but really spiral and crescent patterns are almost completely just a personal choice. When forming a puddle you have to make sure the puddle penetrates 100% otherwise the bead when you form in real welds will be pointless. Generally speaking if you form a wide enough bead the penetration is automatic (back to the puddle width has to be 3-5 times the thickness of the work piece). You have to form a puddle before adding fillers. NEVER MELT THE FILLER WITH THE FLAME.. not only is it a pointless weld that won't penetrate it will also clog your torch because the surface tension of the droplet will cling to the torch's tip. I learned this by watching students in welding class making the mistake. Also you should remember that welding is an art that requires finesse and practice. Typically if you have no finesse it can be practiced and puddle practice is an excellent way to get what heat setting you wanna use.

While i mentioned the subject I'm gonna quickly cover heat adjustments. For all practical purposes a tip only controls the focus of the flame i.e. small tips for nooks and crannys... big tips for the 1/2" steel slab you wanna weld to an I-beam or something like that. Also theres a difference between heat and temperature because temperature on an acetylene torch maxes out at about 5700 degrees. You can go down but not but you can go to different ranges of BTU's. If you have a grill you know what a BTU is so I'm not explaining it. Alright here are the steps to adjust heat.

1. Start the flame with the acetylene slightly opened.
2. Turn up the acetylene to the point where it barely puts out a carbon smoke (black/grey smoke) Note: if its hissing it's either dirty or slightly too high.
This step helps keep adjusting the heat consistent.
3.Set the flame the neutral (here's a recap of the different flame types)

4.At this point the flame is at a default setting that I've given you. Make it cooler, turn the oxygen until the outer cone is twice the length of the inner cone and then turn acetylene down to bring the outer cone in. To turn the heat up, turn the acetylene up until the outer cone is twice the length of the inner cone and add oxygen to bring the outer cone back to the inner cone and make it neutral once more.
Congrats!! you now know how to adjust the heat of an oxy-acetylene torch.

1977 kz1000 - Megasquirt project @ 40% wiring, plenum, and exhaust<--(done!)

Please Log in or Create an account to join the conversation.

Oxy-acetylene welding 24 Oct 2007 17:25 #177959

  • BSKZ650
  • BSKZ650's Avatar
  • Offline
  • User
  • Posts: 2064
  • Thank you received: 14
you forgot to mention the good ole acteylene bomb, those are always fun:laugh: :laugh: :laugh:
77 kz650, owned for over 25 years
77 ltd1000, current rider
76 kz900, just waiting
73 z1,, gonna restore this one
piglet, leggero harley davidson
SR, Ride captian, S.E.Texas Patriot Guard Riders.. AKA KawaBob

Please Log in or Create an account to join the conversation.

Oxy-acetylene welding 24 Oct 2007 17:32 #177964

  • Makarth
  • Makarth's Avatar Topic Author
  • Offline
  • User
  • Posts: 229
  • Thank you received: 1
Now for the juicy stuff. For these shots i was welding two scrap pieces of 1/16" scrap steel. Almost always when you are dealing with oxy-acetylene you are going to have to preheat the work piece which means the its a bit against your advantage to do large work pieces. Some believe that welding with oxy-acetylene will change the molecular structure of the steel... and it's true it will but it so will other welding. Now, welding won't necessarily add stress to the steel, although it could, and if it does then you need to use the torch (with a neutral flame) and heat the steel to red hot and let it air cool (don't quench it unless you know how to temper steel). Typically anything that has to do with motorcycles, the frame especially, the steel isn't really hardened or intended to be hardened to allow some flexing because really the frame is part of the suspension. Hardened steel is usually used in things like transmissions for the gears where alot of sheering is applied to the metal. As a bit of proof that frames are designed to flex a bit, aluminum is used extensively in todays bikes for frames and aluminum cannot be hardened because it lacks a crystallizing alloy (steel has carbon). I could go a bit further in the metallurgy if you guys request it but it gets to be too long and strung out for enjoyment.

Anyways back on task. Once you've practiced welding you can move on to beading but I'm gonna go to Butt-Welding since we are about to move on in class.
Butt-welding is the most basic and it just consist of two parallel straight edges that you are going to weld together. You are going to have to set the steel at a distance based on the thermal expansion rate of the metal.... but really who is gonna look that up?? Basically for the mild steel we are using its about 1/16" to 1/8". also make sure that you angle the pieces so that they are slightly farther apart at the finishing point of the weld then the starting point.
As good practice go ahead and take the time to take cold scraps and practice aligning them and heating them up with a neutral flame to see how they behave. Also as a side note make sure to elevate the work pieces off the surface you intend to work on (we use bricks) this will allow the filler to penetrate without contamination. Now after alligning we can cheat a bit by melting the filler rod with the torch to make a tack weld (make sure not to hold it too close to the tip.. they will cling). Once that is done you start forming you bead, make sure you are moving in some sort of circular motion to spread the heat while forming the bead other wise the heat will trap at the corners and burn the metal away REALLY fast. This also insures that you are heating both work pieces even which is important cause you want to make a large enough bead on both pieces so they will cling together with the surface tension. You'll have to be quick in this part, when the bead is at the desired length (remember 3-5 times the thickness of the workpiece) add the filler to the puddle. This is a good time to mention the you should keep the tip of the filler rod inside the envelop made by the torch this will help prevent the rod from cooling the puddle and sticking to the work piece.
FINALLY SOME PICS

:whistle:


1977 kz1000 - Megasquirt project @ 40% wiring, plenum, and exhaust<--(done!)

Please Log in or Create an account to join the conversation.

Oxy-acetylene welding 24 Oct 2007 17:34 #177965

  • Makarth
  • Makarth's Avatar Topic Author
  • Offline
  • User
  • Posts: 229
  • Thank you received: 1
BSKZ650 wrote:

you forgot to mention the good ole acteylene bomb, those are always fun:laugh: :laugh: :laugh:


grab a 2 liter bottle.. stick a threaded hose end into a hole you tapped into the cap. fill it with a portable tank to about 20psi disconnect tank.. throw a ball at it and run:evil: :evil: :evil: :evil: :evil: :evil: :evil: :evil: :evil:

edit: yay 100th post party over here...

Post edited by: Makarth, at: 2007/10/24 20:35

1977 kz1000 - Megasquirt project @ 40% wiring, plenum, and exhaust<--(done!)

Please Log in or Create an account to join the conversation.

  • Page:
  • 1
Powered by Kunena Forum